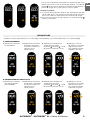
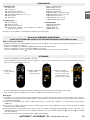
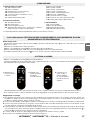
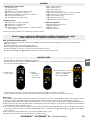
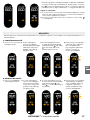
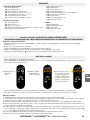
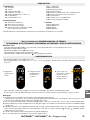
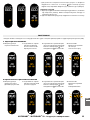
BABYMOOV A001117 Manuale utente
- Categoria
- Frullatori
- Tipo
- Manuale utente

XL
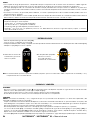
Notice d’utilisation • Instructions for use • Benutzungsanleitung • Gebruikshandleiding
Instrucciones de uso • Istruzioni per l’uso • Instruções de uso • Návod k použití
Hasznàlati utasitàs • Instrucțiuni de utilizare • Instrukcja użytkowania
Brugsanvisning • Інструкція з використання •
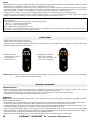
Babymoov
Parc Industriel des Gravanches
16, rue Jacqueline Auriol
63051 Clermont-Ferrand 2 - France
www.babymoov.com
Babymoov UK Ltd
3rd Floor, East Reach House
East Reach
Taunton - TA1 3EN - England
www.babymoov.co.uk
Designed and engineered
by Babymoov in France
Réfs. : A001117 - A001124 - A001127 - A001136 - A108463
A001117_UK - A001124_UK - A001127_UK - A001136_UK

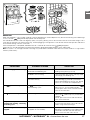
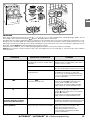
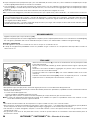
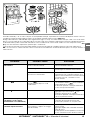
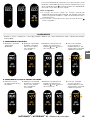
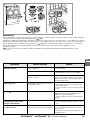
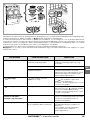
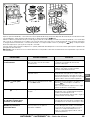
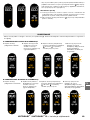
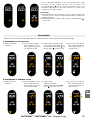
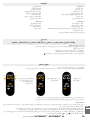
2NUTRIBABY+ / NUTRIBABY+ XL
3.1
3.2
3.3
3.4
1.6
1.1
1.2
1.3
1.4
1.5
1.7
1 2 3

3
NUTRIBABY+ / NUTRIBABY+ XL
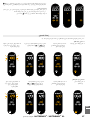
2.1
2.12
2.11
2.10
2.9 2.8
2.7
2.6
2.5
2.3
2.2
2.4
2.13

4
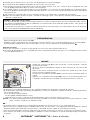
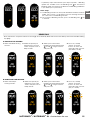
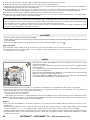
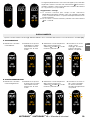
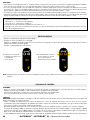
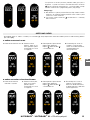
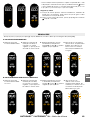
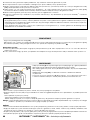
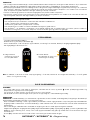
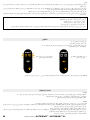
COMMENT ASSEMBLER LE NUTRIBABY+ / XL - HOW TO ASSEMBLE THE NUTRIBABY+ / XL
SO SETZEN SIE NUTRIBABY+ / XL ZUSAMMEN - INEENZETTEN VAN DE NUTRIBABY+ / XL
CÓMO MONTAR LA NUTRIBABY+ / XL - COME ASSEMBLARE IL NUTRIBABY+ / XL
COMO MONTAR A NUTRIBABY+ / XL - JAK SESTAVIT NUTRIBABY+ / XL
КАК СОБРАТЬ NUTRIBABY+ / XL - A NUTRIBABY+ / XL KÉSZÜLÉK ÖSSZESZERELÉSÉNEK MÓDJA
MONTAREA PRODUSULUI NUTRIBABY+ / XL - MONTAŻ NUTRIBABY+ / XL
SÅDAN SAMLES NUTRIBABY+ / XL - ЯК ЗІБРАТИ ПАРОВАРКУ NUTRIBABY+ / XL
NUTRIBABY+ / NUTRIBABY+ XL

5NUTRIBABY+ / NUTRIBABY+ XL
12 - 17
18 - 23
24 - 29
30 - 35
36 - 41
42 - 47
48 - 53
54 - 59
60 - 65
66 - 71
72 - 77
78 - 83
84 - 89
ES
HU
EN
IT
RO
DE
PT
PL
UA
NL
CZ
DK
AR
6 - 11 FR

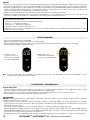
6 NUTRIBABY+ / NUTRIBABY+ XL • Notice d’utilisation
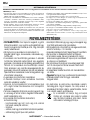
PRÉCAUTIONS D’EMPLOI : lire attentivement toutes les instructions ci-jointes avant d’utiliser le Nutribaby+ / XL.
CONSIGNES DE SÉCURITÉ
• Nettoyer l'appareil après utilisation. Pour se protéger des décharges
électriques, n’immergez pas l’appareil, le cordon dans l’eau ni dans
aucun autre liquide.
• N’utilisez pas l’appareil pour un autre usage que pour cuire / chauffer
/ mixer / stériliser / décongeler. Utiliser cet appareil uniquement pour
l'utilisation prévue. Toute autre utilisation peut-être dangereuse.
• Faites très attention quand vous manipulez les lames du mixeur,
particulièrement quand vous retirez les lames du bol, quand vous
videz le bol, et pendant le lavage.
• L’appareil ne contient aucune pièce utile à l’utilisateur pour une
réparation. Ne pas réparer l'appareil par vous-même. Toute réparation
doit être réalisée par le service après-vente.
• Surveillez l’appareil quand vous l’employez avec des enfants à
proximité. Laissez l’appareil hors de portée des enfants.
• Cet appareil s’utilise en intérieur, ne l’utilisez pas dehors.
• Évitez de laisser le cordon dépasser de la table ou du compteur ou de
le laisser à proximité de surfaces chaudes.
• Utilisez l’appareil sur une surface plane, stable et sèche.
• Ne mettez pas l’appareil sur une surface chaude ou à proximité d’un
four ou d’une plaque de gaz ou tout ce qui s’apparente à une source
de chaleur.
• Ne touchez pas les surfaces chaudes de l’appareil (chambre de
chauffage).
• Ne déplacez pas l’appareil en service, une fois branché, ou s’il contient
de l’eau chaude.
• Précaution : des tâches peuvent apparaitre sur les paniers ou bol de
mixage si vous utilisez des aliments très colorés, particulièrement ceux
qui sont oranges et rouges.
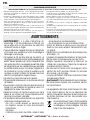
AVERTISSEMENTS
• AVERTISSEMENT : si le câble d’alimentation est
endommagé, il doit être remplacé par le fabricant, son
service après vente ou des personnes de qualification
similaire afin d’éviter un danger.
• Toujours débrancher l’appareil de la source d’alimentation
s’il est laissé sans surveillance et avant l’assemblage, le
démontage ou le nettoyage.
• Cet appareil ne doit pas être utilisé par des enfants. Le
nettoyage et la maintenance ne doit pas être réalisée par des
enfants. Gardez l’appareil et son cordon d’alimentation hors
de la portée des enfants. Les appareils peuvent être utilisés
par des personnes avec des capacités physiques, sensorielles
ou mentales réduites ou avec un manque d’expérience et
de connaissance si on leur a donné la surveillance ou les
consignes concernant l’utilisation de l’appareil d’une façon
sûre et s’ils comprennent les dangers encourus.
• Les enfants ne doivent pas jouer avec l’appareil.
• Risque potentiel de blessure en cas de mauvaise utilisation
de l’appareil.
• Soyez prudent si du liquide chaud est versé dans le bol de
mixage car il peut être éjecté de l’appareil en raison d’un
dégagement de vapeur d’eau soudain.
• Respectez le temps de chauffe et assurez-vous que le
biberon et son contenu sont à bonne température avant
de donner la nourriture à votre bébé.
• Cet appareil est destiné à être utilisé dans des applications
domestiques et analogues telles que:
- des coins cuisines réservés au personnel dans
les magasins, bureaux et autres environnements
professionnels,
- des fermes,
- l’utilisation par les clients des hôtels, motels et autres
environnements à caractère résidentiel,
- des environnements du type de chambres d’hôtes.
• Utilisez des biberons en plastique ou en verre pouvant
bouillir ou tous autres récipients thermorésistants avec
cet appareil.
• Vérifiez toujours vos ustensiles avant de les employer avec
le Nutribaby+ / XL.
• L'appareil doit seulement être utilisé avec la base fournie.
• Ne pas utiliser d'accessoires autres que ceux fournis.
• Éteignez l'appareil et déconnectez le câble avant de
changer des accessoires ou d'approcher des pièces en
mouvement pendant l'utilisation.
• Ne faites pas fonctionner l'unité de mixage en continu
pendant plus de 30 secondes. Attendez cinq secondes
entre chaque cycle de mixage.
• La surface de l'élément chauffant est soumise à la chaleur
résiduelle après utilisation.
• Avertissement! Évitez les déversements sur le connecteur.
• Ne laissez jamais l'appareil sans surveillance pendant
son fonctionnement.
• Les équipements électriques et électroniques font l’objet
d’une collecte sélective. Ne pas se débarrasser des
déchets d’équipements électriques et électroniques avec
les déchets municipaux non triés, mais procéder à leur
collecte sélective.
Ce symbole indique à travers l’Union Européenne
que ce produit ne doit pas être jeté à la poubelle
ou mélangé aux ordures ménagères, mais faire
l’objet d’une collecte sélective.
FR.

7
FR
NUTRIBABY+ / NUTRIBABY+ XL • Notice d’utilisation
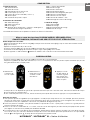
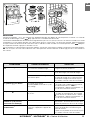
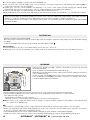
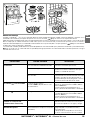
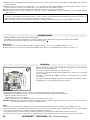
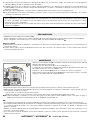
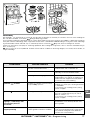
COMPOSITION
1. Unité de cuisson
1.1. Réservoir d’eau
1.2. Unité de chauffe
1.3. Récupérateur de jus de cuisson
1.4. Panier vapeur (x 2 ou x 3)
1.5. Plateau de cuisson amovible (x 2 ou x 3)
1.6. Sortie vapeur
1.7. Couvercle des paniers vapeur
2. Interface de commande
2.1. Alerte détartrage
2.2. Alerte niveau d’eau
2.3. Écran digital
2.4. Sélection de la température : ambiante / froide (pour la
fonction de réchauffage uniquement)
2.5. +/- Flèches de sélection
2.6. Fonction mixage
2.7. Fonction stérilisation
2.8. Fonction décongélation
2.9. Fonction réchauffage de petits pots
2.10. Fonction chauffe-biberon
2.11. Fonction cuisson vapeur
2.12. Touche de validation « OK »
2.13. Affichage de la vitesse de mixage
3. Unité de mixage
3.1. Lame amovible
3.2. Bol de mixage
3.3. Couvercle du bol de mixage
3.4. Bouton de mixage
- Le temps de cuisson dépend du type et de la quantité d’aliments que vous souhaitez cuire. Consultez le tableau des temps
de cuisson pour plus d’informations.
- Si vous souhaitez poursuivre la cuisson, utilisez les flèches pour ajouter des minutes et appuyez sur OK pour démarrer.
Conseils et astuces
1. Vous pouvez séparer les ingrédients par type (légumes / viande) ou par temps de cuisson. Par exemple, placez les pommes
de terre, qui nécessitent un temps de cuisson relativement long, dans le panier du bas et les courgettes dans celui du haut
puisqu’elles cuisent plus rapidement. Cela met fin aux problèmes de légumes trop cuits !
2. Grâce aux plateaux amovibles, vous pouvez moduler la capacité de cuisson : 1 petit panier, 2 paniers ou 1 grand panier en
enlevant le plateau du milieu.
3. Grâce à ses valeurs nutritionnelles et à sa saveur, l’eau de cuisson des légumes peut être utilisée pour préparer des purées
plus légères ou avec du lait en poudre pour le biberon de bébé.
4. Les temps de cuisson ne sont donnés qu’à titre indicatif. Vérifiez toujours que les aliments sont bien cuits avant de les manger.
Si la cuisson n’est pas suffisante, réinitialisez le temps de cuisson. Vous devrez peut-être rajouter de l’eau. Il est possible de
baisser ou d’augmenter le temps de cuisson pendant le cycle de chauffe.
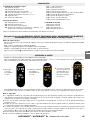
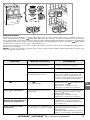
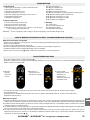
1. Sélectionnez
la fonction de
cuisson vapeur.
2. Sélectionnez le
temps de cuisson
souhaité à l’aide
des flèches.
3. Appuyez sur OK.
Un BIP retentit, le
minuteur clignote.
Une alarme vous
informe lorsque le
repas est prêt !
- Placez les plateaux (1.5.) dans les paniers (1.4.) en fonction de la capacité désirée.
- Coupez les ingrédients en petits dés d’environ 1,5 cm x 1,5 cm et placez-les dans les paniers vapeur. Ne mettez pas plus de
400 g de nourriture dans chaque panier.
CUISSON VAPEUR
L’ensemble des éléments de ce produit est certifié sans BPA et PHTALATES.
Avant chaque mise en route.
- Retirez le récupérateur de jus de cuisson (1.3.) et remplissez le réservoir d’eau (1.1.) jusqu’au niveau de l’unité de chauffe
(1.2.) (400 ml max.).
- Replacez le récupérateur de jus de cuisson.
- Placez les plateaux (1.5.) dans les paniers (1.4.) en fonction de la capacité désirée.
- Positionnez le couvercle (1.7.) de manière à ce que la sortie vapeur (1.6.) soit à l’arrière.
- Allumez l’appareil à l’aide du bouton MARCHE / ARRÊT situé sur le dessus de l’interface de commande.
Mise en route des fonctions CUISSON VAPEUR, DÉCONGÉLATION,
CHAUFFE-BIBERON, RÉCHAUFFAGE DES PETITS POTS ET STÉRILISATION

8 NUTRIBABY+ / NUTRIBABY+ XL • Notice d’utilisation
- Retirez le récupérateur de jus de cuisson (1.3.).
- Empilez les paniers et positionnez-les sur la base (1). Placez les récipients (sans le couvercle) directement sur un plateau (1.5.).
- Pour décongeler, procédez de la même manière que la cuisson, mais en sélectionnant le mode décongélation .
Conseils et astuces
1. Nous vous conseillons 15 min pour un petit pot de 120 ml et 25 min pour un petit pot de 180 ml.
2. Les temps de décongélation sont susceptibles de varier si le produit était déjà en utilisation, ou si la température de l’eau de la
cuve est différente de 20 °C !
DÉCONGÉLATION
MIXAGE
- Vérifier que l’unité mixage (3) est bien connectée à l’unité principale à l’aide du
connecteur rétractable.
- Versez les aliments préalablement coupés en petits morceaux et cuits dans le bol
de mixage.
- Selon la consistance souhaitée ajouter une partie ou la totalité du jus de cuisson
(200 ml max dans le bol de mixage).
- Positionnez et verrouillez le couvercle (3.3.) sur le bol. Placez et verrouillez le bol sur
la base.
- Appuyez sur l’interrupteur de mixage (3.4.) situé sur le couvercle pendant max.
5 secondes. Attendez encore 5 secondes avant de recommencer à mixer, etc.
20
16
12
8
4
5. Ne collez pas les aliments les uns aux autres afin de permettre une cuisson homogène.
6. Essayez d’utiliser des ingrédients biologiques et lavez-les bien avant utilisation.
7. Vous pouvez parfumer vos préparations repas avec des herbes (romarin, thym, etc.). Placez les dans le réceptacle de jus de
cuisson (1.3.) ou directement dans les paniers avec les légumes.
8. Les céréales (avoines, riz etc.) peuvent être cuits par le Nutribaby+ / XL. Placez les en petite quantité dans le réceptacle de jus
de cuisson (1.3.). En fonction de la quantité et du type de grain, il sera aussi nécessaire de rajouter de l’eau dans le réceptacle
de jus de cuisson.
9. Vous pouvez aussi cuire des œufs ! Il vous suffit de les placer sur le support prévu à cet effet dans les plateaux.
10. Nous vous conseillons de lire le chapitre « Entretien et nettoyage » pour savoir comment nettoyer votre Nutribaby+ / XL et
optimiser sa durée de vie.
Nutribaby+ XL. Usage avec 3 paniers.
• Lors de l’utilisation des 3 paniers, il est conseillé d’ajouter les 3 paniers au même moment, en suivant l’ordre des codes couleurs
(voir GUIDE DE DÉMARRAGE POUR LA CUISSON). Il est important de suivre l’ordre des codes couleurs. Cela garantit une
meilleure cuisson de vos aliments.
• Le temps de cuisson pour les 3 paniers est celui du temps de cuisson le plus long, c’est-à-dire le temps de cuisson du panier
du bas (voir GUIDE DE DÉMARRAGE POUR LA CUISSON).
ATTENTION
• N’appuyez pas sur le bouton pendant plus de 5 secondes d’affilées pour éviter toute surchauffe de l’appareil.
• Si les précautions de mixages présentées précédemment ne sont pas respectées, le produit risque de s’arrêter de fonctionner
par mesure de sécurité.
En cas d’arrêt de l’appareil, veuillez :
- laisser le produit refroidir quelques instants,
- ajouter de l’eau (au moins 1/3 de mesure du réceptacle de jus de cuisson) pour relancer la cuisson.
À noter : le système d’arrêt de précaution concerne certains modèles. Pour savoir si votre produit est concerné, vérifiez si 1 sticker
prévu à cet effet, est présent sur le bol de mixage.
NB. :
• Si le contenu dans le mixage est à haute température et dépasse le niveau maximal, il y a un risque de brulure.
• Ne jamais lancer un cycle de mixage sans liquide (jus de cuisson, eau, lait, crème…). Les préparations riches en amidon (ex : pomme
de terres) doivent être composées d’au moins de 25 % de liquide, ou alors rajouter un autre légume au mixage.
• Pour un mixage homogène, remplissez le bol de mixage à moitié. Au-delà, tous les aliments ne seront pas correctement mixés.
• Si les aliments sont collés sur les parois du bol, à l’aide de la spatule rassemblez-les au centre du bol de mixage avant de mixer
à nouveau.

9
- Pour ajuster à la perfection la texture de vos soupes ou purées, vous
pouvez choisir entre 3 vitesses de mixage. Appuyez sur l’icône de
mixage afin d’activer le mode et d’augmenter ou de diminuer la
vitesse de mixage, de 1 (la plus lente) à 3 (la plus rapide).
Conseils et astuces
1. La fonction de mixage peut toujours être sélectionnée, quel que
soit le mode choisi. Vous pouvez par exemple utiliser la fonction
de cuisson vapeur en même temps que la fonction de mixage.
2. Pour annuler la fonction mixage, appuyez sur l’icône de mixage
pendant 3 secondes.
1. Sélectionnez la fonction
chauffe-biberon.
2. Sélectionnez la quantité
de liquide à réchauffer
en utilisant les flèches et
appuyez sur OK.
Un BIP retentit.
3. Sélectionnez la température
actuelle de la nourriture
(ambiante ou froide ) à l’aide
des flèches et appuyez sur OK.
RÉCHAUFFAGE
- Empilez les paniers et positionnez-les sur la base (1). Placez le biberon sans la tétine directement sur un plateau (1.5.).
A. CHAUFFE-BIBERON
4. Appuyez sur OK. Un
BIP retentit. Le minuteur
clignote. Une alarme
vous informera lorsque
le biberon sera prêt !
NUTRIBABY+ / NUTRIBABY+ XL • Notice d’utilisation
B. RÉCHAUFFAGE DES PETITS POTS
1. Sélectionnez la fonction
réchauffage de petits
pots pour bébé.
3. Sélectionnez la température
actuelle de la nourriture
(ambiante ou froide ) à l’aide
des flèches et appuyez sur OK.
2. Sélectionnez la quantité
de nourriture à réchauffer
en utilisant les flèches et
appuyez sur OK.
Un BIP retentit.
4. Appuyez sur OK. Un
BIP retentit. Le minuteur
clignote. Une alarme
vous informera lorsque
le petit pot sera prêt !
FR

10
ATTENTION :
• Afin d’éviter les risques de brûlure, vérifiez toujours la température de la préparation avant de nourrir votre bébé. Secouez bien le
biberon pour mélanger le contenu, puis faites couler une goutte de lait sur l’intérieur de votre poignet afin de contrôler la température.
• Les cycles pré-programmés sont calculés selon le temps moyen nécessaire pour réchauffer un biberon ou un petit pot. La taille
et l’épaisseur du petit pot pour bébé peuvent influencer la température de la nourriture. Si la nourriture est trop chaude ou trop
froide, réduisez ou augmentez le temps de réchauffage à l’aide de la fonction « vapeur ».
• La taille, le matériau et l’épaisseur du petit pot ou du biberon, ainsi que la présence éventuelle d’un fond amovible peuvent influencer
la température de la nourriture.
• Faire chauffer plus d’un biberon à la fois peut également influer sur les temps de réchauffage. Si la nourriture est trop chaude ou
trop froide, réduisez ou augmentez le temps de réchauffage à l’aide de la fonction « vapeur ».
ENTRETIEN ET NETTOYAGE
ALARMES
- Une alarme retentit et l’icône s’allume sur l’interface de commande lorsque le réservoir d’eau est vide. Retirez les paniers vapeur
et rajoutez de l’eau dans le réservoir (1.1.).
Appuyez sur OK pour éteindre l’alarme et appuyez à nouveau sur OK pour redémarrer le minuteur.
- Une alarme retentit à la fin du cycle pour vous avertir que la cuisson est terminée.
NETTOYAGE
ATTENTION : débranchez le Nutribaby+ / XL et vérifiez qu’il est froid avant de le nettoyer ! Les unités de cuisson et de mixage ne
doivent pas être lavées au lave-vaisselle.
- Nettoyez l’unité chauffante à l’intérieur du réservoir ainsi que la base de l’unité de mixage à l’aide d’une éponge ou d’un chiffon
humide. N’utilisez aucun détergent ni nettoyant. Laissez sécher. Ne lavez pas le Nutribaby+ / XL sous l’eau courante. Évitez toute
infiltration d’eau dans les parties contenant des composants électriques.
- N’utilisez aucun produit de nettoyage abrasif ou décapant au risque d’endommager l’appareil et sa surface.
Les paniers vapeur (1.4.), les plateaux amovibles (1.5.), le récupérateur de jus de cuisson (1.3.), les couvercles (1.7.) et (3.3.), la
spatule et le bol de mixage (3.2.) peuvent être lavés à l’eau chaude, au moyen d’une éponge et de liquide vaisselle. Rincez bien et
laissez sécher. Ces éléments passent également au lave-vaisselle.
- La lame (3.1.) doit simplement être déverouillée sous le bol dans le sens des aiguilles d’une montre afin d’être correctement nettoyée.
NUTRIBABY+ / NUTRIBABY+ XL • Notice d’utilisation
Le temps proposé par le Nutribaby+ / XL pour la fonction chauffe-biberon et petit pots n’est plus valable dans le cas suivants.
- Température de l’eau / lait ou petit pot :
· inférieure à 4 °C - température frigo,
· supérieure à 20 °C- température ambiante.
- Température de l’eau versée dans le réservoir supérieure à 20 °C.
- Nutribaby+ / XL déjà en utilisation : si le produit est déjà en utilisation, il faut l’arrêter, enlever l’eau du réservoir et attendre
15 minutes avant de le rallumer.
1. Sélectionnez la fonction
stérilisation et appuyez
sur OK. Un BIP retentit.
2. Le minuteur clignote.
Une alarme vous informera
lorsque la stérilisation
sera terminée.
STÉRILISATION
- Retirez le récupérateur de jus de cuisson (1.3.).
- Empilez les paniers et positionnez-les sur la base (1).
- Placez les biberons tête en bas ainsi que les autres accessoires que vous souhaitez stériliser directement sur un plateau (1.5.).
- Positionnez le couvercle (1.7.) sur le panier supérieur.
N.B. : nous vous conseillons de lire le chapitre « Entretien et nettoyage » pour savoir comment nettoyer votre Nutribaby+ / XL et
optimiser sa durée de vie.

11
DÉTARTRAGE
Lorsque le Nutribaby+ / XL a servi pendant une période prolongée, des dépôts de calcaire peuvent se former sur l’unité de
chauffe et l’endommager. L’icône (2.1.) apparaît alors sur le boîtier de commande.
Il est recommandé de détartrer le réservoir d’eau régulièrement (tous les 50 cycles) en versant 100 ml d’eau chaude et 100 ml de
vinaigre blanc. Laissez reposer pendant une à deux heures (ou plus si nécessaire), sans brancher l’appareil. Videz le mélange et
essuyez l’intérieur du réservoir et de l’unité de chauffe à l’aide d’un chiffon humide. Pour faire disparaitre l’icône (2.1.) une
fois l’opération terminée, appuyez 5 secondes sur OK.
Le calcaire peut aussi être enlevé en utilisant des produits anticalcaires conçu pour les produits alimentaires (à base de citriques).
NB. : les 50 cycles sont une valeur indicative. Vous serez peut-être amené à effectuer un détartrage plus tôt si l’eau utilisée est
très calcaire.
NUTRIBABY+ / NUTRIBABY+ XL • Notice d’utilisation
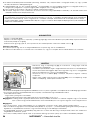
PROBLÈMES CAUSES POSSIBLES SOLUTION
Le bol de mixage ne fonctionne
pas Le connecteur n’est pas sorti et n’est
pas connecté à l’unité de mixage. Sortez et connectez le connecteur à l’unité de
mixage en le placant par-dessus.
Les lames ne tournent pas. Contactez le service SAV. Nous pourrions avoir
besoin d’échanger votre unité de mixage.
Le couvercle du bol de mixage n’est pas
correctement placé . Vérifiez si le couvercle est correctement placé
sur le bol de mixage. Si le couvercle est bien
fixé et que le mixage ne fonctionne toujours
pas, veuillez contacter notre service clientèle.
Le symbole est allumé Le symbole s’allume
automatiquement au bout de 50 cycles
de chauffage.
Appuyez sur le bouton « OK » pendant
5 secondes. Si le symbole reste affiché,
vous devrez effectuer un « RESET ».
Pour réinitialiser : appuyez simultanément sur
les 2 flèches et le bouton ON/OFF.
Le symbole est allumé Il manque de l’eau dans l’unité
de cuisson. Appuyez sur le bouton « OK » pendant
5 secondes et ajoutez de l'eau. Si le symbole
reste affiché, vous devrez faire un « RESET ».
Pour réinitialiser : appuyez simultanément sur
les 2 flèches et le bouton ON/OFF.
Le produit s’arrête avant de
terminer le cycle (cuisson,
stérilisation ou chauffage)
Présence de calcaire. Reportez-vous à la section « ENTRETIEN ET
NETTOYAGE » du manuel d’instructions pour
détartrer le produit avec de l’au et du vinaigre.
L’unité de mixage s’est arrêtée
soudainement Le fusible ou la protection thermique est
activé (ceci s’applique à la plupart des
modèles).
Laissez refroidir le produit quelques instants.
Ajoutez du liquide dans le bol de mixage et
mixez de nouveau.
Si après cela, le produit ne fonctionne toujours
pas, veuillez contacter notre service SAV.
FR
T° < 60 °C

12 NUTRIBABY+ / NUTRIBABY+ XL • Instructions for use
EN.
Read all the instructions below carefully before using Nutribaby+ / XL.
SAFETY INSTRUCTIONS
• Clean the appliance after use. To prevent the risk of electric shock,
do not immerse the appliance or its electrical cord in water or any
other liquid.
• Use the appliance only to cook/heat/blend/sterilise or thaw. Use
the appliance only for its intended purpose. Improper use or wrong
operation may lead to potential injury.
• Take care when handling the blender blades, especially when removing
the blades from the bowl, and emptying or during cleaning.
• The appliance contains no parts useful to the user for repairs. Do not
repair the appliance by yourself. All repair must be carried out by the
after-sales service department.
• Monitor the appliance when in use with children nearby. Keep the
appliance out of reach of children.
• This appliance is for indoor use only. Do not use outdoors.
• Do not allow electrical cord to hang over the edge of the table or
counter. Do not place near hot surfaces.
• Use the appliance on a flat, stable and dry surface.
• Do not place the appliance on a hot surface or near an oven or gas
burner, or any other heat source.
• Do not touch the hot surfaces on the appliance (heating chamber).
• Do not move the appliance during use, once it has been plugged in,
or if it contains hot water.
• Warning: stains may appear on the baskets or blending jug if you use
strongly coloured foods, particular those which are orange and red.
WARNINGS
• WARNING: To avoid danger, if the electrical cable is
damaged, it must be replaced by the manufacturer, its
after-sales service department or a qualified electrician.
• Always disconnect the appliance from the supply if it is
left unattended and before assembling, disassembling
or cleaning.
• This appliance shall not be used by children. Cleaning and
user maintenance shall not be made by children. Keep
the appliance and its cord out of reach of children. This
appliance is not to be used by persons (including children)
with reduced physical, sensory or mental capabilities, or
lack of experience and knowledge, unless they have been
given supervision or instruction.
• Children shall not play with the appliance.
• Any type of misuse of the appliance may result in a
potential injury.
• Be careful if hot liquid is poured into the blender as it can
be ejected out of the appliance due to
a sudden steaming.
• Respect heating times, and ensure the baby bottle and
its contents are at a suitable temperature before feeding
your baby.
• This appliance is intended to be used in household and
similar applications such as:
- staff kitchen areas in shops, offices and other working
environments;
- farm houses;
- by clients in hotels, motels and other residential type
environments;
- bed and breakfast type environments.
• Use plastic or glass baby bottles suitable for boiling, or other
heat-resistant recipients with this appliance.
• Always check your utensils prior to using them with
Nutribaby+ / XL.
• The appliance is only to be used with the base provided.
• Do not use any accessories other than those supplied.
• Switch off the appliance and disconnect from supply before
changing accessories or approaching parts that move
in use.
• Do not operate the blending unit continuously for more
than 30 seconds. Wait five seconds between each
blending cycle.
• The heating element surface is subject to residual heat
after use.
• Warning! Avoid spillage on the connector.
• Never leave the appliance unattended while it is operating.
• Electrical and electronic equipment can be recycled. Do
not throw electrical or electronic appliances away with your
household waste. Ensure they are recycled.
Throughout the European Union, this symbol
indicates that the product must not be disposed
of with household waste, but must be recycled
.

13
EN
NUTRIBABY+ / NUTRIBABY+ XL • Instructions for use
COMPONENTS
1. Steaming unit
1.1. Water tank
1.2. Heating unit
1.3. Cooking juice collector
1.4. Steaming basket (x 2 or x 3)
1.5. Removable cooking tray (x 2 or x 3)
1.6. Steam outlet
1.7. Steamer lid
2. Control panel
2.1. Descaling alert
2.2. Water level alert
2.3. Time & quantity display
2.4. Temperature selection: room temperature / cold (for
warming function only)
2.5. +/- Selection arrows
2.6. Blending function
2.7. Sterilizing function
2.8. Defrosting function
2.9. Baby food jar warming function
2.10. Baby bottle warming function
2.11. Steaming function
2.12. Validation “OK” function
2.13. Blending speed display
3. Blending unit
3.1. Removable blade
3.2. Blending jug
3.3. Blending lid
3.4. Blending switch
- The time will depend on the type and amount of food you wish to cook. Refer to the cooking-time table.
- If you wish to continue cooking, press the arrows to add minutes, then press OK to start.
Hints & tips
1. Ingredients can be separated by type (vegetable/meat), or cooking time. For example: place potatoes which require a
relatively long cooking time in the bottom basket, and courgettes in the upper basket as they cook more quickly. No more
overcooked vegetables!
2. Thanks to the removable trays, you can adjust the capacity: 1 small basket, 2 baskets, or 1 large basket by removing the
middle tray.
3. Thanks to its nutritional value and its taste, the cooking water from rice or vegetables can be used to thin purées or added
to formula milk in babies’ bottle.
4. The cooking times are for guidance only. Always check that food is thoroughly cooked before eating. If your food is not
cooked enough, reset the time. You may need to add more water. It is possible to decrease or increase the cooking
time while cooking.
5. Leave gaps between pieces of food to allow a good steam cooking.
- Place the trays (1.5.) in the basket (1.4.) as desired.
- Cut the ingredients into small cubes measuring approx. 1,5 cm x 1,5 cm and place them in the steaming baskets. Place no
more than 400 g of food in each basket.
STEAMING
All the parts in this product are certified free of BPA and PHTHALATES.
1. Select the
steam cooking
function.
2. Select the desired
cooking time
using the arrows.
3. Press OK. A beep
sounds and the timer
flashes. An alarm will
sound to inform you
that your meal is ready!
Before starting any function.
- Remove the cooking juice collector (1.3.) and fill the water tank (1.1.) up to the level of the heating unit (1.2.) (400 ml max.).
- Replace the cooking juice collector.
- Place the trays (1.5.) into the baskets (1.4.) depending on the required capacity.
- Position the lid (1.7.) so that the steam outlet (1.6.) is at the back.
- Turn on the appliance using the START / STOP button located on the top of the control interface.
Starting the STEAMING, DEFROSTING,
BABY BOTTLE HEATING, BABY FOOD JAR HEATING AND STERILIZING functions

14 NUTRIBABY+ / NUTRIBABY+ XL • Instructions for use
- Remove the cooking juice collector (1.3.).
- Stack the baskets and position them on the base (1). Place the recipients (without the lid) straight onto the removable cooking
tray (1.5.).
- To defrost, proceed in the same way as for cooking, but select defrost mode .
Advice and tips
1. We recommend 15 mins for a 120 ml baby food jar and 25 mins for a 180 ml jar.
2. Defrosting times may vary if the product has just been used, or the temperature of the water in the tank differs from 20 °C!
DEFROSTING
6. Try to use organic ingredients and washed them well before use.
7. You can flavour your meals by adding herbs such as rosemary, thyme, etc. Place them in the cooking juice collector (1.3.) or
straight into the baskets with the vegetables.
8. Cereals (oats, rice, etc.) can be cooked in the Nutribaby+ / XL. Place a small amount into the cooking juice collector (1.3.).
Depending on the quantity and type of grain, you may need to add water to the cooking juice collector.
9. You can also cook eggs! Just place the eggs in the egg supports built into the trays.
10. We recommend you to read the “Care and cleaning” part to know how to clean your Nutribaby+ / XL and optimize its lifetime.
Nutribaby+ XL. Using 3 baskets
• When using 3 baskets, we recommend adding all 3 baskets at the same time, following the colour coding (see STEAM COOKING
GUIDE). It is important to follow the colour-coded order. This guarantees your food is cooked in the best way.
• The cooking time for all 3 baskets is the longest cooking time, i.e. the cooking time for the bottom basket (see STEAM
COOKING GUIDE).
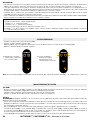
BLENDING
- Check that the blending unit (3) is correctly connected to the main unit using the
retractable connector.
- Place small pieces of cooked food into the blending jug.
- Depending on the required consistency, add some or all of the cooking water (200 ml
max.) to the blending jug.
- Position and lock the lid (3.3.) onto the jug. Position and lock the jug onto the base.
- Press the blending switch (3.4.) on the lid for a maximum of 5 seconds. Wait another
5 seconds before repeating the process.
20
16
12
8
4
WARNING
• Do not hold down the button for more than five seconds at a time, to prevent the device from overheating.
• Failure to follow the blending instructions above may cause the product to stop working as a safety measure.
If the appliance stops, please:
- let the product cool down for a few moments,
- add water (at least 1/3 of the cooking juice collector) to restart the steaming process.
Note: the safety cut-off system only applies to certain models. To find out whether it applies to your product, check whether there
is a sticker on the blending jug.
NB.:
• If the contents in the blending jug are at a high temperature and exceed the maximum level, there is a risk of scalding.
• Never start a blending cycle without liquid (cooking juice, water, milk, cream, etc.) Starchy foods such as potatoes must contain
at least 25 % liquid, or add another vegetable to the mix.
• Fill the blending bowl to half way for smooth blending. Beyond this level, food will not be properly blended.
• If food sticks to the sides of the jug, move it into the centre of the blending jug using the spatula before blending again.

15
- To perfectly adjust the texture of your soups or purées, 3 blending
speeds are available. Press the blending icon to activate the
blending mode, and increase or decrease the blending speed from
1 (the slowest) to 3 (the fastest).
Hints & tips
1. The blending function can always be selected no matter the chosen
mode. For instance, it is possible to use the steaming function at
the same time as the blending function.
2. To cancel the blending function, press the blending icon for
3 seconds.
1. Select the bottle heating
function .
2. Select the quantity of
liquid to heat using the
arrows and press OK. A
beep sounds.
3. Select your current food
temperature (room temperature
or cold ) using the arrows
and press OK.
REHEATING
- Stack the baskets and place them on the base (1). Place the baby bottle without the teat directly onto the removable cooking
tray (1.5.).
A. BABY BOTTLE HEATING
4. Press OK. A beep
sounds. The timer
flashes. An alarm will
sound to inform you that
your bottle is ready!
NUTRIBABY+ / NUTRIBABY+ XL • Instructions for use
B. BABY FOOD JAR HEATING
1. Select the food jar
heating function.
3. Select your current food
temperature (room temperature
or cold ) using the arrows
and press OK.
2. Select the quantity of
food to heat using the
arrows and press OK. A
beep sounds.
4. Press OK. A beep
sounds. The timer
flashes. An alarm will
sound to inform you that
your jar is ready!
EN

16
CARE AND CLEANING
ALARMS
- An alarm will sound and the icon will light up on the control panel if the tank runs out of water during the cooking cycle. Remove
the steamer baskets and add water in the water tank (1.1.).
Press OK to turn off the alarm, then press OK again to restart the timer.
- An alarm will sound at the end of the cycle to notify you that cooking is complete.
CLEANING
CAUTION: Unplug Nutribaby+ / XL and ensure it is cool before cleaning! The bases of the steamer and blender must not be washed
in a dishwasher.
- Wipe off the heating unit inside the tank, and the base of the blending unit with a damp cloth or sponge. Do not use detergents or
cleaners. Allow to dry. Do not wash Nutribaby+ / XL under running water. Do not allow water to enter parts containing electrical
components.
- Do not use abrasive or scouring cleansers for cleaning as they may damage the apparatus and its surface.
The cooking baskets (1.4.), removable trays (1.5.), cooking juice collector (1.3.), lids (1.7.) and (3.3.), spatula and blending
jug (3.2.) may be washed using a sponge, hot water and washing liquid. Rinse well and allow to dry. These elements are also
dishwasher safe.
- To clean the blade (3.1.), simply unscrew it clockwise from beneath the jug.
NUTRIBABY+ / NUTRIBABY+ XL • Instructions for use
1. Select the sterilizing
function and press OK.
A beep sounds.
2. The timer is flashing. An
alarm will sound to inform
you that sterilization is over.
STERILIZING
N.B.: we recommend you to read the “Care and precautions for use” part to know how to clean your Nutribaby+ / XL and optimize
its lifetime.
- Remove the cooking juice collector (1.3.).
- Stack the baskets and place them on the base (1).
- Place the baby bottles upside down and any accessories you wish to sterilize directly onto the removable cooking tray (1.5.).
- Place the lid (1.7.) on the upper basket.
CAUTION:
1. To prevent risk of burns, always check the temperature of the food before feeding your baby. Shake baby bottles well to mix, then
pour a drop of milk on the inside of your wrist to check the temperature.
2. The pre-programmed cycles are based on the average heating time of a baby bottle or baby food jar. The size and thickness of
the baby food jar may affect the temperature of the food. If the food is too hot or too cold, reduce or increase the heating time
using the ‘steam’ function.
3. The size, material and thickness of the baby food jar or bottle and whether or not it has a removable bottom may affect the
temperature of the food.
4. Heating more than one bottle at once may also affect the reheating time. If the food is too hot or too cold, reduce or increase the
heating time using the ‘steam’ function.
The suggested time for the Nutribaby+ / XL to heat baby bottles and baby food jars no longer applies in the following conditions:
- Temperature of water/milk or baby food jar:
· below 4°C - refrigerator temperature,
· above 20°C - room temperature.
- Temperature of water in the tank above 20°C.
- Nutribaby+ / XL already in use: if the product is already in use, stop it, remove the water from the tank and wait 15 minutes
before turning it back on.

17NUTRIBABY+ / NUTRIBABY+ XL • Instructions for use
DESCALING
When the Nutribaby+ / XL has been used for a certain period of time, mineral deposits may form on the heating unit and damage
it. Thus, the icon (2.1.) will be displayed on the control panel.
You should descale the water tank regularly (every 50 cycles), pouring 100 ml of hot water and 100 ml of white vinegar. Let it
sit for one or two hours (or more if necessary), without plugging in the apparatus. Pour off the mixture and wipe of inside of the
tank and the heating unit with a wet cloth.
Once the operation is completed, hold down OK for 5 seconds to make the icon (2.1.) disappear.
Limescale may also be removed using limescale removers designed for food products (citric acid based).
N.B.: 50 cycles is an average estimate. Descaling may need to be carried out more often if the water used has a high mineral
content (“hard water”).
PROBLEMS POSSIBLE CAUSES SOLUTION
The blending jug is not working The connector is not pulled out and
connected to the blending unit. Pull out the connector and connect it to the
blending unit by placing it on top.
The blades are not turning. Contact the after-sales service. We may need
to exchange your blending unit.
The blending jug lid is not
positioned correctly. Check whether the lid is positioned correctly
on the blending jug. If the lid is positioned
correctly but blending will still not start, please
contact our customer service department.
The symbol is lit up The symbol lights up automatically
after 50 heating cycles. Press the OK button for 5 seconds. If the
ymbol stays on, you will need to RESET.
To reset, press the 2 arrows and the ON/OFF
button at the same time.
The symbol is lit up The steaming unit has run out of water. Press the OK button for 5 seconds and add
water. If the symbol stays on, you will need
to RESET.
To reset, press the 2 arrows and the ON/OFF
button at the same time.
The product stops before
finishing the cooking, sterilising
or heating cycle
Limescale build-up. See the ‘CARE AND CLEANING’ section in
the instruction manual for how to descale the
product using water and vinegar.
The blending unit has suddenly
stopped The fuse or heat protection is activated
(this applies to most models). Let the product cool down for a few moments.
Add liquid to the blending jug and blend again.
If the product still does not work after that,
please contact our after-sales service.
EN
T° < 60 °C

18 NUTRIBABY+ / NUTRIBABY+ XL • Bedienungsanleitung
GEBRAUCHSANLEITUNG: Vor Einsatz des Nutribaby+ / XL die nachstehenden Hinweise aufmerksam lesen.
SICHERHEITSHINWEISE
• Das Gerät nach dem Gebrauch reinigen. Um die Gefahr eines
Stromschlags zu vermeiden, dürfen das Gerät und das Stromkabel
nicht in Wasser oder andere Flüssigkeiten getaucht werden.
• Nutzen Sie das Gerät nur zum Kochen / Erwärmen / Mixen / Sterilisieren
/ Auftauen. Das Gerät darf nur zu dem ihm zugedachten Zweck
verwendet werden. Eine unsachgemäße Verwendung oder falsche
Bedienung kann möglicherweise zu Verletzungen führen.
• Seien Sie beim Umgang mit den Klingen des Mixers vorsichtig. Dies
gilt insbesondere für das Entfernen der Klingen aus der Schüssel,
das Leeren der Schüssel und während der Reinigung der Schüssel.
• Das Gerät enthält keine Teile, die dem Benutzer für eine Reparatur
nützlich sein könnten. Reparieren Sie das Gerät nicht selbst. Sämtliche
Reparaturen müssen von unserem Kundendienst durchgeführt werden.
• Überwachen Sie das Gerät, wenn während des Betriebs Kinder in
der Nähe sind. Bewahren Sie das Gerät außerhalb der Reichweite
von Kindern auf.
• Dieses Gerät ist nur für den Einsatz in Räumen geeignet. Benutzen
Sie es nicht im Freien.
• Vermeiden Sie, dass das Stromkabel vom Tisch oder einem Tresen
herab hängt. Lassen Sie es auch nicht in der Nähe heißer Flächen.
• Benutzen Sie das Gerät auf einer ebenen, stabilen und trockenen Fläche.
• Stellen Sie das Gerät nicht auf eine heiße Fläche, in die Nähe eines
Ofens oder eines Gasbrenners oder eine sonstige Wärmequelle.
• Berühren Sie die heißen Flächen des Geräts (Erhitzungskammer) nicht.
• Bewegen Sie das Gerät nicht, wenn es angeschlossen und in Betrieb
ist oder heißes Wasser enthält.
• Achtung: Auf den Garbehältern oder dem Mixbecher können sich
Flecken bilden, wenn Sie sehr farbintensive Lebensmittel verwenden,
insbesondere orangefarbene und rote.
HINWEISE
• HINWEIS: Wenn das Stromkabel beschädigt ist, muss
es zur Vermeidung von Gefahren vom Hersteller, dessen
Kundendienst oder Personen mit ähnlicher Qualifikation
ersetzt werden.
• Trennen Sie das Gerät immer von der Stromversorgung,
wenn es unbeaufsichtigt ist und bevor Sie es
zusammenbauen, zerlegen oder reinigen.
• Kinder dürfen dieses Gerät nicht benutzen. Die Reinigung
und die kundenseitige Wartung dürfen nicht von Kindern
durchgeführt werden. Halten Sie das Gerät und das
Stromkabel von Kindern fern. Das Gerät darf nicht von
Personen (Kinder eingeschlossen) mit körperlichen,
sensorischen oder geistigen Einschränkungen oder Personen
mit mangelnder Erfahrung oder Kenntnis benutzt werden, es
sei denn, sie werden während des Gebrauchs beaufsichtigt
oder wurden in den Gebrauch des Geräts eingewiesen.
• Kinder sollen nicht mit dem Gerät spielen.
• Jegliche zweckentfremdete Verwendung des Geräts kann
zu Verletzungen führen.
• Seien Sie vorsichtig, wenn heiße Flüssigkeit in die
Mischmaschine gegossen wird, wie es aus dem Gerät
aufgrund eines plötzlichen Dämpfens vertrieben werden kann.
• Halten Sie die Aufwärmzeiten ein und prüfen Sie, dass das
Fläschchen und sein Inhalt die richtige Temperatur haben,
bevor Sie Ihr Kind füttern.
• Das Gerät ist für häusliche und ähnliche Anwendungen
vorgesehen, zum Beispiel:
- Küchenecken für das Personal in Geschäften, Büros und
ähnlichen beruflichen Umfeldern,
- Bauernhöfe,
- den Gebrauch durch Kunden von Hotels, Motels und
sonstigen Beherbergungsstätten,
- Gästezimmer und ähnliche.
• Verwenden Sie zusammen mit diesem Gerät
hitzebeständige Kunststoff- oder Glasfläschchen oder
andere hitzebeständige Behälter.
• Prüfen Sie alle Utensilien, bevor Sie sie zusammen mit dem
Nutribaby+ / XL verwenden.
• Das Gerät darf nur mit der mitgelieferten Basisstation
benutzt werden.
• Verwenden Sie kein anderes als das mitgelieferte Zubehör.
• Schalten Sie das Gerät aus und trennen Sie es vom
Stromnetz, bevor Sie Zubehör wechseln oder sich Teilen
nähern, die sich beim Gebrauch bewegen.
• Lassen Sie die Mixeinheit nicht länger als 30Sekunden im
Dauerbetrieb laufen. Warten Sie zwischen den einzelnen
Mixvorgängen 5Sekunden.
• Die Oberfläche des Heizelements gibt nach dem Gebrauch
noch Restwärme ab.
• Warnung! Achten Sie darauf, dass weder Wasser noch
andere Flüssigkeiten an den Gerätestecker gelangen.
• Lassen Sie das Gerät nie unbeaufsichtigt, wenn es in
Betrieb ist.
• Elektro- und Elektronikausstattung werden getrennt
vom häuslichen Abfall gesammelt. Entsorgen Sie keine
Abfälle von Elektrogeräten und elektronischen Geräten
mit dem unsortierten Hausmüll, sondern entsorgen Sie
sie ordnungsgemäß.
EU-weit zeigt dieses Symbol an, dass dieses
Produkt nicht in den Hausmüll gehört, sondern
getrennt zu entsorgen ist.
DE.

19
DE
NUTRIBABY+ / NUTRIBABY+ XL • Bedienungsanleitung
ZUSAMMENSETZUNG
1. Dampfgarer
1.1. Wassertank
1.2. Heizelement
1.3. Kochsaft Auffangbehälter
1.4. Garbehälter (x 2 oder x 3)
1.5. Herausnehmbare Garschalen (x 2 oder x 3)
1.6. Dampfauslass
1.7. Dampfgarer-Deckel
2. Bedieneinheit
2.1. Entkalkungs-Anzeige
2.2. Wasserstandsalarm
2.3. Zeit- und Mengenanzeige
2.4. Temperaturwahl: Zimmertemperatur / kalt (nur für die
Aufwärmfunktion)
2.5. +/- Pfeiltasten
2.6. Mixfunktion
2.7. Sterilisierungsfunktion
2.8. Auftaufunktion
2.9. Aufwärmfunktion für Gläschen
2.10. Aufwärmfunktion für Fläschchen
2.11. Dampfgarfunktion
2.12. Bestätigen „OK“
2.13. Anzeige der Mixstufe
3. Mixer
3.1. Abnehmbares Messer
3.2. Mixbecher
3.3. Mixer-Deckel
3.4. Mixtaste
- Die Gardauer hängt von der Art und der Menge der Lebensmittel, die Sie garen möchten, ab. Weitere Angaben finden Sie in
der Gartabelle.
- Wenn Sie den Garvorgang verlängern möchten, drücken Sie auf die Pfeiltasten, um weitere Minuten hinzuzufügen. Dann drücken
Sie auf OK, um wieder einzuschalten.
Hinweise & tipps
1. Die Zutaten können nach Art (Gemüse/Fleisch) oder Gardauer getrennt zubereitet werden. Zum Beispiel: Legen Sie Kartoffeln,
die eine relativ lange Gardauer haben, in den unteren Garbehälter und Zucchini in den oberen Garbehälter, weil sie schneller
durch sind. So wird das Gemüse nicht zerkocht!
2. Mit den herausnehmbaren Garschalen kann das Fassungsvermögen angepasst werden: 1 kleiner Garbehälter, 2 Garbehälter
oder 1 großer Garbehälter, wenn die mittlere Schale herausgenommen wird.
3. Aufgrund seiner Nährwerte und Aromen kann das Garwasser von Reis oder Gemüse verwendet werden, um Pürees zu
verdünnen oder das Milchpulver für das Babyfläschchen anzurühren.
4. Die Gardauern sind lediglich Richtwerte. Überprüfen Sie vor dem Verzehr immer, ob die Nahrungsmittel vollkommen gar sind. Wenn
Ihre Mahlzeit nicht genügend gegart ist, verlängern Sie die Garzeit. Es kann auch notwendig sein, mehr Wasser hinzuzugeben.
Die Garzeit kann während des Erwärmzyklus verkürzt oder verlängert werden.
- Setzen Sie die Schalen (1.5.) wie gewünscht in den Garbehälter (1.4.).
- Schneiden Sie die Zutaten in ungefähr 1,5 cm x 1,5 cm große Würfelchen und legen Sie sie in den Garbehälter. Geben Sie
höchstens 400 g Lebensmittel in jeden Garbehälter.
1. Wählen Sie
die Funktion
Dampfgaren.
2. Wählen Sie die
gewünschte
Gardauer mit
den Pfeiltasten.
3. Drücken Sie auf OK.
Es ertönt ein
akustischer Alarm,
die Zeitanzeige blinkt.
Wenn die Mahlzeit
fertig ist, ertönt ein
akustischer Alarm!
DAMPFGAREN
Alle Teile dieses Geräts sind zertifiziert ohne BPA und ohne PHTALATE.
Vor jeder Inbetriebnahme.
- Entfernen Sie das Kochsaft Auffangbehälter (1.3.) und füllen Sie den Wassertank (1.1.) bis zur Höhe des Heizelements (1.2.)
(max. 400 ml).
- Setzen Sie das Kochsaft Auffangbehälter wieder auf.
- Legen Sie die Garschalen (1.5.) entsprechend der gewünschten Füllmenge in die Garbehälter (1.4.).
- Setzen Sie den Deckel (1.7.) so auf, dass der Dampfauslass (1.6.) hinten positioniert ist.
- Schalten Sie das Gerät mit der Taste EIN/AUS oben auf der Bedieneinheit ein.
Inbetriebnahme der Funktionen DAMPFGAREN, AUFTAUEN,
FLÄSCHCHENWÄRMER, GLÄSCHENWÄRMER UND STERILISIEREN

20 NUTRIBABY+ / NUTRIBABY+ XL • Bedienungsanleitung
- Entfernen Sie das Kochsaft Auffangbehälter (1.3.).
- Stapeln Sie die Garbehälter und setzen Sie sie auf die Basis (1). Setzen Sie die Behälter (ohne die Deckel) direkt auf die Herausnehmbare
Garschalen (1.5.).
- Zum Auftauen gehen Sie genauso vor wie beim Garen, wählen jedoch den Modus Auftauen .
Tipps und Tricks
1. Wir empfehlen Ihnen 15Minuten für ein Gläschen mit 120ml und 25Minuten für ein Gläschen mit 180ml.
2. Die Auftauzeiten können unterschiedlich sein, je nachdem, ob das Gerät bereits warm ist oder ob die Temperatur des Wassers
im Behälter nicht 20°C beträgt!
AUFTAUEN
5. Lassen Sie Abstände zwischen den Lebensmittelwürfeln, damit der Gardampf zirkulieren kann.
6. Verwenden Sie bevorzugt Biolebensmittel und waschen Sie sie vor der Zubereitung.
7. Sie können Ihre Gerichte mit Kräutern (Rosmarin, Thymian usw.) würzen. Geben Sie die Kräuter in das Kochsaft Auffangbehälter
(1.3.) oder direkt mit dem Gemüse in die Garbehälter.
8. Mit dem Nutribaby+ / XL können Sie auch Getreide (Hafer, Reis usw.) kochen. Geben Sie eine kleine Menge in das Kochsaft
Auffangbehälter (1.3.). Je nach Menge und Korntyp müssen Sie auch Wasser in das Kochsaft Auffangbehälter geben.
9. Sie können auch Eier kochen! Legen Sie die Eier einfach in die Eierhalter in den Garschalen.
10. Bitte lesen Sie sich den Abschnitt „Pflege und Reinigung“ durch, um zu erfahren, wie Sie Ihren Nutribaby+ / XL richtig pflegen,
damit Sie lange Freude an Ihrem Gerät haben werden.
Nutribaby+ XL. Verwendung mit 3 Garbehältern.
• Bei Verwendung mit den 3 Garbehältern wird empfohlen, die 3 Garbehälter gleichzeitig aufzusetzen und dabei die Reihenfolge
der Farbcodes einzuhalten (siehe SCHNELLSTARTANLEITUNG VOR DEM KOCHEN). Es ist wichtig, dass Sie die Reihenfolge
der Farbcodes einhalten. Dadurch wird ein besseres Garen Ihrer Lebensmittel gewährleistet.
• Die Garzeit für die 3 Garbehälter entspricht der längsten Garzeit, das heißt der Garzeit des unteren Garbehälters (siehe
SCHNELLSTARTANLEITUNG VOR DEM KOCHEN).
ACHTUNG
• Drücken Sie die Mixtaste niemals länger als 5Sekunden ununterbrochen, um ein Überhitzen des Geräts zu vermeiden.
• Wenn die genannten Vorsichtsmaßnahmen beim Mixen nicht eingehalten werden, kann es vorkommen, dass das Gerät aus
Sicherheitsgründen nicht mehr eingeschaltet werden kann.
Wenn das Gerät nicht mehr funktioniert:
- lassen Sie das Gerät kurz abkühlen,
- fügen Sie Wasser (mindestens 1/3 der Füllhöhe des Kochsaft Auffangbehälters) hinzu, bevor Sie den Garzyklus wieder einschalten.
Hinweis: Diese Abschaltfunktion ist nur bei bestimmten Modellen vorhanden. Ob Ihr Gerät damit ausgestattet ist, erkennen Sie an
dem entsprechenden Aufkleber auf dem Mixbecher.
Hinweis:
• Wenn der Inhalt des Mixbechers eine hohe Temperatur hat und die maximale Füllhöhe übersteigt, besteht die Gefahr, sich zu
verbrennen.
• Schalten Sie einen Mixzyklus niemals ohne Flüssigkeit ein (Garsaft, Wasser, Milch, Sahne…). Stärkehaltige Gerichte (z.B.: Kartoffeln)
müssen mindestens aus 25% Flüssigkeit bestehen, oder Sie müssen ein weiteres Gemüse zum Pürieren hinzugeben.
• Für gleichmäßiges Mixen sollten sie den Mixbecher nur zur Hälfte füllen. Bei höherer Füllhöhe wird kein Lebensmittel korrekt püriert.
• Wenn die Lebensmittel an den Becherwänden anhaften, sollten Sie sie mit dem Schaber in die Mitte des Mixbechers schieben
und dann erneut mixen.
MIXEN
- Überprüfen Sie, ob der Mixer (3) über das herausziehbare Anschlussstück mit dem
Hauptteil verbunden ist.
- Geben Sie die Lebensmittel, die Sie in kleine Stücke geschnitten und gegart haben,
in den Mixbecher.
- Je nach gewünschter Konsistenz geben Sie den Garsaft teilweise oder ganz hinzu
(max. 200ml im Mixbecher).
- Setzen Sie den Deckel (3.3.) auf den Mixbecher und verriegeln Sie ihn. Setzen Sie den
Mixbecher auf die Basis und verriegeln Sie ihn.
- Drücken Sie die Mixtaste (3.4.) auf dem Deckel maximal 5Sekunden lang. Warten Sie
5Sekunden, bevor Sie die Mixtaste wieder drücken usw.
20
16
12
8
4
La pagina sta caricando ...
La pagina sta caricando ...
La pagina sta caricando ...
La pagina sta caricando ...
La pagina sta caricando ...
La pagina sta caricando ...
La pagina sta caricando ...
La pagina sta caricando ...
La pagina sta caricando ...
La pagina sta caricando ...
La pagina sta caricando ...
La pagina sta caricando ...
La pagina sta caricando ...
La pagina sta caricando ...
La pagina sta caricando ...
La pagina sta caricando ...
La pagina sta caricando ...
La pagina sta caricando ...
La pagina sta caricando ...
La pagina sta caricando ...
La pagina sta caricando ...
La pagina sta caricando ...
La pagina sta caricando ...
La pagina sta caricando ...
La pagina sta caricando ...
La pagina sta caricando ...
La pagina sta caricando ...
La pagina sta caricando ...
La pagina sta caricando ...
La pagina sta caricando ...
La pagina sta caricando ...
La pagina sta caricando ...
La pagina sta caricando ...
La pagina sta caricando ...
La pagina sta caricando ...
La pagina sta caricando ...
La pagina sta caricando ...
La pagina sta caricando ...
La pagina sta caricando ...
La pagina sta caricando ...
La pagina sta caricando ...
La pagina sta caricando ...
La pagina sta caricando ...
La pagina sta caricando ...
La pagina sta caricando ...
La pagina sta caricando ...
La pagina sta caricando ...
La pagina sta caricando ...
La pagina sta caricando ...
La pagina sta caricando ...
La pagina sta caricando ...
La pagina sta caricando ...
La pagina sta caricando ...
La pagina sta caricando ...
La pagina sta caricando ...
La pagina sta caricando ...
La pagina sta caricando ...
La pagina sta caricando ...
La pagina sta caricando ...
La pagina sta caricando ...
La pagina sta caricando ...
La pagina sta caricando ...
La pagina sta caricando ...
La pagina sta caricando ...
La pagina sta caricando ...
La pagina sta caricando ...
La pagina sta caricando ...
La pagina sta caricando ...
La pagina sta caricando ...
La pagina sta caricando ...
-
 1
1
-
 2
2
-
 3
3
-
 4
4
-
 5
5
-
 6
6
-
 7
7
-
 8
8
-
 9
9
-
 10
10
-
 11
11
-
 12
12
-
 13
13
-
 14
14
-
 15
15
-
 16
16
-
 17
17
-
 18
18
-
 19
19
-
 20
20
-
 21
21
-
 22
22
-
 23
23
-
 24
24
-
 25
25
-
 26
26
-
 27
27
-
 28
28
-
 29
29
-
 30
30
-
 31
31
-
 32
32
-
 33
33
-
 34
34
-
 35
35
-
 36
36
-
 37
37
-
 38
38
-
 39
39
-
 40
40
-
 41
41
-
 42
42
-
 43
43
-
 44
44
-
 45
45
-
 46
46
-
 47
47
-
 48
48
-
 49
49
-
 50
50
-
 51
51
-
 52
52
-
 53
53
-
 54
54
-
 55
55
-
 56
56
-
 57
57
-
 58
58
-
 59
59
-
 60
60
-
 61
61
-
 62
62
-
 63
63
-
 64
64
-
 65
65
-
 66
66
-
 67
67
-
 68
68
-
 69
69
-
 70
70
-
 71
71
-
 72
72
-
 73
73
-
 74
74
-
 75
75
-
 76
76
-
 77
77
-
 78
78
-
 79
79
-
 80
80
-
 81
81
-
 82
82
-
 83
83
-
 84
84
-
 85
85
-
 86
86
-
 87
87
-
 88
88
-
 89
89
-
 90
90


BABYMOOV A001117 Manuale utente
- Categoria
- Frullatori
- Tipo
- Manuale utente
in altre lingue
- français: BABYMOOV A001117 Manuel utilisateur
- español: BABYMOOV A001117 Manual de usuario
- Deutsch: BABYMOOV A001117 Benutzerhandbuch
- Nederlands: BABYMOOV A001117 Handleiding
- português: BABYMOOV A001117 Manual do usuário
- slovenčina: BABYMOOV A001117 Používateľská príručka
- dansk: BABYMOOV A001117 Brugermanual
- polski: BABYMOOV A001117 Instrukcja obsługi
- română: BABYMOOV A001117 Manual de utilizare


