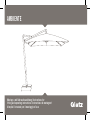
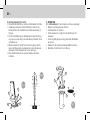
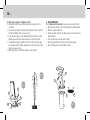
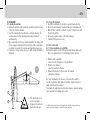
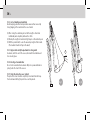
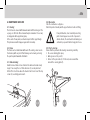
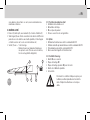
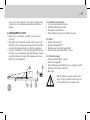
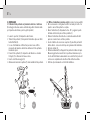
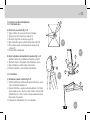
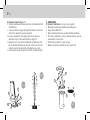
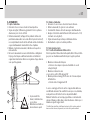
Glatz Ambiente Manuale utente

Tipo
Manuale utente
Montage- und Gebrauchsanleitung / Instructions for
fitting and operating instructions / Instructions de montage et
d’emploi / Istruzioni per il montaggio e l’uso
AMBIENTE
DE INFORMATIONSSERVICE
Herzlichen Dank, dass Sie ein Produkt von Glatz gekauft haben!
Wünschen Sie bezüglich Sicherheit oder Schirmverankerung weitere Informationen, so wenden Sie sich an den Fachhändler oder an:
Glatz AG, Neuhofstrasse 12, 8500 Frauenfeld / Switzerland www.glatz.ch
Antworten zu den häufigsten Produktfragen finden Sie auch auf unserer Homepage www.glatz.ch unter dem Stichwort FAQ (frequently
asked questions).
Technische Änderungen vorbehalten. Gedruckt auf 100 % chlorfrei hergestelltem Papier. Unserer Umwelt zuliebe.
EINFORMATION SERVICE
Thank you very much for purchasing a product from Glatz!
If you would like further information with regard to safety as well as the shade anchoring, please get in touch with your specialist
dealer or directly with: Glatz AG, Neuhofstrasse 12, 8500 Frauenfeld / Switzerland www.glatz.ch
You can find the answers to the most frequent questions about our products on our homepage www.glatz.ch under the key word FAQ
(frequently asked questions).
We reserve the right to make technical alterations. Printed on 100 % chlorine-free paper. For the benefit of our environment.
FR SERVICE D’INFORMATIONS
Merci beaucoup d’avoir acheté un produit de Glatz!
Si vous désirez en savoir plus sur la sécurité ainsi que sur l’ancrage du parasol, adressez-vous s.v.p. au commerçant spécialisé ou
directement à: Glatz AG, Neuhofstrasse 12, 8500 Frauenfeld / Switzerland www.glatz.ch
Vous trouvez les réponses aux questions les plus fréquentes concernant notre produits sur notre site internet www.glatz.ch sous le mot
clés FAQ (frequently asked questions).
Sous réserve de modifications techniques. Imprimé sur papier fabriqué 100 % sans chlore. Pour l’amour de notre environment.
IT SERVIZIO INFORMAZIONI
La ringraziamo sentitamente per avere scelto un prodotto della Glatz!
Qualora lei desiderasse ulteriori informazioni con riguardo alla sicurezza o all’ancoraggio dell’ombrellone, la invitiamo a rivolgersi al
suo rivenditore specializzato oppure a: Glatz AG, Neuhofstrasse 12, 8500 Frauenfeld / Switzerland www.glatz.ch
Troverete le risposte alle domande poste con maggiore frequenza in relazione ai nostri prodotti nel nostro sito internet www.glatz.ch
sotto la rubrica FAQ (frequently asked questions).
Con riserva di modifiche tecniche. Stampato su carta ecologica al 100 % e senza cloro. Per amore del nostro ambiente.
1. Sicherheitsvorschriften 6
1.1 Verwendung der Schirme 6
1.2 Bodenverankerung 6
1.3 Elektroinstallation 6
1.4 Beachten Sie bitte im Besonderen folgende Punkte 6
2. Lieferumfang 7
2.1 Kundenseitige Leistung 7
2.2 Optionen 7
2.3 Möglichkeiten zur Verankerung 7
3. Montage 8
3.1 Standrohr auf Bodenhülse / Sockel montieren 8
3.2 Schirm aufstellen 8
3.3 Schirmstellung justieren 9
4. Demontage 10
4.1 Schirm abbauen 10
5. Bedienung 11
5.1 Schirm aufspannen 11
5.2 Schirm schliessen 11
5.3 Bemerkungen zum Wind 11
6. Wartung und Pflege 13
6.1 Reinigung 13
6.2 Gestell 13
6.3 Schirmspannung 13
6.4 Überwinterung 13
6.5 Vor Inbetriebnahme 13
1. Safety regulations 14
1.1 Use of the shades 14
1.2 Anchorage 14
1.3 Electrical installation 14
1.4 Kindly note the following 14
2. Scope of supply 15
2.1 Client’s work 15
2.2 Options 15
2.3 Possibilities of anchorage 15
3. Fitting 16
3.1 Fitting the support tube into the ground socket / movable base 16
3.2 Setting the sunshade 16
3.3 Adjusting the position 17
4. Disassembling 18
4.1 Taking down the sunshade 18
5. Operation 19
5.1 Opening the sunshade 19
5.2 Closing the sunshade 19
5.3 Notes on the wind 19
6. Maintenance and care 21
6.1 Cleaning 21
6.2 Frame 21
6.3 Shade tensioning 21
6.4 Hibernation 21
6.5 Prior to start-up 21
INHALTSVERZEICHNIS | DE TABLE OF CONTENTS | EN
1. Préscriptions de sécurité 22
1.1 Utilisation des parasols 22
1.2 Ancrage 22
1.3 Installations électriques 22
1.4 Observez particulièrement les instructions d’emploi suivant 22
2. Matériel livré 23
2.1 Prestations incombant au client 23
2.2 Options 23
2.3 Possibilités d’ancrage 23
3. Montage 24
3.1 Montage du tube d’appui sur la douille de sol / sur le socle mobile 24
3.2 Installation du parasol 24
3.3 Ajustement de la position du parasol 25
4. Démontage 26
4.1 Replier le parasol 26
5. Maniement 27
5.1 Ouverture du parasol 27
5.2 Fermer le parasol 27
5.3 Remarques sur le vent 27
6. Entretien et soins 29
6.1 Nettoyage 29
6.2 Monture 29
6.3 Tension du parasol 29
6.4 Remisage pour l’hiver 29
6.5 Avant la mise en service 29
1. Norme di sicurezza 30
1.1 Modalità d’impiego 30
1.2 Ancoraggio al suolo 30
1.3 Installazione elettrica 30
1.4 Tenete per favore conto in particolare dei seguenti punti 30
2. Equipaggiamento si serie 31
2.1 Prestazioni a cura del cliente 31
2.2 Opzioni 31
2.3 Sistemi d’ancoraggio 31
3. Montaggio 32
3.1 Montare il tubo portante sul piantone da interrare / sulla base 32
3.2 Mettere l’ombrellone in posizione eretta 32
3.3 Regolare la posizione dell’ombrellone 33
4. Smontaggio 34
4.1 Smontare l’ombrellone 34
5. Azionamento 35
5.1 Aprire l’ombrellone 35
5.2 Chiudere l’ombrellone 35
5.3 Note riguardo al vento 35
6. Manutenzione e cura 37
6.1 Pulizia 37
6.2 Struttura 37
6.3 Tensione del telo di copertura 37
6.4 Stoccaggio invernale 37
6.5 Prima della messa in esercizio 37
TABLE DES MATIÈRES | FR INDICE | IT
| 6DE DE
1. SICHERHEITSVORSCHRIFTEN
Die Sicherheitsvorschriften bilden zusammen mit den technischen
Informationen für Montage und Bedienung die Grundlage für den
gefahrlosen Gebrauch der Schirme. Sie sind vor Montage und Gebrauch
der Schirme zur Kenntnis zu nehmen, zu befolgen und für späteren
Bedarf aufzubewahren.
Eine Missachtung von Sicherheitsvorschriften und
Anweisungen der Montage und Bedienungsan-
leitung kann gravierende Schäden an Personen
und Material zur Folge haben, für welche der
Hersteller ausdrücklich jede Haftung oder Gewähr-
leistungspflicht wegbedingt!
Bei auffrischendem Wind oder nahenden Sturm-
böen ist der Schirm zu schliessen.
Unbeaufsichtigte Schirme dürfen nicht geöffnet
bleiben. Überraschend auftretender Starkwind
könnte gravierende Schäden verursachen.
1.1 Verwendung der Schirme
Die Glatz-Grossschirme sind ausschliesslich als wetterbeständiger
Sonnen schutz bestimmt. Die Windfestigkeit des aufgespannten
Schirmes ist begrenzt und die Angaben darüber setzen eine Ver-
ankerung gemäss der Anleitung voraus. Mobile Ständer haben im
Vergleich zur Bodenverankerung eine reduzierte Standfestigkeit.
1.2 Bodenverankerung
Die Bodenverankerung ist gemäss den technischen Informationen der
«Einbauanleitung Bodenhülse» bzw. «Einbauanleitung Montageplatte»
einzubauen. Der Einbau hat durch eine Person mit einschlägigen
Baufachkenntnissen zu erfolgen. Die Ausführung hat in Beton oder
Material gleicher Festigkeit zu erfolgen. Die örtlichen Vorschriften sind
zu beachten!
1.3 Elektroinstallation
Schirme mit elektrischer Ausrüstung müssen durch einen ausge-
wiesenen Fachmonteur nach der Montageanleitung und unter Einhaltung
der örtlichen Vorschriften an das Stromnetz angeschlossen werden.
1.4 Beachten Sie bitte im Besonderen folgende Punkte
Stellen Sie den Grossschirm nie ungesichert an eine Wand, er könnte
ins Rutschen kommen und umstürzen.
Vor dem Öffnen und Schliessen des Schirmes prüfen, ob sich kein
Hindernis im Öffnungsbereich befindet.
Der Schirm darf nicht abgeändert oder mit fremdem Material
behängt werden. Standfestigkeit und Schliessfunktion könnten sich
dadurch verschlechtern.
Verwenden Sie den Schirm nur in unbeschädigtem Zustand und
achten Sie auf allfällige Störungen. Veranlassen Sie deren fach-
männische Behebung vor weiterem Gebrauch!
Verwenden Sie nur Original Glatz-Zubehör und Ersatzteile, um
Gewähr für Sicherheit, ungetrübten Komfort und einwandfreie
Funktion zu erhalten.
Zum Anbringen oder Entfernen einer Schutzhülle ist gegebenenfalls
eine selbststehende, standsichere Aufstiegshilfe zu verwenden.
Vergewissern Sie sich, dass diese weder umkippen noch weg-
rutschen kann.
Beim Einsatz an exponierten Orten wie Küstennähe oder stark
windigen Regionen ist mit erhöhtem Verschleiss zu rechnen.
12
6
4
5
3
7 |
DE DE
In diesen Fällen empfehlen wir eine intensivierte Wartung.
2. LIEFERUMFANG
Schirm (1) fertig montiert mit Kurbel (2) und Bindegurt (3)
Standrohr (4) mit Abdeckblech am Mast montiert (Bei Schirmen mit
Sockel oder drehbarer Bodenhülse wird das Standrohr werkseitig auf
den Sockel oder die Bodenhülse montiert)
Kleinteilbeutel (5) mit 5 Verankerungsschrauben M 10, 6-kant-
Bolzen zur schnellen Schirmbedienung mit Akku-Bohrmaschine
(Bohrmaschine nicht im Lieferumfang, Drehmomentbegrenzung
obligatorisch)
2.1 Kundenseitige Leistung
Bodenhülse einbauen
Elektrische Zuleitungen
Stellen des Schirmes
Akku-Bohrmaschine mit Drehmomentbegrenzung
2.2 Optionen
Motorantrieb GSS-99
Fernsteuerung GSS-99
Beleuchtung für Glatz-Grossschirme
Schutzhülle mit/ohne Stab und Reissverschluss
2.3 Möglichkeiten zur Verankerung
Bodenhülse M4 mit Deckel
Montageplatte M4
Spezial-Montageplatte M4 für Garagen und Auf-Deckenmontage
Bodenhülse Ambiente drehbar
Mobiler Sockel
Damit die statischen Bedingungen der Befestigung
erfüllt sind, ist die Bedienungsanleitung der
entsprechenden Bodenbefestigung zwingend zu
konsultieren.
Fig. 1
4
12
3
7
5
6
4
1
2
5
3
| 8DE DE
3. MONTAGE
3.1 Standrohr auf Bodenhülse / Sockel montieren
(Die Montage auf dem Sockel funktioniert sinngemäss zur unten-
stehenden Anleitung für die Bodenhülse)
Deckel (2) von Bodenhülse (1) entfernen.
Standrohr (3) vom Schirmmast abziehen nachdem Schraubenbolzen
(4) entfernt worden sind.
Im Falle einer Elektroinstallation: Elektrokabel von Bodenhülse durch
Standrohr hindurchziehen und Stecker montieren.
Standrohr (3) auf Bodenhülse aufsetzen und Kerbe (5) zum Sitzplatz
hin ausrichten.
Verankerungsschrauben (6) einsetzen.
Abdeckblech (7) auf Standrohrrondelle absenken.
3.2 Schirm aufstellen (Es sind 2 erwachsene Personen notwendig)
Gegebenenfalls Elektroanschlüsse zusammenstecken, verschrauben
und Kabel in Standrohr und Mast verstauen.
Schirm (1) um ca. 30º schräg anheben und unteres Mastende auf
Standrohr (2) aufsetzen.
Schirm sorgfältig weiter aufrichten bis Mast über Standrohr nach
unten rutscht.
Oberen Verbindungsbolzen (3) Mast/Standrohr einsetzen. Unteren
Bolzen nach Schirmjustierung.
Bindegurt (4) lösen.
Kurbel (5) in seitliche Mastöffnung einstecken. Stoff und Dach-
streben von Hand etwas auseinanderziehen d.h. vorspreizen, Kurbel
im Uhrzeigersinn drehen bis Schieber-Stummel voll in Innen-
stockrohr eingefahren ist.
Korrekte Schirmstellung überprüfen.
Fig. 2 Fig. 3
7
8a 8
9
6
11
10
1
2
4
5
9 |
DE DE
3.3 Schirmstellung justieren
3.3.1 Grundausrichtung
(a) Tragarm schwenken (Figur 6 und 7)
Unteren Verbindungsbolzen (6) des Mastes herausnehmen.
Abdeckblech (7) hochschieben.
Alle Verankerungsschrauben (8) um ½-Drehung lösen.
Aufgespannten Schirm in gewünschte Stellung schwenken (4).
Bei Bedarf gleichzeitig Korrektur (5) ausführen.
Alle gelösten Schrauben wieder festziehen.
(b) Schirm in der Aufhängung drehen (Figur 6 und 8)
Nur bei rechteckigen und quadratischen Schirmen zweckmässig
Am geschlossenen Schirm Stellschrauben (10) um ½ Drehung lösen.
Schirm aufspannen und in gewünschte Position führen.
Schirm schliessen und alle gelösten Schrauben wieder festziehen.
3.3.2 Neigung
(c) Vor- und Rückwärtsneigung (Figur 4 und 8)
Am aufgespannten Schirm die Höhendifferenz zwischen innerem und
äusserem Schirmrand feststellen (2).
Schirm schliessen und mit Nivellierschraube (11) justieren. Eine
volle Schraubenumdrehung im Uhrzeigersinn lässt den äusseren
Schirmrand um ca. 4 cm sinken und den inneren Schirmrand um
ebensoviel ansteigen.
Nivellierschraube (11) mit Kontermutter sichern.
Fig. 4
Fig. 6
Fig. 7
Fig. 8
7
8a 8
9
6
3
| 10
4. DEMONTAGE
4.1 Schirm abbauen (Es sind 2 erwachsene Personen notwendig)
Hindernisse im Umlegebereich entfernen.
Schraubenbolzen (1) entfernen.
Schirm anheben bis es möglich ist, ihn zur Rückseite hin
umzulegen.
Schirm sorgfältig umlegen und gegebenenfalls Elektrokabel
ausstecken.
Standrohr (2) abschrauben und wieder im Mast einsetzen.
Bodenhülse (3) mit Deckel (4) verschliessen.
DE DE
(d) Seitliche Neigung (Figur 5 und 7)
Höhendifferenz zwischen den seitlichen Schirmrändern feststellen.
Verankerungsschrauben (8) durch Entfernen des unteren Ver-
bindungsbolzens (6) und Anheben der Schraubenabdeckung (7)
freilegen.
Die hinter dem Mast liegende Verankerungsschraube (8a) festge-
zogen lassen und die übrigen vier Verankerungsschrauben (8) um
½-Drehung lösen.
Nivellierschraube (9) auf der Seite des tiefer liegenden Schirm-
randes im Uhrzeigersinn einschrauben. Eine volle Schraubenum-
drehung lässt den Schirmrand um ca. 4 cm ansteigen.
Nach dem Ausnivellieren alle gelösten Schrauben (8) wieder
festziehen.
1
2
34
Fig. 9
Fig. 5
Fig. 7
1
2
3
11 |
DE DE
5. BEDIENUNG
5.1 Schirm aufspannen
Prüfen ob sich keine Hindernisse im Öffnungsbereich befinden.
Bindegurt (1) abnehmen, Stoff und Dachstreben etwas aus-
einanderziehen (vorspreizen).
Kurbel (2) in seitliche Mastöffnung einstecken. Kurbel im Uhr-
zeigersinn drehen bis Schieberstummel (3) voll in den Innenstock
eingefahren ist. Schirm führt Ausfahr- und Öffnungsbewegung
simultan aus.
Beim Loslassen oder Abziehen der Handkurbel bleibt der Schirm
selbständig aufgespannt.
Bei Schirmbedienung mit Akku-Bohrer ist die Verwendung einer
angepassten Drehmoment-Begrenzung obligatorisch. Für Schäden
mit zu hart eingestellter Maschine ist die Gewährleistung ausge-
schlossen.
Bei auffrischendem Wind
Schirm schliessen.
Unbeaufsichtigte Schirme
dürfen nicht geöffnet
bleiben.
5.2 Schirm schliessen
Prüfen ob sich keine Hindernisse im Schliessbereich befinden.
Kurbel (2) einstecken und im Gegenuhrzeigersinn drehen.
Schliess- und Einfahrbewegung erfolgen simultan.
Stoff vor dem Standgestänge um den Schirm wickeln
(siehe auch 5.3.2) und mit dem Bindegurt (1) sichern.
Kurbel abziehen um Stoffbeschädigungen zu verhindern.
Gegebenenfalls Schutzhülle anbringen.
5.3 Bemerkungen zum Wind
5.3.1 Schirmstoff aus Acryl-Gewebe
Der Überzug aus hochwertigen, spinndüsengefärbten Acryl-Fasern
zeichnet sich durch hervorragenden Eigenschaften aus, wie:
höchste Witterungsbeständigkeit
> kein Verrotten durch Feuchtigkeit oder Pilzbefall
höchste Farbechtheit
> kein Ausbleichen durch UV-Strahlen
höchsten UV-Schutz für Gäste unter dem Schirm
> Reduktion der UV-Strahlung durch Stoff
Als «einziger» Nachteil ist die Scheuerungsempfindlichkeit des Acryl-
stoffes zu erwähnen. Diese Eigenschaft kann sowohl durch unseren
Stofflieferanten als auch durch Glatz nicht eliminiert werden1.
Durch Ihre sachgerechte Behandlung des Schirmes im täglichen
Gebrauch lassen sich Scheuerschäden vermeiden. Die nachfolgenden
Ratschläge sollen Ihnen dabei helfen.
1 Da Glatz die ordnungsgemässe Behandlung des Schirmüberzugs nicht beeinflussen
kann, fallen allfällige Schäden bedingt durch Scheuern (Abrieb) nicht unter die
ordentliche Gewährleistung!
Fig. 10
1
2
3
| 12DE DE
5.3.2 Korrektes Aufwickeln des Schirms
Vermeiden Sie Klemm- und Scheuerschäden und vorzeitige Abnützung
durch starkes Flattern und Schlagen des Stoffes im Wind.
(1) Nach dem Schliessen des Schirms alle Stoffbahnen einzeln und
vollständig zwischen den Streben hervorziehen.
(2) Die Stoffbahnen lagenweise eng um das Schirmteil aufwickeln.
(3) Mit der mitgelieferten Bindegurte die aufgewickelten Stoffbahnen
gut sichern. (Der Stoff darf im Wind nicht flattern)
5.3.3 Regionen mit Viel- oder Starkwind
Im Herbst nach Saisonende den Schirm abbauen und an einem
trockenen Ort überwintern.
5.3.4 Aufstellen von neuen Schirmen
Neue Schirme nicht im Herbst, sondern erst im Frühling vor Saisonstart
aufbauen!
5.3.5 Verwendung der Schutzhülle (Option)
Die Schutzhülle soll vollständig geschlossen und mit dem Seil festge-
bunden werden. Ein Flattern der Schutzhülle ist zu vermeiden. Fig. 11 Fig. 12
1
2
1
2
3
13 |
DE DE
6. WARTUNG UND PFLEGE
6.1 Reinigung
Der Stoff kann mit handwarmem Wasser und mit Feinwaschmittel
gereinigt werden. Dazu Schwamm oder weiche Bürste verwenden. Mit
klarem Wasser gut spülen. Bei Bedarf mit handelsüblichem Spray
nachimprägnieren.
Neue Schirme können bei starkem Regen leicht durchsprühen. Diese
Erscheinung verliert sich nach einigen Tagen.
6.2 Gestell
Die Gestellteile können mit Wasser abgerieben werden. Die Beschich-
tungsfarben lassen sich mit einer Autopolitur auffrischen. Lackschäden
können mit dem bei Glatz erhältlichen Farbreparaturset nachgebessert
werden.
6.3 Schirmspannung
Ein gut gespannter Schirm ist windstabiler und bleibt länger schön. Bei
Bedarf lassen sich die Dachstreben-Verlängerungen (1) verstellen. Dies
geschieht am einfachsten bei halb geschlossenem Schirm. Dabei sind
die Anschlagschrauben (2) entsprechend nachzusetzen und bis zum
Aufliegen des Schraubenkopfes einzudrehen.
6.4 Überwinterung
Schirm trocken und staubgeschützt lagern. Testen Sie vor Wiederin-
betriebnahme den Zustand und die einwandfreie Funktion.
Falls sich infolge von Überlastungen irgendwelche
Deformationen, Risse oder wacklige Verbindungs-
stellen zeigen sollten, ist der Schirm vor neuer
Inbetriebnahme, einer fachmännischen Revision
zu unterziehen.
6.5 Vor Inbetriebnahme
Leichtgängig machen der Dreh- und Gleitlager:
Verwenden Sie einen nicht fleckenden Gleitspray.
Führungsfugen auf Mast Vorderseite (1).
Ecken der Mast-Innenseite (2), dazu ist das Abdeckblech (3)
abzuschrauben und anschliessend wieder anzubringen.
Fig. 13 Fig. 14
| 14EN EN
1. SAFETY REGULATIONS
The safety instructions, together with the technical information for the
fitting and operation, form the basis for using the shades without dan-
ger. They are to be read through before installing an using the shades,
to be obeyed and to kept in a save place for later need.
Any disregard of safety regulations and the in-
structions for erection and operation can result in
serious damage to people and material for which
the manufacturer expressly refuses to accept any
liability or obligation under warranty!
If the wind freshens up or gales gusts are
approaching, the sunshade must be shut.
Unsupervised sunshades must not be left open.
A unexpected stormy wind could cause heavy
damages!
1.1 Use of the shades
The Glatz large shades are intended exclusively as weather resistant
sun protection. The wind resistance of the extended shade is limited
and the details on this presuppose an anchorage in accordance with
the instructions. Movable bases are less stable than bases which are
fixed to the ground.
1.2 Anchorage
The ground anchorage is to be fitted in accordance with the technical
information in “Fitting Instructions Ground Socket” and “Fitting
Instructions Mounting Plate” respectively. Please take note of the
dimensions for the shade type concerned and its sizes. Fitting has to
be carried out by a person with the necessary specialist construction
knowledge. The version is to be in concrete or in a material of like
strength. Local regulations are to be observed.
1.3 Electrical installation
Shades with electric equipment must be connected by a recognised
specialist fitter in accordance with the fitting instructions and connected
to the mains power supply in accordance with local regulations.
1.4 Kindly note the following
Be sure to comply with the operating instructions.
Never place the large shade unsecured against a wall, it could slip
away and tip over.
Before opening or closing the shade, check that there are no
obstacles in the operating area.
The shade must not be altered or draped with a different material.
The stability in wind and closing function may deteriorate.
Use the shade only in a undamaged state and take notice of any
faults.
Use only original Glatz accessories and spares in order to have the
guarantee for full safety, unspoilt convenience and perfect functioning.
When fitting or removing a protective sleeve, if necessary use a
free-standing, stable climbing aid. Make sure that this can neither
tip over or slip away.
If used in exposed locations, for example near the coast or in regions
with heavy winds, increased wear is to be expected. In these cases,
we recommend more intensive maintenance.
12
6
4
5
3
15 |
EN EN
2. SCOPE OF SUPPLY
Sunshade (1) ready assembled with crank (2) and fastening belt (3)
Upright tube (4) with cover plate fitted in the mast (in the case of
sunshades with removable stand or turnable ground sockets, the
support tube is fitted to the stand or ground socket at production
location)
5 anchorage screws M10 (5)
Attachment bolt for speedy operation with rechargeable battery drill
(drill not included in scope of supply, torque limitation obligatory)
2.1 Client’s work
Fitting the ground socket
Electricity supply
Set up the sunshade
Rechargeable battery drill with torque limitation
2.2 Options
Motorised type with control unit GSS-99
Remote control for GSS-99
Incorporated lightening for Glatz large shades
Protective cover with/without zip and rod
2.3 Possibilities of anchorage
Ground socket M4 with cover
Mounting plate M4
Mounting plate special M4 for isolated grounds
Ground socket Ambiente turnable
Movable base
In order to ensure that the static conditions for
the fixing are fulfilled, it is essential to consult the
user manual for the relevant ground fixing.
Fig. 1
4
12
3
7
5
6
4
1
2
5
3
| 16
3. FITTING
3.1 Fitting the support tube into the ground socket / movable base
(Fitting the support tube into the movable base works analogously to
the instructions for the ground socket stated below.)
Remove cover (2) from ground socket (1).
Unscrew support tube (3) from the sunshade mast by unscrewing
the bolts (4) (if necessary pull the electric cables out of the ground
socket through the support tube and fit the plugs).
Place the support tube (3) on the ground socket and align the notch
(5) to the seating area.
Insert the 5 anchoring screws (6).
Lower the cover plate (7) onto the support tube ring.
3.2 Setting the sunshade (2 persons are necessary for this)
If necessary, plug together the electrical connections, screw them
together and stow the cable away in the support tube and mast.
Lift the sunshade (A) to an angle of approx. 30º and place the lower
end of the mast on the support tube (3).
Raise the sunshade carefully further until the mast slips down over
the support tube
Insert the connecting bolts (4).
Undo the fastening belt (2) from the sunshade and pull outwards
cloth and roofstruts for pre-spreading the shade.
Insert crank handle (C) into the opening of the mast, turn the crank
handle in a clockwise direction and open the sunshade completely
up to the stop.
Check the correct position of the sunshade.
EN EN
Fig. 2 Fig. 3
7
8a 8
9
6
11
10
1
2
4
5
17 |
3.3 Adjusting the position
3.3.1 Basic alignment
(a) Swivelling the carrier arm (figures 6 and 7)
Remove the lower connection bolt (6) from the mast.
Push up the cover plate (7).
Loosen all anchoring screws (8) by a ½ turn.
Swivel the opened sunshade to the required position (4).
If necessary, carry out the correction (5) before tighten the loosened
screws.
(b) Rotating the sunshade in its suspension (figures 6 and 8)
Only necessary in the case of rectangular and square sunshades.
With the sunshade still closed, loosen the setting screw (10) by a ¼
turn.
Open the sunshade and move to the required position.
Tighten all the loosened screws again.
3.3.2 Adjusting the levelling
(c) Forward and backward angle of shade roof (figures 4 and 8)
With the sunshade open determine the difference in height between
inside and outside edges (2).
Close the sunshade and adjust by means of the levelling screw
(11). One complete of the screw in a clockwise direction causes the
outside edge to sink by approx. 4 cm and the inner edge to rise by
the same amount.
Secure the levelling screw (11) with the counternut.
EN EN
Fig. 4
Fig. 6
Fig. 7
Fig. 8
7
8a 8
9
6
3
1
2
34
| 18
4. DISASSEMBLING
4.1 Taking down the sunshade (2 persons are necessary for this)
Remove any obstacles in the area for laying the sunshade down.
Remove connection bolts (1).
Lift the sunshade until it is possible to lay it over to the rear. Lay
down carefully.
If necessary, disconnect any electric cables.
Unscrew support tube (2) and insert into the mast again.
Close off the ground socket (3) with cover (4).
(d) Side angle of shade roof (figures 5 and 7)
Determine the difference in high between the side edges of the
sunshade.
Uncover the anchoring screws (8) by removing the lower connecting
bolt (6) and lifting off the screw cover (7).
Leave the anchoring screw located behind the mast (8a) screwed
tight and loosen the other four anchoring screws (8) by ½ turn.
Screw in the levelling screw (9) on the side of the lower lying edge
in a clockwise direction. One complete turn of the screw causes this
edge to rise approx. 4 cm.
After levelling out, screw all anchoring screws (8) tight.
EN EN
Fig. 9
Fig. 5
Fig. 7
1
2
3
19 |
5. OPERATION
5.1 Opening the sunshade
Remove the fastening belt (1) and pre-spread the shade by loosing
cloth and roof struts outwards.
Insert the crank handle (2) and turn in a clockwise direction. The
sunshade carries out the extending and opening movements
simultaneously.
Open completely up to the stop and check whether the sliding catch
(3) has engaged completely in the inner ferrule. If the crank handle
is released or removed, the sunshade automatically remains open.
If opening or closing are done by an accu-drill, a torque limitation is
obligatory.
If the wind freshens up,
close the sunshade.
Unsupervised sunshades
must not be left open.
5.2 Closing the sunshade
Insert the crank handle (2) and turn in a anticlockwise direction.
The closing and retracting movements take place simultaneously.
Wrap the fabric round the sunshade (see also 5.3.2)and secure with
the fastening belt (1).
Remove the crank to avoid possible fabric damages.
If wanted, fit the protective cover.
5.3 Notes on the wind
5.3.1 Parasol membrane on acrylic fibre
The membrane, which is made from high-quality, solution-dyed acrylic
fibre, is exceptional due to its outstanding properties such as:
Ultimate outdoor durability
> doesn't rot due to dampness or fungal attacks
Ultimate colour fastness
> won’t be bleached by UV rays
Ultimate UV protection for those under the umbrella
> Reduction of UV rays
The “only” disadvantage of relevance is the acrylic fibre, which is
sensitive to abrasions. Both Glatz and our fabric supplier have been
unable to eliminate this weakness1.
If you handle the umbrella properly in day-to-day use, abrasion damage
can be avoided. The following advice helps.
1 As Glatz cannot monitor the proper treatment of the umbrella coating, any damage
caused by abrasion (rubbing) lies outside the regular warranty!
EN EN
Fig. 10
1
2
3
| 20
5.3.2 Correct winding-up of umbrella
Avoid clamping, abrasions and premature wear and tear caused by
strong flapping of the material in the case of wind.
(1) After closing the umbrella, pull out all the lengths of material
individually and completely between the struts.
(2) Wind up the lengths of material in tight layers on the umbrella pole.
(3) With the provided belt, secure the wound-up lengths of fabric well.
(The material should not flap in the wind)
5.3.3 Regions affected by frequent wind or strong winds
In autumn, after the end of the season, dismantle the umbrella and
store in a dry place.
5.3.4 Erecting of new umbrellas
Do not erect new umbrellas in autumn. Only set up new umbrellas in
spring before the start of the season.
5.3.5 Using the protective cover (option)
The protective cover should be completely closed and tied with rope.
You should avoid letting the protective cover flap about.
EN EN
Fig. 11 Fig. 12
  • Page 1 1
  • Page 2 2
  • Page 3 3
  • Page 4 4
  • Page 5 5
  • Page 6 6
  • Page 7 7
  • Page 8 8
  • Page 9 9
  • Page 10 10
  • Page 11 11
  • Page 12 12
  • Page 13 13
  • Page 14 14
  • Page 15 15
  • Page 16 16
  • Page 17 17
  • Page 18 18
  • Page 19 19
  • Page 20 20
  • Page 21 21
  • Page 22 22
  • Page 23 23
  • Page 24 24
  • Page 25 25
  • Page 26 26
  • Page 27 27
  • Page 28 28
  • Page 29 29
  • Page 30 30
  • Page 31 31
  • Page 32 32
  • Page 33 33
  • Page 34 34
  • Page 35 35
  • Page 36 36
  • Page 37 37
  • Page 38 38
  • Page 39 39
  • Page 40 40

Glatz Ambiente Manuale utente

Tipo
Manuale utente