
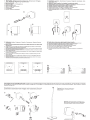
Supplied accessories
1
lm
Li
eferumfang enthaltenes ZubehOr
1
Accessoires fournis
1
Accesorios sumi-
nistrados J Accessori in dotazione J Meegeleverde accessoires J Me
dfO
ijande tillbeh6r
J
npHH8AJ,€)1(HOCTH, BXOARLUH€ 8
KOMnAeKT
nO
C
TaBKH
1-
key hole bracket,
2-
terminals, 3 -screw.
1-
Mon
ta
geklammer
mit
Befestigun
gsbo
hru
ng
.
2 -
Ansc
hlu
ss
kl
emmen
.
3 ·
Sch
ra
ube
.
1 -
support
a
visser, 2 -
bornes
. 3 • vi
s.
1-
soporte
de
bocallave,
2-
termlnales
,
3-
tornillo
.
1-
staffa
serratura.
2
terminali.
3-
vlte.
1
s
leutelgatsteun,
2 -
contacten,
3 -
sc
h
roef.
1
nyckelhc'llsfaste,
2 -
terminaler
.
3-
skruv.
1
ti.DO
HWTe
HH
C
OTBepCn1eM
AI\R
nOAB
C
W~BaH~R;
2 -
IVo.CMM
bl, 3
CD
@
®
~
~~
~
Technical specifications; Technische daten
J
Caracteristiques techniques
1
Es
pecificaciones
tecnicas I Specifiche tecniche I Technische specificaties I Tekniska specifikationer I
TexHI-1ll€CK~--te
xapaKTepHCHiKI-1
Min12
Min
22
:::
""
:::
"'
c:
IUY
C:
"Y
'_'
{S
::C
"'-
::'
l
______
86<J
=
6
-"
i2
:::.
83
~
V
~
=
=
'":::
P"
:::
<l
___
_
__c
68
:.::
!.lB
(2.83
vrms
t
nput
:
~
'
-
--
--
-
--
-
Frequeneyr
e$Jl"O
n
se
120Hl
·20
k
Hz
1
20H
z ·
20
kH
z
I
mpedance
8
Oh
ms
com
patible
R
ecom
me
n!.l
ed
Amp
Power
2
5-2
00W
•
---
--
--
--
Speaker
dimens
ions
{H l
Wt
D)
Wei
gh
t
78~7a~
asmm
(3.1x3
.1
x3
.3")
0.43Kg
t0
.
9!:.
1
DSI
8
Ohm
s
compat
i
ble
25·200
W•
2
~
2.
25
'
15
4
~
78
~
esmm
(6.0
~
3.1
~
3.3' )
0.
75
Kt
(l.
6
51
b$
)
'\lolncoi"IIC!l
OOWO<e<IOm~
ln
ortow.r,.,..niU.olume
v:
-
•-•
"•
;.
-d«IMion
"""""""
'
O<HJnd
.
OI
<G>
,....ll--••ll"
""'
.,.....,"d"'mo<ho
n
O:
ol
.•
,
..
~·
..
,,..-
~~K-
-
--
pl8!4ftl"'"-k•roro-oloudondrMo.....,.eo~t~
o
d..,...le
.
Witlo
o
n~VIIr»e
"'
O.l~!.
':,"~~~.:=M1r
o•...,.ll""""'
•
•-
!~..,
"""'~
14
0th
._..rh
lo
<
o-n
ft
JU
ro<lon.-h..-.:ll
!qltl
Q_
Oi
X201
-=-
,_
-,-
..
-
,
-
,,
-=_,
-::_-::_-::_-::_-::_
-::_-::_
~-
2
"'ooc
w
·--
-
--
--
--
300,-,-
w
-
--
---
---·-------
·
---
Ma
i
ns
voltage
100Vj11Q-120V/220-240V
l.OOV
/
l1
0-120V/220-2
40
V
Speaker
dimensi
on
s
(Hx
WxD)
Wei
ght
1
~
6.5" Su
bwoo
f
e•
2 x
6.5
-
Passwe
Rad
i
ato
r
219 .
2
1
0~
2
22
111 111
{8.
6x8.3x8.7"
)
5
.0
K
t(
1HII
bs
l
1A8'
Su
bw
oo
f
er
1~8-
Passive
Radiator
3
11
x
26
6
~
278mm
(12.
4x
10.5
x
11
.0")
7.5Kg{1fi.51bs)
Mi
nx
is a trademark
of
Cambridge
Aud
io. All
ri
g
ht
s reserved.
©
Copy
ri
g
ht
Aud
io Partnership
Pi
c 2
014
Cambridge
Aud
io is a brand
of
Audio Partnership
Pic.
Regi
stered Office:
Ga
llery
Co
urt
, Hankey Place, London SE1
488,
UK.
Registered
in
England No. 2
953313
www.ca
mbridg
e-a
udio.com
Part No.
AP3
2374/ 3
Installation guide
lnstallationsanleitung
Guide d'installation
Gufa
de
instalaci6n
Guida all'installazione
lnstallatiehandleiding
lnstallationsguide
PyKOBOACTBO
no
ycraHOBKe
by
Cambridge
Audio
m1n12
m1n22
Cambridge
Audio
Your music
+
our passion
Th
e crossed-out wheeled bin is
the
European Union symbol for indicating separate collection for
electrical and electronic e
quipm
ent. This product contains electrical and electronic equipment
which should be reused, recycled
or
recovered and should
not
be disposed
of
with unsorted regular
waste. Please return the unit
or
contact
the
authorised dealer from whom you purchased this
-product
for
more information.
Die durchges
tr
ichene Abfalltonne
auf
Riidern ist das Symbol
dc
r Europiiischen Union, das das
gc
tr
cn
nte
Su
mmeln von
Ele
k
trQ-
und
Elektronikgeraten anzeigt. D!eses
Ge
r
at
enthalt el
ekt
rische
un
d elektronrsche Teile. dte wiederverwendet, recycelt oder wledernergestellt
werden k6nnen
und
nicht
mit
un
sort
i
crtem
normalem Restabfall entsorgt werden dOrfen. Bitte geben Sie das G
erS
t zur
llc
k oder wend
en
Sie
slch
fOr
weitere lnformationen an lhren Fachhandler. von dem Sle dleses
Ge
r
at
gekauft haben.
La poubelle a roulettes bar
rCc
d'un
e croix
est
le symbole de
!"
Union europeenne indiquant Ia collecte separ
ee
des appareils
et
dispositifs
tilectriques
et
etectroniques.
Ce
prodult c
ont
i
en
t des disoosit
ils
electriq
ue
s et et
ect
roniq
ues
q
ui
doive
nt
etre
reutili
st!is
, recycles ou r
etu
peres,
et
qu
i ne
do
i
vcnt
pas etre jetes avec les d
ri:c
hets ordinaires non tries.
Ye
uillez remettre
l"
ap
par
eil
au revend
euragree
chez qui vous avez achete
ce produit.
ou
le
co
ntacter pour plus d
'i
nformations
El cubo
co
n ruedas
tachH
do es el simbolo
de
Ia Un
iOn
Europea para indicar
un
conju
nto
s
epar
ado de
equip
os elec
tri
cos
y
electr6nicos. Este
produ
cto
c
nnt
iene equipos electricos y electr6nicos que de
be
n ser reuti
li
zados. recicla
do
s o recuperados
y
no
deben desecharse con los
de
sperdicios habi
tu
ates sin clasificar. Por favor devuelva el equipo o pOngase en contacto con el dis
bi
bui
do
r
aut
oriza
do
a quien compr6 este
producto para obtener mas informaciOn.
II
contenitore a roteile
pe
r rifiuti, sormonta
to
da una croce, ra
pp
resenta il s
im
bo
lo dei
i"
Unione Europea
pe
r indicare una raccolta separata dei
dispositivi e appareccniature elettriche ed ele
nron
iche. Questa prodotto co
nti
ene
part
i elettriche
ed
elettroniche che devono essere r
iut
ilizzate.
riciclate o riceperate,
~
non
de
ve
pe
rta
~to
_
esser
e
gett~:~to
assl
eme
a1
normali rifiuti non r
i?
rdlnatl. Potete
r
~s
t
l
t
uire
qu
e
~rapparecchi
o
al
negoziante, o mettcrvi
10
co
ntatt
o con il
d1S
tr
1butore
aut
onu a
to
presso
11
quare lo avevate acqutstato per ul
teno
n mformazfont.
De
doorge
kr
uiste venijdbare
af
vatbak Is
he
t symbool van de Europese Unle waarmee wor
dt
aangegeven dat elektrische
en
ele
kt
roniSche
apparatu
ur
gescheiden die
nt
te worden in
ge
zameld. Dit produ
ct
bevat elcktrischc en elektronische inrich
ti
ngen die opnieuw moeten worden
gebrulkt. aerecycl
ed
of hersteld
en
niet
mo
gen wor
de
n weggegoofd bij het o
ng
esorteerde
norm
ale arva
t.
Br
eng
he
t
<~
pp
a
r
aat
terug
of
n
eem
contact op
met
de
bevoegde deal
er
waarbij u dit produ
ct
h
eb
t gekocht voor meer informatie.
D
en
Overkorsa
de
soptunn
an
ar Europei
sKa
Unionens symbol fOr
an
i
nd
ikera separat
up
psamling av el
eK
t
ris
K och elektronisk
ut
ru
s
tn
ing.
Denne produ
kt
innehaller elektrisk och
elek
tronisk
ut
rustning
som
kan Ateranviindas. atervinn
as
eller Aterhiimtas och inte fAr kasseras med
normatt osorterat h
ush<i
llsavfall.
Ta
ti
llbaka a
pp
ar
aten
e
ll
er kontakta den
au
k
to
riserade
i:'iterfOTSa
tjaren som
du
kOp
te
produkten frtln fOrm
ed
informat
io
n.
AIQMK
C KOn
ec3
MM
M C
KpeCTOM
-
3TO
CMMBO
il
EB
poc0
10
38
AliA
YK838HMA H8
OT.QeR
b
HYIO
KOilll
eKI.I.
MIO
31l€KTpM'1€C
KOrO
M
3.n&KT
poHHOrO o6opyAOB8HMA. 3TO M3AellM8
CO
ACPlK
MT
3.neKTpM'IeC
KMC
M 3.neKTpOHHble
KOMROHCHTbl
1
KOTOpbte AOmKHbl
fibiTb
ROBTopHO MCno.nb3
088Hbt,
n
epepa6o
T8Hh.l
Mlllll B
OCC
TBH0811eHbl M He
AQn>KHbl
YTMilM3
MpOBSTbCA C
OBM
BCTHO
C
H
CC
Op
T
MpOB8HHbiMM
o6bi'IHbiMioll
OTXOA(IMM
. n
oc
Tapa
MT
ecb
B03Bp8TMTb yC
TpOMCTBO
MnM
o6paT
MTeCb
K
8BTOpM3088HHOMY
AM.nepy, y
KOT
OpOrO
Bbl
npMo6penM
3TO
111
3ABilMC, AJIA nony'IBHMR AOnOnHMT&IlbHOM
MHcl>opM81.1.MM.
This guide is designed
to
make
Installing and using
this product as easy as possible. Information in this
document has been carefully checked
for
accuracy
at
the
time
of
printin
g;
however, Cambridge
Audio's policy is one
of
continuous improvement,
therefore design and specifications are subject
to
change without pr
ior
notice.
Befolgen Sie f
Or
die Insta
ll
at
ion und Verwendung des Produ
kts
die Sch
ritt
e in dieser Bedienungsanleit
un
g. Die lnforma
tio
n
en
in dieser Anle
it
u
ng
wurden z
ur
Ze
it
der Drucklegu
ng
hinsich
tlic
h
ihrer Ge
na
ui
gk
ei
t sorgfi.il
tl
g Uberpr
ii
ft. C
amb
ri
dge Audio ist
jed
och
bestre
bt
, se
in
e Produkte standig
w
vcrbesse
rn
, und d
<J
her
kOnn
cn
sich das Design und die technisch
en
Daten ohne vorherige
Ankiindi
gungand
ern.
Ce
manuel vt
se
a faciliter I'
installation et !'utilis
at
ion de ce produi
t.
Lcs
in
formatrons qu'il contic
nt
ont
ete
vCr
if
iCe
s soigneuse
ment
avant leur i
mpr
ession. Toutefois, c
omm
e Cam
br
id
ge
Audio a
po
ur
pri
nc
ipe
d"
ame
1i
orer consta
mment
ses prod
uit
s. les caractl!ristiques
techniques
et
generales pe
uv
ent
etre modifi
E!es
sans
pr
eavis.
Esta gufa
est
a dlsertada para
qu
e lnstal
ar
y
utilizer este pr
od
ucto
sea l
omas
facti posible.
La
precisiOn de Ia informa
Ci
On
que
conti
en
e
este docu
me
nt
o
fu
e
ve
rificada cuida
do
sam
en
te
en
el memento
de
su
imp
resi6n. No obsta
nt
e, Ia pol
it
ica de Ca
mb
ridge
Au
dio se basa
en
mejorar continuamente, p
or
lo
qu
e el diserio
y
las especificaciones
est
an
suje
ta
s a modificaciones sin previa a
vi
so
.
Read all instructions Avo
id
damp
Questa
Gu
ida
C
st
ata
id
e
at
e per rendere l'ins
te
llazione e l"im
pi
ego
di questa prodotto piU facili posslbile. Le informazloni contenu
te
in questo documen
to
sono
stat
e accuratamente ver
if
icate per Ia
loro esatteZ2a al momenta della st
amp
a: in ogni caso Ia poltica
di
cam
bridge Audio
e
fana di migliorament! continui.
per
cui it
progetto e le speci
liche
sono soggetti a modifiche se
n.:
a necessita
di
pr
ea
vviso.
Deze handleiding is
be
doeld
om
de
insta
ll
atie en
het
gebruik van
het product zo eenvoudig moge
li
jk
te
maken.
De
in
dit
document
vers
tr
eK
te informatie
is
voor
he
t
drukk
en zorgvuldi
gge
controlee
rdo
p
nauwkeuri
gh
eid: h
et
be
lekl van Ca
mb
ri
dg
e Audio Is e
cht
er geri
cht
op
voortduren
de
verbe
te
ring.
On
tw
erp
en
specificaties kunnen
de
r
ha
lve
zon
der
voorargaan
de
kennisgevmg worden gewtjzigd.
Den
na
handbok
ar
utformad fOr
an
underl
ana
installation och
anvandnlng av denna produk
t.
lnformatlonen i detta
do
kume
nt
h
ar
kontroller
ats
noggr
an
t vld
tr
yi;kningstillfallet.
ca
mb
rkl
ge Audio
h
ar
dock en
po
licy
av
kon
ti
nue
r1
iga f6rbi:ittringa
r,
vilket innebar a
tt
design och specifikationer kan
iindras
ut
an
fOregilende meddclande.
HaCTORI.lJ,CC
pyt<O
BOACTBO
OOMOJI!.el
f\O
~b30B8TC!IIO
ynpoc
ntT
b
yCTS
HOBKY
06oPYAOB&H
I1
R
11
3KC
O
AY8
T
IAPQBa
Tb
CiO
C
MaK
CH
MaAbttO
H
<J
(jl¢>eKTI-1
BH
OCT
biO
.
COA
e
plll
a
wa
R~
El
H8
C/
OH
W€M
AOKyMCHT
€
HH
¢>0pM
8
1..11-1
R
6b
1
Aa
TWa
T
ef\bHO
npoaepeHa HB MOMCHT
ny
6~
11Ka~11
.
0AH8
KO
KOMn
a
HH
fl Cambridge
Aud
io np
OBO
AI-IT
no
~H
H
IK
)'
n
OClOSII
i
i-
WrO
yi;O
B
epwe
H
CTBO&
B
HHR
Bbln)'CKa
eM
Ot>l
e10
O
POAYKUH
I-t
,
lA
003TOMY
QC
f
(I
R
!IReT
3a
C060
t>l
npa
BO
SH
OC
HTb
l-t
3MC
H
CHH~
B
KOHCTPYKUH
IO
111
3AeM
-1
11
H
lAX
TeX
HH
4€CKHe
xapaKT€P
H CTH
~H
6e3 npe
.o.aaOH
Ter.bHO
fO
y
Be
AO
M!\e
HIIIR
.
Secure all cables
Lesen Sic
ail
e
Anweisungen.
Usez to
ut
es les
instructions
Lealasi
ns
truc
cion
es
Leggere
tutte
le
v"
•.
meiden
s.;'.
feuchte
Umgebungen.
Ev
ttez l'humtdlte
Ev
tte l
ahum
edad
Evrtare l'
umidit
a
Y
erm
ijd voc
ht
V. '.
rlegen
.
Sie
aile Kabel
so.dasss
ie ke.ne
Gefah
rdarstell
enode
r
tmW
egs
md.
F
t~ez
tau
s l
es
di
bles
Proteja los cables
istruzioni
L
eesa
lle
in
st
ru
ct
ies
U
isalla
instr
uk
t
io
ne
r
npo•H
11
Te Bee
HHCTPYI(
l..IHH.
Avoid extre
me
tempera
tur
es
Vermel
de
n Sie ex
tr
eme
T
em
peraturen
;
:;
!
:~:
t
e
m~
e
r
a
t
u
r
es
Ev•t
elas
tempera
tur
as
extremes
Evitare temperature estreme
Yermijd ex
tr
eme
temperaturen
Undvik extr
em
a lemperaturer
He
AOOytKai1Te
003
A
CA
CT
9
~ R
B
bl
COK
HX
re
Mneparyp.
Undvi
kfu
kt
Avoid direct sunlight
Setzen Sie das Prod
uk
t
Ke
iner d
ir
eK
ten Sonne-
ne
lns
tr
ahl
un
g
Evitez Ia
lumi
ere directe
duso
leil
Ev
it
e la lu
zso
l
ard
irecta
Ev
itare Ia tuce solare d
ir
et
ta
Ve
rm
ljd d
ir
ect
zonlic
ht
Und
vik
dfr
ek
ts
olljus
He
A
Onyc~taHre
BO.)Ae
i1
CTB
HR
np
RMO
fO
Fissare
tutt
i i cavi
Bevesug aile kabels
Ansl
ut
alla kablar
3
aKpen
w
re
ace
Ka6e,.,~
.
Avoid solvent-based cleane
rs
Verwenden Sie keine
~;
~~
i
~~;~~
;~~~
sis
.
a
uf
Ev
•teL
les
nettoyants
a
ba
se de solvents
Ev
ite limpiadores basa
dos
en
disolvente
Non utiliz
za
re detergenti a base
di
sol-
ventl
V
er
mijd reinigingsmlddelen oo basis van
oplosmid
de
l
en
Undvik rengi:iringsme
de
l baserade
pa
IOsningsmedel
He
n
p
~AM
eHRihe
«1-t
CTJI
W
I-I
e c
peACT
ea
Ha
ocHosep
a
cr
eo
pHre,o,
e
i1
.

1 Wall mounting
1
Befestigen an
der
Wand
1
Montage mural
1
Montaje
en pared
1
Montaggio a
parete
I
Wandmontage
I
vaggmontering
I
KpenAeHHe
Ha
CTeHe
1.1
Key
hole wall bracket.
1.1 Mithilfe der Montagek.lammer
mit
Befestigungsbohrung.
1.1 Support mural
a
visser.
1.1
Soporte
de bocallave para pared.
1.1 Staffa per montaggio a parete con serratura.
1.1 Wandsteun
met
sleutelgat.
1.1 NyckelhAisvagghiste.
1.1.
KpoHWTE!HH C
OTBepcnteM
MA
OOABE!WH88HHA.
-
®
3.
Positioning 1
Aufstellen
1
Emplacement/
Colocaci6n
1
Posizionamento
1
Plaatsing;
Placering;
PacnoAO*eHI-1e
3.1
Before connecting, consider speaker
placement
and all
cabling
requirements. Some typical setups
are shown here:
3.1 Oberlegen
Sie
sich
vor
dem AnschlieBen der
lautsprecher
eine geelgnete Stelle
zum
Aufstellen und welche Kabel Sie
benlltlgen. lm Folgenden werden einlge typlsche Varianten gezeigt:
3.1
Avant
de
proceder
aux
raccordements, prenez
en
compte
le
placement
de
I' enceinte et toutes les exigences
de
cSblage.
Des
exemples
de
configurations typiques sont presentes
ic
i :
3.1
Antes
de
Ia
conexi6n, piense
en
Ia
coloceci6n
de
l altavoz
yen
las necesidades
de
cableado. A continuaci6n
se
muestran
atgunas configuraciones tfpicas:
3.1
Prima
del collegamento valutare
II
posizlonamento delt'altoparlante e
tunll
requlsitl
di
cablaggio.
Qui
di seguito vengono
illustrate aleune configurazioni tipo:
3.1
Denk
voor het aansluiten
na
over
de
positie van
de
luidspreker
en
de
eisen voor
de
kabels. Hieronder ziet u enkele
typische opstellingen:
3.1 lnnan
du
ansluter kablarna
ska
du
Overvaga
placering
av
hOgtatare
och
alia behov
fOr
kabeldragning. Nilgra vanliga
installationer visas nedan:
3.1
OepeA
OOAKAIOl.!eHMeM
Y'fTMTe
pacnOfiO)I{eH14e
8f<YCTM"'eci<OM
ClotCTeMI:ol
H
BceX
Heo6XO~Mb1X
Ka6et.ei1
.
HM)I(.e
nOKa38Hbl
HeKOTOPb19
pacnpocrpaHeHHbl9
B81)H8HTbl
pacnOAO)I{8H\1A
aKyCT\1'leCK!-1X
C\1CTeM.
D
s.1
D
1.1
[]~[]
El El
2. Connections
1
AnschlieSen
1
Raccordements
1
Conexiones
1
Collegamenti
1
Aansluitingen
1
Anslut-
ningar
I
noAKI\104eH~e
2.1
IMPORTANT! Ensure
that
pos~lve
(+)and
negative
(-)connections
are
matched.
2.1
WICHTIG!
Vergewissern Sie sich, dass die positlven (+}- und negativen (+AnschiQsse korrekt mitelnander verbunden sind.
2.1
IMPORTANT:
Veillez
a respectez
Ia
polartte positive(+) et negative (-) des raccordements.
2.1
IMPORTANTE
Compruebe que coincidan las conexiones posltiva
(+)
y negativa (
-).
2.1
IMPORTANTEI
Accertarsi
che
i coltegamenti positive(+) e negative(-) combacino.
2.1 BElANGRIJKI Zorg dat positieve
(+)en
negatieve
(-)
aansluitlngen aan elkaar
WOI'den
gekoppeld.
2.1
VIKTIGTI
Kontrollera
att
de positi
va
(+) och negativa
(-)
anslutningarna matchar.
2.1.
BA>KHAR
~H¢l0PMAUHRI
Y6e.Amecb,
'ITO
OOJ\OlKI1TeAbHble
(+)
M
OTpMu,aTeflbMble
(-)
KI\.CMMbl
C09A14HeMbl
C
Co6AIOACHMCM
OOAAPHOCTM
.
3.2
Position above
or
below screen,
angled
towards
the
listener
If
possible.
3.2
Positionieren Sie die Lautsprecher
Uber
oder unter dem Femseher und so, dass sle
zum
HOrer
gerichtet sind.
3.2
Placez
!'enceinte au-dessus
ou
au-dessous
de
rec
ran,
en
rorientant si possible
vers
rauditeur.
3.2
Poslcl6n enclma o debajo
de
Ia
pantalla. orlentado hacla el usuario
si
es
posible.
3.2
Posizione al di sopra o al di sotto della schermo, angolato possibilmente verso l'ascoltatore.
3.2
Boven
of
onder het scherm geplaatst, gericht
op
de luisteraar, indien mogelijk.
3.2
Placera
Over
eller under skihmen, vinklad mot lyssnaren om mOjligt
3.2.
PacnOAOJKHTe
8KYC1WI9CK\1e
CHCTeMbl
HCIA
HI\H
OOA
3KpaHOM
H no
BOJMOJKHOCTH
pa3BCPHHTe
Hll.
nO
Hanp8BACHHIO
K
CfiYWSTefiiQ.
Also available from your Cambridge Audio retailer
I
Ebenfalls von
lhrem
Cambridge Audio-Handler erhattlich
1
Egalement disponible au
pres de votre revendeur Cambridge Audio
1
TambiE!n
disponible en su
distribuidor
de Cambridge Audio
1
Disponibile
anche
presso
il
proprio rivenditore
cambridge
Audio
1
Ook verkrijgbaar bij uw Cambridge Audio-winkel
1
Kan kbpas
fran
din
Cambridge Audio-aterfbrsaljare
1
MO>KHO
np~-to6pecr1-1
y npoAasua
npOAYKI.I,I-11-1
Gam bridge Audio.
Pivot wall bracket
1
Wandschwenkhalterungl Support mural pivotant.
1
soporte
de
pivote para pared
1
StaHa per montag-
gio a parete
con
perno
1
Draaibare wandsteun
1
Atternati
v-
Pivflvaggfi:iste
1
Cn
oco6 -
wapHI1PH~i1
H8ClCHHbji1
KPOHwrei1H.
@
~
~-
--
Floor
stand
1
Stativ
1
Pied
de
sol/
Soporte
de
suelo
1
Supporto
da
pavimento
I
Vloerstandaard
1
Golvstativ
I
HanO
A
bH8fl
ClO.::iKa
Table
stand
I
Montage des lischstativs
1
Assemblage
du
socle
1
Base
de
sobremesa
1
Gruppo supporto
da
tavoto
1
Tafelstandaardset
I
Montering
av
bordsstativ
I
YcraHOBKa
Ha
HaCTOAbHOH
noACTaBKe
-
 1
1
-
 2
2


in altre lingue
- español: MINX MIN12 Guía de instalación
- Deutsch: MINX MIN12 Installationsanleitung