
CDF 615 A
LAVASTOVIGLIE
DISHWASHER
LAVE-VAISSELLE
MÁQUINA DE LAVAR LOIÇA
GESCHIRRSPÜLER
AFWASMACHINE
Guida pratica all’uso
User instructions
Mode d’emploi
Instruções de utilização
Bedienungsanleitung
Gebruiksaanwijzing
IT
EN
FR
PT
DE
NL

2
Complimenti,
con l'acquisto di questo elettrodomestico Candy, Lei
ha dimostrato di non accettare compromessi: Lei
vuole il meglio.
Candy è lieta di proporLe questa nuova lavastoviglie,
frutto di anni di ricerche e di esperienze maturate sul
mercato, a contatto diretto con i Consumatori.
Lei ha scelto la qualità, la durata e le elevate presta-
zioni che questa lavastoviglie Le offre.
Candy Le propone inoltre una vasta gamma di elet-
trodomestici:
lavatrici, lavastoviglie, lavasciuga, cucine, forni a
microonde, forni e piani di cottura, frigoriferi e
congelatori.
Chieda al Suo Rivenditore il catalogo completo dei
prodotti Candy.
La preghiamo di leggere attentamente le avvertenze
contenute nel presente libretto in quanto forniscono
importanti indicazioni riguardanti la sicurezza di instal-
lazione, d'uso, di manutenzione ed alcuni utili consigli
per il migliore utilizzo della lavastoviglie.
Conservi con cura questo libretto per ogni ulterio-
re consultazione.
SERVIZIO ASSISTENZA CLIENTI
CERTIFICATO DI GARANZIA:
cosa fare?
Il Suo prodotto è garantito, alle condizioni e nei termi-
ni riportati sul certificato inserito nel prodotto ed in
base alle previsioni del decreto legislativo 24/02, fino
a 24 mesi decorrenti dalla data di consegna del bene.
Il certificato di garanzia dovrà essere da Lei conser-
vato, debitamente compilato, per essere mostrato al
Servizio Assistenza Tecnica Autorizzato, in caso di
necessità, unitamente ad un documento fiscalmente
valido rilasciato dal rivenditore al momento dell’acqui-
sto (bolla di consegna, fattura, scontrino fiscale, altro)
sul quale siano indicati il nominativo del rivenditore, la
data di consegna, gli estremi identificativi del prodotto
ed il prezzo di cessione.
Il Servizio di Assistenza Tecnica Autorizzato GIAS,
verificato il diritto all’intervento, lo effettuerà senza
addebitare il diritto fisso di intervento a domicilio, la
manodopera ed i ricambi che sono totalmente gratuiti.
ESTENSIONE DELLA GARANZIA
FINO A 5 ANNI: come?
Le ricordiamo inoltre che sullo stesso certificato di
garanzia convenzionale Lei troverà le informazioni ed
i documenti necessari per prolungare la garanzia del-
l’apparecchio sino a 5 anni e così, in caso di guasto,
non pagare il diritto fisso di intervento a domicilio, la
manodopera ed i ricambi.
Per qualsiasi informazione necessitasse, La preghia-
mo rivolgersi al numero telefonico del Servizio Clienti
0392086811.
ANOMALIE E MALFUNZIONAMENTI:
a chi rivolgersi?
Per qualsiasi necessità il centro assistenza autorizza-
to è a Sua completa disposizione per fornirLe i chiari-
menti necessari; comunque qualora il Suo apparec-
chio presenti anomalie o mal funzionamenti, prima di
rivolgersi al Servizio Assistenza Autorizzato, consi-
gliamo vivamente di effettuare i controlli indicati nel
capitolo “Ricerca piccoli guasti”.
UN SOLO NUMERO TELEFONICO
PER OTTENERE ASSISTENZA
Qualora il problema dovesse persistere, componendo
il “Numero Utile” sotto indicato, sarà messo in contat-
to direttamente, con il Servizio Assistenza Tecnica
Autorizzato che opera nella Sua zona di residenza.
Attenzione:
la chiamata è a pagamento. Il costo verrà comunicato, tra-
mite messaggio vocale, dal Servizio Clienti dell'operatore
telefonico utilizzato. Dettagli sono presenti sul sito internet
www.candy.it.
MATRICOLA DEL PRODOTTO.
Dove si trova?
E’ importante che comunichi al Servizio Assistenza
Tecnica Autorizzato la sigla del prodotto ed il numero
di matricola (16 caratteri che iniziano con la cifra 3)
che troverà sul certificato di garanzia oppure sulla
targa matricola posta all’interno dello sportello, sul
bordo superiore destro. In questo modo Lei potrà con-
tribuire ad evitare trasferte inutili del tecnico, rispar-
miando oltretutto i relativi costi.
INDICE
Descrizione dei comandi pag. 3
Dati tecnici pag. 3
Scelta dei programmi
e funzioni particolari pag. 4
Watercontrol pag. 7
Elenco dei programmi pag. 8
3
Coperti (EN 50242)
Capacità con pentole e piatti
Pressione ammessa nell'impianto idraulico
Ampere fusibile
Potenza max assorbita
Tensione d’alimentazione
15
9 persone
Min. 0,08 - Max 0,8 MPa
(vedere targhetta dati)
(vedere targhetta dati)
(vedere targhetta dati)
A Tasto "AVVIO/ARRESTO"
B Pulsante "PARTENZA DIFFERITA"
C Apertura sportello
D Pulsanti "PROGRAMMI"
E Pulsante "MEZZO CARICO"
F Spia "ESAURIMENTO SALE"
G LEDs "FASI DI LAVAGGIO"/
Tempo "RITARDO PARTENZA"
H LEDs "SELEZIONE PROGRAMMA"
I LED "SELEZIONE OPZIONE"
Altezza
Profondità
Larghezza
Ingombro con porta aperta
cm
cm
cm
cm
con piano lavoro
85
60
60
120
DESCRIZIONE DEI COMANDI
DATI TECNICI:
senza piano lavoro
82
57,3
59,8
117
AB C D E
DIMENSIONI:
H I
F
G

4
SCELTA DEL PROGRAMMA
E FUNZIONI PARTICOLARI
Impostazione dei programmi
■ Aprire lo sportello ed introdurre le stovi-
glie da lavare.
■ Premere il tasto "AVVIO/ARRESTO" .
■ Dopo aver premuto il tasto
"AVVIO/ARRESTO", lampeggerà il LED
corrispondente al programma “consi-
gliato” (preimpostato dalla fabbrica ed
ideale per l'uso quotidiano a pieno cari-
co) oppure quello corrispondente ad un
programma che è stato utilizzato per
almeno 3 volte consecutive.
IMPORTANTE
La lavastoviglie dispone di due utilis-
sime funzioni:
- il programma "consigliato"( ) per
una selezione più rapida e sicura;
- la funzione "auto-apprendimento",
grazie alla quale viene memorizzato
il programma utilizzato per almeno 3
volte consecutive, consentendo a chi
utilizza sempre lo stesso ciclo di
lavaggio, di non dover ripetere ogni
volta la programmazione e quindi, di
risparmiare tempo.
■ Se lo si desidera, premere il pulsante
opzione (il LED corrispondente si illumi-
nerà).
Il tasto opzione va premuto PRIMA
della partenza del programma, affin-
ché l’opzione venga accettata.
■ Se si desidera scegliere un altro pro-
gramma, è necessario premere il pul-
sante corrispondente al programma
desiderato (il relativo LED lampeggerà,
confermando l’avvenuta selezione).
IMPORTANTE
Per la selezione del programma
"AMMOLLO", è necessario premere
contemporaneamente il pulsante
del programma "RAPIDO" e quello
dell'opzione "MEZZO CARICO"
(i relativi LEDs lampeggeranno, con-
fermando l’avvenuta selezione).
■ Per avviare il programma, è necessario
dare conferma, premendo nuovamen-
te il pulsante del programma scelto. Il
relativo LED passerà da luce lampeg-
giante a luce fissa ed a sportello chiuso,
il programma si avvierà automaticamente.
IMPORTANTE
Per la conferma del programma
"AMMOLLO", è necessario premere
contemporaneamente il pulsante del
programma "RAPIDO" e quello del-
l'opzione "MEZZO CARICO" (i relativi
LEDs passeranno da luce lampeg-
giante a luce fissa, confermando
l’avvenuta selezione).
Se le operazioni precedentemente
descritte sono state fatte a sportello
aperto, il programma non partirà, fino
alla chiusura dello sportello.
Interruzione di un programma
Sconsigliamo l’apertura dello sportello
durante lo svolgimento del programma, in
particolare durante la fase centrale del
lavaggio e del risciacquo finale caldo.
Tuttavia, se a programma avviato si apre lo
sportello (per esempio perché si vogliono
aggiungere delle stoviglie) la macchina si
ferma automaticamente.
Richiudendo lo sportello, senza premere
alcun pulsante, il ciclo ripartirà dal punto
in cui era stato interrotto (se necessario, la
macchina effettuerà prima un breve pro-
gramma anti-shock termico).
IMPORTANTE
E’ possibile interrompere il program-
ma in corso anche senza aprire lo
sportello, premendo il tasto
"AVVIO/ARRESTO".
In tal caso, affinché il ciclo riparta dal
punto in cui era stato interrotto, sarà
sufficiente premere nuovamente il
tasto "AVVIO/ARRESTO".
5
Modifica di un programma in
corso
Se si vuole cambiare o annullare un pro-
gramma già in corso, procedere nel
seguente modo:
■ Tenere premuto per almeno 3 secondi il
pulsante del programma in corso (con il
LED acceso a luce fissa). I LEDs dei
programmi (ad esclusione di quello rela-
tivo al programma "RAPIDO") lampeg-
geranno fino al completamento dello
scarico (se necessario). Il programma in
corso verrà annullato ed il LED corri-
spondente inizierà a lampeggiare.
IMPORTANTE
Per annullare il programma "AMMOL-
LO", è necessario tenere premuti
contemporaneamente il pulsante del
programma "RAPIDO" e quello del-
l'opzione "MEZZO CARICO" (i relativi
LEDs lampeggeranno, confermando
l’avvenuto annullamento).
■ A questo punto sarà possibile impostare
un nuovo programma.
ATTENZIONE!
Prima di far partire un nuovo pro-
gramma, è bene accertarsi che non
sia già stato asportato il detersivo; se
lo fosse, ripristinare la dose nel con-
tenitore.
Nel caso d’interruzione di corrente, la
lavastoviglie conserverà in memoria il
programma in fase di svolgimento che
verrà ripreso, dal punto in cui era stato
interrotto, non appena sarà ripristinata
l’alimentazione elettrica (se necessario,
la macchina effettuerà prima un breve
programma anti-shock termico).
Svolgimento del programma
Durante lo svolgimento del programma, il
LED del ciclo scelto rimarrà illuminato a
luce fissa ed i 3 LEDs di visualizzazione
“fasi programma” (corrispondenti a
"LAVAGGIO" , "RISCIACQUO" e
"ASCIUGATURA" ) si illumineranno sin-
golarmente e sequenzialmente per indi-
care la fase in corso.
Fine del programma
Lo spegnimento dei LEDs di visualizzazione
“fasi programma” ed il lampeggiamento di
quello corrispondente al programma scelto
(2 LEDs per il programma "AMMOLLO")
indicheranno che il processo è terminato.
Sarà quindi possibile prelevare le stoviglie
appena lavate e spegnere la lavastoviglie
premendo il tasto "AVVIO/ARRESTO",
oppure effettuare un nuovo carico per un
altro ciclo di lavaggio.
Pulsante opzione
Pulsante “MEZZO CARICO”
Premendo questo pulsante si può lavare
una quantità ridotta di stoviglie, concen-
trando tutto il carico sul cesto superiore, ad
esclusione delle posate che dovranno
essere posizionate nell'apposito cestello
posto nel cesto inferiore.
La scelta di questa funzione permette di
ridurre i consumi di acqua e di energia.
Per il lavaggio dosare il detersivo in quan-
tità ridotta a quella consigliata per il lavag-
gio normale.
IMPORTANTE
L'impostazione di questa opzione
deve essere fatta PRIMA della parten-
za del programma.
Pulsante "PARTENZA DIFFERITA"
Questo pulsante permette di programmare
l'avvio del ciclo di lavaggio, con un ritardo
di 3, 6 o 9 ore.
Per impostare la partenza ritardata proce-
dere nel seguente modo:
■ Premere il pulsante "PARTENZA DIF-
FERITA" (ad ogni pressione si potrà
impostare una partenza ritardata rispetti-
vamente di 3, 6 o 9 ore ed il LED corri-
spondente al tempo scelto s'illuminerà a
luce fissa).
■ Per avviare il conteggio, premere il pul-
sante del programma scelto (il LED cor-
rispondente passerà da luce lampeg-
giante a fissa, mentre quello relativo al
tempo impostato passerà da luce fissa a
lampeggiante).

6
Nel caso si imposti un ritardo di 9 ore, il
decremento del tempo alla partenza viene
visualizzato attraverso l'accensione del LED
6h dopo 3 ore e del LED 3h dopo 6 ore.
Al termine delle ultime 3 ore (alla fine del con-
teggio) il LED 3h passerà da luce lampeg-
giante a fissa indicando la fase di lavaggio ed
il programma partirà automaticamente.
Se il conto alla rovescia non è ancora termi-
nato e quindi il programma non è ancora
partito, è possibile cambiare o annullare la
partenza ritardata, scegliere un altro pro-
gramma o selezionare/deselezionare il tasto
opzione, procedendo nel seguente modo:
■ Tenere premuto per almeno 5 secondi il
pulsante del programma selezionato (il
LED corrispondente passerà da luce
fissa a lampeggiante, mentre quello rela-
tivo al tempo impostato passerà da luce
lampeggiante a fissa).
■ Premere il pulsante "PARTENZA DIF-
FERITA", per impostare un altro tempo
di partenza ritardata (il LED corrispon-
dente al tempo scelto si illuminerà a luce
fissa) oppure per annullare del tutto la
partenza ritardata (i LEDs corrisponden-
ti saranno spenti).
■ Dopo aver cambiato o annullato la par-
tenza ritardata, sarà possibile impostare
un nuovo programma (il LED corrispon-
dente passerà da luce lampeggiante a
fissa) e selezionare o deselezionare il
tasto opzione.
Segnalazione anomalie
Qualora durante lo svolgimento di un pro-
gramma si dovesse verificare un malfun-
zionamento o un’anomalia, il LED corri-
spondente al ciclo scelto (2 LEDs per il pro-
gramma "AMMOLLO") lampeggerà in
maniera molto veloce.
In questo caso, spegnere la lavastoviglie
premendo il tasto "AVVIO/ARRESTO".
Dopo aver controllato che il rubinetto del-
l'acqua sia aperto, che il tubo di scarico
non sia piegato, che il sifone non sia ottu-
rato o i filtri intasati, impostare nuovamente
il programma scelto. Se l’anomalia doves-
se ripetersi, sarà necessario contattare il
Servizio Assistenza Tecnica.
IMPORTANTE
Questa lavastoviglie è dotata di un
dispositivo di sicurezza antitrabocco
che, in caso di anomalia, interviene
scaricando l’acqua in eccesso.
ATTENZIONE!
Per evitare l'intervento intempestivo
del dispositivo di sicurezza antitra-
bocco, si raccomanda di non muove-
re o inclinare la lavastoviglie durante
il funzionamento.
Nel caso sia necessario muovere o
inclinare la lavastoviglie, assicurarsi
prima che abbia completato il ciclo di
lavaggio e che non ci sia acqua nella
vasca.
7
Il tubo di carico dell’acqua è provvisto di un dispositivo di sicurezza che blocca
l’afflusso dell’acqua qualora il tubo di carico si deteriori. Questo fatto viene segnalato
dall’apparizione di una tacca rossa nella finestrella «A».
In questo caso il tubo di carico acqua dovrà essere necessariamente sostituito.
Se la lunghezza del tubo non è sufficiente per un corretto allacciamento, il tubo
stesso dovrà essere sostituito con uno di lunghezza adeguata. Richiedere il tubo
presso il Centro Assistenza Tecnica.
WATERCONTROL-DISPOSITIVO DI BLOCCAGGIO DELL’ACQUA
Tasto rosso
(spia)
di valvola bloccata
Dispositivo
antisvitamento
(premere per svitare
la ghiera)
A

9
8
Programma
Operazioni da compiere Svolgimento del Programma
Durata
media
in minuti
Funzione
facoltativa
Detersivo
prelavaggio
Detersivo
lavaggio
Pulizia filtro e piastra
Controllo scorta
brillantante
Controllo scorta sale
Prelavaggio caldo
Prelavaggio freddo
Lavaggio
Primo
risciacquo freddo
Secondo
risciacquo freddo
Risciacquo caldo con
brillantante
Con acqua fredda (15°C)
(Tolleranza ± 10%)
Pulsante
“PARTENZADIFFERITA”
Pulsante
“MEZZO CARICO”
UNIVERSALE
IGIENIZZANTE
ECO-BIO
RAPIDO 32’
AMMOLLO
(PROGRAMMA “CONSIGLIATO”)
Adatto al lavaggio di stoviglie e pentole
normalmente sporche.
Adatto al lavaggio di pentole e di tutte le altre
stoviglie particolarmente sporche.
Adatto al lavaggio di stoviglie e pentole
normalmente sporche utilizzando detersivi
contenenti enzimi.
Programma normalizzato EN 50242.
Ciclo superveloce da eseguire a fine pasto,
indicato per un lavaggio di stoviglie fino a 4/6
coperti.
Breve prelavaggio per le stoviglie usate al
mattino o mezzogiorno, quando si vuole
rimandare il lavaggio del carico completo.
Lavaggio con prelavaggio
Nel caso si imposti il programma IGIENIZZANTE, occorre aggiungere una seconda dose di
detersivo, circa 20 grammi (1 cucchiaio da tavola) direttamente nella lavastoviglie.
5
•
••
•
••••
••••
•••
50°C
32
••
••
65°C
95
••
SI
75°C
120
•• ••
••••
45°C
140
••
•
••
SI
SI
••
••
••
•
ELENCO DEI PROGRAMMI
SI
SI
SI
SI
SI
Descrizione
+

CONTENTS
Description of the controls
Technical data
Operating the programmes and special functions
The Watercontrol system
Programme selection
pag. 11
pag. 11
pag. 12
pag. 15
pag. 16
Congratulations!
Thank you for choosing a Candy
appliance; quality dishwashers which
guarantee high performance and
reliability.
Candy manufacture a vast range
of domestic appliances: washing
machines, washer/dryers, cookers,
microwave ovens, ovens and hobs,
refrigerators and freezers.
Ask your dealer for the catalogue with
the complete range of Candy products.
Please read this booklet carefully as
it provides important information
regarding the safe installation, use,
and maintenance of the machine,
together with some useful advice on
how to achieve the best results from
your dishwasher.
For future reference please keep this
instruction booklet in a safe place.
CUSTOMER SERVICE AND
GUARANTEE
Your new appliance is fully guaranteed
by the manufacturer for 12 months
against electrical/mechanical break-
down excluding:
A. Any faults which occur due to bad
installation or misuse of the machine.
B. Any faults which occur due to repair
of, or interference with, the machine
by any person not authorised by the
manufacturer to carry out service.
C. Any faults which occur due to
any parts which are fitted to the
machine which are not the original
manufacturers parts.
D. Any faults arising from non-domestic
use or unusual or abnormal use of
the machine.
E. Any faults arising from operation at
incorrect voltage.
F. Any faults arising from incorrect
operation of the machine.
The guarantee applies to Gt Britain
and Northern Ireland only, and is an
addition to your statutory rights.
AFTER SALES SERVICE
For service and repairs call your local engineer on our national telephone number:
GIAS Service Tel: 08705 400 600
Support Service (Eire 018301 666)
10
11
EN 50242 place load
Capacity with pans and dishes
Water supply pressure
Fuse
Power input
Supply voltage
15
9 persons
Min. 0,08 - Max 0,8 MPa
(see rating plate)
(see rating plate)
(see rating plate)
DESCRIPTION OF THE CONTROL
TECHNICAL DATA:
DIMENSIONS:
Height
Depth
Width
Depth with door open
cm
cm
cm
cm
with working top
85
60
60
120
without working top
82
57,3
59,8
117
A "ON/OFF" button
B "DELAY START" button
C Open door
D "PROGRAMS" buttons
E "HALF LOAD" button
F "SALT EMPTY" light
G "PROGRAM STATUS" LEDs/
"DELAY START" time LEDs
H "PROGRAM SELECTION" LEDs
I "OPTION SELECTION" LED
AB C D E
H I
F
G

12
PROGRAM SELECTION
AND SPECIAL FUNCTIONS
(Use in conjunction with programme guide)
Program settings
■ Open the door and place dirty dishes
inside the appliance.
■ Press the "ON/OFF" button .
■ After pressing the "ON/OFF" button.
The LED for the factory set is
"recommended” (which is ideal for full
load daily use) or the LED for the "Auto’
Memory" program (see below) will blink.
IMPORTANT
The dishwasher has two very practical
functions:
- the "recommended" program
( ) for quick and sure selection;
- the "Auto’ Memory", function which
saves a program used at least 3
times consecutively so that if you
regularly use the same washing cycle
each time you do not have to
continually set the program thereby
saving time and effort.
■ If you wish to select an option, press the
option button (the corresponding LED
will light).
The option button must be pressed
BEFORE the program starts for the
option to be accepted.
■ To choose another program, press the
corresponding button (the relevant LED
will blink to confirm the selection).
IMPORTANT
To select the "COLD RINSE" program,
simultaneously press the "RAPID"
program button and "HALF LOAD"
option button (the relevant LEDs will
blink, confirming the selection).
■ To start the program, press the selected
program button again to confirm. The
relevant LED will stop blinking and
remain on and, when the door is shut,
the program will start automatically.
IMPORTANT
To confirm the “COLD RINSE” program,
simultaneously press the “RAPID”
program button and the “HALF
LOAD” option button (the relevant
LEDs will stop blinking and remain
on to confirm the selection).
If the previously described operations
were performed with the door open, the
program will not start until the door is
closed.
Program interruption
Opening the door when a program is
running is not recommended especially
during the main washing and final hot rinse
phases. However, if the door is opened
while a program is running (for example,
to add dishes) the machine stops
automatically.
Close the door, without pressing any
buttons. The cycle will start from where it
left off (if it is necessary, the appliance
will make a short thermal anti-shock
programme before).
IMPORTANT
A running program can be interrupted
without opening the door by
pressing the "ON/OFF" button. In
this case, simply press the "ON/OFF"
button again to restart the cycle from
where it left off.
13
Changing a running program
Proceed as follows to change or cancel a
running program:
■ Hold down the current program button
(with the LED on) for at least 3 seconds.
The program LEDs (except for the
"RAPID" program LED) will blink until all
water is drained (if necessary).
The running program will be cancelled
and the corresponding LED will start to
blink.
IMPORTANT
To cancel the "COLD RINSE" program,
simultaneously hold down the
"RAPID" program button and "HALF
LOAD" option button (the relevant
LEDs will blink to confirm cancellation).
■ At this point a new program can be set.
WARNING!
Before starting a new programme,
you should check that there is still
detergent in the dispenser.
If necessary, top up the dispenser.
If there is any break in the power supply
while the dishwasher is operating, a
special memory stores the selected
programme and, when the power is
restored, it continues where it left off (if
it is necessary, the appliance will make
a short thermal anti-shock programme
before).
Program operations
When a program is running the relevant
LED will remain on and the 3 “PROGRAM
STATUS” LEDs ("WASH" , "RINSE" ,
and "DRY" ) will light singularly and in
sequence to indicate the current phase.
Program end
The “PROGRAM STATUS” LEDs will turn
off and the selected program LED (2 LEDs
for the "COLD RINSE" program) will blink
to indicate that the cycle has ended.
Dishes can now be removed and the
dishwasher turned off by pressing the
"ON/OFF" button or dishes can be loaded
for new cycle.
Option button
"HALF LOAD" button
By using this option, it is possible to wash
a smaller quantity of crockery: you should
load only the upper basket for dishes and
place cutlery in the tray in the bottom
basket.
This reduces water and energy consump-
tion and requires a smaller quantity of
detergent.
IMPORTANT
This button MUST be set BEFORE the
program starts.
"DELAY START" button
Dishwasher start time can be set with this
button, delaying the start by 3, 6 or 9 hours.
Proceed as follows to set a delayed start:
■ Press the "DELAY START" button (each
time the button is pressed the start
will be delayed by 3, 6 or 9 hours
respectively and the corresponding time
LED will light).
■ To start countdown, press the selected
program button (the relevant LED will
stop blinking and remain on, while the
set time LED will start to blink).
If a 9 hour delay is set, countdown will be
displayed by the 6h LED after 3 hours and
the 3h LED after 6 hours.

15
The water-stop device protects against water damages caused by leaks on the fill
hose which could develop due to natural ageing of the hose.
In the water-stop system the leaking water fills the corrugated hose and activates a
stop valve which cuts off the water supply to the machine.
This fault is shown by a red sector on the window «A».
Would this occur, please refer to your Service Agent.
If the hose is not long enough for correct connection, it must be replaced with a longer
one. The hose can be obtained from your Service Agent.
WATERCONTROL-SYSTEM
Red button blocked
valve indicator
Safety antitwist device
(press and twist to
remove the washer)
A
14
At the end of the last 3 hours (at the end
of countdown) the 3h LED will stop
blinking and remain on to indicate the
washing phase and the program will start
automatically.
If countdown has not ended, whereby
the program has not yet started, it is
possible to change or cancel the delayed
start and select another program or to
select/unselect the option button, proceeding
as follows:
■ Hold down the selected program button
for at least 5 seconds (the corresponding
LED will start to blink while the set time
LED will stop blinking and remain on).
■ Press the "DELAY START" button to
set another delayed start time (the
corresponding time LED will turn on) or
cancel delayed start (corresponding time
LEDs will all turn off).
■ A new program can be set after a
delayed time has been changed or
cancelled (the corresponding LED will
stop blinking and remain on) or an option
button has selected or deselected.
Fault signals
If malfunctions or faults occur when a
program is running the LED that
corresponds to the selected cycle (2 LEDs
for the "COLD RINSE" program) will blink
rapidly.
In this case, turn the dishwasher off by
pressing the "ON/OFF" button. After
checking to make sure the water intel hose
tap is open, that the drain hose is not bent
and that the siphon or filters are not
clogged, set the selected program again. If
the anomaly persists, contact Customer
Service.
IMPORTANT
This dishwasher is equipped with an
anti-overflow safety device which will
automatically empty any excess
water should a problem occur.
WARNING!
To ensure the correct operation of
the anti-overflow safety device, it is
recommended not to move or to tilt
the dishwasher during operation.
If it is necessary to move or to tilt the
dishwasher, first make sure the
washing cycle is finished and that no
water is left in the tank.

17
16
5
•
••
•
••••
••••
•••
50°C
32
••
••
65°C
95
••
YES
75°C
120
•• ••
••••
45°C
140
••
•
••
YES
••
••
••
•
YES
YES
YES
YES
Programme
PROGRAMME SELECTION
YES
Check list
Avarage
duration
in minutes
Special function
buttons
available
Detergent for soaking
(Prewash)
Detergent for washing
Clean filter
Check rinse aid
dispenser
Check salt container
Hot pre-wash
Cold pre-wash
Main wash
First cold rinse
Second cold rinse
Hot rinse with rinse aid
With cold water (15°C)
-Tolerance ± 10%-
"DELAY START" button
"HALF LOAD" button
Programme contents
Description
YES
Wash with prewash
If setting the HYGIENIC wash programme, a second dose of about 20 g of detergent
(1 table-spoon) must be added directly in the machine.
(“RECOMMENDED” PROGRAMME)
Once a day - for normal soiled pans and any
other items that have been left all day for
washing.
Once a day - for heavily soiled pans and any
other items that have been left all day for
washing.
Energy Saving Programme suitable for
normal soiled items. Using detergents with
enzyme.
Programme standardised to EN 50242.
Quick wash for dishes which are to be
washed immediately after the meal. Wash
load of 4/6 persons.
Short cold pre-wash for items that are stored
in the dishwasher until you are ready to
wash a full load.
UNIVERSAL
HYGIENIC
ECO
RAPID 32’
COLD RINSE
+

19
Couvert (EN 50242)
Capacité avec casseroles et assiettes
Pression admise pour l'installation hydraulique
Fusible
Puissance maximum absorbée
Tension
15
9 personnes
Min. 0,08 - Max 0,8 MPa
(voir plaque signalétique)
(voir plaque signalétique)
(voir plaque signalétique)
DESCRIPTION DE LA MACHINE
DONNÉES TECHNIQUES:
DIMENSIONS:
Hauteur
Profondeur
Largeur
Encombrement porte ouverte
cm
cm
cm
cm
avec plan de travail
85
60
60
120
sans plan de travail
82
57,3
59,8
117
A Touche "MARCHE/ARRÊT"
B Touche "DEPART DIFFERE"
C Ouverture porte
D Touches "PROGRAMMES"
E Touche "DEMI-CHARGE"
F Témoin de "MANQUE DE SEL"
G Voyants "PHASES DE LAVAGE"/
Voyants de "DEPART DIFFERE"
H Voyants "SÉLECTION DE PROGRAMME"
I Voyant "SÉLECTION D’OPTION"
AB C D E
H I
F
G
18
Compliments,
en ayant acheté un appareil
électroménager Candy, vous avez fait
preuve d’une très grande éxigence:
vous voulez le meilleur.
Candy est heureux de vous proposer
cette nouvelle machine, fruit d’années
de recherches et d’expériences
confirmées sur le marché. Vous avez
choisi la qualité, la fiabilité et les
prestations techniques élevées.
Candy vous propose de plus,
une gamme complète d’appareils
d’électroménagers: machines-à-laver,
lave-vaisselle, machines-à-laver
séchantes, séche-linge, four à
micro-ondes, fours et plaques de
cuisson, réfrigérateurs et congélateurs.
Demandez à votre Revendeur le
catalogue complet des produits Candy.
Nous vous prions de lire attentivement
les indications contenues dans ce
mode d’emploi. Vous y trouverez
d’importantes indications, sur la
sécurité d’installation, d’emploi, de
manutention et d’autres conseils utiles
pour le meilleur emploi du lave-vaisselle.
Conservez avec soin ce mode
d’emploi pour des consultations
futures.
GARANTIE
Cette machine est livrée avec un
certificat de garantie qui permet de
contacter gratuitement l’assistance
technique.
Veuillez garder votre ticket d’achat et
le mettre dans un endroit sûr en cas de
besoin.
INDICE
Description de la machine pag. 19
Données techniques pag. 19
Sélection des programmes
et fonctions spéciales pag. 20
Watercontrol pag. 23
Liste des programmes pag. 24

21
Modification d’un programme en
cours
Pour modifier ou annuler un programme en
cours, procédez de la manière suivante :
■ Enfoncez la touche du programme en
cours (avec le voyant éclairé fixement)
sans la lâcher pendant au moins 3
secondes. Les voyants des programmes
(sauf celui du programme "RAPIDE")
clignotent tant que le vidage (éventuellement
nécessaire) n’est pas achevé.
Le programme en cours s’annule et
le voyant correspondant commence à
clignoter.
IMPORTANT
Pour annuler le programme
"TREMPAGE" enfoncez en même
temps la touche du programme
"RAPIDE" et celle de l’option
"DEMI-CHARGE" (les voyants
correspondants clignotent pour
confirmer l’annulation).
■ Vous pouvez alors configurer un
nouveau programme.
ATTENTION!
Avant de démarrer un nouveau
programme, veuillez contrôler la
présence de lessive dans le compartiment.
Si nécessaire, remplir le compartiment.
En cas de coupure de courant pendant
un programme de lavage, une mémoire
spéciale restaure le programme
sélectionné et, lorsque le courant est
rétabli, reprend le cycle là où il s'est
arrêté (en effectuant au besoin un court
programme antichoc thermique).
Déroulement du programme
Pendant le déroulement du programme, le
voyant du cycle reste fixement éclairé et
les 3 voyants de visualisation "phases du
cycle" (correspondants à "LAVAGE" ,
"RINÇAGE" et "SÉCHAGE" ) s’éclairent
séparément et en séquence pour
indiquer la phase en cours.
Fin du programme
Les voyants de visualisation "phases du
cycle" s’éteignent et celui correspondant
au programme choisi ( 2 voyants pour le
programme "TREMPAGE") clignote pour
indiquer que le processus est achevé.
Vous pouvez alors sortir la vaisselle propre
et éteindre le lave-vaisselle en appuyant
sur la touche "MARCHE/ARRÊT" ou
effectuer un nouveau chargement pour un
nouveau cycle de lavage.
Touche option
Touche "DEMI CHARGE"
En enclenchant cette touche, il est possible
de limiter le lavage de la vaisselle contenue
dans le panier supérieur, à l'exclusion des
couverts qui seront placés dans le panier
inférieur.
Le choix de cette fonction permet de
réduire les consommations d'eau et d'énergie.
IMPORTANT
Configurez cette option AVANT de
lancer le programme.
Touche "DEPART DIFFERE"
Cette touche permet de retarder le démarrage
du cycle de lavage de 3, 6 ou 9 heures.
Pour configurer le départ différé, procédez
de la manière suivante :
■ Appuyez sur la touche "DEPART DIFFERE"
(à chaque pression correspond
respectivement la configuration retardée
de 3, 6 ou 9 heures et le voyant
correspondant au retard choisi s’éclaire
fixement).
■ Pour démarrer le décompte, appuyez
sur la touche du programme choisi (le
voyant correspondant cesse de clignoter
et reste éclairé fixement, tandis que
celui de la durée configurée cesse
d’être éclairé fixement et commence à
clignoter).
20
SELECTION DES PROGRAMMES
ET FONCTIONS SPÉCIALES
Choix des programmes
■ Ouvrez la porte et rangez la vaisselle à
laver.
■ Appuyez sur la touche "MARCHE/ARRÊT"
■ Lorsque vous enfoncez la touche
"MARCHE/ARRÊT", le voyant correspondant
au programme "conseillé" (pré-confi-
guré en usine et parfait pour l’utilisation
quotidienne à pleine charge), ou celui
correspondant à un programme utilisé
au moins 3 fois de suite, clignote.
IMPORTANT
Le lave-vaisselle dispose de deux
fonctions très utiles :
- le programme "conseillé" ( )
permettant d’effectuer une sélection
plus rapide et sûre ;
- la fonction "auto-apprentissage"
permet de proposer le programme
utilisé au moins 3 fois de suite et
procure ainsi un gain de temps en
évitant de répéter chaque fois la
même programmation.
■ Vous pouvez aussi appuyer sur la
touche Option (le voyant correspondant
s’éclaire).
Vous devez appuyer sur la touche
Option AVANT le démarrage du
programme pour que l’option soit
acceptée.
■ Pour choisir un autre programme,
appuyez sur la touche correspondant au
programme voulu (le voyant correspondant
clignote pour confirmer la sélection
effectuée).
IMPORTANT
Pour sélectionner le programme
"TREMPAGE" appuyez en même
temps sur la touche du programme
"RAPIDE" et sur celle de l’option
"DEMI-CHARGE" (les voyants corre-
spondants clignotent pour confirmer
la sélection effectuée).
■ Pour lancer le programme vous devez le
confirmer en appuyant encore sur la
touche du programme choisi.
Le voyant correspondant cesse de
clignoter et s’éclaire fixement et, la
porte étant fermée, le programme
démarre automatiquement.
IMPORTANT
Pour confirmer le programme
"TREMPAGE" appuyez en même
temps sur la touche du programme
"RAPIDE" et sur celle de l’option
"DEMI-CHARGE" (les voyants
correspondants cessent de clignoter
et s’éclairent fixement pour
confirmer la sélection effectuée).
Si vous effectuez les opérations qui
précèdent avec la porte ouverte, le
programme ne démarrera pas tant que
vous ne fermerez pas la porte.
Interruption du programme
Nous vous déconseillons d’ouvrir la porte
pendant l’exécution du programme, surtout
pendant la phase centrale du lavage et
celle du rinçage chaud final.
Cependant, si vous ouvrez la porte lorsque
le programme est en cours (par exemple
pour ajouter de la vaisselle), la machine
s’arrête automatiquement.
Lorsque vous refermez la porte, le cycle
repart de l’endroit où il s’était interrompu
(en effectuant au besoin un court programme
antichoc thermique) sans devoir appuyer
sur une touche.
IMPORTANT
Vous pouvez interrompre le programme
en cours même sans ouvrir la
porte, en appuyant sur la touche
"MARCHE/ARRÊT". Dans ce cas,
pour que le cycle redémarre de
l’endroit où il s’est interrompu, il
suffit d’appuyer à nouveau sur la
touche "MARCHE/ARRÊT".
.

Le tuyau d’alimentation, doublé d’une gaine, est équipé d’un dispositif de blocage de
l’eau.
Dans le cas où le tuyau se détériorerait (usure naturelle ou surpression), l’eau
s’écoulerait dans la gaine et actionnerait le dispositif de blocage de l’eau directement
au robinet.
Cet incident serait alors signalé par un témoin rouge situé dans la petite fenêtre “A”.
Dans ce cas, fermez le robinet d’eau et changez le tuyau.
Si le tuyau n’est pas assez long pour permettre un branchement correct, il doit être
remplacé par un tuyau plus long. Le tuyau peut être fourni par votre service
après-vente.
WATERCONTROL - DISPOSITIF DE BLOCAGE DE L’EAU
Témoin
de valve bloquée
Dispositif
antidévissage
(appuyer pour
devisser l’embout)
A
23
22
Si vous configurez un départ différé de 9
heures, le décompte du temps est signalé par
les voyants 6h et 3h qui s’éclaire et qui
indiquera le temps restant.
Au terme des 3 dernières heures (à la fin du
décompte) le voyant 3h cesse de clignoter et
s’éclaire fixement pour signaler que la phase
de lavage et le programme se déclencheront
automatiquement.
Si le décompte n’est pas achevé et que le
programme n’est donc pas encore parti,
vous pouvez modifier ou annuler le départ
différé, choisir un autre programme ou
sélectionner/désélectionner la touche
Option, en procédant de la manière suivante:
■ Appuyez pendant au moins 5 secondes
sur la touche du programme choisi
(le voyant correspondant cesse d’être
éclairé fixement et commence à
clignoter, tandis que celui de la durée
configurée cesse de clignoter et
s’éclaire fixement).
■ Appuyez sur la touche "DEPART
DIFFERE", pour configurer un autre
horaire de départ retardé (le voyant
correspondant au temps choisi s’éclaire
fixement) ou pour annuler complètement le
retard retardé (les voyants correspondants
s’éteignent).
■ Lorsque vous avez modifié ou annulé le
départ différé, vous pouvez configurer
un nouveau programme (le voyant
correspondant cesse de clignoter et
s’éclaire fixement) et vous pouvez
sélectionner ou désélectionner la touche
Option.
Signalisation des anomalies
Si un dysfonctionnement ou une anomalie
se manifeste pendant le déroulement d’un
programme, le voyant correspondant au
cycle choisi (2 voyants pour le programme
"TREMPAGE") clignote très rapidement.
Dans ce cas, éteignez le lave-vaisselle
en appuyant sur la touche
"MARCHE/ARRÊT". Contrôlez si le robinet
d’eau est ouvert, si le tuyau de vidange
n’est pas plié, si le siphon et les filtres ne
sont pas colmatés et configurez à nouveau
le programme choisi.
Si l’anomalie se répète, adressez-vous au
Service Après-Vente.
IMPORTANT
Ce lave-vaisselle est équipé d’un
système de sécurité anti-déborde-
ment qui, en cas de problème, videra
automatiquement tout excès d’eau.
ATTENTION!
Pour éviter le déclenchement
intempestif du dispositif de sécurité
anti-débordement, il est recommandé
de ne pas remuer ou incliner le
lave-vaisselle pendant son
fonctionnement.
Au cas où il serait nécessaire de
remuer ou d’incliner le lave-vaisselle,
s’assurer d’abord que le cycle de
lavage est terminé et qu’il n’y a plus
d’eau dans la cuve.

25
24
UNIVERSEL
INTENSIF
ECO
RAPIDE 32’
TREMPAGE
(PROGRAMME “CONSEILLÉ”)
Destiné au lavage de la vaisselle et casseroles
normalement sale.
Conçu pour le lavage des casseroles et de
toute autre vaisselle particulièrement sale.
Adapté au lavage de vaisselle et casseroles
normalement sales, avec utilisation de
lessive à base d’enzyme.
Programme normalisé EN 50242.
Cycle trés rapide à effectuer à la fin du repas.
Recommandé pour un lavage de vaisselle
jusqu'à 4/6 personnes.
Pour la vaisselle utilisée le matin ou à midi,
entreposée dans le lave-vaisselle jusqu'à ce
que vous soyez prêt à laver une charge pleine.
5
•
••
••••
•••
50°C
32
••
65°C
95
••
••••
45°C
140
••
•
••
OUI
••
••
•
•
••••
••
75°C
120
•• ••
••
OUI
OUI
OUI
OUI
OUI
OUI
OUI
Programme
LISTE DES PROGRAMMES
Opérations à accomplir Déroulement du programme
Durée
moyenne
en
minutes
Fonctions
facultatives
Lessive prélavage
Lessive lavage
Nettoyage plaque,
filtre
Contrôle provision
du produit de rinçage
Contrôle provision
Sel
Prélavage chaud
Prélavage froid
Lavage
Premier rinçage
à
froid
Second rinçage
à
froid
Rinçage chaud avec-
produit de rinçage
Avec eau froide (15°C)
(Tolerance ±10%)
Touche
“DEPART DIFFERE”
Touche
“DEMI CHARGE”
Lavage précédé d'un prélavage
Dans le cas où l'on utilise le programme INTENSIF il faut également mettre une dose de détergent,
20 grammes (1 cuillère à soupe) directement dans le lave-vaisselle.
+
Description

27
Capacidade seg-norma EN 50242
Capacidade c/ tachos e pratos
Pressão admitida na instalação hidráulica
Fusível
Potência máxima absorvida
Tensão
15 pessoas
9 pessoas
Min. 0,08 - Max 0,8 MPa
(ver placa de características)
(ver placa de características)
(ver placa de características)
A Tecla “LIGAR/DESLIGAR”
B Tecla “INÍCIO DE FUNCIONAMENTO
RETARDADO”
C Dispositivo de abertura da porta
D Teclas “PROGRAMAS”
E Tecla “MEIA CARGA”
F Indicador luminoso “FALTA DE SAL”
G Indicadores luminosos
“FASES DO PROGRAMA”/
Indicadores luminosos “INÍCIO DE
FUNCIONAMENTO RETARDADO”
H Indicadores luminosos “PROGRAMA
SELECCIONADO”
I Indicador luminoso “OPÇÃO
SELECCIONADA”
Altura
Profundidade
Largura
Profundidade com a porta aberta
cm
cm
cm
cm
com bancada
85
60
60
120
DESCRIÇÃO DOS COMANDOS
DADOS TÉCNICOS :
sem bancada
82
57,3
59,8
117
DIMENSÕES :
AB C D E
H I
F
G
26
Parabéns,
Ao comprar este electrodoméstico Candy,
você mostrou ser uma pessoa exigente,
que só se satisfaz com o melhor.
A Candy oferece-lhe esta nova máquina
de lavar, fruto de anos de investigação e
de experiência de mercado, graças ao
contacto directo com os Consumidores.
Você escolheu a qualidade, a durabilidade
e as grandes vantagens que lhe pode
oferecer esta máquina de lavar loiça.
A Candy propõe-lhe também uma vasta
gama de electrodomésticos: máquinas de
lavar roupa, máquinas de lavar e de secar
roupa, máquinas de lavar loiça, fornos
micro-ondas, fornos e placas eléctricos,
fogões, frigoríficos e arcas congeladoras.
Peça ao seu agente da especialidade o
catálogo dos electrodomésticos Candy em
que esti-ver eventualmente interessada.
Pedimos-lhe que leia atentamente as
instruções contidas neste manual, pois
proporcionar-lhe-ão indicações importantes
relacionadas com a segurança da
instalação, a utilização, a manutenção,
assim como certos conselhos úteis para
uma melhor utilização das máquinas de
lavar loiça.
Conserve este manual para o consultar
sempre que tiver necessidade.
GARANTIA
Esta máquina vem acompanhada por um
certificado de garantia com as informações
necessárias sobre o Serviço de
Assistência Técnica.
Aconselhamos que guarde esse certifica-
do. Deverá ser guardado num local seguro
e apresentado ao profissional do Serviço
de Assistência Técnica, quando algum ser-
viço for solicitado.
INDICE
Descrição dos comandos pág. 27
Dados técnicos pág. 27
Selecção do programa
e funções especiais pág. 28
Watercontrol pág. 31
Tabela dos programas pág. 32

29
Mudar um programa que já
começou
Proceda da seguinte forma para alterar ou
cancelar um programa já em decurso:
■ Mantenha pressionada a tecla do progama
(com o indicador luminoso aceso) pelo
menos durante 3 segundos.
Os indicadores luminosos dos programas
(excepto para o indicador luminoso do
programa "RÁPIDO") piscarão até o
escuamento da água terminar (se
necessário). O programa em decurso
será cancelado e o indicador luminoso
correspondente começará a piscar.
IMPORTANTE
Para cancelar o programa
"ENXAGUAMENTO A FRIO", mantenha
pressionadas simultaneamente a
tecla do programa "RÁPIDO" e a
tecla de "MEIACARGA" (os indicadores
luminosos piscarão para confirmar o
cancelamento).
■ Um novo programa pode ser seleccionado.
ATENÇÃO!
Antes de iniciar um novo programa,
deve verificar se ainda há detergente
no reservatório. Se necessário,
encha novamente o reservatório.
Se existir uma quebra de energia
enquanto a máquina está a lavar, uma
memória especial memoriza o programa
seleccionado e, quando a energia é
reposta, a lavagem continua a partir
do ponto em que parou (caso seja
necessário, a máquina de lavar loiça
executará primeiro um pequeno
programa térmico anti-choque).
Fases do programa
Quando um programa está a decorrer o
respectivo indicador luminoso mantem-se
aceso e os 3 indicadores luminosos das
“fases do programa” ("LAVAGEM" ,
"ENXAGUAMENTO" e "SECAGEM" )
acendem-se um a um e em sequência
indicando a fase do programa que está a
ser efectuada.
Fim de programa
Os indicadores luminosos das “fases do
programa” apagam-se e o indicador
luminoso do programa seleccionado
(2 indicadores luminosos para o programa
"ENXAGUAMENTO A FRIO") piscará,
indicando que o programa chegou ao fim.
A loiça pode ser removida e a máquina de
lavar loiça desligada, pressionando a tecla
de "LIGAR/DESLIGAR".
Tecla de opção
Tecla "MEIA CARGA"
Se se premir esta tecla, pode-se optar pela
lavagem de uma quantidade reduzida de
loiça, concentrando toda a loiça a lavar no
tabuleiro supeiror, à excepção dos
talheres, que deverão ser colocados no
cesto existente para esse efeito, colocado
no tabuleiro inferior da máquina.
A selecção desta função permite reduzir o
consumo de água e de energia.
Colocar uma quantidade de detergente
inferior à normalmente doseada para a
lavagem normal.
IMPORTANTE
Esta tecla DEVE ser seleccionada
ANTES do programa começar.
Tecla de "INÍCIO DE
FUNCIONAMENTO RETARDADO"
A hora de início de lavagem pode ser
determinada, adiando o início do programa
3, 6 ou 9 horas.
Proceda da seguinte forma, para adiar o
início do programa:
■ Pressione a tecla de "INÍCIO
DE FUNCIONAMENTO RETARDADO"
(cada vez que o botão é pressionado
o início é adiado 3, 6 ou 9 horas,
respectivamente, e o indicador luminoso
correspondente acender-se-à).
■ Para iniciar a contagem do tempo,
pressione a tecla do programa
que deseja seleccionar (o indicador
luminoso correspondente parará de
piscar mantendo-se aceso, enquanto
que o indicador luminoso do tempo
selecccionado começará a piscar).
28
SELECÇÃO DO PROGRAMA
E FUNÇÕES ESPECIAIS
Selecção de programas
■ Abra a porta e coloque a loiça suja no
interior da máquina.
■ Pressione a tecla "LIGAR/DESLIGAR" .
■ Depois de pressionar a tecla
"LIGAR/DESLIGAR", o indicador
luminoso do programa “recomendado”
(ideal para carga completa, de uso
diário) ou o indicador luminoso do
programa utilizado nas últimas 3
lavagens, começa a piscar.
IMPORTANTE
A máquina de lavar loiça tem duas
funções muito práticas:
- o programa "recomendado" ( )
para uma rápida e segura selecção;
- a função “auto-ajuda”, que memoriza
o programa utilizado nas 3 últimas
lavagens, indicando-o como programa
recomendado na próxima lavagem.
Uma função que lhe poupará muito
tempo, caso utilize regularmente o
mesmo programa de lavagem.
■ Se desejar seleccionar a opção, pressione
a tecla da opção (o indicador luminoso
correspondente acender-se-à).
A tecla da opção deve ser pressiona-
da ANTES do programa começar para
que a opção seja assumida.
■ Para escolher outro programa, pressione
a tecla correspondente (o indicador
luminoso da tecla piscará para que seja
confirmada a selecção).
IMPORTANTE
Para seleccionar o programa
"ENXAGUAMENTO A FRIO", pressione,
simultaneamente, a tecla do programa
“RÁPIDO” e a tecla de "MEIA
CARGA" (os indicadores luminosos
piscarão para que seja confirmada a
selecção).
■ Para iniciar o ciclo de lavagem,
confirme o programa seleccionado,
pressionando novamente a tecla do
programa escolhido.
O indicador luminoso pará de piscar
mantendo-se aceso e, se a porta
estiver fechada, o programa começa
automaticamente.
IMPORTANTE
Para confirmar o programa
“ENXAGUAMENTO A FRIO”, pressione
simultaneamente a tecla do programa
“RÁPIDO” e a tecla de “MEIA
CARGA” (os indicadores luminosos
pararão de piscar mantendo-se
aceso).
Se as operações, anteriormente,
descritas forem executadas com a porta
aberta, o programa só começará
quando a porta for fechada.
Interrupção do programa
Não é recomendado abrir a porta da
máquina enquanto um programa está a
decorrer, especialmente durante a fase de
lavagem principal e o enxaguamento final
a quente. Contudo, se a porta for aberta
durante o decorrer de um programa
(por exemplo, para colocar mais loiça) a
máquina pára automaticamente.
Feche a porta, sem pressionar nenhuma
tecla. O ciclo recomeçará onde parou
(caso seja necessário, a máquina de lavar
loiça executará primeiro um pequeno
programa térmico anti-choque).
IMPORTANTE
Um programa pode ser interrompido sem
que a porta seja aberta, pressionando a
tecla "LIGAR/DESLIGAR".
Neste caso, basta pressionar a tecla
"LIGAR/DESLIGAR" para recomeçar o
ciclo de lavagem a partir do ponto em que
parou.

31
Amangueira de admissão de água está equipada com um dispositivo de protecção
(válvula) que bloqueia a passagam da água se a mangueira de admissão de água
se danificar. Se este dispositivo for activado poder-se-á ver um pino vermelho
através do visor A. Nesse caso a mangueira de admissão de água deverá ser
obrigatoriamente substituída.
Se a mangueira não tiver o comprimento necessário para uma correcta ligação, terá
que ser substituida por uma mais comprida. Esta mangueira por ser adquirida num
agente mais próximo.
“WATERCONTROL” - DISPOSITIVO DE BLOQUEIA DA ÁGUA
Pino vermelho
à vista (no visor):
válvula de bloqueio
da passagem da
água activada.
Dispositivo de
segurança
anti-torção (carregue
e torça para remover
a mangueira).
A
30
Se o início de lavagem foi adiado 9 horas,
passadas 3 horas acender-se-à o indicador
luminoso das 6h e passadas 6 horas
acender-se-à o indicador luminoso das 3h.
No final das últimas 3 horas (ou seja, no final
da contagem) o indicador luminoso das 3h
parará de piscar e manter-se-à aceso
indicando que o programa irá começar
automaticamente.
Se a contagem ainda não tiver terminado, ou
seja, se o programa ainda não começou, é
possível alterar ou cancelar o início de
funcionamento retardado e seleccionar outro
programa ou seleccionar/cancelar esta
opção, procedendo da seguinte forma:
■ Mantenha pressionada a tecla do
programa seleccionado pelo menos
5 segundos (o indicador luminoso
correspondente começará a piscar,
enquanto que o indicador luminoso do
tempo seleccionado parará de piscar,
mantendo-se aceso).
■ Pressione a tecla de "INÍCIO
DE FUNCIONAMENTO RETARDADO"
para seleccionar outro tempo de início
de funcionamento retardado (o indicador
luminoso correspondente acender-se-à)
ou cancelar o início de funcionamento
retardado (o indicador luminoso
correspondente desligar-se-à).
■ Um novo programa pode ser seleccionado,
após a alteração ou cancelamento do
início de funcionamento retardado
(o indicador luminoso parará de piscar
mantendo-se aceso), ou uma tecla de
opção pode ser seleccionada ou
cancelada.
Falha
Se ocorrer alguma anomalia durante o
decurso do programa, o indicador luminoso
correspondente ao programa seleccionado
(2 indicadores luminosos para o programa
"ENXAGUAMANTO A FRIO") piscará
rapidamente. Neste caso, desligue a
máquina de lavar loiça pressionando tecla
de "LIGAR/DESLIGAR". Após verificar se
a torneira da água está aberta, que a
mangueira de escoamento está bem
instalada e o filtro não está bloqueado,
seleccione o progama novamente. Se a
anomalia persistir, contacte os nossos
Serviços de Assistência Técnica.
IMPORTANTE
Esta máquina de lavar loiça está
equipada com um sistema de
segurança anti-inundação, que
bloqueia automáticamente qualquer
excesso de água, no caso de ocorrer
algum problema.
ATENÇÃO!
A fim de evitar que o dispositivo de
segurança contra inundações seja
inoportunamente activado, recomenda-
se que a máquina não seja deslocada
ou inclinada enquanto estiver a fun-
cionar.
Se for absolutamente necessário
deslocar ou inclinar a máquina
enquanto esta estiver a funcionar,
assegure-se primeiro de que o ciclo
de lavagem já terminou e que não há
água na cuba da máquina.

33
5
•
••
••••
•••
50°C
32
••
65°C
95
••
••••
45°C
140
••
•
••
SIM
••
••
•
•
••••
••
75°C
120
•• ••
••
Desenvolvimento do programa
Duração
média em
minutos
Funções
especiais
Detergente
pré-lavagem
Detergente
lavagem
Limpeza do filtro
e placa
Controlo do nível
de abrilhantador
Controlo do nível
de sal
Pré-lavagem
a quente
Pré-lavagem
a frio
Lavagem
Primero
enxaguamento a frio
Segundo
enxaguamento a frio
Enxaguamento a
quente com abrilhantador
Com água fría (15°C)
-Tolerância ± 10%-
Tecla "INÍCIO DE
FUNCIONAMENTO
RETARDADO"
Tecla “MEIA CARGA”
Operações a realizar
SIM
SIM
SIM
SIM
SIM
SIM
SIM
32
UNIVERSAL
INTENSIVO
ECO-BIO
RÁPIDO 32’
ENXAGUAMENTO
A FRIO
(PROGRAMA “RECOMENDADO”)
Adequado para lavar a loiça e tachos
com sujidade normal.
Apto para lavar a loiça e tachos muito
sujos.
Adequado para lavar a loiça e tachos
com sujidade normal, utilizando um
detergente com enzimas.
Programa segundo normas EN 50242.
Ciclo super-rápido que se efectua no final
da refeição, indicado para cargas
pequenas (4/6 pessoas).
Pré-lavagem rápida para a loiça usada
pela manhã ou pelo almoço, quando se
quer realizar apenas uma lavagem
depois do jantar.
Lavagem com pré-lavagem
Se escolher o programa de lavagem INTENSIVO há que acrescentar uma quantidade adicional
de detergente (20 g) directamente na cuba da máquina.
Programa
TABELA DOS PROGRAMAS
Descrição
+

34
Herzlichen Glückwunsch!
Sie haben eine ausgezeichnete Wahl getroffen!
Denn die Candy-Haushaltsgeräte zählen
zu den Spitzenprodukten europäischer
Haushaltsgeräte-Technologie.
Unsere Produkte sind kompromißlose
Spitzengeräte für Kunden, die sich nur mit dem
Besten zufriedengeben.
Es erfüllt uns deshalb mit großer Freude, daß wir
Ihnen diese neuartige Geschirrspülmaschine
präsentieren können: sie ist das Ergebnis
jahrelanger Forschung in unseren
Versuchslaboratorien, aber nicht nur das: hier
haben wir auch unsere gediegenen
Marktkenntnisse und, nicht zuletzt, die Früchte
unserer intensiven Kundenbetreuung einbringen
können. Sie haben ein Gerät von hervorragender
Qualität und langer Lebensdauer gekauft,
dessen Spülergebnisse Sie in jeder Hinsicht
überzeugen werden.
Die Candy-Produktpalette umfaßt den gesamten
Haushaltsgerä-tebereich - und alles in der
hochwertigen Candy-Qualität: Wasch-automaten,
Geschirrspülmaschinen, Wäschetrockner, Gas-
und Elektro-Herde in allen Ausstattungsniveaus,
Kühlschränke und Gefriergeräte.
Eine Bitte: Lesen Sie diese Broschüre mit größ-
ter Aufmerksamkeit, denn sie enthält nicht allein
Hinweise auf Sicherheitsvorkehrungen bei
Installation, Gebrauch und Instandhaltung,
sondern auch einige wichtige Hinweise für den
alltäglichen Umgang mit dem Gerät. Bewahren
Sie deshalb dieses Heft bitte sorgfältig auf.
GARANTIE FÜR DIE
BUNDESREPUBLIK
DEUTSCHLAND
Wir danken Ihnen und freuen uns, das Sie
ein Qualitätserzeugnis der Firma Candy
erworben haben.Ihr Gerät wurde mit der
gewohnten Sorgfalt hergestellt. Sollten Sie
dennoch einen berechtigten Grund zur
Beanstandung haben, bitten wir Sie sich an den
nächstgelegenen Candy Kundendienst unter
der Rufnummer 01805 / 62 55 62 zu wenden.
Zur Überprüfung der Voraussetzungen für
unser Tätigwerden bitten wir Sie dem
Kundendienstpersonal diese Garantiebedingungen
und den Kaufbeleg vorzulegen.
Diese Candy - Garantie leisten wir zusätzlich zu
Ihren gesetzlichen Rechten gegenüber dem
Händler aus dem Kaufvertrag.
Dem Käufer (Verbraucher), der das Gerät
erstmals in Betrieb nimmt, leisten wir ab dem
Zeitpunkt der Übergabe für die Dauer von 24
Monaten Garantie, in dem in diesem
Garantiebedingungen aufgeführten Umfange.
Voraussetzung ist jedoch, daß das Gerät in
Deutschland gekauft wurde und außerdem
diese Garantiebedingungen zusammen mit
dem Kaufbeleg vorgelegt werden.
Bei gewerblicher Nutzung beträgt die
Garantiedauer 12 Monate.
Wird das in Deutschland gekaufte Gerät
ins Ausland verbracht, gelten diese
Garantiebedingungen auch, sofern im
betroffenen Land ein von uns autorisiertes
Kundendienstnetz besteht und das Gerät
die dort technischen Voraussetzungen (z.B
Spannung, Frequenz usw.) erfüllt.
Im Rahmen der Garantie werden wir alle
Mängel, die auf Material- oder Fertigungsfehler
beruhen, beheben. Den Nachweis, daß ein
Material- oder Fertigungsfehler nicht vorliegt,
hat gegebenenfalls Candy zu erbringen.
Ausgeschlossen von der Garantie sind Schäden
oder Mängel aus nicht vorschriftsmäßigem
Anschluß, unsachgemäßer Handhabung,
Verschleiß sowie Nichtbeachtung der
Einbauvorschriften und Bedienungsanweisungen.
Für Folgeschäden übernehmen wir keine
Haftung.
Durch eine Garantieleistung wird die
Garantiefrist nicht erneuert bzw. verlängert.
Die Garantie erlischt, wenn Reparaturen oder
Eingriffe durch Personen, die nicht zu unserer
Kundendienstorganisation gehören, vorgenommen
werden. Das Gleiche gilt, wenn das
Typenschild, bzw. die Gerätenummer entfernt
oder unleserlich gemacht wurde, oder wenn
Teile fremder Herkunft eingebaut werden.
Die Garantieleistungen werden ohne jede
Berechnung durchgeführt.
INHALTSVERZEICHNIS
Beschreibung der
Bedienelemente Seite 35
Technische Daten Seite 35
Programmwahl und
Sonderfunktionen Seite 36
Watercontrol Seite 39
Liste der Programme Seite 40
35
Fassungsvermögen (EN 50242)
Ventildruck der Hydraulikanlage
Absicherung
Gesamtanschlußwert
Spannung
15 Maßgedecke
Min. 0,08 MPa – Max 0,8 MPa
(S. Matrikelschild)
(S. Matrikelschild)
(S. Matrikelschild)
Höhe
Tiefe
Breite
Tiefe bei geöffneter Tür
cm
cm
cm
cm
mit Arbeitsplatte
85
60
60
120
BESCHREIBUNG DER BEDIENELEMENTE
TECHNISCHE DATEN :
ohne Arbeitsplatte
82
57,3
59,8
117
ABMESSUNGEN :
A Taste "START/STOP"
B Taste "STARTVERZÖGERUNG"
C Tür öffnen
D Tasten "PROGRAMME"
E Taste "SPARSPÜLPROGRAMM"
F Leuchte "SALZ EINFÜLLEN"
G LED "PROGRAMMABLAUF"/
Zeit "STARTVERZÖGERUNG"
H LED "PROGRAMMWAHL"
I LED "OPTIONSWAHL"
AB C D E
H I
F
G

36
PROGRAMMWAHL UND
SONDERFUNKTIONEN
Programm einstellen
■ Öffnen Sie dir Tür und ordnen Sie das
Geschirr ein.
■ Drücken Sie die Taste "START/STOP" .
■ Nachdem die Taste "START/STOP"
gedruckt wurde, blinkt das LED auf, das
dem werksseitig empfohlenen Programm
entspricht (werksseitig voreingestellt ist
das Universal-Programm, ideal für den
täglichen Gebrauch bei voller Ladung),
bzw. das LED des Programmes, das
mindestens 3 Mal hintereinander
benutzt wurde.
WICHTIG
Ihr Geschirrspüler verfügt über zwei
äußerst nützliche Sonderfunktionen:
- Die Funktion “empfohlenes”
Programm ( ) um Ihnen eine
leichtere und sicherere
Programmwahl zu ermöglichen;
- Die Funktion „Automatische
Speicherung“ , bei der das
Programm gespeichert und wieder
empfohlen wird, das mindestens drei
Mal hintereinader benutzt wurde.
Wenn Sie vorwiegend das selbe
Programm verwenden, müssen Sie
es nicht mehr jedes Mal neu einstel-
len und sparen dadurch Zeit.
■ Falls erwünscht, drücken Sie die
Optionstaste (das entsprechende LED
wird aufleuchten).
Die Optionstaste muss VOR dem
Programmstart gedrückt werden,
damit die gewählte Option
durchgeführt wird.
■Falls Sie ein anderes Programm wählen
möchten, drücken Sie die Taste, die dem
gewünschten Programm entspricht. Die
entsprechende LED-Leuchte fängt an zu
blinken, um die Einstellujng zu bestätigen.
WICHTIG
Um das Programm “VORSPÜLEN”
einzustellen, müssen Sie die Taste
für das Programm “RAPID” und
die Option “SPARPÜLPROGRAMM”
gleichzeitig drücken.
Die entsprechenden LED-Anzeigen
leuchten auf, um die Programmwahl
zu bestätigen.
■ Um das Programm zu starten, muss das
gewählte Programm durch erneutes
Drücken der Programmtaste bestätigt
werden.
Die entsprechende LED-Anzeige hört
auf zu blinken und bleibt eingeschaltet,
und das Programm startet automatisch,
sobald die Tür geschlossen wird.
WICHTIG
Um das Programm “VORSPÜLEN” zu
bestätigen, drücken Sie die Taste für
das Programm “RAPID” und
die Option “SPARPÜLPROGRAMM”
gleichzeitig drücken .
Die entsprechenden LED-Anzeigen
hören auf zu blinken und bleiben
eingeschaltet, um die Programmwahl
zu bestätigen.
Alle beschriebenen Vorgänge
funktionieren nur bei geschlossener
Tür.
Programm unterbrechen
Wir empfehlen, die Tür während des
Programmablaufs, besonders in der
zentralen Waschphase und beim letzten
warmen Spülgang, nicht zu öffnen. Sollte
das Gerät nach Programmstart jedoch
geöffnet werden (z.B., um Geschirr
hinzuzufügen), wird das Programm
automatisch unterbrochen.
Beim Schließen der Tür, und ohne
irgendeine Taste drücken zu müssen,
läuft das Programm weiter ab dem Punkt,
an dem es unterbrochen wurde (falls nötig,
führt das Gerät zuerst ein kurzes
Anti-Thermoschock-Programm durch).
WICHTIG
Sie können das laufende Programm
auch unterbrechen, ohne die Tür zu
öffnen. Drücken Sie hierfür die
"START/STOP" Taste.
Um das Programm wieder ab dem
gleichen Punkt weiter laufen zu
lassen, brauchen Sie nur die
"START/STOP" Taste erneut zu
drücken.
37
Laufendes Programm ändern
Möchten Sie das laufende Programm
löschen oder ändern, gehen Sie wie folgt vor:
■ Halten Sie die Taste des laufenden
Programms mindestens 3 Sekunden
gedrückt (LED bleibt eingeschaltet). Alle
Programm-LED-Anzeigen (bis auf das LED
für das Programm "RAPID") blinken
solange, bis das Gerät das eventuell
nötige Abpumpen beendet hat. Das
laufende Programm wird gelöscht und
die entsprechende LED-Anzeige fängt
an zu blinken.
WICHTIG
Um das Programm “VORSPÜLEN” zu
löschen, drücken Sie die Taste für
das Programm “RAPID” und
die Option “SPARPÜLPROGRAMM”
gleichzeitig drücken .
Die entsprechenden LED-Anzeigen
fangen an zu blinken, um die
Löschung zu bestätigen.
■ Jetzt können Sie ein neues Programm
wählen.
ACHTUNG!
Bevor Sie ein neues Programm
starten, versichern Sie sich, dass das
Spülmittel nicht bereits eingespült
wurde und füllen ggf. neues
Spülmittel ein.
Im Falle eines Stromausfalls behält der
Geschirrspüler das laufende Programm
gespeichert und fängt dann wieder dort
an zu arbeiten, wo es unterbrochen
wurde, sobald der Strom wieder da ist
(falls nötig, führt das Gerät zuerst ein
kurzes Anti-Thermoschock-Programm
durch).
Programmblauf
Während des Programmablaufs bleibt die
LED-Anzeige des gewählten Programmes
stets eingeschaltet und die 3 LED
der “Programmphasen” (“WASCHEN” ,
“SPÜLEN” und “TROCKNEN” ) leuchten
nacheinander einzeln auf, um den
Programmablauf anzuzeigen.
Programmende
Das Erlöschen der LED-Anzeigen der
“Programmphasen” und das Aufblinken der
LED-Anzeige des gewählten Programmes
(bzw. 2 LED für das Programm
“VORSPÜLEN”) zeigen an, dass das
Programm beendet ist.
Sie können nun das saubere Geschirr
aus dem Gerät entnehmen und das Gerät
durch Drücken der Taste "START/STOP"
ausschalten, oder Geschirr einräumen und
ein neues Spülprogramm einstellen.
Optionstaste
Taste "SPARSPÜLPROGRAMM"
Wenn wenig Geschirr gespült werden soll,
können Sie durch Drücken dieser Taste die
Funktion nur Oberkorbspülen wählen.
Das Geschirr wird hierzu nur in den
Oberkorb geladen, während das Besteck
wie üblich im Besteckkorb im unteren Korb
eingeordnet wird. Das Sparprogramm 1/2
ermöglicht eine Reduzierung der Wasser-und
Stromverbrauchswerte.
Setzen Sie entsprechend weniger
Spülmittel ein.
WICHTIG
Die Option ist VOR dem
Programmstart einzustellen.
Taste “STARTVERZÖGERUNG”
Durch Drücken dieser Taste können Sie
den Programmstart mit einer
Zeitverzögerung von 3, 6 oder 9 Stunden
programmieren.
Um die Startverzögerung einzustellen,
gehen Sie wie folgt vor:
■ Drücken Sie die Taste
"STARTVERZÖGERUNG" (bei jedem
Drücken können Sie jeweils 3, 6, oder 9
Stunden einstellen).
Die LED-Anzeige der gewählten
Verzögerungszeit leuchtet auf.
■ Um den “Countdown” zu starten,
drücken Sie die Taste des gewählten
Programms (die entsprechende
LED-Anzeige hört auf zu blinken und
bleibt an, während die LED-Anzeige der
eingestellten Zeit von fest leuchtend auf
blinkend umschaltet).

38
Bei einer eingestellten Zeitverzögerung von 9
Stunden wird die verbleibende Zeit zum
Programmstart durch Aufleuchten der
LED-Anzeige 6h nach 3 Stunden, sowie der
LED-Anzeige 3h nach 6 Stunden.
Nach Ablauf der letzten 3 Stunden (d.h. am
Ende des Countdown) schaltet die
LED-Anzeige 3h von fest leuchtend auf
blinkend um, und das Programm startet
automatisch.
Falls der Countdown noch nicht abgelaufen
ist und das Programm noch nicht gestartet
wurde, können Sie die Zeitverzögerung
ändern oder ganz löschen, ein neues
Programm wählen oder die Optionstaste
wählen oder die Optionswahl rückgängig
machen. Gehen Sie wie folgt vor:
■ Halten Sie die Taste es gewählten
Programmes mindestes 5 Sekunden
lang gedrückt (die entsprechende
LED-Anzeige schaltet von fest leuchtend
auf blinkend um, während die
LED-Anzeige für die Zeitverzögerung
von blinkend auf fest leuchtend
umschaltet).
■ Drücken Sie die Taste
"STARTVERZÖGERUNG", um eine
andere Zeitverzögerung einzustellen
(die entsprechende LED-Anzeige
leuchtet auf), oder um die
Startverzögerung ganz zu löschen (die
LED erlöschen in diesem Fall).
■ Nachdem Sie die Startverzögerung
geändert oder gelöscht haben, können
Sie ein neues Programm wählen (die
entsprechende LED-Anzeige schaltet
von blinkend auf fest leuchtend um) und
die Optionstaste einstellen oder wieder
entfernen.
Störungsanzeige
Falls während des Programmablaufs eine
Störung oder eine Fehlfunktion auftreten
sollten, beginnt die LED-Anzeige des
gewählten Programms (bzw. 2 LEDs für
das Programm “VORSPÜLEN”) sehr
schnell zu blinken.
In diesem Fall schalten Sie das Gerät
durch Drücken der "START/STOP" Taste
ab. Stellen Sie sicher, dass der
Wasserabsperrhahn geöffnet ist, dass
der Ablaufschlauch nicht geknickt oder
eingeklemmt ist, dass der Abfluss und die
Filter nicht verstopft sind, und stellen Sie
das Programm neu ein. Sollte die Störung
wieder auftreten, rufen Sie den
Kundendienst.
WICHTIG
Dieser Geschirrspüler ist mit einem
Überlaufschutz ausgestattet. Durch
dieses Sicherheitssystem wird im
Falle eines Defektes das überschüs-
sige Wasser abgepumpt.
ACHTUNG!
Um ein ungewolltes Auslösen dieses
Sicherheitsventils zu verhindern,
sollte der Geschirrspüler während
seines Betriebs nicht bewegt oder
geneigt werden.
Falls Sie einmal das Gerät verrücken
müssen, achten Sie darauf, daß es
außer Betrieb ist und in der
Bodenwanne kein Wasser steht.
Der Wasserzulaufschlauch ist mit einem Wasserstop-System ausgestattet. Sollte der
Innenschlauch durch natürliche Alterung schadhaft werden, so blockiert das System
die Wasserzufuhr zum Geråt. Die Störung wird durch das Erscheinen einer roten
Markierung im Fensterchen «A» angezeigt. In diesem Fall muß der Wasserhahn
geschlossen und der Schlauch ersetzt werden.
Sollte die Länge des Schlauches für den korrekten Anschuß nicht ausreichen, muß
dieser mit einem anderen Schlauch mit geeigneter Länge ersetzt werden. Wenden
Sie sich bitte hierfür an Ihren Werkskundendienst.
WATERCONTROL-SYSTEM
Rote Taste
(Signallampe)
bei gesperrtem Ventil
Abschraubsperre
(muß gedrückt werden,
um den Schlauch
abschrauben zu können)
A
39
La pagina si sta caricando...
La pagina si sta caricando...
La pagina si sta caricando...
La pagina si sta caricando...
La pagina si sta caricando...
La pagina si sta caricando...
La pagina si sta caricando...
-
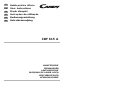 1
1
-
 2
2
-
 3
3
-
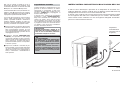 4
4
-
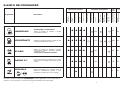 5
5
-
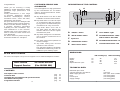 6
6
-
 7
7
-
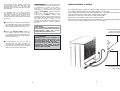 8
8
-
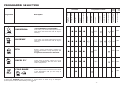 9
9
-
 10
10
-
 11
11
-
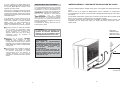 12
12
-
 13
13
-
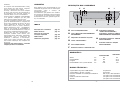 14
14
-
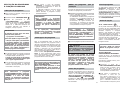 15
15
-
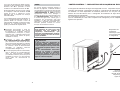 16
16
-
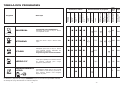 17
17
-
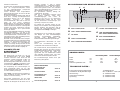 18
18
-
 19
19
-
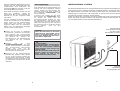 20
20
-
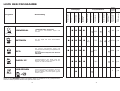 21
21
-
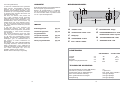 22
22
-
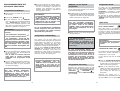 23
23
-
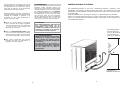 24
24
-
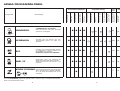 25
25
-
 26
26
-
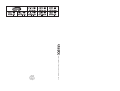 27
27


