Bticino 368721 Istruzioni per l'uso
- Categoria
- Altoparlanti della soundbar
- Tipo
- Istruzioni per l'uso
Questo manuale è adatto anche per

368721 - 368921
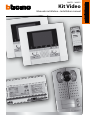
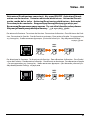
Kit Video
Manuale installatore • Installation manual
La pagina si sta caricando...
La pagina si sta caricando...
La pagina si sta caricando...
La pagina si sta caricando...
La pagina si sta caricando...

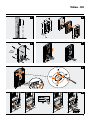
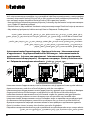
Video - Kit
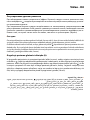
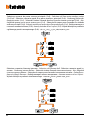
7
30 mm
168 mm
150 mm
160 – 165 cm
❷
❶
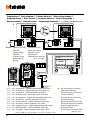
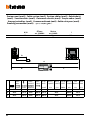
• Installazione del posto interno • Handset installation • Installation du poste interne • Installation
der Hausstation • Instalación de la unidad interior • Installatie van het intern punt • Instalação da
unidade interna • Εγκατάσταση της εσωτερικής θέσης • Установка внутреннего блока • Dahili üni-
te kurma • Instalacja miejsca wewnętrznego • •
• Altezza consigliata salvo diversa normativa vigente
• Recommended height, unless different regulations are specified
• Hauteur conseillée sauf autre norme en vigueur
• Empfohlene Höhe falls die gesetzlichen Vorschriften nichts anderes vorschreiben
• Altura recomendada salvo normativa vigente diferente
• Aanbevolen hoogte behoudens andere normen in voege
• Altura aconselhada a não ser se a norma em vigor for diferente
• Συνιστούμενο ύψος πλην διαφορετικής ισχύουσας νομοθεσίας
• Рекомендуемая высота, если нет других норматив-ных предписаний
• Yürürlükteki kanunlarca farklı şekilde belirlenenler hariç olarak, tavsiye edilen yükseklik
• Zalecana wysokość z zastrzeżeniem innych obowiązujących przepisów
•
La pagina si sta caricando...
La pagina si sta caricando...

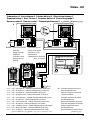
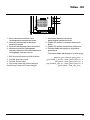
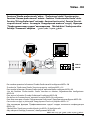
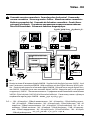
10
ON
OFF
J1 J2
BUS
1
2
5
1
P M
N
ART.344182
2
3
45
6
7
1
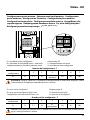
1 • Spostare su ON solo ell’ultimo videocitofono della tratta di ogni appartamento e di ogni montante.
• Move to ON only in the last video internal unit of the stretch of each apartment or each riser.
• Déplacer sur ON (MARCHE) seulement dans le dernier vidéophone du parcours de chaque ap-
partement ou de chaque colonne montante.
• Bei der letzten V ideo-Hausstation ist der Schalter auf ON zu stellen.
• Mueva a ON sólo el último vídeointerfono de la trama de cada departamento o de cada montante.
• Zet slechts de laatste (beeld)huistelefoon van iedere appartementlijn verdiepingslijn op ON.
• Desloque sobre ON somente no último intercomunicador vídeo do trecho de cada apartamen-
to ou de cada montante.
• Μετακινείτε στο ON μόνο στην τελευταία θυροτηλεόραση της διαδρομής κάθε διαμερίσματος και
κάθε διακλαδωτήρα.
• Передвинуть на ON (ВКЛ.) только для последнего видеодомофона отрезка каждой квар-
тиры и каждой стойки.
• Sadece her daire veya her dikme hattının son video dahili ünitesinde ON üzerine getirin.
• Ustawić w pozycji ON tylko w ostatnim wideodomofonie w obrębie pionu lub linii w mieszkaniu.
ON •
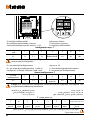
2 • Sede dei configuratori
• Configurator seat
• Logement configurateurs
• Sitz der Konfiguratoren
• Alojamiento configuradores
• Alojamento configurador
• Plaats van de configuratiemodules
• Έδρα διαρυθμιστών
• Гнездо конфигураторов
• Konfigüratörler yuvası
• Gniazdo konfiguratorów
•
3 • J2: Master/Slave, estrarre per slave
• J2: Master/Slave, extract for slave
• J2: Master/Slave, extraire pour salve
• J2: Master/Slave, für Slave herausziehen
• J2: Master/Slave, extraiga para slave
• J2: Master/Slave, uittrekken voor slave
• J2: Master/Slave, extrair para slave
• J2: Master/Slave, εξάγετε για slave
• J2: Основной/ Подчиненный режим
(Master/Slave),для Подчиненного – извлечь
• J2: Master/Slave, slave için çıkarın
• J2: Master/Slave, wyciągnąć dla Slave’u
:J2 •

Video - Kit
11
4 • J1: Jumper da rimuovere in caso di alimentatore supplementare
• J1: Jumper to be removed when there is an extra power supply
• J1: Cavalier à retirer en cas d’alimentation supplémentaire
• J1: Falls eines zusätzlischen Netzgeräts muß der Jumper entfernt werden
• J1: Puente extraíble en caso de alimentador adicional
• J1: Te verwijderen jumper bij het gebruik van een extra voeding
• J1: Jumper a ser removido se houver alimentador suplementar
• J1: Jumper που αφαιρείται σε περίπτωση συμπληρωματικού τροφοδοτικού
• J1: Джампер, который следует удалить при наличии дополнительного источника питания
• J1: Yedek besleyici durumunda sökülecek Jumper
• J1: Usunąć zworkę, jeżeli jest dodatkowy zasilacz
:J1 •
5 • Morsetto per alimentazione supplementare
• Terminal for additional power supply
• Borne d’alimentation supplémentaire
• Klemme für zusätzliche Stromversorgung
• Borne para alimentación adicional
• Klem voor supplementaire voeding
• Borne para alimentação suplementar
• Ακροδέκτης για συμπληρωματική τροφοδό-
τηση
• Вывод для дополнительного питания
• Yedek besleme için terminal
• Zacisk zasilania dodatkowego
•
6 • Morsetti di collegamento per funzioni aggiuntive
• Connection terminals for additional functions
• Bornes de branchement pour fonctions supplé-
mentaires
• Anschlussklemmen für zusätzliche Funktionen
• Bornes de conexión para funciones adicionales
• Klemmen van verbinding voor bijkomende functies
• Bornes de conexão para funções adicionais
• Ακροδέκτες σύνδεσης για πρόσθετες λειτουργίες
• Соединительные выводы для дополнитель-
ных функций
• İlave işlevler için bağlantı terminalleri
• Zacisk łączący funkcji dodatkowych
•
7 • Morsetto per collegamento al BUS
• BUS connection terminal
• Borne de branchement au BUS
• Klemme für den BUS-Anschluss
• Borne de conexión al BUS
• Klem voor de verbinding met de BUS
• Borne para conexão com o BUS
• Ακροδέκτης για σύνδεση σε BUS
• Вывод для подключения к шине (BUS)
• BUS bağlantısı için terminal
• Zacisk połączenia do BUS
BUS •
La pagina si sta caricando...
La pagina si sta caricando...
La pagina si sta caricando...
La pagina si sta caricando...
La pagina si sta caricando...

Video - Kit
17
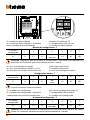
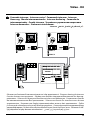
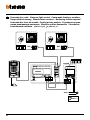
• Installare e collegare gli apparecchi come indicato nello schema. Assicurarsi che durante le ope-
razioni di montaggio degli apparecchi, l’alimentatore non sia collegato alla rete pubblica. L’ali-
mentatore non deve essere esposto a stillicidio o spruzzi d’acqua. Non ostruire le aperture di
ventilazione dell’alimentatore. Prima di alimentare l’impianto verificare l’esattezza del cablaggio
ed accertarsi che la tensione di rete sia compatibile con quella dell’alimentatore.
Posare i cavi seguendo lo schema riportato nelle pagine precedenti in cui è indicato il numero dei
cavi da predisporre e la dislocazione fisica degli apparecchi che compongono l’impianto.
Le tabelle della pagina seguente indicano la sezione minima dei cavi in funzione della distanza tra
posto esterno e posto interno e del numero di posti interni.
• Die Gerate laut Plan montieren und anschlieBen. Bei der Montage der Gerate darf das Netzgerat nicht
am Niederspannungsnetz angeschlossen sein. Das Speisegerat darf nicht Tropfwasser oder Wasser-
spritzer ausgesetzt werden. Beluftungsschlitze des Speisegerats nicht verstopfen. Bevor die Anlage mit
Strom versorgt wird, sollte kontrolliert werden, ob die Verkabeluna richtig vorgenommen wurde.
Frufen Sie bitte die Anschlusswerte des Netzgerates mit der Netzspannung. Bitte beachten Sie die
Nummerierung der Drahte auf beigefugtem Schaltplan.
In den Tabellen der nachfolgenden Seite ist der Mindestschnitt der Kabel je nach Abstand zwischen
Tür- und Hausstation und Anzahl der Hausstationen angegeben.
• Monter et brancher les appareils comme indiqué sur le schéma. S’assurer que pendant les opéra-
tions d’installation des appareils l’alimentation n’est pas raccordée au réseau public. L’alimenta-
tion ne doit etre exposée ni à stillation ou à pulvérisations d’eau. Ne pas boucher les ouvertures
d’aération de l’alimentation. Avant d’alimenter l’installation, vérifier que le cablage est correct et
s’assurer que la tension du réseau est compatible avec celle de l’alimentation.
Poser les câbles d’après le schéma qui se trouve dans les pages précédentes, sur lequel est indi-
qué le nombre de cables à placer et la localisation physique des appareils qui forment l’installa-
tion.
Les tableaux de la page suivante indiquent la section minimale des câbles en fonction de la dis-
tance entre poste extérieur et poste interne et du nombre de postes internes.
• Install and connect the devices as indicated in the diagram. Make sure that when the devices are
mounted the power supply is not connected to the public electric power line. The power supply must
not be exposed to dripping water or splashes. Do not block the power supply ventilation openings.
Before energizing the installation chech that cabling is correct and make sure that line voltage is com-
patible with power supply voltage.
Lay cables according to diagram shown in the previous pages, which indicates the number of cables
to be arranged and the layout of devices that make up the installation.
The tables on the following page indicate the minimum section of the wires as a function of the dis-
tance between entrance panel and audio handset and the number of audio handsets.
La pagina si sta caricando...
La pagina si sta caricando...
La pagina si sta caricando...

Video - Kit
21
schema pag. 35
T= temporizzatore serratura
S= non deve essere configurato
Numero del configuratore - T
0 = nessun
configuratore
1 2 3 4 5 6 7
4 s 1 s 2 s 3 s
come
pulsante
6 s 8 s 10 s
• P= non deve essere configurato
N= non deve essere configurato; 1 solo nella
configurazione con funzione intercom, vedi
Attenzione: tutte le volte che si modifica la configurazione è necessario togliere e ridare
l’alimentazione all’impianto, attendendo circa 1 minuto.
diagram page 35
T= door lock timer relay
S= must not be configured
Number of the configurator - T
0 = no
configurator
1 2 3 4 5 6 7
4 s 1 s 2 s 3 s
as
pushbutton
6 s 8 s 10 s
• P= must not be configured
N= must not be configured;1 only in the
configuration with intercom function, see
Caution: every time the configuration is altered the system must be switched off and back on
again, waiting for about 1 minute.
· Configurazione posto esterno · Entrance panel configuration · Configuration
poste extérieur · Konfiguration Türstation · Configuración placa exterior ·
Configuratie externe plaats · Configuração unidade externa · Διαρρύθμιση εξω-
τερικού σημείου · Конфигурация внешнего блока · Dış ünite konfigürasyonu ·
Konfiguracja panelu zewnętrznego ·
·
La pagina si sta caricando...
La pagina si sta caricando...
La pagina si sta caricando...

Video - Kit
25
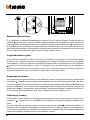
ON OFF
• Regolazione del volume
Se si manifestasse il disturbo del fischio, (effetto Larsen), ridurre prima la potenza del microfono
, agendo con un cacciavite sul potenziometro corrispondente, fino ad un livello accettabile.
Qualora il fenomeno persista, agire sul potenziometro dell’altoparlante
in modo da elimina-
re l’inconveniente. Se il volume è troppo basso, aumentare prima il volume dell’altoparlante ed
eventualmente anche quello del microfono, tenendo presente che è preferibile una trasmissione
chiara e priva di disturbi, che una al limite dell’innesco (Larsen).
•
Einstellung der Lautstärke:
Beim etwaigen Auftreten eines Pfeiftones (Larsen-Effekt), zuerst die Lautstärke des Mikrophones bis
auf einen annehmbaren Wert herabsetzen, indem man das entsprechende Potentiometer mit einem
Schraubendreher einstellt. Sollte die Störung weiterhin bestehen, dann das Potentiometer des Laut-
sprechers
bis zur Beseitigung des Pfeiftones einstellen. Ist die Lautstärke nun zu niedrig, dann zuerst
die des Lautsprechers und erst danach evtl. auch die des Mikrophones erhohen, wobei ein deutlicher
und störungsfreier Empfang einem an der Störungsgrenze liegendem (Larsen-Effekt) vorzuziehen ist.
•
Réglage du volume:
Lors de sifflement (effet de Larsen), reduire d’abord la puissance du micro , sur le potentiomètre
correspondant, à l’aide d’un tournevis, jusqu’à l’obtention d’un niveau satisfaisant. Si le sifflement
persiste, régler le potentiomètre du hautparleur
jusqu’à l’élimination de celui-ci. Si le volume
est trop bas, augmenter d’abord la puissance du haut-parleur et éventuellement celle du micro,
en considérant qu’une réception claire et sans parasite est préférable à une communication à la
limite de l’accrochage (effet de Larsen).
• Adjustment volume:
In case of a whistle (Larsen effect), first reduce the microphones power, adjusting the corresponding
potentiometers with a screw driver, until an acceptable level is reached. Should the whistle persist,
adjust the loudspeakers
volume in order to eliminate the trouble. If the volume is too low level then,
increase first the potentiometer of the loudspeaker and secondly the one for the microphone, bearing
in mind that a clear and noise free reception is preferable than one just before whistling (Larsen).
La pagina si sta caricando...
La pagina si sta caricando...

28
ON OFF
2
3
4
1
• 1 - Abilitazione/disabilitazione tono
conferma apertura serratura
2 - Led verde: indicazione porta aperta
3 - Led verde: comunicazione attiva
4 - Led lampeggiante Verde: chiamata
inoltrata; Led lampeggiante Rosso:
sistema occupato
• 1 - Habilitación/deshabilitación del tono de
confirmación de apertura de la cerradura
2 - Led verde: indicación puerta abierta
3 - Led verde: comunicación activada
4 - Led parpadenate Verde: llamada
enviada; Led parpadenate Rojo: sistema
ocupado
• 1 - Enabling/disabling of door lock opening
confirmation tone
2 - Green LED: door open indication
3 - Green LED: communication active
4 - Green flashing LED; call forwarded
Red flashing LED: system busy
• 1 - Activation/désactivation tonalité de
confirmation ouverture serrure
2 - Diode verte: indication porte ouverte
3 - Diode verte: communication active
4 - Témoin clignotant vert - appel passé
Témoin clignotant rouge: système
occupé
• 1 - Aktivierung/Deaktivierung des
Bestätigungssignals nach erfolgter
Türöffnung
2 - Grüne Led: Meldet offene Tür
3 - Grüne Led: Kommunikation aktiv
4 - Grüne blinkende Led: Ruf gesendet
Rote blinkende Led: System belegt
• 1 - Activering/desactivering toon bevestiging
opening slot
2 - Groene led: aanduiding open deur
3 - Groene led: communicatie actief
4 - Groene knipperende led: oproep
doorgestuurd;
Rode knipperende led: systeem bezet
• 1 - Activação/desactivação do sinal de
confirmação da abertura da fechadura
2 - Indicadores luminosos verde: indicação
de porta aberta
3 - Indicadores luminosos verde:
comunicação activa
4 - Indicador luminoso lampejante Verde:
chamada enviada; Indicador luminoso
lampejante Vermelho: sistema cupado
• 1 - Ενεργοποίηση/απενεργοποίηση τόνου
επιβεβαίωσης ανοίγματος κλειδαριάς
2 - Πράσινο led: ένδειξη ανοιχτής πόρτας
3 - Πράσινο led: επικοινωνία ενεργή
4 - Πράσινο led που αναβοσβήνει: μεταγωγή
κλήσης; Κόκκινο led που αναβοσβήνει:
σύστημα κατειλημμένο
La pagina si sta caricando...

30
• Selezione suoneria
La suoneria di chiamata del citofono è selezionabile tra 16 differenti tipi di melodie.
Si possono differenziare le seguenti tipologie di chiamata:
Chiamata al piano; Chiamata da posto esterno; Chiamata intercom.
• Bell selection
The door entry unit call bells can be selected from 16 different types of tune.
The following types of call can be differentiated:
Call to the floor; Call from entrance panel; Intercom Call.
• Sélection sonnerie
La sonnerie d’appel du phone peut être sélectionnée parmi 16 différents types de mélodies.
On peut différencier les typologies d’appel suivantes:
Appel à l’étage; Appel de poste extérieur; Appel intercom.
• Läutwerk wählen
Für das Läutwerk der Rufe des haustelefons stehen 16 verschiedene Melodien zur Verfügung.
Die Rufe können folgendermaßen differenziert werden:
Etagenruf; Ruf von der Türstation; Intercom Anruf.
• Selección del timbre
El timbre del llamada del interno fono se puede seleccionar entre 16 melodías diferentes.
Es posible diferenciar las siguientes tipologías de llamadas:
Llamada a la planta; llamada desde puesta exterior; Llamada interna.
• Beltoon kiezen
De oproepbeltoon van de telefoon biedt de keus uit 16 melodiën.
Het is mogelijk om de volgende types oproepen te kenmerken:
Oproep aan de verdieping; Oproep vanuit het deurstation; Intercom oproep.
• Selecção toques
Os toques de chamada do intercomunicador podem ser seleccionados em 16 tipos de melodias
diferentes.
Podem ser diferenciados os seguintes tipos de chamada:
Chamada ao piso; Chamada da unidade externa; Chamada Intercom.
• Επιλογή κουδουνιού
Το κουδούνι κλήσης του θυροτηλεφώνου είναι επιλέξιμο μεταξύ 16 διαφορετικών τύπων μελωδιών.
Μπορούν να διαφοροποιούνται οι ακόλουθες τυπολογίες κλήσης:
Κλήση στον όροφο. Κλήση από εξωτερικό σημείο. Κλήση intercom.

Video - Kit
31
>3s
EXIT
OK
1
17
2
• Выбор мелодии
Мелодия звонка домофона может быть выбрана из 16 различных типов мелодии.
Различаются следующие виды звонков:
Звонок на этаж; Звонок с внешнего блока; Звонок интрекомм.
• Zil sesi seçimi
Dahili ünitenin arama zil sesi, 16 farklı melodi tipi arasından seçilebilir.
Aşağıdaki arama tipleri farklılaştırılabilir:
Kat araması; Dış üniteden arama; İntercom araması
• Wybór dźwięku sygnału wywołania
Dźwięk sygnału wywołania może być wybrany spośród 16 dostępnych dźwięków.
Możliwe jest przypisanie różnych dźwięków do różnych źródeł wywołania, np.:
Wywołanie z dzwonka przy drzwiach; Wywołanie z panelu zewnętrznego; Wywołanie interkomowe
•
16
intercom
• Selezione suoneria chiamata al piano • Selection call to the floor bell • Sélection sonnerie appel à
l’étage · Änderung Rufton Etagentaster • Selección timbre llamada al piso • Kies belgeluid oproep
aan verdieping • Selecção do toque para chamada ao andar • Επιλογή κουδουνιού κλήσης στον
όροφο • Выбор мелодии звонка на этаж. • Kat araması zil sesi seçimi • Wybór dźwięku wywołania
z dzwonka •
•

32
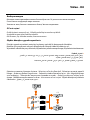
1
17
2
1
1
1
>3s
EXIT
OK
1
17
2
3
3
3
>3s
EXIT
OK
• Selezione suoneria da posto esterno principale (S=0) • Selection call from main outdoor station
(S=0) bell • Sélection sonnerie appel d’un poste extérieur principal (S=0) • Änderung Rufton der
Haupttürstation (S=0) • Selección timbre llamada desde el puesto exterior principal (S=0) • Kies
belgeluid oproep vanuit eerste externe post (S=0) • Selecção do toque para chamada da unidade
externa principal (S=0) • Επιλογή κουδουνιού από κύριο εξωτερικό σημείο (S=0) • Выбор мелодии с
главного внешнего блока (S=0) • Ana dış üniteden zil sesi seçimi (S=0) • Wybór dźwięku wywołania
z głównego panelu zewnętrznego (S=0) •
• Selezione suoneria chiamata intercom • Selection call intercom bell · Sélection sonnerie appel in-
tercom • Änderung interner Rufton • Selección timbre llamada intercomunicante • Kies belgeluid
intercom oproep gebouw • Selecção do toque para chamada intercomomunicador • Επιλογή κου-
δουνιού κλήσης intercom • Выбор мелодии звонка интеркомм • İntercom araması zil sesi seçimi •
Wybór dźwięku wywołania interkomowego •
) •
intercom •

Video - Kit
33
CLAC
P
N MOD
2 0
3501/2
2
0
3501/0
❶
❷
❸
· Funzione “Studio professionale” attiva · “Professional studio” function active ·
Fonction “Bureau professionnel” activée · Funktion “Professionelles Studio” aktiv ·
Función “Oficina Profesional” activada · Kantoorfunctie actief · Função “Escritó-
rio profissional” activa · Λειτουργία “Επαγγελματικό στούντιο” ενεργή · Функция
“Профессиональная студия” активирована · “Mesleki büro” fonksiyonu etkin ·
Funkcja “Pracownia” aktywna ·
• Per rendere operativa la funzione “Studio Professionale” configurare MOD= 20
• To make the “Professional Studio” function operative, configure MOD = 20
• Pour rendre la fonction “Bureau Professionnel” opérationnelle, configurer MOD=20
• Um die Funktion “Professionelles Studio” benutzen zu können, folgendermaßen konfigurieren:
MOD=20
• Para activar la función “Estudio Profesional” configure MOD=20
• Om de functie “kantoorfunctie” operatief te maken MOD=20 configureren
• Para fazer com que a função “Departamento Profissional” fique operativa configurar MOD=20
• Για να κάνετε ενεργή τη λειτουργία “Επαγγελματικό Στούντιο” ρυθμίστε MOD= 20
• Для активации функции “Профессиональная студия” следует выполнить конфигурацию
MOD= 20
• “Mesleki Büro” fonksiyonunu etkin kılmak için MOD= 20 konfigüre edin
• Aby uaktywnić funkcję „Pracownia”, skonfigurować MOD=20
•
”“ ·

34
>3s
Led ON
Led ON
>3s
BEEP
BEEP
BEEP
EXIT
EXIT
>3s
Led ON
Led ON
>3s
BEEP
BEEP
BEEP
EXIT
EXIT
· Nota: nel caso di espansione del KIT, per ulteriori informazioni circa le modalità di configurazione disponibili,
fare riferimento al foglio istruzioni a corredo del videocitofono.
· Note: when expanding the KIT, for more information on the configuration modes available, refer to the instruction
sheet which comes with the video handset.
· Remarque: dans le cas d’extension du KIT, pour de plus amples informations sur les modalités de configura-
tion disponibles, se reporter au livret d’instructions livré avec le vidéophone.
· Bemerkung: Falls das Kit erweitert werden sollte, beziehen Sie sich bitte auf die mit dem Haustelefon gelieferten
Anweisungen für weitere Informationen bezüglich den möglichen Konfigurationsmodalitäten.
· Nota: en caso de expansión del KIT, para más información sobre los modos de configuración disponibles, se
remite a la hoja de instrucciones suministrada junto con el videointerfono.
· Opmerking: in geval van expansie van de KIT, kan men voor bijkomende inlichtingen m.b.t. de beschikbare moda-
liteiten van configuratie beroep doen op het instructieblad in dotatie bij de beeld-huistelefoon.
· Nota: caso o KIT for expandido, para ulteriores informações sobre as modalidades de configuração disponí-
veis, consulte a folha de instruções fornecida com o intercomunicador vídeo.
· Σημείωση: σε περίπτωση επέκτασης του KIT, για περισσότερες πληροφορίες σχετικά με τους διαθέσιμους τρόπους
διαρρύθμισης, αναφέρεστε στο στάνταρ φύλλο οδηγιών της θυροτηλεόρασης.
· Примечание: в случае расширения комплекта для получения дополнительной информации об имею-
щихся способах конфигурации следует обращаться к листу с инструкциями, предоставляемому вместе
с видеодомофоном.
· Not: KİT’in genişletilmesi halinde, mevcut konfigürasyon modları hakkında detaylı bilgiler için dahili ünitenin
beraberindeki talimat kağıdını referans olarak alın.
· Uwaga: w przypadku rozbudowy zestawu, odnieść się do dodatkowych informacji na temat konfiguracji
podanych w instrukcji dla wideodomofonu.
·
• Per disattivare la funzione • To deactivate the function • Pour désactiver la fonction • Zum Deaktivie-
ren der Funktion • Para desactivar la función • Om de functie te deactiveren • Para desactivar a fun-
ção • Για απενεργοποίηση της λειτουργίας • Чтобы вылючить функцию • İşlevi devreden çıkarmak
için • Aby dezaktywować funkcję •
• Per attivare la funzione • To activate the function • Pour activer la fonction • Zum Aktivieren der Funktion
· Para activar la función • Om de functie te activeren • Para activar a função • Για ενεργοποίηση της
λειτουργίας • Чтобы включить функцию • İşlevi etkin kılmak için • Aby aktywować funkcję •
•
•
La pagina si sta caricando...

36
P
N MOD
6 0
3501/6
6 0
3501/0
• La funzione Mani Libere attiva automaticamente microfono ed altoparlante in caso di chiamata,
evitando di dover premere il tasto Connessione per rispondere (la connessione si stabilisce im-
mediatamente al momento della chiamata).
• The Hands Free function automatically activates the microphone and loudspeaker when there is a
call, avoiding having to press the Connection key to answer (the connection is established immedi-
ately the call is made).
• La fonction Mains Libres active automatiquement micro et haut-parleur en cas d’appel, évitant
ainsi de devoir appuyer sur la touche Connexion pour répondre (la connexion est immédiate-
ment établie au moment de l’appel).
• Die Funktion Freie Hände aktiviert automatisch Mikrofon und Lautsprecher wenn ein Ruf eintrifft, so
dass man die Verbindungstaste nicht mehr drücken muss, um den Ruf zu beantworten (die Verbin-
dung stellt sich sofort beim Eintreffen des Rufes her).
• La función Manos Libres activa automáticamente el micrófono y el altavoz en caso de llamada,
evitándole tener que presionar la tecla de conexión para contestar (la conexión se establece in-
mediatamente al momento de la llamada)
• De functie Handsfree activeert automatisch microfoon en luidspreker in geval van een oproep, en ver-
mijdt dat je de toets Aansluiting moet indrukken om te antwoorden (de aansluiting komt onmiddellijk
tot stand op het ogenblik van de oproep).
• A função Mãos Livres activa automaticamente o microfone e o altifalante em caso de chamada
evitando-lhe ter de pressionar a tecla Conexão para atender (a conexão se estabelece imediata-
mente no momento da chamada).
· Funzione Mani Libere · Hands Free function · Fonction Mains Libres · Funktion
Freie Hände · Función Manos Libres · Handsfreefunctie · Função Mãos Livres ·
Λειτουργία Ελεύθερα Χέρια · Функция “Свободные Руки” (Free Hand) · Eller
Serbest işlevi · Funkcja Wolne Ręce ·
• Per rendere operativa la funzione “Mani Libere” configurare MOD=60;
• To make the “Hands Free” function operative, configure MOD = 60;
• Pour rendre la fonction “Mains Libres” opérationnelle, configurer MOD=60
• Um die Funktion “Freie Hände” benutzen zu können, folgendermaßen konfigurieren: MOD=60;
• Para activar la función “Manos Libres” configure MOD=60;
• Om de functie “Handsfree” operatief te maken MOD=60 configureren;
• Para fazer com que a função “Mãos Livres” fique operativa configurar MOD=60;
• Για να κάνετε ενεργή τη λειτουργία “Ελεύθερα Χέρια” ρυθμίστε MOD=60;
• Чтобы “Свободные Руки”, сконфигурировать MOD=60;
• “Eller Serbest” fonksiyonunu etkin kılmak için MOD=60 konfigüre edin;
• Aby uaktywnić funkcję „Wolne Ręce”, skonfigurować MOD=60;
•
·
La pagina si sta caricando...

38
• Se il posto esterno si trova in un ambiente particolarmente rumoroso è possibile, durante la con-
versazione, attivare la funzione Push to Talk al fine di ottenere una comunicazione meno distur-
bata. Durante la conversazione è possibile attivare la funzione Push to Talk nel seguente modo.
- Premere il tasto Connessione per almeno 2 secondi per parlare con il posto esterno. Il Led rima-
ne verde.
- Rilasciare il tasto per poter ascoltare dal posto esterno. Il Led diventa rosso.
- Per terminare la connessione premere brevemente il tasto Connessione. Il Led si spegne.
• If the entrance panel is in a particularly noisy place, during the conversation the Push to Talk function
can be activated for a less disturbed call. During the conversation the Push to Talk function can be
activated as follows.
- Press the Connection key for at least 2 seconds to talk to the entrance panel. The LED remains green.
- Release the key to ear from the entrance panel. The LED becomes red.
- To end the connection press the connection key briefly. The LED goes out
• Si le poste externe se trouve dans un environnement particulièrement bruyant, il est possible
d’activer durant la conversation la fonction Push to Talk pour obtenir une meilleure communica-
tion. Durant la conversation, il est possible d’activer la fonction Push to Talk en procédant comme
suit.
- Appuyer sur la touche Connexion pendant au moins 2 secondes pour parler avec le poste ex-
terne. Le voyant reste vert.
- Relâcher la touche pour pouvoir écouter depuis le poste externe. Le voyant devient rouge.
- Pour mettre fin à la connexion, appuyer brièvement sur la touche connexion. Le voyant s’éteint.
• Wenn die Türstation in einem besonders geräuschvollen Bereich installiert ist, kann man während des
Gesprächs die Funktion Push to Talk drücken, um diese Geräusche zu überwinden. Während des Ge-
sprächs kann die Funktion Push to Talk folgendermaßen aktiviert werden.
- Die Verbindungstaste mindestens 2 Sekunden lang drücken, um mit der Türstation zu sprechen. Die
grüne Meldeleuchte leuchtet immer noch.
- Taste loslassen, um die Türstation hören zu können. Die Meldeleuchte leuchtet rot auf.
- Um die Verbindung abzubrechen, die Verbindungstaste kurz drücken. Die Meldeleuchte erlischt
• Si la placa exterior se encuentra en un ambiente con un alto nivel de ruido, durante la conversa-
ción es posible activar la función Push to Talk para obtener una comunicación con menor interfe-
rencias. Durante la conversación es posible activar la función Push to Talk en el modo siguiente.
- Presione la tecla de conexión almenos 2 segundos para conversar con la placa exterior. El led
permanece verde.
- Suelte la tecla para poder escuchar desde la placa exterior. El led se vuelve rojo.
- Para terminar la conexión, presione brevemente la tecla de conexión. El led se apaga
· Modalità Push to Talk · Push to Talk mode · Modalité Push to Talk · Función Push to
Talk · Push to Talk functie · Função Push to Talk · Τρόπος Push to Talk · Режим Push
to Talk · Push to Talk (Bas Konuş) Yöntemi · Tryb Push to Talk ·
·
La pagina si sta caricando...

40
BUS
OF FOF F
BUSBUS
ON
344182/344192
P
N
MOD
P
N
MOD
P
N
MOD
344182/344192
• Jeśli miejsce zewnętrzne znajduje się w szczególnie hałaśliwym pomieszczeniu, można podczas
rozmowy aktywować funkcję Push to Talk w celu uzyskania mniej zakłóconej komunikacji. Pod-
czas rozmowy można aktywować funkcję Push to Talk w poniższy sposób.
- Nacisnąć klawisz Połączenie przez przynajmniej 2 sekundy, aby rozmawiać z miejscem zewnętrz-
nym. Dioda LED pozostaje zielona.
- Zwolnić klawisz, aby umożliwić słuchanie z miejsca zewnętrznego. Dioda Led staje się czerwona.
- Aby zakończyć połączenie, krótko nacisnąć klawisz Połączenie. Dioda gaśnie.
•
2
· Intercomunicante d’appartamento · Apartment intercom · Intercommunicant
d’appartement · Gegensprechfunktion für Wohnungen · Intercomunicante de
apartamento · Intercom van appartement · Intercomunicador de apartamento ·
Ενδοεπικοινωνία διαμερίσματος · Интерком в квартире · Daire içi interkom siste-
mi · Połączenie wewnętrzne mieszkania ·
·
• Intercomunicante d’appartamento, invia la chiamata a tutti gli apparecchi con uguale indirizzo.
• Apartment intercom: sends the call to all the devices with the same address.
• Intercommunicant d’appartement: envoie l’appel à tous les appareils ayant une adresse identique.
• Gegensprechfunktion für Wohnungen: sendet den Ruf an alle Geräte mit derselben Adresse.
• Intercomunicante de apartamento: envía la llamada a todos los aparatos con igual dirección.
• Intercomun van appartement: verstuurt de oproep naar alle toestellen met hetzelfde adres.
• Intercomunicador de apartamento: envia a chamada a todos os aparelhos com endereço igual.
• Η ενδοεπικοινωνία διαμερίσματος, αποστέλλει την κλήση σε όλες τις συσκευές με ίδια διεύθυνση.
• Функция интеркома в квартире посылает вызов на все приборы с одинаковым адресом.
• Daire içi interkom sistemi, aramayı tüm cihazlara aynı adres ile gönderir.
•
Połączenie wewnętrzne mieszkania wysyła wywołanie do wszystkich aparatów o tym samym adresie.
•
La pagina si sta caricando...
La pagina si sta caricando...
La pagina si sta caricando...
La pagina si sta caricando...
La pagina si sta caricando...
La pagina si sta caricando...
La pagina si sta caricando...

BTicino SpA
Via Messina, 38
20154 Milano - Italy
www.bticino.com
Servizio clienti
BTicino SpA si riserva il diritto di variare in qualsiasi momento i contenuti illustrati nel presente stampato e di
comunicare, in qualsiasi forma e modalità, i cambiamenti apportati.
BTicino SpA reserves at any time the right to modify the contents of this booklet and
to comunicate in any form and modality, the charges brought to the same.
Timbro installatore
Installer stamp
-
 1
1
-
 2
2
-
 3
3
-
 4
4
-
 5
5
-
 6
6
-
 7
7
-
 8
8
-
 9
9
-
 10
10
-
 11
11
-
 12
12
-
 13
13
-
 14
14
-
 15
15
-
 16
16
-
 17
17
-
 18
18
-
 19
19
-
 20
20
-
 21
21
-
 22
22
-
 23
23
-
 24
24
-
 25
25
-
 26
26
-
 27
27
-
 28
28
-
 29
29
-
 30
30
-
 31
31
-
 32
32
-
 33
33
-
 34
34
-
 35
35
-
 36
36
-
 37
37
-
 38
38
-
 39
39
-
 40
40
-
 41
41
-
 42
42
-
 43
43
-
 44
44
-
 45
45
-
 46
46
-
 47
47
-
 48
48


Bticino 368721 Istruzioni per l'uso
- Categoria
- Altoparlanti della soundbar
- Tipo
- Istruzioni per l'uso
- Questo manuale è adatto anche per
in altre lingue
- English: Bticino 368721 Operating instructions
- français: Bticino 368721 Mode d'emploi
- español: Bticino 368721 Instrucciones de operación
- Nederlands: Bticino 368721 Handleiding
- português: Bticino 368721 Instruções de operação
- polski: Bticino 368721 Instrukcja obsługi
- Türkçe: Bticino 368721 Kullanma talimatları
- română: Bticino 368721 Instrucțiuni de utilizare
Documenti correlati
-
Bticino 368911 Istruzioni per l'uso
-
-
-
-
-
-
-
-
-