HP LaserJet Pro M1536 Multifunction Printer series Guida d'installazione
- Categoria
- Barebone per PC / workstation
- Tipo
- Guida d'installazione

SV
Installationshandbok
PT
Guia de instalação
NO
Installeringsveiledning
LT
Montavimo vadovas
LV
Uzstādīšanas rokasgrāmata
FI
Asennusopas
ET
Paigaldusjuhend
NL
Installatiehandleiding
DA
Installationsvejledning
CA
Guia d'instal·lació
ES
Guía de instalación
IT
Guida di installazione
DE
Installationshandbuch
FR
Guide d'installation
EN
Installation Guide
LASERJET PRO M1530
MFP SERIES / SERIE MFP

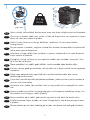
10% - 80%
10 - 32.5°C
(50 - 91°F)
PP
LQFKHV
PP
LQFKHV
PP
LQFKHV
11.7 kg
25.8 lb
SV
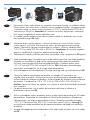
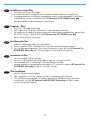
Placera enheten på ett stabilt underlag på en plats utan damm och med god ventilation.
PT
Escolha uma área limpa, arejada, resistente e longe da luz solar direta para posicionar
o produto.
NO
Plasser produktet på et stabilt, godt ventilert og støvfritt sted, borte fra direkte sollys.
LT
Gaminiui padėti pasirinkite tvirtą pagrindą gerai ventiliuojamoje nedulkėtoje vietoje, kuri
būtų atokiau nuo tiesioginių saulės spindulių.
LV
Novietojiet ierīci stabilā, labi ventilētā vietā, kur nav putekļu un ko neapspīd tieši saules
stari.
FI
Sijoita laite tukevalle alustalle pölyttömään paikkaan, johon aurinko ei paista suoraan ja
jossa on hyvä ilmanvaihto.
ET
Valige toote paigutamiseks tugev pind hästi ventileeritud tolmuvabas alas, otsese
päikesevalguse eest eemal.
NL
Kies een stevige, goed geventileerde, stofvrije plek niet in direct zonlicht om het apparaat
te plaatsen.
DA
Placer produktet i et stabilt, godt udluftet, støvfrit område uden direkte sollys.
CA
El producte s’ha de col·locar en una superfície estable, ben ventilada, sense pols i lluny
de la llum del sol directa.
ES
Seleccione un lugar sólido, bien ventilado, sin polvo y alejado de la luz solar directa en
el que colocar el producto.
IT
Per posizionare il prodotto, scegliere un'area ben ventilata, lontana dalla luce diretta del
sole e poco esposta alla polvere.
DE
Stellen Sie das Gerät an einem gut belüfteten, staubfreien Ort auf einem stabilen
Untergrund auf.
FR
Choisissez un endroit stable, bien ventilé, à l’abri de la poussière, non exposé aux rayons
directs du soleil pour placer le produit.
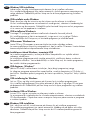
Select a sturdy, well-ventilated, dust-free area, away from direct sunlight to position the product.
EN
1
1
La pagina si sta caricando...

2 31
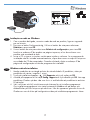
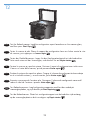
IT
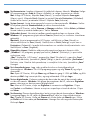
Collegare il cavo di alimentazione tra il prodotto e la presa CA con messa a
terra, quindi accendere il prodotto. Accertarsi che la fonte di alimentazione sia
adeguata all'indicazione della tensione del prodotto. L'indicazione della tensione
si trova sull'etichetta del prodotto. Il prodotto utilizza 110-17 Vac o 0-40 Vac
e 50/60 Hz. Attenzione: per evitare danni al prodotto, utilizzare solo il cavo di
alimentazione fornito con il prodotto stesso.
Sul pannello di controllo, utilizzare i pulsanti freccia per selezionare la lingua e la
posizione, quindi premere OK.
1.
.
DE
Schließen Sie das Netzkabel des Geräts an eine geerdete Steckdose an, und schalten
Sie das Gerät ein. Stellen Sie sicher, dass Ihre Stromquelle für die Betriebsspannung
des Geräts geeignet ist. Die Betriebsspannung nden Sie auf dem Geräteetikett.
Das Gerät verwendet entweder 110 bis 17 Volt Wechselspannung oder 0 bis
40 Volt Wechselspannung und 50/60 Hz. Achtung: Um Schäden am Gerät zu
vermeiden, verwenden Sie ausschließlich das Netzkabel, das im Lieferumfang des
Geräts enthalten ist.
Verwenden Sie zum Auswählen der Sprache und der Position die Pfeiltasten auf
dem Bedienfeld, und drücken Sie dann OK.
1.
.
FR
Reliez le produit à la prise reliée à la terre à l'aide du cordon d'alimentation, puis
mettez le produit sous tension. Assurez-vous que votre source d'alimentation est
adaptée à la tension nominale du produit. La tension nominale est indiquée sur
l'étiquette du produit. Le produit utilise 110-17 volts c.a. ou 0-40 volts c.a.
et 50/60 Hz. Attention ! Pour éviter tout endommagement du produit, utilisez
uniquement le câble fourni avec le produit.
Sur le panneau de commande, sélectionnez votre langue et votre pays/région
à l'aide des èches, puis appuyez sur OK.
1.
.
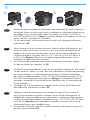
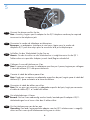
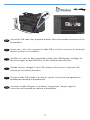
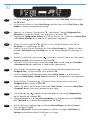
EN
Connect the power cord between the product and a grounded AC outlet, and turn on
the product. Make sure your power source is adequate for the product voltage rating.
The voltage rating is on the product label. The product uses either 110-17 Vac or
0-40 Vac and 50/60 Hz. Caution: To prevent damage to the product, use only the
power cord that is provided with the product.
On the control panel, use the arrow buttons to select your language and location,
and then press OK.
1.
.
3
4
La pagina si sta caricando...
La pagina si sta caricando...

NL
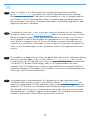
Sluit het telefoonsnoer van de fax aan.
Opmerking: Een land-/regiospecieke adapter voor het RJ11-telefoonsnoer is mogelijk
vereist om het snoer op de telefoonaansluiting aan te sluiten.
DA
Slut telefonledningen til faxen.
Bemærk: Det kan være nødvendigt med en lande-/områdespecik adapter til RJ11-
telefonledningen for at kunne slutte den til telefonstikket.
CA
Connecteu el cable de telèfon per al fax.
Nota: Pot ser que sigui necessari un adaptador especíc del país/regió per connectar
el cable de telèfon RJ11 a l'endoll del telèfon.
ES
Conecte el cable de teléfono para el fax.
Nota: Puede que se requiera un adaptador especíco de país/región para el cable del
teléfono RJ11 para conectarlo a la toma de teléfono.
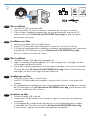
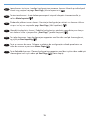
IT
Collegare il cavo del telefono per il fax.
Nota: è necessario utilizzare un adattatore specico per il paese/regione per collegare
il cavo del telefono RJ11 alla presa telefonica.
DE
Schließen Sie das Telefonkabel für das Fax an.
Hinweis: Für den Anschluss an die Telefonbuchse ist möglicherweise für die RJ11-
Telefonschnur ein spezieller Adapter je nach Land/Region erforderlich.
FR
Connectez le cordon de téléphone au télécopieur.
Remarque : un adaptateur spécique à votre pays/région pour le cordon de
téléphone RJ11 peut être requis pour la connexion à la prise téléphonique.
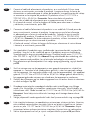
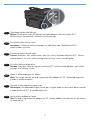
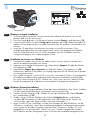
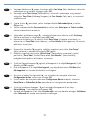
EN
Connect the phone cord for the fax.
Note: A country/region specic adapter for the RJ11 telephone cord may be required
to connect to the telephone jack.
6
5
La pagina si sta caricando...
La pagina si sta caricando...

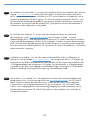
CA
Instal·lació USB al Windows
Introduïu el CD i seguiu les instruccions de la pantalla per instal·lar el programari.
Si el programa d'instal·lació no s'inicia automàticament, examineu l'ordinador i
seleccioneu la unitat de CD. Feu doble clic al txer Setup.exe per executar el programa
i instal·lar el producte.
ES
Instalación USB en Windows
Introduzca el CD y siga las instrucciones que aparecen en pantalla para instalar el
software.
Si el programa de instalación no se inicia automáticamente, explore el equipo y
seleccione la unidad de CD. Haga doble clic en el archivo Setup.exe para ejecutar
el programa e instalar el producto.
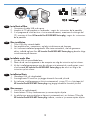
IT
Installazione USB con Windows
Inserire il CD e attenersi alle istruzioni visualizzate sullo schermo per installare il software.
Se il programma di installazione non si avvia automaticamente, sul computer individuare
e selezionare l'unità CD. Fare doppio clic sul le Setup.exe per eseguire il programma
di installazione del prodotto.
DE
Windows USB-Installation
Legen Sie die CD ein, und folgen Sie den Anweisungen auf dem Bildschirm, um die
Software zu installieren.
Wenn das Installationsprogramm nicht automatisch gestartet wird, suchen Sie auf dem
Computer nach dem CD-Laufwerk, und wählen Sie es aus. Doppelklicken Sie auf die Datei
„Setup.exe“, um das Programm auszuführen und das Gerät zu installieren.
FR
Installation sous Windows par USB
Pour installer le logiciel, insérez le CD et suivez les instructions à l'écran.
Si le programme d'installation ne démarre pas automatiquement, parcourez l'ordinateur
et sélectionnez le lecteur CD. Cliquez deux fois sur le chier Setup.exe pour exécuter le
programme et installer le produit.
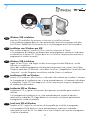
EN
Windows USB installation
Insert the CD and follow the onscreen instructions to install the software.
If the installation program does not start automatically, browse the computer and select
the CD drive. Double-click the Setup.exe le to run the program and install the product.
7
La pagina si sta caricando...

CA
Connecteu el cable USB quan us ho demani el programari i després seguiu les
instruccions de la pantalla per nalitzar el procediment.
Conecte el cable USB cuando se le solicite y siga las instrucciones que aparecen en
pantalla para completar el procedimiento.
ES
Quando richiesto, collegare il cavo USB e attenersi alle istruzioni visualizzate sullo
schermo per terminare la procedura.
IT
Schließen Sie, wenn Sie dazu aufgefordert werden, das USB-Kabel an, und folgen Sie
den Anweisungen auf dem Bildschirm, um die Installation abzuschließen.
DE
Lorsque vous y êtes invité, connectez le câble USB et suivez les instructions à l'écran pour
terminer le processus d'installation.
FR
EN
Connect the USB cable when prompted, and then follow the onscreen instructions to nish
the procedure.
11
La pagina si sta caricando...
La pagina si sta caricando...

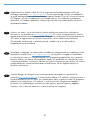
CA
Instal·lació en la xarxa al Windows
Amb el producte apagat, connecteu el cable de xarxa al producte, engegueu el
producte i espereu un minut.
Premeu el botó Conguració
. Utilitzeu els botons de etxa per seleccionar
Informes i després premeu OK.
Utilitzeu els botons de etxa per seleccionar Informe de conguració i premeu OK.
Busqueu l'adreça IP a la pàgina que s'imprimeix per conrmar que el producte està
connectat a la xarxa.
Introduïu el CD i seguiu les instruccions de la pantalla per instal·lar el programari.
Si el programa d'instal·lació no s'inicia automàticament, examineu l'ordinador i feu
doble clic al txer Setup.exe, que trobareu al CD. Quan us ho demani el programari,
escriviu l'adreça IP de la pàgina de conguració a la pantalla del programa
d'instal·lació.
1.
.
3.
4.
ES
Instalación en la red en Windows
Con el producto apagado, conecte el cable de red al producto, encienda el producto
y espere un minuto.
Pulse el botón Conguración
. Utilice los botones de echa para seleccionar
Informes
y, a continuación, pulse OK.
Utilice los botones de echa para seleccionar Informe cong. y, a continuación,
pulse OK
. Localice la dirección IP del producto en la página que se imprima para
comprobar que el producto está conectado a la red.
Introduzca el CD y siga las instrucciones que aparecen en pantalla para instalar el
software. Si el programa de instalación no se inicia automáticamente, explore el
equipo y haga doble clic en el archivo Setup.exe, en la unidad de CD. Cuando se
le solicite, escriba la dirección IP de la página de conguración en la pantalla del
programa de instalación.
1.
.
3.
4.
IT
Installazione sulla rete Windows
Quando il prodotto è spento, collegare il cavo di rete, accenderlo e attendere un
minuto.
Premere il pulsante di impostazione
. Utilizzare i pulsanti freccia per selezionare
Report, quindi premere OK.
Utilizzare i pulsanti freccia per selezionare Report cong., quindi premere OK.
Individuare l'indirizzo IP del prodotto sulla pagina che viene stampata per vericare
che il prodotto sia collegato alla rete.
Inserire il CD e attenersi alle istruzioni visualizzate sullo schermo per installare
il software. Se il programma di installazione non si avvia automaticamente, sul
computer individuare e fare doppio clic sul le Setup.exe presente sul CD. Quando
richiesto, digitare l'indirizzo IP dalla pagina di congurazione nella schermata del
programma di installazione.
1.
.
3.
4.
14
La pagina si sta caricando...
La pagina si sta caricando...
La pagina si sta caricando...

ES
Instalación en Mac
Conecte el cable USB o de red.
Introduzca el CD del producto en el equipo y siga las instrucciones que aparecen
en pantalla.
Si el programa de instalación del software no se inicia automáticamente, explore
el contenido del CD y ejecute el archivo HP LaserJet Pro M1530 MFP Series.pkg;
a continuación, siga las instrucciones que aparecen en pantalla.
1.
.
3.
IT
Installazione con Mac
Collegare il cavo USB o il cavo di rete.
Inserire il CD del prodotto nel computer e attenersi alle istruzioni visualizzate sullo
schermo.
Se il programma di installazione non si avvia automaticamente, accedere ai contenuti
del CD ed eseguire il le HP LaserJet Pro M1530 MFP Series.pkg, quindi attenersi alle
istruzioni visualizzate sullo schermo.
1.
.
3.
DE
Mac Installation
Schließen Sie das USB- oder Netzwerkkabel an.
Legen Sie die dem Gerät beiliegende CD in den Computer ein, und folgen Sie den
Anweisungen auf dem Bildschirm.
Wenn das Installationsprogramm nicht automatisch gestartet wird, suchen Sie auf der
CD nach der Datei HP LaserJet Pro M1530 MFP Series.pkg. Führen Sie die Datei aus,
und folgen Sie den Anweisungen auf dem Bildschirm.
1.
.
3.
FR
Installation sous Mac
Connectez le câble USB ou le câble réseau.
Insérez le CD du produit dans l'ordinateur et suivez les instructions à l'écran.
Si le logiciel du programme d'installation ne démarre pas automatiquement, parcourez
le contenu du CD et exécutez le chier HP LaserJet Pro M1530 MFP Series.pkg.
Ensuite, suivez les instructions à l'écran.
1.
.
3.
EN
Mac installation
Connect the USB or network cable.
Insert the product CD into the computer, and follow the onscreen instructions.
If the software installation program does not start automatically, browse the CD
contents and run the HP LaserJet Pro M1530 MFP Series.pkg le, and then follow
the onscreen instructions.
1.
.
3.
1
La pagina si sta caricando...
La pagina si sta caricando...

NL
Druk op de knop Instellingen
en selecteer Faxinstellingen met de pijlknoppen.
Druk vervolgens op OK.
Selecteer Basisinstell. met de pijlknoppen en selecteer vervolgens Tijd/datum of
Faxkop om de desbetreffende instellingen te wijzigen.
4.
5.
DA
Tryk på opsætnings-
knappen, brug pileknapperne til at vælge Faxopsætning,
og tryk derefter på knappen OK.
Brug pileknapperne til at vælge Basisopsætning, og vælg derefter enten Tid/Dato
eller Faxhoved for at ændre den pågældende indstilling.
4.
5.
CA
Premeu el botó Conguració
, utilitzeu les tecles de etxa per seleccionar
Conguració fax i premeu el botó OK.
Utilitzeu els botons de etxa per seleccionar Con. bàsica i seleccioneu Hora/Data
o Encapçal. fax per canviar els paràmetres que calgui.
4.
5.
ES
Pulse el botón Conguración
y utilice los botones de echa para seleccionar
Congurar fax
y, a continuación, pulse el botón OK.
Utilice los botones de echa para seleccionar Cong. básica y, a continuación,
seleccione Hora/Fecha o Encab. fax para cambiar la conguración correspondiente.
4.
5.
IT
Premere il pulsante di impostazione
e utilizzare i pulsanti freccia per selezionare
Impostazione fax, quindi premere il pulsante OK.
Utilizzare i pulsanti freccia per selezionare Imp. base, quindi scegliere Ora/data
o Intestazione fax per modicare le impostazioni appropriate.
4.
5.
DE
Drücken Sie die Setup-Taste
, wählen Sie mit Hilfe der Pfeiltasten die Option
Fax-Setup aus, und drücken Sie OK.
Wählen Sie mit Hilfe der Pfeiltasten die Option Basis-Setup aus. Wählen Sie dann
entweder Zeit/Datum oder Fax-Kopf aus, um die entsprechenden Einstellungen zu
ändern.
4.
5.
FR
Appuyez sur le bouton Conguration
. Sélectionnez l'option Conguration du
télécopieur à l'aide des èches, puis appuyez sur le bouton OK.
Sélectionnez Conguration de base à l'aide des èches, puis sélectionnez Heure/Date
ou En-tête de télécopie pour modier les paramètres appropriés.
4.
5.
EN
Press the Setup
button, use the arrow buttons to select Fax Setup, and then press
the OK button.
Use the arrow buttons to select Basic Setup, and then select either Time/Date or Fax
Header to change the appropriate settings.
4.
5.
1
10
La pagina si sta caricando...

DA
Test dokumentføderen. Læg kongurationsrapporten i dokumentføderen med forsiden
opad, juster papirstyrene mod papirets kanter, og tryk derefter på Start kopiering
.
CA
Proveu l'alimentador de documents. Carregueu l'informe de conguració cara amunt
a l'alimentador de documents, ajusteu les guies de material amb els marges del paper
i premeu Inicia còpia
.
ES
Pruebe el alimentador de documentos. Cargue el informe de conguración boca arriba
en el alimentador de documentos, ajuste las guías del soporte a los bordes del papel y,
a continuación, pulse Iniciar copia
.
IT
Vericare l'alimentatore documenti. Caricare il report di congurazione rivolto verso l'alto
nell'alimentatore documenti, regolare le guide dei supporti in base ai bordi del foglio,
quindi premere Avvia copia
.
DE
Testen des Vorlageneinzugs: Legen Sie den Kongurationsbericht mit der bedruckten Seite
nach oben in den Vorlageneinzug. Richten Sie die Papierführungen an den Kanten des
Papiers aus, und drücken Sie anschließend auf Kopie starten
.
FR
Testez le bac d'alimentation. Placez le rapport de conguration face vers le haut dans
le bac d'alimentation, réglez les guides papier en fonction des bords du papier, puis
appuyez sur Lancer copie
.
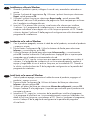
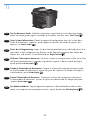
EN
Test the document feeder. Load the conguration report face-up in the document feeder,
adjust the media guides against the edges of the paper, and then press Start Copy
.
3
11
La pagina si sta caricando...

NL
Test de atbedscanner. Plaats het conguratierapport met de bedrukte zijde omlaag
op de scannerglasplaat en druk vervolgens op Kopie starten
.
DA
Test atbedscanneren. Læg kongurationsrapporten med forsiden nedad på
scannerglaspladen, og tryk derefter på Start kopiering
.
CA
Executeu una prova de l'escàner pla. Carregueu l'informe de conguració cara avall
sobre el vidre de l'escàner i premeu Inicia còpia
.
ES
Pruebe el escáner de supercie plana. Cargue el informe de conguración boca abajo
en el cristal del escáner y, a continuación, pulse Iniciar copia
.
IT
Testare lo scanner a supercie piana. Caricare il report di congurazione rivolto verso
il basso sul vetro dello scanner, quindi premere Avvia copia
.
DE
Testen des Flachbildscanners: Legen Sie den Kongurationsbericht mit der bedruckten
Seite nach unten auf das Scannerglas, und drücken Sie auf Kopie starten
FR
Testez le scanner à plat. Placez le rapport de conguration face vers le bas contre la vitre
du scanner, puis appuyez sur Lancer copie
.
EN
Test the atbed scanner. Load the conguration report face-down on the scanner glass,
and then press Start Copy
.
5
1
La pagina si sta caricando...

NL
Test de scanfunctie. Plaats de pagina met de beschrijving van het bedieningspaneel
op de scannerglasplaat. Windows: Selecteer in de programmagroep HP Scannen
naar en selecteer een scanbestemming.
Mac: Open HP Director, klik op Scan en klik vervolgens opnieuw op Scan. Klik op
Voltooien en vervolgens op Bestemmingen. Geef het bestand een naam en geef een
locatie voor het bestand op. Klik op Opslaan.
DA
Test scanning. Læg kontrolpanelets beskrivelsesside på scannerglaspladen. Windows:
I HP-programgruppen skal du vælge Scan til og vælge en scanningsdestination.
Mac: Åbn HP Director, klik på Scan, og klik på Scan igen. Klik på Afslut, og klik derefter
på Destinationer. Navngiv len og angiv destinationsplaceringen. Klik på Arkiver.
CA
Executeu una prova d'escaneig. Carregueu la pàgina de descripció del tauler de
control al vidre de l'escàner. Windows: Al grup de programes d'HP, seleccioneu
Escaneig a i seleccioneu una destinació d'escaneig.
Mac: Obriu l'HP Director, feu clic a Escaneja una vegada i torneu fer clic a Escaneja.
Feu clic a Finalitza i feu clic a Destinacions. Assigneu un nom al txer i especiqueu
la ubicació de la destinació. Feu clic a Desa.
ES
Pruebe el escaneado. Cargue la página de descripción del panel de control en el
cristal del escáner. Windows: En el grupo de programas HP, seleccione Escanear a
y seleccione el destino del archivo escaneado.
Mac: Abra HP Director, haga clic en Escanear y vuelva a hacer clic en Escanear. Haga
clic en Finalizar y después en Destinos. Asigne un nombre al archivo y especique la
ubicación de destino. Haga clic en Guardar.
IT
Testare la scansione. Caricare la pagina di descrizione del pannello di controllo sul
vetro dello scanner. Windows: nel gruppo dei programmi HP, selezionare Scansione
in e scegliere una destinazione di scansione.
Mac: aprire HP Director, fare clic su Scansione quindi nuovamente su Scansione. Fare clic
su Fine, quindi su Destinazioni. Assegnare un nome al le e specicare la posizione della
destinazione. Fare clic su Registra.
DE
Testen des Scanners: Legen Sie die Seite mit der Beschreibung des Bedienfelds auf
das Scannerglas. Windows: Wählen Sie in der Programmgruppe für HP Scannen nach
und anschließend das Scanziel aus.
Mac: Öffnen Sie den HP Director, klicken Sie auf Scannen und dann noch einmal auf
Scannen. Klicken Sie auf Fertig stellen und anschließend auf Ziele. Bennennen Sie die
Datei, und legen Sie einen Speicherort fest. Klicken Sie auf Speichern.
FR
Testez la numérisation. Placez la page de description du panneau de commande
contre la vitre du scanner.
Windows : Dans le groupe de programmes HP,
sélectionnez Numériser vers et sélectionnez une destination de numérisation.
Mac : Ouvrez HP Director, cliquez sur Numériser, puis à nouveau sur Numériser.
Cliquez sur Terminer, puis sur Destinations. Nommez le chier, puis spéciez
l'emplacement de destination. Cliquez sur Enregistrer.
EN
Test scan. Load the control-panel description page on the scanner glass. Windows:
In the HP program group, select Scan to, and select a scanning destination.
Mac: Open the HP Director, click Scan, and click Scan again. Click Finish, and then click
Destinations. Name the le and specify the destination location. Click Save.
7
13
La pagina si sta caricando...

IT
La congurazione è stata completata. Se il prodotto non è stato registrato durante
l'installazione del software, visitare il sito Web all'indirizzo www.register.hp.com per
eseguire la registrazione. HP Help and Learn Center e documentazione aggiuntiva sono
disponibili sul CD fornito con il prodotto o nella cartella dei programmi HP sul computer.
HP Help and Learn Center è uno strumento di assistenza che fornisce accesso facilitato
alle informazioni sul prodotto, supporto Web ai prodotti HP, guida alla risoluzione dei
problemi e informazioni relative alla sicurezza e alle normative.
DE
Die Installation ist abgeschlossen. Wenn Sie das Produkt während der Softwareinstallation
noch nicht registriert haben, rufen Sie die Website www.register.hp.com auf, um sich
zu registrieren. Das HP Help and Learn Center sowie weitere Dokumentationen benden
sich auf der CD, die dem Gerät beiliegt, oder im HP Programmordner auf Ihrem
Computer. Das HP Help and Learn Center ist eine Produkthilfe für einfachen Zugriff auf
Produktinformationen, Web-Support für HP Produkte, Hinweise zur Fehlerbehebung sowie
Zulassungs- und Sicherheitsinformationen.
FR
L’installation est terminée. Si vous n'avez pas enregistré le produit lors de l'installation
du logiciel, rendez-vous sur www.register.hp.com pour le faire dès maintenant. Le centre
d'aide et d'apprentissage HP ainsi que d'autres documents se trouvent sur le CD fourni
avec le produit ou dans le dossier dédié aux programmes HP sur votre ordinateur. Le
centre d'aide et d'apprentissage HP est un outil d'aide qui permet d'accéder en toute
simplicité aux informations sur le produit, à une assistance en ligne pour les produits HP,
à des conseils de dépannage et à des informations relatives à la réglementation et à la
sécurité.
EN
Setup is complete. If you did not register the product during software installation,
go to www.register.hp.com to register now. The HP Help and Learn Center and other
documentation are on the CD that came with the product or in the HP program folder on
your computer. The HP Help and Learn Center is a product help tool that provides easy
access to product information, HP product Web support, troubleshooting guidance, and
regulatory and safety information.
14
La pagina si sta caricando...
La pagina si sta caricando...
La pagina si sta caricando...
La pagina si sta caricando...
La pagina si sta caricando...
La pagina si sta caricando...
-
 1
1
-
 2
2
-
 3
3
-
 4
4
-
 5
5
-
 6
6
-
 7
7
-
 8
8
-
 9
9
-
 10
10
-
 11
11
-
 12
12
-
 13
13
-
 14
14
-
 15
15
-
 16
16
-
 17
17
-
 18
18
-
 19
19
-
 20
20
-
 21
21
-
 22
22
-
 23
23
-
 24
24
-
 25
25
-
 26
26
-
 27
27
-
 28
28
-
 29
29
-
 30
30
-
 31
31
-
 32
32
-
 33
33
-
 34
34
-
 35
35
-
 36
36


HP LaserJet Pro M1536 Multifunction Printer series Guida d'installazione
- Categoria
- Barebone per PC / workstation
- Tipo
- Guida d'installazione
in altre lingue
- English: HP LaserJet Pro M1536 Multifunction Printer series Installation guide
- français: HP LaserJet Pro M1536 Multifunction Printer series Guide d'installation
- español: HP LaserJet Pro M1536 Multifunction Printer series Guía de instalación
- Deutsch: HP LaserJet Pro M1536 Multifunction Printer series Installationsanleitung
- Nederlands: HP LaserJet Pro M1536 Multifunction Printer series Installatie gids
- português: HP LaserJet Pro M1536 Multifunction Printer series Guia de instalação
- dansk: HP LaserJet Pro M1536 Multifunction Printer series Installationsvejledning
- eesti: HP LaserJet Pro M1536 Multifunction Printer series paigaldusjuhend
- svenska: HP LaserJet Pro M1536 Multifunction Printer series Installationsguide
- suomi: HP LaserJet Pro M1536 Multifunction Printer series Asennusohje
Documenti correlati
-
HP LaserJet Pro CP1525 Color Printer series Guida d'installazione
-
-
HP LaserJet Pro M701 Guida d'installazione
-
HP LaserJet Pro M1213nf/M1219nf Multifunction Printer series Manuale utente
-
HP LaserJet Pro M1217nfw Multifunction Printer series Guida d'installazione
-
-
-
-
-