
RevA 10-2015

Welcome
Thank you for choosing Hill Audio for your sound system. To make sure that this product meets your
expectations and provides long-term, reliable performance, please read and follow this instruction
manual carefully.
Important safety instructions
Read these instructions and all markings on the product. Keep these instructions.
Heed all warnings and instructions, both in this manual and on the product.
Clean only with a dry cloth. Unplug from AC supply before cleaning.
Do not use this product near water and avoid any exposure to water.
Before connecting this product to any AC supply, make sure to check whether the AC mains vol-
tage and frequency match the indication on the product and its packaging.
Only connect this product to an AC supply with sufficient power handling, protective earth con-
nection, ground-fault (earth-fault) protection and overload protection.
Disconnect the product from the AC supply during thunderstorms or longer periods of being
unused.
Make sure any heat sink or other cooling surface, or any air convection slot , is exposed sufficiently
to free air circulation and is not blocked.
Do not operate this product in environmental temperatures exceeding 35 degrees Celsius and/or
85% relative humidity.
Position the product in a safe and stable place for operation, out of reach of unauthorized persons.
Make sure any cable connections to and from the product are neither subject to potentially des-
tructive mechanical impact nor present any risk of stumbling or other accident risk to people.
Audio equipment may generate sound pressure levels sufficient to cause permanent hearing
damage to persons. Always start up at low volume settings and avoid prolonged exposure to sound
pressure levels exceeding 90 dB.
Do not open this product for service purposes. There are no user-serviceable parts inside.
Warranty will be void in any case of unauthorized service by the user or other not authorized persons.
Take any precaution required by local law, applicable regulations or good business practice to avoid
injury of people or material damage by use of this product.
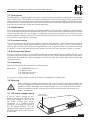
Explanation of symbols used in this manual and on the product:
DANGER!
Safety hazard.
Risk of injury or death.
WARNING!
Fire hazard.
WARNING!
Hazardous voltage.
Risk of severe or fatal
electric shock.
ATTENTION!
Read manual
before installation
and operation.
Manual Language
UK This user manual is written in English. For other languages, visit www.hill-audio.com
FR Ce guide est écrit en anglais. Pour les autres langues, visitez: www.hill-audio.com
DE Diese Anleitung ist in Englisch verfasst. Für andere Sprachen: www.hill-audio.com
ES Este manual está escrito en Inglés. Para otros idiomas, visite: www.hill-audio.com
PT Este manual está escrito em Inglês. Para outros idiomas, visite: www.hill-audio.com
IT Questo manuale è scritto in inglese. Per altre lingue, visitare: www.hill-audio.com
PAGE 1
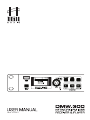
USER MANUAL - DMW300 NETWORK | FM | USB RECEIVER & PLAYER

PAGE 2
1.2. Health advice
This unit produces and absorbs electromagnetic radiation. The strength of radiation and the sensitiv-
ity for disturbing interference matches the CE and FCC requirements. A corresponding sign is printed
on the backside of the unit. Any change or modification may affect the behavior of the unit concerning
electromagnetic radiation, with the CE requirements eventually not to be met any more. The manufac-
turer takes no responsibility in this case.
1.3. Functional advice
This unit is immune to the presence of electromagnetic disturbances – both conducted and radiated
- up to a certain level. Under peak conditions, the unit is classified to show a “class C” performance
criteria and may encounter temporary degradation or loss of function which may need manual help
to recover. In such case, disconnect the AC power from the unit and reconnect it again to recover.
1.4. Environmental advice
This unit is built to conform to the ROHS standards and the WEEE directive 2002/96/EC of the
European Parliament and of the Council of the European Union. Under these regulations, the product
shall not be discarded into regular garbage at the end of its life, but shall be returned to authorized
recycling stations.
1.5. Unpacking
Please check that the box contains the following items:
Main parts: 1 pc. DMW300 main unit
1 pc. Mains cable
1 pc. Operation manual
1 pc. Remote Control
If any part is missing, please contact your dealer immediately for replacement.
1.6. Warning
After unpacking, and before plugging the AC cord in the wall outlet, check whether the
AC mains voltage and frequency is the same as this product is specified for (see rear
panel of product). Whenever the specified voltage or your AC plug should not match
the local conditions, do NOT plug the AC cord into the wall outlet and contact your
dealer immediately.
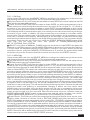
1.1. Description
The DMW300 is a digital program source for commercial sound systems, and can work as a stand-
alone media player, as a network media player playing files from the network via UPnP, as an internet
radio and also as a terrestrial radio receiver being able to receive analog FM Radio with RDS readout.
It offers wired or wireless network access, an IR remote control and menu separation for the installer
and user, to provide safe, simple and reliable operation.
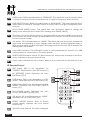
1.7. AC mains voltage setting
If the AC mains voltage of your
power outlet and the setting of the
AC supply voltage on your unit do
not match, contact your dealer,
contractor or a qualified service
workshop to change the setting of
the AC voltage selector. The AC
voltage selector switch is located on
the side panel of the unit, close to
the AC inlet.
AC Voltage
Selector Switch
USER MANUAL - DMW300 NETWORK | FM | USB RECEIVER & PLAYER

PAGE 3
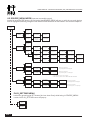
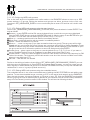
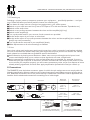
2
1
34
15 14
2120
18
910 1319
7
17
8
6
11 12
5
16
Control - Front
Output Section
Input Section
2.1. Controls and Connections
Connections - Rear
USER MANUAL - DMW300 NETWORK | FM | USB RECEIVER & PLAYER

PAGE 4
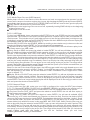
2.2. Functional Description
The DMW300 is both a receiver for internet radio and terrestrial FM radio, as well as a USB and
network media player to play the music library stored in any of the computers in the local network that
are compatible with the UPnP (Universal Plug and Play) media sharing protocol. The DMW300 is
specifically catering for background music replay in commercial venues and as such allows easy
access to preset sources, while system settings are not easily accessible by the operator to avoid
accidental change of settings by unqualified operators; this is achieved by two different user levels,
named SOURCE_MENU (SRC) mode and SET_MENU (SET) mode. The DMW300 can be connected
to a wired network or a wireless network via an optional USB WiFi adapter. An IR remote control is
available for the main functions.
2
1
3
4
9
10
7
8
6
11
5
AC inlet and fuse holder. Use the supplied AC cord to connect the unit to AC mains. Make sure
voltage and frequency stated and set on the unit comply with your local AC supply. The fuse
can be accessed by the small drawer at the AC inlet. To change the fuse, unplug the AC cord
first, pull out the fuse drawer and replace the fuse ONLY with a fuse of SAME voltage and
rating. If the fuse blows again after replacement, hand over the unit to qualified service person-
nel.
Stereo Main output. This is a balanced stereo XLR output carrying the main output signal.
Stereo Main output. This is an unbalanced RCA output carrying the same signal as output (2).
Maximum level setting for Stereo Main output. This control allows to limit the maximum level
at the outputs (2)/(3) in order to match the connected sound system. Adjustments shall be
made with a small screw driver. Note that the total angle is 300 degrees; do not apply exces-
sive force with the screw driver.
Aerial socket. Plug in a suitable FM antenna here, or connect any suitable antenna cable of the
house installation here (75 Ohms cable). Depending on whether the antenna connector is
male or female, the included adaptor may be required.
Reset button. In the unlikely event of an unforeseen operational status, press this button to
re-boot the unit.
Rear USB connection. This USB-type-A socket is mainly designated for insertion of a USB WiFi
adaptor in case the unit is supposed to be connected to the LAN via WiFi. Note that only Ralink
RT5370-based USB WiFi adaptors are compatible with this unit.
LAN connection. This is a standard RJ45 jack for insertion of a network cable. Whenever
possible, it is recommended to operate this unit via this input and a wired LAN access.
Display. This is a A 128x64 monochrome graphics display, indicating the operational status of
the unit.
NAVIGATION wheel. This is turn/push encoder; turn left to navigate up or turn right to
navigate down in a menu. Press the control to confirm an item selected in the menu (ENTER).
SRC (LAST PLAYED) button. SRC is the abbreviation for “SOURCE”. This switch with rear illumi-
nation selects the source (continuously lit when source is confirmed, flashing when new
source is under selection)
BACK (BROWSE) button. This switch with rear illumination allows to navigate backwards.
SET button. SET is the abbreviation of “SETTINGS”. This switch with rear illumination switches
between the two main modes of the unit (all time lit on when the unit is not in SET_MENU
mode; flashing when the unit is in SET_MENU mode)
USER MANUAL - DMW300 NETWORK | FM | USB RECEIVER & PLAYER
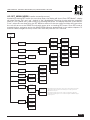
13
12

PAGE 5
28
26
25
29
FWD button. FWD is the abbreviation of “FORWARD”. This switch with rear illumination allows
a “forward” transport function in certain menus or might be assigned to other functions.
BWD (DELETE) button. BWD is the abbreviation of “BACKWARD”. This switch with rear illumi-
nation allows a “backward” transport function in certain menus or might be assigned to other
functions.
PLAY/PAUSE (MUTE) button. This switch with rear illumination allows to change the
replay/mute status (all time lit when PLAY, flashing when PAUSE/MUTE)
IR receiver. This is the optical receiver for the optional IR remote control. Make sure this area
is not covered and a line of sight is provided between this receiver and the IR remote control
to secure proper function.
JGL button. JGL is the abbreviation of “JINGLE”. This switch with rear illumination activates the
jingle mode and depending on other settings made, will either activate scheduled replay or
allow one-shot replay of prestored jingles. The backlight is all time on when JGL is disabled, and
flashing when JGL enabled.
Front USB connection. This USB-type-A socket is mainly designated for insertion of a USB
memory device for media replay or firmware updates.
DIRECT ACCESS buttons. A set of 10 direct access keys. All keys have constantly lit rear illumi-
nation, and allow to choose presets directly.
Power switch. Switches the unit on and off. Make sure you switch the unit off when not in use.
15
14
20
18
19
17
16
21
22
23
24
IR Remote Control
27
22
23
24
26
25
SRC button. SRC is the abbreviation for
“SOURCE”. Replicates the unit’s SRC button (11)
UP (BROWSE) button. Replicates the unit’s
BACK button (12)
FWD button. FWD is the abbreviation of “FOR-
WARD”. Replicates the unit’s FWD button (14)
BWD button. BWD is the abbreviation of “BACK-
WARD”. Replicates the unit’s BWD (DELETE)
button (15)
PLAY/PAUSE button. Replicates the unit’s
PLAY/PAUSE (MUTE) button (16)
JGL button. JGL is the abbreviation of “JINGLE”.
Replicates the unit’s JGL button (18)
DIRECT ACCESS buttons. Allow to choose
presets directly. Replicate the unit’s relative
buttons (20)
Special Function Buttons. Currently unassigned.
28
29
27
USER MANUAL - DMW300 NETWORK | FM | USB RECEIVER & PLAYER

PAGE 6
3.1. Preparation and connections
To prepare for first operation, the following points need to be taken care of:
Make sure that your local AC power grid supplies the voltage that the DMW300 is set to (see
voltage selection switch on rear) and connect the DMW300 to AC power via the provided power
cable and the rear-side IEC socket.
Connect a suitable aerial to the relative rear side socket to enable FM radio reception.
Connect the audio output to a sound system which provides the necessary amplification to listen to
the DMW300’s output signal. The DMW300 itself does not contain any amplifier, neither for
speakers nor for headphones. Set the rear-side output level control with a small flat screwdriver to
a medium level and adjust it later according to your sound system’s input sensitivity.
For many of its functions, the DMW300 requires a broadband Internet connection, either through
an RJ45 cable or through Wifi (requires additional USB WiFi dongle based on Ralink RT5370
chipset, not included). The easiest way is to connect a router set to DHCP mode (automatic
assignment of IP addresses) to an ADSL modem or a cable modem provided by your ISP. You
should choose a router that supports UPnP (many older routers do not support UPnP well in their
initial releases and you might need to update the firmware for better UPnP support) to enable you
to play music stored in PCs and NASs (network attached storage) in the local network. Enable the
default DHCP function and the UPnP sharing function of your router, then plug in an RJ45 cable
with Ethernet connection into the rear-side relative socket.
In case you use Wifi, ready the security key of the Wifi router (get it from the person setting up the
Wifi router for you). For setup of the Wifi, do the set-up close to the Wifi router (within 2 meters
line of sight).
If your network works with fixed IP addresses, assign an IP address for use with the DMW300
and read further below how to make the required settings in the DMW300.
4.1. Basic concept of operation
To make initial settings and operate the DMW300 for the first time, it is essential to understand the
operational concept. The DMW300 has been designed for commercial applications, where it is
assumed that the installer/configurator are not identical with the daily operator. It is thus assumed
that setup is done by the installer/configurator once, and the unit is then run by the daily operator
subsequently. Under this presumption, to make operation as easy and intuitive for the daily operator
as possible, some of the setup, editing and advanced configuration features are not available to the
daily operator. In this sense, the DMW300 operation is significanltly different from a HiFi component
where all menus are accesible with same ease by the user. The DMW300 makes it intentionally more
difficult for access certain functions by the daily operator.
Consequently, the DMW300 has two main operation modes:
SOURCE_MENU mode – this is the mode accessible to the daily operator, where the replay sour-
ces can be chosen, and folder/file choices can be made where required to determine the program
material.
SET_MENU mode – this is the mode designed to be mainly used be the installer/configurator,
where all configurational settings are made, and some advanced editing features are available.
The following pages show the menu trees of the unit, separately for the SOURCE_MENU and the
SET_MENU modes. Refer to the further following chapters to learn how to access and leave the
SET_MENU mode.
USER MANUAL - DMW300 NETWORK | FM | USB RECEIVER & PLAYER

PAGE 7
USER MANUAL - DMW300 NETWORK | FM | USB RECEIVER & PLAYER
4.2. SOURCE_MENU MODE
(operator-accessible menus)
Invoked by pressing SRC button, the top level of the SOURCE_MENU will pop up, with the currently playing
source highlighted, allowing navigation with NAVIGATION elements as described in the relative chapters.
PLAY_SETTING MENU
Invoked by pressing the SET button (for less than 2sec) while being in SOURCE_MENU
mode, the PLAY_SETTING menu will pop up.
Play Last
USB-Player
Song
Playlist
List of folders
(incl. ROOT)
List of folders
(incl. ROOT)
List of files
List of files Play List
Play Song
Play Last
Network
Player Playlist
Song
List of folders
(incl. ROOT)
List of folders
(incl. ROOT)
List of files Play List
List of files Play Song
List of servers
List of servers
Note: during navigation,
only valid playlist files are displayed
Note: during navigation,
only valid song files** are displayed
Note: during navigation,
only valid playlist files are displayed
Note: during navigation,
only valid song files** are displayed
Web-Radio
Play Last
Presets
All
Region List of
Countries
Skytune
Server
Genre List of
Genres Play Station
List of Stations
Play Station
List of Stations
List of Stations
Play Station
Play Station
List of 6
Groups
FM-Radio
Play Last
Presets
Select
Frequency
(and play)
Manual
Tuning
Play Station
List of Stations
Add Station
(last to preset list)
* Valid playlist file formats are: m3u8, pls
**Note: valid song file formats are: MP3, AAC, OGG, FLAC, WAV
List of Stations
Select Group
Select Group
Select Group
SOURCE
MENU
Repeat:
[None]
Order:
[Sequential]
Add Station
(last to preset list)
Add Station
(last to preset list)
Add Station
(last to preset list)

PAGE 8
USER MANUAL - DMW300 NETWORK | FM | USB RECEIVER & PLAYER
Web-Radio
FM-Radio
Jingle Play Ducking
Level
Play
Mode Sequential
Single
Note: if Single jingle play mode is chosen, and the user presses the JGL button,
unit wil offer all available jingle for choice, and wheel navigation + ENTER will play the
relative jingle once.
Note: if Sequential jingle play mode is chosen, and the user presses the JGL button,
unit will play all jingles in a sequence with following music as per jingle file name.
JGL button acts as on/off.
Manage
Stations
Manage
Groups
Maintenance
SET
MENU
Network
Setup
Backlight
Language
Time & Date
List of
languages
Auto Play
Time (s): [10]
HW/SW
Version
Check
Update
Factory
Default
Machine
ID
Brightness
Timeout
Manage
Presets
Scan
Frequency
Region:
[USA]
Seek RSSI:
[10 dBuV]
Seek SNR:
[10 dBuV]
Current
Status
Wired
LAN
Wireless
LAN
Time
Zone
Time
Notation
Use NTP:
[No]
Set
Time
Set
Date
IP:
[Dynamic]
DNS:
[Dynamic]
Add/Remove
AP
AP:
[“SSID“]
Sig:
-xx dBm
IP:
[Dynamic]
DNS:
[Dynamic]
Add AP
Remove AP
Edit AP
4.3. SET_MENU MODE (installer-accessible menus)
Invoked by pressing SET button for more than 2sec, the display will show „Enter SET Mode?“, display
will show entries “No” and “yes”, default is "No" (highlighted). Scroll by turning with the navigation
wheel to "Yes" (below "No"), then confirm by pressing the wheel. The display will show “press Set for
2 sec”, when the user does this, the SET Mode is entered; if the user does not follow the instruction,
the unit will return to the SOURCE mode with status prior to invoking SET button. Once SET mode is
entered, further
navigation works with NAVIGATION elements as described in the relative chapters. To
leave SET Mode, navigate to the top of the menu tree and press SET for 5 seconds.

PAGE 9
5. OPERATION
5.1. SET_MENU MODE
As explained, the SET_MENU mode mainly serves for the installer and configurator to set up the unit
for first use, or to adjust the units’ settings to a changed environment or changed user requirements.
To avoid accidental setting changes being made, the access to the SET_MENU mode has been
restricted by means of a multi-step access sequence.
To enter the SET_MENU mode, expedite the following access sequence:
Press the SET button for more than 2sec, the display will show „Enter SET Mode?“ with two below
entries, “No” and “yes”, default is "No" (highlighted).
Scroll by turning with navigation wheel clockwise to "Yes" (below "No"),
Confirm by pressing the navigation wheel
The display will show “press Set for 2 sec”, follow the instruction and press SET for 2 seconds.
After this, you will be in the SET_MENU mode, the display will show SET_MENU with entries listed
below as documented in the menu tree. If you fail to complete the above access sequence, the unit will
simply return to the SOURCE_MENU mode, and you will need to start over if you intend to access
SET_MENU mode.
To navigate inside SET_MENU mode, do the following:
Turn the navigation wheel to right (cw) to scroll down, to left (ccw) to scroll up
Press the wheel to confirm current selection (enter)
Press BACK to move one level higher in menu tree
To leave SET_MENU mode, do the following:
Press SET for more than 5 seconds. The unit will save all applied changes and return back to
SOURCE mode.
Note: the SET LED blinks during editing and turns to constantly lit onces changes are stored and the
unit returns to SOURCE_MENU mode.
5.1.1. Initial setup
Power up the unit and make sure a broadband internet connection is available as described. Enter the
SET mode as explained in previous chapter 5.1.
5.1.1.1. Setting the user interface language
Make sure you are in the SET_MENU root and navigate to SET_MENU>LANGUAGE, then press the
wheel to invoke ENTER. A list of available language will appear Scroll to the language you require
(current position is highlighted) and press press wheel to invoke ENTER. Available languages are
English, German, French, Spanish, Portugese and Chinese. Once the language has been chosen, the
user interface will change the language immediately and the unit returns to the higher menu level, in
this case SET_MENU.
Note: For convenience - in case the unit is accidentally set to the wrong language – the menu path to
the SET_MENU>LANGUAGE menu is indicated with a flag symbol to allow you to locate the language
settings even if you can not read the current language.
USER MANUAL - DMW300 NETWORK | FM | USB RECEIVER & PLAYER

PAGE 10
5.1.1.2. Setting time and date
Make sure you are in the SET_MENU root and navigate to SET_MENU>TIME&DATE, then press the
wheel to invoke ENTER. The following settings can be made subsequently:
Time zone. Scroll to TIME_ZONE, press the wheel to invoke ENTER and then scroll to the area which
you know is in the same time zone as your location and press ENTER. After this, the unit will return
to the higher menu level, in this case SET_MENU>TIME&DATE.
Time notation. Scroll to TIME_NOTATION, press the wheel to invoke ENTER and then scroll choose
either 12-hour or 24-hour notation and press ENTER. After this, the unit will return to the higher
menu level, in this case SET_MENU>TIME&DATE.
Use NTP (network time protocol). NTP is designed to synchronize a device’s clock with a time
server. Your Receiver will synchronize the time server you nominated (see below) every time it
powers up and connects to Internet. This ensures a very high degree of accuracy in the Receivers
clock. Scroll to USE_NTP and press ENTER. Scroll to select whether to use NTP or not and press
ENTER. If you choose to use NTP, a pop up window will be shown to ask you to input the URL ad-
dress of the NTP server of your choice. You can continue to use the default NTP server, which is
using GMT (UK) time, at server 0.uk.pool.ntp.org
If you choose not to use NTP for clock synchronization, you need to enter the time and date manually.
Scroll to SET_TIME and press the wheel to invoke ENTER, the unit will display hours and minutes with
the hour section flashing. Use the wheel to set the desired hours value, then use the FWD button to
skip to minutes and adjust again by the wheel. If you need to skip back to set hours, you can toggle
between the hoiurs and minutes setting by the BWD/FWD buttons. Press BACK once done. Scroll to
SET_DATE and press the wheel to invoke ENTER, the unit will display year, month and day with the year
section flashing. Use the wheel to set the desired year value, then use the FWD button to skip to day
and so on. Press BACK once done.
Note that any change will only be saved if you leave the SET mode with saving the changes, as
described in 5.1.
5.1.1.3. Setting the backlight properties
Make sure you are in the SET_MENU root and navigate to SET_MENU>BACKLIGHT, then press the
wheel to invoke ENTER. The following settings can be made subsequently:
Brightness. The backlight LED intensity can be programmed from Off to Maximum intensity in very
fine steps. Scroll to BRIGHTNESS and press the wheel to invoke ENTER. A pop up window with a
solid bar showing the current intensity level will be shown. Use the NAVIGATION wheel to tune to
the intensity desired (the actual intensity will vary in real time). Press BACK once done.
Timeout. The backlight LED can be programmed to turn on for certain duration (10/30 seconds,
1/2/5 minutes after the last key action) or forever (always on). Scroll to TIMEOUT and press the
wheel to invoke ENTER, then make the required settings. Press BACK once done.
Note that any change will only be saved if you leave the SET mode with saving the changes, as
described in 5.1.
5.1.1.4. Setting the Auto play time properties
The DMW300 can be programmed to play the last media automatically after power up if the user
does not operate any key for 10, 30, or 60 seconds after the radio is ready. This feature is default to
be Off. The change the setting, make sure you are in the SET_MENU root and navigate to
SET_MENU>AUTO_PLAY_TIME, then press the wheel to invoke ENTER. The unit will display a list
containing the entries OFF (default, highlighted), 10s. 30s, 60s. Use the NAVIGATION wheel to choose
the desired setting. Press BACK once done.
Note that any change will only be saved if you leave the SET mode with saving the changes, as
described in 5.1.
USER MANUAL - DMW300 NETWORK | FM | USB RECEIVER & PLAYER

USER MANUAL - DMW300 NETWORK | FM | USB RECEIVER & PLAYER
5.1.1.5. Setting up FM Radio presets
The DMW300 provides the facility to scan the air and store the available FM broadcast frequencies.
However, some of the scanned frequencies might not provide good enough reception. You can deter-
mine if any scanned frequency should be stored or not in the preview session accordingly, and also
name and order the frequencies the way you like. Go to SET_MENU>FM_RADIO and then press the
wheel to invoke ENTER. You can now choose various scan parameters:
Choose REGION and scroll to the applicable entry then press ENTER; this will select the FM
frequency range of your territory. The unit will return to to SET_MENU>FM_RADIO afterwards.
Choose SEEK RSSI (received signal strength indicator). This allows the DMW300 to search for
frequencies that are of higher received signal than the indicator. The default value is 10dBuV. The
unit will return to SET_MENU>FM_RADIO after you made your choice.
Choose SEEK SNR (signal to noise ratio). This allows the DMW300 to search for frequencies that
have signal-to-noise value higher than the selected indicator. The default value is 10dBuV. The unit
will return to SET_MENU>FM_RADIO after you made your choice.
You are now ready to run the frequency scan: Choose SCAN to enter the frequency scanning option
and confirm YES by pressing ENTER once again, this will erase all your current presets and start the
scanning a new. The number of scanned frequencies will be displayed. Press ENTER to preview the
scanned frequencies. The radio at the lowest frequency of the scanned values will be highlighted.
Press ENTER to listen and take actions per the pop up window:
Move down - exchange the position with the frequency below it
Delete – remove it
Name it – assign a name to the frequency with Navigation dial and RWD/FWD buttons. Note that
naming a station only replaces the displayed frequency by the defined name alias, the RDS informa
tion (since displayed in a separate tag line) is not affected by this.
Fine tune it – adjust the reception frequency in steps of 50 KHz for the best listening experience
(use RWD/FWD buttons)
Press Back when you finish. Note that any change will only be saved if you leave the SET mode with
saving the changes, as described in 5.1.
ADVICE: If your broadband internet connection is provided by a wired Ethernet connection via the
rear-side RJ45 port from a DHCP-enabled router, and the user interface language suits you, then no
further settings are necessary. The DMW300 will automatically acquire an IP address, and you are
ready to go. You can skip the following steps 5.1.1.7., 5.1.1.8. and 5.1.1.9. If you connect the
DMW300 however to a network with fixed IP addresses, to a WiFi network or if you wish to change
the user interface language, please refer to the following:
5.1.1.7. Configure for wired access to network with fixed IP addresses
IP address and the DNS address can either be assigned by hand or automatically by the DHCP server
(default) in the local network or statically. Make sure you are in the SET_MENU root and navigate to
SET_MENU>NETWORK_SETUP> WIRED_LAN, then press the wheel to invoke ENTER. A pop up
window will prompt you to select either Dynamic or Fixed:
To choose Dynamic, scroll the DYNAMIC and press the wheel to invoke ENTER; no further action is
needed if you choose Dynamic.
To choose Fixed, scroll to FIXED and press the wheel to invoke ENTER; you will be prompted with
IP:?, GW:?, NW:? and DNS:?. Step through each item and supply the network parameters in turn.
Unless you are tech savvy enough, it is recommended that you stay with Dynamic to allow the local
DHCP server to supply the network parameters automatically.
In the case you need to use a dedicated DNS server, you can specify one even if you choose Dynamic
under IP:Dynamic. Go to SET_MENU>NET_SETUP>WIRED_LAN>DNS:[Dynamic] and press the wheel
to ENTER. Choose FIXED in the pop up window and enter the desired DNS address and press the
wheel to ENTER. The DMW300 will skip the DNS address supplied by the DHCP and use your desig-
nated DNA address.
Note that any change will only be saved if you leave the SET mode with saving the changes, as
described in 5.1.
PAGE 11

5.1.1.8. Installing a WiFi Dongle and setting up WiFi access.
Please insert a USB Wifi dongle into the rear-panel USB type-A socket. Make sure that the DMW300
is located in near proximity of your access point (max. 2m) to make the below settings. Note:
The USB Wifi dongle must be based on a Ralink RT5370 chipset. If you insert a different type of Wifi
dongle, the unit will show “device not supported” and the WiFi function will not be available.
The USB WiFi dongle must be inserted before switching the unit on. Hot-plugging is not permitted.
The unit will not recognize the USB WiFi dongle if you insert it when the unit is already switched on.
Once the correct WiFi dongle is inserted, make sure you are in the SET_MENU root and navigate to
SET_MENU>NETWORK_SETUP>WIRELESS_LAN, then press the wheel to invoke ENTER. The follow-
ing settings can be made:
Access point editing. Scroll to ADD/REMOVE AP and press the wheel to invoke ENTER. Scroll to
ADD AP and press the wheel to ENTER. A list of APs/Wi-Fi routers with their signal strength on the
right side will be shown. If the AP is protected with a security passkey, a lock icon will be shown. Scroll
with the NAVIGATION wheel to the AP you want to connect to and press the wheel to ENTER. If the
Wi-Fi router does not have security implemented, the DMW300 will connect to it immediately. In case
of implemented WEP, WPA or WPA2 security protocols, you will be prompted to enter the necessary
passphrase in a pop-up window. Use the NAVIGATION wheel to choose the character to be applied,
starting from the first digit of the passphrase. Press the wheel to ENTER when the desired character
is highlighted; the chosen character will be applied to the respective digit and data entry progresses
to the next digit. Press BWD to delete the last character if required. Once completed, press BACK and
a pop up window will prompt you to Save & Exit or Ignore changes. Confirm Save & Exit by pressing the
wheel to ENTER; the authentication process starts. A sucessful authentication will be indicated by a
brief display of “Associated!” and the display will return to the ADD/REMOVE AP. You can continue to
add more Wi-Fi AP if there is more than one Wi-Fi AP in the vicinity.
Note: This is the only menu where a change can be saved without leaving the SET menu, for the
convenience of being able to check whether association with a newly added AP works.
When there is more than one AP around that has been associated, you can choose the AP you want
to use. Go to SET_MENU>NETWORK_SETUP>WIRELESS_LAN. Scroll to ENTER_AP and press the
wheel to ENTER. Scroll and press the wheel to ENTER to choose the particular AP you want to use.
In case you want to delete an AP, go to ROOT>SETUP>NETWORK_SETUP> WIRELESS_LAN>ADD/
REMOVE_AP, then scroll to REMOVE_AP and press the wheel to ENTER. Scroll and press the wheel
to ENTER to choose the particular AP you want to delete.
Similarly, when you have to edit the AP (for example, the security pass key has been changed), go to
ROOT>SETUP>NETWORK_SETUP>WIRELESS_LAN>EDIT_AP, and press the wheel to ENTER. Scroll to
the item you want to edit and edit accordingly.
IP address and DNS address assignment. The IP address and the DNS address can either be
assigned by hand or automatically by the DHCP server (default) in the local network or statically. Go to
SET_MENU>NETWORK_SETUP>WIRELESS_LAN and choose IP:[Dynamic]. A pop up window will
prompt you to select either Dynamic or Fixed. No further action is needed if you choose Dynamic. If you
choose Fixed, you will be prompted with IP:?, GW:?, NW:? and DNS:?. Step through each item and
supply the network parameters in turn. Unless you are tech savvy enough, it is recommended that you
stay with Dynamic to allow the local DHCP server to supply the network parameters automatically. In
the case you need to use a dedicated DNS server, you can specify one even if you choose Dynamic
under IP:Dynamic. Go to SET_MENU>NETWORK_SETUP>WIRELESS_LAN> DNS:[Dynamic] and press
the wheel to ENTER. Choose FIXED in the pop up window and enter the desired DNS address and
press the wheel to ENTER. The DMW300 will skip the DNS address supplied by the DHCP and use
your designated DNA address.
5.1.1.9. Checking the network status
You can always check the network connection status (the AP that is being connected, the current
network parameters, Wi-Fi signal strength and the Internet connection). To do so, make sure you are
in the SET_MENU root and navigate to SET_MENU>NETWORK_SETUP>CURRENT_STATUS, then
press the wheel to invoke ENTER. If the network setup is correct, the network equipment and the
Receiver are working and your ISP service is intact, you will see Internet: Connected. Sometimes, if
your ISP provider network has a problem, even if your Wi-Fi connection is working, you still cannot
connect to Internet. If the Internet connection fails, it will show Internet: No connect.
PAGE 12
USER MANUAL - DMW300 NETWORK | FM | USB RECEIVER & PLAYER

5.1.1.10. Configuring WEB radio presets
Due to the vast amount of available web radio stations, the DMW300 allows to store up to 600
preset stations in 6 groups. Editing the stations and groups can either be done via the unit’s user
interface in SET_MENU>WEB_RADIO or more comfortably via an externl PC and the unit’s built-in web
server.
5.1.1.10.1. Editing WEB radio presets using the user interface
Scroll to SET_MENU>WEB_RADIO>MANAGE_STATIONS, then press the wheel to invoke ENTER. Then
edit as follows:
Rename – press ENTER and the Edit name window will pop up with the current name displayed.
Use the FWD/BWD buttons and the NAVIGATION wheel to edit the name. Press ENTER when you
are done. You can also use the default group names: Group 1, Group 2, ….
Move up – exchange position with the station immediately above it
Move down - exchange position with the station immediately below it
Delete – delete the station from the list
Move to… – move it to a group (if you have created at least one group). The top group will be high
lighted and you can choose the group (if there are more than one group) to house the station. Press
ENTER to choose the group and a sub-window showing Open will be displayed. Press ENTER to open
the group and scroll to choose the position to store the station and press ENTER.
Create group – give a name to the group or use the default Group 1/2/3/4, etc... If you want to
use the available default Group as suggested, press Back and choose Save & exit.
Create station – enter the name and URL for Internet radio station and name and frequency for FM
radio of the station. The frequency of FM radio station must be of the format xx.x MHz orxxx.x MHz,
where x is any digit from 0~9.
Edit URL – edit the URL as needed
Similar to the editing of stations by scrolling to SET_MENU>WEB_RADIO>MANAGE_GROUPS, you can
edit the groups by highlighting it, press ENTER and choose Open. However, you cannot create groups
within a group. In other words, the structure of the MY STATIONS list is Root/Group and a station can
reside either in root or in groups (2-level structure).
5.1.1.10.2. Editing WEB radio presets using the embedded server
The embedded server is the most comfortable way of editing the MY STATIONS list and adding new
stations. To use the embedded server, connect your PC to the same local network as the DMW300.
Open the web browser in Internet Explorer or Chrome on your PC. Visit the DMW300’s embedded
server by typing the local IP address (the IP address of your Receiver can be found in>Setup >Network
setup >Current status) in web browser’s URL window. You will see the following window:
USER MANUAL - DMW300 NETWORK | FM | USB RECEIVER & PLAYER
PAGE 13

You can now comfortably do the following:
Choose the group (root or groups you have created)
Add a station. Input the name and URL of a new radio station into the ADD CHANNEL input boxes
and click Submit. The new station will appear immediately in the Receiver under the root or any
specific group. You can then listen to it by highlighting it and pressing [ENTER].
To edit an existing entry, click Edit beside the station. The edit window will open.
Click Delete to remove a channel.
Click Top (Bottom) to move the channel to the top (bottom) of the channel list.
Click Up (Down) will exchange the channel’s position with the channel that is immediately above
(below) it
Notes: URLs of the stations obtained from the integrated Skytune portal server cannot be viewed or
edited. The name and position of such station can be edited, however. Please note that URL’s you add
will be reported to the Skytune server for possible inclusion into the Skytune portal listing.
5.1.1.11. Configuring Network (LAN) Replay via UPnP
UPnP (Universal Plug and Play) is an industry standard to allow the sharing of media resources in a
local network based on standards like TCP/IP, UDP, DHCP, HTTP and XML. UPnP enables zero-
configuration networking whereby a compliant device can dynamically join a network, announce its
name, convey its capabilities upon request, and learn about the presence and capabilities of other
devices. One common use is for a networked music player like the DMW300 to stream and play the
music files stored in a PC’s (or NAS’s) hard disk drive. There are 3 components in an UPnP network:
media server, renderer and control point. The control point discovers the media server and render-
ers in the network and controls how the media from the server is streamed to a renderer. For exam-
ple, Windows Media player 11 and 12 contain a media server that contains and manages the media
content for your DMW300 to list and play. In this case, your Receiver acts as both a control point and
renderer. Your DMW300 has been tested to be compatible with the Media player 11 and 12 server
implementations, the Twonky media server and the media server found in NetgearStorage NAS. You
can use other media servers provided they are compliant with the UPnP specifications. To start,
enable the UPnP function of both the PC and the router that connects the local network to enable
your DMW300 to stream the music files in your PC for playback.
5.1.1.11.1. Enable UPnP function in Wifi AP/Router
Make sure it supports UPnP and that the function is turned on. Read the instruction manual of your
Wifi AP/router carefully and make sure it’s latest firmware and drivers are installed.
5.1.1.11.2. Enable UPnP in Windows XP
Windows XP (> Start > Control Panel > Add or Remove Programs > Add/Remove Windows Compo-
nents)
UPnP is not enabled by default in Windows XP and you need to turn it on by yourself. Click Start, click
Control Panel and then click Add or Remove Programs. In the Add or Remove Programs dialog box,
click Add/Remove Windows Components. In the Windows Components Wizard, click Networking
Services, click Details and then select the Universal Plug and Play check box. Click [ENTER] and then
click Next in the Windows Components Wizard. Open My Network Places to check the available
UPnP-enabled devices in the local network. You should be able to see at least one device, your
DMW300.
A digital media server is required to make the media available to your DMW300. Windows Media
Player11 has an integrated digital media server. Download and install Windows Media Player 11 if
you have an earlier version. Click the arrow below the Library tab and then click Media Sharing. In the
Media Sharing dialog box, select the “Share my media to” check box. In the list of devices below the
“Share my media to” check box, select your DMW300, click Allow.
Media files must be stored in the monitored folders before they can be shared in Windows Media
Player 11. When the player is first started, it will automatically search certain folders for digital media
to add to the library. To add your contents to the library: Click the arrow below the Library tab, click
Add to Library. In the Add to Library dialog box, click the folders you want the library to monitor for
update.
PAGE 14
USER MANUAL - DMW300 NETWORK | FM | USB RECEIVER & PLAYER

5.1.1.11.3. Enable UPnP in Windows 7
Control panel>Network and sharing center>change advance sharing settings
Turn on network discovery
Choose "media streaming options" and show devices on Local network
Choose "Allowed" for your device (you should see at least one device - the DMW300)
5.1.1.11.4. Share Windows 7 files
Open Windows Media Player> Organize > Manage libraries > Music
Choose directories and files to share to Internet receiver and click Add
If everything is properly done, you should see your PC in the DMW300 under UPnP (for example
Danny’s PC). Invoke ENTER and you will be presented with the songs as organized by the Media player
UPnP server.
Notes:
1. It might take some time for the UPnP server in Windows media player to organize the songs for
sharing, especially if the library of songs is large.
2. The way the songs appear in the DMW300 is determined by the UPnP server and you cannot
change it, except for the songs shown under Folders.
You can learn more about Windows Media Sharing by visiting below link.
http://www.microsoft.com/windows/windowsmedia/player/faq/sharing.mspx
5.2. SOURCE_MENU mode
As explained, the SOURCE_MENU mode mainly serves for the daily operator to chose the program
source and the program material. To enter the SOURCE_MENU mode, simply press the SRC button.
Once doing so, the unit will show SOURCE_MENU in its display with the following source entries avail-
able for choice below:
FM Radio
WEB Radio
USB Player
Network Player
The last chosen source will play in the last known settings (before switching off) and will be highlighted
in the SOURCE_MENU accordingly. From here, the user has two choices:
Using the NAVIGATION wheel to scroll to another source, press the wheel to invoke ENTER and
makes further source selection settings as described below, or
Press the SRC button repeatedly to toggle through the available sources with their last known play
setting (PLAY LAST) directly.
Please note that choosing a new station or media does not interrupt the current replay, so you can
make a new choice while the current media still plays. The new choice only becomes active once you
press ENTER, otherwise you can simply not invoke any user command for more than 20 seconds and
the unit will return to the currently playing media screen.
Also note that the direct access keys on the front panel only relate to station choices and hence only
work when FM radio or WEB radio are chosen as the program source. The direct access key are disa-
bled when USB player or Network player are chosen as the program source.
5.2.1. Radio Sources (FM, WEB)
Radio sources in the sense of this document are remote sources where the operator has no control
over transport such as play/pause, skip backwards (BWD) or skip forward (FWD). Accordingly, the
transport buttons PLAY/PAUSE, BWD and FWD are used in a different way with radio sources:
PLAY/PAUSE works as a MUTE function.
BWD has no functional assignment
FWD works as a storage button for a new station preset
USER MANUAL - DMW300 NETWORK | FM | USB RECEIVER & PLAYER
PAGE 15

5.2.1.1. FM Radio
Having chosen FM radio from the SOURCE_MENU bo scrolling to the relative entry in the source list
and pressing the wheel to invoke ENTER, you are presented with three options:
Play Last. Scroll to PLAY_LAST and press the wheel to invoke ENTER, the unit will replay the last FM
Radio station that was replayed before.
Preset. Scroll to PRESET and press the wheel to invoke ENTER, you will be presented with a list of
Preset stations as stored during the automatic scan in the setup of the unit (see 5.1.1.5.). Scroll to
the station of your choice and press the wheel to invoke ENTER, the preset will start to play immedi-
ately. If you want to go back to choose a different station, press the BACK (BROWSE) button and the
unit will display the list of preset stations again, from where you can make a new choice by scrolling to
the station of your choice. In addition, ten direct access keys are provided for immediate station
preset choice. The user needs to type in the 2-digit station preset position, and is requested to not let
more than 2 seconds of time pass by between typing of the two digits, as otherwise the next digit
would be interpreted as the first digit of a new 2-dgit station preset position. The new station will play
immediately. Note that this only works from inside the SOURCE_MENU>FM_RADIO branch of the
menu tree, and will reset the menu tree position to SOURCE_MENU>FM_RADIO>
LIST_OF_STATIONS_PLAY_STATION.
Manual Tuning. Scroll to MANUAL_TUNING and press the wheel to invoke ENTER, the display will
show the current FM frequency. Use the NAVIGATION wheel to decrement/increment the frequency
in 50 kHz steps, the displayed frequency will be audible in real-time. If you find a station you like and
would like to store it, press the FWD(ADD_STATION) button for 2 seconds. The station will be added
as the last entry into the Preset list and can be chosen next time from the PRESET submenu.
5.2.1.3. WEB Radio
Having chosen WEB radio from the SOURCE_MENU bo scrolling to the relative entry in the source list
and pressing the wheel to invoke ENTER, you are presented with three options:
Play Last. Scroll to PLAY_LAST and press the wheel to invoke ENTER, the unit will replay the last
WEB Radio station that was replayed before.
Preset. Scroll to PRESET and press the wheel to invoke ENTER, you will be presented with a list of
Preset groups as pre-configured by the installer (see 5.1.1.10.). Scroll to the preset group of your
choice and press the wheel to invoke ENTER. Scroll to the preset station of your choice and press the
wheel to invoke ENTER. The chosen web radio station will start to play after buffering. If you want to
go back to choose a different station or group, press the BACK(BROWSE) button once or twice and
the unit will display the list of preset stations or groups again, from where you can make a new choice
by scrolling to the group/station of your choice and pressing the wheel to invoke ENTER. In addition,
ten direct access key are provided for immediate station preset choice. The keys can be used to (a)
select the preset group, preceeded by two zeros, meaning to choose preset group 1, you need to type
“001”. If receiving such 3-digit code, the unit will interpret this as a change command to a new preset
group, and will start to play preset # 01 inside this group (b) select the 2-digit station preset position.
If a typed-in code is only two digits long, the unit will interprete this as a new preset station choice
inside the current preset group. The new station will start buffering only after 2 seconds and will start
playing the station once buffering is accomplished. Changing a station can thus require some
patience and is not immediate. Using the direct access keys, the user is requested to not let more
than 2 seconds of time pass by between typing of digits, as otherwise the next digit would be inter-
preted as the first digit of a new command. Note that this works only from a position inside the
SOURCE_MENU>WEB_RADIO branch of the menu tree, and will reset the menu tree position
SOURCE_MENU>WEB_RADIO>LIST_OF_GROUPS>LIST OF STATIONS>PLAY_STATION.
Skytune Server. This will let you access the categorized archive of the Skytune server service, pres-
sorted by either Countries or Genres. Scroll to SKYTUNE_SERVER and press the wheel to invoke
ENTER. You will be presented with a choice of either seeing ALL_STATIONS in alphabetical sorting, or
a list of COUNTRIES or a list of GENRES. Scroll to your choice and press the wheel to invoke ENTER.
You will be presented with a list of applicable stations. Scroll to your choice and press the wheel to
invoke ENTER. The chosen web radio station will start to play after buffering. If you find a station you
like and would like to store it, press the FWD(ADD_STATION) button for 2 seconds. A pop-up window
will show the available preste groups; scroll to the group of cour choice and press the wheel to invoke
ENTER. The station will be added as the last entry into the Preset list in the chosen group and can be
chosen next time from the relative PRESET GROUP submenu.
PAGE 16
USER MANUAL - DMW300 NETWORK | FM | USB RECEIVER & PLAYER

5.2.2. Media Player Sources (USB, Network)
Media player sources in the sense of this document are local sources where the operator has full
control over transport functions such as play/pause, skip backwards (BWD) and skip forward (FWD).
Accordingly, the transport buttons PLAY/PAUSE, BWD and FWD are used in their genuine purpose:
PLAY/PAUSE commences or pauses the replay
BWD skips to the beginning of the current track, repeatedly invoking BWD will skip to the beginning
of the previous track.
FWD skips to the next track.
5.2.2.1. USB Player
To play from USB Media, insert a storage media (FAT32 format, max. 32GB) into the front-panel USB
type-A socket. The media on such drive must be organized in a specific way to make it accessible in a
useful manner. This includes only a 1-level folder structure (root and one level below), and the storage
of playlists in a specific folder named PLAYLISTS. Playlists can be in M3U8 and pls formats. Replay will
be expedited under the parameters set in 7.1.1.
Choose USB_PLAYER from the SOURCE_MENU by scrolling to the relative entry in the source list and
pressing the wheel to invoke ENTER. You are presented with three options:
Play Last. Scroll to PLAY_LAST and press the wheel to invoke ENTER, the unit will start replay in the
last known status from USB media.
Song. Scroll to SONG and press the wheel to invoke ENTER. You will see all folders on the media,
with one additional folder named ROOT which contains all files in the root (but only displays valid file
formats, in this case MP3, AAC, OGG, FLAC, WAV). Excluded from displaying is the folder “playlist”.
Scroll to the desired folder and press the wheel to invoke ENTER. You will see a list of songs inside the
chosen folder. Scroll to the song you wish to play and press the wheel to invoke ENTER. A pop up menu
will present you with 2 options: Play now and Queue up. Play now will stop the currently playing song
and play the newly selected song immediately. Queue up will play the newly selected song after the
currently playing song finishes. You can queue up as many songs to play as you like. The songs will be
played in the order you include the songs. Please note that the queue up list will be removed when you
exit from SOURCE_MENU>USB_PLAYER>SONG.
Note: For the user of the internal jingle player, the USB storage media is the only allowed source, and
the jingles have to be stored in a folder “Jingles” in this USB storage media. This folder will however
NOT be displayed in the folder list and the content is ONLY accessible via the Jingles menu. Read
more in chapter 7.3.
Playlist. Scroll to PLAYLIST and press the wheel to invoke ENTER. You will see all playlists stored on
the media in a folder named “playlist”. External playlists can have m3u and pls formats; internally
created playlists will be stored as m3u. Scroll to the playlist you wish to play and press the wheel to
invoke ENTER. The list of songs inside the playlist will be displayed. Scroll to the song you wish to start
with and press the wheel to invoke ENTER.
5.2.2.2. Network Player
To play media from the LAN, make sure your LAN is configured for replay via UPnP (see chapter
5.1.1.11). Choose NETWORK_PLAYER from the SOURCE_MENU by scrolling to the relative entry in
the source list and pressing the wheel to invoke ENTER. You are presented with three options:
Play Last. Scroll to PLAY_LAST and press the wheel to invoke ENTER, the unit will start replay in
the last known status from LAN media.
Song. Scroll to SONG and press the wheel to invoke ENTER. You will see all available UPnP
resources (e.g. a PC which has allowed your Receiver to share its files). Scroll to the desired UPnP
resource and press the wheel to invoke ENTER. Excluded from displaying is the folder “playlist”. Scroll
to the desired folder and press the wheel to invoke ENTER. You will see a list of songs inside the
chosen folder (only valid file formats, in this case MP3, AAC, OGG, FLAC, WAV). Scroll to the song you
wish to play and press the wheel to invoke ENTER. A pop up menu will present you with 2 options: Play
now and Queue up. Play now will stop the currently playing song and play the newly selected song
immediately. Queue up will play the newly selected song after the currently playing song finishes. You
can queue up as many songs to play as you like. The songs will be played in the order you include the
songs. Please note that the queue up list will be removed when you exit from
SOURCE_MENU>METWORK_PLAYER>SONG.
USER MANUAL - DMW300 NETWORK | FM | USB RECEIVER & PLAYER
PAGE 17

Playlist. Scroll to PLAYLIST and press the wheel to invoke ENTER. You will see all available UPnP
resources (e.g. a PC which has allowed your Receiver to share its files). Scroll to the desired UPnP
resource and press the wheel to invoke ENTER. Scroll to the desired folder and press the wheel to
invoke ENTER. You will see a list of playlists inside the chosen folder. External playlists can have m3u
and pls formats; internally created playlists will be stored as m3u. Scroll to the playlist you wish to play
and press the wheel to invoke ENTER. The list of songs inside the playlist will be displayed. Scroll to the
song you wish to start with and press the wheel to invoke ENTER. The playlist will start to play from
the chosen song.
Replay will be expedited under the parameters set in 5.2.2.3.
Reminder: The PLAY_LAST status can also be accessed by toggling through the different cources in
PLAY_LAST status via multiply invoking the SRC button.
5.2.2.3. Replay Properties
Media replay can be influenced in both replay sequence as well as repeatability, this applies both to
replay from the USB media as well as any replay via UPnP from the local network (LAN). To make the
required settings, make sure you are in SOURCE_MENU and press SET. A pop-up menu named
PLAY_SETTING will appear, with the following entries:
Order. Scroll to ORDER and press the wheel to invoke ENTER. You will be presented with the a list
of the following choices for the playback order:
Sequential: Songs will be played in the order they appear in the folder or the playlist.
Shuffle: Songs will be played in a pseudo-random manner (all songs will be played once before
any song will be repeated if [Repeat: All songs] is selected)
Scroll to the desired option and press the wheel to invoke ENTER. Afterwards, the unit will exit the
PLAY_SETTING menu and return to SOURCE_MENU.
Repeatability. Scroll to REPEAT and press the wheel to invoke ENTER. 4 choices are availavle to
determine the way songs are repeated:
Repeat (Number of times the songs will be played)
None: The Receiver will stop after all songs are played once.
One song: The chosen song will be repeatedly played.
All songs: All the songs in the folder or playlist will be repeatedly played.
Scroll to the desired option and press the wheel to invoke ENTER. Afterwards, the unit will exit
the PLAY_SETTING menu and return to SOURCE_MENU.
5.3. Jingle Playback
5.3.1. Overview
The internal jingle player is a powerful feature to deliver your branding or marketing message in a
recurring manner to the listeners. This can be a special offer, your company slogan or a general com-
pany identification jingle. The jingle player allows to access 3 jingles either directly or play them auto-
matically with a certain time gap in between.
5.3.2. Preparations
Jingles must be stored in a folder named “JINGLES” on the root level of a USB storage stick (max.
32GB) which is inserted in the front-panel USB type-A socket. The Jingles inside must be in MP3
format of fixed bitrate and must be named as follows:
J1_MM.mp3
J2_MM.mp3
J3_MM.mp3
Any other files in the folder “Jingles” will be ignored.
The file name section _MM indicates the jingle pause (meaning the time music may play) after the
jingle became active in scheduled play.
PAGE 18
USER MANUAL - DMW300 NETWORK | FM | USB RECEIVER & PLAYER

5.3.3. Settings
The jingle player can be configured to work in different ways, either as a one-shot jingle player or a
scheduled jingle player. Further, the level reduction of the background music during jingle replay can
be set. To make the required settings., enter the SET_MENU mode as described in chapter 5.1., and
scroll to SET_MENU>JINGLE_PLAY, then press the wheel to invoke ENTER. You will be presented with
two submenus:
Ducking Level. This allows you to set the level reduction of the background music during jingle replay.
Scroll to DUCKING_LEVEL and press the wheel to invoke ENTER. The current level setting will be
shown and you can adjust the value via the NAVIGATION wheel between -10dB and -60dB in 3dB
steps. Once the appropriate choice is made, press the wheel to invoke ENTER. The unit will return to
SET_MENU>JINGLE_PLAY.
Play Mode. This allows to set whether the jingle player works as a one-shot player or in schedule
play. Scroll to PLAY_MODE and press the wheel to invoke ENTER. Choose either SINGLE or SEQUEN-
TIAL by scrolling and confirm the choice by pressing the wheel to invoke ENTER. The unit will return to
SET_MENU>JINGLE_PLAY.
Note that any change will only be saved if you leave the SET mode with saving the changes, as
described in 5.1.
5.3.4. Operation
The jingle player can only be operated from the SOURCE_MENU mode. Depending on the settings
made in the SET_MENU mode (see 5.3.3.), invoking the JGL button will have the following effect:
If the play mode in SET_MENU>JINGLE_PLAY>PLAY_MODE is set to SEQUENTIAL (see 5.3.3.), then
pressing the JGL button once will activate the sequential jingle replay. The backlight of the JGL button
will change from constantly lit to flashing. The jingles stored on the USB media will be played according
to the sequence found in the jingle folder, with the relative period of background music following each
jingle and then this sequence loops. While playing a jingle, the background music will be lowered by the
amount specified in the settings for the DUCKING_LEVEL (see 5.3.3.). Pressing the JGL button once
again will stop the sequential jingle replay and the backlight of the JGL button will turn back from flash-
ing to constantly lit.
If the play mode in SET_MENU>JINGLE_PLAY>PLAY_MODE is set to SINGLE, then pressing the JGL
button will open a pop-up window prompting you to choose between the following options:
JINGLE1: J1 plays immediately for one time.
JINGLE2: J2 plays immediately for one time.
JINGLE3: J3 plays immediately for one time.
While playing a jingle, the background music will be lowered by the amount specified in the settings
for the DUCKING_LEVEL (see 5.3.3.). During replay of the selected jingle, the JGL button flashes, and
once the replay is finished, automatically turns to be constantly lit again.
6. Maintenance
The DMW300 offers various maintenance functions. Due to such functions being intended to be only
used by the installer/configurator, they are located in the SET_MENU mode. Scroll with the naviga-
tion wheel to SET_MENU>MAINTENANCE and press the wheel to invoke ENTER. You will be presented
with four available submenus:
Machine ID
HW/SW version
Check update
Factory default
6.1. Machine ID
You might be required to provide the machine ID to service personnel or for on-line service registra-
tion. Machine ID comprises of 8 4-character strings in hex. You may be required to provide this
number to the service people for machine identification. To see the Machine ID, scroll to
SET_MENU>MAINTENANCE>MACHINE_ID and and press the wheel to invoke ENTER. The machine ID
will be displayed.
USER MANUAL - DMW300 NETWORK | FM | USB RECEIVER & PLAYER
PAGE 19
La pagina si sta caricando...
La pagina si sta caricando...
La pagina si sta caricando...
La pagina si sta caricando...
-
 1
1
-
 2
2
-
 3
3
-
 4
4
-
 5
5
-
 6
6
-
 7
7
-
 8
8
-
 9
9
-
 10
10
-
 11
11
-
 12
12
-
 13
13
-
 14
14
-
 15
15
-
 16
16
-
 17
17
-
 18
18
-
 19
19
-
 20
20
-
 21
21
-
 22
22
-
 23
23
-
 24
24


