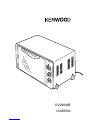
Kenwood OV340B Manuale utente
- Categoria
- Produttori di sandwich
- Tipo
- Manuale utente


Your Kenwood Quartz mini oven with its Quartz tube
technology allows odour free, smoke free cooking of a
range of food such as fish, meat, poultry, pastries etc. The
features of the oven allow you to defrost, roast, grill, bake
and spit roast.
The dimensions of the oven allow you to cook pie dishes
up to 28cm in diameter, rectangular dishes up to 30cm x
28cm and a 1Kg Chicken.
safety
●Read all instructions.
●Do not touch the hot surfaces of the oven. The
temperature of accessible surfaces may be high when
the appliance is operating. Always use the handle and
knobs.
●Do not immerse the oven, supply cord or plug in water
or other liquids.
●Do not use this appliance if there is any visible sign of
damage to the oven or the supply cord. Get it checked
or repaired: see ‘service’.
●Do not let the cord hang over the edge of the table or
work surface, or touch hot surfaces.
●This appliance is not intended for use by young
children or infirm persons without supervision. Do not
let children play with the appliance.
●The mini oven should not be used near or below
curtains and other combustible materials.
●Do not block or cover the air vents at the rear of the
oven. Always ensure that there is adequate ventilation
around the oven during operation.
●Do not rest anything on the door when open.
●Do not use outdoors.
●Do not leave the oven unattended when on.
●Always switch off and unplug after use.
●Take care when grilling and do not touch or allow
trays/food to come in direct contact with the Quartz
tubes during operation.
●Do not use the appliance for other than its intended
domestic use.
before plugging in
●Before switching on make sure that the voltage of your
electricity supply is the same as that indicated on the
rating plate.
Note: This appliance complies with European
Economic Community Radio Interference Directive
89/336/EEC.
before using for the first time
1 Remove all labels and any packaging from the oven.
2 Wash the shelves, drip tray and roasting spit in warm
soapy water. Dry thoroughly.
3 As this oven operates slightly differently to a traditional
oven, some adjustments to the manufacturers cooking
times and temperatures may be necessary to achieve
the desired results.
4 Foil used to cover items during cooking should not be
allowed to come in direct contact with the bottom
element or Quartz tubes.
5 Food items such as filled pies, pizza etc., that could
bubble over during cooking should be placed on a
baking tray to prevent them splashing onto the bottom
element.
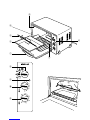
know your Kenwood Turbo Quartz
mini oven
door handle
drip tray
spit roast
shelf
quartz tubes (top of oven cavity)
control panel
bottom element
setting control
indicator light
temperature control
timer
oven shelf positions
The shelf supplied can be inverted to give 4 different shelf
positions.
control panel
setting control
Turn the control to select the required cooking mode.
setting 1 :
●Both the bottom heating element and Quartz tubes
are on and regulated by the thermostat.
●The Quartz technology enables the oven to reach a
temperature of 250°C in less than 5 minutes. No
preheating is required and the power consumption is
greatly reduced.
●The taste and nutritional qualities of the food is
retained with this method of cooking.
2

●This setting can also be used for defrosting and as a
keep warm function.
setting 2 :
●The bottom heating element operates continuously on
full power.
●If the temperature control is set to “0” then only the
bottom element will operate.
●The Quartz element can be switched on by turning
the temperature control to the required temperature
(see cooking charts) during the last 10minutes of
cooking to brown, crisp or grill the top of the food.
●This setting is ideal for cooking savoury or sweet tarts
and pies.
setting 3 : spit roast
●Only the Quartz tubes operate on this setting.
●When using the spit roast function the door must be
left half opened.
●When grilling the food should be placed as near to
the quartz tubes as possible without touching them.
●The temperature control should be turned to setting
10.
setting 4 : grill
●Only the Quartz tubes operate on this setting.
●When using the grill the door must be left half
opened.
●When grilling the food should be placed as near to
the quartz tubes as possible without touching them.
●The temperature control should be turned to setting
10.
indicator light
●The light will come on when the oven is switched on
and will go out when the temperature set is reached.
temperature control
●The temperature control has 10 positions that can be
selected.
Position Temp
1 60°C
2 80°C
3 100°C
4 120°C
5 140°C
6 160°C
7 180°C
8 200°C
9 225°C
10 250°C
timer
●The cooking timer can be set up to a maximum of
120minutes.
●The oven will not operate unless a cooking time has
been selected.
using your Kenwood Quartz oven
selecting the cooking modes
●The oven will not operate unless a cooking
time has been selected.
●The oven will automatically switch off when the timer
reaches “0”.
setting 1
●Select setting 1 on the setting control.
●Turn the temperature control to select the temperature
required.
●For defrosting and keeping food warm turn the
temperature control to position 1.
●Set the cooking time using the timer.
●Refer to the cooking tables for the times and
temperatures to use for individual recipes.
setting 2
●Select setting 2 on the setting control. Only the
bottom element will operate continuously on full power.
●The temperature control should be set to “0” unless the
top Quartz tubes are required as well to brown, grill or
crisp the top of the food.
●Refer to the cooking tables for the approx. times and
temperatures to use for individual recipes.
●Set the cooking time required using the timer.
3

setting 3 : spit roast
●Select setting 3 on the setting control.
●Turn the temperature control to maximum/position 10.
●Fit the spit . When using the spit roast
function the door must be left half opened.
●Set the cooking time required using the timer.
●Refer to the cooking tables for the approx. times to
use.
setting 4 : quartz grill
●Select setting 4 on the setting control.
●Turn the temperature control to maximum/position 10.
●Place the food as near to the quartz tubes as possible
without touching them. When using the grill the
door must be left half opened.
●Place the drip tray under the grill shelf to catch the
cooking juices and fat.
●Set the cooking time required using the timer.
●Refer to the cooking tables for the approx. times to use
for individual recipes.
4

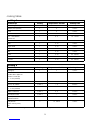
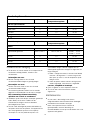
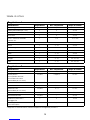
cooking tables
setting 1
Dish/Recipe Setting Temperature Position Cooking time
Bread 500g (5min preheat) 1 10 then 8 - 9 45mins
Soufflé (3min preheat) 1 8 25mins
Pizza 1 8 25mins
Quiche Lorraine 1 8 20mins
Fish - Cod, Bream, 1 8 - 9 10 - 15mins
Salmon etc
Meat
Beef 1 9 -10 20mins
Leg of lamb 1 9 -10 20mins
Pork 1 9 -10 25mins
Veal 1 9 -10 20mins
Duck 1 9 -10 60 - 90mins
Rabbit 1 9 -10 40 - 45mins
Chicken 1 9 -10 60 - 90mins
setting 2
Dish/Recipe Setting Temperature Position Cooking time
Meringues 1 3 25mins
Tarts or Pies 2 then 1 0 then 8 25mins*
Upside down apple tart
Clafouti custard pie
(2 - 3 mins preheat)
Cakes 2 then 1 8 - 9 30mins*
Biscuits or cookies 2 then 1 7 - 8 30mins*
Fruit Soufflé 2 then 1 8 - 9 12mins*
(2 - 3 mins preheat)
Apple custard tart 2 then 1 8 - 9 25mins*
Yeasted fruit cake 2 then 1 7 35mins
Ham & Cheese 2 8 10mins
melted Sandwich
Puff pastries 2 10 , then 8 20mins
Open savoury pastry
tart
* Last 10 minutes of cooking increase temperature and select setting 1.
5

6
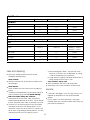
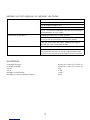
Spit Roast
Dish/Recipe Setting Temperature Position Cooking time
Spit Roast
Beef or mutton 3 10 35mins
Pork 3 10 45mins
Veal 3 10 45mins
Poultry ie Chicken, Turkey, Duck 3 10 60 - 110mins
Grill
Dish/Recipe Setting Temperature Position Cooking time
Grill
Toast 4 8 - 10 10mins
Gratins 1 then 4 4 then 10 Setting 1 - 10mins
Setting 4 - 10mins
Beef steaks 4 10 10mins
Lamb or veal chops 4 10 10mins
Sausages 4 10 10mins
Fish steaks 4 10 10mins
care and cleaning
●Switch off, unplug and allow the oven to cool
completely before cleaning.
oven exterior
●Wipe with a damp cloth or non abrasive cleaner and
dry thoroughly.
oven interior
●Clean the door with warm water and a non-abrasive
cleaner.
●The bottom heating element can be lifted up slightly to
clean the bottom of the oven. To avoid damage
take care when lifting the element.
●Grease particles on the quartz tubes will normally
evaporate during operation of the oven. Do not attempt
to clean the actual quartz tubes as damage may occur.
●The oven has self-cleaning panels which are covered
with porous enamel that will absorb grease. Do not
scrape the surface with sharp utensils or scourers and
do not clean using detergent based products. To clean
and extend the life of the self cleaning surface :-
a) After cooking greasy foods - heat the oven when
empty for 15 minutes with the door open on setting
2 and the temperature set to maximum.
b) Large splashes of grease should be wiped off with a
damp sponge once the oven is cold.
oven shelves, tray & spit
●Wash immediately after use in hot soapy water.
●Alternatively they can be washed in the dishwasher.
service
●If the cord is damaged it must, for safety reasons, be
replaced by Kenwood or an authorised Kenwood
repairer.
●For any repairs in or out of guarantee, servicing or
selected spare parts contact the dealer from whom you
purchased your appliance.

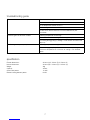
troubleshooting guide
The oven does not work? Check that it is plugged in
Is the timer on?
Is the temperature control set to 0?
Is the setting control set to 0?
If none of the above check the fuse/circuit breaker for your
installation
The oven gives off too much smoke? Cooking temperature set too high
Oven door closed when using the Quartz grill or spit roast setting.
If smoking during grilling try adding a small amount of water to the
drip tray.
The Oven gets dirty too quickly? Cooking temperature too high.
After cooking greasy/fatty foods - clean the oven by setting it to
maximum temperature for 15minutes on setting 2 with the door
open.
specification
Exterior dimensions 360mm (w) X 350mm (D) X 250mm (H)
Internal dimensions 360mm (W) X 310mm (D) X 235mm (H)
Weight 9kg
Capacity 26litres
Quartz tube power 1100W
Bottom heating element power 600W
7

De Kenwood Quartz mini oven met Quartz
buizentechnologie maakt het mogelijk om een groot aantal
gerechten met vis, vlees, gevogelte, gebak, enz. geurloos
en rookloos klaar te maken. Deze oven biedt ook de
volgende functies: ontdooien, braden, grillen, bakken en
aan het spit roosteren.
De afmetingen van de oven stellen u in staat taarten met
een maximumdoorsnede van 28 cm, rechthoekige
schotels van maximaal 30 x 28 cm en een kip van 1 kg te
bereiden.
veiligheid
●Lees alle aanwijzingen.
●Raak de hete oppervlakken van de oven niet aan. De
temperatuur van de toegankelijke oppervlakken kan
tijdens bedrijf van het apparaat hoog zijn. Gebruik altijd
de handgreep en knoppen.
●De oven, het netsnoer en de stekker niet
onderdompelen in water of andere vloeistoffen.
●Dit apparaat niet gebruiken in het geval van zichtbare
tekenen van schade aan de oven of het netsnoer. Laat
mankementen nakijken of repareren: zie paragraaf
‘klantenservice’.
●Zorg dat het snoer niet over de rand van de tafel of het
werkoppervlak hangt of tegen een heet oppervlak komt.
●Jonge kinderen of zieke personen mogen dit apparaat
niet zonder toezicht gebruiken. Laat kinderen niet met
het apparaat spelen.
●De minioven mag niet worden gebruikt nabij of onder
gordijnen of andere brandbare materialen.
●De luchtopeningen aan de achterkant van de oven niet
blokkeren of afdekken. Zorg altijd voor voldoende
ventilatie rond de oven terwijl deze in bedrijf is.
●Plaats niets op de deur wanneer hij open staat.
●Gebruik het apparaat niet buitenshuis.
●Laat de oven nooit onbeheerd achter terwijl hij
aanstaat.
●Na gebruik altijd uitzetten en de stekker uit het
stopcontact trekken.
●Wees voorzichtig tijdens grillen; tijdens bedrijf van de
oven de kwartsbuizen niet aanraken en voorkomen dat
bakplaten of voedsel direct daarmee in contact komen.
●Gebruik het apparaat uitsluitend voor het beoogde
huishoudelijke doel.
voordat u de stekker in het stopcontact
steekt
●Controleer, voordat u het apparaat aanzet, of de voltage
van het elektriciteitsnet overeenkomt met de op het
typeplaatje aangegeven voltage.
Opmerking: Dit apparaat voldoet aan EG-richtlijn
inzake radiostoring nr. 89/336/EEG.
vóór het eerste gebruik
1 Verwijder alle etiketten en eventuele verpakking uit de
oven.
2 Reinig de roosters, de druipbak en het braadspit met
warm zeepwater. Grondig drogen.
3 Omdat deze oven iets anders werkt dan een
traditionele oven, kan het nodig zijn de door
producenten opgegeven bereidingstijden en
temperaturen aan te passen om de gewenste resultaten
te bereiken.
4 Folie dat wordt gebruikt voor afdekking van artikelen
tijdens de bereiding, mag niet direct in contact komen
met het verwarmingselement onderin of de
kwartsbuizen.
5 Voedingsmiddelen zoals gevulde pasteien, pizza’s, enz.
die tijdens de bereiding kunnen overlopen, moeten op
een bakplaat worden gezet om te voorkomen dat ze op
het verwarmingselement onderin spatten.
ken uw Kenwood Turbo Quartz
minioven
handgreep aan deur
druipbak
braadspit
rek
kwartsbuizen (boven in de oven)
regelpaneel
verwarmingselement onderin
regelknop
controlelampje
temperatuurregelaar
timer
NL
8

standen van roosters in de oven
Het geleverde rek kan omgekeerd worden tot 4
verschillende rekposities.
regelpaneel
regelknop
Draai de regelknop om de vereiste bereidingsmethode te
selecteren.
stand 1:
●Zowel de verwarmingselementen onderin de oven als
de Quartz buizen staan aan en worden door de
thermostaat geregeld.
●Dankzij de kwartstechnologie kan de oven in minder
dan 5 minuten een temperatuur van 250°C bereiken.
Voorverwarmen is onnodig, zodat het stroomverbruik
veel lager is.
●Bij deze bereidingsmethode blijven de smaak en
voedingswaarden van het voedsel behouden.
●Deze stand kan ook worden gebruikt voor ontdooien
en opwarmen.
stand 2:
●Het verwarmingselement onderin de oven functioneert
voortdurend op de hoogste stand.
●Als de temperatuur op ‘0’ wordt gezet, functioneert
alleen het verwarmingselement onderin de oven.
●Tijdens de laatste 10 minuten van de bereiding
kunnen de kwartsbuizen worden ingeschakeld door
de temperatuurregelaar op de vereiste temperatuur
(zie de bereidingstabellen) te zetten om het voedsel
aan de bovenkant te bruineren, knapperig te maken
of te grillen.
●Deze stand is ideaal voor het maken van hartige of
zoete taarten en pasteien.
stand 3: braadspit
●In deze stand werken alleen de kwartsbuizen.
●Wanneer u etenswaren aan het spit roostert, moet de
ovendeur half open staan.
●Tijdens het grillen moet het voedsel zo dicht mogelijk
bij de kwartsbuizen worden geplaatst zonder dat het
ermee in contact komt.
●De temperatuurregelaar moet op 10 worden gezet.
stand 4: grillen
●In deze stand werken alleen de kwartsbuizen.
●Wanneer u de grill gebruikt, moet de ovendeur half
open staan.
●Tijdens het grillen moet het voedsel zo dicht mogelijk
bij de kwartsbuizen worden geplaatst zonder dat het
ermee in contact komt.
●De temperatuurregelaar moet op 10 worden gezet.
controlelampje
●Het lampje gaat aan als de oven wordt aangezet, en
gaat uit zodra de ingestelde temperatuur is bereikt.
temperatuurregelaar
●De temperatuurregelaar kan in 10 standen worden
gezet.
Positie Temp
1 60°C
2 80°C
3 100°C
4 120°C
5 140°C
6 160°C
7 180°C
8 200°C
9 225°C
10 250°C
timer
●De kooktimer kan worden ingesteld op maximaal 120
minuten.
●De oven werkt alleen als een bereidingstijd is
geselecteerd.
de Kenwood Quartz oven gebruiken
selectie van bereidingsmethode
●De oven werkt alleen als een bereidingstijd is
geselecteerd.
●De oven gaat automatisch uit zodra de timer “0” heeft
bereikt.
9

stand 1
●Zet de regelknop op 1 .
●Zet de temperatuurregelaar op de vereiste temperatuur.
●Zet de temperatuurregelaar op 1, als u voedsel wilt
ontdooien of opwarmen.
●Stel met de timer de bereidingstijd in.
●Raadpleeg de bereidingstabellen voor de tijden en
temperaturen die voor individuele recepten moeten
worden gebruikt.
stand 2
●Zet de regelknop op 2 . Alleen het
verwarmingselement onderin zal continu op vol
vermogen werken.
●De temperatuurregelaar moet op “0” worden gezet,
tenzij de kwartsbuizen bovenin nodig zijn, alsook om
het voedsel aan de bovenzijde te bruineren, te grillen of
knapperig te maken.
●Raadpleeg de bereidingstabellen voor de geschatte
tijden en temperaturen die voor individuele recepten
moeten worden gebruikt.
●Stel met de timer de gewenste kooktijd in.
stand 3 : aan het spit roosteren
●Zet de regelknop op 3 .
●Zet de temperatuurregelaar op de maximumstand,
d.w.z. stand 10.
●Breng het braadspit aan . Tijdens roosteren aan
het spit moet de deur half open blijven staan.
●Stel met de timer de vereiste bereidingstijd in.
●Raadpleeg de bereidingstabellen voor de geschatte
tijden die moeten worden aangehouden.
stand 4 : grillen met kwartsbuizen
●Zet de regelknop op 4 .
●Zet de temperatuurregelaar op de maximumstand,
d.w.z. stand 10.
●Plaats het voedsel zo dicht mogelijk bij de kwartsbuizen
zonder dat het daarmee in aanraking komt. Tijdens
grillen moet de deur half open blijven staan.
●Plaats de druipbak onder het grillrooster om kooknat en
vet op te vangen.
●Stel met de timer de vereiste bereidingstijd in.
●Raadpleeg de bereidingstabellen voor de geschatte
tijden die voor individuele recepten moeten worden
aangehouden.
10

bereidingstabellen
stand 1
Schotel/recept Stand Stand Bereidingstijd
temperatuurregelaar
500 g brood (5 min voorverwarmen) 1 eerst 10, dan 8 - 9 45 min
Soufflé (3 min voorverwarmen) 1 8 25 min
Pizza 1 8 25 min
Quiche Lorraine 1 8 20 min
Vis – kabeljauw, brasem, zalm, enz. 1 8 - 9 10 - 15 min
Vlees
Rundvlees 1 9 - 10 20 min
Lamsbout 1 9 - 10 20 min
Varkensvlees 1 9 - 10 25 min
Kalfsvlees 1 9 - 10 20 min
Eend 1 9 - 10 60 - 90 min
Konijn/haas 1 9 - 10 40 - 45 min
Kip 1 9 - 10 60 - 90 min
stand 2
Schotel/recept Stand Stand Bereidingstijd
temperatuurregelaar
Schuimgebak 1 3 25 min
Taarten of pasteien eerst 2, dan 1 eerst 0, dan 8 25 min*
Omgekeerde appeltaart
Custardpudding met vruchten
(2 - 3 min voorverwarmen)
Cakes eerst 2, dan 1 8 - 9 30 min*
Biscuits of koekjes eerst 2, dan 1 7 - 8 30 min*
Fruitsoufflé eerst 2, dan 1 8 - 9 12 min*
(2 - 3 min voorverwarmen)
Custardtaart met appel eerst 2, dan 1 8 - 9 25 min*
Gegiste vruchtencake eerst 2, dan 1 7 35 min
Sandwich met gesmolten ham en kaas 2 8 10 min
Bladerdeeg 2 eerst 10 , dan 8 20 min
Open, hartige taart
* De laatste 10 minuten bij een hogere temperatuur en in stand 1.
11

Aan het spit roosteren
Schotel/recept Stand Stand Bereidingstijd
temperatuurregelaar
Aan het spit roosteren
Rund- of schapenvlees 3 10 35 min
Varkensvlees 3 10 45 min
Kalfsvlees 3 10 45 min
Gevogelte, d.w.z. kip, kalkoen, eend 3 10 60 - 110 min
Grillen
Schotel/recept Stand Stand Bereidingstijd
temperatuurregelaar
Grillen
Toast 4 8 – 10 10 min
Gegratineerde gerechten eerst 1, dan 4 eerst 4, dan 10 Stand 1 - 10 min
Stand 4 - 10 min
Biefstuk 4 10 10 min
Lams- of kalfskarbonade 4 10 10 min
Worstjes 4 10 10 min
Vissticks 4 10 10 min
12
onderhoud en reiniging
●Zet de oven uit, trek de stekker uit het stopcontact en
laat de oven volledig afkoelen, voordat u hem
schoonmaakt.
buitenzijde van oven
●Met een vochtige doek en niet-schurend
schoonmaakmiddel afvegen en grondig drogen.
binnenzijde van oven
●De deur met warm water en een niet-schurend
schoonmaakmiddel reinigen.
●Het verwarmingselement onderin kan iets worden
opgelicht om de onderzijde van de oven te reinigen.
Het verwarmingselement voorzichtig
oplichten om schade te voorkomen.
●Vetdeeltjes op de kwartsbuizen verdampen gewoonlijk
tijdens bedrijf van de oven. Probeer niet de
kwartsbuizen te reinigen, omdat ze daardoor
beschadigd kunnen raken.
●De oven heeft zelfreinigende panelen die bedekt zijn
met poreus email dat vet opneemt. Het oppervlak niet
met scherp gereedschap of een schuursponsje
afschrapen en niet met producten op basis van
wasmiddelen reinigen. Doe het volgende om het
zelfreinigende oppervlak te reinigen en zorgen dat het
langer meegaat:
a) Nadat u vettige etenswaren in de oven heeft bereid,
verwarmt u de lege oven 15 minuten lang met de
deur open, op stand 2, met de temperatuur op de
hoogste stand.
b) Grote vetspatten moeten met een vochtige spons
worden afgeveegd, nadat de oven is afgekoeld.
roosters, druipbak en braadspit
●Direct na gebruik in warm zeepwater afwassen.
●Ze kunnen ook in de afwasmachine worden
afgewassen.
klantenservice
●Als het snoer is beschadigd, moet het om
veiligheidsredenen door Kenwood of een bevoegde
Kenwood-monteur worden vervangen.
●Neem voor reparaties binnen of buiten de
garantieperiode, service of bestelling van
reserveonderdelen contact op met de dealer waar u het
apparaat heeft gekocht.

leidraad voor het opsporen en oplossen van fouten
Werkt de oven niet? Controleer of de stekker in het stopcontact zit.
Staat de timer aan?
Staat de temperatuurregelaar op 0?
Staat de regelknop op 0?
Als niets van het bovenstaande geldt, controleer dan de zekering of
stroomonderbreker van uw installatie.
Geeft de oven te veel rook af? De bereidingstemperatuur is te hoog ingesteld.
Tijdens gebruik van de oven in de stand voor grillen of roosteren
aan het spit met de kwartsbuizen is de ovendeur gesloten.
Als de oven tijdens grillen rook afgeeft, probeer dit dan tegen te
gaan door wat water in de druipbak te doen.
Wordt de oven te snel vuil? De bereidingstemperatuur is te hoog ingesteld.
Nadat u vettige etenswaren in de oven heeft bereid, maakt u de
oven schoon door hem eerst 15 minuten lang met de deur open,
op stand 2 en de temperatuur op de hoogste stand te verwarmen.
specificaties
Uitwendige afmetingen 360mm (B) X 350mm (D) X 250mm (H)
Inwendige afmetingen 360mm (B) X 310mm (D) X 235mm (H)
Gewicht 9 kg
Inhoud 26 liter
Vermogen van kwartsbuizen 1100W
Vermogen van verwarmingselement onderin 600W
13

Votre mini four Kenwood Quartz bénéficie de la
technologie des tubes de quartz permettant ainsi la
cuisson sans odeurs et sans fumée de toute une gamme
d’aliments, tels que le poisson, la viande, la volaille, les
pâtisseries, etc. Les diverses fonctions de votre four
permettent la décongélation, la cuisson de rôtis, au gril, au
four traditionnel et à la broche.
Les dimensions de votre four permettent la cuisson dans
des plats à tarte jusqu’à 28 cm de diamètre, des plats
rectangulaires jusqu’à 30 cm x 28 cm, ainsi que la cuisson
de poulets de 1 kg.
sécurité
●Lisez toutes les instructions.
●Ne touchez pas les surfaces chaudes du four. La
température des surfaces accessibles peut être
élevée lorsque l’appareil est en marche. Utilisez toujours
la poignée et les boutons.
●Ne plongez pas le four, le cordon d’alimentation ou la
prise dans l’eau ou tout autre liquide.
●N’utilisez pas cet appareil en cas de signe visible
d’endommagement du four ou du cordon
d’alimentation. Faites-le vérifier et réparer. Pour cela,
reportez-vous à la rubrique “service après-vente”.
●Ne laissez pas le cordon pendre du bord de la table ou
d’un plan de travail, ou au contact de surfaces
chaudes.
●Cet appareil n’est pas prévu pour être utilisé par de
jeunes enfants ou des personnes infirmes sans
surveillance. Ne laissez pas les enfants jouer avec cet
appareil.
●Le four ne doit pas être utilisé à proximité ou sous des
rideaux ou tout autre matériau combustible.
●Veillez à ne pas bloquer ou couvrir les bouches
d’aération à l’arrière du four. Assurez-vous toujours
d’une ventilation adéquate autour du four lors de son
fonctionnement.
●Ne laissez rien reposer sur la porte lorsqu’elle est
ouverte.
●N’utilisez pas cet appareil en plein air.
●Ne laissez pas le four sans surveillance lorsqu’il est en
marche.
●Éteignez et débranchez toujours cet appareil après
utilisation.
●L’utilisation en mode gril requiert des précautions. Ne
touchez pas et ne laissez pas les plaques/aliments
entrer en contact direct avec les tubes de quartz
pendant la cuisson.
●Réservez cet appareil à l’usage domestique pour lequel
il est prévu.
avant de brancher l’appareil
●Avant de mettre l’appareil en marche, assurez-vous que
la tension électrique que vous utilisez est la même que
celle indiquée dans les caractéristiques techniques.
Remarque : Cet appareil est conforme à la directive
89/336 de la C.E. relative aux interférences radio.
avant d’utiliser votre appareil pour la
première fois
1 Retirez toutes les étiquettes et tout emballage du four.
2 Lavez les grilles, la lèchefrite et la broche dans de l’eau
chaude savonneuse. Séchez soigneusement.
3 Ce four fonctionnant de manière légèrement différente
d’un four traditionnel, il est possible que les
températures et temps de cuisson recommandés sur
les recettes doivent être ajustés pour parvenir au
résultat souhaité.
4 Veillez à ne pas laisser l’aluminium employé pour
recouvrir certains aliments pendant la cuisson entrer en
contact direct avec la résistance du bas ou les tubes
quartz.
5 Les préparations telles que les tartes, pizzas, etc.,
susceptibles de déborder pendant la cuisson, doivent
être placées sur une plaque de cuisson, afin d’éviter
toute projection sur la résistance inférieure.
faites connaissance avec votre four
Kenwood Turbo Quartz
poignée de porte
lèchefrite
tournebroche
grille
tubes quartz (haut de la cavité du four)
panneau de contrôle
résistance du bas
bouton de commande
voyant lumineux
thermostat
minuterie
14
F

positions des grilles du four
Les grilles fournies peuvent être inversées afin de
permettre 4 positions différentes.
panneau de contrôle
bouton de contrôle
Tournez la commande afin de sélectionner le mode de
cuisson souhaité.
réglage 1 :
●La résistance chauffante du bas et les tubes de
quartz fonctionnent simultanément et sont réglés à
l’aide du thermostat.
●La technologie Quartz permet au four d’atteindre une
température de 250°C en moins de 5 minutes. Le
préchauffage est inutile et la consommation d’énergie
est réduite de manière importante.
●La saveur et les qualités nutritionnelles des aliments
sont préservées par ce mode de cuisson.
●Ce réglage peut également être employé pour la
décongélation et en tant que fonction de maintien au
chaud.
réglage 2 :
●La résistance chauffante du bas fonctionne en continu
et à pleine puissance.
●Si la commande de température est réglée sur « 0 »,
seule la résistance du bas fonctionne.
●La résistance Quartz peut être mise en marche en
tournant le thermostat jusqu’à la valeur souhaitée (voir
tableaux de cuisson) pendant les 10 dernières
minutes de cuisson, afin de faire dorer, de rendre
croustillant ou de faire griller le dessus de la
préparation.
●Ce réglage est idéal pour la cuisson des tartes et
tourtes salées ou sucrées.
réglage 3 : tournebroche
●Seuls les tubes quartz fonctionnent sur ce réglage.
●Pendant l’utilisation de la fonction broche, la porte
doit être laissée entrouverte.
●Lors de la cuisson sous le gril, les aliments doivent
être placés aussi près que possible des tubes quartz,
sans néanmoins les toucher.
●Le thermostat doit être tourné jusqu’au réglage 10.
réglage 4 : gril
●Seuls les tubes quartz fonctionnent sur ce réglage.
●Pendant l’utilisation du gril, la porte doit être laissée
entrouverte.
●Lors de la cuisson sous le gril, les aliments doivent
être placés aussi près que possible des tubes quartz,
sans néanmoins les toucher.
●Le thermostat doit être tourné jusqu’au réglage 10.
voyant lumineux
●Le voyant s’allume lorsque le four est mis en marche
et il s’éteint lorsque la température souhaitée est
atteinte.
le thermostat
●Le thermostat vous offre un choix de 10 positions.
Position Temp
1 60°C
2 80°C
3 100°C
4 120°C
5 140°C
6 160°C
7 180°C
8 200°C
9 225°C
10 250°C
minuterie
●Cette minuterie peut être réglée jusqu’à un temps de
cuisson maximal de 120 minutes.
●Le four ne fonctionne pas à moins qu’un temps de
cuisson ait été sélectionné.
15

utilisation de votre four Kenwood
Quartz
sélection des modes de cuisson
●Le four ne fonctionne pas à moins qu’un
temps de cuisson ait été sélectionné.
●Le four s’éteint automatiquement lorsque la minuterie
parvient à « 0 ».
réglage 1
●Sélectionnez le réglage 1 sur la commande de
réglage.
●Tournez le thermostat afin de sélectionner la
température souhaitée.
●Pour la décongélation et le maintien au chaud des
aliments, tournez le thermostat en position 1.
●Réglez le temps de cuisson à l’aide de la minuterie.
●Voir les tableaux de cuisson pour les températures et
les temps de cuisson adéquats pour des recettes
spécifiques.
réglage 2
●Sélectionnez le réglage 2 le bouton de
commande. Seule la résistance du bas fonctionne en
continu et à pleine puissance.
●Le thermostat doit être réglée sur « 0 » à moins que les
tubes quartz du haut soient également requis afin de
faire dorer, griller ou de rendre croustillant le dessus de
la préparation.
●Voir les tableaux de cuisson pour les températures et
les temps de cuisson approx. employés pour des
recettes spécifiques.
●Réglez le temps de cuisson requis à l’aide de la
minuterie.
réglage 3 : tournebroche
●Sélectionnez le réglage 3 sur le bouton de
commande.
●Tournez le thermostat au maximum/position 10.
●Mettez la broche en place. Pendant l’utilisation
de la fonction tournebroche, la porte doit
être laissée entrouverte.
●Réglez le temps de cuisson requis à l’aide de la
minuterie.
●Voir les tableaux de cuisson pour les temps de cuisson
approx. employés.
réglage 4 : gril quartz
●Sélectionnez le réglage 4 sur le bouton de
commande.
●Tournez le thermostat au maximum/position 10.
●Placez les aliments aussi près que possible des tubes
quartz, sans néanmoins les toucher. Pendant
l’utilisation du gril, la porte doit être laissée
entrouverte.
●Placez la lèchefrite sous la grille afin de récupérer la
graisse et les jus de cuisson.
●Réglez le temps de cuisson requis à l’aide de la
minuterie.
●Voir les tableaux de cuisson pour les temps de cuisson
approx. employés pour des recettes spécifiques.
16

tableaux de cuisson
réglage 1
Plat/Recette Réglage Position Température Temps de cuisson
Pain 500 g (préchauff. 5 mn) 1 10 puis 8 - 9 45 mn
Soufflé (préchauff. 3 mn) 1 8 25 mn
Pizza 1 8 25 mn
Quiche lorraine 1 8 20 mn
Poisson – morue, brème, saumon, etc. 1 8 - 9 10 - 15 mn
Viande
Bœuf 1 9 - 10 20 mn
Gigot d’agneau 1 9 - 10 20 mn
Porc 1 9 - 10 25 mn
Veau 1 9 - 10 20 mn
Canard 1 9 - 10 60 - 90 mn
Lapin 1 9 - 10 40 - 45 mn
Poulet 1 9 - 10 60 - 90 mn
réglage 2
Plat/Recette Réglage Position Température Temps de cuisson
Meringues 1 3 25 mn
Tartes ou tourtes 2 puis 1 0 puis 8 25 mn*
Tarte renversée aux pommes
Clafoutis
(préchauffage 2 - 3 mn)
Gâteaux 2 puis 1 8 - 9 30 mn*
Biscuits ou cookies 2 puis 1 7 - 8 30 mn*
Soufflé aux fruits 2 puis 1 8 - 9 12 mn*
(préchauffage 2 - 3 mn)
Flan aux pommes 2 puis 1 8 – 9 25 mn*
Cake aux fruits 2 puis 1 7 35 mn
Croque-monsieur 2 8 10 mn
Pâtisseries à pâte feuilletée 2 10 puis 8 20 mn
Quiche lorraine
* Pour les 10 dernières minutes de cuisson, augmentez la température et sélectionnez le réglage 1.
17
La pagina si sta caricando...
La pagina si sta caricando...
La pagina si sta caricando...
La pagina si sta caricando...
La pagina si sta caricando...
La pagina si sta caricando...
La pagina si sta caricando...
La pagina si sta caricando...
La pagina si sta caricando...
La pagina si sta caricando...
La pagina si sta caricando...
La pagina si sta caricando...
La pagina si sta caricando...
La pagina si sta caricando...
-
 1
1
-
 2
2
-
 3
3
-
 4
4
-
 5
5
-
 6
6
-
 7
7
-
 8
8
-
 9
9
-
 10
10
-
 11
11
-
 12
12
-
 13
13
-
 14
14
-
 15
15
-
 16
16
-
 17
17
-
 18
18
-
 19
19
-
 20
20
-
 21
21
-
 22
22
-
 23
23
-
 24
24
-
 25
25
-
 26
26
-
 27
27
-
 28
28
-
 29
29
-
 30
30
-
 31
31
-
 32
32
-
 33
33
-
 34
34


Kenwood OV340B Manuale utente
- Categoria
- Produttori di sandwich
- Tipo
- Manuale utente
in altre lingue
- français: Kenwood OV340B Manuel utilisateur
- Deutsch: Kenwood OV340B Benutzerhandbuch
- Nederlands: Kenwood OV340B Handleiding