Hotpoint WML 902 EU Guida utente
- Categoria
- Lavatrici
- Tipo
- Guida utente

GB
1
Contents
Installation, 2-3
Unpacking and levelling
Connecting the electricity and water supplies
The first wash cycle
Technical data
Care and maintenance, 4
Cutting off the water or electricity supply
Cleaning the washing machine
Cleaning the detergent dispenser drawer
Caring for the door and drum of your appliance
Cleaning the pump
Checking the water inlet hose
Precautions and tips, 5
General safety
Disposal
Description of the washing machine
and starting a wash cycle, 6-7
Control panel
Indicator lights
Starting a wash cycle
Wash cycles, 8
Table of wash cycles
Personalisation, 9
Setting the temperature
Setting the spin speed
Functions
Detergents and laundry, 10
Detergent dispenser drawer
Preparing the laundry
Garments requiring special care
Load balancing system
Troubleshooting, 11
Service, 12
WML 902
Instructions for use
WASHING MACHINE
English,1
GB
IT
Italiano,13

2
GB
Installation
! This instruction manual should be kept in a
safe place for future reference. If the washing
machine is sold, transferred or moved, make
sure that the instruction manual remains with
the machine so that the new owner is able to
familiarise himself/herself with its operation
and features.
! Read these instructions carefully: they con-
tain vital information relating to the safe instal-
lation and operation of the appliance.
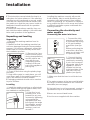
Unpacking and levelling
Unpacking
1. Remove the washing machine from its
packaging.
2. Make sure that the washing machine has
not been damaged during the transportation
process. If it has been damaged, contact the
retailer and do not proceed any further with
the installation process.
3. Remove the 4 pro-
tective screws (used
during transportation)
and the rubber wa-
sher with the cor-
responding spacer,
located on the rear
part of the appliance
(see figure).
4. Close off the holes using the plastic plugs
provided.
5. Keep all the parts in a safe place: you will
need them again if the washing machine ne-
eds to be moved to another location.
! Packaging materials should not be used as
toys for children.
Levelling
1. Install the washing machine on a flat sturdy
floor, without resting it up against walls, furni-
ture cabinets or anything else.
2. If the floor is not
perfectly level, com-
pensate for any une-
venness by tightening
or loosening the
adjustable front feet
(see figure); the angle
of inclination, measu-
red in relation to the
worktop, must not
exceed 2°.
Levelling the machine correctly will provide
it with stability, help to avoid vibrations and
excessive noise and prevent it from shifting
while it is operating. If it is placed on carpet or
a rug, adjust the feet in such a way as to allow
a sufficient ventilation space underneath the
washing machine.
Connecting the electricity and
water supplies
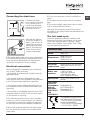
Connecting the water inlet hose
1. Connect the inlet
hose by screwing it to
a cold water tap using
a 3/4 gas threaded
connection (see figu-
re).
Before performing the
connection, allow the
water to run freely until
it is perfectly clear.
2. Connect the inlet
hose to the washing
machine by screwing
it onto the correspon-
ding water inlet of the
appliance, which is
situated on the top
right-hand side of the
rear part of the ap-
pliance (see figure).
3. Make sure that the hose is not folded over
or bent.
! The water pressure at the tap must fall within
the range of values indicated in the Technical
data table (see next page).
! If the inlet hose is not long enough, contact a
specialised shop or an authorised technician.
! Never use second-hand hoses.
! Use the ones supplied with the machine.

GB
3
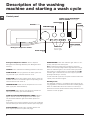
Connecting the drain hose
Connect the drain
hose, without bending
it, to a drain duct or
a wall drain situated
between 65 and 100
cm from the floor;
alternatively, placed
it over the edge of a
basin, sink or tub, fa-
stening the duct sup-
plied to the tap (see
figure). The free end
of the hose should
not be underwater.
! We advise against the use of hose extensions;
if it is absolutely necessary, the extension must
have the same diameter as the original hose
and must not exceed 150 cm in length.
Electrical connections
Before plugging the appliance into the electri-
city socket, make sure that:
• thesocketisearthedandcomplieswithall
applicable laws;
• thesocketisabletowithstandthemaxi-
mum power load of the appliance as indicated
in the Technical data table (see opposite);
• thepowersupplyvoltagefallswithintheva-
lues indicated in the Technical data table (see
opposite);
• thesocketiscompatiblewiththeplugofthe
washing machine. If this is not the case, repla-
ce the socket or the plug.
! The washing machine must not be installed
outdoors, even in covered areas. It is extreme-
ly dangerous to leave the appliance exposed
to rain, storms and other weather conditions.
! When the washing machine has been instal-
led, the electricity socket must remain within
easy reach.
65 - 100 cm
! Do not use extension cords or multiple so-
ckets.
! The cable should not be bent or compres-
sed.
! The power supply cable must only be repla-
ced by authorised technicians.
Warning! The company shall not be held re-
sponsible in the event that these standards are
not observed.
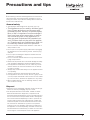
The first wash cycle
Once the appliance has been installed, and
before you use it for the first time, run a wash
cycle with detergent and no laundry, using
wash cycle number “Auto Clean” (see “Clea-
ning the washing machine”).
Technical data
Model
WML 902
Dimensions
width 59.5 cm
height 85 cm
depth 60,5 cm
Capacity
from 1 to 9 kg
Electrical
connections
please refer to the technical
data plate fixed to the ma-
chine
Water con-
nections
maximum pressure
1 MPa (10 bar)
minimum pressure
0.05 MPa (0.5 bar)
drum capacity 62 litres
Spin speed
up to 1000 rotations per
minute
Test wash
cycles in
accordance
with re-
gulations
1061/2010
and
1015/2010
Programme 4:
Eco Cotton 60°C.
Programme 4:
Eco Cotton 40°C.
This appliance conforms to
the following EC Directives:
- 2004/108/EC (Electroma-
gnetic Compatibility)
- 2006/95/EC (Low Voltage)
- 2012/19/EU - WEEE

4
GB
Care and maintenance
Cutting off the water and electri-
city supplies
•Turnoffthewatertapaftereverywashcycle.
This will limit wear on the hydraulic system in-
side the washing machine and help to prevent
leaks.
•Unplugthewashingmachinewhencleaning
it and during all maintenance work.
Cleaning the washing machine
•Theouterpartsandrubbercomponents
of the appliance can be cleaned using a soft
cloth soaked in lukewarm soapy water. Do not
use solvents or abrasives.
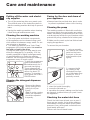
•Thewashingmachinehasa“AutoClean”
programme for its internal parts that must be
run with no load in the drum.
To help the wash cycle you may want to use
either the detergent (i.e. a quantity 10% the
quantity specified for lightly-soiled garments)
or special additives to clean the washing
machine. We recommend running a cleaning
programme every 40 wash cycles.
To start the programme
press buttons A and
B simultaneously for 5
seconds (see figure).
The programme will
start automatically and
will run for about 70
minutes. To stop the
cycle press the START/
PAUSE button.
Cleaning the detergent dispenser
drawer
Remove the dispen-
ser by raising it and
pulling it out (see
figure).
Wash it under running
water; this operation
should be repeated
frequently.
1
2
A
B
Caring for the door and drum of
your appliance
•Alwaysleavetheportholedoorajarinorder
to prevent unpleasant odours from forming.
Cleaning the pump
The washing machine is fitted with a self-clea-
ning pump which does not require any mainte-
nance. Sometimes, small items (such as coins
or buttons) may fall into the pre-chamber which
protects the pump, situated in its bottom part.
! Make sure the wash cycle has finished and
unplug the appliance.
To access the pre-chamber:
1. using a screwdri-
ver, remove the cover
panel on the lower
front part of the wa-
shing machine (see
figure);
2. unscrew the lid
by rotating it anti-
clockwise (see figu-
re): a little water may
trickle out. This is
perfectly normal;
3. clean the inside thoroughly;
4. screw the lid back on;
5. reposition the panel, making sure the hooks
are securely in place before you push it onto
the appliance.
Checking the water inlet hose
Check the inlet hose at least once a year. If
there are any cracks, it should be replaced
immediately: during the wash cycles, water
pressure is very strong and a cracked hose
could easily split open.
! Never use second-hand hoses.

GB
5
Precautions and tips
! This washing machine was designed and constructed in
accordance with international safety regulations. The fol-
lowing information is provided for safety reasons and must
therefore be read carefully.
General safety
•Thisappliancewasdesignedfordomesticuseonly.
• This appliance can be used by children aged
from 8 years and above and persons with
reduced physical, sensory or mental capabi-
lities or lack of experience and knowledge if
they have been given supervision or instruc-
tion concerning use of the appliance in a
safe way and understand the hazards invol-
ved. Children shall not play with the applian-
ce. Cleaning and user maintenance shall not
be made by children without supervision..
•Donottouchthemachinewhenbarefootorwithwetor
damp hands or feet.
•Donotpullonthepowersupplycablewhenunplugging
the appliance from the electricity socket. Hold the plug
and pull.
•Donotopenthedetergentdispenserdrawerwhilethe
machine is in operation.
•Donottouchthedrainedwaterasitmayreachextreme-
ly high temperatures.
• Neverforcetheportholedoor.Thiscoulddamagethesafety
lock mechanism designed to prevent accidental opening.
•Iftheappliancebreaksdown,donotunderanycircum-
stances access the internal mechanisms in an attempt
to repair it yourself.
•Alwayskeepchildrenwellawayfromtheappliancewhile
it is operating.
•Thedoorcanbecomequitehotduringthewashcycle.
•Iftheappliancehastobemoved,workinagroupoftwo
or three people and handle it with the utmost care. Never
try to do this alone, because the appliance is very heavy.
•Beforeloadinglaundryintothewashingmachine,make
sure the drum is empty.
Disposal
•Disposingofthepackagingmaterials:observelocalregu-
lations so that the packaging may be re-used.
•TheEuropeanDirective2012/19/EU-WEEEonWaste
Electrical and Electronic Equipment, requires that old
household electrical appliances must not be disposed of in
the normal unsorted municipal waste stream. Old applian-
ces must be collected separately in order to optimise the
recovery and recycling of the materials they contain and
reduce the impact on human health and the environment.
The crossed out “wheeled bin” symbol on the product
reminds you of your obligation, that when you dispose of
the appliance it must be separately collected. Consumers
should contact their local authority or retailer for information
concerning the correct disposal of their old appliance.

6
GB
Detergent dispenser drawer: used to dispense
detergents and washing additives (see “Detergents and
laundry”).
ON/OFF button: switches the washing machine on and off.
WASH CYCLE knob: programmes the wash cycles. Du-
ring the wash cycle, the knob does not move.
FUNCTION buttons with indicator light: used to select the
available functions. The indicator light corresponding to the
selected function will remain lit.
TEMPERATURE knob: sets the temperature or the cold
wash cycle (see “Personalisation”).
SPIN SPEED knob: sets the spin speed or exclude the
spin cycle completely (see “Personalisation”).
WASH CYCLE PROGRESS/DELAY TIMER
indicator
light
s: used to monitor the progress of the wash cycle.
The illuminated indicator light shows which phase is in
progress.
If the Delay Timer function has been set, the time remaining
until the wash cycle starts will be indicated (see next page).
DOOR LOCKED indicator light: indicates whether the
door may be opened or not (see next page).
START/PAUSE button with indicator light: starts or tem-
porarily interrupts the wash cycles.
N.B. To pause the wash cycle in progress, press this
button; the corresponding indicator light will flash orange,
while the indicator light for the current wash cycle phase
will remain lit in a fixed manner. If the DOOR LOCKED
indicator light is switched off, the door may be opened
(wait approximately 3 minutes).
To start the wash cycle from the point at which it was inter-
rupted, press this button again.
Standby mode
This washing machine, in compliance with new energy sa-
ving regulations, is fitted with an automatic standby system
which is enabled after about 30 minutes if no activity is
detected. Press the ON-OFF button briefly and wait for the
machine to start up again.
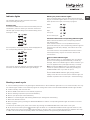
Description of the washing
machine and starting a wash cycle
TEMPERATURE
knob
Detergent dispenser drawer
WASH CYCLE PROGRESS/
DELAY TIMER indicator lights
FUNCTION
buttons with
indicator lights
ON/OFF
button
SPIN SPEED
knob
DOOR
LOCKED
indicator light
START/PAUSE
button with indicator
light
Control panel
WASH CYCLE
knob

GB
7
Indicator lights
The indicator lights provide important information.
This is what they can tell you:
Delayed start
If the DELAY TIMER function has been activated (see “Per-
sonalisation”), after the wash cycle has been started the
indicator light corresponding to the selected delay period
will begin to flash:
As time passes, the remaining delay will be displayed and
the corresponding indicator light will flash:
Once the set delay has elapsed, the flashing indicator light
will switch off and the selected wash cycle will begin.
Wash cycle phase indicator lights
Once the desired wash cycle has been selected and has
begun, the indicator lights switch on one by one to indicate
which phase of the cycle is currently in progress.
Function buttons and corresponding indicator lights
When a function is selected, the corresponding indicator
light will illuminate.
If the selected function is not compatible with the pro-
grammed wash cycle, the corresponding indicator light will
flash and a sound alert (3 beeps); the function will not be
activated.
If a function which is incompatible with another function
selected previously, only the most recent selection will
remain active.
Door locked indicator light
If this indicator light is on, the appliance door is locked to
prevent it from being opened accidentally; to avoid any
damage, wait for the indicator light to switch off before you
open the appliance door (wait approximately 3 minutes).
N.B. If the DELAY TIMER function is activated, the door
cannot be opened; pause the machine by pressing the
START/PAUSE button if you wish to open it.
! If the START/PAUSE indicator light (orange) flashes
rapidly at the same time as the function indicator light, this
indicates a problem has occurred (see “Troubleshooting”).
Starting a wash cycle
1. Turn the washing machine on by pressing the ON/OFF button. All the indicator lights will turn on for a few seconds, then only
the indicator lights relative to the selected programme settings will remain lit and the START/PAUSE indicator light will flash.
2. Load the laundry and close the door.
3. Set the WASH CYCLE knob to the desired programme.
4. Set the washing temperature (see “Personalisation”).
5. Set the spin speed (see “Personalisation”).
6. Measure out the detergent and washing additives (see “Detergents and laundry”).
7. Select the desired functions.
8. Start the wash cycle by pressing the START/PAUSE button and the corresponding indicator light will remain lit in a fixed
manner, in green.
To cancel the set wash cycle, pause the machine by pressing the START/PAUSE button and select a new cycle.
9. At the end of the wash cycle the indicator light will switch on. The DOOR LOCKED indicator light will switch off, indi-
cating that the door may be opened (wait approximately 3 minutes). Take out your laundry and leave the appliance door ajar
to make sure the drum dries completely. Switch the washing machine off by pressing the ON/OFF button.
Wash
Rinse
Spin
Pump out
End of wash cycle
END

8
GB
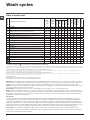
Wash cycles
Table of wash cycles
Anti Stain: the programme 1 is suitable to heavily-soiled garments with resistant colours. It ensures a washing class that is
higher than the standard class (A class). When running the programme, do not mix garments of different colours. We recom-
mend the use of powder detergent. Pre-treatment with special additives is recommended if there are obstinate stains.
Whites: use this cycle 2 to wash white clothes. The programme is designed to maintain the brightness of white clothes over
time. Use powder detergent for best results.
Anti allergy: use programme 6 to remove major allergens such as pollen, mites, cat’s and dog’s hair.
Baby: use the special wash cycle 7 to remove the remove the soiling typically caused by babies, while removing all traces
of detergent from nappies in order to prevent the delicate skin of babies from suffering allergic reactions. The cycle has been
designed to reduce the amount of bacteria by using a greater quantity of water and optimising the effect of special disinfec-
ting additives added to the detergent.
Eco cycles
The Eco Cycles assure energy saving by eliminating the need of heating water and it’s an advantage both to your
energy bill and the environment! These innovative Eco programmes (
12
Eco Cottons,
13
Eco Synthetics and
14
Eco
Fast 30’) are available for various fabrics and different quantity of garment; they have been designed to guarantee a
high cleaning action even at low temperature and can be used for lightly to medium soiled loads. Eco Cycles give the
best results thanks to an intensified wash action, water optimization and are carried out in the same average time of a
standard cycle. For the best washing results with Eco Cycles we recommend the usage of a liquid detergent.
Cotton 20°: the programme 11 ideal for lightly soiled cotton loads. The effective performance levels achieved at cold
temperatures, which are comparable to washing at 40°, are guaranteed by a mechanical action which operates at varying
speed, with repeated and frequent peaks.
Wash cycles
Description of the wash cycle
Max.
temp.
(°C)
Max.
speed
(rpm)
Detergents
Max. load (kg)
Residual dam-
pness%
Energy con-
sumptionkWh
Total water lt
Cycle duration
Prewash
Wash
Bleach
Fabric
softener
1
Anti Stain
40° 1000
5 - - - 180’
2
Whites
60° 1000
-
5 - - - 180’
3
Cotton: lightly soiled resistant and delicate colours.
40°
(Max. 90°)
1000
9 - - - 115’
4
Eco Cotton 60° (1): heavily soiled whites and resistant colours.
60° 1000 -
-
9 62 1,30 57,4 240’
4
Eco Cotton 40° (2): lightly soiled resistant and delicate colours.
40° 1000 -
-
9 62 1,10 97 225’
5
Synthetics: heavily soiled resistant colours.
60° 1000
4,5 46 1,03 65 135’
5
Synthetics (3): lightly soiled resistant colours.
40° 1000
4,5 - - - 100’
6
Anti allergy
60° 1000 -
-
5 - - - 195’
7
Baby
40° 1000
5 - - - 145’
8
Wool: for wool, cashmere, etc.
40° 800 -
-
2 - - - 85’
9
Delicates
30° 0 -
-
1 - - - 80’
10
Fast Wash 60’: to refresh normal soiled garments quickly (not
suitable for wool, silk and clothes which require washing by hand).
60° 1000 -
-
3,5 62 0,84 44 60’
11
Cotton 20°: lightly soiled resistant and delicate colours.
20° 1000 -
9 - - - 175’
12
Eco Cottons
Cold Water
1000 -
-
9 - - - 80’
13
Eco Synthetics
Cold Water
1000 -
-
3 - - - 70’
14
Eco Fast 30’
Cold Water
800 -
-
3 71 0,20 38 30’
Rinse
- 1000 - -
9 - - - 36’
Spin and Pump out
- 1000 - - - - 9 - - - 10’
Pump out only *
- - - - - 9 - - - 3’
1) Test wash cycle in compliance with regulation 1061/2010: set wash cycle 4 with a temperature of 60°C.
This cycle is designed for cotton loads with a normal soil level and is the most efficient in terms of both electricity and water consumption; it should be used for garments which can be
washed at 60°C . The actual washing temperature may differ from the indicated value.
2) Test wash cycle in compliance with regulation 1061/2010: set wash cycle 4 with a temperature of 40°C.
This cycle is designed for cotton loads with a normal soil level and is the most efficient in terms of both electricity and water consumption; it should be used for garments which can be
washed at 40°C . The actual washing temperature may differ from the indicated value.
For all Test Institutes:
2) Long wash cycle for cottons: set wash cycle 4 with a temperature of 40°C.
3) Long wash cycle for synthetics: set wash cycle 5 with a temperature of 40°C.
The length of cycle shown on the display or in this booklet is an estimation only and is calculated assuming standard working conditions. The actual duration can vary accor-
ding to factors such as water temperature and pressure, the amount of detergent used, the amount and type of load inserted, load balancing and any wash options selected.
* If you select programme and exclude the spin cycle, the machine will drain only.

GB
9
Setting the temperature
Turn the TEMPERATURE knob to set the wash temperature (see Table of wash cycles).
The temperature may be lowered, or even set to a cold wash ( ).
The washing machine will automatically prevent you from selecting a temperature which is higher than the maximum value
set for each wash cycle.
! Exception: if the
3
programme is selected, the temperature can be increased up to a value of 90°C.
Setting the spin speed
Turn the SPIN SPEED knob to set the spin speed for the selected wash cycle.
The maximum spin speeds available for each wash cycle are as follows:
Wash cycles Maximum spin speed
Cottons 1000 rpm
Synthetics 1000 rpm
Wool 800 rpm
Silk drain only
The spin speed may be lowered, or the spin cycle can be excluded altogether by selecting the symbol .
The washing machine will automatically prevent you from selecting a spin speed which is higher than the maximum speed
set for each wash cycle.
Functions
The various wash functions available with this washing machine will help to achieve the desired results, every time.
To activate the functions:
1. Press the button corresponding to the desired function;
2. the function is enabled when the corresponding indicator light is illuminated.
Note:
- If the selected function is not compatible with the programmed wash cycle, the corresponding indicator light will flash and
a sound alert (3 beeps); the function will not be activated.
- If a function which is incompatible with another function selected previously, only the most recent selection will remain
active.
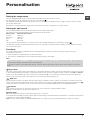
Super Wash
This option offers a high-performance wash due to the greater quantity of water used in the initial phase of the cycle, and due
to the increased wash cycle duration, is particularly useful for the removal of stubborn stains. It can be used with or without
bleach. If you desire bleaching, insert the extra tray compartment (4) into compartment 1. When pouring in the bleach, be
careful not to exceed the “max” level marked on the central pivot (see figure pag. 10).
Easy iron
By selecting this function, the wash and spin cycles will be modified in order to reduce the formation of creases. At the end
of the cycle the washing machine will perform slow rotations of the drum; the EASY IRON indicator light will flash and the
phase will remain lit in a fixed manner. To end the cycle, press the START/PAUSE button or the EASY IRON button.
Prewash
If this function is selected, the pre-wash cycle will run; this is useful for removing stubborn stains.
N.B.: Put the detergent in the relevant compartment.
Delay timer
This timer delays the start time of the wash cycle by up to 12 hours.
Press the button repeatedly until the indicator light corresponding to the desired delay time switches on. The fifth time the button
is pressed, the function will be disabled.
N.B. Once you have pressed the START/PAUSE button, the delay time may only be decreased if you wish to modify it.
Personalisation

10
GB
Detergents and laundry
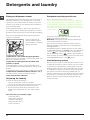
Detergent dispenser drawer
Good washing results also depend on the correct dose of
detergent: adding too much detergent will not necessa-
rily result in a more efficient wash, and may in fact cause
build up on the inside of your appliance and contribute to
environmental pollution.
! Use powder detergent for white cotton garments, for
pre-washing, and for washing at temperatures over 60°C.
! Follow the instructions given on the detergent packaging.
! Do not use hand washing detergents because these
create too much foam.
Open the detergent di-
spenser drawer and pour
in the detergent or washing
additive, as follows.
compartment 1: Pre-wash detergent (powder)
Before pouring in the detergent, make sure that extra com-
partment 4 has been removed.
compartment 2: Detergent for the wash cycle
(powder or liquid)
If liquid detergent is used, it is recommended that the
removable plastic partition A (supplied) be used for proper
dosage.
If powder detergent is used, place the partition into slot B.
compartment 3: Additives (fabric softeners, etc.)
The fabric softener should not overflow the grid.
extra compartment 4: Bleach
Preparing the laundry
•Dividethelaundryaccordingto:
- the type of fabric/the symbol on the label
- the colours: separate coloured garments from whites.
•Emptyallgarmentpocketsandcheckthebuttons.
• Donotexceedthelistedvalues,whichrefertothe
weight of the laundry when dry: see “Table of wash
cycles”.
How much does your laundry weigh?
1 sheet 400-500 g
1 pillow case 150-200 g
1 tablecloth 400-500 g
1 bathrobe 900-1200 g
1 towel 150-250 g
M
AX
1
2
4
3
A
B
Garments requiring special care
Wool - Woolmark Apparel Care - Green:
the wool wash cycle of this machine has been approved
by The Woolmark Company for the washing of wool gar-
ments labelled as “hand wash” provided that the products
are washed according to the instructions on the garment
label and those issued by the manufacturer of this washing
machine. (M1127)
In UK, Eire, Hong Kong and India the Woolmark trade
mark is a Certification trade mark.
Delicates: use programme 9 to wash very delicate gar-
ments having strasses or sequins.
We recommend turning the garments inside out before
washing and placing small items into the special bag for
washing delicates.
Use liquid detergent on delicate garments for best results.
To wash silk garments and curtains select cycle 9 and then
function ; the machine will end the cycle while the
laundry is soaking and the indicator light will flash. To
drain the water so that the laundry may be removed, press
the START/PAUSE button or the button.
Load balancing system
Before every spin cycle, to avoid excessive vibrations and
to distribute the load in a uniform manner, the drum rotates
continuously at a speed which is slightly greater than the
washing rotation speed. If, after several attempts, the load
is not balanced correctly, the machine spins at a reduced
spin speed. If the load is excessively unbalanced, the
washing machine performs the distribution process instead
of spinning. To encourage improved load distribution and
balance, we recommend small and large garments are
mixed in the load.

GB
11
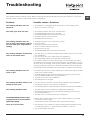
Troubleshooting
Your washing machine could fail to work. Before contacting the Technical Assistance Centre (see “Assistance”), make sure
that the problem cannot be solved easily using the following list.
Problem:
The washing machine does not
switch on.
The wash cycle does not start.
The washing machine does not
take in water (the indicator light for
the first wash cycle stage flashes
rapidly).
The washing machine continuously
takes in and drains water.
The washing machine does not
drain or spin.
The washing machine vibrates a lot
during the spin cycle.
The washing machine leaks.
The START/PAUSE indicator light
(orange) and the function indicator
lights flash rapidly.
There is too much foam.
Possible causes / Solutions:
•Theapplianceisnotpluggedintothesocketfully,orisnotmakingcontact.
•Thereisnopowerinthehouse.
•Thewashingmachinedoorisnotclosedproperly.
•TheON/OFFbuttonhasnotbeenpressed.
•TheSTART/PAUSEbuttonhasnotbeenpressed.
•Thewatertaphasnotbeenopened.
•Adelayedstarthasbeenset.
•Thewaterinlethoseisnotconnectedtothetap.
•Thehoseisbent.
•Thewatertaphasnotbeenopened.
•Thereisnowatersupplyinthehouse.
•Thepressureistoolow.
•TheSTART/PAUSEbuttonhasnotbeenpressed.
•Thedrainhoseisnotfittedataheightbetween65and100cmfromthefloor
(see “Installation”).
•Thefreeendofthehoseisunderwater(see “Installation”).
•Thewalldrainagesystemisnotfittedwithabreatherpipe.
If the problem persists even after these checks, turn off the water tap, switch
the appliance off and contact the Assistance Service. If the dwelling is on one of
the upper floors of a building, there may be problems relating to water drainage,
causing the washing machine to fill with water and drain continuously. Special
anti-draining valves are available in shops and help to avoid this inconvenience.
•Thewashcycledoesnotincludedraining:somewashcyclesrequirethedrain
phase to be started manually.
•TheEASYIRONfunctionhasbeenactivated:Tocompletethewashcycle,
press the START/PAUSE button (“Personalisation”).
•Thedrainhoseisbent(see “Installation”).
•Thedrainageductisclogged.
•Thedrumwasnotunlockedcorrectlyduringinstallation(see “Installation”).
•Thewashingmachineisnotlevel(see “Installation”).
• Thewashingmachineistrappedbetweencabinetsandwalls(see “Installation”).
•Thewaterinlethoseisnotscrewedonproperly(see “Installation”).
•Thedetergentdispenserdrawerisblocked(forcleaninginstructions,see
“Care and maintenance”).
•Thedrainhoseisnotfixedproperly(see “Installation”).
•Switchoffthemachineandunplugit,waitforapproximately1minuteand
then switch it back on again.
If the problem persists, contact the Technical Assistance Service.
•Thedetergentisnotsuitableformachinewashing(itshoulddisplaythetext
“for washing machines” or “hand and machine wash”, or the like).
•Toomuchdetergentwasused.

12
GB
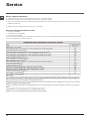
Service
Before calling for Assistance:
• Check whether you can solve the problem alone (see “Troubleshooting”);
•Restarttheprogrammetocheckwhethertheproblemhasbeensolved;
•Ifthisisnotthecase,contactanauthorisedTechnicalAssistanceCentreusingthetelephonenumberprovidedonthe
guarantee certificate.
! Always request the assistance of authorised technicians.
Have the following information to hand:
• thetypeofproblem;
• theappliancemodel(Mod.);
• theserialnumber(S/N).
This information can be found on the data plate applied to the rear of the washing machine, and can also be found on the
front of the appliance by opening the door.

13
IT
Italiano
Sommario
Installazione, 14-15
Disimballo e livellamento
Collegamenti idraulici ed elettrici
Primo ciclo di lavaggio
Dati tecnici
Manutenzione e cura, 16
Escludere acqua e corrente elettrica
Pulire la lavabiancheria
Pulire il cassetto dei detersivi
Curare oblò e cestello
Pulire la pompa
Controllare il tubo di alimentazione dell’acqua
Precauzioni e consigli, 17
Sicurezza generale
Smaltimento
Descrizione della lavabiancheria e
avviare un programma, 18-19
Pannello di controllo
Spie
Avviare un programma
Programmi, 20
Tabella dei programmi
Personalizzazioni, 21
Impostare la temperatura
Impostare la centrifuga
Funzioni
Detersivi e biancheria, 22
Cassetto dei detersivi
Preparare la biancheria
Capi particolari
Sistema bilanciamento del carico
Anomalie e rimedi, 23
Assistenza, 24
Assistenza Attiva 7 giorni su 7
IT
WML 902
Istruzioni per l’uso
LAVABIANCHERIA

14
IT
Installazione
! È importante conservare questo libretto per
poterlo consultare in ogni momento. In caso di
vendita, di cessione o di trasloco, assicurarsi
che resti insieme alla lavabiancheria per infor-
mare il nuovo proprietario sul funzionamento e
sui relativi avvertimenti.
! Leggere attentamente le istruzioni: ci sono
importanti informazioni sull’installazione,
sull’uso e sulla sicurezza.
Disimballo e livellamento
Disimballo
1. Disimballare la lavabiancheria.
2. Controllare che la lavabiancheria non abbia
subìto danni nel trasporto. Se fosse danneggia-
ta non collegarla e contattare il rivenditore.
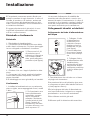
3. Rimuovere le 4 viti
di protezione per il
trasporto e il gommino
con il relativo distan-
ziale, posti nella parte
posteriore (vedi figura).
4. Chiudere i fori con i tappi di plastica in dota-
zione.
5. Conservare tutti i pezzi: qualora la lavabian-
cheria debba essere trasportata, dovranno
essere rimontati.
! Gli imballaggi non sono giocattoli per bambini.
Livellamento
1. Installare la lavabiancheria su un pavimento
piano e rigido, senza appoggiarla a muri, mobili
o altro.
2. Se il pavimento non
fosse perfettamente
orizzontale, compen-
sare le irregolarità
svitando o avvitando
i piedini anteriori (vedi
figura); l’angolo di
inclinazione, misurato
sul piano di lavoro, non
deve superare i 2°.
Un accurato livellamento dà stabilità alla
macchina ed evita vibrazioni, rumori e spo-
stamenti durante il funzionamento. In caso di
moquette o di un tappeto, regolare i piedini in
modo da conservare sotto la lavabiancheria
uno spazio sufficiente per la ventilazione.
Collegamenti idraulici ed elettrici
Collegamento del tubo di alimentazione
dell’acqua
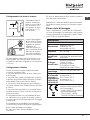
1. Collegare il tubo
di alimentazione
avvitandolo a un
rubinetto d’acqua
fredda con bocca
filettata da 3/4 gas
(vedi figura).
Prima di allacciare,
far scorrere l’acqua
finché non sia limpi-
da.
2. Collegare il tubo
di alimentazione alla
lavabiancheria
avvitandolo all’appo-
sita presa d’acqua,
nella parte posteriore
in alto a destra (vedi
figura).
3. Fare attenzione che nel tubo non ci siano
né pieghe né strozzature.
! La pressione idrica del rubinetto deve esse-
re compresa nei valori della tabella Dati tecni-
ci (vedi pagina a fianco).
! Se la lunghezza del tubo di alimentazione
non fosse sufficiente, rivolgersi a un negozio
specializzato o a un tecnico autorizzato.
! Non utilizzare mai tubi già usati.
! Utilizzare quelli in dotazione alla macchina.

15
IT
Collegamento del tubo di scarico
Collegare il tubo di
scarico, senza pie-
garlo, a una condut-
tura di scarico o a
uno scarico a muro
posti tra 65 e 100
cm da terra;
oppure appoggiarlo
al bordo di un lavan-
dino o di una vasca,
legando la guida in
dotazione al
rubinetto (vedi figu-
ra). L’estremità libera
del tubo di scarico
non deve rimanere
immersa nell’acqua.
! È sconsigliato usare tubi di prolunga; se in-
dispensabile, la prolunga deve avere lo stes-
so diametro del tubo originale e non superare
i 150 cm.
Collegamento elettrico
Prima di inserire la spina nella presa della
corrente, accertarsi che:
• la presa abbia la messa a terra e sia a nor-
ma di legge;
• la presa sia in grado di sopportare il carico
massimo di potenza della macchina, indicato
nella tabella Dati tecnici (vedi a fianco);
• la tensione di alimentazione sia compresa
nei valori indicati nella tabella Dati tecnici (vedi
a fianco);
• la presa sia compatibile con la spina della
lavabiancheria. In caso contrario sostituire la
presa o la spina.
! La lavabiancheria non va installata all’aper-
to, nemmeno se lo spazio è riparato, perché
è molto pericoloso lasciarla esposta a pioggia
e temporali.
! A lavabiancheria installata, la presa della
corrente deve essere facilmente raggiungibile.
! Non usare prolunghe e multiple.
! Il cavo non deve subire piegature o com-
pressioni.
! Il cavo di alimentazione deve essere sostituito
solo da tecnici autorizzati.
Attenzione! L’azienda declina ogni responsabi-
lità qualora queste norme non vengano rispet-
tate.
Primo ciclo di lavaggio
Dopo l’installazione, prima dell’uso, effettuare
un ciclo di lavaggio con detersivo e senza bian-
cheria impostando il programma “Auto Pulizia”
(vedi “Pulire la lavabiancheria”).
65 - 100 cm
Dati tecnici
Modello
WML 902
Dimensioni
larghezza cm 59,5
altezza cm 85
profondità cm 60,5
Capacità
da 1 a 9 kg
Collega-
menti elet-
trici
vedi la targhetta caratteristi-
che tecniche applicata sulla
macchina
Collega-
menti idrici
pressione massima
1 MPa (10 bar)
pressione minima
0,05 MPa (0,5 bar)
capacità del cesto 62 litri
Velocità di
centrifuga
sino a 1000 giri al minuto
Programmi
di controllo
secondo i
regolamenti
1061/2010
1015/2010
programma 4;
Eco Cotone 60°C.
programma 4;
Eco Cotone 40°C.
Questa apparecchiatura è
conforme alle seguenti Diret-
tive Comunitarie:
- 2004/108/CE (Compatibili-
tà Elettromagnetica)
- 2012/19/EU - WEEE
- 2006/95/CE (Bassa Tensione)

16
IT
Manutenzione e cura
Escludere acqua e corrente elettrica
• Chiudere il rubinetto dell’acqua dopo ogni la-
vaggio. Si limita così l’usura dell’impianto idrau-
lico della lavabiancheria e si elimina il pericolo di
perdite.
• Staccare la spina della corrente quando si
pulisce la lavabiancheria e durante i lavori di
manutenzione.
Pulire la lavabiancheria
• La parte esterna e le parti in gomma pos-
sono essere puliti con un panno imbevuto di
acqua tiepida e sapone. Non usare solventi o
abrasivi.
• La lavabiancheria è dotata di un programma
di “Auto Pulizia” delle parti interne che deve
essere effettuato senza alcun tipo di carico
nel cesto.
Il detersivo (nella quantità pari al 10% di quella
consigliata per capi poco sporchi) o additi-
vi specifici per la pulizia della lavabiancheria,
potranno essere utilizzati come coadiuvanti nel
programma di lavaggio. Si consiglia di effettuare
il programma di pulizia ogni 40 cicli di lavaggio.
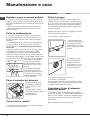
Per attivare il program-
ma premere contem-
poraneamente il tasto
A e B per 5 sec. (vedi
figura).
Il programma partirà
automaticamente ed
avrà una durata di circa
70 minuti. Per fermare
il ciclo premere il tasto
START/PAUSE.
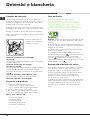
Pulire il cassetto dei detersivi
Sfilare il cassetto sol-
levandolo e tirandolo
verso l’esterno (vedi
figura).
Lavarlo sotto l’acqua
corrente; questa pulizia
va effettuata
frequentemente.
Curare oblò e cestello
• Lasciare sempre socchiuso l’oblò per evitare
che si formino cattivi odori.
Pulire la pompa
La macchina è dotata di una pompa auto-
pulente che non ha bisogno di manutenzio-
ne. Può però succedere che piccoli oggetti
(monete, bottoni) cadano nella precamera
che protegge la pompa, situata nella parte
inferiore di essa.
! Assicurarsi che il ciclo di lavaggio sia termi-
nato e staccare la spina.
Per accedere alla precamera:
1. rimuovere il pan-
nello di copertura sul
lato anteriore della
macchina con l’ausi-
lio di un giravite (vedi
figura);
2. svitare il coper-
chio ruotandolo in
senso antiorario
(vedi figura): è nor-
male che fuoriesca
un po’ d’acqua;
3. pulire accuratamente l’interno;
4. riavvitare il coperchio;
5. rimontare il pannello assicurandosi, prima
di spingerlo verso la macchina, di aver inseri-
to i ganci nelle apposite asole.
Controllare il tubo di alimenta-
zione dell’acqua
Controllare il tubo di alimentazione almeno
una volta all’anno. Se presenta screpolature e
fessure va sostituito: durante i lavaggi le forti
pressioni potrebbero provocare improvvise
spaccature.
! Non utilizzare mai tubi già usati.
1
2
A
B

17
IT
Precauzioni e consigli
! La lavabiancheria è stata progettata e costruita in
conformità alle norme internazionali di sicurezza. Queste
avvertenze sono fornite per ragioni di
sicurezza e devono essere lette attentamente.
Sicurezza generale
• Questo apparecchio è stato concepito esclusivamente
per un uso di tipo domestico.
•Questo apparecchio può essere usato da
bambini da 8 anni in su e da persone con
capacità fisiche, sensoriali o mentali ridotte
o con esperienza e conoscenze insufficienti
se sono supervisionati o se hanno ricevuto
adeguata formazione in merito all’uso dell’ap-
parecchio in modo sicuro e capendo i pericoli
connessi. I bambini non devono giocare con
l’apparecchio. Manutenzione e pulizia non
devono essere effettuati dai bambini senza
supervisione.
• Non toccare la macchina a piedi nudi o con le mani o i
piedi bagnati o umidi.
• Non staccare la spina dalla presa della corrente tirando il
cavo, bensì afferrando la spina.
• Non aprire il cassetto dei detersivi mentre la macchina è
in funzione.
• Non toccare l’acqua di scarico, che può raggiungere
temperature elevate.
• Non forzare in nessun caso l’oblò: potrebbe danneggiarsi
il meccanismo di sicurezza che protegge da aperture
accidentali.
• In caso di guasto, in nessun caso accedere ai meccanismi
interni per tentare una riparazione.
• Controllare sempre che i bambini non si avvicinino alla
macchina in funzione.
• Durante il lavaggio l’oblò tende a scaldarsi.
• Se dev’essere spostata, lavorare in due o tre persone con
la massima attenzione. Mai da soli perché la macchina è
molto pesante.
• Prima di introdurre la biancheria controlla che il cestello
sia vuoto.
Smaltimento
•Smaltimento del materiale di imballaggio:
attenersi alle norme locali, così gli imballaggi potranno
essere riutilizzati.
• La direttiva Europea 2012/19/EU (WEEE) sui rifiuti di
apparecchia¬ture elettriche ed elettroniche (RAEE),
prevede che gli elettrodo¬mestici non debbano essere
smaltiti nel normale flusso dei rifiuti solidi urbani. Gli
apparecchi dismessi devono essere raccolti separata-
mente per ottimizzare il tasso di recupero e riciclaggio
dei materiali che li compongono ed impedire potenziali
danni per la salute e l’ambiente.
Il simbolo del cestino barrato è riportato su tutti i prodotti
per ricordare gli obblighi di raccolta separata. Quando si
acquista una nuova apparecchiatura equivalente si può
consegnare il RAEE al negoziante, che è tenuto a ritirarlo
gratuitamente; i RAEE di “piccolissime dimensioni” (nessun
lato sopra i 25 cm) possono essere consegnati gratuita-
mente ai negozianti anche se non si acquista nulla (solo nei
negozi con superficie di vendita superiore a 400 mq). Per
ulteriori informazioni sulla corretta dismissione degli elettro-
domestici i detentori potranno rivolgersi al servizio pubblico
preposto o ai rivenditori.

18
IT
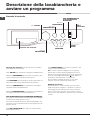
Pannello di controllo
Descrizione della lavabiancheria e
avviare un programma
Cassetto dei detersivi: per caricare detersivi e additivi
(vedi “Detersivi e biancheria”).
Tasto ON/OFF: per accendere e spegnere la lavabiancheria.
Manopola PROGRAMMI: per impostare i programmi. Du-
rante il programma la manopola resterà ferma.
Tasti FUNZIONE: per selezionare le funzioni disponibili. La
spia relativa alla funzione selezionata rimarrà accesa.
Manopola CENTRIFUGA: per impostare la centrifuga o
escluderla (vedi “Personalizzazioni”).
Manopola TEMPERATURA: per impostare la temperatura
o il lavaggio a freddo (vedi “Personalizzazioni”).
SPIE AVANZAMENTO CICLO/PARTENZA RITARDATA:
per seguire lo stato di avanzamento del programma di lavaggio.
La spia accesa indica la fase in corso.
Se è stata impostata la funzione “Partenza Ritardata”, indi-
cheranno il tempo mancante all’avvio del programma (vedi
pagina a fianco).
Spia OBLÒ BLOCCATO: per capire se l’oblò è apribile
(vedi pagina a fianco).
Tasto START/PAUSE: per avviare i programmi o inter-
romperli momentaneamente.
N.B.: mettere in pausa il lavaggio in corso premere
questo tasto, la spia relativa lampeggerà con colore
arancione mentre quella della fase in corso sarà accesa
fissa. Se la spia OBLÒ BLOCCATO sarà spenta, si
potrà aprire l’oblò (attendere 3 minuti circa).
Per far ripartire il lavaggio dal punto in cui è stato
interrotto, premere nuovamente questo tasto.
Modalità di stand by
Questa lavatrice, in conformità alle nuove normative
legate al risparmio energetico, è dotata di un sistema
di autospegnimento (stand by) che entra in funzione
dopo circa 30 minuti nel caso di non utilizzo. Premere
brevemente il tasto ON/OFF e attendere che la macchina
si riattivi.
Manopola
TEMPERATURA
Manopola
PROGRAMMI
Cassetto dei detersivi
SPIE AVANZAMENTO
CICLO/PARTENZA
RITARDATA
Tasti con spie
FUNZIONE
Tasto ON/OFF
Manopola
CENTRIFUGA
Spia
OBLÒ
BLOCCATO
Tasto con spia
START/
PAUSE

19
IT
Spie
Le spie forniscono informazioni importanti.
Ecco che cosa dicono:
Partenza ritardata
Se è stata attivata la funzione “Partenza ritardata” (vedi
“Personalizzazioni”), dopo avere avviato il programma, ini-
zierà a lampeggiare la spia relativa al ritardo selezionato:
Col trascorrere del tempo verrà visualizzato il ritardo
residuo con il lampeggio della spia relativa:
Trascorso il ritardo selezionato la spia lampeggiante si
spengnerà e avrà inizio il programma impostato.
Spie fase in corso
Una volta selezionato e avviato il ciclo di lavaggio desidera-
to, le spie si accenderanno progressivamente per indicarne
lo stato di avanzamento:
Tasti funzione e relative spie
Selezionando una funzione la spia relativa si illuminerà.
Se la funzione selezionata non è compatibile con il program-
ma impostato la spia relativa lampeggerà, verranno emessi
“3 beep” e la funzione non verrà attivata.
Nel caso venga impostata una funzione incompatibile con
un’altra precedentemente selezionata rimarrà attiva solo
l’ultima scelta.
Spia oblò bloccato
La spia accesa indica che l’oblò è bloccato per impedire
aperture accidentali; per evitare danni è necessario atten-
dere che la spia si spenga prima di aprire l’oblò (attendere 3
minuti circa).
! Il lampeggio veloce della spia START/PAUSE (arancione)
contemporaneo a quello delle funzioni segnala un’anomalia
(vedi “Anomalie e rimedi”).
Lavaggio
Risciacquo
Centrifuga
Scarico
Fine lavaggio
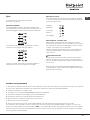
Avviare un programma
1. Accendere la lavabiancheria premendo il tasto ON/OFF. Tutte le spie si accenderanno per qualche secondo, poi rimarranno
accese le spie ralative alle impostazioni del programma selezionato e pulserà la spia START/PAUSE.
2. Caricare la biancheria e chiudere l’oblò.
3. Impostare con la manopola PROGRAMMI il programma desiderato.
4. Impostare la temperatura di lavaggio (vedi “Personalizzazioni”).
5. Impostare la velocità di centrifuga (vedi “Personalizzazioni”).
6. Versare detersivo e additivi (vedi “Detersivi e biancheria”).
7. Selezionare le funzioni desiderate.
8. Avviare il programma premendo il tasto START/PAUSE e la spia relativa rimarrà accesa fissa di colore verde.
Per annullare il ciclo impostato mettere la macchina in pausa premendo il tasto START/PAUSE e scegliere un nuovo ciclo.
9. Al termine del programma si illuminerà la spia END. La spia OBLÒ BLOCCATO si spegnerà indicando che l’oblò è apribile
(attendere 3 minuti circa). Estrarre la biancheria e lasciare l’oblò socchiuso per far asciugare il cestello. Spegnere la lavabian-
cheria premendo il tasto ON/OFF.
END

20
IT
Programmi
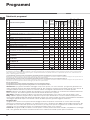
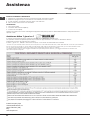
Tabella dei programmi
Antimacchia: il programma 1 è adatto al lavaggio di capi molto sporchi, con colori resistenti. Il programma garantisce una
classe di lavaggio superiore alla classe standard (classe A). Non eseguire il programma mescolando capi di colore diverso. Si
consiglia l’utilizzo di detersivo in polvere. Per macchie ostinate è consigliato il pretrattamento con additivi specifici.
Bianchi: utilizzare il ciclo 2 per il lavaggio dei capi bianchi. Il programma è studiato per il mantenimento della brillantezza del
bianco nel tempo. Per risultati migliori si raccomanda l’utilizzo del detersivo in polvere.
Anti Allergy: utilizzare il programma 6 per la rimozione dei principali allergeni come polline, acari, peli del gatto e cane.
Baby: utilizzare l’apposito programma 7 per asportare lo sporco tipico dei bambini e rimuovere il detersivo dai panni onde
evitare reazioni allergiche alla pelle delicata dei bambini. Questo ciclo è stato studiato per ridurre la carica batterica utilizzando
una maggior quantità di acqua e ottimizzando l’effetto di additivi specifici igenizzanti aggiunti al detersivo.
Programmi Eco
I programmi Eco offrono buone performance di lavaggio a basse temperature consentendo un minore utilizzo di energia
elettrica con un beneficio per l’ambiente e un risparmio economico. I programmi Eco (
12
Eco Cotone,
13
Eco Sintetici e
14
Eco Rapido 30’) sono stati creati per diversi tipi di tessuto e per capi poco sporchi. Per garantire un risultato ottimale racco-
mandiamo l’uso di un detergente liquido; si consiglia di pretrattare polsini, colli e macchie.
Cotone 20°: il programma
11
per carichi in cotone sporchi. Le buone performance anche a freddo, comparabili con un lavaggio
a 40°, sono garantite da un’azione meccanica che lavora con variazione di velocità a picchi ripetuti e ravvicinati.
Programmi
Descrizione del Programma
Temp.
max.
(°C)
Velocità
max.
(giri al
minuto)
Detersivi
Carico max.
(Kg)
Umidità residua
%
Consumo ener-
gia kWh
Acqua totale lt
Durata ciclo
Prelaggio
Lavaggio
Candeg-
gina
Ammorbi-
dente
1
Antimacchia
40° 1000
5 - - - 180’
2
Bianchi
60° 1000
-
5 - - - 180’
3
Cotone: Bianchi e colorati delicati poco sporchi.
40°
(Max. 90°)
1000
9 - - - 115’
4
Eco Cotone 60° (1): Bianchi e colorati resistenti molto spor-
chi.
60° 1000 -
-
9 62 1,30 57,4 240’
4
Eco Cotone 40° (2): Bianchi e colorati delicati poco sporchi. 40° 1000 -
-
9 62 1,10 97 225’
5
Sintetici: Colori resistenti molto sporchi. 60° 1000
4,5 46 1,03 65 135’
5
Sintetici (3): Colori resistenti poco sporchi. 40° 1000
4,5 - - - 100’
6
Anti Allergy
60° 1000 -
-
5 - - - 195’
7
Baby
40° 1000
5 - - - 145’
8
Lana: Per lana, cachemire, ecc. 40° 800 -
-
2 - - - 85’
9
Delicati
30° 0 -
-
1 - - - 80’
10
Rapido 60': Per rinfrescare rapidamente capi sporchi
(non indicato per lana, seta e capi da lavare a mano).
60° 1000 -
-
3,5 62 0,84 44 60’
11
Cotone 20°: Bianchi e colorati delicati poco sporchi. 20° 1000 -
9 - - - 175’
12
Eco Cotone
Acqua
fredda
1000 -
-
9 - - - 80’
13
Eco Sintetici
Acqua
fredda
1000 -
-
3 - - - 70’
14
Eco Rapido 30'
Acqua
fredda
800 -
-
3 71 0,20 38 30’
Risciacquo
- 1000 - -
9 - - - 36’
Centrifuga + Scarico
- 1000 - - - - 9 - - - 10’
Solo scarico *
-
- - - - 9 - - - 3’
* Selezionando il programma ed escludendo la centrifuga la macchina effettuerà solo lo scarico.
La durata del ciclo indicata sul display o sul libretto è una stima calcolata in base a condizioni standard. Il tempo effettivo può variare in base a numerosi fattori
quali la temperatura e la pressione dell’acqua in ingresso, la temperatura ambiente, la quantità di detersivo, la quantità ed il tipo di carico, il bilanciamento del
carico, le opzioni aggiuntive selezionate.
1) Programma di controllo secondo il regolamento 1061/2010: impostare il programma 4 con una temperaura di 60°C.
Questo ciclo è adatto per pulire un carico di cotone normalmente sporco ed è il più efficiente in termini di consumo combinato di energia e di acqua, da usare su
capi lavabili a 60 °C. La temperatura effettiva di lavaggio può differire da quella indicata.
2) Programma di controllo secondo il regolamento 1061/2010: impostare il programma 4 con una temperatura di 40°C.
Questo ciclo è adatto per pulire un carico di cotone normalmente sporco ed è il più efficiente in termini di consumo combinato di energia e di acqua, da usare su
capi lavabili a 40°C. La temperatura effettiva di lavaggio può differire da quella indicata.
Per tutti Test Institutes:
2) Programma cotone lungo: impostare il programma 4 con una temperatura di 40°C.
3) Programma sintetico lungo: impostare il programma 5 con una temperatura di 40°C.
La pagina si sta caricando...
La pagina si sta caricando...
La pagina si sta caricando...
La pagina si sta caricando...
-
 1
1
-
 2
2
-
 3
3
-
 4
4
-
 5
5
-
 6
6
-
 7
7
-
 8
8
-
 9
9
-
 10
10
-
 11
11
-
 12
12
-
 13
13
-
 14
14
-
 15
15
-
 16
16
-
 17
17
-
 18
18
-
 19
19
-
 20
20
-
 21
21
-
 22
22
-
 23
23
-
 24
24


Hotpoint WML 902 EU Guida utente
- Categoria
- Lavatrici
- Tipo
- Guida utente
in altre lingue
- English: Hotpoint WML 902 EU User guide