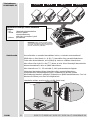
AEG BS2E 12 T Manuale del proprietario
- Categoria
- Trapani combinati a batteria
- Tipo
- Manuale del proprietario
Questo manuale è adatto anche per

GB
D
F
I
E
P
NL
DK
S
SF
RUS
TR
RC
Atlas Copco Electric Tools GmbH
BS2E 7.2 T
BS2E 9.6 T
BS2E 12 T
BS2E 14.4 T
POWERBASE 60
Instructions for use
Please read and save these
instructions.
Gebrauchsanleitung
Bitte lesen und aufbewahren.
Instruction d’utilisation
Prière de lire et de conserver.
Istruzioni d’uso
Si prega di leggere le istruzioni e
di conservarle.
Instrucciones de uso
Lea y conserve estas
instrucciones por favor.
Instruções de serviço
Por favor leia e conserve em seu
poder.
Gebruiksaanwijzing
Lees en let goed op deze
adviezen.
Brugsanvisning
Vær venlight at læse og
opbevare.
Bruksanvisning
Var god läs och tag tillvara dessa
instruktioner.
Käyttöohje
Lue ja säilytö
Kullanøm kølavuzu
Lütfen okuyun ve saklayin
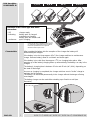
1.7Ah
24.5 Wh
14.4
VOLT
4
3
2
1
4
5
Laden
voll
Zu heiß
Zu kalt

2
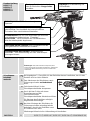
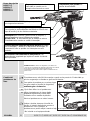
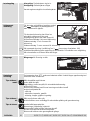
ENGLISH
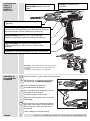
BS2E 7.2 T, BS2E 9.6 T, BS2E 12 T, BS2E 14.4 T, POWERBASE 60
You are demanding and expect to purchase quality goods – quality offered by Atlas
Copco.
We have built a durable and reliable electric power tool for you.
Please read the instructions for use before first operation so you can handle your
power tool effectively and safely.
We are sure that buying an AEG Electric Power Tool from Atlas Copco was the right
choice!
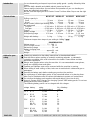
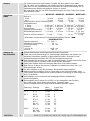
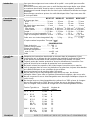
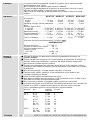
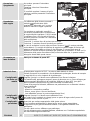
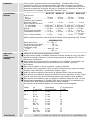
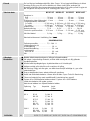
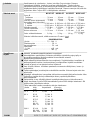
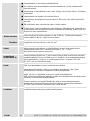
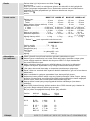
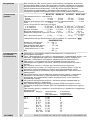
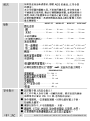
BS2E7.2T BS2E9.6T BS2E12T BS2E14.4T
Drilling capacity in
Steel 10 mm 10 mm 13 mm 13 mm. . . . . . . . . . . . . . . . . . . . . . . . . . . . . . . .
Wood 15 mm 20 mm 25 mm 28 mm. . . . . . . . . . . . . . . . . . . . . . . . . . . . . . .
Wood screws (without pre-drilling) 6mm 8 mm 8 mm 8 mm. . . . . . . . . . . . . .
No-load speed
1st gear 0–300 min
–1
0–300 min
–1
0–300 min
–1
0–320 min
–1
. . . . . . . . . . . . . .
2nd gear 0–900 min
–1
0–900 min
–1
0–900 min
–1
0–1030min
–1
. . . . . . . . . . . . . .
Torque* 1–12 Nm 1–15 Nm 1–19 Nm 1–25 Nm. . . . . . . . . . . . . . . . . . . . . . . . . .
Battery voltage 7,2 V 9,6 V 12 V 14,4 V. . . . . . . . . . . . . . . . . . . . . . . . . . .
Drill opening range 1–10 mm 1–10 mm 1–10 mm 1–10 mm. . . . . . . . . . . .
(1,5–13 mm)
Weight with battery 1,4 kg 1,5 kg 1,6 kg 1,9 kg. . . . . . . . . . . . . . . . . . . . . . .
*Maximum torque when torque is pre setting to “drilling” (
).
POWERBASE 60
Voltage range 7,2 - 14,4 V. . . . . . . . . . . . .
Quick charge current 1,8 A. . . . . . . . . . . . .
Maintaining charge 50 mA. . . . . . . . . . . . . .
Battery charging time
1,4 Ah approx 60 min. . . . . . . . . . . . . . . . . .
Weight 490 g. . . . . . . . . . . . . . . . . . . . . . . .
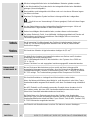
Please pay attention to the safety instructions in the attached leaflet!
Dust that arises when working on material containing asbestos or stonework
containing crystalline silicic acid is harmful to the health. Please follow accident
prevention regulations.
Always wear goggles when using the machine. It is recommended to wear gloves,
sturdy non slipping shoes and apron.
Sawdust and splinters must not be removed while the machine is running.
When drilling in walls ceiling, or floor, take care to avoid electric cables and gas or
waterpipes.
Remove the battery pack before starting any work on the machine.
Do not dispose of used battery packs in the household refuse or by burning them.
Atlas Copco Distributors offer to retrieve old batteries to protect our environment.
Do not store the battery pack together with metal objects (short circuit risk).
Use only System 3000 chargers for charging System 3000 battery packs. Do not use
battery packs from other systems.
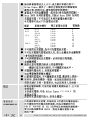
The following battery packs can be charged with this charger:
voltage battery rating No. of battery
(of storage battery) cells
7,2 V B 7.2 1,4 Ah 6
9,6 V B 9.6 1,4 Ah 8
BX 9.6 1,7 Ah 8
12 V B 12-1 1,2 Ah 10
B 12 1,4 Ah 10
BX 12 1,7 Ah 10
BXS 12 2,0 Ah 10
14,4 V B 14.4 1,4 Ah 12
BX 14.4 1,7 Ah 12
BXS 14.4 2,0 Ah 12
Introduction
Technical Data
Advice for your
safety

3
ENGLISH
BS2E 7.2 T, BS2E 9.6 T, BS2E 12 T, BS2E 14.4 T, POWERBASE 60
Do not try to charge non-chargeable batteries with this charger.
No metal parts must be allowed to enter the battery section of the charger (short
circuit risk).
Never break open battery packs and chargers and store only in dry rooms.
Keep dry at all times.
Please pay attention to the following symbol on the label of the charger:
This tool is only suitable for indoor use. Never expose tool to rain.
The battery clamps of the charger are fed by the mains supply. Do not touch the
tool with conducting objects.
Never charge a damaged battery pack. Replace by a new one.
Before use check machine, cable, and plug for any damages or material fatigue.
Repairs should only be carried out by authorised Service Agents.
Typically the A-weighted sound pressure level of the tool is less than 70 dB (A). The
noise level when working can exceed 85 dB (A). Wear ear protectors!
Typically the hand-arm vibration is below 2.5 m/s
2
.
The battery drill/screwdriver is designed for drilling and screwdriving for independent
use away from mains supply.
The quick charger can charge AEG System Accu 3000 batteries from 7.2 V to 14.4
V.
Do not use this product in another way as stated for normal use.
Connect charger only on single phase AC current and only with mains voltage given
on rating plate. Connection is also possible to sockets without earthwire, as
appliance is double insulated in accordance with DIN 57 700/VDE 0700 or IEC 335.
Radio suppression complies with European standard EN 55014.
When fitting the plug, make sure that the brown (live) wire of this appliance is
connected to the plug terminal marked L or coloured red, and the blue (neutral) wire
of this appliance is connected to the plug terminal marked N or coloured black.
Under no circumstances must the wires of this appliance be connected to the earth
terminal of the plug marked either E, with the earth symbol or coloured green or
green/yellow.
The contacts of chargers and battery packs must be kept clean.
If the supply cord of this appliance is damaged, it must only be replaced by a repair
shop appopinted by the manufacturer, because special purpose tools are required.
Use only AEG accessories and spare parts. Should components need to be
replaced which have not been described, please contact one of our AEG service
agents (see our list of guarantee/service addresses).
If needed, an exploded view of the tool can be ordered. Please state the ten–digit
No. as well as the machine type printed on the label and order the drawing at your
local service agents or directly at: Atlas Copco Electric Tools GmbH, Postfach 320,
D–71361 Winnenden.
The range of accessories with part numbers is shown in our catalogue.
Measured sound
value
Measured
vibration value
Use
Mains
connection
POWERBASE 60
Maintenance
Accessories

4
ENGLISH
BS2E 7.2 T, BS2E 9.6 T, BS2E 12 T, BS2E 14.4 T, POWERBASE 60
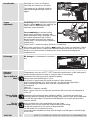
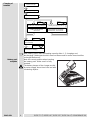
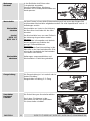
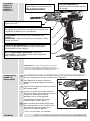
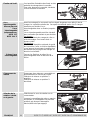
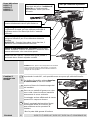
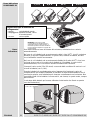
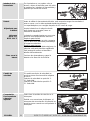
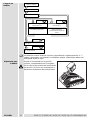
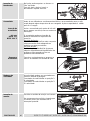
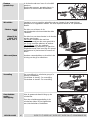
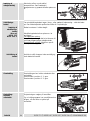
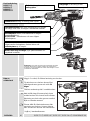
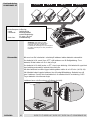
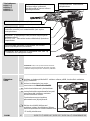
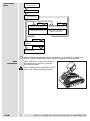
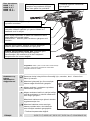
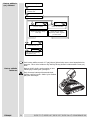
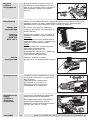
The chuck is easier to remove when 1st gear is engaged as the gears tend not to
rotate as easily.
1. To remove the chuck first take off the
safety screw by turning to the right.
2. Lock Allen key* in chuck.
3. Loosen the keyless chuck by hitting the
inserted Allen key lightly with a plastic
hammer.
Mount the chuck in reverse order.
Aways re–fasten the locking screw after
mounting the chuck. Otherwise thchuck
might become loose in anti–clockwise
operation.
*Keys are not included as standard equipment.
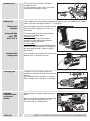
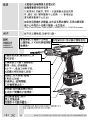
Brief description
BS2E 7.2 T
BS2E 9,6 T
BS2E 12 T
BS2E 14.4 T
12
VOLT
4
3
2
1
4
5
1.4Ah
13.4 Wh
9,6 VOLT
4
3
2
1
4
5
4 W
1.4Ah
10.
7. 2
V
O
4
3
2
1
4
5
1.7Ah
24.5 Wh
14.4
VOLT
4
3
2
1
4
5
Modifications: Text, diagrams and data are correct at the
time of printing. In the interest of continuous improvement of
our products, technical specifications are subject to alteration
without prior notice.
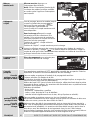
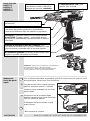
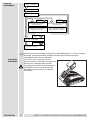
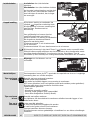
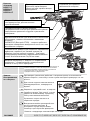
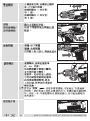
Variable torque pre-selection at adjustment ring for
correct screwing depth when working with different
screws or different material.
Reversing lever for changing from forward to reverse
rotation – due to a lockout mechanism, switching the lever
is only possible if the On-/Off switch is not depressed.
Switch trigger for switching the machine on and off, and
for smooth starting and varying speed.
QUICKSTOP – the speed of the working spindle is
immediately reduced when releasing the switch.
Powerful battery pack with reverse battery protection,
negative and positive pole cannot be mistaken.
Two-speed gears, changeable
under no-load at the gear lever.
Bit storage for compartment
screwdriver bits
Keyless chuck for tightening without a key.
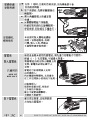
Changing the
keyless drill
chuck
4
3
2
1
4
5
4
3
2
1
4
5

5
ENGLISH
BS2E 7.2 T, BS2E 9.6 T, BS2E 12 T, BS2E 14.4 T, POWERBASE 60
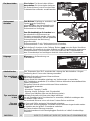
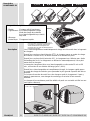
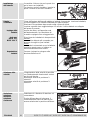
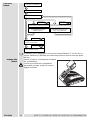
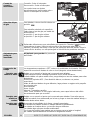
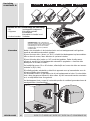
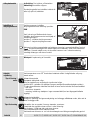
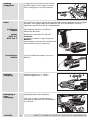
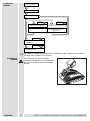
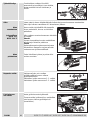
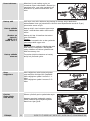
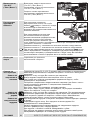
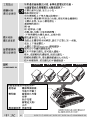
The chuck can be used for drill bits or
screwdriver bits.
For this purpose, Open chuck, insert the
selected bit and tighten chuck.
Fully charge new or long stored battery packs before using your battery tool. Battery
packs only reach full capacity after 4 – 5 chargings.
Insert the battery pack from behind into the
machine until it engages (as shown in
illustration).
The battery pack can be inserted either
way into the holding device:
From the front:
The shape of the machine is more
compact and therefore well suited for
working in restricted space.
From the back:
Due to the optimum weight distribution the
machine is ideally balanced. This protects
the wrist when driving screws or drilling
horizontally.
Press together the clamps and remove the
battery pack in direction of arrow.
The gears can be changed when the
machine is switched off or is running under
no load.
Gear change lever in position 1: 1st gear
Gear change lever in position 2: 2nd gear
Select direction of rotation with reversing
lever.
Due to a lockout mechanism, the reversing
lever can only be switched when the
On-/off switch is not depressed.
Inserting tools
Battery pack
Battery pack
reception
(only applicable
for
BS2E 12 T
BS2E 14.4 T:
Removing the
battery pack
Changing gear
Switching
between forward
and reverse
rotation
4
3
2
1
4
5
12
VOLT
4
3
2
1
4
5
2
1
4
3
2
1
4
5

6
ENGLISH
BS2E 7.2 T, BS2E 9.6 T, BS2E 12 T, BS2E 14.4 T, POWERBASE 60
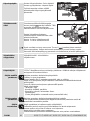
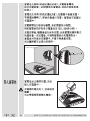
Switching on: Press on-off switch
Switching off: Release on-off switch
The speed can be infinitely varied by
slowly releasing/pressing the switch
trigger.
For drilling twist the adjustment ring such
that the symbol
faces the marking; the
safety clutch is now locked and the
maximum torque available.
For screwdriving at constant cutting
depth torque speed pre–selection with
torque adjustment ring is possible. For this
turn torque adjustment ring until the
desired torque level faces the marking.
Torque level 1: minimum torque speed for
screwdriving
Torque level 7: maximum torque speed for screwdriving
When often screwing in the “drilling” (
) setting, the motor can overheat. Please
choose a torque which is suited to the working material and size of the screw. By
doing so you can avoid the bit sliding of the screw head and damaging the
screwdriver bit.
Bit storage for compartment screwdriver
bits
Temperatures in excess of 50
o
C (122
o
F)reduce the performance of the battery pack.
Avoid extended exposure to heat or sunshine (risk of overheating).
Center punch the point you have marked for drilling.
Always hold sheet metal firmly in a vice.
Lay a block of wood under thin metal to prevent it from distorting.
Use HSS spiral drill bits. (For white cast iron, use drill bits with special tips.)
Before drilling large-diameter holes, first drill a small pilot hole.
Use lubricant:
Steel: Oil
Aluminium: Turpentine, paraffin
Brass, copper, cast iron: no lubricant, but take the drill out of the hole frequently to
cool it off.
Center punch the point you have marked for drilling. To prevent the wood from
splintering when the drill bit tip breaks through, lay a piece of scrap wood underneath
it, or drill from both sides.The maximum drill-diameter can only be reached with a
Forstner–drill bit.
Use screwdriver bits of the appropriate size and shape.
Suitable screws can be driven into softwood without pre-drilling.
Pre-drill into hardwood or for screws of large diameter.
Pre-drill further for countersunk screws.
For woodscrews threaded less than their full length, pre-drill approx. half the length
of the screw.
On-/off switch
Torque
Adjustment
Bit storage
Advice for
operation
Tips on drilling in
metal
Tips on drilling
into wood
Tips for
screw-driving
3
2
1
4
3
2
1
4
5
4
3
2
1
4

7
ENGLISH
BS2E 7.2 T, BS2E 9.6 T, BS2E 12 T, BS2E 14.4 T, POWERBASE 60
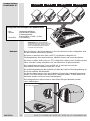
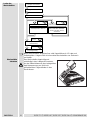
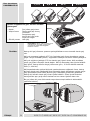
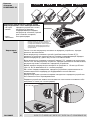
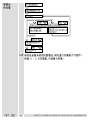
After inserting the battery into the reception of the charger the battery will
automatically be charged.
If the battery is too hot (over approx .45
o
C) the charger switches to maintenance
charge. Remove battery, allow to cool down and insert again.
If the battery is too cold (less than approx. 0
o
C) no charging takes place. After
warming up of the battery charging takes up automatically; the battery can stay in the
charger.
The battery’s charging time is between 10 min and 60 min (at 1,4 Ah), depending on
the state of discharge.
As soon as charging is completed, the charger switches over to ”trickle” charge to
maintain the full capacity.
The battery can be stored permanently in the charger without the danger of being
overcharged.
The battery charger can be used either standing up or fixed to a wall (see
illustration).
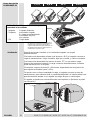
Brief description
POWERBASE 60
Laden
voll
Zu heiß
Zu kalt
RC
Universal
12
VOLT
9.6 VOLT
9.6 VOLT
1.7Ah
20.4 Wh
14,4
VOLT
12 V9,6 V7,2 V 14.4 V
Modifications: Text, diagrams and data are
correct at the time of printing. In the interest
of continuous improvement of our products,
technical specifications are subject to
alteration without prior notice.
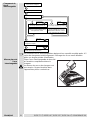
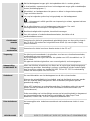
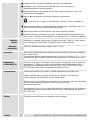
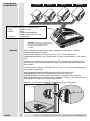
Indication of the control light after mains
connection:
–Off charger ready
–indicating battery pack is charged
maintenance charging
battery pack too hot/too cold
–continuous quick charging
Characteristics
Laden
Ladebereit
voll
Laden
Ladebereit
voll
Laden
Ladebereit
voll

8
ENGLISH
BS2E 7.2 T, BS2E 9.6 T, BS2E 12 T, BS2E 14.4 T, POWERBASE 60
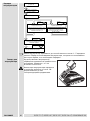
New battery packs reach full loading capacity after 4 – 5 chargings and
dischargings. Battery packs which have not been used for some time should be
recharged before use.
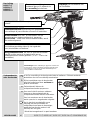
Note the correct position when inserting
the battery pack. Make sure it is fully
inserted.
The battery clamps of the charger are fed
by mains supply. do not touch the tool with
conducting objects.
Charging of
batteries
Battery pack
reception
Battery too hot (over 45
o
C)
Battery is charged/
Maintenance charging
flashing
Maintenance charging until
battery temperature is
above 0
o
C
Maintenance charging
allow battery to cool down
below 45
o
C, and re-insert
Connect charger
Charger ready
Insert battery
flashing
Battery too cold (less than 0
o
C)
flashing
Battery temperature 0
o
C–45
o
C
quick charging
continuous
light
Laden
voll
Zu heiß
Zu kalt

9
DEUTSCH
BS2E 7.2 T, BS2E 9.6 T, BS2E 12 T, BS2E 14.4 T, POWERBASE 60
Sie sind anspruchsvoll und erwarten Qualität, die Ihnen Atlas Copco bietet.
Für Sie haben wir ein haltbares und möglichst sicheres Elektrowerkzeug gebaut.
Bitte lesen Sie vor Inbetriebnahme Ihres Gerätes die Gebrauchsanleitung, um Ihr
Elektrowerkzeug effektiv und gefahrlos nutzen zu können.
Wir sind sicher, daß Sie mit AEG-Elektrowerkzeugen von Atlas Copco Ihre richtige
Wahl getroffen haben.
BS2E7.2T BS2E9.6T BS2E12T BS2E14.4T
Bohr-ø in
Stahl 10 mm 10 mm 13 mm 13 mm. . . . . . . . . . . . . . . . . . . . . . . . . . . . . . . .
Holz 15 mm 20 mm 25 mm 28 mm. . . . . . . . . . . . . . . . . . . . . . . . . . . . . . . . .
Holzschrauben (ohne Vorbohren)6mm 8 mm 8 mm 8 mm. . . . . . . . . . . . . . .
Leerlaufdrehzahl
1. Gang 0–300 min
–1
0–300 min
–1
0–300 min
–1
0–320 min
–1
. . . . . . . . . . . . . . .
2. Gang 0–900 min
–1
0–900 min
–1
0–900 min
–1
0–1030min
–1
. . . . . . . . . . . . . . .
Drehmoment* 1–12 Nm 1–15 Nm 1–19 Nm 1–25 Nm. . . . . . . . . . . . . . . . . . . . .
Spannung Wechselakku 7,2 V 9,6 V 12 V 14,4 V. . . . . . . . . . . . . . . . . . .
Bohrfutterspannbereich 1–10 mm 1–10 mm 1–10 mm 1–10 mm. . . . . . . .
(1,5–13 mm)
Gewicht mit Wechselakku 1,4 kg 1,5 kg 1,6 kg 1,9 kg. . . . . . . . . . . . . . . . .
* Maximales Drehmoment bei Drehmomenteinstellung “Bohren” (
).
POWERBASE 60
Spannungsbereich 7,2 - 14,4 V. . . . . . . .
Ladestrom Schnelladung 1,8 A. . . . . . . . .
Erhaltungsladung 50 mA. . . . . . . . . . . . . . . .
Ladezeit
mit 1,4 Ah ca.60 min. . . . . . . . . . . . . . . . . . .
Gewicht 490 g. . . . . . . . . . . . . . . . . . . . . . .
Sicherheitshinweise der beiliegenden Broschüre beachten!
Staub der bei der Bearbeitung von asbesthaltigen Materialien und Gestein mit
kristalliner Kieselsäure entsteht, ist gesundheitsschädlich. Beachten Sie die
Unfallverhütungsvorschriften VBG 119 der Berufsgenossenschaft.
Beim Arbeiten mit der Maschine stets Schutzbrille tragen. Schutzhandschuhe, festes
und rutschsicheres Schuhwerk und Schürze werden empfohlen.
Späne oder Splitter dürfen bei laufender Maschine nicht entfernt werden.
Beim Bohren in Wand, Decke oder Fußboden auf elektrische Kabel, Gas- und
Wasserleitungen achten.
Vor allen Arbeiten an der Maschine den Wechselakku herausnehmen.
Verbrauchte Wechselakkus nicht ins Feuer oder in den Hausmüll werfen. Atlas
Copco bietet eine umweltgerechte Alt-Wechselakku-Entsorgung an; bitte fragen Sie
Ihren Fachhändler.
Wechselakkus nicht zusammen mit Metallgegenständen aufbewahren
(Kurzschlußgefahr).
Wechselakkus des Systems Accu 3000 nur mit Ladegeräten des Systems
Accu 3000 laden. Keine Akkus aus anderen Systemen laden.
Mit dem Ladegerät können folgende Wechselakkus geladen werden:
Spannung Akkutyp Nenn– Anzahl der
kapazität Zellen
7,2 V B 7.2 1,4 Ah 6
9,6 V B 9.6 1,4 Ah 8
BX 9.6 1,7 Ah 8
12 V B 12-1 1,2 Ah 10
B 12 1,4 Ah 10
BX 12 1,7 Ah 10
BXS 12 2,0 Ah 10
14,4 V B 14.4 1,4 Ah 12
BX 14.4 1,7 Ah 12
BXS 14.4 2,0 Ah 12
Vorwort
Technische
Daten
Hinweise für
Ihre Sicherheit

10
DEUTSCH
BS2E 7.2 T, BS2E 9.6 T, BS2E 12 T, BS2E 14.4 T, POWERBASE 60
Mit dem Ladegerät dürfen keine nichtaufladbaren Batterien geladen werden.
In den Wechselakku-Einschubschacht der Ladegeräte dürfen keine Metallteile
gelangen (Kurzschlußgefahr).
Wechselakkus und Ladegeräte nicht öffnen und nur in trockenen Räumen lagern.
Vor Nässe schützen.
Beachten Sie folgendes Symbol auf dem Leistungsschild des Ladegerätes:
– Gerät ist nur zur Verwendung in Räumen geeignet, Gerät nicht dem Regen
aussetzen.
An den Batterieklemmen des Ladegerätes liegt Netzspannung an. Nicht mit
stromleitenden Gegenständen in das Gerät fassen.
Keinen beschädigten Wechselakku laden, sondern diesen sofort ersetzen.
Vor jedem Gebrauch Gerät , Anschlußkabel, Verlängerungskabel und Stecker auf
Beschädigung und Alterung kontrollieren. Beschädigte Teile nur von einem
Fachmann reparieren lassen.
Der A-bewertete Schalldruckpegel des Gerätes ist typischerweise kleiner als
70 dB (A). Der Geräuschpegel beim Arbeiten kann 85 dB (A) überschreiten.
Gehörschutz tragen!
Die Hand-Arm Vibration ist typischerweise niedriger als 2,5 m/s
2
.
Der Akku-Bohrschrauber ist universell einsetzbar zum Bohren und Schrauben
unabhängig von einem Netzanschluß.
Das Schnelladegerät lädt AEG-Wechselakkus des Systems Accu 3000 von
7,2 V...14,4 V.
Dieses Gerät darf nur wie angegeben bestimmungsgemäß verwendet werden.
Nur an Einphasen-Wechselstrom und nur an die auf dem Leistungsschild
angegebene Netzspannung anschließen. Anschluß ist auch an Steckdosen ohne
Schutzkontakt möglich, da eine Schutzisolierung nach DIN 57 700/VDE 0700 bzw.
IEC 335 vorliegt. Die Funkentstörung entspricht der Europanorm EN 55014.
Die Anschlußkontakte an Ladegerät und Wechselakku sauber halten.
Wenn die Netzanschlußleitung beschädigt ist, muß diese durch eine Atlas Copco
Kundendienststelle ausgewechselt werden, weil dazu Sonderwerkzeug erforderlich
ist.
Nur AEG Zubehör und Ersatzteile verwenden. Bauteile, deren Austausch nicht
beschrieben wurde, bei einer AEG Kundendienststelle auswechseln lassen
(Broschüre Garantie/Kundendienstadressen beachten).
Bei Bedarf kann eine Explosionszeichnung des Gerätes unter Angabe der
Maschinen Type und der zehnstelligen Nummer auf dem Leistungsschild bei Ihrer
Kundendienststelle oder direkt bei Atlas Copco Electric Tools GmbH, Postfach 320,
D–71361 Winnenden angefordert werden.
Das Zubehör mit Bestellnummern ersehen Sie bitte aus unseren Katalogen.
Geräusch-
meßwerte
Vibrations-
meßwerte
Verwendung
Netzanschluß
POWERBASE 60
Wartung
Zubehör

11
DEUTSCH
BS2E 7.2 T, BS2E 9.6 T, BS2E 12 T, BS2E 14.4 T, POWERBASE 60
Bei eingelegtem 1. Gang läßt sich das Bohrfutter besser handhaben, da sich das
Getriebe nicht so leicht mitdreht.
1. Zum Abnehmen des Bohrfutters zuerst
Sicherungsschraube rechtsdrehend
lösen.
2. Sechskantschlüssel* in das
Schnellspannbohrfutter einspannen.
3. Durch leichten Schlag mit einem
Gummihammer auf den
Sechskantschlüssel
Schnellspannbohrfutter linksdrehend lösen
Die Montage des Bohrfutters erfolgt in
umgekehrter Reihenfolge.
Nach der Montage des Bohrfutters die
Sicherungsschraube unbedingt wieder
befestigen, da sich das Bohrfutter sonst
im Linkslauf lösen kann.
*Werkzeugschlüssel sind im Lieferumfang nicht enthalten.
Kurzbeschreibung
BS2E 7.2 T
BS2E 9,6 T
BS2E 12 T
BS2E 14.4 T
12
VOLT
4
3
2
1
4
5
1.4Ah
13.4 Wh
9,6 VOLT
4
3
2
1
4
5
4 W
1.4Ah
10.
7. 2
V
O
4
3
2
1
4
5
1.7Ah
24.5 Wh
14.4
VOLT
4
3
2
1
4
5
Änderungen: Text, Bild und Daten entsprechen dem
technischen Stand zur Zeit des Drucktermins. Änderungen
im Sinne der Weiterentwicklung unserer Produkte sind
vorbehalten.
7stufige Drehmomentvorwahl am Schaltring für
gleichmäßige Einschraubtiefe bei unterschiedlichen
Schrauben oder verschiedenen Materialien.
Umschalter Rechts-Linkslauf durch Schaltsperre nur bei
nicht gedrücktem Schalterdrücker schaltbar.
Schalterdrücker zum Ein- und Ausschalten der Maschine
und stufenlosem elektronischem ”Gasgeben”.
QUICKSTOP – nach Loslassen des Schalterdrückers
wird die Arbeitsspindel abgebremst.
Leistungsstarker Wechselakku, verpolungssicher
konstruiert – eine Verwechslung von Plus- und Minuspol
ist ausgeschlossen.
Zweigang-Getriebe im Leerlauf
oder im Auslauf am Gangschalter
schaltbar.
Bitgarage zur Aufbewahrung von
Schrauberbits.
Schnellspannbohrfutter für werkzeugloses
Spannen.
Schnellspann-
bohrfutter
wechseln
4
3
2
1
4
5
4
3
2
1
4
5

12
DEUTSCH
BS2E 7.2 T, BS2E 9.6 T, BS2E 12 T, BS2E 14.4 T, POWERBASE 60
In das Bohrfutter sind Bohrer oder
Schrauberbits einsetzbar.
Dazu Bohrfutter öffnen, Werkzeug
einsetzen und Schnellspannbohrfutter von
Hand spannen.
Vor dem Einsatz in Ihrem Akku-Elektrowerkzeug muß ein neuer oder längere Zeit
nicht benutzter Wechselakku aufgeladen werden. Die volle Kapazität wird nach 4 - 5
Aufladungen erreicht.
Wechselakku von hinten in die Halterung
der Maschine einschieben bis der Akku
einrastet.
Der Wechselakku kann von zwei Seiten in
die Halterung eingeschoben werden:
Von vorn:
Die Maschine ist kompakter und dadurch
besser geeignet zum Arbeiten bei
geringen Platzverhältnissen
Von hinten:
Durch optimale Gewichtsverteilung ist die
Maschine in der Hand ausbalanciert. Dies
schont das Handgelenk bei horizontalem
Schrauben oder Bohren.
Halterungen zusammendrücken und
Wechselakku in Pfeilrichtung abziehen
Die Gangschaltung ist im Leerlauf oder im
Auslauf schaltbar.
Gangschalter in Stellung 1: 1. Gang
Gangschalter in Stellung 2: 2. Gang
Die Drehrichtung am Umschalter wählen.
Durch eine Schaltsperre ist der
Umschalter nur bei nicht gedrücktem
Ein-/Ausschalter schaltbar.
Werkzeuge
einsetzen
Wechselakku
Wechselakku
einsetzen
(nur bei
BS2E 12 T
BS2E 14.4 T:
Wechselakku
abnehmen
Gangschaltung
Umschalten:
Rechtslauf
Linkslauf
4
3
2
1
4
5
12
VOLT
4
3
2
1
4
5
2
1
4
3
2
1
4
5

13
DEUTSCH
BS2E 7.2 T, BS2E 9.6 T, BS2E 12 T, BS2E 14.4 T, POWERBASE 60
Einschalten: Ein-/Ausschalter drücken
Ausschalten: Ein-/Ausschalter loslassen
Die Drehzahl kann je nach Druck auf den
Schalterdrücker stufenlos verstellt werden.
Zum Bohren Schaltring so verdrehen, daß
Symbol
der Markierung
gegenübersteht; die Rutschkupplung ist
damit überbrückt und es steht das max.
Drehmoment zu Verfügung.
Zum flächenbündigen Schrauben kann
das erforderliche Drehmoment am
Schaltring vorgewählt werden. Hierzu den
Schaltring so verdrehen, daß die gewählte
Drehmomentstufe der Markierung
gegenübersteht.
Drehmomentstufe 1: min. Drehmoment zum Schrauben
Drehmomentstufe 7: max. Drehmoment zum Schrauben.
Bei häufigem Schrauben in der Stellung “Bohren (
) kann der Motor überhitzen.
Verwenden Sie möglichst eine dem Material und der Schraubengröße angepasste
Drehmomentstufe. Sie vermeiden so ein Durchrutschen des Schrauberbits auf
dem Schraubenkopf und verlängern damit die Lebensdauer des Schrauberbits.
Bitgarage zur Aufbewahrung von
Schrauberbits.
Eine Temperatur über 50
o
C vermindert die Leistung des Wechselakkus. Längere
Erwärmung durch Sonne oder Heizung vermeiden.
Markierte Bohrstelle mit einem Körner ankörnen.
Blech stets einspannen.
Dünnes Metall mit Holzplatte unterlegen um Verformungen zu vermeiden.
HSS-Spiralbohrer verwenden (Für weißes Gußeisen besondere hartmetallbestückte
Spitzen verwenden)
Bei großen Bohrer-ø mit einem kleineren Bohrer vorbohren.
Schmiermittel verwenden:
- Stahl: Öl
- Aluminium: Terpentin, Paraffin
- Messing, Kupfer, Gußeisen: kein Schmiermittel
(Bohrer zum Abkühlen öfter aus der Bohrung ziehen).
Markierte Bohrstelle mit Körner oder Nagel ankörnen.
Um ein Zersplittern beim Durchbrechen zu vermeiden, Abfallholz unterlegen oder
von beiden Seiten bohren.
Der maximale Bohrer-ø ist nur mit einem Forstner-Bohrer erreichbar.
In Form und Größe geeignete Schrauberbits einsetzen.
In Weichholz können geeignete Schrauben ohne Vorbohren eingeschraubt werden.
In Hartholz oder bei großen Schrauben-ø vorbohren.
Bei Senkschrauben Bohrung ansenken.
Bei Holzschrauben mit nicht durchgängigem Gewinde ca. halbe Schraubenlänge
vorbohren.
Ein-/Ausschalten
Drehmoment
einstellen
Bitgarage
Arbeitshinweise
Tips zum Bohren
in Metall
Tips zum Bohren
in Holz
Tips zum
Schrauben
3
2
1
4
3
2
1
4
5
4
3
2
1
4

14
DEUTSCH
BS2E 7.2 T, BS2E 9.6 T, BS2E 12 T, BS2E 14.4 T, POWERBASE 60
Nach Einstecken des Wechselakkus in den Einschubschacht des Ladegerätes wird
der Wechselakku automatisch geladen.
Bei einem zu warmen Akku (über ca.45
o
C) schaltet das Ladegerät auf
Erhaltungsladung. Akku herausnehmen, abkühlen lassen und erneut einstecken.
Bei einem zu kalten Akku (unter ca. 0
o
C) erfolgt keine Ladung. Nach Erwärmung des
Akkus setzt die Ladung automatisch ein, der Akku kann eingesteckt bleiben.
Die Ladezeit liegt zwischen 10 min und 60 min, je nachdem wie weit der
Wechselakku vorher entladen wurde (bei 1,4 Ah).
Bei vollständig geladenem Wechselakku schaltet das Gerät auf Erhaltungsladung um
für höchst nutzbare Akkukapazität.
Der Wechselakku braucht nach dem Aufladen nicht aus dem Ladegerät genommen
werden. Der Wechselakku kann dauernd im Ladegerät bleiben. Er kann dabei nicht
überladen werden und ist so immer betriebsbereit.
Das Ladegerät kann stehend oder an einer Wand hängend betrieben werden
(siehe Abbildungen).
Kurzbeschreibung
POWERBASE 60
Laden
voll
Zu heiß
Zu kalt
RC
Universal
12
VOLT
9.6 VOLT
9.6 VOLT
1.7Ah
20.4 Wh
14,4
VOLT
12 V9,6 V7,2 V 14.4 V
Änderungen: Text, Bild und Daten
entsprechen dem technischen Stand zur
Zeit des Drucktermins. Änderungen im
Sinne der Weiterentwicklung unserer
Produkte sind vorbehalten.
Anzeige der Kontrollampe nach Netzanschluß:
–Aus Ladegerät ladebereit
–Blinken Wechselakku geladen
Erhaltungsladung
Wechselakku zu heiß / zu kalt
–Dauerlicht Schnelladung
Merkmale
Laden
Ladebereit
voll
Laden
Ladebereit
voll
Laden
Ladebereit
voll

15
DEUTSCH
BS2E 7.2 T, BS2E 9.6 T, BS2E 12 T, BS2E 14.4 T, POWERBASE 60
Neue Wechselakkus erreichen ihre volle Kapazität nach 4-5 Lade-und
Entladezyklen. Längere Zeit nicht benutzte Wechselakkus vor Gebrauch
nachladen.
Den Wechselakku lagerichtig und
vollständig in das Ladegerät einsetzen.
An den Batterieklemmen des Ladegerätes
liegt Netzspannung an. Nicht mit
stromleitenden Gegenständen in das
Gerät fassen.
Laden der
Wechselakkus
Wechselakku
einsetzen
Ladegerät ladebereit
Ladegerät anschließen
Akku einsetzen
Akku zu kalt (unter 0
o
C) Akku zu heiß (über 45
o
C)
Akkutemperatur 0–45
o
C
Schnelladung
Akku geladen /
Erhaltungsladung
Blinken
Erhaltungsladung bis
Akkutemperatur über 0
o
C
Erhaltungsladung
Akku unter 45
o
C abkühlen
lassen und dann erneut
einstecken
Dauerlicht
Blinken Blinken
Laden
voll
Zu heiß
Zu kalt

16
FRANÇAIS
BS2E 7.2 T, BS2E 9.6 T, BS2E 12 T, BS2E 14.4 T, POWERBASE 60
Vous avez des exigences et vous voulez de la qualité – une qualité que vous offre
Atlas Copco.
Nous avons mis au point pour vous un outil électrique de longue durée vous offrant
un maximum de sécurité. Avant la mise en service de votre appareil, veuillez lire
attentivement le mode d’emploi afin d’en tirer le plus d’efficacité et d’éviter tout risque
de danger.
Nous sommes convaincus qu’avec les outils électriques Atlas Copco vous avec fait
le choix qu’il fallait.
BS2E7.2T BS2E9.6T BS2E12T BS2E14.4T
Ø de perçage dans
Acier 10mm 10mm 13mm 13mm. . . . . . . . . . . . . . . . . . . . . . . . . . . . . . . .
Bois 15 mm 20 mm 25 mm 28 mm. . . . . . . . . . . . . . . . . . . . . . . . . . . . . . . . .
Vis à bois (sans avant trou) 6 mm 8 mm 8 mm 8 mm. . . . . . . . . . . . . . . . . .
Régime à vide
1ère vitesse 0–300 min
–1
0–300 min
–1
0–300 min
–1
0–320 min
–1
. . . . . . . . . . .
2ème vitesse 0–900 min
–1
0–900 min
–1
0–900 min
–1
0–1030min
–1
. . . . . . . . . .
Couple * 1–12 Nm 1–15 Nm 1–19 Nm 1–25 Nm. . . . . . . . . . . . . . . . . . . . . . . . .
Tension accu interchangeable 7,2 V 9,6 V 12 V 14,4 V. . . . . . . . . . . . . . .
Plage de serrage du mandrin1–10mm 1–10 mm 1–10 mm 1–10 mm. . . . .
(1,5–13 mm)
Poids avec accu interchangeable1,4kg 1,5 kg 1,6 kg 1,9 kg. . . . . . . . . . . . .
*Couple maximal en position ”Perçage” (
).
POWERBASE 60
Plage de tension 7,2 - 14,4 V. . . . . . . . . .
Courant charge rapide 1,8 A. . . . . . . . . . .
Charge de maintien 50 mA. . . . . . . . . . . . . .
Durée de chargement
avec 1,4 Ah env.60 min. . . . . . . . . . . . . . . .
Poids 490 g. . . . . . . . . . . . . . . . . . . . . . . . .
Respecter les instructions de sécurité se trouvant dans le prospectus cijoint.
La poussière qui se dégage lors de l’usinage des matériaux contenant de l’amiante
et des pierres contenant de l’acide silicique cristallin porte atteinte à la santé.
Toujours porter des lunettes protectrices lorsqu’on travaille avec la machine. Des
gants de sécurité et un masque de protection sont recommandés.
Ne jamais enlever les copeaux ni les éclats lorsque la machine est en marche.
Lors du perçage dans les murs, les plafonds ou les planchers, toujours faire attention
aux câbles électriques et aux conduites de gaz et d’eau.
Avant tous travaux sur la machine retirer l’accupack.
Ne pas jeter les accus interchangeables usés au feu ou avec les déchets
ménagers. Atlas Copco offre un système d’évacuation écologique des accus usés.
Ne pas conserver les accus interchangeables avec des objets métalliques (risque de
court–circuit)
Ne charger les accus interchangeables du système Accu 3000 qu’avec le chargeur
d’accus du système Accu 3000. Ne pas charger des accus d’autres systèmes.
Avec le chargeur il est possible de charger les accus interchangeables suivants:
Tension Type d’accu Capacité Nombre de
nominale cellules
7,2 V B 7.2 1,4 Ah 6
9,6 V B 9.6 1,4 Ah 8
BX 9.6 1,7 Ah 8
12 V B 12-1 1,2 Ah 10
B 12 1,4 Ah 10
BX 12 1,7 Ah 10
BXS 12 2,0 Ah 10
14,4 V B 14.4 1,4 Ah 12
BX 14.4 1,7 Ah 12
BXS 14.4 2,0 Ah 12
Introduction
Caractéristiques
techniques
Conseils de
sécurité

17
FRANÇAIS
BS2E 7.2 T, BS2E 9.6 T, BS2E 12 T, BS2E 14.4 T, POWERBASE 60
N’essayer pas de charger des accus non-rechargables avec ce chargeur
Aucune pièce métallique ne doit pénétrer dans le logement d’accu du chargeur
(risque de court–circuit)
Ne pas ouvrir les accus interchangeables et les chargeurs et ne les stocker que
dans des locaux secs. Les protéger contre l’humidité.
Soyez attentif au symbole suivant sur l’étiquette signalétique du chargeur.
– appareil à utiliser uniquement dans un local, à ne jamals exposer à la pluie.
Les bornes des accus du chargeur sont sous tension. Ne pas introduire dans
l’appareil des pièces conductrices.
Ne pas charger un accu interchangeable défectueux, il faut le remplacer tout de
suite.
Toujours extraire la fiche de la prise d’alimentation secteur avant de procéder à des
transformation ou opérations de maintenance.
La mesure réelle (A) du niveau de bruit de l’outil est de moins de 70 dB (A). Le
niveau du briut en fonctionnement peut dépasser 85 dB (A). Toujours porter des
casques protecteurs!
La vibration de l’avant–bras est en–dessous de 2,5 m/s
2
.
Le perçarge et vissage à accu est polyvalente pour le percer et visser sans la
contrainte d’un raccord au réseau.
Le chargeur rapide permet de charger les accus interchangeables AEG Accu
System 3000 de 7,2 V...14,4 V.
Comme déjà indiqué, cette machine n’est conçue que pour une utilisation normale.
Nos machines fonctionnent sur courant alternatif monophasé. S’assurer que la
tension du réseau correspond à celle indiquée sur la plaque signalétique de la
machine. Le branchement à une prise de courant sans mise à la terre est possible
du fait de la double isolation suivant normes DIN 57 700/VDE 0700 et IEC 335.
Antiparasitage suivant la norme européenne EN 55014.
Tenir propre les contacts des accupacks et des chargeurs.
Lorsque le câble d’alimentation du secteur est endommagé, il doit être échangé par
une station de service après-vente d’Atlas Copco étant donné qu’un outillage est
nécessaire à cet effet.
N’utiliser que des pièces et accessoires AEG. Pour des pièces dont l’échange n’est
pas décrit, s’adresser de préférence aux stations de service après-vente AEG (voir
brochure Garantie/Adresses des stations de service après-vente).
Si besoin est, une vue éclatée de l’appareil peut être fournie. S’adresser, en
indiquant bien le numéro à dix chiffres porté sur la plaque signalétique, à votre
station de service après–vente (voir liste jointe) ou directement à Atlas Copco
Electric Tools GmbH, B.P. 320, D–71361 Winnenden.
Consulter nos catalogues qui vous renseignent sur notre programme d’accessoires
avec leur référence.
Mesure de bruit
Valeur de
vibration
mesurée
Utilisation
Branchement
secteur
POWERBASE 60
Entretien
Accessoires

18
FRANÇAIS
BS2E 7.2 T, BS2E 9.6 T, BS2E 12 T, BS2E 14.4 T, POWERBASE 60
Le maniement du mandrin est facilité lorsque la 1ère vitesse est enclenchée, du
fait que l’engrenage n’est plus entraîné aussi facilement.
1. Pour démonter le mandrin dévisser
d’abord la vis de blocage en tournant à
droite.
2. Serrer la clé hexagonale* dans le mandrin
de serrage rapide.
3. Lâcher le mandrin de serrage rapide en
donnant de légers coups vers la gauche à
l’aide d’une massette à embouts
plastiques sur la clé hexagonale.
Le montage du mandrin de serrage
s’effectue dans l’ordre inverse.
Après montage du mandrin de perçage,
fixer absolument la vis de sécurité, sinon
le mandrin de perçage risque de se
détacher en rotation à gauche.
* Clés en accessoires, non fourniers.
Description
BS2E 7.2 T
BS2E 9,6 T
BS2E 12 T
BS2E 14.4 T
12
VOLT
4
3
2
1
4
5
1.4Ah
13.4 Wh
9,6 VOLT
4
3
2
1
4
5
4 W
1.4Ah
10.
7. 2
V
O
4
3
2
1
4
5
1.7Ah
24.5 Wh
14.4
VOLT
4
3
2
1
4
5
Modifications: Les textes, les illustrations et les données
techniques correspondent à la situation au moment de
l’impression. Toutes modifications techniques sont réservées
dans le cadre du développement technique permanent.
Présélection sur 7 positions de la vitesse à la molette
de réglage pour profondeur constante du vissage lors de
l’utilisation de différents vis ou matériaux.
Possibilité de réversibilité par verrouillage de mise en
marche, commutable seulement lorsque l’interrupteur
Marche/Arrêt n’est pas appuyé.
Commutateur marche/arrêt et pour démarrage doux
réglable
QUICKSTOP – après avoir lâché le commutateur, l’arbre
moteur est freiné.
Accu interchangeable performant, construction
d’irréversibilité – une confusion entre le pôle positif et le
pôle négatif est ainsi exclue.
Engrenage deux vitesses
commutable en fonctionnement à
vide ou par inertie avec le
commutateur sélecteur.
Place de rangement pour
embouts pour conservation des bits
de vissage.
Mandrin à serrage rapide pour la mise en
place sans outil.
Changement du
mandrin de
serrage rapide
4
3
2
1
4
5
4
3
2
1
4
5

19
FRANÇAIS
BS2E 7.2 T, BS2E 9.6 T, BS2E 12 T, BS2E 14.4 T, POWERBASE 60
Il est possible d’introduire des forets ou des
embouts de vissage dans le mandrin.
Pour cela, desserrer le mandrin, introduire
l’outil et resserrer le mandrin.
Avant le montage d’un accupack neuf ou depuis longtemps non utilisé, il faut le
charger. La capacité maximum de l’accupack est atteinte après 4 ou 5 charges.
Introduire par derrière l’accu
interchangeable dans sa fixation jusqu’au
déclic.
L’accu interchangeable peut être introduit
dans sa fixation par devant et par derrière:
Par devant:
La machine étant plus compacte, elle se
prête davantage à un travail dans un
espace réduit.
Par derrière:
Grâce à une répartition optimale du poids
de la machine, celle–ci est bien équilibrée,
ce qui permet de ménager le poignet lors
des travaux de perçage et de vissage en
direction horizontale.
Presser les fixations et retirer l’accu
interchangeable dans la direction de la
flèche.
Engrenage deux vitesses commutable en
fonctionnement à vide ou par inertie.
Sélecteur de vitesse en position 1:
première
Sélecteur de vitesse en position 2:
deuxième
Sélectionner le sens de rotation sur le
commutateur.
Lorsque le verrouillage de mise en marche
est opérant, le commutateur ne peut être
actionné que lorsque l’interrupteur
Marche/Arrêt n’est pas appuyé.
Fixation de l’outil
Accu
interchangeable
Mise en place de
l’accu
interchangeable
(uniquement sur
BS2E 12 T
BS2E 14.4 T:
Enlever l’accu
interchangeable
Changement de
vitesse
Sélection de la
rotation: à droite
ou à gauche
4
3
2
1
4
5
12
VOLT
4
3
2
1
4
5
2
1
4
3
2
1
4
5

20
FRANÇAIS
BS2E 7.2 T, BS2E 9.6 T, BS2E 12 T, BS2E 14.4 T, POWERBASE 60
Mise en marche: Appuyer sur
l’interrupteur Marche/Arrêt
Arrêt: Lâcher l’interrupteur Marche/Arrêt
La vitesse de rotation peut être modifiée
en continu selon l’appui sur l’interrupteur
marche/arrêt.
Pour le perçage: tourner la molette jusqu’à
ce que le symbole de perçage
se
trouve en face du marquage. Par cela
l’accouplement à glissement est
court–circuité et le couple maximum est à
votre disposition.
Pour le vissage affleurant le couple
nécessaire peut être sélectionné à la
molette. Pour cela tourner la molette de
sorte que la position du couple choisie se
trouve en face du marquage.
Position du couple 1: couple minimum
pour le vissage
Position du couple 7: couple maximum pour le vissage.
Lorsqu’on effecture souvent des travaux de vissage avec réglage du couple se
trouvant en position ”Perçage” (
) , le moteur risque de surchauffer.. Régler le
couple de sorte qu’il éviter l’emballement des embouts sur la tête de vis et afin de
prolonger la durée de vie des embouts.
Place de rangement pour embouts pour
conservation des bits de vissage.
Une température supérieure à 50
o
C amoindrit la capacité des accupacks. Eviter les
expositions au soleil ou les suréchauffements dus au chauffage.
Faire un repère au pointeau à l’endroit où le perçage doit avoir lieu.
Toujours procéder à la fixation de la tôle.
En présence de métal de faible épaisseur, toujours protéger la pièce au moyen d’un
morceau de bois pour éviter les déformations.
Utiliser des forets HSS (pour la fonte de fer blanche, utiliser des forets dont la pointe
est munie de lèvres carbure). Un avant-trou doit être réalisé avec un petit foret avant
l’utilisation d’un foret de grand ø.
Utilisation de lubrifiant:
- Acier: Huile
- Aluminium: Térébenthine, paraffine
- Laiton, cuivre, fonte de fer: Pas de lubrifiant
(extraire le foret régulièrement hors du trou, afin qu’il puisse se refroidir).
Faire un repère au pointeau ou avec un clou sur l’endroit à percer.
Afin d’éviter l’éclatement lors de la rupture, toujours placer un morceau de bois sous
la pièce ou encore, percer des deux côtés de celle-ci.
Mettre en place des bits à visser appropriés, tant au niveau de la forme que de la
taille. Des vis appropriées peuvent être vissées dans le bois tendre sans procéder à
des avants-trous préalables. Un avant-trou doit être réalisé lorsqu’on perce dans le
bois dur ou avec des diamètres de vis importants. Avec les vis à tête conique,
toujours fraiser le perçage. Avec les vis à bois dont le filet n’est pas courant, faire un
avant-trou équivalant approximativement à la demi-longueur de la vis.
Mise en
marche/arrêt
Réglage du
couple
Logement pour
embouts
Conseils
pratiques
Conseils
pratiques pour le
perçage du métal
Conseils
pratiques pour le
perçage du bois
Conseils
pratiques pour le
vissage
3
2
1
4
3
2
1
4
5
4
3
2
1
4
La pagina si sta caricando...
La pagina si sta caricando...
La pagina si sta caricando...
La pagina si sta caricando...
La pagina si sta caricando...
La pagina si sta caricando...
La pagina si sta caricando...
La pagina si sta caricando...
La pagina si sta caricando...
La pagina si sta caricando...
La pagina si sta caricando...
La pagina si sta caricando...
La pagina si sta caricando...
La pagina si sta caricando...
La pagina si sta caricando...
La pagina si sta caricando...
La pagina si sta caricando...
La pagina si sta caricando...
La pagina si sta caricando...
La pagina si sta caricando...
La pagina si sta caricando...
La pagina si sta caricando...
La pagina si sta caricando...
La pagina si sta caricando...
La pagina si sta caricando...
La pagina si sta caricando...
La pagina si sta caricando...
La pagina si sta caricando...
La pagina si sta caricando...
La pagina si sta caricando...
La pagina si sta caricando...
La pagina si sta caricando...
La pagina si sta caricando...
La pagina si sta caricando...
La pagina si sta caricando...
La pagina si sta caricando...
La pagina si sta caricando...
La pagina si sta caricando...
La pagina si sta caricando...
La pagina si sta caricando...
La pagina si sta caricando...
La pagina si sta caricando...
La pagina si sta caricando...
La pagina si sta caricando...
La pagina si sta caricando...
La pagina si sta caricando...
La pagina si sta caricando...
La pagina si sta caricando...
La pagina si sta caricando...
La pagina si sta caricando...
La pagina si sta caricando...
La pagina si sta caricando...
La pagina si sta caricando...
La pagina si sta caricando...
La pagina si sta caricando...
La pagina si sta caricando...
La pagina si sta caricando...
La pagina si sta caricando...
La pagina si sta caricando...
La pagina si sta caricando...
La pagina si sta caricando...
La pagina si sta caricando...
La pagina si sta caricando...
La pagina si sta caricando...
La pagina si sta caricando...
La pagina si sta caricando...
La pagina si sta caricando...
La pagina si sta caricando...
La pagina si sta caricando...
La pagina si sta caricando...
La pagina si sta caricando...
La pagina si sta caricando...
La pagina si sta caricando...
La pagina si sta caricando...
La pagina si sta caricando...
-
 1
1
-
 2
2
-
 3
3
-
 4
4
-
 5
5
-
 6
6
-
 7
7
-
 8
8
-
 9
9
-
 10
10
-
 11
11
-
 12
12
-
 13
13
-
 14
14
-
 15
15
-
 16
16
-
 17
17
-
 18
18
-
 19
19
-
 20
20
-
 21
21
-
 22
22
-
 23
23
-
 24
24
-
 25
25
-
 26
26
-
 27
27
-
 28
28
-
 29
29
-
 30
30
-
 31
31
-
 32
32
-
 33
33
-
 34
34
-
 35
35
-
 36
36
-
 37
37
-
 38
38
-
 39
39
-
 40
40
-
 41
41
-
 42
42
-
 43
43
-
 44
44
-
 45
45
-
 46
46
-
 47
47
-
 48
48
-
 49
49
-
 50
50
-
 51
51
-
 52
52
-
 53
53
-
 54
54
-
 55
55
-
 56
56
-
 57
57
-
 58
58
-
 59
59
-
 60
60
-
 61
61
-
 62
62
-
 63
63
-
 64
64
-
 65
65
-
 66
66
-
 67
67
-
 68
68
-
 69
69
-
 70
70
-
 71
71
-
 72
72
-
 73
73
-
 74
74
-
 75
75
-
 76
76
-
 77
77
-
 78
78
-
 79
79
-
 80
80
-
 81
81
-
 82
82
-
 83
83
-
 84
84
-
 85
85
-
 86
86
-
 87
87
-
 88
88
-
 89
89
-
 90
90
-
 91
91
-
 92
92
-
 93
93
-
 94
94
-
 95
95


AEG BS2E 12 T Manuale del proprietario
- Categoria
- Trapani combinati a batteria
- Tipo
- Manuale del proprietario
- Questo manuale è adatto anche per
in altre lingue
- français: AEG BS2E 12 T Le manuel du propriétaire
- Nederlands: AEG BS2E 12 T de handleiding
- dansk: AEG BS2E 12 T Brugervejledning
- svenska: AEG BS2E 12 T Bruksanvisning
Documenti correlati
Altri documenti
-
Kress AS 72 S Manuale del proprietario
-
Milwaukee PES 9.6 T Instructions For Use Manual
-
Facom CL.P1210 Manuale del proprietario
-
-
Hitachi DS14DVF3 Manuale del proprietario
-
DeWalt DW997 Manuale utente
-
-
EINHELL Screwmaxx NGS 4.8 Istruzioni per l'uso