
Lire attentivement les instructions avant de faire
fonctionner l'appareil.
FR
Read the instructions carefully before operating the unit.
GB
Leia este manual com atenção antes de qualquer utilização.
PT
Bitte lesen sie dieses handbuch vor dem gebrauch des
gerätes sorgfältig durch.
DE
Antes de utilizar este aparato, lea atentamente las
siguientes instrucciones.
ES
Leggete attentamente il manuale prima dell’uso.
IT
Lees deze handleiding aandachtig voor u het toestel
gebruikt.
NL
Benutzerhandbuch
Manuale
Handleiding
Manual do Utilizador
M-088 R
User Manual
Manual de instrucciones
Manuel de l'utilisateur
FR
GB
PT
DE
ES
IT
NL
13 8 9 10 11 12
1
19
16
15
14
17
246
3 5 7
18
Écoute des stations préréglées
Appuyez sur et recommencer l'opération autant de fois que
nécessaire pour sélectionner votre station.
Appuyez sur ou pour ajuster le niveau sonore.
Pour améliorer la réception radio:
FM: déployez l’antenne FM.
MW (AM): pivotez l'appareil horizontalement pour une réception optimale.
1. En mode veille, appuyez longuement sur , L'afcheur de l'horloge
clignotera. Réglez l'heure avec HR. et les minutes avec MIN..
2. Appuyez à nouveau sur pour conrmer.
REMARQUE: Si Pendant le temps de réglage aucune touche n'est
activée dans les 9 secondes, l'affichage présent à l'écran sera mis
automatiquement en mémoire.
Pour s’endormir en mode allumé, puis appuyez sur pour
sélectionner 120-90-60-30-15-10 ou 5 minutes d'écoute. L'indicateur
de Sommeil s'allume. L'appareil s'éteindra automatiquement après le
délai spécié. Pour annuler la fonction Sommeil, appuyez sur Ou
appuyez sur à plusieurs reprises jusqu'à ce qu’ « OFF » s’afche.
REMARQUE:
- Lorsque l’unité est alimentée sur CC, si aucune touché n’est active
pendant 8 secondes, l’afchage s’éteindra an de préserver la durée
de vie de la batterie.
- Le cordon CA doit être débranchée de l’alimentation pour que l’unité
puisse fonctionner sur piles.
- Lorsque l’appareil est connecté au secteur, la source d'alimentation
bascule automatiquement en alimentation secteur.
En mode veille, appuyez sur pour mettre l’appareil en marche.
Maintenez pendant 2 secondes pour éteindre l’unité.
1. En mode arrêt, appuyez et maintenez pendant quelques secondes
. L'afchage clignote.
2. Appuyez sur HR. et / ou MIN. pour régler l'heure de réveil.
3. Appuyez sur puis appuyez sur ou pour choisir la source de
réveil sonnerie, radio FM, MW (AM) ou USB.
Cette fonction vous réveille après une courte période de temps.
Seul le Buzzer peut être sélectionné.
1. En mode Veille, Appuyez sur pour sélectionner
120-90-60-30-15-10 ou 5 minutes, le temps de votre sieste.
L’indicateur de sieste s’allume.
2. Pour arrêter l’alarme, appuyez sur ou .
3. Pour annuler cette fonction, appuyez sur Successivement
jusqu’à ce que OFF s’afche sur l’écran.
1. Connectez votre source auxiliaire (par exemple lecteur MP3) sur
la prise AUX IN sur le coté droit de l’unité (câble non inclus).
2. Appuyez sur le bouton SOURCE pour sélectionner le mode AUX.
« AU» apparaît a l’écran.
3. Commencez la lecture de votre source auxiliaire.
4. Réglez le volume au niveau souhaité.
5. Pour arrêter la lecture, débranchez votre source auxiliaire de la
prise AUX IN.
Passage en veille automatique
Lorsque vous êtes en mode USB ou AUX IN, cet appareil passe
automatiquement en veille au bout d’environ 10 minutes sans
signal. Pour redémarrer l’appareil, éteignez-le comme décrit dans le
manuelde nouveau.
Alimentation:
Radio:
Dimensions:
Secteur: 230V 50Hz, consommation: 7W
Courant continu: 4x1.5V, type R14/ UM-2/”C”
(non fournies)
FM 87.5-108MHz
MW (AM) 522-1620kHz
230(L) x 83(W) x 120(H) mm
ATTENTION: Pour réduire le risque de choc éle-
ctrique, ne pas ouvrir l’appareil, il n’y a aucune
partie à l’intérieur destinée à l’utilisateur. Conez
toutes les réparations à un personnel qualié.
L’éclair avec le symbole de la flèche dans le triangle
est un signe d’alerte avertissant l’utilisateur de “tension
dangereuse” à l’intérieur de l’unité.
Le point d’exclamation dans le triangle est un signe
d’alerte avertissant l’utilisateur d’instructions importantes
accompagnant le produit.
IMPORTANT
- Utilisez cet appareil sous un climat tempéré.
- La plaque signalétique se trouve à l’arrière de cet appareil.
- Veiller à avoir une distance minimale de 5 cm autour de l’appareil
pour une aération sufsante et que la ventilation ne soit pas gênée en
recouvrant les orices d’aération de l’appareil avec des objets tels que
journaux, nappes, rideaux…..
- Ne placez pas de sources de ammes nues, telles que des bougies
allumées sur l’appareil.
- Ne pas exposer l’appareil à des gouttes d’eau ou éclaboussures.
- Ne placez pas d’objets remplis de liquides, tels que verre, vase ou
objets similaires sur l’appareil.
- Ne pas jeter les piles dans le feu! Respectez l’environnement lors de la
disposition des piles usagées.
- Les piles ne doivent pas être exposées à une chaleur excessive
comme le soleil, le feu ou autre source de chaleur similaire.
- La fiche du cordon d’alimentation est utilisée comme dispositif
de débranchement et doit rester facilement accessible. Pour être
totalement déconnecté, cette fiche doit être débranchée du réseau
complètement. La prise de courant ne doit pas être obstruée et doit
être facilement accessible lors de son utilisation .
- Sous l’inuence du phénomène transitoire rapide et / ou phénomène
électrostatique électrique, le produit pourrait présenter des
dysfonctionnements et l’utilisateur devra faire une réinitialisation de
l’appareil.
Secteur: 230V 50 Hz (norme CE)
Courant continu: 4x1.5V, type R14/ UM-2/”C” (non fournies)
Pour des performances optimale, des piles de type Alcaline sont
recommandées. Ces piles doivent- être remplacées tous les 6 mois.
1. Insérez la prise du cordon d'alimentation dans une prise murale
standard.
2. Installez les piles dans leur compartiment .Utilisez uniquement la
taille et le type de piles spéciées. Respectez la polarité indiquée
dans le compartiment. Une mauvaise Polarité peut causer des
dommages à l'appareil. Ne pas essayer de recharger les piles, elles
peuvent prendre feu ou exploser. Les piles doivent être remplacées
lorsque: le volume sonore diminue ou le son est déformé.
ATTENTION: Risque d’explosion si les piles ne sont pas insérées
correctement. Utilisez uniquement des piles identiques ou de type
équivalent.
Sélectionner une Bande
Lorsque l’unité est allumée, appuyez sur SOURCE pour sélectionner
la bande de fréquences désirée (FM ou MW(AM)). L’indicateur
correspondant s’allume.
Recherche manuelle
1. Choisissez votre station souhaitée avec ou .
2. Réglez le volume par ou au niveau désiré.
3. Pour arrêter d'écouter la radio, maintenez pendant 2 secondes
pour éteindre l’unité.
REMARQUE: La station de radio FM supporte 0,05MHz, mais l’écran
afchera « 0,1 » avec le point décimal « . » clignotant à la place (ex:
lorsque vous choisissez la station de radio « 87.55 », l’écran n’afchera
que « 87.5 » avec le point de la décimale « . » clignotant).
Recherche automatique
Appuyez et maintenez pendant quelques secondes ou pour
lancer la recherche. La recherche automatique localise les stations
les plus puissantes. Une station avec un signal faible peut être réglée
manuellement en appuyant plusieurs fois sur ou .
REMARQUE: Au cours de l'opération de recherche le niveau sonore
est automatiquement mis en sourdine.
Stations préréglées
Cet appareil peut mémoriser 10 stations FM et 10 stations MW (AM).
Mémorisation manuelle:
1. Sélectionnez une station radio manuellement ou en recherche
automatique.
2. Tenez appuyé jusqu'à ce que « P 01 » clignote sur l'écran.
3. Appuyez sur pour choisir un canal.
4. Appuyez sur pour mémoriser.
5. Répétez les étapes 1-4 pour mémoriser d'autres stations.
Mémorisation automatique:
Appuyez et maintenez pendant quelques secondes sur et l'appareil
mémorisera automatiquement les 10 premières station de la bande
FM ou 10 premières station de la bande MW (AM).
Lorsque vous mémorisez sur une station déjà préréglée, celle-ci sera
effacée et remplacée par la nouvelle station mise en mémoire.
Si à l’avenir, vous deviez vous débarrasser de ce produit,
sachez que les produits électriques usagés ne doivent pas
être jetés avec les ordures ménagères. Des installations
destinées au recyclage existent. Vérifiez auprès de
votre municipalité ou demandez à votre revendeur des
conseils. (Directive Déchets d’Equipements Electriques et
Electroniques)
1. In standby mode, press and hold button, the display will ash,
set the time with HR. hour and/or MIN. minutes.
2. Press again to conrm.
NOTE:
- If during the adjustment time no key is activated in 9 seconds, the
current display will be automatically stored.
In standby mode, press once to turn on the unit. Press and hold
for 2 seconds to turn off the unit.
Selecting band
When the unit is ON, press SOURCE button repeatedly to select FM
or MW (AM) mode. The corresponding indicator lights up.
Automatic search
Press and hold for few seconds or . The automatic search
locates strong stations. A station with a weak signal can be set
manually by repeatedly pressing or .
NOTE: During the search operation, the sound level is automatically
muted.
To enhance radio reception ability:
FM: Extend the telescopic antenna.
MW (AM): Rotate the unit horizontally for optimum reception.
Preset stations
This unit can store 10 FM and 10 MW (AM) stations.
Manual storage:
1. Select a radio station manually or in automatic search.
2. Press and hold until “P 01” blinks on the screen.
3. Press to select a channel.
4. Press to save it.
5. Repeat steps 1-4 to store other stations.
Automatic storage:
Press and hold for few seconds and the unit will automatically
save the first 10 FM stations or 10 MW (AM) stations. When you
store on a channel already been preset, the previous station will
automatically be cleared and replaced by the new station.
Listen to station presets
Press and repeat the operation as many times as necessary to
select your station.
Press or to adjust sound level.
1. In standby mode, press and hold for a few seconds, the display
blinks.
2. Press HR. and/or MIN. to set the time of wake up.
3. Press then press or to select the source of wake up
buzzer, FM, MW (AM) radio or USB.
4. Press to conrm, the alarm indicator lights up.
Note: Same procedure applies for Alarm 2 with button.
Note: - The previous level of listening is stored, the volume of the alarm
will be identical. If you wake up with the radio or USB, do not forget to
check the volume level.
Press once to turn on the unit. Adjust the volume with or . Then
press and hold for 2 seconds to turn off the unit.
- If you use the sleep mode with low sound level, you should use the
buzzer to wake you up.
- If the incorrect or damage USB is used ,it will change to buzzer alarm
automatically during in wake up to USB mode.
- The unit will stop playback at the end of the track when in wake up to
USB mode ,then it will atomatically switch to standby after approx. 10
minutes without a signal.
- The alarm is programmed to run for 60 minutes.
1-Alarm repetition
Press SNOOZE. The alarm stops and will sound again 9 minutes later.
2-Alarm stop
Press or . The alarm will sound again the next day at the same
time.
3-Alarm Cancellation
In standby mode, press to cancel the alarm permanently. The alarm
indicator lights off.
Note: Same procedure applies for Alarm 2 with button.
IMPORTANT
- The use of apparatus in moderate climates.
- The Marking plate is located at the back of the device.
- Make sure to have a minimum distance of 5 cm around the unit for
sufcient ventilation.
- Ensure that the ventilation openings is not covered with items such as
newspapers, tablecloths, curtains, etc.
- Do not place naked flame sources, such as lighted candles on the
apparatus.
- Do not expose this appliance to dripping or splashing water.
- Do not place objects filled with liquids, such as glass, vase on the
device.
- Do not throw batteries into fire! Respect the environment when
disposing of used batteries.
- Batteries should not be exposed to excessive heat such as sunshine,
re or other similar heat source.
- The power plug is used as a disconnect device and must be easily
accessible. To be completely disconnected from the power, the plug of
the appliance should be disconnected completely. The socket must not
be obstructed and should be easily accessible during intended use.
- Under the influence of fast transient and / or electrostatic electric
phenomenon, the product may malfunction and the user must perform
a power reset of the device.
If in the future, you need to get rid of this product, please
note that Waste electrical products should not be disposed
of with household waste. Recycling facilities exist. Check
with your municipality or ask your dealer for advice.
(Directive for Waste Electrical and Electronic Equipment)
1. Tela
2. Para ligar e desligar o aparelho
ORIGEM : Para selecionar o modo MW (AM), USB, AUX ou FM
3. Busca automática e memorização de estações de rádio
MODO DE REP.: Modo de reprodução
4. Botão : Para iniciar ou pausar uma reprodução
5. Botão : Para interromper uma reprodução
6. Alarme 1
Aumentar o volume
7. Alarme 2
Diminuir o volume
8. SNOOZE : Intervalo de repetição do alarme
Diminuir a intensidade da luz de fundo da tela
9. Cochilar
Dormir (para ir dormir com o rádio, USB ou Aux in)
10. Congurar o relógio
Memorizar
PROG.: Programar
11. HR. Conguração de Hora
Conguração abaixo
12. MIN. Conguração de Minutos
Conguração acima
13. Altifalante
14. Compartimento da bateria e cabo de alimentação de rede
15. Cabo de alimentação de rede
16. Antena telescópica FM
17. Porta USB
18. Tomada de entrada Aux
19. Pega
AC: 230V 50 Hz (CE)
DC: 4x1,5V, bateria do modelo R14/ UM- 2/”C” (não inclusa)
Recomenda-se a utilização de pilhas alcalinas. Para um
funcionamento óptimo, recomenda-se a substituição das pilhas todos
os 6 meses.
1. Ligue o cabo de alimentação de rede a uma tomada de rede.
2. Instale as baterias em seu compartimento. Utilize apenas pilhas
que respeitam as recomendações do fabricante. Certique-se de
que respeita a polaridade aquando da colocação de pilhas (ver
compartimento). A inobservância da polaridade pode danificar o
aparelho. Não tente recarregar pilhas não recarregáveis. Podem
sofrer um sobreaquecimento e explodir. As pilhas devem ser
substituídas quando: O volume diminuir, ou o som car distorcido
durante o funcionamento.
ATENÇÃO: Riscos de explosão se as pilhas não forem inseridas
correctamente. Utilize apenas pilhas idênticas ou de tipo equivalente.
- Quando o cabo AC estiver ligado da unidade principal à tomada da
parede, a alimentação muda automaticamente para AC.
Sintonização manual
1. Sintonize a estação desejada através de / .
2. Utilize o botão ou para regular o volume.
3. Para para de ouvir o rádio, mantenha o botão por 2 segundos
para desligar o aparelho.
OBSERVAÇÃO: O rádio é capaz de sintonizar estações FM em
incrementos de 0,05MHz, mas exibirá apenas incrementos de 0,1
com o separador decimal “,” piscando (ex: quando você escolher a
estação “87,55”, na tela será exibido apenas “87,5” com o separador
decimal “,” piscando).
Memorização automática:
Mantenha pressionada por alguns segundos e o aparelho irá
memorizar automaticamente as primeiras 10 estações FM ou 10
estações MW (AM). Quando você armazena ou já tiver armazenado
estações, as estações anteriores serão automaticamente apagadas
e substituidas pelas novas.
Escutando estações memorizadas
Pressione e repita essa ação quantas vezes for necessário para
chegar na estação desejada.
Utilize o botão ou para regular o volume.
CONFIGURANDO O ALARME E O MODO DO ALARME
UTILIZAÇÃO DA ENTRADA AUXILIAR
NOTA IMPORTANTE
ESPECIFICAÇÕES
INSTRUÇÕES DE SEGURANÇA
PARANDO O ALARME
LUZ DE FUNDO
FUNÇÃO DORMIR
FUNÇÃO SONECA
LEITURA DE DISPOSITIVO USB
BESCHREIBUNG DES GERÄTES
WECKRUF UND WECKMODUS EINSTELLEN
STROMVERSORGUNG
EINSTELLEN DER UHRZEIT
EIN- UND AUSSCHALTEN DES GERÄTES
1. No modo de espera (standby), mantenha pressionado por alguns
segundos até que a tela comece a piscar.
2. Pressione HR. e/ou MIN. para denir a hora do despertador.
3. Pressione e então pressione ou para selecionar a origem do
som do alarme , rádio FM/MW (AM) ou USB.
4. Pressione para conrmer, e o indicador do alarme se acenderá.
Observação: O mesmo procedimento pode ser utilizado para o Alarme
2 através do botão .
Observação: - O nível de volume existente na hora da configuração
será armazenado, e o volume do alarme será o mesmo. Caso o rádio
ou USB seja selecionado como alarme, não se esqueça de vericar o
nível do volume.
Pressione uma vez para para ligar o aparelho. Ajuste o volume
através de ou . Mantenha então o botão pressionado por 2
segundos para ligar o aparelho.
- Se você utilizar o modo Dormir com o volume baixo, será melhor
utilizar o despertador para acordar.
- Se o USB estiver riscado ou danicado, o despertar é executado com
o bip sonoro em vez do USB.
- O aparelho interromperá a reprodução depois de reproduzir uma
faixa, quando estiver congurado como despertador pelo modo USB,
e então entrará automaticamente no modo de espera por volta de 10
minutos sem emitir nenhum sinal.
- Os alarmes estão programados para funcionar durante 60 minutos.
1-Repetindo o alarme
Pressione SNOOZE. O alarme irá parar e irá começar novamente 9
minutos depois.
2-Parar o alarme
Pressione ou . O alarme irá soar novamente no dia seguinte no
mesmo horário.
3-Cancelando o alarme
No modo de espera (standby), pressione para cancelar o alarme
permanentemente.O indicador do alarme se apagará.
Observação: O mesmo procedimento pode ser utilizado para o
Alarme 2 através do botão .
Para dormir com o aparelho ligado, e então pressione para
selecionar 120-90-60-30-15-10 ou 5 minutos. O indicador se
acenderá. O aparelho irá desligar automaticamente depois de um
horário especíco. Para cancelar a função Dormir, pressione ou
para DESLIGAR.
Esta função irá acorda-lo depois de um curto período de tempo.
Apenas o despertador poderá ser selecionado.
1. No modo de espera (standby), pressione para selecionar
120-90-60-30-15-10 ou 5 minutos para a sua soneca. O indicador
se acenderá.
2. Para parar o alarme, pressione ou .
3. Para cancelar a função, pressione várias vezes até que “OFF”
seja exibido.
1. Conecte a origem auxiliar (por exemplo um tocador mp3) ao
conector AUX IN no lado direito do aparelho (o não acompanha).
2. Pressione o botão SOURCE para seleccionar o modo AUX. “AU”
aparece no ecrã.
3. Arranque a reprodução na sua fonte auxiliar.
4. Ajuste o volume sonoro para o nível pretendido.
5. Para parar a reprodução, desligue a fonte áudio externa com
ligação à tomada AUX IN.
Pressione para selecionar o brilho da tela: alto, baixo ou desligado.
Alimentação:
Rádio:
Dimensões:
ATENÇÃO: Para reduzir o risco de choque
eléctrico, não desmonte o aparelho. O aparelho não
contém qualquer peça passível de ser reparada
pelo utilizador. Confie todas as operações de
manutenção a um técnico qualicado.
Busca automática
Mantenha pressionado por alguns segundos o botão ou . A busca
automática encontrará as estações de sinal mais forte. Uma estação
com sinal fraco poderá ser configurada manualmente através do
pressionamento repetido do botão ou .
OBSERVAÇÃO: Durante a operação de busca, o nível de volume será
colocado automaticamente em mudo.
Para melhorar a qualidade de recepção rádio:
FM: Estique a antena .
MW (AM): Rode o aparelho horizontalmente para uma melhor recepção.
Memória de estações
Este aparelho pode guardar até 10 estações FM e 10 estações MW (AM).
Armazengem manual:
1. Selecione uma estação de rádio manualmente ou pela busca
automática.
2. Mantenha pressionado até que “P 01” comece a piscar na tela.
3. Pressione para selecionar um canal.
4. Pressione para armazená-la.
5. Repita os passos 1-4 para memorizar todas as outras estações.
Caso pretenda descartar-se deste aparelho, proceda à sua
reciclagem num centro de recolha para electrodomésticos.
Procure obter informações sobre o centro de reciclagem
mais próximo. Informe-se junto das autoridades locais ou
do seu revendedor local para a obtenção de pormenores
adicionais (Directiva sobre os Resíduos dos Equipamentos
Eléctricos e Electrónicos).
AC 230V 50Hz, consumo 7W
DC: 4x1,5V, bateria do modelo R14/ UM-2/”C”
(não inclusa)
FM 87.5-108MHz
MW (AM) 522-1620kHz
230(L) x 83(W) x 120(H) mm
Netzstromversorgung: 230V 50 Hz
DC: 4 Batterien Typ R14/UM-2/ “C” (nicht im Lieferumfang enthalten)
Wir empfehlen den Gebrauch alkalischer Batterien. Damit das Gerät
optimal funktioniert, sollten Sie diese Batterien alle 6 Monate ersetzen.
1. Schließen Sie das Stromversorgungskabel an eine Steckdose an.
2. Legen Sie die Batterien in das Batteriefach ein. Verwenden Sie
nur Batterien, die den Vorgaben des Herstellers entsprechen.
Bitte beachten Sie die Polarität beim Einlegen der Batterien (siehe
Batteriefach). Die Nicht-Beachtung der Polarität kann das Gerät
beschädigen. Versuchen Sie nicht, nicht-wiederauadbare Batterien
wieder aufzuladen. Sie könnten überhitzen und explodieren.
Batterien müssen ersetzt werden, wenn: Die Lautstärke nachlässt
oder der Klang während des Betriebs unklar wird.
ACHTUNG: Wenn die Batterien nicht richtig eingelegt sind, besteht
Explosionsgefahr. Verwenden Sie nur gleiche oder gleichwertige
Batterietypen.
HINWEIS:
- Wenn das Gerät mit Gleichstrom betrieben und innerhalb von 8
Sekunden keine Taste gedrückt wird, schaltet sich das Display aus,
um Energie zu sparen.
- Für den Batteriebetrieb muss das AC Netzkabel aus der Steckdose
gezogen werden.
- Wenn das AC-Kabel der Haupteinheit mit der Steckdose verbunden
ist, schaltet die Stromquelle automatisch auf AC.
1. Halten Sie im Standby-Modus die Taste gedrückt; die Anzeige
blinkt. Stellen Sie die Stunden mit den Tasten HR.. Stellen Sie die
Minuten mit den Tasten MIN..
2. Drücken Sie wieder die Taste , um Ihre Einstellung zu bestätigen.
HINWEIS:
- Wenn während der Einstellung innerhalb von 9 Sekunden keine Taste
gedrückt wird, wird automatisch die aktuelle Anzeige gespeichert.
Drücken Sie im Standby-Modus einmal die Taste , um das Gerät
einzuschalten. Halten Sie die Taste 2 Sekunden lang gedrückt,
um das Gerät auszuschalten.
RADIO HÖREN
Frequenzband einstellen
Drücken Sie, wenn das Gerät AN ist, wiederholt die Taste
SOURCE, um den UKW- oder MW-(AM-) Modus einzustellen. Das
entsprechende Symbol leuchtet auf.
Manuelle Recherche
1. Wählen Sie den gewünschten Radiosender mit der oder .
2. Verwenden Sie das Drehrädchen oder , um die Lautstärke
einzustellen.
3. Wenn Sie kein Radio mehr hören möchten, halten Sie die Taste 2
Sekunden lang gedrückt, um das Gerät auszuschalten.
HINWEIS: Der UKW-Radiosender unterstützt eine Frequenz von
0,05MHz, im Display erscheint jedoch die Anzeige „0.1“ und der
Dezimalpunkt „.“ blinkt. (Wenn Sie z.B. den UKW-Sender „87,55
“ auswählen, erscheint im Display nur die Anzeige „87.5“ und der
Dezimalpunkt „.“ blinkt.)
MORE INFORMATION
CAUTION: To reduce the risk of electric shock,
do not open the device, there is no party inside for
the user. Refer all servicing to qualied personnel.
The lightning with the arrow symbol in the triangle is a warning
sign alerting the user to “dangerous voltage” inside the unit.
The exclamation point in the triangle is a warning sign alerting
the user of important instructions accompanying the product.
1. Insert the plug of power cord into a standard wall outlet.
2. Install the batteries in their compartment. Use only the size and
type of batteries specified .Respect the polarity indicated in the
compartment. Improper polarity can cause damage to the device.
Do not attempt to recharge the batteries, they can catch fire or
explode. The batteries need to be replaced when: The volume
decreases, or sound is distorted during operation.
CAUTION: Danger of explosion if battery is incorrectly replaced.
Replace only with the same or equivalent type.
Note:
- When the unit is powered by DC, if no button is pressed within 8
seconds, the display will light off in order to save the battery life.
- The AC cord must be unplugged from the power outlet for the unit
to run on the batteries.
- When the set is connected to the mains, the power source
automatically switches to AC.
- Não coloque qualquer fonte de calor, como uma vela acesa, sobre ou
na proximidade do aparelho.
- Não exponha o aparelho a salpicos ou a humidade.
- Não coloque objectos que contenham líquido, como uma jarra, sobre
ou na proximidade do aparelho.
- Não deite as pilhas no fogo! Certique-se de que respeita o ambiente
quando eliminar pilhas gastas.
- Não exponha as pilhas a calor excessivo, como raios do sol, fogo ou
outras fontes de calor semelhantes.
- A cha de alimentação de rede permite desligar o aparelho e deve car
facilmente acessível. Para cortar a alimentação do aparelho, desligue
de vez a cha de alimentação de rede da tomada de rede. A cha de
alimentação de rede não pode estar tapada e deve ser facilmente
acessível durante a utilização.
- Sob o efeito de fenómenos electrostáticos e/ou eléctricos transitórios, o
produto pode apresentar anomalias e pode acabar por ser necessário
proceder-se a uma reinicialização.
O símbolo do relâmpago com uma seta e situado no interior
de um triângulo destina-se a alertar o utilizador para a
presença de uma “tensão perigosa” no aparelho.
O ponto de exclamação no interior de um triângulo destina-
se a alertar o utilizador para a presença de instruções
importantes no manual que acompanha o aparelho.
1. No modo de espera (standby), mantenha pressionado o botão ,
e a tela começará a piscar. Utilize os botões HR. para ajustar as
horas. Utilize os botões MIN. para ajustar as minutos.
2. Pressione uma vez mais o botão para conrmar o ajuste.
OBSERVAÇÃO:
- Caso durante o ajuste da hora, nenhum botão seja utilizado por 9
segundos, o que estiver sendo exibido na tela será automaticamente
armazenado.
No modo de espera (standby), pressione uma vez para ligar o aparelho.
Mantenha pressionado por 2 segundos para desligar o aparelho.
AUDIÇÃO DO RÁDIO
Selecionando a banda
Quando o aparelho estiver LIGADO, pressione SOURCE várias
vezes para selecionar o modo FM ou MW (AM). O indicador
correspondente se acenderá.
1. Connect your auxiliary source (e .g. mp3 player) to the AUX IN
jack on the right side of unit (cable not included).
2. Press SOURCE button repeatedly to select AUX mode. “AU”
appears on display.
3. Start playback from your auxiliary source.
4. Adjust the volume to desired level.
5. To stop playback, disconnect your auxiliary source from the AUX
IN jack.
IMPORTANT NOTICE
TECHNICAL SPECIFICATIONS
POWER SUPPLY:
RADIO:
DIMENSION:
AC 230V 50Hz, 7W consumption
DC 6V 4x1.5V, battery type R14/UM-2/ “C”
size (not provided)
FM 87.5-108MHz
MW (AM) 522-1620kHz
230(L) x 83(W) x 120(H) mm
POWER SUPPLY
AC: 230V 50 Hz (CE)
DC: 4x1.5V, battery type R14/ UM-2/”C” size (not provided)
For optimal performance, alkaline batteries are recommended.
These batteries must be replaced every six months.
- Si vous utilisez le mode sommeil avec un faible niveau sonore, nous
vous conseillons d'utiliser la fonction Buzzer pour vous réveiller.
- Si le USB est endommagé ou abîmé, le réveil se fera avec le bip
sonore au lieu du USB.
- L’unité arrêtera la lecture à la n de la piste lorsque vous êtes en
mode de réveil sur USB, ensuite elle passera automatiquement en
mode veille après environ 10 minutes sans signal.
- L’alarme est programmée pour fonctionner pendant 60 minutes.
1- Répétition de l'alarme
Appuyez sur SNOOZE. L'alarme s'arrête et se déclenchera à
nouveau 9 minutes plus tard.
2-Arrêt de l'alarme
Appuyez sur ou , L'alarme se déclenchera à nouveau le jour
suivant à la même heure.
3-Annuler l'alarme
En mode veille, appuyez sur pour annuler l'alarme de façon
permanente. L'indicateur d'alarme s'éteint.
Remarque: La même procédure s'applique pour l'alarme 2 avec le
bouton .
NEW ONE S.A.S
10, Rue de la Mission, 25480 Ecole Valentin, France
Remarque: Le dernier niveau d'écoute étant mémorisé, le niveau
sonore de l'alarme en sera identique. Si vous vous réveillez avec la
radio ou USB, n'oubliez pas de vérier le volume sonore.
Appuyez sur pour allumer la radio. Réglez le volume par ou
au niveau désiré. Puis, maintenez pendant 2 secondes pour
éteindre l’unité.
NEW ONE S.A.S
10, Rue de la Mission, 25480 Ecole Valentin, France
ATENÇÃO
- Utilize este aparelho num clima temperado.
- A placa de características situa-se na parte de trás deste aparelho.
- Certique-se de que respeita uma distância mínima de 5 cm à volta do
aparelho de modo a permitir uma ventilação suciente.
- Certique-se de que garante uma ventilação correcta do aparelho e
que não tapa os orifícios de ventilação com objectos como jornais,
toalhas, cortinas, etc.
NEW ONE S.A.S
10, Rue de la Mission, 25480 Ecole Valentin, France
Automatische Sendersuche
Halten Sie die Tasten / etwa 2 Sekunden gedrückt, um
die Suche in eine der Richtungen zu starten. Die automatische
Suchfunktion erkennt Sender mit starkem Signal. Sender mit
schwachem Signal können manuell eingestellt werden.
HINWEIS: Während der Sendersuche wird der Ton automatisch
abgeschaltet.
Zur Verbesserung der Radioempfangsleistung:
UKW: Ziehen Sie den UKW-Antennendraht vollständig aus.
MW (AM): Zur Erreichung eines optimalen Empfangs drehen Sie die
Einheit horizontal.
1. Afchage LED
2. Veille / Marche
SOURCE: Permet de choisir les modes MW (AM), USB, AUX ou FM
3. Balayage et mise en mémoire automatique des stations
P.MODE: Mode de lecture
4. Touche: démarre la lecture ou la met en pause
5. Touche : arrête la lecture
6. Alarme 1
Volume ascendant
7. Alarme 2
Volume descendant
8. SNOOZE Répétition de l'alarme
Réglage d'intensité lumineuse de l'écran
9. Sieste
Sommeil (pour s'endormir avec la radio, USB ou Aux in)
10. Réglage de l'horloge
Mise en mémoire
PROG.: Programme
11. HR. Réglage des heures
Réglage arrière
12. MIN. Réglage des minutes
Réglage avant
13. Haut-parleur
14. Compartiment à piles et cordon d'alimentation secteur
15. Cordon d'alimentation secteur
16. Antenne télescopique FM
17. Port USB
18. Entrée auxiliaire
19. Poignée de transport
4. Appuyez sur pour conrmer, l' indicateur d'alarme s'allume.
Remarque: La même procédure s'applique pour l'alarme 2 avec le
bouton .
EMPLACEMENT ET DESCRIPTION DES COMMANDES
ALIMENTATION
RÉGLAGE DE L’HEURE
MISE EN MARCHE ET ARRET DE L’APPAREIL
ÉCOUTE DE LA RADIO
REGLAGE DE L’ALARME ET DU MODE DE REVEIL FICHE TECHNIQUE
REMARQUE IMPORTANTE
CONNEXION D’UNE SOURCE AUXILIAIRE
LOCATION AND DESCRIPTION OF CONTROLS
SETTING THE TIME
TURNING UNIT ON/OFF
LISTENING TO THE RADIO
LECTURE D’UN PÉRIPHÉRIQUE USB
FONCTION SIESTE
FONCTION SOMMEIL
RÉGLAGE D’INTENSITE LUMINEUSE DE L’ECRAN
ARRET DE L’ALARME
PLUS D’INFORMATION
SETTING THE ALARM AND THE ALARM MODE
CONNECTING AUXILIARY SOURCE
AJUSTANDO A HORA
LIGANDO/DESLIGANDO O APARELHO
STOPPING THE ALARM
DIMMER
SLEEP FUNCTION
NAP FUNCTION
LISTENING TO USB DEVICE
DESCRIÇÃO DO APARELHO
ALIMENTAÇÃO
Connexion d’un périphérique USB (non fourni)
Connectez votre appareil USB sur le port USB, appuyez sur la
touche SOURCE plusieurs fois pour choisir le mode USB. Si un
appareil USB a déjà été inséré, appuyez sur la touche SOURCE
pour passer en mode USB. « USB » clignote sur l'écran.
Fonctions de base
Lecture/pause: appuyez sur la touché pour mettre la lecture en
pause. Appuyez à nouveau sur cette touche pour reprendre la
lecture.
Régler le mode lecture: Appuyez plusieurs fois sur la touche
P.MODE pour choisir les modes désirés dans l'ordre suivant: « ONE »
(répéter un)-> « FLd » (répéter le dossier) -> « ALL » (répéter tout) ->
« rnd » (lecture aléatoire) -> « OFF » (annuler le paramètre) .
Changer de piste: Pendant la lecture, appuyez sur ou pour
passer immédiatement à la piste suivante ou précédente.
Stop: Appuyez sur la touche pour interrompre la lecture. L'écran
afchera le nombre de toutes les pistes sur votre appareil USB.
Remarque: Lorsque le nombre total de pistes sur l'appareil USB
dépasse 2999, l'écran clignotera « 2 » au lieu d'afcher le nombre
total de pistes.
LECTURE PROGRAMMÉE
La lecture programmée vous permet de lire les pistes dans l’ordre
de votre choix. Jusqu’à 20 pistes peuvent être programmées.
1. Appuyez sur la touche PROG., l'indicateur PROG. s'allume.
2. Appuyez sur ou pour choisir le numéro de piste de votre
choix. Puis appuyez sur la touche PROG. de nouveau pour
mémoriser la piste sélectionnée.
3. Répétez l'étape 2 jusqu’à ce que toutes les pistes de votre choix
soient programmées.
4. Appuyez sur la touche pour commencer la lecture.
5. Pour annuler la fonction programmée, appuyez 2 fois sur la
touche STOP ou appuyez sur la touche pour éteindre
l’appareil.
Remarque: Vous ne pouvez programmer des pistes que lorsque le
lecteur est à l’arrêt.
Sortir du mode USB
Pour quitter le mode USB, déconnectez votre appareil USB de
l'unité ou appuyez plusieurs fois sur la touche SOURCE pour passer
à un autre mode.
Remarque:
* Il existe de nombreux modèles de périphériques USB. Nous
ne pouvons garantir que l’appareil soit compatible avec tous
ces différents modèles. Si votre périphérique USB n’est pas
compatible, veuillez en essayer un autre.
* Il se peut que certains chiers enregistrés sur le périphérique USB
ne puissent être lus. En effet, certains formats spéciaux ne sont
pas compatibles avec cet appareil.
1. LED display
2. To turn unit on/off
SOURCE: To select MW (AM), USB, AUX or FM mode
3. Auto scan and preset radio stations
P.MODE: Playback mode
4. button: To start and pause the playback
5. button: To stop playback
6. Alarm 1
Volume up
7. Alarm 2
Volume down
8. SNOOZE: Interval alarm repetition
Dimmer light intensity of the screen
9. Nap
To fall asleep with the radio, USB or Aux in
10. Setting the clock
Memorization
PROG.: Programme
11. HR. Hour setting
Setting down
12. MIN. Minute setting
Setting up
13. Speaker
14. Battery & AC cord compartment
15. AC Power Cord
16. FM telescopic antenna
17. USB port
18. AUX IN jack
19. Carrying handle
NOTE: The FM radio station supports 0.05MHz, but the display will
show “0.1” with decimal point “.” blinking instead (eg. When you
choose the FM radio station “87.55” ,the display will only show “87.5”
with the decimal point “.” blinking.).
To fall asleep in ON mode, press to select 120-90-60-30-15-10
or 5 minutes of listening. indicator lights up. The unit will
automatically turn off after the specied time. To cancel the sleep
function, press or to OFF.
This function wakes you up after a short period of time. Only the
buzzer may be selected.
1. In standby mode, press to select 120-90-60-30-15-10 or 5
minutes for your nap. The indicator lights up.
2. To stop the alarm, press or .
3. To cancel the function, press repeatedly until “OFF” is displayed.
To insert a USB device (not included)
Connect your USB device to the USB port, press SOURCE button
repeatedly to select USB mode. If USB has already been inserted,
press SOURCE button to switch to USB mode. “USb” blinks on display.
Basic player functions
Play/Pause: press to suspend momentarily the track playback.
Press again to resume playback.
Setting Playback Mode: Repeatedly press P.MODE button to select
the desired mode in the following order: “ONE”(repeat one) -> “FLd”
(repeat folder) -> “ALL”(repeat all) -> “rnd” (random playback) -> “OFF“
(cancel the setting) .
Changing track : While playing , press or to go immediately to
the next or previous track.
Stop: Press button to stop playback. The display will show the
number of the all the tracks on your USB device.
Note: When the total number of tracks on the USB device exceeds
2999, the display will blink “2” instead of showing the number of total
tracks.
PROGRAMMED PLAYBACK
Programmed playback enables tracks to be played in the desired order.
Up to 20 tracks can be programmed.
1. Press the PROG. button ,the PROG. indicator lights up.
2. Press the or to select the desired track number.Then, press
PROG. button again to memorize the selected track.
3. Repeat steps 2 until all desired tracks are programmed.
4. Press the button to start palyback.
5. To cancel program function, press button twice or press button to
turn off the unit.
Note: Programming can only be made when the player is in stop mode.
Exit USB mode
To exit USB mode, disconnect your USB device from the unit or
repeatedly press SOURCE button to switch to other modes.
Note
* There are many USB devices in the market. We cannot guarantee to
support all different models. Please try another USB device if yours is
not supported.
* The unit might not support all the multimedia files stored in USB
because it includes some special playback procedure which might not
be compatible with the procedure of this unit.
Para inserir dispositivo USB (não incluso)
Conecte o seu dispositivo USB no conector USB, pressione o botão
SOURCE várias vezes até selecionar o modo USB. Caso o USB já
tenha sido inserido, pressione o botão SOURCE para trocar para o
modo USB. "USb" piscará na tela.
Funções básicos do aparelho
Play/Pausa: Durante a reprodução, pressione o botão para colocar
a reprodução em pausa. Pressione mais uma vez o botão para
retomar a reprodução.
Denindo o Modo de Reprodução: Pressione várias vezes o botão
P.MODE para selecionar o modo desejado de acordo com a seguinte
ordem: “ONE”(repetir uma vez) -> “FLd”(repetir pasta) -> “ALL”
(repetir todas) -> “rnd” (reprodução aleatória) -> “OFF” (cancela a
conguração) .
Trocando de faixa: Durante uma reprodução, pressione ou para
ir imediatamente para a faixa seguinte ou anterior.
Parar: Pressione o botão para interromper uma reprodução. A tela
exibirá o número total de faixas no seu dispositivo USB.
Observação: Quando o número total de faixas do seu dispositivo USB
exceder 2999, a tela exibirá "2" piscando ao invés de exibir o número
total de faixas.
REPRODUÇÃO PROGRAMADA
A reprodução programada permite que as faixas sejam reproduzidas na
ordem desejada. Até 20 faixas podem ser programadas.
1. Pressione o botão PROG., e o indicador PROG. acenderá.
2. Pressione ou para selecionar o número da faixa desejada.
Então, pressione o botão PROG. mais uma vez para memorizar a
faixa selecionada.
3. Repita o passo 2 até que todas as faixas tenha sido programadas.
4. Pressione o botão para iniciar a reprodução.
5. Para cancelar a função de programação, premir duas vezes o botão
STOP ou premir o botão para desligar o aparelho.
Observação: A programação só poderá ser feita quando o aparelho
estiver no modo PARADO.
Sair do modo USB
Para sair do modo USB, desconecte o seu dispositivo USB do aparelho
ou pressione SOURCE várias vezes para trocar para outros modos.
Observação
* Existem inúmeros modelos de periféricos USB. Não podemos garantir
que o aparelho suporte todos estes modelos diferentes. Se o seu
periférico USB não for suportado, experimente outro.
* Alguns cheiros gravados no periférico USB não são suportados. Com
efeito, alguns procedimentos de leitura especiais não são compatíveis
com este aparelho.
1. LED Anzeige
2. Gerät ein-/ausschalten
SOURCE: MW-(AM-), USB-, AUX- oder FM-Modus auswählen
3. Radiosender suchen und speichern
P.MODE: Wiedergabemodus
4. Wiedergabe starten und unterbrechen
5. Wiedergabe beenden
6. Alarm 1
Lautstärke erhöhen
7. Alarm 2
Lautstärke reduzieren
8. SNOOZE: Alarmwiederholung mit Intervall
Helligkeit der Displaybeleuchtung
9. Nap-Funktion
Sleep-Timer (mit Musik einschlafen)
10. Uhrzeit einstellen
Speicher
PROG.: Programmieren
11. HR. Einstellung der Uhrzeit
Einstellung reduzieren
12. MIN. Minuten einstellen
Einstellung erhöhen
13. Lautsprecher
14. Batterie- & (AC) Netzkabelfach
15. Netzstromkabel
16. FM-Teleskopantenne
17. USB-Port
18. AUX-Eingang
19. Traggriff
Gespeicherte Radiosender einschalten
Drücken Sie wiederholt die Taste , um einen gespeicherten
Radiosender Ihrer Wahl einzuschalten.
Stellen Sie mit den Tasten oder die Lautstärke entsprechend ein.
Automatisch speichern:
Halten Sie die Taste einige Sekunden lang gedrückt; das Gerät wird
die ersten 10 UKW-Sender oder 10 MW-(AM-) Sender speichern. Falls
auf einem Speicherplatz bereits ein Sender gespeichert ist, wird der
vorhandene Sender gelöscht und automatisch durch den neuen ersetzt.
Gespeicherte Radiosender
Das Gerät kann jeweils bis zu 10 UKW- und 10 MW-(AM-) Radiosender
speichern.
Manuell speichern:
1. Sie können Radiosender manuell oder automatisch suchen.
2. Halten Sie die Taste
gedrückt, bis im Display die Anzeige „P 01“
blinkt.
3. Wählen Sie mit einen Sender aus.
4. Drücken Sie die Taste zum Speichern.
5. Wiederholen Sie die Schritte 1-4, um weitere Sender zu speichern.
1. Halten Sie im Standby-Modus die Taste einige Sekunden lang
gedrückt; das Display blinkt.
2. Stellen Sie mit den Tasten HR. und/oder MIN. die Weckzeit ein.
3. Drücken Sie gefolgt von oder , um als Weckrufmodus den
Buzzer ( ), den USB-Modus, FM- oder MW-(AM) Radiomodus
auszuwählen.
4. Bestätigen Sie mit ; das Alarmsymbol leuchtet auf.
Hinweis: Gehen Sie für Alarm 2 mit der Taste genauso vor.
Hinweis: - Die Lautstärke vor dem Ausschalten wird gespeichert;
der Weckruf ertönt dann mit derselben Lautstärke. Wenn Sie Radio-
oder USB als Weckmodus eingestellt haben, sollten Sie daher die
Lautstärke entsprechend überprüfen.
Manual search
1. Choose your radio station with or .
2. Adjust the volume by or to the desired level.
3. To stop listening to the radio, press and hold for 2 seconds to
turn off the unit.
Automatic standby mode
When in USB or AUX IN mode ,the unit automatically switches to
standby after approx. 10 minutes without a signal.To switch the unit on
again, please follow the instructions mentioned in instruction manual.
Press to select the brightness of the screen: high, low or OFF.
Appuyez sur pour sélectionner la luminosité de l’écran: Forte,
Basse ou Ecran éteint.
OBSERVAÇÃO:
- Quando o aparelho estiver conectado à bateria DC, caso nenhum
botão for pressionado dentro de 8 segundos, a tela se desligará
automaticamente para poupar a carga da bateria.
- O o de energia AC não deverá estar conectado à tomada para
que o aparelho funcione através das baterias.
Alternar para o modo de espera automático
Quando estiver no modo USB ou ENT. AUX, a unidade alterna
automaticamente para o modo de espera após aproximadamente
10 minutos sem sinal. Para reiniciaro aparelho, desligue-ocomo
descritono manualde novo.
Drücken Sie einmal die Taste zum Einschalten des Geräts. Stellen
Sie die Lautstärke mit den Tasten oder entsprechend ein.
Halten Sie dann die Taste 2 Sekunden lang gedrückt, um das Gerät
auszuschalten.
- Falls Sie mit dem Sleep-Timer bei geringer Lautstärke einschlafen
möchten, wird empfohlen, den Buzzer als Weckmodus zu verwenden.
RADIO PLL PORTABLE AVEC USB
PORTABLE PLL RADIO WITH USB
RÁDIO PLL PORTÁTIL COM USB
TRAGBARES PLL-RADIO MIT USB
FR
GB
PT
DE
Nos emballages peuvent faire l’objet d’une consigne de tri,
pour en savoir plus: www.quefairedemesdechets.fr

Im eingeschalteten Modus einschlafen; stellen Sie dann mit der
Taste die Minuten bis zum Ausschalten ein: 120-90-60-30-15-10
oder 5 Minuten. Das Symbol leuchtet auf. Nach Ablauf der
programmierten Zeit schaltet sich das Gerät automatisch aus. Um
den Sleep-Timer zu deaktivieren, drücken Sie die Taste oder
wiederholt , bis in der Anzeige „OFF“ erscheint.
Mit dieser Funktion werden Sie nach einer kurzen Zeit geweckt. Als
Weckmodus kann nur der Buzzer eingestellt werden.
1. Drücken Sie im Standby-Modus die Taste , um für Ihre Pause
eine Zeit von 120-90-60-30-15-10 oder 5 Minuten einzustellen.
Das Symbol leuchtet auf.
2. Beenden Sie den Weckruf durch Drücken der Tasten oder .
3. Um die Funktion zu deaktivieren, drücken Sie wiederholt die Taste
, bis in der Anzeige OFF erscheint.
1. Schließen Sie ein externes Gerät (z.B. MP3-Spieler) an die AUX
IN Buchse rechts am Gerät an (Kabel nicht mitgeliefert).
2. Drücken Sie die SOURCE Taste und wählen Sie den AUX Modus.
Die Anzeige „AU“ wird auf dem Display eingeblendet.
3. Beginnen Sie mit dem Playback Ihrer Zusatzquelle.
4. Stellen Sie die Lautstärke auf den gewünschten Pegel ein.
5. Um das Playback zu beenden, nehmen Sie Ihre Zusatzquelle aus
der AUX IN Buchse heraus.
Mit der Taste können Sie die Helligkeit der Anzeige einstellen:
hoch, niedrig oder AUS.
Netzstromversorgung:
RADIO:
ABMESSUNG:
ACHTUNG: Um Elektroschockgefahr zu vermeiden,
dürfen Sie dieses Gerät nicht demontieren. Das
Gerät enthält keine Teile, die der Benutzer selbst
reparieren kann. Vertrauen Sie die Instandhaltung
des Geräts einem Fachmann an.
Das in einem Pfeil endende Blitzsymbol innerhalb eines Dreiecks
weist den Benutzer auf die Gegenwart einer „gefährlichen
Spannung“ im Gerät hin.
Das Ausrufezeichen im Inneren eines Dreiecks weist den
Benutzer auf wichtige Anweisungen hin, die sich in dem das
Gerät begleitenden Handbuch benden.
ACHTUNG
- Verwenden Sie dieses Gerät in klimatisch gemäßigter Umgebung.
- Das Typenschild bendet sich auf der Rückseite des Geräts.
- Achten Sie auf einen Mindestabstand von 5 cm zu Ihrem Gerät,
um eine ausreichende Belüftung zu gewährleisten.
- Stellen Sie eine ausreichende Belüftung des Geräts sicher und
behindern Sie die Belüftungsöffnungen nicht mit Gegenständen
wie z. B. Zeitungen, Tischdecken, Vorhängen, usw.
- Stellen Sie keine Wärmequelle wie eine angezündete Kerze auf
oder in der Nähe des Geräts ab.
- Setzen Sie das Gerät niemals Wasserspritzern oder Feuchtigkeit aus.
- Stellen Sie kein mit Wasser gefülltes Gefäß, wie z. B. Vasen, in der
Nähe des Geräts ab.
- Werfen Sie Batterien nicht ins Feuer! Entsorgen Sie leere Batterien
umweltgerecht.
- Batterien dürfen keiner übermäßigen Hitze ausgesetzt werden
(wie zum Beispiel praller Sonne, Feuer oder anderen ähnlichen
Hitzequellen).
- Mit dem Netzstecker kann das Gerät vom Netz getrennt werden, er
muss daher leicht zugänglich sein. Um das Gerät vollständig vom
Netz zu trennen, trennen Sie den Netzstecker komplett von der
Netzsteckdose. Der Netzstecker darf nicht behindert werden und
muss während der Verwendung leicht zugänglich sein.
- Unter der Einwirkung von elektrostatischen und/oder elektrischen
Phänomen kann das Produkt Fehlfunktionen aufweisen. Ein
Zurücksetzen auf die Werkseinstellungen kann sich als notwendig
erweisen.
AC 230V 50Hz, Stromverbrauch 7W
DC: 4 Batterien Typ R14/UM-2/ “C” (nicht
im Lieferumfang enthalten)
UKW 87.5-108MHz
MW (AM) 522-1620kHz
230(L) x 83(W) x 120(H) mm
NOTA:
- Cuando la unidad esté alimentada con DC, si no se pulsa ningún
botón durante 8 segundos, el display se apagará para prolongar la
duración de la pila.
- El cable de alimentación deberá estar desenchufado de la toma de
corriente para ser alimentado por pila.
- Cuando el aparato está conectado a la red eléctrica, la fuente de
alimentación cambia automáticamente a CA.
1. En el modo en espera, mantenga pulsado el botón , el display
parpadeará. Utilice los botones HR. para ajustar las horas. Utilice
los botones MIN. para ajustar las minutos.
2. Pulse de nuevo para conrmar.
NOTA:
- Si durante el ajuste de la hora n ose pulsa ningún botón durante
9 segundos, la hora que se esté visualizando se almacenará
automáticamente.
En el modo en espera, pulse una vez para encender la unidad.
Mantenga pulsado durante 2 segundos para apagar la unidad.
FUNCIONAMIENTO DE LA RADIO
Selección de bandas
Cuando la unidad esté encendida, pulse SOURCE repetidamente para
seleccionar el modo FM o MW (AM). El indicador correspondiente se
iluminará.
Sintonización manual
1. Sintonice la emisora que desee con / .
2. Utilice el botón o para ajustar el volumen.
3. Para dejar de escuchar la radio, mantenga pulsado durante 2
segundos para apagar la unidad.
NOTA: La emisora de radio FM soporta 0.05MHz, pero, sin embargo,
el display mostrará “0.1” con el punto decimal “.” parpadeando (por
ejemplo, cuando usted sintonice la emisora de radio “87.55”, el display
solo mostrará “87.5” con el punto decimal “.” parpadeando.).
Para quedarse dormido con la unidad encendida, pulse para
seleccionar 120-90-60-30-15-10 o 5 minutos de escucha. El
indicador se encenderá. La unidad se apagará automáticamente
a la hora especificada. Para cancelar la función de apagado
automático, pulse o repetidamente hasta que se visualice
“OFF”.
Esta función le despertará una vez transcurrido un periodo de
tiempo. Solo podrá seleccionarse el timbre.
1. En el modo en espera, pulse para seleccionar 120-90-60-30-15
-10 o 5 minutos de siesta. El indicador se encenderá.
2. Para detener la alarma, pulse o .
3. Para cancelar la función, pulse repetidamente hasta que se
muestre OFF.
1. Conecte su fuente auxiliar (por ejemplo, un reproductor de MP3) a la
toma AUX IN de la parte derecha de la unidad (cable no incluido).
2. Pulse la tecla SOURCE para seleccionar el modo AUX.
3. Empiece el playback desde la fuente AUX IN. «AU» aparecerán en la
pantalla.
4. Ajuste el volumen hasta el nivel deseado.
5. Para parar el playback, desconecte la fuente AUX-IN de la entrada
AUX-IN.
Pulse para seleccionar el brillo de la pantalla: Alto, bajo o Apagada.
Alimentación:
Radio:
Dimensiones:
AC 230V 50Hz, consumo7W
DC: 4x1,5V, pilas R14/ UM-2/del tipo ”C”
(no incluidas)
FM 87.5-108MHz
MW (AM) 522-1620kHz
230(L) x 83(W) x 120(H) mm
ATENCIÓN: Para reducir el riesgo de descarga
eléctrica, no desmonte el aparato. En el interior de
este aparato no existe ninguna pieza que pueda ser
reparada por el usuario. Para cualquier operación
de mantenimiento y reparación, póngase en
contacto con personal técnico cualicado.
El símbolo del rayo con una flecha dentro de un triángulo
equilátero advierte al usuario de la presencia de voltaje
peligroso en el interior del aparato.
El signo de exclamación dentro de un triángulo equilátero
advierte al usuario de la presencia de importantes instrucciones
de funcionamiento y mantenimiento en el manual que
acompaña al producto.
ATENCIÓN
- Utilice este aparato en lugares con climas templados.
- La placa de identicación se encuentra en la parte posterior del
aparato.
- Deje libre alrededor del aparato una distancia mínima de 5 cm
para garantizar una correcta ventilación del mismo.
- Para asegurar una ventilación correcta del aparato, no cubra
los orificios de ventilación con objetos tales como periódicos,
manteles, cortinas, etc.
- No coloque ninguna fuente de calor, como por ejemplo una vela
encendida, sobre el aparato o cerca de él.
- No exponga el aparato a salpicaduras o a la humedad.
- No coloque objetos que contengan líquido, como un jarrón, encima
del aparato.
- No tire las pilas al fuego. Respete el medio ambiente cuando se
deshaga de las pilas usadas.
- No exponga las pilas a temperaturas demasiado altas, como las
producidas por la exposición directa a los rayos del sol, al fuego o
a otras fuentes de calor.
- El acceso al enchufe ha de permanecer despejado. Para cortar por
completo la alimentación del aparato, desenchúfelo de la toma de
corriente. Se ha de poder acceder fácilmente al enchufe durante el
uso del aparato; procure que el acceso al mismo esté despejado.
- Como resultado de fenómenos electroestáticos y/o eléctricos
transitorios, pueden producirse fallos en el funcionamiento del
producto. En estos casos, el usuario deberá reiniciar el aparato
desenchufándolo y volviéndolo a enchufar.
Si desea deshacerse de este aparato, recuerde que
ha de depositarlo en un lugar destinado al reciclado de
electrodomésticos. Infórmese acerca del centro de reciclaje
más cercano. Consulte a las autoridades locales o a su
proveedor para obtener más información al respecto.
(Directiva de Residuos de Aparatos Eléctricos y Electrónicos)
Alimentatore CA: 230V 50 Hz (CE)
DC: 4x1.5V batteria tipo R14/UM-2/”C” (non forniti).
Si raccomanda l’uso di pile alcaline. Per ottenere un funzionamento
ottimale, si raccomanda di sostituire le pile ogni 6 mesi.
1. Collegare il cavo di alimentazione di rete ad una presa di corrente.
2. Inserire le batterie nel relativo vano.Utilizzate soltanto pile che
corrispondono alle indicazioni del fabbricante. Rispettate la polarità
durante l’inserimento delle pile (vedi illustrazione nel comparto).
Non rispettare la polarità può arrecare danni all’apparecchio. Non
cercate di ricaricare pile non ricaricabili. Potrebbero surriscaldarsi
ed esplodere. Le batterie devono essere sostituite quando: il
volume diminuisce, o il suono risulta distorto durante l’uso.
ATTENZIONE: Rischio di esplosione se le pile non sono inserite
correttamente. Utilizzate solamente pile identiche o equivalenti.
NOTA:
- Per questioni di risparmio energetico, quando l’apparecchio è
alimentata a corrente continua (CC) il display si spegne se per 8
secondi non viene premuto alcun pulsante.
- Per utilizzare l’alimentazione a batterie il cavo CA deve essere
scollegato dalla presa.
- Quando l’apparecchio è collegato con la presa da parete mediante
il cavetto CA, l’alimentazione passa automaticamente a CA.
1. In modalità standby, premete a lungo il tasto , le cifre dell’orologio
lampeggia, impostare l’ora con HR.. Regolare i minuticon tasto MIN..
2. Premete nuovamente il tasto per confermare l’impostazione.
N.B.: se durante l’impostazione dell’ora con la schermata orologio
lampeggiante non viene premuto alcun tasto entro 9 secondi, il
dispositivo salva in automatico l’impostazione corrente.
In modalità standby, premere una volta il tasto per attivare
l’apparecchio. Tenere premuto per due secondi il tasto per disattivarlo.
Selezionebanda
Con l’apparecchio in funzione (ON), premere più volte il tasto
SOURCE per selezionare la banda FM o MW (AM). La relativa spia
luminosa si illuminerà.
Sintonizzazione manuale
1. Sintonizzarsi sulla stazione desiderata con / .
2. Regolare il volume sul livello desiderato con i tasti e .
3. Per interrompere l’ascolto della radio, tenere premuto per due
secondi il tasto per spegnere l’apparecchio.
NOTA: la radio FM supporta la regolazione a intervalli di 0,05 MHz,
tuttavia sul display le stazioni vengono semplicemente visualizzate
come “0.1” con il punto decimale lampeggiante (ad es., quando si
seleziona la stazione FM “87.55” sul display viene visualizzato “87.5”
con il punto decimale “.” lampeggiante).
Ricerca automatica
Tenere premuto per alcuni secondi il tasto o . La funzione
di ricerca automatica rileverà le stazioni con il segnale più forte.
Stazioni radio con segnale più debole possono essere sintonizzate
manualmente premendo più volte il tasto o .
NOTA: Durante l’operazione di ricerca il volume audio viene
automaticamente azzerato.
Per migliorare la ricezione:
FM: Estendere l’antenna.
MW (AM): Ruotare l’apparecchio orizzontalmente per ottenere la
ricezione migliore.
Preselezione delle stazioni
L’apparecchio può memorizzare no a 10 stazioni FM o 10 stazioni
MW (AM).
Memorizzazione manuale:
1. Sintonizzare una stazione radio manualmente o con la ricerca
automatica.
2. Tenere premuto il tasto fino a quando la dicitura “P 01” non
lampeggia sul display.
3. Premere per selezionare un canale.
4. Premete nuovamente il tasto per confermare l’impostazione.
5. Ripetete i punti da 1 a 4 per memorizzare altre stazioni.
Memorizzazione automatica:
Tenere premuto per alcuni secondi il tasto per far sì che l’appare-
cchio salvi automaticamente le prime 10 stazioni FM o le prime 10
stazioni MW (AM). Salvando una stazione in un programma della
preselezione già occupato, la stazione precedentemente salvata verrà
automaticamente eliminata e sostituita dalla nuova stazione.
Ascoltare le preselezioni
Utilizzate i tasti per selezionare direttamente unapreselezione di
stazione.
Utilizzate i tasti o per impostare il volume al livello d’ascolto
desiderato.
1. In modalità standby, tenere premuto per alcuni secondi il tasto ,
nché il quadrante lampeggi.
2. Premere HR. e/o MIN. per impostare l’orario della sveglia.
3. Premere , quindi premere o per selezionare l’origine della
sveglia: buzzer , radio FM/MW (AM) o USB.
4. Premere per confermare, e l’indicatore della sveglia si
illuminerà.
Nota: La stessa procedura è valida per la Sveglia 2 con il tasto .
Nota: - Il livello sonoro della sveglia corrisponderà all’ultimo livello
di volume selezionato.Se si seleziona la sveglia con radio o USB,
accertarsi sempre che il livello del volume sia adeguato.
1. Collegare la propria sorgente ausiliaria (es.lettore MP3) alla presa
AUX IN posta sul retro dell’apparecchio (cavo non incluso).
2. Premere il tasto SOURCE per selezionare la modalità AUX. “AU”
compare sullo schermo.
3. Avviare la riproduzione dalla sorgente ausiliaria.
4. Regolare il volume al livello desiderato.
5. Per arrestare la riproduzione scollegare la sorgente ausiliaria
dalla presa AUX IN.
Premere per selezionare la luminosità del quadrante: alta, bassa
o ‘OFF’.
Alimentatore:
RADIO:
Dimensioni:
CA 230V 50 Hz,potenza assorbita 7W
DC 6V, 4x1.5V batteria tipo R14/UM-2/”C”
(non forniti).
FM 87.5-108MHz
MW (AM) 522-1620kHz
230(L) x 83(W) x 120(H) mm
ATTENZIONE: Per ridurre il rischio di scossa
elettrica, non smontate l’apparecchio. Questo
apparecchio non contiene pezzi riparabili dall’utente.
Per ogni riparazione rivolgetevi esclusivamente a
tecnici qualicati.
Il simbolo del fulmine con una freccia all’estremità all’interno di
un triangolo equilatero avverte l’utente della presenza di una
“tensione pericolosa” nell’apparecchio.
Il punto esclamativo inscritto nel triangolo equilatero indica
all’utente che nel manuale di istruzioni si trovano importanti
avvertenze per l’uso e la manutenzione dell’apparecchio.
ATTENZIONE
- Utilizzate l’apparecchio in ambienti temperati.
- La targhetta segnaletica si trova nella parte posteriore dell’apparecchio.
- Lasciate uno spazio minimo di 5 cm intorno all’apparecchio per
permettere una ventilazione sufciente.
- Garantite sempre una ventilazione corretta dell’apparecchio e non
coprite le aperture di ventilazione con oggetti come giornali, tovaglie,
tende, ecc.
- Non collocate nessuna fonte di calore, come una candela accesa,
sopra o nei pressi dell’apparecchio.
- Non esponete l’apparecchio all’acqua o all’umidità.
- Non collocate nessun recipiente contenente liquidi, come ad esempio
un vaso, nelle vicinanze dell’apparecchio.
- Non gettate le pile nel fuoco! Abbiate cura di rispettare l’ambiente
quando gettate le pile.
- Non esponete le pile ad un calore eccessivo, come raggi solari, fuoco
o fonti di calore analoghe.
- La presa di alimentazione permette di scollegare l’apparecchio
dalla corrente elettrica e deve quindi restare facilmente accessibile.
Per interrompere completamente l’alimentazione dell’apparecchio,
scollegate la spina di alimentazione dalla presa di corrente. La presa
di alimentazione deve restare facilmente accessibile durante l’uso,
accertatevi che l’accesso alla presa sia libero.
- Per effetto di fenomeni transitori elettrostatici e/o elettrici, è possibile
che il prodotto non funzioni correttamente. In tal caso è opportuno
reinizializzarel’apparecchio.
Netvoeding: 230V 50Hz
DC: 4x1.5V, batterijtype R14/ UM-2/”C” (niet meegeleverd)
Het gebruik van alkalinebatterijen is aan te raden. Om een optimale
werking te verzekeren, is het aan te raden om de batterijen elke 6
maanden te vervangen.
OPMERKING:
- Als het apparaat wordt gevoed door batterijstroom en er gedurende 8
seconden geen knop wordt ingedrukt, dan zal de achtergrondverlichting
van het display uitschakelen om de batterijen te sparen.
- De stekker moet uit het stopcontact worden gehaald als u het apparaat
wilt gebruiken op batterijstroom.
- Wanneer het AC-snoer aangesloten is op het apparaat en op het
stopcontact, wijzigt de stroombron automatisch naar AC.
1. Houd in de standbymodus ingedrukt, het display knippert, stel
de tijd in met HR. voor de uren en/of MIN. voor de minuten.
2. Druk nogmaals op om te bevestigen.
OPMERKING:
- Als er tijdens het instellen van de tijd gedurende 9 seconden niet
op een toets wordt gedrukt, dan zal de ingestelde tijd automatisch
worden opgeslagen.
Druk in de standbymodus één keer op om het apparaat in te
schakelen. Houd voor 2 seconden ingedrukt om het apparaat uit
te schakelen.
De band selecteren
Druk als het apparaat is ingeschakeld herhaaldelijk op SOURCE om de
FM- of MW-(AM-)modus te selecteren. De bijbehorende indicator licht op.
Handmatig zoeken
1. Stem op een gewenste zender af met behulp van / .
2. Stel het volume naar wens in met behulp van en .
3. Als u wilt stoppen met luisteren naar de radio, houd dan voor 2
seconden ingedrukt om het apparaat uit te schakelen.
Automatisch zoeken
Houd of voor een paar seconden ingedrukt. De automatische
scan zoekt naar sterke zenders. Een zender met een zwak signaal kan
handmatig worden gezocht door herhaaldelijk op of te drukken.
OPMERKING: Tijdens het zoeken zal het geluid automatisch worden
uitgeschakeld.
Om de ontvangst van de radio te optimaliseren:
FM: Strek de FM-draadantenne volledig uit.
MW (AM): Draai het apparaat in horizontale richting.
Voorkeurszenders
Dit apparaat kan 10 FM-zenders en 10 MW-(AM-)zenders opslaan.
Handmatig opslaan:
1. Zoek handmatig of automatisch naar een radiozender.
2. Houd ingedrukt tot “P 01” op het scherm knippert.
3. Druk op om een zender te selecteren.
4. Druk op om de zender op te slaan.
5. Herhaal de stappen 1-4 om andere zenders op te slaan.
Automatisch opslaan:
Houd voor een paar seconden ingedrukt, het apparaat zal
automatisch de 10 eerstgevonden FM-zenders of de 10 eerstgevonden
MW-(AM-)zenders opslaan. Als u een zender opslaat op een
kanaalnummer dat al in gebruik is, dan zal de eerder opgeslagen zender
automatisch worden gewist en vervangen door de nieuwe zender.
1. Sluit uw hulpbron (bv. mp3-speler) aan op de AUX IN-aansluiting
aan de rechterkant van het apparaat (kabel niet meegeleverd).
2. Druk op de SOURCE toets om de modus AUX te selecteren.
« AU » verschijnt op het scherm.
3. Start het afspelen van uw hulpbron.
4. Stel het geluidsvolume in op het gewenste niveau.
5. Om het afspelen te stoppen, trekt u de externe audiobron uit de
AUX IN aansluiting.
OPGELET
- Gebruik dit toestel bij een gematigd klimaat.
- Het kenmerkenplaatje bevindt zich aan de achterkant van het
toestel.
- Zorg voor een afstand van minimum 5 cm rondom uw toestel voor
voldoende ventilatie.
- Zorg voor een juiste ventilatie van het toestel en bedek de
ventilatie-openingen niet met voorwerpen zoals dagbladen,
tafellakens, gordijnen, enz.
- Plaats geen warmtebron, zoals een brandende kaars, op of in de
buurt van het toestel.
- Stel het toestel niet bloot aan waterspatten of vochtigheid.
- Plaats geen voorwerpen met vloeistof, zoals een vaas, op of in de
buurt van het toestel.
- Gooi de batterijen niet in het vuur. Respecteer het milieu als u
gebruikte batterijen wegwerpt.
- Stel de batterijen niet bloot aan overdreven hitte zoals
zonnestralen, vuur of gelijkaardige warmtebronnen.
- Met de netspanningsstekker kan het toestel uitgetrokken worden,
deze moet dus gemakkelijk toegankelijk blijven. Om de voeding
van het toestel volledig te onderbreken dient u de voedingsstekker
helemaal uit het stopcontact te trekken. De netspanningsstekker
mag niet verhinderd worden en moet gemakkelijk toegankelijk zijn
tijdens gebruik.
- Onder invloed van tijdelijke elektrostatische en/of elektrische
verschijnselen kan het product storingen ondervinden en kan een
heropstart nodig blijken.
Indien u dit toestel in de toekomst wilt weggooien, denk er dan
aan om het te recycleren via een inzamelpunt voor elektrische
huishoudapparaten. Informeer naar het dichtstbijzijnde
recyclagecentrum. Voor meer informatie wendt u zich tot de
lokale overheden of uw verdeler (richtlijn met betrekking tot
Afval afkomstig van elektrische en elektronische apparaten).
AC: 230V 50 Hz (CE)
DC: 4x1,5V, pilas R14/ UM-2/del tipo ”C” (no incluidas)
Para un máximo rendimiento, se recomienda el uso de pilas alcalinas.
Estas pilas deberán ser sustituidas cada 6 meses.
1. Conecte el cable de alimentación a una toma de corriente.
2. Introduzca la pila en el compartimento de la pila. Utilice únicamente
pilas que cumplan las recomendaciones del fabricante. Respete la
polaridad al colocar las pilas (véase el interior del compartimento
de las pilas). Si no lo hace, podría estropear el aparato. No intente
recargar las pilas no recargables. Podrían sobrecalentarse y explotar.
Las baterías se tienen que sustituir cuando: el volumen disminuye, o
el sonido está distorsionado durante el funcionamiento.
ATENCIÓN: Riesgo de explosión si las pilas no se introducen
correctamente. Cambie las pilas únicamente por otras del mismo tipo o
uno equivalente.
1-Weckruf wiederholen
Drücken Sie die Taste SNOOZE. Der Weckruf wird unterbrochen
und ertönt nach 9 Minuten erneut.
2-Weckruf beenden
Drücken Sie oder . Der Weckruf ertönt am nächsten Tag erneut
zur gleichen Uhrzeit.
3-Weckruf deaktivieren
Drücken Sie im Standby-Modus die Taste , um den Weckruf zu
deaktivieren. Das Alarmsymbol verschwindet aus der Anzeige.
Hinweis: Gehen Sie für Alarm 2 mit der Taste genauso vor.
Druk op om de helderheid van het scherm in te stellen: hoog,
laag of UIT.
Netstroom:
Radio:
Afmetingen:
AC 230 50Hz, Verbruik 7W
DC: 4x1.5V, batterijtype R14/ UM-2/”C”
(niet meegeleverd)
FM 87.5-108MHz
MW (AM) 522-1620kHz
230(L) x 83(W) x 120(H) mm
1. Sluit het netsnoer aan op een stopcontact.
2. Installeer de batterijen in hun compartiment. Gebruik uitsluitend
batterijen die voldoen aan de aanbevelingen van de fabrikant.
Respecteer de polariteit wanneer u batterijen plaatst (zie
compartiment). Anders kan het toestel beschadigd raken. Zorg
ervoor dat u geen niet-oplaadbare batterijen oplaadt. Ze zouden
kunnen verhitten en ontploffen. Vervang de batterijen wanneer
het volume vermindert of het geluid vervormt tijdens het gebruik.
OPGELET: Ontplofngsgevaar als de batterijen niet juist geplaatst
zijn. Gebruik enkel identieke of gelijkwaardige batterijen.
Per addormentarsi con la radio in modalità ON, quindi premere
il tasto per selezionare la durata dell’ascolto tra le opzioni
120-90-60-30-15-10 o 5 minuti. La spia si illuminerà. L’apparecchio
si spegnerà automaticamente allo scadere del periodo selezionato.
Per annullare la funzione “Sleep”, premere più volte o fino a
quando la scritta ‘OFF’appaia sul quadrante.
1-Ripetizione dell’allarme
Premere SNOOZE. La suoneria della sveglia si arresterà, per poi
riprendere a suonare dopo 9 minuti.
2-Disattivare la sveglia
Premere o . La sveglia suonerà nuovamente alla stessa ora del
giorno successivo.
3-Annullare la sveglia
In modalità standby, premere per annullare la sveglia
permanentemente. La spia della sveglia si spegnerà.
La stessa procedura è valida per la Sveglia 2 con il tasto .
Premere una volta il tasto per attivare l’apparecchio. Regolare il
volume con i tasti o .Quindi tenere premuto per due secondi il
tasto per spegnere l’apparecchio.
- Nel caso si decida di addormentarsi usando la funzone “Sleep” a
basso volume, si consiglia di selezionare la sveglia con cicalino
(buzzer).
- Se il USB è danneggiato o rovinato, la sveglia si attiverà
automaticamente con il bip e non con il USB.
- Quando la sveglia è impostata in modalità USB, l’unità arresta la
riproduzione al termine del brano, quindi passa in automatico alla
modalità di standby dopo circa 10 minuti senza nessun avviso.
- L’allarme è programmato per funzionare per 60 minuti.
1-Repetición de la alarma
Pulse SNOOZE. La alarma se detendrá y volverá a sonar 9 minutos
después.
2-Detención de la alarma
Pulse o . La alarma sonará de nuevo al día siguiente a la
misma hora.
3-Cancelación de la alarma
En el modo en espera, pulse para cancelar la alarma
permanentemente. El indicador de alarma se apagará.
Nota: Se aplicará el mismo procedimiento para la Alarma 2 con el
botón .
Wenn Sie dieses Gerät entsorgen möchten, denken
Sie daran, es bei einer Sammelstelle für elektrische
Haushaltsgeräte zu entsorgen. Erkundigen Sie sich
nach Ihrer nächstgelegenen Wertstoffsammelstelle.
Für detaillierte Informationen wenden Sie sich an die
örtlichen Behörden oder an Ihren Händler. (Richtlinie über
elektrische und elektronische Abfallgeräte).
NEW ONE S.A.S
10, Rue de la Mission, 25480 Ecole Valentin, France 1. En el modo en espera, mantenga pulsado durante unos
segundos, entonces, el display parpadeará.
2. Pulse HR. y/o MIN. para seleccionar la hora de despertador.
3. Pulse después pulse o para seleccionar la fuente de
despertador zumbador, USB o radio FM, MW (AM).
4. Pulse para conrmar. El indicador de alarma se iluminará.
Nota: Se aplicará el mismo procedimiento para la Alarma 2 con el
botón .
Nota: - Se almacenará el nivel previo de escucha, el volumen de la
alarma será idéntico. Si se despierta con la radio o USB, no olvide
comprobar el nivel de volumen.
Pulse una vez para encender la unidad. Ajuste el volumen con
o . Después mantenga pulsado durante 2 segundos para
apagar la unidad.
- Si usa el modo de apagado automático (Sleep) a un volumen bajo,
deberá usar el timbre para despertarse.
- Si ha programado el despertador en modo de USB y el disco está
dañado o estropea do, el despertador pasará al modo de timbre.
- La unidad detendrá la reproducción al nal de la pista cuando se
haya seleccionado el modo de despertador por USB, después
pasará automáticamente al modo de espera cuando hayan
transcurrido unos 10 minutos sin que haya señal.
- El despertador está programado para funcionar durante 60 minutos.
NEW ONE S.A.S
10, Rue de la Mission, 25480 Ecole Valentin, France
NEW ONE S.A.S
10, Rue de la Mission, 25480 Ecole Valentin, France
- Wenn die USB beschädigt ist, erfolgt das Wecken mit einem
Piepton anstatt mit der USB.
- Im USB-Weckrufmodus wird die Wiedergabe am Ende des Titels
beendet. Falls ungefähr 10 Minuten lang kein Signal erkannt wird,
schaltet das Gerät automatisch in den Standby-Modus um.
- Der Weckten schaltet sich nach einer Stunde ab!
Anschluss von USB-Speichermedien (nicht im Lieferumfang)
Verbinden Sie Ihr USB-Gerät mit dem USB-Port und drücken Sie
wiederholt die SOURCE-Taste, um den USB-Modus einzustellen. Falls
bereits ein USB-Gerät angeschlossen ist, drücken Sie die SOURCE-
Taste, um den USB-Modus einzuschalten. Im Display blinkt die Anzeige
„USb“.
Grundlegende Wiedergabefunktionen
Wiedergabe/Pause: Betätigen Sie die Taste, um die Wiedergabe
vorübergehend zu unterbrechen. Betätigen Sie die Taste erneut, um
mit der Wiedergabe fortzufahren.
Wiedergabemodus einstellen: Drücken Sie wiederholt die
P.MODE-Taste, um in folgender Reihenfolge den gewünschten
Wiedergabemodus einzustellen: „ONE“ (einen Titel wiederholen) ->
„FLd“ (Ordner wiederholen) -> „ALL“ (alle Titel wiederholen) -> „rnd“
(willkürliche Wiedergabe) -> „OFF“ (Einstellung abbrechen).
Titel auswählen: Drücken Sie während der Wiedergabe die Tasten
oder , um unmittelbar zum nächsten oder vorherigen Titel zu
springen.
Stopp: Drücken Sie die Taste , um die Wiedergabe zu beenden. Im
Display erscheint die Gesamtzahl aller Titel auf Ihrem USB-Gerät.
Hinweis: Wenn sich auf dem USB-Gerät mehr als 2999 Titel benden,
blinkt im Display anstatt der Anzeige der Titelanzahl eine „2“.
PROGRAMMIERTE WIEDERGABE
Mit der programmierten Wiedergabe können Sie Titel in einer
gewünschten Reihenfolge abspielen. Es können bis zu 20 Titel
programmiert werden.
1. Drücken Sie die PROG.-Taste. Die PROG.-Anzeige leuchtet auf.
2. Wählen Sie mit den Tasten oder die gewünschte Titelnummer.
Drücken Sie PROG. erneut, um den ausgewählten Titel zu speichern.
3. Wiederholen Sie Schritt 2, bis Sie alle gewünschten Titel programmiert
haben.
4. Drücken Sie für die Wiedergabe.
5. Um die Programmfunktion abzubrechen, drücken Sie zweimal STOP
oder drücken Sie , um das Gerät auszuschalten.
Hinweis: Titel können nur im Stopp-Modus programmiert werden.
USB-Modus beenden
Um den USB-Modus zu beenden, trennen Sie das USB-Gerät von
Ihrem Gerät oder schalten Sie mit der SOURCE-Taste einen anderen
Modus ein.
Anmerkungen:
* Auf dem Markt gibt es viele verschiedene externe USB-Geräte. Wir
können deshalb die Kompatibilität dieses Gerätes mit allen externen
USB-Geräten nicht garantieren. Falls Ihr externes USB-Gerät nicht
unterstützt wird, probieren Sie ein anderes aus.
* Möglicherweise werden einige Dateien, die auf der USB-Gerät
gespeichert sind, nicht vom Gerät unterstützt. Denn bestimmte
spezielle Wiedergabe- Prozeduren sind mit diesem Gerät nicht
kompatibel.
1. Display LED
2. Para encender/apagar la unidad
SOURCE: Para seleccionar el modo MW (AM), USB, AUX o FM
3. Búsqueda automática y preselección de emisoras de radio
P.MODE: Modo de reproducción
4. Botón : Para comenzar y dejar en pausa la reproducción
5. Botón : Para detener la reproducción
6. Alarma 1
Volumen +
7. Alarma 2
Volumen -
8. SNOOZE: Intervalo de repetición de la alarma
Intensidad lumínica de la pantalla
9. Siesta
Apagado automático (para quedarse dormido con la radio,
USB o Aux in)
10. Ajuste de la hora
Memorización
PROG.: Programación
11. HR. Ajuste de las horas
Ajuste -
12. MIN. Ajuste de los minutos
Ajuste +
13. Altavoz
14. Compartimento para la pila y cable de alimentación
15. Cable de alimentación
16. Antena telescópica FM
17. Puerto USB
18. Toma para auriculares
19. Asa de transporte
Búsqueda automática
Mantenga pulsado durante unos segundos o . La búsqueda
automática localizará emisoras con señales intensas. Una emisora
con una señal débil podrá ser sintonizada manualmente pulsando
repetidamente o .
NOTA: Durante la operación de búsqueda, el audio será suprimido
automáticamente.
Para mejorar la capacidad de recepción de la radio:
FM: Alargar la antena.
MW (AM): Girar el aparato horizontalmente para una recepción óptima.
Emisoras presintonizadas
Esta unidad podrá almacenar hasta emisoras 10 FM y 10 MW (AM).
Almacenamiento manual:
1. Seleccione una emisora de forma manual o con la sintonización
automática.
2. Mantenga pulsado hasta que “P 01” parpadee en la pantalla.
3. Pulse para seleccionar un canal.
4. Pulse para guardarla.
5. Repita los pasos 1-4 para guardar otras emisoras.
Almacenamiento automático:
Mantenga pulsado durante unos segundos , y la unidad guardará
automáticamente las primeras 10 emisoras de FM o las 10
primeras de MW (AM). Cuando guarde en un canal que ya ha sido
presintonizado, la emisora anterior se eliminará automáticamente y
será sustituida por la nueva emisora.
Para escuchar emisoras presintonizadas
Pulse y repita la operación las veces que sea necesario para
seleccionar su emisora.
Pulse o para ajustar el volumen.
Para insertar dispositivos USB (no incluidos)
Conecte su dispositivo USB al puerto USB, pulse el botón SOURCE
repetidamente para seleccionar el modo USB. Si ya se hubiera
conectado un USB, pulse el botón SOURCE para pasar al modo USB.
“USB” parpadeará en el display.
Funciones básicas de reproducción
Reproducción/pausa: pulse el botón para suspender la reproducción
temporalmente. Pulse el botón de nuevo para reanudar la
reproducción.
Selección del modo de reproducción: Pulse el botón P.MODE
repetidamente para seleccionar el modo que desee según el siguiente
orden:“ONE”(repetir una) -> “FLd”(repetir carpetta) -> “ALL”(repetir
todas) -> “rnd” (reproducción aleatoria) -> “OFF“ (cancelar ajuste) .
Cambio de pista : Durante la reproducción , pulse o to para
pasar inmediatamente a la pista siguiente o anterior.
Detención : pulse el botón para detener la reproducción. El display
mostrará el número de todas las pistas de su dispositivo USB.
Nota: Cuando el número total de pistas del dispositivo USB sea
superior a 2999, el display parpadeará con un “2”, en lugar de mostrar
el número total de pistas.
REPRODUCCIÓN PROGRAMADA
La reproducción programada permite que las pistas sean reproducidas
en el orden deseado. Podrán programarse hasta un total de 20 pistas.
1. Pulse el botón PROG. y el indicador PROG. se iluminará.
2. Pulse o para seleccionar el número de pista que desee.
Después pulse de nuevo el botón PROG. para memorizar la pista
seleccionada.
3. Repita el paso 2 hasta haber programado todas las pistas que desee.
4. Pulse el botón para comenzar la reproducción.
5. Para cancelar la función de reproducción programada, pulse el botón
STOP dos veces o pulse para pagar la unidad.
Nota: La programación solo podrá realizarse cuando el reproductor se
encuentre en el modo detención.
Salir del modo USB
Para salir del modo USB, desconecte su dispositivo USB de la unidad
o pulse repetidamente el botón SOURCE para pasar a otro modo.
Nota:
* Existen diferentes modelos de dispositivos USB. Nosotros no
podemos garantizar que este aparato sea compatible con todos los
modelos. Si su dispositivo USB no es compatible, pruebe con otro.
* Es posible que algunos archivos grabados en una tarjeta USB no
sean compatibles. En efecto, algunos formatos de reproducción
especiales no son compatibles con este aparato.
1. Display LED
2. Attivazione e disattivazione dell’apparecchio (ON/OFF)
Tasto SOURCE: consente di selezionare un’origine tra MW (AM),
USB, AUX e FM
3. Ricerca e preselezione automatica delle stazioni radio
Tasto P.MODE: consente di selezionare la modalità di riproduzione
4. Tasto : consente di avviare e arrestare la riproduzione
5. Tasto : consente di arrestare la riproduzione
6. Sveglia1
Aumento del volume
7. Sveglia2
Diminuzione del volume
8. SNOOZE: Ripetizione della sveglia dopo un intervallo
Variazione dell’intensità della luce del quadrante
9. Pisolino
Funzione “Sleep” (spegnimento automatico della radio, USB e
Aux in)
10. Impostazione dell’ora corrente
Memorizzazione
PROG.: consente di selezionare un programma
11. HR. Impostazione della cifra dell’ora
Decrementocifra impostazione
12. MIN. Impostazione dei minuti
Incremento cifra impostazione
13. Altoparlanti
14. Vano batteria e cavo CA
15. Cavo di alimentazione di rete
16. Antenna telescopica FM
17. Porta USB
18. Presa auricolari
19. Maniglia
Questa funzione permette di impostare l’attivazione della sveglia dopo
un breve periodo. È disponibile solo con la suoneria a cicalino (buzzer).
1. In modalità standby, premere per selezionare la durata del pisolino
tra 120-90-60-30-15-10 o 5 minuti. La spia si illuminerà.
2. Per spegnere la suoneria, premere o .
3. Per annullare la funzione, premere più volte no a leggere ‘OFF’
sul quadrante.
Per inserire un dispositivo USB (non incluso)
Collegare il proprio dispositivo USB alla porta USB, premere più volte
il tasto SOURCE per selezionare l’origine USB. Se il dispositivo USB è
già stato inserito, premere il tasto SOURCE per passare alla modalità
USB. La dicitura “USB” lampeggia sul display.
Funzioni di base del lettore
Avvio/pausa: premere per sospendere temporaneamente la
riproduzione di un brano. Premere nuovamente lo stesso tasto per
riprendere l’ascolto.
Impostazione della modalità di riproduzione: Premere più volte il
tasto P.MODE per selezionare la modalità desiderata nel seguente
ordine: “ONE” (ripeti uno) -> “FLd” (ripeti cartella) -> “ALL” (ripeti tutti) ->
“Rnd” (riproduzione casuale) -> “OFF“ (annulla impostazione).
Cambio di traccia: durante la riproduzione, premere o per
passare al brano successivo o tornare a quello precedente.
Arresto: premere il tasto per arrestare la riproduzione. Sul display
viene visualizzato il numero totale di tracce salvate nel dispositivo USB.
Nota: quando il numero totale di tracce contenute nel dispositivo USB è
superiore a 2999, sul display, invece del numero totale di tracce, viene
visualizzato “2”.
RIPRODUZIONE PROGRAMMATA
La riproduzione programmata consente di riprodurre le tracce
nell’ordine desiderato. È possibile programmare no a 20 tracce.
1. Premere il tasto PROG. per visualizzare il relativo indicatore.
2. Premere il tasto o il tasto per selezionare il numero di traccia
desiderato, quindi premere di nuovo il tasto PROG. per memorizzare
la traccia selezionata.
3. Ripetere il punto 2 per tutte le tracce che si desidera programmare.
4. Premere il tasto per avviare la riproduzione.
5. Per disattivare la funzione di programmazione, premete due volte il
tasto STOP oppure il tasto per spegnere l’apparecchio.
Nota: La programmazione può essere effettuata solo quando il lettore è
in modalità di arresto.
Uscita dalla modalità USB
Per uscire dalla modalità USB, scollegare il dispositivo USB
dall’unità o premere più volte il tasto SOURCE per selezionare
un’altra modalità.
Nota:
* Esistono in commercio molti modelli di periferiche USB. Non possiamo
garantire che il presente apparecchio supporti tutti i modelli. Qualora
una periferica USB non sia supportata, provate con un’altra.
* L’apparecchio potrebbe non essere compatibile con alcuni file
multimediali memorizzati sulla periferica USB, poiché tali dipositivi
richiedono particolari procedure di riproduzione non sempre compatibili
con quelle dell’apparecchio.
Se in futuro volete sbarazzarvi di questo apparecchio,
ricordate che le apparecchiature elettroniche non devono
essere gettate insieme ai rifiuti domestici. Informatevi per
sapere dove si trova il centro di riciclaggio più vicino. Per
ulteriori dettagli, rivolgetevi alle autorità locali o al vostro
rivenditore. (Direttiva sui riuti delle apparecchiature elettriche
ed elettroniche).
NEW ONE S.A.S
10, Rue de la Mission, 25480 Ecole Valentin, France
1. LED-display
2. Om het apparaat aan/uit te zetten
SOURCE: Voor het selecteren van de MW-(AM-),USB-, AUX- of
FM- modus
3. Automatisch scannen en instellen voorkeurszenders
P.MODE : Afspeelmodus
4. Om het afspelen te starten of pauzeren
5. Om het afspelen te stoppen
6. Alarm 1
Volume verhogen
7. Alarm 2
Volume verlagen
8. SNOOZE : Interval alarmherhaling
Dimmer, lichtsterkte van het scherm
9. Dutje
Slaap (in slaap vallen met de radio, USB of Aux in)
10. De klok instellen
Onthouden
PROG.: Programma
11. HR. Instellen uren
Instelling verlagen
12. MIN. Instelling minuten
Instelling verhogen
13. Luidspreker
14. Batterij- & netsnoercompartiment
15. Netsnoer
16. Telescopische FM-antenne
17. USB-poort
18. Aux in-stekkerbus
19. Draagbeugel
OPMERKING: De FM-radio ondersteunt afstemmen met stappen
van 0.05MHz, maar het display kan slechts één cijfer achter de punt
weergeven. Als het tweede cijfer achter de punt een 5 is, dan zal de punt
knipperen en wordt op het display alleen het eerste cijfer achter de punt
weergeven (bijv. “0.1”). Stel dat u bijvoorbeeld afstemt op de FM-zender
“87.55”, dan zal het display alleen “87.5” tonen en de punt “.” zal knipperen.
Luisteren naar voorkeurszenders
Druk herhaaldelijk op om de gewenste zender te selecteren.
Druk op of om het geluid naar wens in te stellen.
1. Houd in de standbymodus een paar seconden ingedrukt, het
display knippert.
2. Druk op HR. en/of MIN. om de wektijd in te stellen.
3. Druk op en daarna op of om de wekbron te selecteren:
zoemer, FM-, MW-(AM-) radio of USB.
4. Druk ter bevestiging op , de alarm-indicator licht op.
Opmerking: U kunt dezelfde procedure volgen met om Alarm 2 in
te stellen.
Opmerking: - Het volume waarmee u het laatst naar de radio heeft
geluisterd wordt opgeslagen, het alarmvolume zal gelijk zijn aan
het opgeslagen volume. Als de wekbron wordt ingesteld op radio of
USB, vergeet dan niet het volume te controleren.
Druk één keer op om het apparaat in te schakelen. Stel het
volume in met of . Houd daarna voor 2 seconden ingedrukt
om het apparaat uit te schakelen.
- Als u de slaapmodus gebruikt met een laag geluidsniveau, dan is
het verstandig om de wekbron in te stellen op zoemer.
- Als de USB beschadigd of vernield is, gebeurt het wekken met het
alarmsignaal in plaats van met de USB.
- Het apparaat zal het afspelen stoppen aan het einde van de track
wanneer u heeft ingesteld dat het apparaat u moet wekken in de
USB-modus. Daarna zal het apparaat na ongeveer 10 minuten
zonder signaal automatisch naar de standbymodus schakelen.
- Het alarm wordt geprogrammeerd gedurende 60 minuten.
1-Alarmherhaling
Druk op SNOOZE. Het alarm stopt en zal 9 minuten later opnieuw
klinken.
2-Alarm stoppen
Druk op of . Het alarm klinkt de volgende dag opnieuw op de
ingestelde tijd.
3-Alarm annuleren
Druk in de standbymodus op om het alarm permanent te
annuleren. The alarm-indicator verdwijnt van het display.
Opmerking: U kunt dezelfde procedure volgen met voor Alarm 2.
Om in slaap te vallen terwijl het apparaat is ingeschakeld, en druk
daarna op om de luistertijd in te stellen op 120-90-60-30-15-10
of 5 minuten. De indicator licht op. Het apparaat zal automatisch
uitschakelen nadat de ingestelde tijd is verstreken. Als u de
slaapfunctie wilt annuleren, druk dan op of herhaaldelijk op tot
‘OFF’ wordt getoond op het display.
Deze functie wekt u na een korte periode. Alleen de zoemer kan
worden geselecteerd.
1. Druk in standbymodus op om de duur van uw dutje in te stellen
op 120-90-60-30-15-10 of 5 minuten. De indicator licht op.
2. Druk op of om het alarm te stoppen.
3. Druk herhaaldelijk op tot ‘OFF’ wordt getoond op het display
om de functie te annuleren.
Een USB-apparaat plaatsen (niet meegeleverd)
Sluit uw USB-apparaat aan op de USB-POORT, druk herhaaldelijk
op SOURCE om de USB-modus te selecteren. Als het USB-apparaat
al is aangesloten, druk dan op SOURCE om te schakelken naar de
USB-modus. “USB” knippert op het display.
Basisfuncties voor afspelen
Play/pause: druk tijdens het afspelen op om de track tijdelijk te
pauzeren. Druk nogmaals op om het afspelen te hervatten.
De afspeelmodus instellen: Druk herhaaldelijk op P.MODE om
de gewenste modus in de volgende volgorde te selecteren:“ONE”
(herhaal een) -> “FLd”(herhaal map) -> “ALL”(herhaal alle) -> “rnd”
(afspelen in willekeurige volgorde) -> “OFF“ (de instelling annuleren).
De track veranderen: Druk tijdens het afspelen op of Iom
direct naar de volgende of vorige track te gaan.
Stop: Druk op om het afspelen te stoppen. Het display toont het
totaal aantal tracks op uw USB-apparaat.
Opmerking: Als het totaal aantal tracks op uw USB-apparaat groter
is dan 2999, dan zal er een “2” op het display knipperen in plaats van
het totaal aantal tracks.
PROGRAMMA AFSPELEN
Met behulp van een programma kunt u tracks in de gewenste
volgorde afspelen. Er kunnen tot 20 tracks aan een programma
worden toegevoegd.
1. Druk op PROG., de PROG. indicator licht op.
2. Druk op of om het gewenste tracknummer te selecteren en
druk daarna nogmaals op PROG. om de geselecteerde track op te
slaan.
3. Herhaal stap 2 tot alle gewenste tracks zijn geprogrammeerd.
4. Druk op om het afspelen te starten.
5. Druk tweemaal op STOP om de programmeerfunctie uit te
schakelen of druk op om het toestel uit te zetten.
Opmerking: Er kan alleen een programma worden samengesteld
wanneer het afspelen is gestopt.
De USB-modus verlaten
Als u de USB-modus wilt verlaten, haal het USB-apparaat dan uit de
USB-poort of druk herhaaldelijk op SOURCE om naar een andere
modus te schakelen.
Opmerking
* Er bestaan tal van modellen van USB-sleutels. We kunnen niet
garanderen dat het toestel alle modellen ondersteunt. Als uw USB-
sleutel niet ondersteund wordt, probeer dan een ander model.
* Het is mogelijk dat bepaalde bestanden die opgeslagen zijn op de
het USB-apparaat niet kunnen gelezen worden omdat deze speciale
afspeelprocedures vereisen die niet compatibel zijn met dit toestel.
OPGEPAST: Om het risico op elektrische schokken
te vermijden, mag u het toestel niet demonteren.
Het toestel bevat geen enkel onderdeel dat door de
gebruiker zelf kan gerepareerd worden. Contacteer
altijd een gekwalificeerde technieker indien een
reparatie nodig is.
Het symbool van een zwarte driehoek met daarin een witte
bliksemschicht eindigend in een driehoek, waarschuwt de
gebruiker dat er een gevaarlijke spanning aanwezig is in het
toestel.
Het bovenstaande symbool (zwarte driehoek met daarin een wit
uitroepingsteken) waarschuwt de gebruiker dat er belangrijke
gebruiksaanwijzingen in verband met het gebruik en het
onderhoud ter beschikking zijn in de bijgeleverde handleiding.
13 8 9 10 11 12
1
19
16
15
14
17
246
3 5 7
18
Automatische Standby-Schaltung
Im USB- oder AUX-Modus, schaltet das Gerät nach ca. 10 Minuten
Innaktivität automatisch in den Standby-Modus, ohne vorherige
Ankündigung. Um das Gerät wieder einzuschalten, schalten Sie es
wie in der Bedienungsanleitung beschrieben wieder ein.
Automatische standby schakeling
Wanneer het apparaat in de USB- of AUX IN-modus staat, schakelt
het apparaat na ca. 10 minuten automatisch naar de standby stand,
zonder dit aan te duiden. Om het apparaatopnieuw te starten,schakel
deze dan uit, zoals beschreven in de handleiding weer.
Modalità di standby automatico
In modalità USB o AUX, l’apparecchio entra in modalità di standby in
automatico dopo circa 10 minuti di assenza di segnale. Per riaccendere
l’apparecchio, seguite le istruzioni fornite nel manuale di istruzioni.
Cambio automático a modo de espera (standby)
Cuando se encuentre en el modo USB o AUX IN, la unidad cambia
automáticamente al modo de espera cuando pasan aprox. 10 minutos
sin una señal.Para reiniciar launidad, apáguela como se describeen el
manualde nuevo.
WECKRUF BEENDEN
DIMMER
SLEEP-TIMER
NAP-FUNKTION
WIEDERGABE VON USB
DESCRIPCIÓN DEL APARATO
DETENCIÓN DE LA ALARMA
CONEXIÓN DE UN DISPOSITIVO EXTERNO
NOTA IMPORTANTE
ALIMENTAZIONE FUNZIONE “SLEEP”
FUNZIONE PISOLINO
ASCOLTO DA DISPOSITIVO USB
REGOLAZIONE DELL’ORA
ATTIVARE E DISATTIVARE L’APPARECCHIO (ON/OFF)
ASCOLTO DELLA RADIO
FICHA TÉCNICA
INSTRUCCIONES DE SEGURIDAD
REGULADOR DE INTENSIDAD LUMÍNICA
FUNCIÓN DE APAGADO AUTOMÁTICO (SLEEP)
FUNCIÓN DE SIESTA
OÍR UN DISPOSITIVO USB
DESCRIZIONE DEL PRODOTTO
BESCHRIJVING VAN HET TOESTEL
VOEDING
DE TIJD INSTELLEN
HET APPARAAT IN-/UITSCHAKELEN
NAAR DE RADIO LUISTEREN
HET ALARM EN DE ALARMMODUS INSTELLEN
TECHNISCHE KENMERKEN
VEILIGHEIDSINSTRUCTIES
HET ALARM STOPPEN
DIMMER
SLAAPFUNCTIE
NAP-FUNCTIE
LUISTEREN NAAR USB-APPARAAT
GEBRUIK VAN DE HULPINGANG
BELANGRIJKE OPMERKING
VARIATORE
SPEGNERE LA SVEGLIA
IMPOSTARE LA SVEGLIA E LA MODALITÀ SVEGLIA
COLLEGAMENTO SORGENTE AUSILIARIA
NOTA IMPORTANTE
SPECIFICHE
AVVERTENZE DI SICUREZZA
ALIMENTACIÓN
AJUSTE DE LA HORA
ENCNEDIDO/APAGADO DE LA UNIDAD
PROGRAMACIÓN DE LA ALARMA Y SELECCIÓN DEL
MODO DE ALARMA
ANSCHLUSS EINER ZUSATZQUELLE
WICHTIGER HINWEIS
TECHNISCHE EIGENSCHAFTEN
SICHERHEITSANWEISUNGEN
RADIO PORTÁTIL PLL CON USB
RADIO PORTATILE PLL CON USB
DRAAGBARE PLL-RADIO MET USB
ES
IT
NL
-
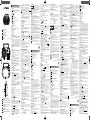 1
1
-
 2
2


in altre lingue
- français: Muse M-088 R Manuel utilisateur
- español: Muse M-088 R Manual de usuario
- Deutsch: Muse M-088 R Benutzerhandbuch
- Nederlands: Muse M-088 R Handleiding
- português: Muse M-088 R Manual do usuário
Documenti correlati
-
Muse M-081 RW Manuale utente
-
Muse M-080 R Manuale utente
-
Muse M-695 DBTW Manuale utente
-
Muse M-695 DBT Manuale utente
-
Muse M-1380 DBT Manuale utente
-
-
-
-
Muse M192CR Manuale del proprietario