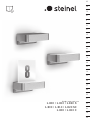
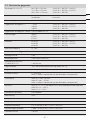
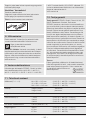
STEINEL L 800 SC anthrazit Manuale utente
- Tipo
- Manuale utente


– 2 –
...
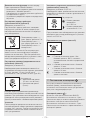
Textteil beachten!
Follow written instructions!
Suivre les instructions ci-après !
Tekstpassage in acht nemen!
Seguire attentamente le istruzioni!
¡Obsérvese la información textual!
Siga as instruções escritas
Följ den skriftliga montageinstruktionen.
Følg de skriftlige instruktioner!
Huomioi tekstiosa!
Se tekstdelen!
Τηρείτε γραπτές οδηγίες!
Yazılı talimatlara uyunuz!
A szöveges utasításokat tartsa meg!
Dodržujte písemné pokyny!
Dodržiavajte písomné informácie!
Postępować zgodnie zinstrukcją!
Respectai instruciunile următoare!
Upoštevajte besedilo!
Pridržavajte se uputa!
Järgige tekstiosa!
Atsižvelgti į rašytines instrukcijas!
Pievērsiet uzmanību teksta daļai!
Прочетете инструкциите!
遵守文字说明要求!
Соблюдать текстовую инструкцию!
DE ........ 6
GB ...... 13
FR ...... 20
NL ...... 27
IT ........ 33
ES ...... 40
PT ...... 47
SE ...... 54
DK ...... 60
FI ........ 66
NO ...... 72
GR ...... 78
TR ...... 85
HU ...... 91
CZ ...... 97
SK .... 103
PL ..... 110
RO .... 117
SI ...... 124
HR .... 130
EE .... 137
LT ..... 143
LV ..... 150
BG .... 156
CN .... 163
RU .... 169

– 3 –
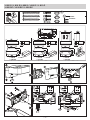
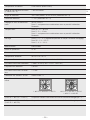
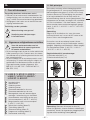
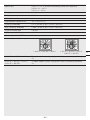
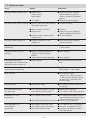
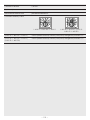
2 3
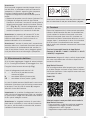
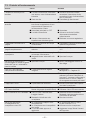
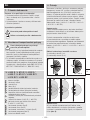
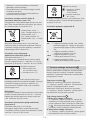
sensor o
L 800 S / L 810 S/ L 820 S / L 800 C / L 810 C
L 800 SC / L 810 SC / L 820 SC
L 820 S
L 820 SC
L 820 S
L 820 SC
L 810 S L 810 C
L 810 SC
L 800 S L 800 C
L 800 SC

– 4 –
2 3
L 820 S / L 820 SC
L 800 S / L 810 S / L 820 S / L 800 C / L 810 C
L 800 SC / L 810 SC / L 820 SC
15.1 15.2
L 800 S / L 810 S / L 820 S only

– 5 –

– 6 –
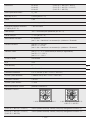
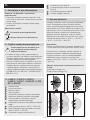
4. Das Prinzip
Sensorleuchte mit einem aktiven Bewegungsmelder.
Der integrierte iHF-Sensor sendet hoch frequente
elektromagnetische Wellen (5,8 GHz) aus und
empfängt deren Echo. Bei Bewegung von Perso-
nen im Erfassungsbereich der Leuchte, wird die
Echoveränderung vom Sensor wahrgenommen. Ein
Microprozessor löst dann den Schaltbefehl „Licht
einschalten“ aus. Eine Erfassung durch Türen, Glas-
scheiben oder dünne Wände ist möglich. (L 800 C/
L 800SC/ L 810 C / L 810 SC / L 820 SC)
Hinweis:
Bitte sorgen Sie bei der Installation dafür, dass
ein Abstand von min. 3 m zu WLAN Router oder
Access Points eingehalten wird.
Die Funktionen der Sensorleuchte können über
Smartphone und Tablet oder Einstellregler einge-
stellt werden. Eine Bluetooth-Vernetzung ist nur
über Smartphone oder Tablet möglich.
(L 800 SC / L 800 C / L 810 SC / L 810 C /
L 820 SC)
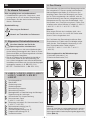
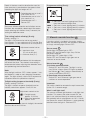
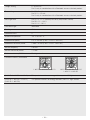
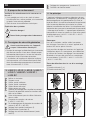
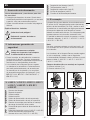
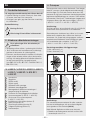
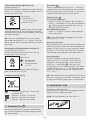
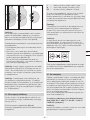
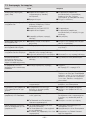
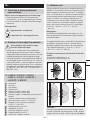
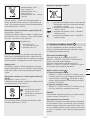
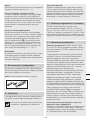
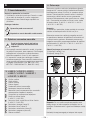
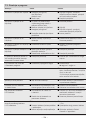
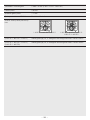
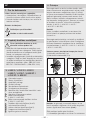
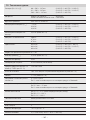
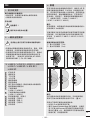
Erfassungsbereiche bei Wandmontage:
1) Minimale Reichweite (1 m)
2) Maximale Reichweite (5m)
5
1)
2)
10
5
1)
2)
10
5 m
5 m
B C
5 m
A
Hinweis:
Wenn die Leuchten zu nahe nebeneinander montiert
sind, kann es zu Fehlschaltungen kommen, da sich
die ausgesendeten Hochfrequenzsignale gegenseitig
stören (Abb. A).
DE
1. Zu diesem Dokument
Bitte sorgfältig lesen und aufbewahren!
• Urheberrechtlich geschützt. Nachdruck, auch
auszugsweise, nur mit unserer Genehmigung.
• Änderungen, die dem technischen Fortschritt
dienen, vorbehalten.
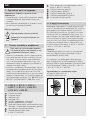
Symbolerklärung
!
Warnung vor Gefahren!
... Verweis auf Textstellen im Dokument.
2. Allgemeine Sicherheitshinweise
Vor allen Arbeiten am Gerät die
Spannungszufuhr unterbrechen!
• Bei der Montage muss die anzuschließende elekt-
rische Leitung spannungsfrei sein. Daher als Erstes
Strom abschalten und Spannungsfreiheit mit einem
Spannungsprüfer überprüfen.
• Bei der Installation der Sensorleuchte handelt es
sich um eine Arbeit an der Netzspannung. Sie
muss daher fachgerecht nach den landes üblichen
Installationsvorschriften und Anschluss bedingungen
durchgeführt werden. (z. B. DE: VDE 0100,
AT: ÖVE / ÖNORM E8001-1, CH: SEV 1000)
3. L 800 S / L 810 S / L 820 S / L 800 C/
L 810 C / L 800 SC / L 810 SC /
L 820 SC
1 Leuchtengehäuse
2 Wandhalter
3 Abdeckung unten
4 Abdeckung oben
5 Netzzuleitung Unterputz
6 Netzzuleitung Aufputz
7 Montagehaken zur Vereinfachung der Montage /
Zugentlastung der Leitungen
8 Abstandhalter für Aufputzzuleitung
9 Hausnummern-Panel
(L 820 S / L 820 SC)
10 Sicherungsschrauben für Hausnummern-Panel
(L 820 S / L 820 SC)
11 Reichweiteneinstellung (nur S)
12 Zeiteinstellung (nur S)
13 Dämmerungseinstellung (nur S)
14 Programmeinstellung (nur S)
15 Dauerlichtfunktion
!

– 7 –
Folgende Maßnahmen helfen, diesen Fehler zu
umgehen:
• Die Leuchten in einem Abstand von mindestens
5 m montieren.
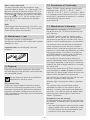
• Vernetzen Sie die Leuchten über die Steinel
Connect App und schalten Sie den Sensor über
die Sensor-O Funktion bei einzelnen Leuchten
gezielt ab (Abb. B + C). Durch die Vernetzung
werden auch die Leuchten bei Bewegung mit
eingeschaltet, deren Sensor deaktiviert ist.
Hinweis:
Die Hochfrequenzleistung des iHF-Sensors beträgt
ca. 1mW – das ist nur ein 1.000stel der Sende-
leistung eines Handys oder einer Microwelle.
Hinweis:
Der Sensor eignet sich zum automatischen
Schalten von Licht. Witterungseinflüsse können
die Funktion des Sensors beeinflussen, bei starken
Windböen, Schnee, Regen, Hagel kann es zu einer
Fehlauslösung kommen.
5. Elektrischer Anschluss
Um die angegebene Reichweite von 5m zu
erzielen, sollte die Montagehöhe ca. 2m betragen.
Anschluss der Netzzuleitung (s. Abb.)
Die Netzzuleitung besteht aus einem 3-adrigen
Kabel:
L = Phase (meistens schwarz,
braun oder grau)
N = Nullleiter (meistens blau)
PE = Schutzleiter (grün/gelb)
Im Zweifel müssen Sie die Kabel mit einem Span-
nungsprüfer identifizieren; anschließend wieder
spannungsfrei schalten. Phase (L) und Nullleiter (N)
werden an die Lüsterklemme angeschlossen.
Wichtig:
Ein Vertauschen der Anschlüsse führt im Gerät oder
Ihrem Sicherungskasten später zum Kurzschluss.
In diesem Fall müssen nochmals die einzelnen
Kabel identifiziert und neu verbunden werden.
Hinweis:
Die Lichtquelle dieser Leuchte ist nicht ersetzbar;
falls die Lichtquelle ersetzt werden muss (z. B. am
Ende ihrer Lebensdauer), ist die komplette Leuchte
zu ersetzen.
In die Netzzuleitung kann selbstverständlich ein
Netzschalter zum Ein- und Ausschalten installiert sein.
6. Funktionen
Nachdem das Gehäuse montiert und der Netz an-
schluss vorgenommen ist, kann die Sensorleuch-
te in Betrieb genommen werden. Bei manueller
Inbetriebnahme der Leuchte über den Lichtschalter
schaltet diese sich für die Einmessphase nach 1
Sekunde aus und ist anschließend für den Sensor-
betrieb aktiv.
Ein erneutes Betätigen des Lichtschalters ist nicht
erforderlich.
Funktionen einstellbar über Steinel Connect App
(L 800 SC / L 800 C / L 810 SC / L 810 C /
L 820 SC) oder Einstellregler.
Hinweis:
Es gelten die Einstellungen, die am zuletzt verwen-
deten Bedienelement vorgenommen wurden.
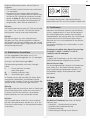
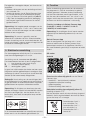
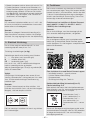
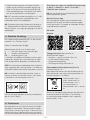
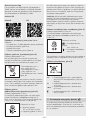
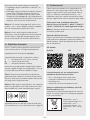
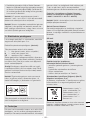
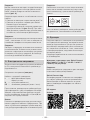
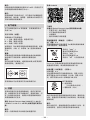
Steinel Connect App
Für die Konfiguration der Leuchte mit Smartphone
oder Tablet muss die Steinel Connect App aus
Ihrem AppStore heruntergeladen werden. Es ist
ein Bluetooth-fähiges Smartphone oder Tablet
erforderlich.
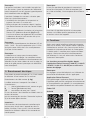
QR-Codes
Android iOS
Zusätzliche Funktionen nur durch die Steinel
Connect App:
– Hauptlicht- / Grundlichtlevel einstellbar
– erweiterte Reichweiteneinstellung
– Gruppenvernetzung
– Dämmerungseinstellung durch Teach-In
DE

– 8 –
Reichweiteneinstellung (Empfindlichkeit) (nur S)
Werkseinstellung: 5m
Mit der Reichweite ist der halbkreisförmige Bereich
auf dem Boden gemeint, der sich bei Montage der
Leuchte in 2 m Höhe als Erfassungsbereich ergibt.
– Poti „max“ =
max. Reichweite 5 m
– Poti „min“ =
min. Reichweite 1 m
– Poti „o“ = Sensor o
Sensor o: Die Bewegungserfassung und alle ande-
ren Sensorfunktionen sind komplett ausgeschaltet.
Zur Einstellung des Erfassungsbereichs wird emp-
fohlen die kürzeste Zeit (5 Sekunden) zu wählen.
Zeiteinstellung (Ausschaltverzögerung) (nur S)
Werkseinstellung: 5 s
Die gewünschte Leucht dauer der Leuchte kann
stufenlos von ca. 5 s bis max. 15min (für S) oder von
ca. 5 s bis max. 60 min (für SC) eingestellt werden.
Einstellregler auf:
+ = maximale Zeit
(15min bzw. 60min).
- = minimale Zeit (5s).
Durch jede erfasste Bewe gung vor Ablauf die-
ser Zeit wird die Zeituhr erneut ge startet. Bei der
Einstellung des Erfassungsbereiches und für den
Funktionstest wird empfohlen, die kür zeste Zeit
einzustellen.
Hinweis:
Nach jedem Ab schaltvorgang der Leuchte ist eine
erneute Bewe gungserfassung für ca. 1Sekunde
unterbrochen. Erst nach Ablauf dieser Zeit kann die
Leuchte bei Bewegung wieder Licht schalten.
Dämmerungseinstellung (Ansprechschwelle)
(nur S)
Werkseinstellung: 2.000 Lux
Die gewünschte Ansprech schwelle der Leuchte kann
stufenlos von ca. 2 bis 2.000 Lux eingestellt werden.
Einstellregler auf:
= Tageslichtbetrieb
ca. 2.000 Lux.
= Dämmerungsbetrieb
ca. 2 Lux.
Zur Einstellung des Erfassungsbereiches bei Tages-
licht ist der Einstellregler auf 2.000 Lux zu stellen.
Programmeinstellung (nur S)
= Softstart / kein Grundlicht AN ab einge-
stelltem Dämmerungswert
= Softstart + Grundlicht 10 Minuten
= Softstart + Grundlicht 30 Minuten
= Softstart + Grundlicht die ganze Nacht
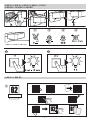
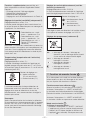
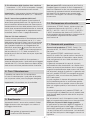
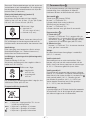
7. Dauerlichtfunktion 15
Wird ein Netzschalter in die Netzzuleitung montiert,
sind neben dem einfachen Ein- und Ausschalten
folgende Funktionen möglich:
Sensorbetrieb 15.1 :
Licht einschalten (wenn Leuchte AUS):
Schalter 1 × AUS und AN. Leuchte bleibt für die
eingestellte Zeit an.
Licht ausschalten (wenn Leuchte AN):
Schalter 1 × AUS und AN. Leuchte geht aus bzw. in
den Sensorbetrieb über.
Dauerlichtbetrieb 15.2 :
1) Dauerlicht einschalten:
Schalter 2 × AUS und AN. Die Leuchte wird für
4 Stunden auf Dauerlicht gestellt (blaue LED
leuchtet hinter der Leuchtenabdeckung 4).
Anschließend geht sie automatisch wieder in den
Sensorbetrieb über (blaue LED aus).
2) Dauerlicht ausschalten:
Schalter 1 × AUS und AN. Leuchte geht aus
bzw. in den Sensorbetrieb über.
Wichtig:
Das mehrmalige Betätigen des Schalters sollte schnell
hintereinander erfolgen (im Bereich 0,2 – 1Sekunden).
Was ist Soft-Lichtstart ?
Die Sensorleuchte verfügt über eine Soft-Lichtstart-
Funktion. Das bedeutet, dass das Licht beim Ein-
schalten nicht direkt auf maximale Leistung schaltet,
sondern die Helligkeit innerhalb einer Sekunde
langsam bis zu 100% hochgeregelt wird. Ebenso
wird das Licht beim Ausschalten langsam herunter-
geregelt.
Was ist Grundlicht ?
Grundlicht ermöglicht eine nächtliche Dauer-
beleuchtung mit ca. 10% Lichtleistung. Erst bei Be-

– 9 –
wegung im Erfassungsbereich wird das Licht (für die
eingestellte Zeit, s. Zeiteinstellung 12 ) auf maximale
Lichtleistung (100%) geschaltet. Danach schaltet
die Leuchte wieder auf Grundlicht (ca. 10%). Bei der
SC-Version schaltet die Leuchte auf das von Ihnen
voreingestellte Grundlicht (0% – 100%).
Hinweis:
Im Dimm-Modus kann es je nach lokalem Stromnetz
zu einem leichten Flackern der LEDs kommen. Dies ist
kein Produktnachteil und kein Grund zur Reklamation.
8. Wartung/Pflege
Das Produkt ist wartungsfrei.
Die Leuchte kann bei Verschmutzung mit einem
feuchten Tuch (ohne Reinigungsmittel) gesäubert
werden.
Wichtig: Das Betriebsgerät ist nicht austauschbar.
9. Entsorgung
Elektrogeräte, Zubehör und Verpackungen sollen
einer umweltgerechten Wiederverwertung zugeführt
werden.
Werfen Sie Elektrogeräte
nicht in den Hausmüll!
Nur für EU-Länder:
Gemäß der geltenden Europäischen Richtlinie
über Elektro- und Elektronik-Altgeräte und ihrer
Umsetzung in nationales Recht müssen nicht mehr
gebrauchsfähige Elektrogeräte getrennt gesammelt
und einer umweltgerechten Wiederverwertung
zugeführt werden.
10. Konformitätserklärung
Hiermit erklärt STEINEL GmbH, dass der Funkan-
lagentyp L 800 SC / L800 S /L 800 C
L810 SC/ L810 S /L 810 C / L820 SC / L820 S
der Richtlinie 2014/53/EU entspricht. Der vollständi-
ge Text der EU-Konformitätserklärung ist unter der
folgenden Internetadresse verfügbar:
www.steinel.de
11. Herstellergarantie
Herstellergarantie der STEINEL GmbH,
Dieselstraße80-84, 33442 Herzebrock-Clarholz
Alle STEINEL-Produkte erfüllen höchste Quali-
tätsansprüche. Aus diesem Grund leisten wir als
Hersteller Ihnen als Endkunden gerne eine Garantie
gemäß den nachstehenden Bedingungen:
Die Garantie umfasst die Freiheit von Mängeln,
die nachweislich auf einem Material- oder Her-
stellungsfehler beruhen und uns unverzüglich
nach Feststellung und innerhalb der Garantiezeit
gemeldet werden. Die Garantie gilt für sämtliche
STEINEL-Produkte, die in Deutschland gekauft und
verwendet werden, ausschließlich der STEINEL
Professional-Produkte.
Sie haben die Wahl, ob wir die Garantieleistung
durch kostenlose Reparatur, kostenlosen Austausch
(ggf. durch ein gleich- oder höherwertiges Nachfol-
gemodell) oder Erstellung einer Gutschrift leisten.
Die Garantiezeit für Ihr erworbenes STEINEL-Pro-
dukt beträgt 3 Jahre (bei Produkten der XLED
home-Serie 5 Jahre) jeweils ab Kaufdatum des
Produkts.
Wir tragen die Transportkosten, jedoch nicht die
Transportrisiken der Rücksendung.
Gesetzliche Mängelrechte, Unentgeltlichkeit
Die hier beschriebenen Leistungen gelten zusätzlich
zu den gesetzlichen Gewährleistungsansprüchen
– einschließlich besonderer Schutzbestimmungen
für Verbraucher – und beschränken oder ersetzen
diese nicht. Die Inanspruchnahme Ihrer gesetzlichen
Rechte bei Mängeln ist unentgeltlich.
Ausnahmen von der Garantie
Ausdrücklich ausgenommen von dieser Garantie
sind alle auswechselbaren Leuchtmittel. Darüber
hinaus ist die Garantie ausgeschlossen:
– bei einem gebrauchsbedingten oder sonstigen
natürlichen Verschleiß von Produktteilen oder
Mängeln am STEINEL-Produkt, die auf ge-
brauchsbedingtem oder sonstigem natürlichen
Verschleiß zurückzuführen sind,
– bei nicht bestimmungs- oder unsachgemäßem
Gebrauch des Produkts oder Missachtung der
Bedienungshinweise,
– wenn An- und Umbauten bzw. sonstige Modifika-
tionen an dem Produkt eigenmächtig vorgenom-
men wurden oder Mängel auf die Verwendung
von Zubehör-, Ergänzungs- oder Ersatzteilen
zurückzuführen sind, die keine STEINEL-Original-
teile sind,
– wenn Wartung und Pflege der Produkte nicht
entsprechend der Bedienungsanleitung erfolgt
sind,
DE

– 10 –
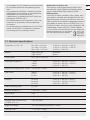
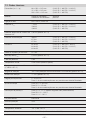
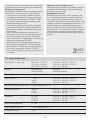
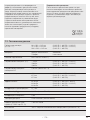
12. Technische Daten
Abmessungen (H×B×T) 88 × 230 × 145 mm (L 800 S / L 800 SC / L 800 C)
91 × 230 × 145 mm (L 810 S / L 810 SC / L 810 C)
260 × 230 × 145 mm (L 820 S / L 820 SC)
Material Leuchtengehäuse: Aluminium
Leuchtenabdeckung: Kunststoff
Netzanschluss 220 – 240V, 50/60Hz
Leistungsaufnahme (Pon) 7,50W (L 800 S / L 800 SC / L 800 C)
9,80W (L 810 S / L 810 SC / L 810 C)
9,80W (L 820 S / L 820 SC)
Leistungsaufnahme iHF Sensorik 0,61W (nur SC / S)
Lichtleistung 466lm (L 800 S / L 800 SC / L 800 C)
679lm (L 810 S / L 810 SC / L 810 C)
679lm (L 820 S / L 820 SC)
Effizienz 62lm/W (L 800 S / L 800 SC/ L 800 C)
69lm/W (L 810 S / L 810 SC / L 810 C)
69lm/W (L 820 S / L 820 SC)
Farbwiedergabeindex Ra = 82
Standby Netzwerk (Pnet) 0,40 W (nur SC / C)
Leistungsfaktor 0,89
Farbtemperatur 3.000 K (warmweiß)
Mittlere Bemessungslebensdauer
(L70B50 bei 25°C) > 60.000 Std.
Erfassungswinkel 160° mit Unterkriechschutz (nur SC / S)
Erfassungsreichweite 1 – 5 m (nur SC / S)
Dämmerungseinstellung 2 – 2.000 Lux
Für C: Nur in Kombination mit einem Bluetooth-Sensor-Produkt
– wenn Anbau- und Installation nicht gemäß den
Installationsvorschriften von STEINEL ausgeführt
wurden,
– bei Transportschäden oder -verlusten.
Geltung deutschen Rechts
Es gilt deutsches Recht unter Ausschluss des
Übereinkommens der Vereinten Nationen über Ver-
träge über den internationalen Warenkauf (CISG).
Geltendmachung
Wenn Sie die Garantie in Anspruch nehmen wollen,
senden Sie es bitte vollständig mit dem Origi-
nal-Kaufbeleg, der die Angabe des Kaufdatums
und der Produktbezeichnung enthalten muss, an Ih-
ren Händler oder direkt an uns, die STEINEL GmbH
– Reklamationsabteilung –, Dieselstraße80-84,
33442 Herzebrock-Clarholz (AT: STEINEL Austria
GmbH – Hirschstettnerstraße 19/G/1/1, AT-1220
Wien, CH: PUAG AG, Oberebenestrasse 51, CH-
5620 Bremgarten). Wir empfehlen Ihnen daher,
Ihren Kaufbeleg bis zum Ablauf der Garantiezeit
sorgfältig aufzubewahren.
HERSTELLER
1
3
JAHR
DEU
GARANTIE
5
HERSTELLER
GARANTIE
HERSTELLER
GARANTIE

– 11 –
Zeiteinstellung Für SC: 5 s – 160 min
Für S: 5 s – 115 min
Für C: Nur in Kombination mit einem Bluetooth-Sensor-Produkt
Grundlicht Für S: 0%, 10% (nur per Einstellregler einstellbar)
Für SC: 0% – 100%
Für C: 0% – 100%
Dauerlicht schaltbar
Schutzart IP 44
Schutzklasse II
Umgebungstemperatur -20°C bis +40°C
Frequenz Bluetooth 2,4 – 2,48 GHz (L 800 / L 810 / L 820 SC)
Sendeleistung Bluetooth 5dBm / 3mW (L 800 / L 810 / L 820 SC)
Frequenz Sensor 5,8 GHz
Sendeleistung Sensor < 1 mW
FarbkonsistenzSDCM Anfangswert: 3
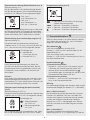
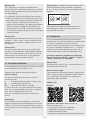
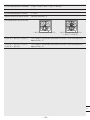
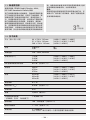
Lichtstärkeverteilung
LumEdit
202006041013_L800_ANTHRAZIT_2835LED_ANTHRAZIT.LDT
Polar Diagram
17.03.21 / 13:26 1/1
100
200
300
90°90°
180°
0° 30°30°
150°150°
60°
120°
60°
120°
cd / 1000 lm
C0 / C180 C90 / C270
LumEdit
202006031132_L810_SILBER_2835LED_WW.LDT
Polar Diagram
17.03.21 / 13:30 1/1
40
80
120
160
200
90°90°
180°
0° 30°30°
150°150°
60°
120°
60°
120°
cd / 1000 lm
C0 / C180 C90 / C270
L 800 S / L 800 SC / L 800 C L 810 S / L 810 SC / L 810 C
L 820 S / L 820 SC
(L 800 S / L 800 SC / L 800 C) Dieses Produkt enthält eine Lichtquelle der Energieeffizienzklasse „E“
(L 810 S / L 810 SC / L 810 C)
(L 820 S / L 820 SC) Dieses Produkt enthält eine Lichtquelle der Energieeffizienzklasse „D“
DE

– 12 –
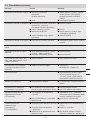
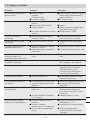
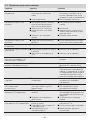
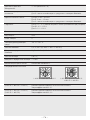
Störung Ursache Abhilfe
Sensorleuchte ohne Spannung ■Sicherung hat ausgelöst,
nicht eingeschaltet,
Leitung unterbrochen
■Kurzschluss
■Sicherung einschalten, tauschen,
Netzschalter einschalten; Leitung
mit Spannungsprüfer überprüfen
■Anschlüsse überprüfen
Sensorleuchte schaltet nicht ein ■bei Tagesbetrieb, Dämmerungs-
einstellung steht auf Nachtbetrieb
■Netzschalter AUS
■Sicherung hat ausgelöst
■Erfassungsbereich nicht gezielt
eingestellt
■neu einstellen
■Einschalten
■Sicherung einschalten, tauschen,
evtl. Anschluss überprüfen
■neu justieren
Sensorleuchte schaltet nicht aus ■dauernde Bewegung im
Erfassungsbereich ■Bereich kontrollieren und evtl. neu
justieren
Sensorleuchte schaltet nicht
komplett aus ■Grundlicht gewählt ■Programmwahlschalter auf 0
Sensorleuchte schaltet
unerwünscht ein ■Wind bewegt Bäume und
Sträucher im Erfassungsbereich
■Erfassung von Autos auf der
Straße
■Bereich umstellen
■Bereich umstellen
Größere Metallgegenstände,
wie z. B. Autos oder
Metallwände, im
Erfassungsbereich
■Bereich umstellen ■z. B. Auto umparken
LED-Strahler wird in der
Bluetooth-Übersicht nicht
aufgeführt
■Falsche Region ausgewählt ■ Einstellungen
Region EU/Region US
Passwort vergessen ■ Nach Falscheingabe: Button
„Passwort zurücksetzten“
drücken; Innerhalb von
10Minuten Strom abschalten
und wieder einschalten; Danach
Passwort neu vergeben
App startet nicht ■ Standort ist nicht aktiviert ■ Standort in Smartphone-
Einstellungen aktivieren
Einstellungen für LED-Strahler
sind ausgegraut ■ LED-Strahler ist nicht als
Gruppenmaster deklariert
(Slave-Betrieb)
■ Masterstrahler einstellen
■ LED-Strahler als Master
deklarieren
Es werden keine Bluetooth-LED-
Strahler gefunden ■ LED-Strahler befinden sich nicht
in Reichweite
■ Bluetooth am Smartphone ist
deaktiviert
■ Prüfen, ob im Smartphone
Bluetooth aktiviert ist oder den
Abstand zum Produkt verringern
■ Suchlauf neu starten
Kein Verbindungsaufbau
vom Smartphone zum
LED-Strahler
■ Das Smartphone befindet sich zu
nah am Gerät
■ Smartphone ist nicht App-
kompatibel
■ App-Version nicht auf dem
neuesten Stand
■ Abstand zum LED-Strahler
mindestens 1,5 m
■ Anderes Smartphone verwenden
■ Steinel Connect App im
Appstore updaten
13. Betriebsstörungen

– 13 –
4. Principle
Sensor-switched light with an active motion detec-
tor. The integrated iHF sensor emits high-frequency
electromagnetic waves (5.8GHz) and receives their
echo. Any movement by persons in the light's de-
tection zone is noticed by the sensor as a change
in echo. A microprocessor then issues the switch
command “switch light ON”. Detection is possible
through doors, panes of glass or thin walls.
(L800C / L800SC / L810C / L810SC /
L820SC)
Note:
When installing, please always allow a distance of
at least 3 m to Wi-Fi routers or access points.
The functions of the sensor-switched light can
be set via smartphone and tablet or control dial.
Bluetooth interconnection is only possible via smart-
phone or tablet. (L800SC/ L800C/ L810SC/
L810C/ L820SC)
Detection zones for wall mounting:
1) Minimum reach (1m)
2) Maximum reach (5m)
5
1)
2)
10
5
1)
2)
10
5 m
5 m
B C
5 m
A
Note:
If lights are mounted too close together, switching
errors may occur as the high-frequency signals
emitted will interfere with each other (Fig. A).
GB
1. About this document
Please read carefully and keep in a safe place.
• Under copyright. Reproduction either in whole or
in part only with our consent.
• Subject to change in the interest of technical
progress.
Symbols
!
Hazard warning!
...
Reference to other information in
the document.
2. General safety precautions
!
Disconnect the power supply before
attempting any work on the unit.
• During installation, the electric power cable being
connected must not be live being connected
must not be live. Therefore, switch o the power
first and use a voltage tester to make sure the
wiring is o-circuit.
• Installing the sensor-switched light involves work
on the mains voltage supply. This work must
therefore be carried out professionally in accord-
ance with national wiring regulations and electri-
cal operating conditions. (e.g. DE: VDE 0100,
AT: ÖVE / ÖNORM E8001-1, CH: SEV 1000)
3. L800S / L810S / L820S /
L800C / L810C / L800SC /
L810SC / L820SC
1 Light enclosure
2 Wall mount
3 Bottom cover
4 Top cover
5 Mains lead, concealed wiring
6 Mains lead, surface wiring
7 Mounting hook to simplify installation /
cable strain relief grips
8 Spacers for surface wiring
9 House number panel (L820S / L820SC)
10 Retaining screws for house number panel
(L820S / L820SC)
11 Reach setting (S only)
12 Time setting (S only)
13 Twilight setting (S only)
14 Programme setting (S only)
15 Manual override function
GB

– 14 –
The following measures will help to avoid switching
errors of this kind:
• Allow a distance of at least 5 m between lights.
• Interconnect lights via the Steinel Connect App
and selectively deactivate the sensor in individual
lights via the Sensor-O function (Fig. B + C).
As a result of interconnection, movement will also
switch lights ON in spite of their sensor being
deactivated.
Note:
The high-frequency output of the iHF sensor is
is approx. 1mW – 1,000times less than the trans-
mission power of a mobile phone or microwave oven.
Note:
The sensor is suitable for switching light on auto-
matically. Note: weather conditions may aect the
way the sensor works. Strong gusts of wind, snow,
rain or hail may cause the light to come on when it
is not wanted.
5. Electrical connection
To achieve the stated reach of 5m, the light should
be mounted at a height of approx. 2m.
Connecting the mains power supply lead
(see diagram)
The supply lead is a three-core cable:
L = phase conductor (usually black,
brown or grey)
N = neutral conductor (usually blue)
PE = protective-earth conductor (green/yellow)
If you are in any doubt, identify the conductors
using a voltage tester; then disconnect from the
power supply again. Phase (L) and neutral conduc-
tor (N) are connected to the terminal block.
Important:
Incorrectly wired connections will produce a short
circuit later on in the product or your fuse box. In
this case, you must identify the individual conduc-
tors once again and reconnect them.
Note:
The light source of this luminaire cannot be re-
placed. If the light source needs to be replaced (e.g.
at the end of its service life), the complete luminaire
must be replaced.
A mains power switch for turning the unit ON and
OFF may of course be installed in the mains supply
lead.
6. Functions
The sensor-switched light can be put into service
after mounting the enclosure and connecting to the
mains power supply. When putting the light into
operation manually at the light switch, it will switch
OFF after 1second for the calibration phase and is
then activated for sensor mode.
It is not necessary to operate the light switch a
second time.
Functions can be set via Steinel Connect App
(L800SC/ L800C/ L810SC / L810C/
L820SC) or control dial.
Note:
The settings last selected on the control will be used.
Steinel Connect App
To configure the light via smartphone or tablet, you
must download the Steinel Connect App from your
app store. You will need a Bluetooth-capable smart-
phone or tablet.
QR codes
Android iOS
Additional functions only via the Steinel Connect
App:
– Main light- / basic light level adjustable
– Extended reach adjustment
– Group interconnection
– Twilight setting by teach-in
Reach setting (sensitivity) (S only)
factory setting: 5m

– 15 –
Reach is the term used to describe the semi-cir-
cular zone that is produced on the ground when
mounting the light at a height of 2 m.
– Potentiometer set to “max” =
max. reach of 5 m
– Potentiometer set to “min” =
min. reach of 1 m
– Potentiometer “o” =
Sensor OFF
Sensor o: Motion detection and all other sensor
functions are completely deactivated. We recom-
mend selecting the shortest time (5seconds) for
setting the detection zone.
Tine setting (switch-o delay) (S only)
Factory setting: 5 s
The light's ON time can be set to any period
from approx. 5 s to a maximum of 15min (for S) or
from approx. 5 s to a maximum of. 60 min (for SC).
Adjustment control set to::
+ = maximum time
(15min or 60min).
– = minimum time (5s).
Any movement detected before this time elapses
will restart the timer. The shortest time setting is
recommended when adjusting the detection zone
and performing the functional test.
Note:
After the light switches OFF, it takes approx. 1sec-
ond before it is able to start detecting movement
again. The light will only switch ON in response to
movement once this period has elapsed.
Twilight setting (response threshold) (S only)
Factory setting: 2,000 lux
The light's chosen response threshold can be
infinitely varied from approx. 2 to 2,000 lux.
Adjustment control set to:
= Daylight mode
approx. 2,000 lux.
= Night-time operation
approx. 2 lux.
To adjust the detection zone in daylight, the control
dial must be set to 2,000lux.
Programme setting (S only)
= Soft start / no basic lighting level ON as
from the selected twilight level
= Soft start + basic lighting level 10 minutes
= Soft start + basic lighting level 30 minutes
= Soft start + basic lighting level all night
long
7. Manual override function 15
If a mains switch is installed in the mains supply
lead, the following functions are available in addition
to simply switching light ON and OFF:
Sensor mode 15.1 :
Switch light ON (when light is OFF):
Switch OFF and ON once. Light stays ON for
the period selected.
Switch light OFF (when light is ON):
Switch OFF and ON once. Light goes out or
switches to sensor mode.
Manual override 15.2 :
1) Activate manual override:
Switch OFF and ON twice. The light is set to
stay ON for 4 hours (blue LED lights up behind
the diuser 4). Then it returns automatically to
sensor mode (blue LED OFF).
2) Deactivate manual override:
Switch OFF and ON once. Light goes out or
switches to sensor operation.
Important:
The switch should be actuated in rapid succession
(in the 0.2–1-second range).
What is soft light start?
The sensor-switched light features a soft light start
function. This means that when turned ON, the
light is not switched directly to maximum output
but gradually builds up brightness to 100% within
the space of a second. Brightness is also gradually
reduced when the light is switched OFF.
GB

– 16 –
What is basic light level?
The basic light level provides continuous night-
time illumination at approx. 10% light output. The
light only switches to maximum output (100%) in
response to movement in the detection zone (see
Time setting 12 ). The light then returns to the basic
light level (approx. 10%). The SC version switch-
es the light to the basic light level you preselect
(0% – 100%).
Note:
Depending on the local power grid, the LED's may
flicker slightly when dimmed. This is not a product
defect and no reason for complaint.
8. Maintenance/care
The product requires no maintenance.
The light can be cleaned with a damp cloth (without
detergents) if dirty.
Important note: the control gear cannot be
replaced.
9. Disposal
Electrical and electronic equipment, accessories
and packaging must be recycled in an environmen-
tally compatible manner.
Do not dispose of electrical and electronic
equipment as domestic waste.
EU countries only:
Under the current European Directive on Waste
Electrical and Electronic Equipment and its imple-
mentation in national law, electrical and electronic
equipment no longer suitable for use must be col-
lected separately and recycled in an environmentally
compatible manner.
10. Declaration of Conformity
Hereby, STEINEL GmbH declares that the radio
equipment type L800SC/ L800 S/L 800C/
L810SC/ L810S/L 810 C/ L820SC/ L820S
is in compliance with Directive 2014/53/EU. The full
text of the EU declaration of conformity is available
at the following internet address:
www.steinel.de
11. Manufacturer’s Warranty
Manufacturer’s warranty of STEINEL GmbH,
Dieselstrasse 80-84, DE-33442 Herzebrock-Clar-
holz, Germany
All STEINEL products meet the highest quality
standards. For this reason, we, the manufacturer,
are pleased to provide you, the consumer, with a
warranty under the following terms and conditions:
The warranty covers the absence of deficiencies
which are proven to be the result of a material
defect or fault in manufacturing and which are re-
ported to us immediately after detection and within
the warranty period. The warranty shall apply to
all STEINEL products sold and used in Germany -
excluding STEINEL Professional products.
You can opt for warranty cover in the form of
repair or replacement which will be provided free
of charge (if applicable, in the form of a successor
model of the same or higher quality) or in the form
of a credit note.
The warranty period for the STEINEL product you
have purchased is 3 years (5 years for products
from the XLED home range) in each case from the
date on which the product was purchased.
We shall bear the shipping costs but not the trans-
port risks involved in return shipment.
Statutory rights accruing from defects, gratuitous-
ness
The warranty cover described here shall be
applicable in addition to the statutory rights of
warranty – including special consumer protection
provisions – and shall not restrict or replace them.
Exercising your statutory rights in the event of
defects is gratuitous.
Exemptions from the warranty
All replaceable lamps are expressly excluded from
this warranty. In addition to this, the warranty shall
not cover:
– any wear resulting from use or any other natural
wear of product parts or any deficiencies in the
STEINEL product that are attributable to wear
caused by use or other natural wear,

– 17 –
12. Technical specifications
Dimensions (H×W×D) 88 × 230 × 145 mm
91 × 230 × 145 mm
260 × 230 × 145 mm
(L 800 S / L 800 SC / L 800 C)
(L 810 S / L 810 SC / L 810 C)
(L820S / L820SC)
Material Light enclosure: aluminium
Light diffuser: plastic
Power supply 220 – 240V, 50/60Hz
Power consumption (Pon) 7.50W (L 800 S / L 800 SC / L 800 C)
9.80W (L 810 S / L 810 SC / L 810 C)
9.80W (L 820 S / L 820 SC)
Power consumption of iHF sensor 0.61W (SC / C only)
Light output 466lm (L 800 S / L 800 SC / L 800 C)
679lm (L 810 S / L 810 SC / L 810 C)
679lm (L 820 S / L 820 SC)
Efficiency 62lm/W (L 800 S / L 800 SC/ L 800 C)
69lm/W (L 810 S / L 810 SC / L 810 C)
69lm/W (L 820 S / L 820 SC)
Colour rendering index Ra = 82
Standby network (Pnet) 0.40 W (SC / C only)
Power factor 0.89
Colour temperature 3,000K (warm white)
Average rated life expectancy
(L70B50 at 25°C) > 60,000hours
Angle of coverage 160° with Sneak-by guard (SC / S only)
Detection reach 1 – 5m (SC / C only)
– any improper or non-intended use of the product
or any failure to observe the operating instruc-
tions,
– any unauthorised additions, alterations or other
modifications to the product or any deficiencies
attributable to the use of accessory,
– supplementary or replacement parts which are
not genuine STEINEL parts,
– any maintenance or care of products that is not
carried out in accordance with the operating
instructions,
– any attachment or installation that is not in accor-
dance with STEINEL’s installation instructions,
– any damage or loss occurring in transit.
Application of German law
The warranty shall be governed by German law
excluding the United Nations Convention concer-
ning the International Sale of Goods (CISG).
Making claims
If you wish to make a warranty claim, please send
your product complete and carriage paid with the
original receipt of purchase, which must show the
date of purchase and product designation, either to
your retailer or directly to us at STEINEL (UK) Ltd. –
25 Manasty Road, Axis Park, Orton Southgate, GB-
Peterborough Cambs PE2 6UP United Kingdom.
For this reason, we recommend that you keep your
receipt of purchase in a safe place
until the warranty period expires.
MANUFACTURER'S
1
3
5
YEAR
GB
WARRANTY
MANUFACTURER'S
YEAR
WARRANTY
MANUFACTURER'S
YEAR
WARRANTY
GB

– 18 –
Twilight setting 2 – 2,000 Lux
For C: only in combination with a Bluetooth sensor-switched product
Time setting For SC: 5 s – 60 min
For S: 5 s – 15 min
For C: only in combination with a Bluetooth sensor-switched product
Basic light level For S: 0%, 10% (can only be set by adjustment control)
For SC: 0% – 100%
For C: 0% – 100%
Permanent light selectable
IP rating IP 44
Protection class II
Ambient temperature -20°C to +40°C
Bluetooth frequency 2.4 – 2.48 GHz (L 800 / L 810 / L 820 SC)
Bluetooth transmitter power 5 dBm / 3 mW (L 800 / L 810 / L 820 SC)
Sensor frequency 5.8 GHz
Sensor transmitter power < 1mW
Colour consistencySDCM Starting value: 3
Luminous intensity distribution
LumEdit
202006041013_L800_ANTHRAZIT_2835LED_ANTHRAZIT.LDT
Polar Diagram
17.03.21 / 13:26 1/1
100
200
300
90°90°
180°
0° 30°30°
150°150°
60°
120°
60°
120°
cd / 1000 lm
C0 / C180 C90 / C270
LumEdit
202006031132_L810_SILBER_2835LED_WW.LDT
Polar Diagram
17.03.21 / 13:30 1/1
40
80
120
160
200
90°90°
180°
0° 30°30°
150°150°
60°
120°
60°
120°
cd / 1000 lm
C0 / C180 C90 / C270
L 800 S / L 800 SC / L 800 C L 810 S / L 810 SC / L 810 C
L 820 S / L 820 SC
(L 800 S / L 800 SC / L 800 C) This product contains an energy efficiency class “E” light source
(L 810 S / L 810 SC / L 810 C)
(L 820 S / L 820 SC) This product contains an energy efficiency class “D” light source

– 19 –
Malfunction Cause Remedy
Sensor-switched light without
power ■Fuse has tripped,
not switched ON,
break in wiring
■Short circuit
■Activate, change fuse, turn ON
mains switch, check wiring with
voltage tester
■Check connections
Sensor-switched light will not
switch ON ■Twilight control set to night
mode during daytime operation
■Mains switch OFF
■Fuse has tripped
■Detection zone not correctly
adjusted
■Reset
■Switch ON
■Activate, change fuse, check
connection if necessary
■Readjust
Sensor-switched light will not
switch OFF ■Continued movement within the
detection zone ■Check detection zone and
readjust if necessary
Sensor-switched light will not
switch OFF completely ■Basic lighting level selected ■Turn programme selector dial to 0
Sensor-switched light switching
ON when it should not ■Wind is moving trees and
bushes in the detection zone
■Cars in the street are detected
■Change detection zone
■Change detection zone
Large metal objects, such
as cars or metal walls, in the
detection zone
■Change detection zone ■e.g. park car somewhere else
LED floodlight is not shown in
the Bluetooth listing ■Incorrect region selected ■ Settings
Region EU/Region US
Forgotten password? ■ After entering wrong password:
“Reset password” button; switch
power supply OFF and back ON
again within 10minutes; then
re-enter password
App won't start ■ Location is not activated ■ Activate location in smartphone
settings
Settings for LED floodlight are
greyed out ■ LED floodlight is not declared as
group master (slave mode) ■ Set master floodlight
■ Declare LED floodlight as master
No Bluetooth LED floodlight
found ■ LED floodlight is not in reach
■ Bluetooth is deactivated on
smartphone
■ Check whether Bluetooth is
activated on smartphone or
reduce distance to the product
■ Re-start search
No connection being set up from
smartphone to LED floodlight ■ Smartphone too close to device
■ Smartphone not compatible
with app
■ App version not up to date
■ Distance to LED floodlight at
least 1.5 m
■ Use dierent smartphone
■ Update Steinel Connect App in
app store
13. Troubleshooting GB

– 20 –
14 Réglage des programmes (seulement S)
15 Fonction de marche forcée
4. Le principe
L'applique à détection contient un détecteur de mou-
vement actif. Le détecteur iHF intégré émet des ondes
électromagnétiques à hyperfréquence (5,8GHz) et
reçoit leur écho. Au moindre mouvement de personnes
dans la zone de détection du luminaire, le système
détecte la modification de l'écho. Un microprocesseur
déclenche alors presque instantanément la commande
«Allumage de la lumière». L'appareil peut détecter les
mouvements à travers les portes, les vitres et les parois
de faible épaisseur. (L800C / L800SC / L810C /
L810SC / L820SC)
Remarque :
Lors de l’installation, veuillez veiller à respecter
une distance d’au moins3m entre l’appareil et le
routeur WiFi ou les points d’accès.
Il est possible de régler les fonctions de l’applique
à détection depuis un smartphone, une tablette ou
en utilisant les boutons de réglage. Une connexion
Bluetooth n'est possible qu'avec un smartphone
ou une tablette. (L800SC/ L800C/ L810SC/
L810C/ L820SC)
Zones de détection dans le cas d'un montage
mural:
1) Portée minimale (1m)
2) Portée maximale (5m)
5
1)
2)
10
5
1)
2)
10
5 m
5 m
B C
5 m
A
FR
1. À propos de ce document
Veuillez le lire attentivement et le conserver en
lieu sûr !
• Il est protégé par la loi sur les droits d'auteur.
Une réimpression, même partielle, n'est autorisée
qu'après notre accord préalable.
• Sous réserve de modifications techniques.
Explication des symboles
!
Attention danger !
... Renvoi à des passages dans le document.
2. Consignes de sécurité générales
!Avant toute intervention sur l'appareil,
couper l'alimentation électrique !
• Pendant le montage, le câble électrique à raccorder
doit être hors tension. Il faut donc d'abord couper
l'alimentation électrique et s'assurer de l'absence
de tension à l'aide d'un testeur de tension.
• L'installation de l'applique à détection implique
une intervention sur le réseau électrique et doit
donc être eectuée correctement et conformé-
ment à la norme NFC-15100.
3. L800S / L810S / L820S / L800C /
L810C / L800SC / L810SC /
L820SC
1 Boîtier du luminaire
2 Support mural
3 Cache, partie inférieure
4 Cache, partie supérieure
5 Câble secteur encastré
6 Câble secteur en saillie
7 Crochet de montage pour simplifier le montage/
Dispositif de protection contre les tractions exer-
cées sur les câbles
8 Pièce d'écartement pour le câble d'alimenta-
tion en saillie
9 Plaquette de numéros de maison
(L820S / L820SC)
10 Vis de blocage pour la plaquette de numéros de
maison (L820S / L820SC)
11 Réglage de la portée (seulement S)
12 Temporisation (seulement S)
13 Réglage du seuil de déclenchement (seule-
ment S)
La pagina si sta caricando...
La pagina si sta caricando...
La pagina si sta caricando...
La pagina si sta caricando...
La pagina si sta caricando...
La pagina si sta caricando...
La pagina si sta caricando...
La pagina si sta caricando...
La pagina si sta caricando...
La pagina si sta caricando...
La pagina si sta caricando...
La pagina si sta caricando...
La pagina si sta caricando...
La pagina si sta caricando...
La pagina si sta caricando...
La pagina si sta caricando...
La pagina si sta caricando...
La pagina si sta caricando...
La pagina si sta caricando...
La pagina si sta caricando...
La pagina si sta caricando...
La pagina si sta caricando...
La pagina si sta caricando...
La pagina si sta caricando...
La pagina si sta caricando...
La pagina si sta caricando...
La pagina si sta caricando...
La pagina si sta caricando...
La pagina si sta caricando...
La pagina si sta caricando...
La pagina si sta caricando...
La pagina si sta caricando...
La pagina si sta caricando...
La pagina si sta caricando...
La pagina si sta caricando...
La pagina si sta caricando...
La pagina si sta caricando...
La pagina si sta caricando...
La pagina si sta caricando...
La pagina si sta caricando...
La pagina si sta caricando...
La pagina si sta caricando...
La pagina si sta caricando...
La pagina si sta caricando...
La pagina si sta caricando...
La pagina si sta caricando...
La pagina si sta caricando...
La pagina si sta caricando...
La pagina si sta caricando...
La pagina si sta caricando...
La pagina si sta caricando...
La pagina si sta caricando...
La pagina si sta caricando...
La pagina si sta caricando...
La pagina si sta caricando...
La pagina si sta caricando...
La pagina si sta caricando...
La pagina si sta caricando...
La pagina si sta caricando...
La pagina si sta caricando...
La pagina si sta caricando...
La pagina si sta caricando...
La pagina si sta caricando...
La pagina si sta caricando...
La pagina si sta caricando...
La pagina si sta caricando...
La pagina si sta caricando...
La pagina si sta caricando...
La pagina si sta caricando...
La pagina si sta caricando...
La pagina si sta caricando...
La pagina si sta caricando...
La pagina si sta caricando...
La pagina si sta caricando...
La pagina si sta caricando...
La pagina si sta caricando...
La pagina si sta caricando...
La pagina si sta caricando...
La pagina si sta caricando...
La pagina si sta caricando...
La pagina si sta caricando...
La pagina si sta caricando...
La pagina si sta caricando...
La pagina si sta caricando...
La pagina si sta caricando...
La pagina si sta caricando...
La pagina si sta caricando...
La pagina si sta caricando...
La pagina si sta caricando...
La pagina si sta caricando...
La pagina si sta caricando...
La pagina si sta caricando...
La pagina si sta caricando...
La pagina si sta caricando...
La pagina si sta caricando...
La pagina si sta caricando...
La pagina si sta caricando...
La pagina si sta caricando...
La pagina si sta caricando...
La pagina si sta caricando...
La pagina si sta caricando...
La pagina si sta caricando...
La pagina si sta caricando...
La pagina si sta caricando...
La pagina si sta caricando...
La pagina si sta caricando...
La pagina si sta caricando...
La pagina si sta caricando...
La pagina si sta caricando...
La pagina si sta caricando...
La pagina si sta caricando...
La pagina si sta caricando...
La pagina si sta caricando...
La pagina si sta caricando...
La pagina si sta caricando...
La pagina si sta caricando...
La pagina si sta caricando...
La pagina si sta caricando...
La pagina si sta caricando...
La pagina si sta caricando...
La pagina si sta caricando...
La pagina si sta caricando...
La pagina si sta caricando...
La pagina si sta caricando...
La pagina si sta caricando...
La pagina si sta caricando...
La pagina si sta caricando...
La pagina si sta caricando...
La pagina si sta caricando...
La pagina si sta caricando...
La pagina si sta caricando...
La pagina si sta caricando...
La pagina si sta caricando...
La pagina si sta caricando...
La pagina si sta caricando...
La pagina si sta caricando...
La pagina si sta caricando...
La pagina si sta caricando...
La pagina si sta caricando...
La pagina si sta caricando...
La pagina si sta caricando...
La pagina si sta caricando...
La pagina si sta caricando...
La pagina si sta caricando...
La pagina si sta caricando...
La pagina si sta caricando...
La pagina si sta caricando...
La pagina si sta caricando...
La pagina si sta caricando...
La pagina si sta caricando...
La pagina si sta caricando...
La pagina si sta caricando...
La pagina si sta caricando...
La pagina si sta caricando...
La pagina si sta caricando...
La pagina si sta caricando...
La pagina si sta caricando...
La pagina si sta caricando...
La pagina si sta caricando...
La pagina si sta caricando...
-
 1
1
-
 2
2
-
 3
3
-
 4
4
-
 5
5
-
 6
6
-
 7
7
-
 8
8
-
 9
9
-
 10
10
-
 11
11
-
 12
12
-
 13
13
-
 14
14
-
 15
15
-
 16
16
-
 17
17
-
 18
18
-
 19
19
-
 20
20
-
 21
21
-
 22
22
-
 23
23
-
 24
24
-
 25
25
-
 26
26
-
 27
27
-
 28
28
-
 29
29
-
 30
30
-
 31
31
-
 32
32
-
 33
33
-
 34
34
-
 35
35
-
 36
36
-
 37
37
-
 38
38
-
 39
39
-
 40
40
-
 41
41
-
 42
42
-
 43
43
-
 44
44
-
 45
45
-
 46
46
-
 47
47
-
 48
48
-
 49
49
-
 50
50
-
 51
51
-
 52
52
-
 53
53
-
 54
54
-
 55
55
-
 56
56
-
 57
57
-
 58
58
-
 59
59
-
 60
60
-
 61
61
-
 62
62
-
 63
63
-
 64
64
-
 65
65
-
 66
66
-
 67
67
-
 68
68
-
 69
69
-
 70
70
-
 71
71
-
 72
72
-
 73
73
-
 74
74
-
 75
75
-
 76
76
-
 77
77
-
 78
78
-
 79
79
-
 80
80
-
 81
81
-
 82
82
-
 83
83
-
 84
84
-
 85
85
-
 86
86
-
 87
87
-
 88
88
-
 89
89
-
 90
90
-
 91
91
-
 92
92
-
 93
93
-
 94
94
-
 95
95
-
 96
96
-
 97
97
-
 98
98
-
 99
99
-
 100
100
-
 101
101
-
 102
102
-
 103
103
-
 104
104
-
 105
105
-
 106
106
-
 107
107
-
 108
108
-
 109
109
-
 110
110
-
 111
111
-
 112
112
-
 113
113
-
 114
114
-
 115
115
-
 116
116
-
 117
117
-
 118
118
-
 119
119
-
 120
120
-
 121
121
-
 122
122
-
 123
123
-
 124
124
-
 125
125
-
 126
126
-
 127
127
-
 128
128
-
 129
129
-
 130
130
-
 131
131
-
 132
132
-
 133
133
-
 134
134
-
 135
135
-
 136
136
-
 137
137
-
 138
138
-
 139
139
-
 140
140
-
 141
141
-
 142
142
-
 143
143
-
 144
144
-
 145
145
-
 146
146
-
 147
147
-
 148
148
-
 149
149
-
 150
150
-
 151
151
-
 152
152
-
 153
153
-
 154
154
-
 155
155
-
 156
156
-
 157
157
-
 158
158
-
 159
159
-
 160
160
-
 161
161
-
 162
162
-
 163
163
-
 164
164
-
 165
165
-
 166
166
-
 167
167
-
 168
168
-
 169
169
-
 170
170
-
 171
171
-
 172
172
-
 173
173
-
 174
174
-
 175
175
-
 176
176
-
 177
177
-
 178
178
-
 179
179
-
 180
180


STEINEL L 800 SC anthrazit Manuale utente
- Tipo
- Manuale utente
in altre lingue
Documenti correlati
-
STEINEL L 810 specificazione
-
STEINEL RS 20 S Manuale utente
-
STEINEL RS LED M1 RS M1 S Istruzioni per l'uso
-
-
-
-
-
-
-