Haier MD-2485M Operating Panel
- Categoria
- Microonde
- Tipo
- Operating Panel

MD-Design
MIKROWELLE ID CODE
Bedienblende 050MWO
MICROWAVE
Operating Panel
MICRO-ONDES
Panneau de commande
APPARECCHIO A MICROONDE
Panello di comando
MICROONDAS
Panel de funcionamiento
MICRO-ONDAS
Painel de mando
MAGNETRON
Bedieningspaneel
MD-2485M
fi0103 Attachment to General IU MWO
D
GB
F
I
E
P
NL

KONFORMITÄTSERKLÄRUNG
Der Hersteller der/des hierin beschriebenen Produkte(s) auf welche(s) sich diese Erklärung bezieht, erklärt
hiermit in alleiniger Verantwortung, dass diese(s) die einschlägigen, grundliegenden Sicherheits-
Gesundheits- und Schutzanforderungen der hierzu bestehenden EG Richtlinien erfüllen und die
entsprechenden Prüfprotokolle, insbesondere die vom Hersteller oder seinem Bevollmächtigten
ordnungsgemäss ausgestellte CE-Konformitätserklärung zur Einsichtnahme der zuständigen Behörden
vorhanden sind und über den Geräteverkäufer angefordert werden können.
Der Hersteller erklärt ebenso, dass die Bestandteile der in dieser Bedienungsanleitung beschriebenen
Gerät, welche mit frischen Lebensmitteln in Kontakt kommen können, keine toxischen Substanzen
enthalten.
DECLARATION OF CONFORMITY
The manufacturer of the product/s described herein, to which this description refers, declares on its sole
responsibility that the product/s meet the relevant fundamental safety, health and protection requirements of
the relevant EU guidelines and that the corresponding test reports are available for examination by the
relevant authorities and can be requested from the seller of the appliance, especially with regard to CE
Declaration of Conformity issued by the manufacturer or with the manufacturer‘s approval.
Moreover, the manufacturer declares that the parts of the appliance described in this user manual, which
come into contact with fresh food, do not contain any toxic substances.
DECLARATION DE CONFORMITE
Par la présente, le fabricant du (des) produit(s) décrit(s) se rapportant à la présente déclaration, déclare
sous sa propre responsabilité que ce(s) produit(s) satisfait(font) aux normes de sécurité requises en matière
de santé personnelle et de protection et sont conformes aux directives CE en la matière et que les procès-
verbaux d’essai correspondant, notamment la déclaration de conformité CE régulièrement émise par le
fabricant ou par le délégué relatif pour la prise de connaissance de la part des autorités compétentes,
existent et peuvent être remis au vendeur de l’appareil.
Le fabricant déclare en outre que les composants de l’appareil décrits dans la notice d’utilisation pouvant
entrer en contact avec les aliments frais ne contiennent aucune substance toxique.
DICHIARAZIONE DI CONFORMITÀ
Con la presente, il produttore del(dei) prodotto(i) qui descritto(i) a cui si riferisce la presente dichiarazione
dichiara dietro propria responsabilità che questo(i) prodotto(i) soddisfa(no) i requisiti di sicurezza, salute
personale e protezione di base pertinenti alle direttive CE esistenti in materia e che i relativi verbali di prova,
in particolare la dichiarazione di conformità CE emessa regolarmente dal produttore o dal relativo delegato
per la presa in visione da parte delle autorità competenti, sono presenti e possono essere richiesti al
rivenditore dell’apparecchio.
Il produttore dichiara inoltre che i componenti dell’apparecchio descritto nelle presenti istruzioni per l’uso,
che possono venire a contatto con alimenti freschi, non contengono alcuna sostanza tossica.
D
F
I
GB

Inhalt Mikrowelle
ID CODE 050MWO
Kapitel Seite
Allgemeine Bedienungsanleitung Mikrowelle siehe separates Buch
CE-Konformitätserklärung des Herstellers siehe Deckblatt Innenseite
Warnungen 1
Bedienblende / -Knöpfe 2
Beispiel zum Programmieren eine Kochprogramms 3
Anwendung der Leistungs- / Programmstufen 4
D

Warnung !
1.
Lesen Sie vor der ersten Inbetriebnahme Ihres Mikrowellengerätes die nachstehenden Warnungen und alle dem Gerät
beiliegenden Broschüren / Bedienungsanleitungen gründlich durch.
Es ist sehr wichtig die Gefahren zu kennen, welche durch falsche Gerätebedienung auftreten können.
2.
Stecken Sie keine metallischen Gegenstände in die Verschlußöffnung am Gehäuse, da dies zum Austreten von
Mikrowellen führen kann.
3.
Schließen Sie die Tür nicht mit Gewalt. Die Tür könnte sich verziehen und gefährliche Mikrowellen könnten dadurch
austreten.
4.
Erhitzen Sie keine Lebensmittel in Vakuumverpackung oder in geschlossenen Behältern. In Folien müssen vor dem
Erhitzen Löcher gestochen werden.
5.
Kochen Sie Eier niemals mit Schale, da diese sonst explodieren könnten.
6.
Entfernen Sie Fettreste im Backraum, da diese sich beim weiteren Gebrauch des Gerätes entzünden oder zu
Rauchentwicklung führen können.
7.
Benutzen Sie das Mikrowellengerät ausschließlich zum Kochen oder Erhitzen von Lebensmitteln oder Getränken.
8.
Verwenden Sie immer eine sichere Erdleitung. Betreiben Sie das Gerät niemals über eine ungeerdete Steckdose.
9.
Stellen Sie sicher, daß sich der Drehteller immer ungehindert drehen kann.
10.
Über dem Gerät muß mindestens 20cm Freiraum vorhanden sein, damit eine ausreichende Wärmeabfuhr gewährleistet ist.
11.
Stellen Sie das Mikrowellengerät nie in eine feuchte oder heiße Umgebung.
12.
Verbrühungsgefahr ! Berühren Sie niemals die Gehäuseoberseite oder die Türverglasung während oder unmittelbar nach
Betrieb des Gerätes.
13.
Lassen Sie das Mikrowellengerät nie leer laufen, um Schäden am Gerät zu vermeiden.
14.
Benutzen Sie zum Kochen im Mikrowellengerät niemals metallische Behälter, da sonst Funkenschlag entstehen kann.
15.
Nach längerem Betrieb erhitzt sich das Gerät. Wir empfehlen, das Gerät vor erneuter Nutzung erst abkühlen zu lassen.
16.
Überprüfen Sie vor dem Kochen, ob Ihre Kochbehälter für Mikrowellengeräte geeignet sind.
17.
Vermeiden Sie zu Ihrer eigenen Sicherheit das Kochen von Lebensmitteln in Plastik- oder Papierverpackungen. Diese
Verpackungsmaterialien könnten sich entzünden und einen Brand verursachen.
18.
Falls beim Kochen Rauch im Garraum entstehen sollte, lassen Sie die Gerätetür verschlossen und ziehen Sie den
Netzstecker oder drehen Sie die Sicherung heraus. Öffnen Sie die Gerätetür erst dann, wenn keine Rauchentwicklung
mehr auftritt.
19.
Wenn Sie Flüssigkeiten erhitzen, achten Sie darauf, daß diese sich bei der Erhitzung ausdehnen. Verwenden Sie
ausreichend große Gefäße und achten Sie darauf, daß Sie sich beim Herausnehmen nicht verbrühen, da das Überkochen
der Flüssigkeit zeitverzögert auftreten kann.
20.
Wenn Sie Getränke oder Nahrung für Kinder erhitzen, rühren Sie diese nach dem Erhitzen gut um und prüfen Sie die
Temperatur um Verbrühungen zu vermeiden.
21.
Wenn Tür, Türrahmen oder Türdichtungen Beschädigungen aufweisen, lassen Sie das Mikrowellengerät erst von
Fachpersonal reparieren, bevor Sie es erneut benutzen. Es besteht sonst die Gefahr, dass schädliche Mikrowellen
austreten.
22.
Ziehen Sie vor jeder Reinigung des Gerätes immer den Netzstecker oder drehen Sie die Netzsicherung heraus.
23.
Versuchen Sie niemals selbst Reparaturen am Gerät vorzunehmen. Das Gehäuse darf nur von Fachpersonal geöffnet
werden, da sonst die Gefahr eines Elektroschocks besteht.
24.
Kinder sollten nur unter Aufsicht eines Erwachsenen das Mikrowellengerät bedienen. Erklären Sie Kindern in jedem Fall die
Gefahren im Umgang mit Mikrowellengeräten.
25.
Reinigen Sie die Tür und die Dichtung wöchentlich mit Seifenlauge, die Innenseite des Gerätes muß immer sauber sein.
26.
Falls ein Defekt am Netzkabel vorliegt, darf dieser nur von Fachpersonal behoben werden, da sonst die Gefahr eines
Elektroschocks besteht.
27.
Falls Sie Kochbehälter benutzen, die nicht vom Gerätehersteller empfohlen sind, müssen Sie den Kochvorgang beobachte
n
um allenfalls rechtzeitig Massnahmen (siehe Ziffer 18.) ergreifen zu können.
28.
Lassen Sie nach Beendigung des Kochvorganges insbesondere Flüssigkeiten ca, 10 Sekunden im Garraum stehen, bevor
sie diese herausnehmen
1

2
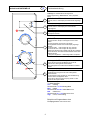
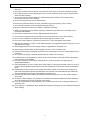
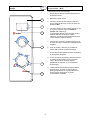
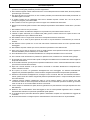
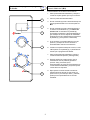
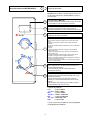
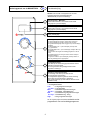
Bedienblende MIKROWELLE
Funktionsbeschreibung
ID CODE 050MWO
Achtung! Vor Inbetriebnahme die Allgemeine
Bedienungsanleitung “MIKROWELLE“ lesen (separates
Buch)
Kontrollleuchte “Minuten“
Leuchtet, wenn im LED Display eine Minutenzahl angezeigt
wird.
Kontrollleuchte “Sekunden“
Leuchtet, wenn im LED Display eine Sekundenzahl
angezeigt wird.
LED Display
Anzeige der Kochzeit
Kochzeit Timer
(Max. 30 Min.)
Kochzeit erhöhen: Knopf im Uhrzeigersinn nach rechts
drehen.
Kochzeit reduzieren: Knopf nach links drehen
Die eingestellte Kochzeit wird im LED Display angezeigt.
Beispiel:
1.Kochzeit 2 Min: LED Anzeige “02“ & (1) leuchtet
2.Kochzeit 25 Sek: LED Anzeige “25“ & (2) leuchtet
Während ein Kochprogramm abläuft, lauft die Uhr rückwärts.
Die Kochzeit kann auch während des Betriebes erhöht oder
reduziert werden.
3. Programm abgelaufen: LED Anzeige “00“ & 5 Pieptöne
Leistungsstufen Einstellknopf
Drehen Sie den Knopf bis die Markierung (6) mit der
gewünschten Leistungsstufe übereinstimmt.
Die Leistungsstufe kann während des Betriebes verändert
werden.
Leistungsstufen Wahlschalter
Die Markierung muss genau mit einer Leistungsstufe
übereinstimmen.
Ein Dauerpiepton zeigt allenfalls an, dass die Markierung
zwischen zwei Leistungsstufen steht.
Drehen Sie in diesem Fall den Knopf (5) etwas vor oder
zurück bis der Piepton abstellt.
7 Leistungsstufen:
Low = Niedrig
Zwischenstufe Low-Med Niedrig-Mittel
Med = Mittel
Zwischenstufe Med-M.H. Mittel-Mittel hoch
M.H. = Mittel hoch
Zwischenstufe M.H.-High Mittel hoch-Hoch
High = Hoch, volle Leistung
Beispiel zum Programmieren eines
Kochprogramms:
siehe nächste Seite
D
4
5
1
2
3
6

3
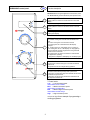
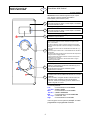
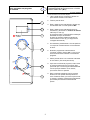
Beispiel zum Programmieren eines
Kochprogramms
3 Minuten Kochen/Garen mit Leistungsstufe
“Mittelhoch“ (M.H)
ID CODE 050MWO
Gerät ist im Stand by Modus
1. Gerätetür öffnen und Lebensmittel auf den
Drehteller im Gerät legen.
2. Gerätetür schliessen.
3. Knopf (5) Knopf im Uhrzeigersinn nach rechts
drehen, bis die Markierung (6) mit der
Leistungsstufe M.H übereinstimmt.
4. Knopf (4) im Uhrzeigersinn nach rechts drehen,
bis die Kontrollleuchte (1) leuchtet und im Display
(3) die Minutenzahl “03“ angezeigt wird.
Das Programm startet 2-3 Sekunden nachdem die
Kochzeit nicht mehr verändert wurde.
Die Restkochzeit wird im Display (3) dauernd
angezeigt. (Uhr läuft rückwärts)
5. Die Leistungsstufe sowie die Kochzeit können bei
Bedarf während des Betriebes verändert werden.
6. Wenn das Kochprogramm abgelaufen ist, wird im
Display (3) die Zahl “00“ angezeigt und 5 kurze
Pieptöne zeigen das Programmende an.
7. Gerätetür öffnen und gekochte Lebensmittel aus
dem Gerät nehmen. (Kochhandschuh verwenden)
8. Drehen Sie den Leistungsstufen Knopf (5) nach
jedem Programmende auf Position “Stop“ um zu
verhindern, dass das Gerät versehentlich ohne
Lebensmittel den Betrieb aufnimmt. (Gerät könnte
dabei Schaden erleiden)
9. Lebensmittel vor dem Servieren kurz bei Seite
legen. Sie können nämlich im Innern noch kurz
weiter kochen und bei sofortigem Verzehr
Verbrennungen verursachen.
D
4
5
1
2
3
6

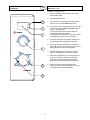
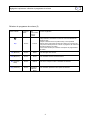
4
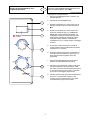
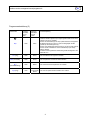
Anwendung der Leistungs- / Programmstufen
ID CODE 050MWO
Programm Wahlschalter (5)
Position / Stufe Grill
Leistung
Mikrowellen
Leistung
Funktion / Anwendung
Stop keine keine
Stellen Sie den Leistungsstufen Wahlschalter nach jedem Gebrauch
des Gerätes auf Position “Stop“, um zu vermeiden dass das Gerät
den Betrieb unbeabsichtigt ohne Lebensmittel aufnimmt.
Wenn der Wahlschalter auf Position “Stop“ steht, kann das Gerät den
Betrieb nicht aufnehmen und es kann mit dem Kochzeit Timer (4)
keine Kochzeit eingestellt werden.
Ein laufendes Kochprogramm kann jederzeit abgebrochen werden,
indem der Wahlschalter während des Betriebes auf Position “Stop“
gedreht wird.
Ein so eingeleiteter Abbruch wird durch einen Klingelton bestätigt.
Low (Tief) keine 300 W Zum Auftauen von gefrorenen Lebensmitteln
Med (Mittel) keine 510W Zum Erhitzen von Milch oder anderen Getränken
M.H (Mittel Hoch) keine 690 W Zum Dünsten / Schmoren / Aufwärmen von Lebensmitteln
High ( Hoch) keine volle Leistung
850 W
Zum schnellen Erhitzen / Garen von Lebensmitteln
D

.

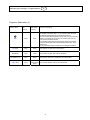
Contents MICROWAVE
ID CODE 050MWO
Chapter Page
general MICROWAVE operating instructions See separate book
Manufacturer's CE Declaration of Conformity Cover inside
Electrical safety Instruction (Plug) 1
WARNINGS 2
Control panel 3
Example of programming a cooking programme 4
Setting the Power- / Programme levels 5
GB

1
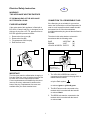
Electrical Safety Instruction
WARNING !
THIS APPLIANCE MUST BE EARTHED.
IF THE MAINS LEAD OF THE APPLIANCE
IS FITTED WITH A PLUG:
FUSE REPLACEMENT
If the mains lead of this appliance is fitted with a
BS 1363A 13 amp fused plug, to change a fuse in
this type of plug use a A.S.T.A. approved fuse to
BS 1362 type and proceed as follow:
1. Remove the fuse cover (A)
2. Remove the fuse (B)
3. Fit replacement fuse into plug
4. Refit the fuse cover
IMPORTANT:
The fuse cover mast be refitted when changing a
fuse and if the fuse cover is lost the plug must not
be used until a correct replacement is fitted.
Correct replacements are identified by the colour
insert or the colour embossed in words on the
base of the plug. Replacement fuse cover are
available from your local electrical store.
CONNECTION TO A REWIREABLE PLUG
If the fitted plug is not suitable for your socket
outlet, then it should be cut off and disposed of in
order to avoid a possible shock hazard should it
be inserted into a 13A socket elsewhere.
A suitable alternative plug should then be fitted to
the cable.
The wires in this mains lead are coloured in
accordance with the following code:
BLUE “NEUTRAL” (N)
BROWN “LIVE” (L)
YELLOW & GREEN “EARTH” (E)
1. The YELLOW & GREEN wire must be
connected to the terminal in the plug which is
marked with the letter E
or by the Earth symbol
or coloured green or yellow & green
2. The BLUE wire must be connected to the
terminal which is marked with the letter N
or coloured black
3. The BROW wire mast be connected to the
terminal which is marked with the letter L
or coloured red
A
B
BLUE N
Connected to a
typical 13 amp plug
BROWN N
YELLOW & GREEN E
CABLE CLAMP
GB

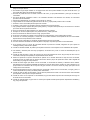
Warning!
1. No one except the professional technicians can decompose the microwave oven. Electric shock danger
may occur!
2. Do not put metal stick into the interlock hole at the front of the cavity. It may cause microwave leakage!
3. Do not add excessive force to opposite direction on the door. Otherwise the door may be deformed and
cause microwave leakage.
4. Do not cook food with vacuum package or packed into enclosed container. For the food with skin,
remember to puncture it before cooking.
5. Do not cook eggs with shell. It may cause bursting.
6. Remove the grease remained in the cavity. Otherwise it may cause smoking or fire in heating.
7. Do not use the microwave oven for purposes other than cooking.
8. Be sure to earth the microwave oven reliably in installation and usage.
9. Reserve enough space for the rotation of the tray. At least 20cm space above the microwave oven is
required for heat radiation.
10. Do not put microwave oven in humid or high-temperature environment.
11. Do not touch the upper part of the shell and the outer screen of the door. It may cause scalding.
12. Do not run the microwave oven without load. It may damage the microwave oven.
13. Do not use metal container to cook with microwave oven. It may cause igniting phenomenon.
14.
A
fter long time cooking, the cavity is under high temperature. It is suggested to wait for some time to cool it
down before next usage.
15. Before usage, please check if the cooking utensils are applicable for microwave oven.
16. When cooking food with plastic or paper package, be sure to check if it strikes a fire.
17. If there’s smoking during cooking with microwave oven, please keep the oven door closed and pull off the
power plug.
18. 18. If you heat beverage, it will slowly expand. Be sure to watch out for bursting.
19. For those drinks or food prepared for children, be sure to stir or shake evenly and check the temperature
before feeding to avoid scalding.
20. If the door, door frame or door seal is damaged, do not use the oven before it is repaired by the
professional technicians.
21. During maintenance, be sure to switch off the power supply. To decompose the shell of the oven, be sure
to have it done by professional technicians. The inner components are electrified, and may cause electric
shock.
22. Children shall use the microwave oven under the instruction of adult, or use the oven by self after they
have received complete instruction and description from the adult. The adult shall teach the children the
general knowledge on the danger of operating the microwave oven.
23. The door seal and all of the relative parts shall be cleaned with soap liquor once each week to keep the
cavity clean.
24. If the power cord is damaged, only the sellers or professional technicians authorized by the manufacturer
can make maintenance to avoid any electric shock danger.
25. If you use cook utensils not recommended by us, be sure to watch out for the cooking proceeding in the
microwave oven.
26. If you heat liquor, in handling the liquor, please notice that the boiled liquor may have delayed bursting and
cause scalding.
2

3
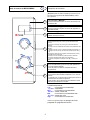
MICROWAVE control panel
Function description
ID CODE 050MWO
Attention! Before using the appliance for the first time, read
the “MICROWAVE” general instructions (see separate book)
Indicator light “Minutes”
Lights up when a number of minutes is shown in the LED
display.
Indicator light “Seconds”
Lights up when a number of seconds is shown in the LED
display.
LED Display
Cooking time display
Cooking timer (Max. 30 min.)
To increase cooking time: turn the knob clockwise to the
right.
To reduce cooking time: turn the knob to the left
The cooking time set is indicated in the LED display.
Example:
1st. cooking time 2 min: LED display “02” & (1) lights up
2nd. cooking time 25 sec.: LED display “25” & (2) lights up
Two seconds later cooking programme is being executed
and the clock counts down.
The cooking time can also be increased or reduced while
the appliance is operating.
3. Programme completed: LED display “00” & 5 Beep signal
Power levels
Turn the knob until the mark (6) is in line with the desired
power level.
The power level can be changed during operation.
Power level mark
The mark must be exactly lined up with a power level.
In any event, a continuous beep tone indicates that the mark
is between two power levels.
In this case, turn the knob (5) forwards or backwards until
the beep tone switches off.
7 Power levels:
Low = Low microwave power
Intermediate level Low-Med
Med = Medium microwave power
Intermediate level Med-M.H
M.H. = Medium High microwave power
Intermediate level M.H-High
High = High microwave power
See the next page for an example of programming a
cooking programme
GB
4
5
1
2
3
6

4
Example of programming a cooking
programme
3 minutes cooking/simmering with “Medium high”
(M.H) power level
ID CODE 050MWO
Appliance is in Stand-by mode
1. Open the appliance door and place the food on
the turntable inside.
2. Close the appliance door.
3. Turn the knob (5) clockwise to the right until the
mark (6) is in line with the M.H power level.
4. Turn the knob (4) clockwise until the indicator light
(1) lights up and the number of minutes “03” is
shown in the display (3).
The programme starts 2-3 seconds after the
cooking time stops being altered.
The remaining cooking time is continuously shown
in the display (3). (The clock counts down)
5. If required, the power level and the cooking time
can be altered while the appliance operates.
6. When the cooking programme is completed, the
figure “00” is shown in the display (3) and 5 short
beeps indicate the end of the programme.
7. Open the appliance door and take the cooked
food out of the appliance. (Use oven gloves)
8. After each programme end, turn the power level
knob (5) to the “Stop” position to prevent the
appliance from being inadvertently operated
without food, which can damage the appliance
9. Allow the food to rest at side briefly before
serving. It can thus cook inside a little more and
can cause burns if eaten immediately.
GB
4
5
1
2
3
6

5
Setting the power / programme levels
ID CODE 050MWO
Programme selector knob (5)
Position / Level
available
depending on Model
Grill
Power
Microwave
Power
Function / Application
Stop None None
Turn the power level selector knob to the “Stop” position each time
after use, to prevent the appliance inadvertently being operated
without food.
When the selector knob is at the “Stop” position, the appliance cannot
be operated and cooking times can no longer be set on the cooking
timer(4).
When a cooking programme is running, it can be interrupted at any
time by turning the selector switch to the “Stop” position.
An interruption caused in this way is confirmed by a ringing tone.
Low None 300 W Defrost frozen food
Med None 510 W For heating up milk or other drinks
M.H (medium high) None 690 W For steaming / braising / warming up food
High None Full power
850 W
For rapid heating up / simmering of food
GB

Table des matières MICRO-ONDES
ID CODE 050MWO
Chapitre Page
Notice d'emploi générale du MICRO-ONDES Voir livret séparé
Déclaration de conformité CE du fabricant à l'intérieur de la couverture.
AVERTISSEMENTS 1
Panneau de commandes 2
Exemple de sélection d'un programme de cuisson 3
Réglage de la puissance / sélection d'un programme de cuisson 4
F

AVERTISSEMENTS
1.
2.
3.
4.
Ne cuisinez pas les œufs avec leur coque pour éviter l’éclatement de la coque.
5.
Retirez les graisses à l’intérieur du four. Elles pourraient fumer ou s’enflammer lors de la cuisson
6.
Il ne faut pas utiliser le four à micro-ondes pour d’autres usages que la cuisine.
7.
Positionnez stablement le four à micro-ondes lors de l’installation et de l’utilisation.
8.
9.
Le four à micro-onde ne doit pas être installé dans un environnement humide ou à forte chaleur.
10.
11.
N’utilisez pas le four à micro-ondes à vide, cela peut l’endommager.
12.
N’utilisez pas d’ustensiles de métal lors de la cuisson. Cela pourrait créer des étincelles.
13.
14.
Avant utilisation, veuillez vérifier que les ustensiles sont adaptés au four à micro-ondes.
15.
16.
17.
Si vous faites réchauffer un liquide, son niveau va monter. Il faut faire attention aux débordements.
18.
19.
20.
21.
22.
23.
24.
25.
Si vous réchauffez de l’alcool, attention à ne pas vous brûler avec les éclaboussures, même après la cuisson.
Seuls les techniciens de maintenance spécialisés peuvent démonter le four à micro-ondes. Nulle autre personne y est
autorisée, au risque d’être électrocutée.
Il ne faut en aucun cas introduire de baguette métallique dans la bouche d’interrupteur à verrouillage à l’avant du four. Cela
pourrait provoquer une fuite de micro-ondes.
Il ne faut pas exercer une grande force sur la porte de four dans la direction opposée à l’ouverture, ce qui peut conduire à la
déformation de la porte et à la fuite de micro-ondes.
Ne cuisinez pas de nourriture ayant un emballage sous vide ou fermé. N’oubliez pas de percer le dessus des aliments
comportant une peau.
Après une longue durée d’utilisation, il y a une grande chaleur à l’intérieur de four à micro-ondes. Il vaut mieux le laisser
refroidir avant le prochain usage.
Lorsque vous cuisinez des aliments avec un emballage de papier ou plastique, il faut vérifier que l’emballage ne peut
s’enflammer.
S’il y de la fumée durant le fonctionnement de four à micro-ondes, il faut garder la porte fermée et débrancher la prise
électrique pour interrompre le courant.
Laissez un espace suffisant pour la rotation du plateau tournant. Il faut laisser au moins 20 cm au-dessus du four pour la
dissipation de la chaleur.
Il ne faut pas toucher le dessus du four et le côté extérieur de la porte du four à micro-ondes, ce qui pourrait provoquer des
brûlures.
Toutes les semaines, le joint de la porte et les parties concernées doivent être nettoyées par l’eau savonneuse pour garder
l’intérieur du four propre.
Si des fils électriques sont endommagés, seuls les techniciens et personnels de vente approuvés par le fabricant sont
autorisés à effectuer la réparation, pour éviter tout risque de décharge électrique.
Quand vous faites la cuisine avec des ustensiles que nous ne recommandons pas, il vous faut surveiller le déroulement de la
cuisson à l’intérieur du four jusqu’à sa fin.
Lorsque vous chauffez des boissons et aliments pour les enfants il faut avec soin mélanger ou secouer la préparation et tester
la température pour éviter les brûlures.
Si la porte, son encadrement ou son étanchéité est endommagé, ne pas utiliser le micro-ondes avant la réparation effectuée
par un technicien professionnel.
En cours de réparation, il faut couper le courant. S’il y a besoin d’enlever la couverture extérieure du four à micro-onde, cela
doit absolument être fait par des techniciens spécialisés, car les pièces à l’intérieur sont électrifiées et il y a risque de décharge
électrique.
Quand les enfants utilisent le four à micro-ondes, il vaut mieux qu’ils opèrent sous la surveillance d’un adulte. Ils ne peuvent
l’utiliser seuls qu’après avoir reçu les explications et instructions d’un adulte. L’adulte devra notamment informer l’enfant des
risques relatifs à l’utilisation d’un micro-ondes.
1

2
Panneau de commandes MICRO-ONDES
Description de la fonction
CODE ID 050MWO
Attention ! Avant d'utiliser l'appareil pour la première fois,
lisez attentivement la notice d'emploi générale du "MICRO-
ONDES" (voir livret séparé)
Voyant "Minutes"
S'allume lorsque l'afficheur à LED visualise un nombre de
minutes.
Voyant "Secondes"
S'allume lorsque l'afficheur à LED visualise un nombre de
secondes.
Afficheur à LED
Affichage du temps de cuisson
Minuteur (30 minutes max.)
Pour augmenter le temps de cuisson : tournez le bouton vers la
droite (dans le sens des aiguilles d'une montre).
Pour réduire le temps de cuisson : tournez le bouton vers la
gauche.
L'afficheur à LED visualise le temps de cuisson sélectionné.
Exemple :
1er temps de cuisson 2 min. : l'afficheur à LED visualise "02" et le
voyant (1) s'allume.
2ème temps de cuisson 25 sec. : l'afficheur à LED visualise "25" et
le voyant (2) s'allume.
La cuisson démarre après deux secondes et le minuteur commence
le compte à rebours.
Il est possible de prolonger ou d'écourter le temps de cuisson
pendant le fonctionnement de l'appareil.
3. Fin du programme : l'afficheur à LED visualise "00" et 5 bips
sonores retentissent.
Réglage de la puissance
Tournez le bouton jusqu'à ce que le repère (6) se trouve en
face de la puissance souhaitée.
Il est possible de modifier la puissance pendant le
fonctionnement de l'appareil.
Repère du niveau de puissance
Le repère doit se trouver exactement en face d'un niveau de
puissance.
Un signal sonore continu vous avertit si le repère se trouve
entre deux niveaux de puissance.
Dans ce cas, tournez le bouton (5) dans le sens souhaité
jusqu'à l'extinction du signal sonore.
7 Niveaux la puissance :
Low = Puissance minimum
Low-Med = Minimum-Moyenne
Med = Puissance moyenne
Med-M.H = Moyenne - Moienne-haut
M.H. = Puissance moyenne-haute
M.H-High = Moyenne-haut - Maximun
High = Puissance maximum
Consultez la page suivantepour un exemple de
sélection d'un programme de cuisson.
F
4
5
1
2
3
6

3
Exemple de sélection d'un programme de
cuisson
3 minutes de cuisson/mijotage à la puissance "
Moyenne-haute " (M.H)
CODE ID 050MWO
L'appareil est en mode 'veille' (Stand-by)
1. Ouvrez la porte du four et posez les aliments sur
le plateau tournant.
2. Refermez la porte du four.
3. Tournez le bouton (5) vers la droite, jusqu'à ce
que le repère (6) se trouve en face du niveau de
puissance M.H.
4. Tournez le bouton (4) vers la droite jusqu'à ce que
le voyant (1) s'allume et que le nombre de
minutes "03" s'affiche (3).
Le programme démarre 2 à 3 secondes après la
sélection définitive du temps de cuisson.
L'afficheur (3) indique continuellement temps de
cuisson restant (compte à rebours).
5. Vous pouvez, au besoin, modifier la puissance et
le temps de cuisson pendant le fonctionnement de
l'appareil.
6. En fin de cuisson, l'afficheur (3) visualise les
chiffres "00" et 5 bips sonores retentissent.
7. Ouvrez la porte de l'appareil et sortez les aliments
du four (portez des gants).
8. A la fin de chaque programme, ramenez le bouton
de réglage de la puissance (5) sur la position
"Stop", afin d'éviter la remise en marche
accidentelle de l'appareil, ce qui risquerait de
l'endommager.
9. Laissez reposer les aliments quelques instants
avant de servir. En effet, la cuisson peut se
prolonger légèrement au cœur des aliments et
pourrait causer des brûlures en cas de
consommation immédiate.
F
4
5
1
2
3
6

4
Réglage de la puissance / sélection du programme de cuisson
ID CODE 050MWO
Sélecteur du programme de cuisson (5)
Position / Niveau
Puissance du
gril selon le
modèle
Puissance
des
micro-ondes
selon le
modèle
Fonction / Application
Stop Aucune Aucune
Ramenez le sélecteur du niveau de puissance sur "Stop" après
chaque utilisation, afin d'éviter la remise en marche accidentelle de
l'appareil à vide.
Lorsque le sélecteur est sur la position "Stop", il est impossible
d'allumer le four et de régler les temps de cuisson sur le minuteur (4).
Vous pouvez interrompre à tout moment un programme de cuisson en
ramenant le sélecteur sur "Stop".
Une sonnerie retentira pour confirmer l'interruption du programmation
de cuisson.
Low (Minimum) Aucune 300 W Pour décongeler des aliments
Med (Moyenne) Aucune 510 W Pour réchauffer du lait ou d'autres boissons
M.H (moyenne-
haute)
Aucune 690 W Pour cuire à la vapeur / braiser / réchauffer des aliments
High (maximum) Aucune Puissance
maximum
850 W
Pour réchauffer rapidement / faire mijoter des aliments
F

.
La pagina si sta caricando...
La pagina si sta caricando...
La pagina si sta caricando...
La pagina si sta caricando...
La pagina si sta caricando...
La pagina si sta caricando...
La pagina si sta caricando...
La pagina si sta caricando...
La pagina si sta caricando...
La pagina si sta caricando...
La pagina si sta caricando...
La pagina si sta caricando...
La pagina si sta caricando...
La pagina si sta caricando...
La pagina si sta caricando...
La pagina si sta caricando...
La pagina si sta caricando...
La pagina si sta caricando...
La pagina si sta caricando...
La pagina si sta caricando...
La pagina si sta caricando...
La pagina si sta caricando...
La pagina si sta caricando...
La pagina si sta caricando...
La pagina si sta caricando...
-
 1
1
-
 2
2
-
 3
3
-
 4
4
-
 5
5
-
 6
6
-
 7
7
-
 8
8
-
 9
9
-
 10
10
-
 11
11
-
 12
12
-
 13
13
-
 14
14
-
 15
15
-
 16
16
-
 17
17
-
 18
18
-
 19
19
-
 20
20
-
 21
21
-
 22
22
-
 23
23
-
 24
24
-
 25
25
-
 26
26
-
 27
27
-
 28
28
-
 29
29
-
 30
30
-
 31
31
-
 32
32
-
 33
33
-
 34
34
-
 35
35
-
 36
36
-
 37
37
-
 38
38
-
 39
39
-
 40
40
-
 41
41
-
 42
42
-
 43
43
-
 44
44
-
 45
45


Haier MD-2485M Operating Panel
- Categoria
- Microonde
- Tipo
- Operating Panel
in altre lingue
- français: Haier MD-2485M
- español: Haier MD-2485M
- Deutsch: Haier MD-2485M
- Nederlands: Haier MD-2485M
- português: Haier MD-2485M