SICK MLG-2 IPG69K, Protective housing installation Mounting instructions
- Tipo
- Mounting instructions

Moun‐
tin
g
Instru
ctions
2006/42/EC
NO
SAFE
TY
8025069:
M O U N T I N G I N S T R U C T I O N S
en
Installed in the IPG69K protective pipe, the MLG-2 light grids achieve an enclo‐
sure rating of IP 69K. The protective pipe is used to protect the light grid from dust
and spraying water. Suitable for use in the food industry.
These instructions are only valid in connection with the mounting instructions
(8025069). You can find the mounting instructions at www.sick.com.
de
Die Lichtgitter MLG-2 erreichen, in das Schutzrohr IPG69K eingebaut, die Schutz‐
art IP 69K. Das Schutzrohr dient dazu, das Lichtgitter vor Staub und Strahlwasser
zu schützen. Tauglich für die Anwendung in der Lebensmittelindustrie.
Diese Anleitung ist ausschließlich in Verbindung mit der Montageanleitung
(8025069) gültig. Die Montageanleitung finden Sie unter www.sick.com.
it
Installate nel tubo di protezione IPG6K, le barriere fotoelettriche MLG-2, raggiun‐
gono il grado di protezione IP 69K. Il tubo di protezione serve a proteggere la bar‐
riera fotoelettrica da polvere e spruzzi d’acqua. Adatto per l'impiego nell’industria
alimentare.
Le presenti istruzioni sono valide solo in abbinamento alle istruzioni per il montag‐
gio (8025069). Le istruzioni per il montaggio sono disponibili all’indirizzo
www.sick.com.
fr
Montés dans le tube de protection IPG69K, les rideaux de détection MLG-2 atteig‐
nent l’indice de protection IP69K. Le tube de protection sert à protéger le rideau
de détection contre la poussière et les jets d’eau. Convient pour l’utilisation dans
l’industrie agro-alimentaire.
Cette notice n’est valable qu’avec la notice de montage (8025069). La notice de
montage est disponible sur le site Internet www.sick.com.
es
Montadas en el tubo de protección IPG69K, las rejillas fotoeléctricas MLG-2
alcanzan un grado de protección IP 69K. El tubo de protección se emplea para
proteger la rejilla fotoeléctrica contra el polvo y los chorros de agua. Apto para el
uso en el sector alimentario.
Estas instrucciones son válidas exclusivamente en combinación con las instruc‐
ciones de montaje (8025069). Encontrará las instrucciones de montaje en
www.sick.com.
zh
到达光
栅
MLG-2,内置到保护管 IPG69K 中,形成外壳防护等级 IP 69K。保护管
的作用是保护光栅免受灰尘和喷射水的影响。适合在食品工业中使用。
本指南仅
在结合使用安装指南 (8025069) 的情况下有效。如需查看安装指南,
可访问 www.sick.com 网页。
1 Scope of delivery
Lieferumfang Dotazione di fornitura
Étendue de la livraison Volumen de suministro
供货范围
en
•
MLG-2 protective pipe, IP69K
•
Plastic tensioning ring
de
•
S
c
hutzrohr MLG-2 IP69K
•
Kunststoffspannring
it
•
T
ubo di pr
otezione MLG-2 IP69K
•
Anello di chiusura in plastica
fr
•
T
ube de pr
otection MLG-2 IP69K
•
Bague de serrage en plastique
es
•
T
ubo de pr
otección MLG-2 IP69K
•
Anillo de apriete de plástico
zh
•
保护管 ML
G-2 IP69K
•
塑料夹紧环
2 Mounting
Montage Montaje
Montaggio 安装
Montage
2
1
3
4
5
6
7
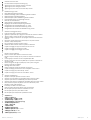
en
1.
L
oosen c
able clamp 1.
2.
Slide sleeve 2 in direction of male connector.
3.
Loosen cable gland 3 and slide in direction of male connector.
4.
Hold stainless steel plug 4 against SW.
5.
Loosen stainless steel plug 5 and slide in direction of male connector.
6.
Remove plastic tensioning ring 6 using long nose pliers.
7.
Slide pipes 7 off the device.
8025606 / 24.04.2020/de MLG-2 IPG69K | SICK 1
8025606 / 24.04.2020
www.sick.com
MLG-2 IPG69K
SICK AG
E
rwin-Sick
-Straße 1
D-79183 Waldkirch

Assemble in reverse order.
Use the enclosed new plastic tensioning ring.
Tightening torque for stainless steel plug: 3 to 5 Nm
Tightening torque for cable gland: 10 Nm
Tightening torque for sleeve of the cable clamp: 10 Nm
de
1.
K
abelklemmung 1 lösen.
2.
Hülse 2 Richtung Stecker schieben.
3.
Kabelverschraubung 3 lösen und Richtung Stecker schieben.
4.
Edelstahlstopfen 4 an SW gegenhalten.
5.
Edelstahlstopfen 5 lösen und Richtung Stecker schieben.
6.
Kunststoffspannring 6 mit Spitzzange entfernen.
7.
Röhre 7 von Gerät schieben.
Zusammenbau in umgekehrter Reihenfolge.
Beigelegten neuen Kunststoffspannring verwenden.
Anzugsdrehmoment für Edelstahlstopfen: 3 ... 5 Nm
Anzugsdrehmoment für Kabelverschraubung: 10 Nm
Anzugsdrehmoment für Hülse der Kabelklemmung: 10 Nm
it
1.
Allent
are il bloccaggio dei cavi 1.
2.
Inserire la boccola 2 in direzione connettore.
3.
Sganciare il pressacavo 3 e spingerlo in direzione del connettore maschio.
4.
Tenere il tappo in acciaio inox 4 contro l’apertura chiave.
5.
Sganciare il tappo in acciaio inox 5 e spingerlo in direzione del connettore
maschio.
6.
Rimuovere l’anello di chiusura in plastica 6 con una pinza a becchi.
7.
Staccare i tubi 7 dal dispositivo.
Per il montaggio, procedere in ordine inverso.
Utilizzare il nuovo anello di chiusura in plastica in dotazione.
Coppia di serraggio per tappo in acciaio inox: da 3 a 5 Nm
Coppia di serraggio per pressacavo: 10 Nm
Coppia di serraggio per bloccaggio cavo: 10 Nm
fr
1.
D
esserrer le serre-câbles1.
2.
Pousser l’embout 2en direction du connecteur mâle.
3.
Desserrer le presse-étoupe 3 et le pousser en direction du connecteur
mâle.
4.
Contre-appuyer le bouchon en acier inoxydable 4sur SW.
5.
Desserrer le bouchon en acier inoxydable 5 et le pousser en direction du
connecteur mâle.
6.
Retirer la bague de serrage en plastique 6 avec la pince à long bec.
7.
Enlever le tuyau 7 de l’appareil.
Montage dans l’ordre inverse.
Utiliser la bague de serrage en plastique neuve fournie.
Couple de serrage pour bouchon en acier inoxydable : 3 Nm à 5 Nm
Couple de serrage pour presse-étoupe : 10 Nm
Couple de serrage pour embout du serre-câbles : 10 Nm
es
1.
Sue
lte el sujetacables 1.
2.
Desplace el casquillo 2 hacia el conector macho.
3.
Suelte el racor para cables 3 y desplácelo hacia el conector macho.
4.
Sujete el tapón de acero inoxidable 4 por la abertura para llave.
5.
Suelte el tapón de acero inoxidable 5 y desplácelo hacia el conector macho.
6.
Retire el anillo de apriete de plástico 6 con unos alicates de punta.
7.
Desplace el tubo 7 del dispositivo.
El montaje se realiza en el orden inverso.
Utilice el anillo de apriete de plástico nuevo suministrado.
Par de apriete para tapón de acero inoxidable: 3 a 5 Nm
Par de apriete para racor para cables: 10 Nm
Par de apriete para casquillo del sujetacables: 10 Nm
zh
1.
松开电缆夹 1。
2.
向插头方向推衬套 2。
3.
松开电缆压盖 3 并向插头方向推。
4.
将不锈钢保护塞 4 抵靠在 S
W 上。
5.
松开不锈钢保护塞 5 并向插头方向推。
6.
用尖嘴钳移除塑料夹紧环 6。
7.
将管材 7 推离设备。
以相反顺序组装。
使用随附的新塑料夹紧环。
不锈钢保护塞的拧紧力矩:3 ~ 5 Nm
电缆压盖的拧紧力矩:10 Nm
电缆夹衬套的拧紧力矩:10 Nm
8025606 / 24.04.2020/de IPG96K | SICK 2
-
 1
1
-
 2
2


SICK MLG-2 IPG69K, Protective housing installation Mounting instructions
- Tipo
- Mounting instructions
in altre lingue
Documenti correlati
-
SICK AFB Quickstart
-
-
-
-
-
-
-
SICK C4000 Palletizer in IP69K Housing Istruzioni per l'uso
-
-