
Getting Started Guide
Guide de mise en route
Leitfaden zur Inbetriebnahme
Guida rapida
Guía de instalación inicial
Manual de primers passos
Installatiegids
Guia de Introdução
HP LaserJet P4010 and P4510 Series Printers
Imprimantes HP LaserJet séries P4010
et P4510
Lea esto primero

Copyright and License
© 2008 Copyright Hewlett-Packard Development Company, L.P.
Reproduction, adaptation or translation without prior written
permission is prohibited, except as allowed under the copyright
laws.
The information contained herein is subject to change without
notice.
The only warranties for HP products and services are set forth in
the express warranty statements accompanying such products
and services. Nothing herein should be construed as constituting
an additional warranty. HP shall not be liable for technical or
editorial errors or omissions contained herein.
Part number: CB506-90999
Edition 1, 8/2008
FCC Regulations
This equipment has been tested and found to comply with the
limits for a Class B digital device, pursuant to Part 15 of the FCC
rules. These limits are designed to provide reasonable protection
against harmful interference in a residential installation. This
equipment generates, uses, and can radiate radio-frequency
energy. If this equipment is not installed and used in accordance
with the instructions, it may cause harmful interference to
radio communications. However, there is no guarantee that
interference will not occur in a particular installation. If this
equipment does cause harmful interference to radio or television
reception, which can be determined by turning the equipment
off and on, correct the interference by one or more of the
following measures:
• Reorient or relocate the receiving antenna.
• Increase separation between equipment and receiver.
• Connect equipment to an outlet on a circuit different from
that to which the receiver is located.
• Consult your dealer or an experienced radio/TV technician.
Any changes or modications to the product that are not
expressly approved by HP could void the user’s authority to
operate this equipment. Use of a shielded interface cable is
required to comply with the Class B limits of Part 15 of FCC
rules. For more regulatory information, see the electronic
user guide. Hewlett-Packard shall not be liable for any direct,
indirect, incidental, consequential, or other damage alleged in
connection with the furnishing or use of this information.
Trademark Credits
Windows® is a U.S. registered trademark of Microsoft
Corporation.
Copyright et licence
© 2008 Copyright Hewlett-Packard Development Company, L.P.
Toute reproduction, adaptation ou traduction sans autorisation
expresse par écrit est interdite, sauf dans les cas permis par les
lois régissant les droits d'auteur.
Les informations contenues dans ce document peuvent être
modiées sans préavis.
Les seules garanties pour les produits et services HP sont décrites
dans les déclarations de garantie expresses accompagnant
ces mêmes produits et services. Les informations contenues
dans ce document ne constituent en aucun cas une garantie
supplémentaire. HP n'est pas responsable des éventuelles
erreurs d'ordre technique ou éditorial ou des omissions du
présent document.
Référence : CB506-90999
Edition 1, 8/2008
Réglementations de la FCC
Les tests effectués sur cet équipement ont déterminé qu’il est
conforme aux prescriptions des unités numériques de classe B,
telles que spéciées à l’article 15 des normes de la FCC
(Commission fédérale des communications). Ces limites
sont destinées à assurer une protection sufsante contre les
interférences produites dans une installation résidentielle. Cet
équipement génère, utilise et peut émettre de l’énergie sous
forme d'ondes radio. Si ce matériel n’est pas installé et utilisé
conformément aux instructions, il peut causer des interférences
nuisibles aux communications radio. Aucune garantie n'est
néanmoins fournie quant à l'apparition d'interférences dans
une installation particulière. Si cet appareil provoque des
interférences nuisibles (qui peuvent être déterminées en
éteignant et rallumant l'appareil) à des communications radio ou
télévision, corrigez ce problème en appliquant une ou plusieurs
des mesures suivantes :
• Réorientez ou déplacez l’antenne de réception.
• Augmentez la distance séparant l’équipement du récepteur.
• Connectez l’équipement à une prise située sur un circuit
différent de celui sur lequel se trouve le récepteur.
• Consultez votre revendeur ou un technicien radio/télévision
expérimenté.
Toute modication apportée au produit sans le consentement de
HP peut se traduire par la révocation du droit d’exploitation de
l’équipement dont jouit l’utilisateur. Un câble d’interface blindé
est requis an de satisfaire aux stipulations de l’article 15 des
réglementations de la FCC sur les appareils de classe B. Pour de
plus amples informations sur les réglementations, reportez-vous
au Guide de l'utilisateur au format électronique. Hewlett-Packard
ne sera en aucun cas tenu responsable des dommages directs,
indirects, accessoires, consécutifs ou autres pouvant résulter de
la mise à disposition de ces informations ou de leur utilisation.
Marques commerciales et déposées
Windows® est une marque déposée aux Etats-Unis de Microsoft
Corporation.

Hardware setup................................................................................................................................. 2
Software setup
Windows USB........................................................................................................................ 9
Windows Network.................................................................................................................. 14
Macintosh USB....................................................................................................................... 21
Macintosh Network................................................................................................................. 29
Conguration matérielle...................................................................................................................... 2
Conguration logicielle
USB pour Windows................................................................................................................ 9
Réseau pour Windows............................................................................................................ 14
USB pour Macintosh............................................................................................................... 21
Réseau pour Macintosh........................................................................................................... 29
Hardware-Einrichtung.......................................................................................................................... 2
Software-Einrichtung
USB unter Windows................................................................................................................ 9
Netzwerk unter Windows........................................................................................................ 14
USB unter Macintosh............................................................................................................... 21
Netzwerk unter Macintosh....................................................................................................... 29
Installazione hardware........................................................................................................................ 2
Installazione software
USB Windows........................................................................................................................ 9
Rete Windows........................................................................................................................ 14
USB Macintosh....................................................................................................................... 21
Rete Macintosh....................................................................................................................... 29
Conguración del hardware................................................................................................................ 2
Conguración del software
Conexión USB en Windows..................................................................................................... 9
Conguración de red en Windows........................................................................................... 14
Conexión USB en Macintosh.................................................................................................... 21
Conguración de red en Macintosh.......................................................................................... 29
Conguració del maquinari................................................................................................................. 2
Conguració del programari
USB per al Windows.............................................................................................................. 9
Xarxa per al Windows............................................................................................................ 14
USB per al Macintosh............................................................................................................. 21
Xarxa per al Macintosh........................................................................................................... 29
Installatie van de hardware................................................................................................................. 2
Installatie van de software
USB-installatie voor Windows.................................................................................................. 9
Netwerkinstallatie voor Windows............................................................................................. 14
USB-installatie voor Macintosh................................................................................................. 21
Netwerkinstallatie voor Macintosh............................................................................................ 29
Conguração do hardware................................................................................................................. 2
Conguração do software
USB Windows....................................................................................................................... 9
Rede Windows...................................................................................................................... 14
USB Macintosh...................................................................................................................... 21
Rede Macintosh..................................................................................................................... 29

1
1
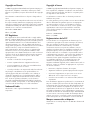
23.5 kg
52 lb
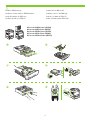
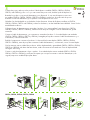
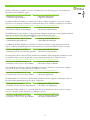
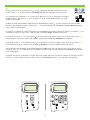
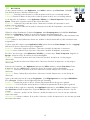
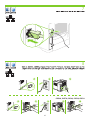
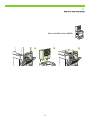
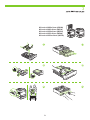
Unpack the product.
HP LaserJet P4014 Printer (CB506A)
HP LaserJet P4014n Printer (CB507A)
HP LaserJet P4014dn Printer (CB512A)
HP LaserJet P4015n Printer (CB509A)
HP LaserJet P4015dn Printer (CB526A)
HP LaserJet P4515n Printer (CB514A)
Déballez le produit. Packen Sie das Produkt aus.
Disimballare il prodotto. Desembale el producto. Desempaqueteu el producte.
Pak het product uit. Desembale o produto.
1 2
3
4

2
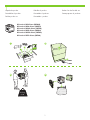
23.5 kg
52 lb
25.8 kg
57 lb
HP LaserJet P4515xm Printer (CB517A)
HP LaserJet P4015tn Printer (CB510A)
HP LaserJet P4015x Printer (CB511A)
HP LaserJet P4515tn Printer (CB515A)
HP LaserJet P4515x Printer (CB516A)
1 2 3
4 5 6
1 2 3

2
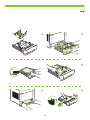
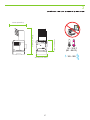
10˚ - 32.5˚C
(50˚ - 90.5˚F)
10% - 90%
425 mm (16.5 inches)
94 mm (15.5 inches)
955 mm (.6 inches)
5 mm (21.0 inches)
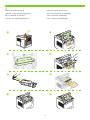
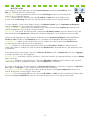
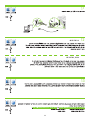
Select a sturdy, well-ventilated, dust-free area to position the product.
Choisissez un emplacement stable, aéré et non poussiéreux pour installer le produit.
Stellen Sie das Gerät an einem gut belüfteten Ort auf einer stabilen, staubfreien Fläche auf.
Posizionare il prodotto su una supercie solida in un'area ben ventilata e priva di polvere.
Elija una zona sólida con buena ventilación y sin polvo para colocar el producto.
Seleccioneu una zona ben ventilada i sense pols per situar el producte.
Zoek een stevige, goed geventileerde, stofvrije plek uit om het product te plaatsen.
Escolha um local rme, bem ventilado e livre de poeiras para colocar o produto.

4
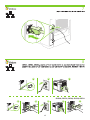
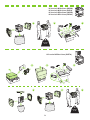
Install the 500-sheet tray.
HP LaserJet P4015tn Printer (CB510A)
HP LaserJet P4015x Printer (CB511A)
HP LaserJet P4515tn Printer (CB515A)
HP LaserJet P4515x Printer (CB516A)
HP LaserJet P4515xm Printer (CB517A)
Installez le bac 500 feuilles.
Installieren Sie das Fach für 500 Blatt Papier. Installare il vassoio da 500 fogli.
Instale la bandeja de 500 hojas. Instal·leu la safata de 500 fulls.
Installeer de lade voor 500 vel. Instale a bandeja para 500 folhas.
1
3
2
5
6
4

5
4
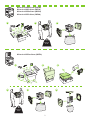
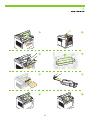
Remove the packing material.
Retirez les bandes de protection.
Entfernen Sie das Verpackungsmaterial.
Rimuovere il materiale di imballaggio.
Retire el material de embalaje.
Traieu el material d'embalatge.
Verwijder het verpakkingsmateriaal.
Retire o material de embalagem.
1 2
3 4
5 6
7 8

6
5
Load paper. Chargez du papier.
Legen Sie Papier ein. Caricare la carta.
Cargue el papel. Carregueu-hi paper.
Plaats papier. Carregue papel.
1 2
4 5
3

6
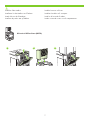
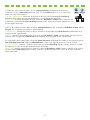
Install the 5-bin mailbox.
HP LaserJet P4515xm Printer (CB517A)
Installez la trieuse à 5 bacs.
Installieren Sie die Mailbox mit 5 Fächern. Installare il mailbox a 5 scomparti.
Instale el buzón de 5 bandejas. Instal·leu la bústia de 5 safates.
Installeer de postbus met vijf bakken. Instale a caixa de correio com 5 compartimentos.
1 2 3

8
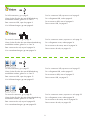
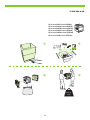
For USB connections, go to page 9.
For network connections, go to page 14.
For USB connections, go to page 21.
For network connections, go to page 29.
Pour les connexions USB, reportez-vous à la page 9.
Pour les connexions réseau, reportez-vous à la page 14.
Pour les connexions USB, reportez-vous à la page 21.
Pour les connexions réseau, reportez-vous à la page 29.
Wenn Sie den Drucker über eine USB-Verbindung
anschließen möchten, gehen Sie zu Seite 9.
Wenn Sie den Drucker über eine Netzwerkverbindung
anschließen möchten, gehen Sie zu Seite 14.
Wenn Sie den Drucker über eine USB-Verbindung
anschließen möchten, gehen Sie zu Seite 21.
Wenn Sie den Drucker über eine Netzwerkverbindung
anschließen möchten, gehen Sie zu Seite 29.
Per i collegamenti USB, vedere pagina 9.
Per i collegamenti in rete, vedere pagina 14.
Per i collegamenti USB, vedere pagina 21.
Per i collegamenti in rete, vedere pagina 29.
Para conexiones USB, vaya a la página 9.
Para conexiones de red, vaya a la página 14.
Para conexiones USB, vaya a la página 21.
Para conexiones de red, vaya a la página 29.
Per a connexions USB, aneu a la pàgina 9.
Per a connexions de xarxa, aneu a la pàgina 14.
Per a connexions USB, aneu a la pàgina 21.
Per a connexions de xarxa, aneu a la pàgina 29.
Voor USB-aansluitingen: ga naar pagina 9.
Voor netwerkaansluitingen: ga naar pagina 14.
Voor USB-aansluitingen: ga naar pagina 21.
Voor netwerkaansluitingen: ga naar pagina 29.
Para conexões USB, ver página 9.
Para conexões de rede, ver página 14.
Para conexões USB, ver página 21.
Para conexões de rede, ver página 29.

9
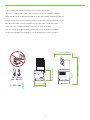
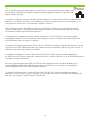
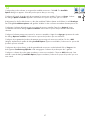
Caution! Do not connect USB now. Wait until the software prompts you.
USB connection
Attention ! Ne branchez pas le câble USB tout de suite. Attendez les instructions du logiciel.
Connexion USB
Achtung! Schließen Sie das USB-Kabel jetzt noch nicht an. Warten Sie, bis Sie von der Software dazu aufgefordert
werden.
USB-Verbindung
Attenzione. Non collegare il cavo USB. Attendere la richiesta del software.
Collegamento USB
Precaución: No conecte aún el cable USB. Espere hasta que el software se lo solicite.
Conexión USB
Precaució. No connecteu l'USB ara. Espereu ns que el programari ho sol·liciti.
Connexió USB
Let op! Sluit de USB-kabel nu nog niet aan. Wacht tot de software daarom vraagt.
USB-aansluiting
Cuidado! Não conecte o USB agora. Aguarde até que isso seja solicitado pelo software.
Conexão USB

10
8
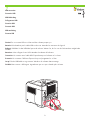
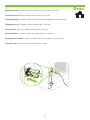
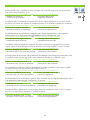
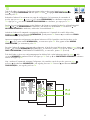
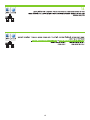
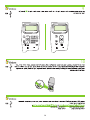
CB511A, CB512A, CB516A, CB517A, CB526A
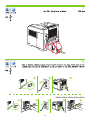
Connect the power, and turn on the product. If the duplexer is installed (CB511A, CB512A, CB516A,
CB51A, and CB526A), pull it out so you can connect the power cord, and then push the duplexer in.
Branchez le produit sur une prise d'alimentation, puis allumez-le. Si une unité d'impression recto verso
est installée (CB511A, CB512A, CB516A, CB51A et CB526A), tirez-la hors du produit an de pouvoir
brancher le cordon d'alimentation, puis replacez l'unité d'impression recto verso.
Schließen Sie das Netzkabel an, und schalten Sie das Gerät ein. Wenn der Duplexer installiert ist (CB511A,
CB512A, CB516A, CB51A und CB526A), ziehen Sie ihn heraus, um das Netzkabel anzuschließen. Setzen Sie ihn
anschließend wieder ein.
Collegare il cavo di alimentazione e accendere il prodotto. Se è stata installata l'unità fronte/retro (CB511A,
CB512A, CB516A, CB51A e CB526A), estrarla in modo da poter collegare il cavo di alimentazione, quindi
reinserirla.
Conecte el cable de alimentación y, a continuación, encienda el producto. Si la unidad dúplex está instalada
(CB511A, CB512A, CB516A, CB51A y CB526A), extráigala para poder conectar el cable de alimentación y, a
continuación, vuelva a introducirla.
Endolleu la impressora i enceneu el producte. Si s'ha instal·lat la unitat dúplex (CB511A, CB512A, CB516A,
CB51A i CB526A), traieu-la per poder connectar el cable d'alimentació i, a continuació, inseriu la unitat dúplex.
Sluit het netsnoer aan en schakel het product in. Als de duplexeenheid is geïnstalleerd (CB511A, CB512A, CB516A,
CB51A en CB526A), trek deze dan naar buiten, zodat u het netsnoer kunt aansluiten. Duw de duplexeenheid
vervolgens weer terug.
Conecte o cabo de alimentação e ligue o produto. Se a unidade dúplex estiver instalada (CB511A, CB512A,
CB516A, CB51A e CB526A), puxe-a para fora para que você possa conectar o cabo de alimentação e, em
seguida, empurre a unidade dúplex para dentro.
1 2
4
5
3
1 2
3

11
9
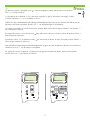
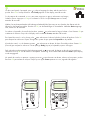
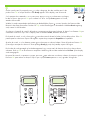
On the control panel, if prompted, press to select a language, the date, and the time for the product.
Press OK to accept selections.
Sur le panneau de commande, si vous y êtes invité, appuyez sur pour sélectionner une langue, la date
et l'heure. Appuyez sur OK pour conrmer vos choix.
Wählen Sie nach entsprechender Aufforderung im Bedienfeld die Option , um eine Sprache, das Datum und die
Uhrzeit für das Gerät einzustellen. Drücken Sie OK, um die Einstellungen zu übernehmen.
Se richiesto sul pannello di controllo del prodotto, premere per selezionare la lingua, la data e l'ora. Premere OK
per confermare le selezioni.
En el panel de control, si se le solicita, pulse para seleccionar el idioma, la fecha y la hora del producto. Pulse OK
para aceptar las selecciones.
Al tauler de control, si us ho demana, premeu per seleccionar un idioma, la data i l'hora del producte. Premeu OK
(D'acord) per acceptar les seleccions.
Druk zodra dit wordt gevraagd op het bedieningspaneel op om een taal, de datum en de tijd voor het product te
selecteren. Druk op OK om de selecties te accepteren.
No painel de controle, se aparecer o prompt, pressione para selecionar um idioma, a data e a hora para o
produto. Pressione OK para aceitar as seleções.

12
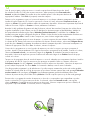
10
H
P
La
se
r
Jet XXXXX
Pr
in
te
r
HP
La
se
r
Jet M1319
S
er
i
es
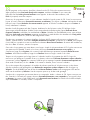
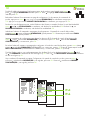
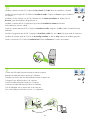
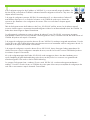
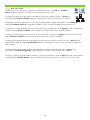
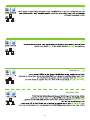
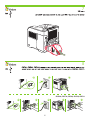
Quit all programs on the computer. Install the software from the CD. Follow the onscreen instructions.
When prompted, select Connected directly to this computer, and then click Next. Do not connect the
USB cable until the Looking for new hardware screen appears. At the end of the installation, click
Finish. If prompted, restart the computer.
Quittez tous les programmes ouverts sur votre ordinateur. Installez le logiciel à partir du CD. Suivez les instructions à
l'écran. A l'invite, sélectionnez Connecté directement à cet ordinateur, puis cliquez sur Suivant. Ne branchez le câble
USB que lorsque l'écran Recherche de nouveau matériel apparaît. A la n de l'installation, cliquez sur Terminer. A
l'invite, redémarrez l'ordinateur.
Beenden Sie alle Programme auf dem Computer. Installieren Sie die Software von der CD. Befolgen Sie die
Anweisungen auf dem Bildschirm. Wählen Sie bei entsprechender Aufforderung die Option Direkt mit diesem
Computer verbunden, und klicken Sie anschließend auf Weiter. Schließen Sie das USB-Kabel erst an, wenn auf dem
Bildschirm Suche nach neuer Hardware angezeigt wird. Klicken Sie nach Abschluss der Installation auf Fertig stellen.
Starten Sie den Computer neu, wenn Sie dazu aufgefordert werden.
Chiudere tutti i programmi sul computer. Installare il software dal CD. Attenersi alle istruzioni visualizzate sullo
schermo. Quando richiesto, selezionare Collegata direttamente al computer, quindi fare clic su Avanti. Non collegare
il cavo USB no a quando non viene visualizzata la schermata Ricerca nuovo hardware. Al termine dell'installazione,
fare clic su Fine. Se richiesto, riavviare il computer.
Cierre todos los programas que estén abiertos en el equipo. Instale el software mediante el CD. Siga las instrucciones
que aparecen en la pantalla. Cuando se le solicite, seleccione Conectado directamente a este equipo y, a
continuación, haga clic en Siguiente. No conecte el cable USB hasta que aparezca la pantalla Buscando nuevo
hardware. Al nal de la instalación, haga clic en Finalizar. Reinicie el equipo cuando se le solicite.
Tanqueu tots els programes que hi hagi oberts a l'ordinador. Instal·leu el programari des del CD. Seguiu les
instruccions que apareguin en pantalla. Quan se us demani, seleccioneu Connectat directament a aquest ordinador i,
a continuació, premeu Següent. No connecteu l'USB ns que no aparegui la pantalla S'està cercant maquinari nou.
Quan acabi la instal·lació, feu clic a Acaba. Si el sistema ho demana, torneu a iniciar l'ordinador.
Sluit op de computer alle programma's af. Installeer de software vanaf de cd. Volg de instructies op het scherm.
Selecteer zodra dit wordt gevraagd de optie Rechtstreeks aangesloten op deze computer en klik vervolgens op
Volgende. Sluit de USB-kabel pas aan als het scherm Nieuwe hardware zoeken wordt weergegeven. Klik aan het
einde van de installatie op Voltooien. Start de computer opnieuw op als dat wordt gevraagd.
Saia de todos os programas que estiverem abertos no computador. Instale o software do CD. Siga as instruções na
tela. Quando for solicitado pelo prompt, selecione Conectado diretamente a este computador e, em seguida, clique
em Avançar. Só conecte o cabo USB quando a tela Procurando novo hardware for exibida. No nal da instalação,
clique em Concluir. Se solicitado, reinicie o computador.

1
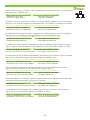
Windows USB setup is complete. For more information about the following topics, see the electronic
User Guide on the CD-ROM or go to:
www.hp.com/support/hpljp4010series or www.hp.com/support/hpljp4510series.
• Detailed user instructions. • Important safety notices.
• Troubleshooting information. • Regulatory information.
L'installation USB pour Windows est terminée. Pour de plus amples informations sur les sujets suivants,
reportez-vous au Guide de l'utilisateur au format électronique sur le CD-ROM ou rendez-vous à l'adresse :
www.hp.com/support/hpljp4010series ou www.hp.com/support/hpljp4510series.
• Instructions d'utilisation détaillées. • Notices importantes de sécurité.
• Informations relatives au dépannage. • Informations réglementaires.
Die USB-Einrichtung unter Windows ist abgeschlossen. Weitere Informationen zu den folgenden Themen
nden Sie im elektronischen Benutzerhandbuch auf der CD-ROM oder unter:
www.hp.com/support/hpljp4010series oder www.hp.com/support/hpljp4510series.
• Ausführliche Anweisungen für Benutzer • Wichtige Sicherheitshinweise
• Fehlerbehebungsinformationen • Behördliche Bestimmungen
L'installazione USB per Windows è terminata. Per ulteriori informazioni sugli argomenti riportati di
seguito, vedere la Guida dell'utente in formato elettronico inclusa nel CD-ROM o visitare i siti Web:
www.hp.com/support/hpljp4010series o www.hp.com/support/hpljp4510series.
• Istruzioni dettagliate per l'utente. • Note importanti sulla sicurezza.
• Informazioni per la risoluzione dei problemi. • Informazioni sulle normative.
La conguración de la conexión USB en Windows ha nalizado. Para obtener más información sobre
los siguientes temas, consulte la guía del usuario electrónica incluida en el CD-ROM o visite:
www.hp.com/support/hpljp4010series o www.hp.com/support/hpljp4510series.
• Instrucciones detalladas para el usuario. • Avisos de seguridad importantes.
• Información sobre solución de problemas. • Información sobre normativas.
S'ha completat la conguració USB per al Windows. Per obtenir informació sobre el temes següents,
consulteu la Guia de l'usuari electrònica al CD-ROM o aneu a:
www.hp.com/support/hpljp4010series o www.hp.com/support/hpljp4510series.
• Instruccions detallades per a l'usuari. • Avisos importants sobre seguretat.
• Informació per a la solució de problemes. • Informació regulatòria.
De USB-installatie voor Windows is gereed. Meer informatie over de volgende onderwerpen vindt u in
de elektronische gebruikersgids op de cd-rom. Of ga naar:
www.hp.com/support/hpljp4010series of www.hp.com/support/hpljp4510series.
• Gedetailleerde instructies. • Belangrijke veiligheidsinformatie.
• Informatie over het oplossen van problemen. • Informatie over regelgeving.
A instalação USB no Windows foi concluída. Para obter mais informações sobre os tópicos a seguir,
consulte o Guia do Usuário eletrônico no CD-ROM ou acesse:
www.hp.com/support/hpljp4010series ou www.hp.com/support/hpljp4510series.
• Instruções detalhadas para o usuário. • Aviso de segurança importante.
• Informações sobre solução de problemas. • Informações regulamentares.

14
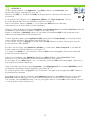
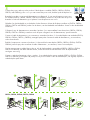
Network connection. Connect the network cable to the product and to the network.
Connexion réseau. Branchez le câble réseau au produit et au réseau.
Netzwerkverbindung. Schließen Sie das Gerät über das Netzwerkkabel an das Netzwerk an.
Collegamento in rete. Collegare il cavo di rete al prodotto e alla rete.
Conexión de red. Conecte el cable de red al producto y a la red.
Connexió de xarxa. Connecteu el cable de xarxa al producte i a la xarxa.
Aansluiting op een netwerk. Sluit de netwerkkabel aan op het product en op het netwerk.
Conexão de rede. Conecte o cabo de rede ao produto e à rede.

15
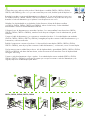
8
CB511A, CB512A, CB516A, CB517A, CB526A
Connect the power, and turn on the product. If the duplexer is installed (CB511A, CB512A, CB516A,
CB51A, and CB526A), pull it out so you can connect the power cord, and then push the duplexer in.
Branchez le produit sur une prise d'alimentation, puis allumez-le. Si une unité d'impression recto verso
est installée (CB511A, CB512A, CB516A, CB51A et CB526A), tirez-la hors du produit an de pouvoir
brancher le cordon d'alimentation, puis replacez l'unité d'impression recto verso.
Schließen Sie das Netzkabel an, und schalten Sie das Gerät ein. Wenn der Duplexer installiert ist (CB511A, CB512A,
CB516A, CB51A und CB526A), ziehen Sie ihn heraus, um das Netzkabel anzuschließen. Setzen Sie ihn anschließend
wieder ein.
Collegare il cavo di alimentazione e accendere il prodotto. Se è stata installata l'unità fronte/retro (CB511A, CB512A,
CB516A, CB51A e CB526A), estrarla in modo da poter collegare il cavo di alimentazione, quindi reinserirla.
Conecte el cable de alimentación y, a continuación, encienda el producto. Si la unidad dúplex está instalada (CB511A,
CB512A, CB516A, CB51A y CB526A), extráigala para poder conectar el cable de alimentación y, a continuación,
vuelva a introducirla.
Endolleu la impressora i enceneu el producte. Si s'ha instal·lat la unitat dúplex (CB511A, CB512A, CB516A, CB51A i
CB526A), traieu-la per poder connectar el cable d'alimentació i, a continuació, inseriu la unitat dúplex.
Sluit het netsnoer aan en schakel het product in. Als de duplexeenheid is geïnstalleerd (CB511A, CB512A, CB516A,
CB51A en CB526A), trek deze dan naar buiten, zodat u het netsnoer kunt aansluiten. Duw de duplexeenheid
vervolgens weer terug.
Conecte o cabo de alimentação e ligue o produto. Se a unidade dúplex estiver instalada (CB511A, CB512A, CB516A,
CB51A e CB526A), puxe-a para fora para que você possa conectar o cabo de alimentação e, em seguida, empurre a
unidade dúplex para dentro.
1 2
4 5
3
1 2 3

16
9
On the control panel, if prompted, press to select a language, the date, and the time for the
product. Press OK to accept selections. After Ready appears on the display, wait 0 seconds.
Sur le panneau de commande, si vous y êtes invité, appuyez sur pour sélectionner une langue,
la date et l'heure. Appuyez sur OK pour conrmer vos choix. Lorsque Prêt apparaît sur l'écran,
attendez 0 secondes.
Wählen Sie nach entsprechender Aufforderung im Bedienfeld die Option , um eine Sprache, das Datum und die
Uhrzeit für das Gerät einzustellen. Drücken Sie OK, um die Einstellungen zu übernehmen. Nachdem Bereit angezeigt
wird, warten Sie 0 Sekunden.
Se richiesto sul pannello di controllo del prodotto, premere per selezionare la lingua, la data e l'ora. Premere OK per
confermare le selezioni. Dopo che sul display viene visualizzato Pronta, attendere 0 secondi.
En el panel de control, si se le solicita, pulse para seleccionar el idioma, la fecha y la hora del producto. Pulse OK
para aceptar las selecciones. Espere 0 segundos a partir de que aparezca Preparado en la pantalla.
Al tauler de control, si us ho demana, premeu per seleccionar un idioma, la data i l'hora del producte. Premeu OK
(D'acord) per acceptar les seleccions. Quan aparegui Ready (A punt) a la pantalla, espereu 0 segons.
Druk zodra dit wordt gevraagd op het bedieningspaneel op om een taal, de datum en de tijd voor het product te
selecteren. Druk op OK om de selecties te accepteren. Wacht nog 0 seconden nadat het bericht Klaar op het display
wordt weergegeven.
No painel de controle, se aparecer o prompt, pressione para selecionar um idioma, a data e a hora para o produto.
Pressione OK para aceitar as seleções. Depois que a opção Pronto aparecer no visor, aguarde 0 segundos.

1
10
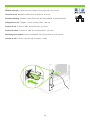
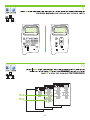
IPv4
IPv6
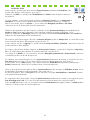
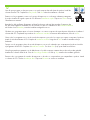
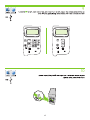
Find the IP address by printing a Conguration page. At the product control panel, press Menu ,
press to highlight INFORMATION and then press OK. Press to highlight PRINT CONFIGURATION
and then press OK.
Recherchez l'adresse IP en imprimant une page de conguration. Sur le panneau de commande du
produit, appuyez sur Menu , puis sur pour mettre INFORMATIONS en surbrillance et appuyez sur
OK. Appuyez sur pour mettre IMPRIMER CONFIGURATION en surbrillance, puis appuyez sur OK.
Drucken Sie eine Kongurationsseite, um die IP-Adresse des Geräts zu ermitteln. Drücken Sie auf dem Bedienfeld
Menü und , um INFORMATIONEN zu markieren, und drücken Sie anschließend OK. Drücken Sie , um
DRUCKKONFIGURATION zu markieren, und drücken Sie anschließend OK.
Individuare l'indirizzo IP stampando una pagina di congurazione. Sul pannello di controllo del prodotto,
premere Menu , per evidenziare INFORMAZIONI, quindi premere OK. Premere per evidenziare STAMPA
CONFIGURAZIONE, quindi premere OK.
Imprima una página de conguración para obtener la dirección IP. En el panel de control del producto, pulse
Menú , pulse para resaltar INFORMACIÓN y, a continuación pulse OK. Pulse para resaltar IMPRIMIR
CONFIGURACIÓN y, a continuación, pulse OK.
Per trobar l'adreça IP, imprimiu una pàgina de conguració. Al tauler de control del producte, premeu Menu (Menú) ,
premeu per ressaltar INFORMATION (INFORMACIÓ) i, a continuació, premeu OK (D'acord). Premeu per ressaltar
PRINT CONFIGURATION (CONFIGURACIÓ D'IMPRESSIÓ) i, a continuació, premeu OK (D'acord).
Zoek het IP-adres op door een conguratiepagina af te drukken. Druk op het bedieningspaneel op Menu , druk
op om INFORMATIE te markeren en druk vervolgens op OK. Druk op om CONFIGURATIE AFDRUKKEN te selecteren
en druk vervolgens op OK.
Veja o endereço IP imprimindo a página Conguração. No painel de controle do produto, pressione Menu ,
pressione para destacar INFORMAÇÕES e, em seguida, pressione OK. Pressione para destacar IMPRIMIR
CONFIGURAÇÃO e, em seguida, pressione OK.
La pagina si sta caricando...
La pagina si sta caricando...
La pagina si sta caricando...
La pagina si sta caricando...
La pagina si sta caricando...
La pagina si sta caricando...
La pagina si sta caricando...
La pagina si sta caricando...
La pagina si sta caricando...
La pagina si sta caricando...
La pagina si sta caricando...
La pagina si sta caricando...
La pagina si sta caricando...
La pagina si sta caricando...
La pagina si sta caricando...
La pagina si sta caricando...
La pagina si sta caricando...
La pagina si sta caricando...
La pagina si sta caricando...
La pagina si sta caricando...
La pagina si sta caricando...
La pagina si sta caricando...
La pagina si sta caricando...
La pagina si sta caricando...
La pagina si sta caricando...
La pagina si sta caricando...
La pagina si sta caricando...
La pagina si sta caricando...
La pagina si sta caricando...
La pagina si sta caricando...
La pagina si sta caricando...
La pagina si sta caricando...
La pagina si sta caricando...
La pagina si sta caricando...
La pagina si sta caricando...
La pagina si sta caricando...
La pagina si sta caricando...
La pagina si sta caricando...
La pagina si sta caricando...
La pagina si sta caricando...
La pagina si sta caricando...
La pagina si sta caricando...
La pagina si sta caricando...
La pagina si sta caricando...
-
 1
1
-
 2
2
-
 3
3
-
 4
4
-
 5
5
-
 6
6
-
 7
7
-
 8
8
-
 9
9
-
 10
10
-
 11
11
-
 12
12
-
 13
13
-
 14
14
-
 15
15
-
 16
16
-
 17
17
-
 18
18
-
 19
19
-
 20
20
-
 21
21
-
 22
22
-
 23
23
-
 24
24
-
 25
25
-
 26
26
-
 27
27
-
 28
28
-
 29
29
-
 30
30
-
 31
31
-
 32
32
-
 33
33
-
 34
34
-
 35
35
-
 36
36
-
 37
37
-
 38
38
-
 39
39
-
 40
40
-
 41
41
-
 42
42
-
 43
43
-
 44
44
-
 45
45
-
 46
46
-
 47
47
-
 48
48
-
 49
49
-
 50
50
-
 51
51
-
 52
52
-
 53
53
-
 54
54
-
 55
55
-
 56
56
-
 57
57
-
 58
58
-
 59
59
-
 60
60
-
 61
61
-
 62
62
-
 63
63
-
 64
64


HP LaserJet P4015 Printer series Guida Rapida
- Tipo
- Guida Rapida
- Questo manuale è adatto anche per
in altre lingue
Documenti correlati
-
HP P4010 Manuale utente
-
HP LaserJet M5035 Multifunction Printer series Guida Rapida
-
HP LaserJet Enterprise P3015 Printer series Manuale utente
-
HP (Hewlett-Packard) 3000 Manuale utente
-
-
-
-
HP LaserJet M3035 Multifunction Printer series Guida Rapida
-
HP (Hewlett-Packard) CP3525 Manuale utente
-
HP COLOR LASERJET 2600N PRINTER Manuale del proprietario