ORIENT RA-AA0E01S Manuale utente
- Categoria
- Orologi
- Tipo
- Manuale utente
Questo manuale è adatto anche per

1
ENGLISH
ENGLISH
MECHANICAL WATCHES
INSTRUCTION MANUAL
Thank you for choosing our product. To ensure prolonged use and optimum
performance, please read this instruction manual carefully and familiarize
your-self with the terms of the guarantee.
Please keep this Instruction Manual handy for future reference.
SAFETY PRECAUTIONS
Make absolutely sure to observe the demarcated contents indicated below to
prevent any possible physical danger and property damage to you as well as
other people concerned.
... A demarcation with this symbol represents the contents
assuming possibility for death or serious injury
when the product is used in any manner different from
given instructions.
... A demarcation with this symbol represents the contents
assuming possibility of causing human injury or
material damage only when a product is used in any
manner different from given instructions.
WARNING
!
CAUTION
!

2
ENGLISH
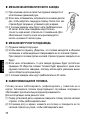
IN HANDLING THE WATCH
(1) Precautions when diving
WARNING
!
Watches with “DIVER’S 200m” or “DIVER’S WATCH 200m” marked on its
dial or case back are designed to be able to be used when scuba diving
(air diving, water depth of up to 200m).
• This watch is not designed for saturation diving. Do not use this watch
when saturation diving.
• Do not use this watch in water depths of 200m or deeper.
CAUTION
!
[Precautions before diving]
Make sure to do the following before you dive.
• Check that the watch is fully wound.
• Make sure the watch shows the correct time.
• Make sure the rotating bezel is set correctly. Also, make sure that the
watchband is not too loose or too tight.
• Check that the screwed-down type crown is securely tightened.
• Make sure that there are no cracks or chips in the glass.
• Make sure that the watchband is not about to tear, and check that
there are no problems with its joints (spring bar, buckle, clasp, etc.).
If there are any problems, do not use the watch when diving.
CAUTION
!
[Precautions during diving]
• Do not operate the crown while in the water.
• The rotating bezel may be hard to operate under water due to water
pressure.
• Do not subject the watch to shocks, such as banging on rocks.

3
ENGLISH
CAUTION
!
[Precautions after diving]
• To remove salt water from the case or bracelet/strap, first make sure
the crown is securely tightened. Then, rinse it with fresh water to
prevent rusting.
• Do not use chemical agents to rinse the watch or soak the watch.
(2) Shock
1
Be sure not to carry the watch when you engage in
strenuous sports, whereas playing such light sports as golf,
etc., will not adversely influence the watch.
2
Avoid a violent shock such as dropping the watch on the
floor.
(3) Magnetism
1
If the watch is left at a location with strong magnetism for an extended
period of time, the components may be magnetized, resulting in
malfunction. Be careful.
2
The watch may temporarily speed up or slow down when exposed to
magnetism. Precision is restored when placed away from magnetism. In
such a case, reset the time.
(4) Vibration
The watch may lose precision if subjected to strong
vibrations such as from riding motorcycles, using
jackhammers, chain saws, etc.
(5) Temperature
In environments below and above normal temperatures (5°C-35°C), the
watch may malfunction and stop.
CAUTION
!
Do not use the watch at high temperatures, such as in a sauna. The
watch may heat and cause burns.

4
ENGLISH
(6) Chemicals, Gases, etc.
Utmost caution must be exercised when coming into contact with gases,
mercury, chemicals (paint thinner, gasoline, various solvents, detergents
containing such components, adhesives, paint, drugs, perfumes,
cosmetics, etc.), and so forth. Such may cause discoloration of the
watchcase, watchband, and dial face. Discoloration, deformation, and
damage to various resin-based component parts may also occur.
(7) About accessory parts
CAUTION
!
Do not attempt to disassemble or modify the watch.
WARNING
!
Store the bracelet/strap pin and other small parts out of the reach of
children.
If any small parts are swallowed, immediately contact a doctor.
(8) Allergic reactions
CAUTION
!
If you develop a skin rash or your skin becomes abnormally irritated due
to contact with the watch or strap, stop wearing the watch immediately
and consult a doctor.

5
ENGLISH
(9) About “luminous light”
This watch has luminous light on the hands and dial.
The luminous light is a safe paint that stores sunlight and artificial light
without using any radioactive material, and emits that light in a dark
setting. As the paint discharges the stored light, it will become dimmer
over time. The amount of light emitted and the time that light is emitted
depends on various factors when the light is stored, such as the shape
of the glass, the thickness of the paint, surrounding brightness level, the
distance from the watch to the light source, and the light absorption level.
Please note that when not enough light energy is stored, the watch may
emit weak light or emit light for only a short time.
◆
HOW TO IDENTIFY THE CALIBER NUMBER
Check the caliber number by referring to the model number of your watch or
the case code on the watch’s case back.
1. Searching by 13-digit model number
Check the 13-digit model number on the guarantee supplied with your watch.
You can also see the number on the product tag put on the watch. Its fourth
and fifth digits indicate the caliber number of your watch.
Example: If the model number is “RA-AC0L01B”, the caliber number is “AC”.
2. Searching by the case code
See the case code on the case back of your watch like XXXX-XXXX.
The first three digits indicate the caliber number.
Example : When the case code is “F672-UAA0”, the caliber number is “F67”.
* The place of case code may vary and its letter size may be small and
difficult to see depending on the characteristics of watches.
* The pictures and illustrations on this manual may differ from the actual
appearance of your watch but the function and operation procedures are
the same.

6
ENGLISH
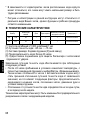
SPECIFICATIONS
Caliber
Number of
jewels
Date Day of week
Second hand halt
mechanism
Remark1*
AA F69 22
○ ○ ○
8:00P.M.-4:00A.M.
AC F67 22
○
–
○
8:00P.M.-4:00A.M
(1) Vibrations: 21,600 vibrations/1 hour
(2) Daily accuracy: +25 sec. to -15 sec.
(3) Drive system: Mainspring winding (Hand-winding)
(4) Running time: More than 40 hours
(5) Shock-proof bearings to protect the balance with hairspring from shocks.
The stated daily accuracy is in the following conditions:
• After 24 hours at room temperature with the mainspring wound fully and
the dial facing up.
• Due to the characteristics of the automatic winding watch, the time may
deviate from the stated “daily accuracy” depending on the following
conditions: amount of time the watch is worn each day, position of the
watch, movement of your arm, winding condition of the mainspring.
• Determine the deviation from not just a day but a period of about a week.
Product specifications may change without notice, for improvement.
CAUTION
!
* Avoid setting the date during the time periods listed in “Remark1” above
since the calendar changes during this time. If the date is set during this
time period, the date may not change or the watch may malfunction. Be
sure to move the hour and minute hands away from this time period when
setting the date.

7
ENGLISH
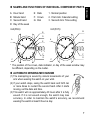
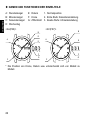
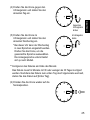
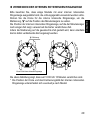
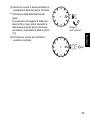
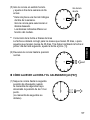
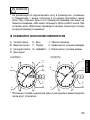
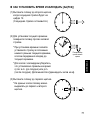
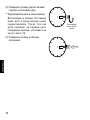
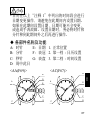
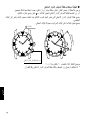
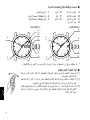
NAMES AND FUNCTIONS OF INDIVIDUAL COMPONENT PARTS
A: Hour hand
E:
Date 1. Normal position
B: Minute hand F: Crown 2. First click: Calendar setting
C: Second hand G: Dial 3. Second click: Time setting
D:
Day of the week
<AA(F69)> <AC(F67)>
* The position of the crown, date indicator, or day of the week window may
be different, depending on the model.
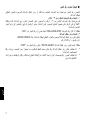
AUTOMATIC WINDING MECHANISM
(1) The mainspring is wound by natural movements of your
arm when wearing the watch on your wrist.
(2) If your watch stops, swing the watch back and forth ten
or more times to re-start the second hand. After it starts
moving, set the date and time.
(3) This watch will run approximately 40 hours after it is fully
wound. If it is not wound enough, the watch may lose
accuracy. In order to maintain the watch’s accuracy, we recommend
wearing the watch at least 8 hours a day.
MON
G
A
B
D
C
E
F
1
2
3
G
A
B
C
E
F
12
3

8
ENGLISH
HAND WINDING MECHANISM
(1) The mainspring is wound up manually.
(2) To wind the spring, ensure that the crown is in its normal position and
slowly turn it clockwise.
Turning the crown counterclockwise will have no effect.
(3) When the watch is in the stopped state, the spring can be wound
sufficiently by rotating the crown approximately 30 times. Since the crown
will rotate even when winding is complete, wind the watch using the
above number of turns as a guide.
(4) This watch will run approximately 40 hours after the spring is fully wound.
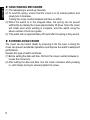
SCREWED-DOWN CROWN
The crown can be locked (fixed) by screwing it into the case. Locking the
crown can prevent accidental operations and improve the watch’s waterproof
performance.
Operate this type of watch as follows:
(1) Before setting the date and time, first turn the crown counterclockwise to
loosen the screw lock.
(2) After setting the date and time, turn the crown clockwise while pressing
in, until it stops turning to securely tighten the screw.

9
ENGLISH
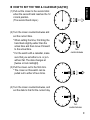
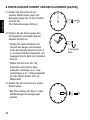
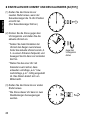
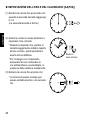
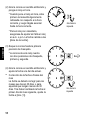
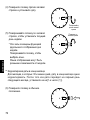
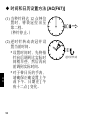
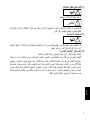
HOW TO SET THE TIME & CALENDAR [AA(F69)]
(1) Pull out the crown to the second click
when the second hand reaches the 12
o’clock position.
(The second hand stops.)
(2) Turn the crown counterclockwise and
set the current time.
* When setting the time, first bring the
hand back slightly earlier than the
actual time and then move it forward
to the actual time.
* For the watch with a calendar, make
sure that you set either a.m. or p.m.
without fail. The date changes at
[twelve o’clock midnight].
(3) Pull the crown out to the first click.
* The crown on this watch can be
pulled out to either of two clicks.
(4) Turn the crown counterclockwise, and
set the date to that for the current day.
Turn
counterclockwise
SAT
Turn
counterclockwise
SAT

10
ENGLISH
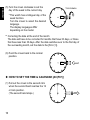
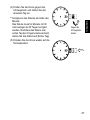
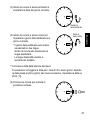
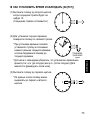
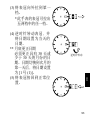
(5) Turn the crown clockwise to set the
day of the week to the current day.
* This watch has a bilingual day of the
week function.
Turn the crown to select the desired
language.
The display languages differ
depending on the model.
** Correcting the date at the end of the month
The date will have to be corrected for months that have 30 days, or those
that have less than 30 days. After the date switches over to the first day of
the succeeding month, set the date to the [First (1)].
(6) Push the crown back to the normal
position.
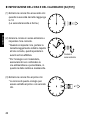
HOW TO SET THE TIME & CALENDAR [AC(F67)]
(1) Pull out the crown to the second click
when the second hand reaches the 12
o’clock position.
(The second hand stops.)
Turn clockwise
MON
MON

11
ENGLISH
(2) Turn the crown counterclockwise and
set the current time.
* When setting the time, first bring the
hand back slightly earlier than the
actual time and then move it forward
to the actual time.
* For the watch with a calendar, make
sure that you set either a.m. or p.m.
without fail. The date changes at
[twelve o’clock midnight].
(3) Pull the crown out to the first click.
* The crown on this watch can be
pulled out to either of two clicks.
(4) Turn the crown counterclockwise, and
set the date to that for the current
day.
** Correcting the date at the end of the
month
The date will have to be corrected for
months that have 30 days, or those that
have less than 30 days. After the date
switches over to the first day of the
succeeding month, set the date to the
[First (1)].
Turn
counterclockwise
Turn
counterclockwise

12
ENGLISH
(5) Push the crown back to the normal
position.
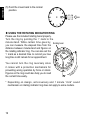
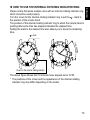
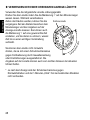
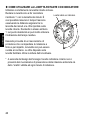
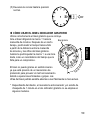
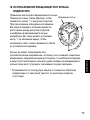
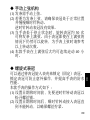
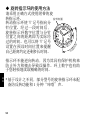
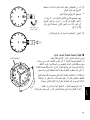
USING THE ROTATING INDICATOR RING
Please use the included rotating bezel properly.
Turn the ring by pointing the
mark to the
minute-hand. While certain time goes by,
you can measure the elapsed time from the
distance between minute-hand and figures on
the rotating indicator ring. You can also set the
mark as a desired time to remind you how
long time is still remain for an appointment.
You cannot turn the ring reversely since
it comes with a protection mechanism for
preventing wrong operation by force or shock.
Figures on the ring could also help you to read
the current time easily.
* Depending on design, anti-reversely and 1 minute “click” sound
mechanism on rotating indicator ring does not apply to some models.
Rotating bezel
E
l
a
p
s
e
d
T
i
m
e

13
ENGLISH
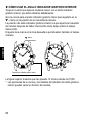
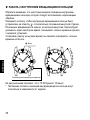
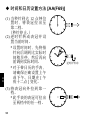
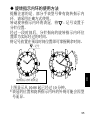
HOW TO USE THE INTERNAL ROTATING INDICATOR RING
Please notice that some models come with an internal rotating indicator ring,
which should be used properly.
Turn the crown for the internal rotating indicator ring to set the
- mark to
the position of the minute hand.
The position of the internal rotating indicator ring to which the minute hand is
pointing after some time has elapsed indicates the elapsed time.
Setting the mark to the desired time also allows you to know the remaining
time.
- mark
Crown for the internal rotating indicator
E
l
a
p
s
e
d
T
i
m
e
The above figure shows that 10 minutes have elapsed since 10:08.
* The positions of the crown and the appearance of the internal rotating
indicator ring may differ depending on the model.

14
ENGLISH
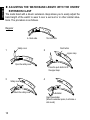
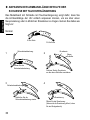
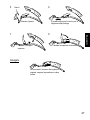
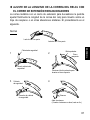
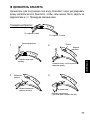
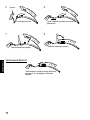
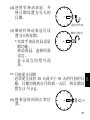
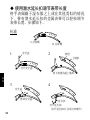
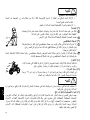
ADJUSTING THE WATCHBAND LENGTH WITH THE DIVERS’
EXTENSION CLASP
The metal band with a divers’ extension clasp allows you to easily adjust the
band length of the watch to wear it over a wet suit or in other similar situa-
tions. The procedure is as follows.
Regular
6 o’clock side
12 o’clock side
1
Safety cover
Open the safety cover.
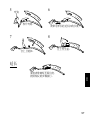
2
Push button
Upper clasp
Press the push button to lift
the upper clasp.
3
Safety cover
Return the safety cover.
4
Extender
Open the extender.
(When the extender opens, it will make a
click sound)

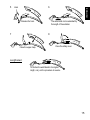
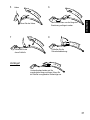
15
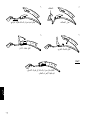
ENGLISH
5
Hook
Release the hook.
6
The watchband can be extended by
the length of the extender.
7
Close the upper clasp.
8
Close the safety cover.
Lengthened
To shorten the watchband to its original
length, carry out the procedure in reverse.

16
DEUTSCH
DEUTSCH
MECHANISCHE UHR
BEDIENUNGSANLEITUNG
Wir danken Ihnen für den Kauf unseres Erzeugnisses. Bitte lesen Sie diese
Bedienungsanleitung sorgfältig durch und befolgen Sie die Anweisungen, um
dieses Produkt lange Zeit und mit optimaler Leistung verwenden zu können.
Bitte bewahren Sie diese Bedienungsanleitung für spätere Bezugnahme gut auf.
Sicherheitsmaßnahmen
Um zu verhindern, dass Sie oder andere Personen sich verletzen
oder Sachschäden entstehen, lesen Sie die Anweisungen, die mit den
nachfolgenden Symbolen gekennzeichnet sind, sorgfältig durch und befolgen
diese.
!
WARNUNG
... Die Missachtung dieser Anweisung kann zum Tod
oder zu schweren Verletzungen führen.
!
ACHTUNG
... Die Missachtung dieser Anweisung kann zu
Verletzungen oder Schäden an der Uhr führen.
HANDHABUNG DER UHR
(1) Vorsichtsmaßnahmen beim Tauchen
!
ACHTUNG
Uhren mit der Kennzeichnung „TAUCHER 200 m“ oder „TAUCHERUHR
200 m“ auf dem Zifferblatt oder der Gehäuserückseite sind für die Nutzung
beim Gerätetauchen geeignet (Tauchen mit Luft, Wassertiefe bis zu 200 m).
• Diese Uhr ist nicht für das Sättigungstauchen geeignet. Verwenden
Sie diese Uhr nicht für das Sättigungstauchen.
• Verwenden Sie diese Uhr nicht in Wassertiefen, die tiefer als 200 m sind.

17
DEUTSCH
!
WARNUNG
[Vorsichtsmaßnahmen vor dem Tauchen]
Bevor Sie tauchen, befolgen Sie unbedingt die folgenden
Vorsichtsmaßnahmen.
• Überprüfen Sie, ob die Uhr vollständig aufgezogen ist.
• Stellen Sie sicher, dass die Uhr die korrekt Uhrzeit anzeigt.
• Stellen Sie sicher, dass der Drehring korrekt eingestellt ist. Stellen Sie
zudem sicher, dass das Armband nicht zu lose oder fest sitzt.
• Stellen Sie sicher, dass bei einer verschraubten Krone die Krone fest
angezogen ist.
• Stellen Sie sicher, dass das Glas keine Risse oder Absplitterungen aufweist.
• Stellen Sie sicher, dass das Armband nicht kurz davor ist, zu reißen,
und überprüfen Sie, ob es keine Probleme mit den Verbindungen
(Federsteg, Verschluss, Schließe usw.) gibt.
Sollte es damit Probleme geben, verwenden Sie die Uhr nicht zum Tauchen.
!
WARNUNG
[Vorsichtsmaßnahmen während des Tauchens]
• Bedienen Sie die Krone nicht im Wasser.
• Der Drehring lässt sich aufgrund des Wasserdrucks unter Wasser
möglicherweise schwer bedienen.
• Setzen Sie die Uhr keinen Stößen aus, wie z. B. das Schlagen an Steinen.
!
WARNUNG
[Vorsichtsmaßnahmen nach dem Tauchen]
• Um das Salzwasser vom Gehäuse oder dem Armband/Riemen zu
entfernen, stellen Sie zuerst sicher, dass die Krone sicher befestigt ist.
Spülen Sie die Uhr dann mit frischem Wasser ab, um ein Rosten zu
vermeiden.
• Benutzen Sie keine chemischen Substanzen, um die Uhr abzuspülen
oder darin einzuweichen.

18
DEUTSCH
(2) Stöße
1 Tragen Sie die Uhr nicht bei harten sportlichen Aktivitäten;
bei relativ sanften sportlichen Aktivitäten wie Golf usw. kann
die Uhr aber getragen werden.
2
Vermeiden Sie starke Stöße, wie z. B. Herunterfallen auf den Fußboden.
(3) Magnetismus
1 Wenn die Uhr längere Zeit starkem Magnetismus ausgesetzt wird, werden
die einzelnen Teile magnetisiert, wodurch Störungen verursacht werden
können. Bitte lassen Sie Vorsicht walten.
2 Wenn die Uhr Magnetismus ausgesetzt wird, kann sie zeitweilig vor- oder
nachgehen, aber wenn sie nicht mehr dem Magnetismus ausgesetzt ist,
geht sie wieder mit ihrer ursprünglichen Genauigkeit. Stellen Sie in einem
solchen Fall die Uhr auf die richtige Zeit.
(4) Vibration
Wenn die Uhr starken Vibrationen ausgesetzt ist, wie z.
B. beim Fahren auf einem Motorrad oder bei Verwendung
eines Presslufthammers oder einer Motorsäge, kann sie
zeitweilig nachgehen.
(5) Temperatur
In Umgebungen unter oder über Normaltemperaturen (5°C - 35°C) kann
die Uhr Fehlfunktionen aufweisen und stoppen.
!
ACHTUNG
Tragen Sie die Armbanduhr nicht an Orten mit sehr hohen Temperature,
wie etwa in einer Sauna. Die Uhr kann sehr heiß werden und
Hautverbrennungen verursachen.
(6) Chemikalien, Gase usw.
Bei Kontakt mit Gasen, Quecksilber, Chemikalien (Verdünnungsmittel, Benzin,
Lösungsmittel, Reinigungsmittel mit solchen Bestandteilen, Klebstoffe, Farben,
Medikamente, Parfüme, Kosmetika usw.) usw. ist äußerste Vorsicht erforderlich.
Solcher Kontakt kann Verfärbung des Uhrgehäuses, des Armbands bzw. des
Zifferblatts verursachen. Es kann auch zu Verfärbung, Verformung oder
Beschädigung der verschiedenen auf Harz basierenden Bestandteile kommen.

19
DEUTSCH
(7) Über Zubehörteile
!
ACHTUNG
Versuchen Sie nicht diese Uhr auseinanderzubauen oder zu modifizieren.
!
WARNUNG
Legen Sie den Armbandstift und andere kleine Teile außer Reichweite
kleiner Kinder ab.
Falls kleine Teile verschluckt werden, suchen Sie sofort einen Arzt auf.
(8) Allergische Reaktionen
!
ACHTUNG
Falls Sie einen Hautausschlag bekommen oder Ihre Haut durch Berührung
mit der Uhr oder dem Armband gereizt wird, nehmen Sie die Uhr sofort ab
und suchen einen Arzt auf.
(9) Über „Fluoreszierende stoffe“
Einige Modelle verfügen über leuchtende Zeiger bzw. Ziffernblatt.
Das Leuchten entsteht durch eine fluoreszierende Sicherheitsfarbe, die
Sonnenlicht und Kunstlicht speichert, ohne den Einsatz von radioaktivem
Mate-rial, und gibt dieses Licht in dunkler Umgebung ab. Da die Farbe
das gespeicherte Licht allmählich abgibt, wird das Leuchten mit der Zeit
immer dunkler. Die Intensität und Dauer der Lichtabgabe hängt von
verschiedenen Faktoren bei der Lichtspeicherung ab, wie der Form des
Glases, der Dicke der Farbe, der Helligkeit der Umgebung, der Entfernung
der Uhr zur Lichtquelle und der Lichtaufnahme. Bitte beachten Sie, dass
bei einer ungenügenden Lichtspeicherung die Uhr nur schwach oder nur
für kurze Zeit leuchtet.

20
DEUTSCH
IDENTIFIZIEREN DER KALIBER-NUMMER
Prüfen Sie die Kaliber-Nummer entsprechend der Modellnummer Ihrer Uhr
oder dem Gehäusecode auf der Gehäuserückseite der Uhr.
1. Suchen nach der 13-stelligen Modellnummer
Prüfen Sie die 13-stellige Modellnummer auf der der Uhr beiliegenden
Garantiekarte. Sie können die Nummer auch auf dem Produktaufkleber auf
der Uhr prüfen. Die vierte und fünfte Stelle gibt die Kalibernummer Ihrer Uhr
an.
Beispiel: Wenn die Modellnummer „RA-AC0L01B“ ist, ist die Kaliber-
Nummer „AC“.
2. Suchen nach dem Gehäusecode
Suchen Sie den Gehäusecode auf der Gehäuserückseite der Uhr, wie z. B.
XXXX-XXXX.
Die ersten drei Stellen geben die Kalibernummer an.
Beispiel: Beträgt der Gehäusecode „F672-UAA0“, dann ist die Kaliber-
Nummer „F67“.
* Die Lage des Gehäusecodes kann sich unterscheiden, und die
Buchstabengröße kann klein und schwer lesbar sein, je nach Auslegung
der Uhr.
* Die Bilder und Abbildungen in dieser Bedienungsanleitung können sich von
dem tatsächlichen Aussehen Ihrer Armbanduhr unterscheiden, aber die
Funktionen und Bedienverfahren sind gleich.
La pagina si sta caricando...
La pagina si sta caricando...
La pagina si sta caricando...
La pagina si sta caricando...
La pagina si sta caricando...
La pagina si sta caricando...
La pagina si sta caricando...
La pagina si sta caricando...
La pagina si sta caricando...
La pagina si sta caricando...
La pagina si sta caricando...
La pagina si sta caricando...
La pagina si sta caricando...
La pagina si sta caricando...
La pagina si sta caricando...
La pagina si sta caricando...
La pagina si sta caricando...
La pagina si sta caricando...
La pagina si sta caricando...
La pagina si sta caricando...
La pagina si sta caricando...
La pagina si sta caricando...
La pagina si sta caricando...
La pagina si sta caricando...
La pagina si sta caricando...
La pagina si sta caricando...
La pagina si sta caricando...
La pagina si sta caricando...
La pagina si sta caricando...
La pagina si sta caricando...
La pagina si sta caricando...
La pagina si sta caricando...
La pagina si sta caricando...
La pagina si sta caricando...
La pagina si sta caricando...
La pagina si sta caricando...
La pagina si sta caricando...
La pagina si sta caricando...
La pagina si sta caricando...
La pagina si sta caricando...
La pagina si sta caricando...
La pagina si sta caricando...
La pagina si sta caricando...
La pagina si sta caricando...
La pagina si sta caricando...
La pagina si sta caricando...
La pagina si sta caricando...
La pagina si sta caricando...
La pagina si sta caricando...
La pagina si sta caricando...
La pagina si sta caricando...
La pagina si sta caricando...
La pagina si sta caricando...
La pagina si sta caricando...
La pagina si sta caricando...
La pagina si sta caricando...
La pagina si sta caricando...
La pagina si sta caricando...
La pagina si sta caricando...
La pagina si sta caricando...
La pagina si sta caricando...
La pagina si sta caricando...
La pagina si sta caricando...
La pagina si sta caricando...
La pagina si sta caricando...
La pagina si sta caricando...
La pagina si sta caricando...
La pagina si sta caricando...
La pagina si sta caricando...
La pagina si sta caricando...
La pagina si sta caricando...
La pagina si sta caricando...
La pagina si sta caricando...
La pagina si sta caricando...
La pagina si sta caricando...
La pagina si sta caricando...
La pagina si sta caricando...
La pagina si sta caricando...
La pagina si sta caricando...
La pagina si sta caricando...
La pagina si sta caricando...
La pagina si sta caricando...
La pagina si sta caricando...
La pagina si sta caricando...
La pagina si sta caricando...
La pagina si sta caricando...
La pagina si sta caricando...
La pagina si sta caricando...
La pagina si sta caricando...
La pagina si sta caricando...
La pagina si sta caricando...
La pagina si sta caricando...
-
 1
1
-
 2
2
-
 3
3
-
 4
4
-
 5
5
-
 6
6
-
 7
7
-
 8
8
-
 9
9
-
 10
10
-
 11
11
-
 12
12
-
 13
13
-
 14
14
-
 15
15
-
 16
16
-
 17
17
-
 18
18
-
 19
19
-
 20
20
-
 21
21
-
 22
22
-
 23
23
-
 24
24
-
 25
25
-
 26
26
-
 27
27
-
 28
28
-
 29
29
-
 30
30
-
 31
31
-
 32
32
-
 33
33
-
 34
34
-
 35
35
-
 36
36
-
 37
37
-
 38
38
-
 39
39
-
 40
40
-
 41
41
-
 42
42
-
 43
43
-
 44
44
-
 45
45
-
 46
46
-
 47
47
-
 48
48
-
 49
49
-
 50
50
-
 51
51
-
 52
52
-
 53
53
-
 54
54
-
 55
55
-
 56
56
-
 57
57
-
 58
58
-
 59
59
-
 60
60
-
 61
61
-
 62
62
-
 63
63
-
 64
64
-
 65
65
-
 66
66
-
 67
67
-
 68
68
-
 69
69
-
 70
70
-
 71
71
-
 72
72
-
 73
73
-
 74
74
-
 75
75
-
 76
76
-
 77
77
-
 78
78
-
 79
79
-
 80
80
-
 81
81
-
 82
82
-
 83
83
-
 84
84
-
 85
85
-
 86
86
-
 87
87
-
 88
88
-
 89
89
-
 90
90
-
 91
91
-
 92
92
-
 93
93
-
 94
94
-
 95
95
-
 96
96
-
 97
97
-
 98
98
-
 99
99
-
 100
100
-
 101
101
-
 102
102
-
 103
103
-
 104
104
-
 105
105
-
 106
106
-
 107
107
-
 108
108
-
 109
109
-
 110
110
-
 111
111
-
 112
112


ORIENT RA-AA0E01S Manuale utente
- Categoria
- Orologi
- Tipo
- Manuale utente
- Questo manuale è adatto anche per
in altre lingue
- English: ORIENT RA-AA0E01S User manual
- español: ORIENT RA-AA0E01S Manual de usuario
- Deutsch: ORIENT RA-AA0E01S Benutzerhandbuch
- русский: ORIENT RA-AA0E01S Руководство пользователя
Documenti correlati
-
ORIENT AA05003B Manuale del proprietario
-
ORIENT RA-AA0001B Manuale del proprietario
-
-
ORIENT AK00001Y Manuale del proprietario
-
ORIENT RA-AK0004A Manuale del proprietario
-
ORIENT RE-AV0001S Manuale del proprietario
-
-
-
-
ORIENT EV0P001W Manuale del proprietario