
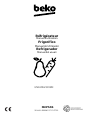
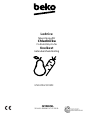
GN1406231XBN
EN/DE/PL
58 4402 0000/AO-1/7-EN-DE-PL
Refrigerator
User Manual
Gefrierschrank
Bedienungsanleitung
Chłodziarka
Instrukcja użytkowania

Please read this manual before using the product!
Dear Customer,
We'd like you to make the best use of our product, which has been manufactured in modern facilities
with care and meticulous quality controls.
Thus, we advice you to read the entire user manual before you use the product. In case the product
changes hands, do not forget to hand the guide to its new owner along with the product.
This guide will help you use the product quickly and safely.
Please read the user guide carefully before installing and operating the product.
Always observe the applicable safety instructions.
Keep the user guide within easy reach for future use.
Please read any other documents provided with the product.
Keep in mind that this user guide may apply to several product models. The guide clearly indicates any
variations of different models.
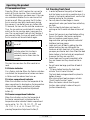
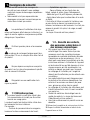
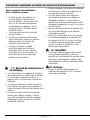
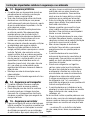
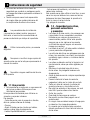
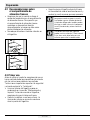
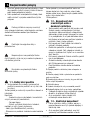
CImportant information and useful
tips.
ARisk of life and property.
BRisk of electric shock.
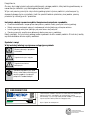
The product’s packaging is made of
recyclable materials, in accordance
with the National Environment
Legislation.
A
A
A
C
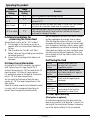
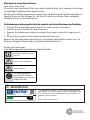
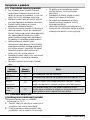
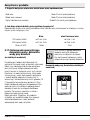
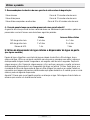
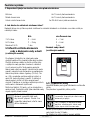
SUPPLIER’S NAME MODEL IDENTIFIER (*)
INFORMATION
C
.The model information as stored in the product data base
can be reached by entering following website and searching
for your model identifier (*) found on energy label.
https://eprel.ec.europa.eu/

2 / 30 EN Refrigerator / User Manual
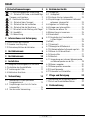
1- Safety Instructions 3
2 Your Refrigerator 8
2 Your Refrigerator 9
3 Installation 10
3.1 Appropriate location for installation . . . . . . .10
3.2 Installing the plastic wedges . . . . . . . . . . . .10
3.3 *Adjusting the feet . . . . . . . . . . . . . . . . . . .11
3.4 Electric connection . . . . . . . . . . . . . . . . . . .12
4 Preparation 13
4.1 Things to be done for saving energy . . . . .13
4.2 Recommendations about the fresh food
compartment. . . . . . . . . . . . . . . . . . . . . .13
4.3 Initial use. . . . . . . . . . . . . . . . . . . . . . . . .14
5 Operating the product 15
5.1 Indicator panel . . . . . . . . . . . . . . . . . . . . . .15
5.2 Indicator panel. . . . . . . . . . . . . . . . . . . . .20
5.3 Freezing fresh food. . . . . . . . . . . . . . . . . . .22
5.4 Recommendations for preserving the frozen
food . . . . . . . . . . . . . . . . . . . . . . . . . . . .23
5.5 Deep-freeze information . . . . . . . . . . . . . . .23
5.6 Placing the food . . . . . . . . . . . . . . . . . . . . .23
5.7 Door open warning. . . . . . . . . . . . . . . . . . .23
5.8 Crisper. . . . . . . . . . . . . . . . . . . . . . . . . . . .24
5.9 Humidity-controlled crisper . . . . . . . . . . . . .24
(FreSHelf). . . . . . . . . . . . . . . . . . . . . . . . . . . . .24
5.10 Egg tray . . . . . . . . . . . . . . . . . . . . . . . . . .24
5.11 Movable Middle Section . . . . . . . . . . . . . .24
5.12 Cool Control Storage Compartment . . . . .25
5.13 Blue light/HarvestFresh. . . . . . . . . . . . . . .25
5.14 Odour filter. . . . . . . . . . . . . . . . . . . . . . . .25
5.15 Wine cellar compartment . . . . . . . . . . . . .26
5.16 Use of internal water dispenser and water
dispenser at the door . . . . . . . . . . . . . . . .28
5.17 Dispensing water . . . . . . . . . . . . . . . . . . .28
5.18 For using water dispenser. . . . . . . . . . . . .29
5.19 Icematic . . . . . . . . . . . . . . . . . . . . . . . . .29
5.20 Icematic and ice storage container . . . . . .30
6 Maintenance and cleaning 31
6.1 Avoiding bad odours . . . . . . . . . . . . . . . . . .31
6.2 Protecting the plastic surfaces . . . . . . . . . .31
7. Troubleshooting 32

3/ 30 EN Refrigerator / User Manual
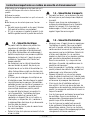
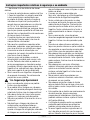
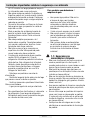
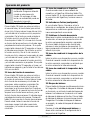
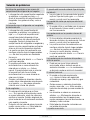
This section includes the safety
instructions necessary to prevent
the risk of personal injury or material
damage.
Our company shall not be held
responsible for damages that may
occur if these instructions are not
observed.
Installation and repair operations shall always
be performed by Authorized Service.
Always use genuine spare parts and
accessories.
Original spare parts will be provided for
10 years, following the product purchasing date.
Do not repair or replace any part of the
product unless specified expressly in the user
manual.
Do not perform any modifications on the
product.
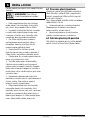
1.1 Purpose of usage
This product is not intended for commercial
use and it shall not be used out of its intended
purpose.
This product is intended for operating interiors,
such as households or similar.
For example;
- In the staff kitchens of the stores, offices and
other working environments,
- In farm houses,
- In the units of hotels, motels or other resting
facilities that are used by the customers,
- In hostels, or similar environments,
- In catering services and similar non-retail
applications.
This product shall not be used in open or enclosed
external environments such as vessels, balconies
or terraces. Exposing the product to rain, snow,
sunlight and wind may cause risk of fire.
1.2 Safety of children,
vulnerable persons and pets
This product may be used by children
aged 8 years and older and persons
with underdeveloped physical,
sensory or mental capabilities or
lack of experience and knowledge
if they have been given supervision
or instruction concerning use of the
appliance in a the product safe way
and the hazards involved.
Children between 3 and 8 years are
allowed to put and take out food to/
from the cooler product.
Electrical products are dangerous for
children and pets. Children and pets
must not play with, climb on, or enter
the product.
Cleaning and user maintenance
should not be performed by children
unless there is someone overseeing
them.
Keep the packaging materials away
from children. Risk of injury and
suffocation.
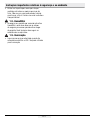
Before disposing of old products that
shall not be used any more:
1.
Unplug the power cord from the mains socket.
2.
Cut the power cord and remove it from the
appliance together with the plug.
3.
Do not remove the racks and drawers from the
product to prevent children from getting inside the
appliance.
4.
Remove the doors.
5.
Store the product so that it shall not be tipped over.
6.
Do not allow children to play with the scrapped
product.
Do not dispose of the product by throwing it
into fire. Risk of explosion.
If there is a lock available in the product’s
door, keep the key out of children’s reach.
1- Safety Instructions

4 / 30 EN Refrigerator / User Manual
Important instructions regarding safety and environment
1.3 Electrical safety
The product shall not be plugged
into the outlet during installation,
maintenance, cleaning, repair, and
transportation operations.
If the power the cord is damaged, it
shall be replaced by authorized service
only to avoid any risk that may occur.
Do not tuck the power cord under the
product or to the rear of the product. Do
not put heavy items on the power cord.
The power cord should not be bent,
crushed, and come into contact with
any heat source.
Do not use an extension cord, multi-
plug or adaptor to operate your product.
Portable multi sockets or portable
power supplies may overheat and cause
fire. Thus, do not have a multi-plug
behind or in the vicinity of the product.
The plug shall be easily accessible. If
this is not possible, a mechanism that
meets the electrical legislation and
that disconnects all terminals from
the mains (fuse, switch, main switch,
etc.) shall be available on the electrical
installation.
Do not touch the plug with wet hands.
When unplugging the appliance, don’t
hold the power cord, but the plug.
1.4 Handling Safety
This product is heavy, do not handle it
by yourself.
Do not hold the product from its door
while handling the product.
Be careful not to damage the cooling
system and the pipes while handling
the product. Do not operate the product
if the pipes are damaged, and contact
an authorized service.
1.5 Installation Safety
Contact the Authorized Service
for the product’s installation. To
prepare the product for installation,
see the information in the user
guide and make sure the electric
and water utilities are as required.
If the installation is not suitable, call
a qualified electrician and plumber
to have them make the necessary
arrangements. Otherwise, electric
shock, fire, issues with the product or
injuries may occur.
Check for any damage on the product
before installing it. Do not have the
product installed if it is damaged.
Place the product on a level and
hard surface and balance with the
adjustable legs. Otherwise, the
refrigerator may tip over and cause
injuries.
The product shall be installed in a
dry and ventilated environment.
Do not keep carpets, rugs or similar
floor covers under the product. This
may cause risk of fire as a result of
inadequate ventilation!
Do not block or cover ventilation
holes. Otherwise, power consumption
may be increased and damage to your
product may occur.
Do not connect the product to supply
systems such as solar power supplies.
Otherwise, damage to your product
may occur as a result of the abrupt
voltage fluctuations!
The more refrigerant a refrigerator
contains, the bigger its installation
room shall be. In very small rooms,
a flammable gas-air mixture may
occur in case of a gas leak in the
cooling system. At least 1 m3 of
volume is required for each 8 grams

5/ 30 EN Refrigerator / User Manual
Important instructions regarding safety and environment
of refrigerant. The amount of the
refrigerant available in your product
is specified in the Type Label.
The installation place of the product
shall not be exposed to direct
sunlight and it shall not be in the
vicinity of a heat source such as
stoves, radiators, etc.
If you cannot prevent installation of the product
in the vicinity of a heat source, you shall use a
suitable insulation plate and the minimum distance
to the heat source shall be as specified below.
- At least 30 cm away from heat sources such
as stoves, heating units and heaters, etc.,
- And at least 5 cm away from electric ovens.
Your product has the protection
class of I. Plug the product in a
grounded socket that conforms with
the Voltage, Current and Frequency
values specified in the type label. The
socket outlet shall be equipped with a
fuse with a rating of 10 A – 16 A. Our
company shall not be responsible for
the damages that shall be incurred
as a result of operating the product
without ensuring ground and
electrical connections made as per
local or national regulations.
The product’s power cable must
be unplugged during installation.
Otherwise, risk of electric shock and
injury may occur!
Do not plug the product to loose, broken, dirty,
greasy sockets or sockets that has come out
their seats or sockets with a risk of water
contact.
Place the power cord and hoses (if available) of
the product so that they shall not cause a risk
of tripping over.
Penetration of humidity to live parts or to the
power cord may cause short circuit. Thus, do
not use the product in humid environments or
in areas where water may splash (e.g. garage,
laundry room, etc.) If the refrigerator is wet
by water, unplug it and contact an authorized
service.
Do not connect your refrigerator to power
saving devices. These systems are harmful for
the product.
1.6 Operational safety
Do not use chemical solvents on the product.
These materials contain an explosion risk.
In case of a failure of the product, unplug it
and do not operate until it is repaired by the
authorized service. There is a risk of electric
shock!
Do not place a source of flame (e.g. candles,
cigarettes, etc.) on the product or in the vicinity
of it.
Do not get on the product. Risk of falling and
injury!
Do not cause damage to the pipes of the
cooling system using sharp and piercing tools.
The refrigerant that sprays out in case of
puncturing the gas pipes, pipe extensions or
upper surface coatings may cause irritation of
skin and injuries of the eyes.
Do not place and operate electric appliances
inside the refrigerators/deep freezer unless it is
advised by the manufacturer.
Do not jam any parts of your hands or your
body to the moving parts inside the product.
Be careful to prevent jamming of your fingers
between the refrigerator and its door. Be careful
while opening or closing the door if there are
children around.
Do not put ice cream, ice cubes or frozen food
to your mouth as soon as you take them out of
the freezer. Risk of frostbite!
Do not touch the inner walls, metal
parts of the freezer or food kept
inside the refrigerator with wet
hands. Risk of frostbite!
Do not place soda cans or cans and
bottles that contain fluids that may be
frozen to the freezer compartment.
Cans or bottles may explode. Risk of
injury and material damage!
Do not use or place materials
sensitive against temperature such as
flammable sprays, flammable objects,
dry ice or other chemical agents in the

6 / 30 EN Refrigerator / User Manual
Important instructions regarding safety and environment
vicinity of the refrigerator. Risk of fire
and explosion!
Do not store explosive materials
such as aerosol cans with flammable
materials inside the product.
Do not place cans containing fluids
over the product. Splashing of water
on an electrical part may cause the
risk of an electric shock or a fire.
This product is not intended for
storage and cooling of medicines,
blood plasma, laboratory preparations
or similar materials and products that
are subject to the Medical Products
Directive.
If the product is used against its
intended purpose, it may cause
damage to or deterioration of the
products kept inside.
If your refrigerator is equipped with
blue light, do not look at this light
with optical devices. Do not stare
directly at UV LED light for a long
time. Ultraviolet rays may cause eye
strain.
Do not fill the product with more food
than its capacity. Injuries or damages
may occur if the contents of the
refrigerator falls when the door is
opened. Similar problems may occur
when an object is placed over the
product.
Ensure that you have removed any
ice or water that may have fallen to
the floor to prevent injuries.
Change the locations of the racks/
bottle racks on the door of your
refrigerator while the racks are
empty only. Danger of physical injury!
Do not place objects that may fall/
tipped over on the product. These
objects may fall while opening or
closing the door and cause injuries
and/or material damages.
Do not hit or exert excessive pressure
on glass surfaces. Broken glass
may cause injuries and/or material
damages.
The cooling system in your product
contains R600a refrigerant. The
refrigerant type used in the product
is specified in the the type label.
This gas is flammable. Therefore, be
careful not to damage the cooling
system and the pipes while operating
the product. In case of damage to the
pipes;
- do not touch the product or the power cord,
- Keep the product away from potential sources
of fire that may cause the product to catch fire.
- ventilation the area where the product is
placed. Do not use a fan.
- Contact authorized service.
If the product is damaged and you
observe gas leak, please stay away
from the gas. Gas may cause frostbite
if it contacts your skin.
For Products With Water Fountain / Ice Maker
Use only drinking water. Do not fill the water
tank with fruit juice, milk, fizzy beverages,
alcoholic beverages or any other liquids
incompatible for use in the water fountain. This
may cause risk to your health and safety.
Do not allow the children to play with the water
dispenser or Ice Maker to prevent accidents
and injuries.
Do not insert your fingers or other objects
inside the hole of the water dispenser, ice
channel or inside the container of the Ice
Maker. This may cause injuries or material
damages.
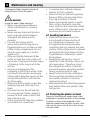
1.7 Maintenance and
cleaning safety
Do not pull by the door handle if you
shall move the product for cleaning

7/ 30 EN Refrigerator / User Manual
Important instructions regarding safety and environment
purposes. Handle may cause injuries
if it is pulled too hard.
Do not clean the product by spraying
or pouring water on the product and
inside the product. Risk of electric
shock and fire.
Do not use sharp or abrasive tools
to clean the product. Do not use
materials such as household cleaning
agents, detergents, gas, gasoline,
alcohol, wax, etc.
Use cleaning and maintenance
agents that are not harmful for food
only inside the product.
Do not use steam or steamed
cleaning materials for cleaning the
product and thawing the ice inside it.
Steam contacts the live areas in your
refrigerator and causes short circuit
or electric shock!
Take care to keep water away from
the electronic circuits or lighting of
the product.
Use a clean, dry cloth to wipe the dust
or foreign material on the tips of the
plugs. Do not use a wet or damp piece
of cloth to clean the plug. Otherwise,
risk of fire or electric shock may occur.
1.8HomeWhiz
(May not be applicable for all models)
Follow the safety warnings even if
you are away from the product while
operating the product via HomeWhiz
app. Also, pay attention to the
warnings in the app.
1.9 Lighting
(May not be applicable for all models)
Contact an authorized service when
you shall replace the LED / bulb using
for lighting.
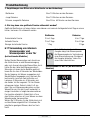
1.10 Environmental instructions
Compliance with the WEEE
Directive and Disposing
of the Waste Product:
This product complies with EU WEEE Directive
(2012/19/EU). This product bears a classification
symbol for waste electrical and electronic equip-
ment (WEEE).
This symbol indicates that this product
shall not be disposed with other house-
hold wastes at the end of its service life.
Used device must be returned to offical
collection point for recycling of electri-
cal and electronic devices. To find these collection
systems please contact to your local authorities or
retailer where the product was puchased. Each
household performs important role in recovering
and recycling of old appliance. Appropriate dispos-
al of used appliance helps prevent potential nega-
tive consequences for the environment and hu-
man health.
1.11 Compliance with RoHS Directive
The product you have purchased complies with EU
RoHS Directive (2011/65/EU). It does not contain
harmful and prohibited materials specified in the
Directive.
1.12 Package information
Packaging materials of the product are
manufactured from recyclable materials
in accordance with our National
Environment Regulations. Do not dis-
pose of the packaging materials together with the
domestic or other wastes. Take them to the pack-
aging material collection points designated by the
local authorities.

8 / 30 EN Refrigerator / User Manual
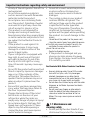
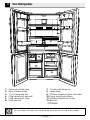
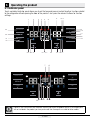
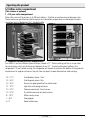
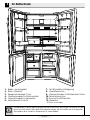
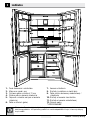
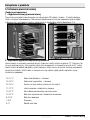
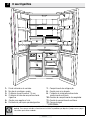
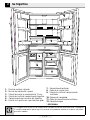
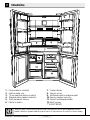
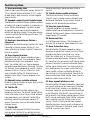
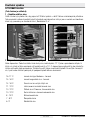
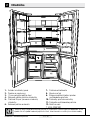
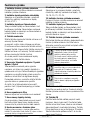
CFigures in this user manual are schematic and may not match the product exactly. If the subject parts
are not included in the product you have purchased, then those parts are valid for other models.
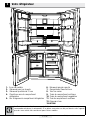
2 Your Refrigerator
6
*12
1- Control and indicator panel
2- Butter & Cheese section
3- 70 mm moving door shelf
4- Fridge compartment glass shelf
5- Fridge compartment crisper
6- Gallon door shelf
7- The dairy (cold storage) bin
8- Icebox drawer
9- Multizone compartment glass shelf/cooler
10- Freezer compartment drawers
11- Multizone Compartment's drawer
12- Watertank
* OPTIONAL

9/ 30 EN Refrigerator / User Manual
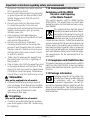
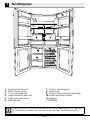
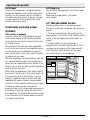
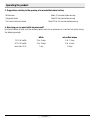
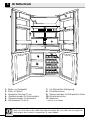
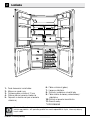
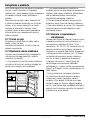
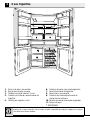
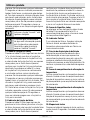
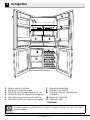
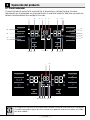
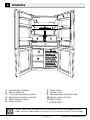
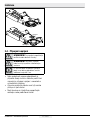
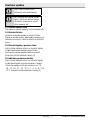
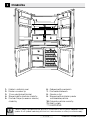
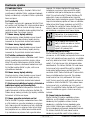
CFigures in this user manual are schematic and may not match the product exactly. If the subject parts
are not included in the product you have purchased, then those parts are valid for other models.
2 Your Refrigerator
1- Control and indicator panel
2- Butter & Cheese section
3- 70 mm moving door shelf
4- Fridge compartment glass shelf
5- Fridge compartment crisper
6- Gallon door shelf
7- The dairy (cold storage) bin
8- Icebox drawer
9- Multizone compartment glass shelf/cooler
10- Freezer compartment drawers
11- Watertank
* OPTIONAL
*2
*3
4
56
7
*8
*9
1
10
5*11

10 / 30 EN Refrigerator / User Manual
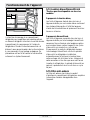
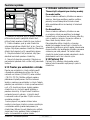
3.1 Appropriate location
for installation
Contact an Authorized Service for the installation
of the product. In order to prepare the product
for use, refer the information in the user manual
and ensure that electrical installation and water
installation are appropriate. If not, call a qualified
electrician and technician to have any necessary
arrangements carried out.
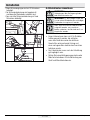
BWARNING: Manufacturer shall not
be held liable for damages that may
arise from procedures carried out by
unauthorized persons.
BWARNING: Product must not be plugged
in during installation. Otherwise, there is
the risk of death or serious injury!
A
WARNING: : If the door clearance of the
room where the product shall be placed is
so tight to prevent passing of the product,
remove the door of the room and pass the
product through the door by turning it to
its side; if this does not work, contact the
authorized service.
prevent jolts.
heat sources such as hobs, heater cores and
stoves and at least 5 cm away from electrical
ovens.
and kept in humid places.
function efficiently. If the product will be placed
in an alcove, remember to leave at least 5 cm
clearance between the product and the ceiling,
rear wall and the side walls.
remember to leave at least 5 cm clearance
between the product and the ceiling, rear
wall and the side walls. Check if the rear wall
clearance protection component is present at
its location (if provided with the product). If the
component is not available, or if it is lost or
3 Installation
fallen, position the product so that at least 5 cm
clearance shall be left between the rear surface
of the product and the wall of the room. The
clearance at the rear is important for efficient
operation of the product.
temperature falls below -5°C.
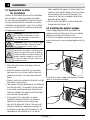
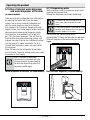
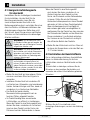
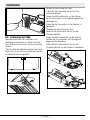
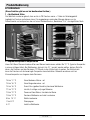
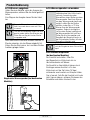
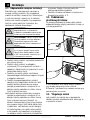
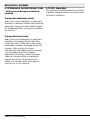
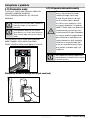
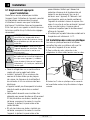
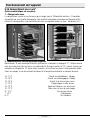
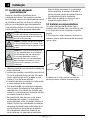
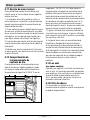
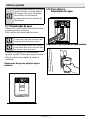
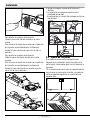
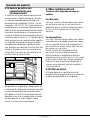
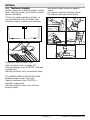
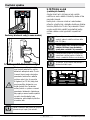
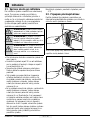
3.2 Installing the plastic wedges
Plastic wedges supplied with the product are
used to create the distance for the air circulation
between the product and the rear wall.
1.
To install the wedges, remove the screws on the
product and use the screws supplied together with the
wedges.
2.
Insert the 2 plastic wedges onto the rear ventilation
cover as illustrated in the figure.

11/ 30 EN Refrigerator / User Manual
Installation
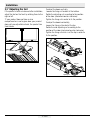
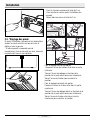
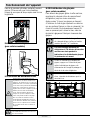
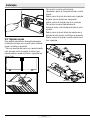
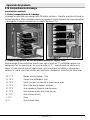
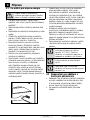
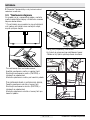
3.3 *Adjusting the feet
If the product stands unbalanced after installation,
adjust the feet on the front by rotating them to the
right or left.
*If your product does not have a wine
compartment or is not a glass door, your product
does not have adjustable stands, the product has
fixed stands.
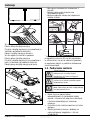
To adjust the doors vertically,
Loosen the fixing nut located at the bottom.
Rotate the adjusting nut according to the position
of the door (clockwise/counter-clockwise).
Tighten the fixing nut in order to fix the position.
To adjust the doors horizontally,
Loosen the fixing nut located at the top.
Rotate the side adjusting nut according to the
position of the door (clockwise/counter-clockwise).
Tighten the fixing nut which is at the top in order to
fix the position.
adjusting nut
adjusting nut

12 / 30 EN Refrigerator / User Manual
Installation
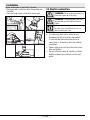
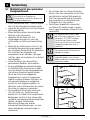
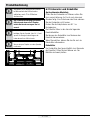
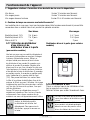
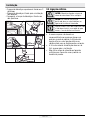
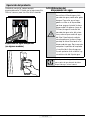
3.4 Electric connection
AWARNING: Do not make connections via
extension cables or multi-plugs.
BWARNING: Damaged power cable must
be replaced by the Authorized Service
Agent.
CIf two coolers are to be installed side
by side, there should be at least 4 cm
distance between them.
Our company shall not be liable for any
damages that will arise when the product
is used without grounding and electrical
connection in accordance with the national
regulations.
Power cable plug must be within easy reach
after installation.
Do not extension cords or cordless multiple
outlets between your product and the wall
outlet.
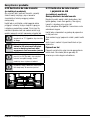
-Upper hinge group is fixed with 3 screws.
-The hinge cover is attached after the sockets are
installed.
- Then the hinge cover is fixed with two screws.

13/ 30 EN Refrigerator / User Manual
4 Preparation
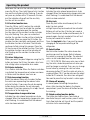
Thawing the frozen foods in the fridge
compartment both saves energy and reserves
the quality of the foods.
CTemperature of the room where your
refrigerator is located should at least
be 10ºC /50°F. Operating your
refrigerator under cooler conditions is not
recommended with regard to its efficiency.
CInside of your refrigerator must be cleaned
thoroughly.
CIf two coolers are to be installed side
by side, there should be at least 4 cm
distance between them.
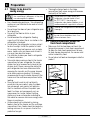
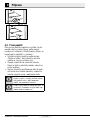
4.2 Recommendations about the
fresh food compartment
Make sure that the food does not touch the
temperature sensor in fresh food compartment.
To allow the fresh food compartment to keep
its ideal storage temperature, the sensor must
not be hindered by food.
Do not place hot foods or beverages inside the
product.
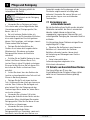
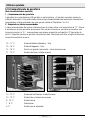
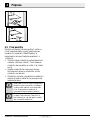
4.1 Things to be done for
saving energy
AConnecting your refrigerator to systems
that save energy is dangerous as they may
cause damage on the product.
For a freestanding appliance; ‘this refrigerating
appliance is not intended to be used as a built-
in appliance’ .
Do not leave the doors of your refrigerator open
for a long time.
Do not put hot food or drinks in your
refrigerator.
Do not overload the refrigerator. Cooling
capacity will fall when the air circulation in the
refrigerator is hindered.
Do not place the refrigerator in places subject
to direct sunlight. Install the product at least
30 cm away from heat sources such as hobs,
ovens, heater units and stoves and at least 5
cm away from electrical ovens.
Pay attention to store your food in refrigerator
in closed containers.
To be able store maximum food in the freezer
compartment of your refrigerator, the upper
drawer has to be removed and placed on top
of glass shelf. Power consumption stated for
your refrigerator has been determined after
removing the icematic and the upper drawers
as to allow maximum loading. It is strongly
recommended to use the lower drawers in the
freezer and the multizone compartment while
loading.
Since hot and humid air will not directly
penetrate into your product when the doors
are not opened, your product will optimize
itself in conditions sufficient to protect your
food. Functions and components such as
compressor, fan, heater, defrost, lighting,
display and so on will operate according to
the needs to consume minimum energy under
these circumstances.
Airflow should not be blocked by placing
foods in front of the freezer and the multizone
compartment fans. Foods should be loaded by
leaving minimum 5 cm space in front of the
protective fan grid.

14 / 30 EN Refrigerator / User Manual
Preparation
4.3 Initial use
Before using the product, make sure that all
preparations have been made in accordance
with the instructions given in the "Important
instructions regarding safety and environment" and
"Installation" chapters.
Clean the interior of the refrigerator as
recommended in the “Maintenance and
cleaning” section. Before you start the
refrigerator, make sure that the interior is dry.
Plug the refrigerator in a grounded socket. The
interior illumination is lit when the door of the
refrigerator is opened.
Operate the refrigerator for 6 hours without
placing any food in it and do not open its door
unless it is necessary.
C
starts up. The liquids and gases sealed
within the refrigeration system may also
give rise to noise, even if the compressor is
not running and this is quite normal.
CFront edges of the refrigerator may
feel warm. This is normal. These areas
are designed to be warm to avoid
condensation.

15/ 30 EN Refrigerator / User Manual
5 Operating the product
CFigures in this user manual are schematic and may not match the product exactly. If the subject parts
are not included in the product you have purchased, then those parts are valid for other models.
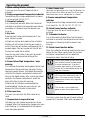
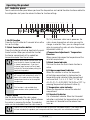
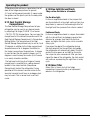
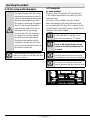
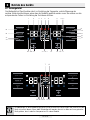
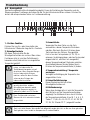
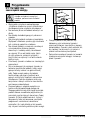
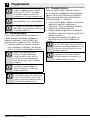
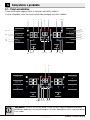
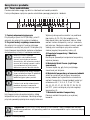
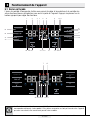
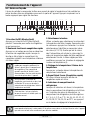
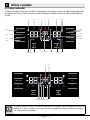
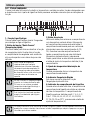
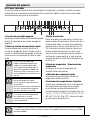
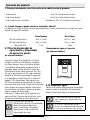
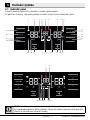
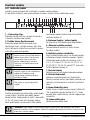
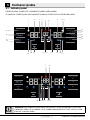
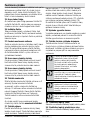
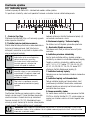
5.1 Indicator panel
Touch-controlled indicator panel allows you to set the temperature and control the other functions related
to the refrigerator without opening the door of the product. Just press the relevant buttons for function
settings.
Select
Quick FreezeQuick Cool
FN
OK
3 “
3 “
12 3 45 *6 9 10 11
12
*13
14
15
16
*17
*18
19
20
27
*28
29
30
31
32
33
*34.1*34.2
Select
Quick FreezeQuick Cool
FN
OK
3 “
3 “
7*8
*22 21
23
24
*25
26

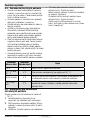
16 / 30 EN Refrigerator / User Manual
Operating the product
1. Quick cooling function indicator
It turns on when the quick fridge function is
activated.
2. Fridge compartment temperature indicator
Temperature of the fridge compartment is shown;
it can be set to 8,7,6,5,4,3,2,1.
3. Fahrenheit indicator
It is a Fahrenheit indicator. When the Fahrenheit
indication is activated, the temperature set values
are shown in Fahrenheit and the relevant icon
turns on.
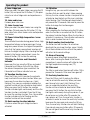
4. Key lock
Press key lock button simultaneously for 3 sec-
onds. Key lock symbol
will light up and key lock mode will be activated.
Buttons will not function if the Key lock mode is
active. Press key lock button simultaneously for 3
seconds again. Key lock symbol will turn off and
the key lock mode will be exited.
Press the key lock button if you want to prevent
changing of the temperature setting of the
refrigerator.
5. Power failure/High temperature / error
warning
This indicator illuminates during power failure, high
temperature failures and error warnings. During
long-term power failures, the highest temperature
value that the freezer compartment reaches will
blink on the digital display. After checking the food
located in the freezer compartment, press the
alarm off button to clear the warning.
Please refer to "solutions recommended for
troubleshooting" section on your manual if you
observe that this indicator is illuminated.
6. Filter reset icon
This icon turns on when the filter needs to be
reset.
7. Temperature change cabin icon
Indicates the cabin whose temperature is to be
changed. When the temperature change cabin icon
starts flashing, it is understood that the relevant
cabin has been selected.
8. Joker freezer icon
Hover over the Joker freezer icon using the FN button; the
icon will start to flash. When you press the OK key, joker
cabin freezer icon turn on and operates as a freezer.
9. Freezer compartment temperature
indicator
Temperature of the fridge compartment is shown;
it can be set to -16,-18,-19,-20,-21,-22,-24.
10. Quick freeze function indicator
It turns on when the quick freeze function is
activated.
11. Fahrenheit indicator
It is a Fahrenheit indicator. When the Fahrenheit
indication is activated, the temperature set values
are shown in Fahrenheit and the relevant icon
turns on.
12. Quick freeze function button
Press this button to activate or deactivate the quick
freeze function. When you activate the function,
the freezer compartment will be cooled to a
temperature lower than the set value.
CUse the quick freeze function when you
want to quickly freeze the food placed
in freezer compartment. If you want
to freeze large amounts of fresh food,
activate this function before putting the
food into the product.
CIf you do not cancel it, Quick Freeze
will cancel itself automatically after 24
hours at the most or when the fridge
compartment reaches to the required
temperature.
CThis function is not recalled when
power restores after a power failure.
13. Filter reset
The filter is reset when the quick freeze button is
pressed for 3 seconds. Filter reset icon goes off.

17/ 30 EN Refrigerator / User Manual
Operating the product
14. FN button
Using this key, you can switch between the
functions that you want to select. Upon pressing
this key, the icon, whose function is required to be
activated or deactivated, and this icon's indicator
starts flashing. The FN button gets deactivated if
button to change the functions again.
15. Celsius indicator
It is a Celsius indicator. When the Celsius indication
is activated, the temperature set values are shown
in Celsius and the relevant icon turns on.
16. OK button
After navigating the functions using the FN button,
when the function is cancelled via the OK button,
the relevant icon and the indicator flashes. When
the function is activated, it remains on. The
indicator continues to flash in order to show the
icon it is on.
17. Temperature change cabin icon
Indicates the cabin whose temperature is to be
changed. When the temperature change cabin icon
starts flashing, it is understood that the relevant
cabin has been selected.
18. Temperature change cabin icon
Indicates the cabin whose temperature is to be
changed. When the temperature change cabin icon
starts flashing, it is understood that the relevant
cabin has been selected.
19. Set increasing button
Select the relevant cabin with the select button;
the cabin icon representing the relevant cabin will
start to flash. If you press the set increasing button
during this process, the set value gets increased. If
you keep pressing it in a loop, the set value returns
to the beginning.
20. Temperature change cabin icon
Indicates the cabin whose temperature is to be
changed. When the temperature change cabin icon
starts flashing, it is understood that the relevant
cabin has been selected.
21. Setting the Celsius and Fahrenheit
indicator
Hover over this key using the FN key and select
Fahrenheit and Celsius via the OK key. When
the relevant temperature type is selected, the
Fahrenheit and Celsius indicator turns on.
22. Ice machine off icon
Press the FN key (until it reaches the ice icon and
the lower line) to switch off the ice machine. The
ice machine off icon and the ice machine function
indicator start flashing when you hover over them,
thus you can understand whether the ice machine
will be turned on or off. When you press the OK
button, the ice machine icon lights continuously
and the Indicator continues to flash during this
process. If you do not press any button after 20
seconds, the icon and the indicator remains on.
Thus, the ice machine is switched off. In order to
switch on the ice machine again, hover over the
icon and the indicator; thus, both the ice machine
off icon and the indicator will start flashing. If you
do not press any button within 20 seconds, the
icon and the indicator will go off and thus the ice
machine will be switched on again.
CIndicates whether the icematic is
on or off.
CWater flow from water tank
will stop when this function is
selected. However, ice made
previously can be taken from the
icematic.
23. Eco fuzzy function icon
Press the FN key (until it reaches the letter e
icon and the lower line) to activate the eco fuzzy.
When you hover over the eco fuzzy icon and the
eco fuzzy function indicator, they start flashing.
Thus, you can understand whether the eco fuzzy
function will be activated or deactivated. When you
press the OK button, the eco fuzzy function icon
lights continuously and the Indicator continues to
flash during this process. If you do not press any
button after 20 seconds, the icon and the indicator
remains on. Thus, the eco fuzzy function is
activated. In order to cancel the eco fuzzy function,

18 / 30 EN Refrigerator / User Manual
Operating the product
hover over the icon and the indicator again and
press the OK key. Thus, both the eco fuzzy function
icon and the indicator will start flashing. If you do
not press any button within 20 seconds, the icon
and the indicator will go off and the eco fuzzy
function will be cancelled.
24. Vacation function icon
Press the FN key (until it reaches the umbrella
icon and the lower line) to activate the vacation
function. When you hover over the vacation
function icon and the vacation function indicator,
they start flashing. Thus, you can understand
whether the vacation function will be activated or
deactivated. When you press the OK button, the
vacation function icon lights continuously and thus
the Vacation function is activated. The Indicator
continues to flash during this process. Press the
OK key to cancel the vacation function. Thus, both
the vacation function icon and the indicator will
start flashing and the vacation function will be
cancelled.
25. Joker fridge icon
When you select the joker fridge icon using the FN
button and press the OK key, the joker cabin turns
into a fridge cabin and operates as a cooler.
26. Celsius indicator
It is a Celsius indicator. When the Celsius indication
is activated, the temperature set values are shown
in Celsius and the relevant icon turns on.
27. Set decreasing function
Select the relevant cabin with the select button;
the cabin icon representing the relevant cabin
will start to flash. If you press the set decreasing
button during this process, the set value gets
decreased. If you keep pressing it in a loop, the set
value returns to the beginning.
28. Temperature change cabin icon
Indicates the cabin whose temperature is to be
changed. When the temperature change cabin icon
starts flashing, it is understood that the relevant
cabin has been selected.
29. Temperature change cabin icon
Indicates the cabin whose temperature is to be
changed. When the temperature change cabin icon
starts flashing, it is understood that the relevant
cabin has been selected.
30. Key lock
Press key lock button simultaneously for 3 sec-
onds. Key lock symbol
will light up and key lock mode will be activated.
Buttons will not function if the Key lock mode is
active. Press key lock button simultaneously for 3
seconds again. Key lock symbol will turn off and
the key lock mode will be exited.
Press the key lock button if you want to prevent
changing of the temperature setting of the
refrigerator.
31.Select button
Use this button to select the cabin whose tem-
perature you want to change. Switch between
the cabins by pressing this button. The selected
cabin can be understood from the cabin icons
(7,17,18,20,28,29). Whichever cabin icon is flash-
ing, the cabin, whose temperature set value you
want to change, is selected. Then, you can change
the set value by pressing the cabin set value
decreasing button (27) and the cabin set value in-
creasing button (19). If you do not press the select
button for 20 seconds, the cabin icons will go off.
32. Alarm off warning
In case of power failure/high temperature
alarm, after checking the foods in the freezer
compartment, press the alarm off button to clear
the warning.
33. Quick cooling function button
The button has two functions. To activate or
deactivate the quick cool function, press it briefly.
Quick Cool indicator will turn off and the product
will return to its normal settings.

19/ 30 EN Refrigerator / User Manual
Operating the product
CUse quick cooling function when you
want to quickly cool the food placed
in the fridge compartment. If you want
to cool large amounts of fresh food,
activate this function before putting the
food into the product.
CIf you do not cancel it, quick cooling
will cancel itself automatically after 1
hours at the most or when the fridge
compartment reaches to the required
temperature.
CIf you press the quick cooling button
repeatedly with short intervals, the
electronic circuit protection will be
activated and the compressor will not
start up immediately.
CThis function is not recalled when
power restores after a power failure.
34. 1 Joker temperature indicator
Temperature set values of the joker cabin are
displayed.
34. 2 Wine cooler compartment tempature
indicator
Tempature set values of the winecabin are dis-
played.
La pagina si sta caricando...
La pagina si sta caricando...
La pagina si sta caricando...
La pagina si sta caricando...
La pagina si sta caricando...
La pagina si sta caricando...
La pagina si sta caricando...
La pagina si sta caricando...
La pagina si sta caricando...
La pagina si sta caricando...
La pagina si sta caricando...
La pagina si sta caricando...
La pagina si sta caricando...
La pagina si sta caricando...
La pagina si sta caricando...
La pagina si sta caricando...
La pagina si sta caricando...
La pagina si sta caricando...
La pagina si sta caricando...
La pagina si sta caricando...
La pagina si sta caricando...
La pagina si sta caricando...
La pagina si sta caricando...
La pagina si sta caricando...
La pagina si sta caricando...
La pagina si sta caricando...
La pagina si sta caricando...
La pagina si sta caricando...
La pagina si sta caricando...
La pagina si sta caricando...
La pagina si sta caricando...
La pagina si sta caricando...
La pagina si sta caricando...
La pagina si sta caricando...
La pagina si sta caricando...
La pagina si sta caricando...
La pagina si sta caricando...
La pagina si sta caricando...
La pagina si sta caricando...
La pagina si sta caricando...
La pagina si sta caricando...
La pagina si sta caricando...
La pagina si sta caricando...
La pagina si sta caricando...
La pagina si sta caricando...
La pagina si sta caricando...
La pagina si sta caricando...
La pagina si sta caricando...
La pagina si sta caricando...
La pagina si sta caricando...
La pagina si sta caricando...
La pagina si sta caricando...
La pagina si sta caricando...
La pagina si sta caricando...
La pagina si sta caricando...
La pagina si sta caricando...
La pagina si sta caricando...
La pagina si sta caricando...
La pagina si sta caricando...
La pagina si sta caricando...
La pagina si sta caricando...
La pagina si sta caricando...
La pagina si sta caricando...
La pagina si sta caricando...
La pagina si sta caricando...
La pagina si sta caricando...
La pagina si sta caricando...
La pagina si sta caricando...
La pagina si sta caricando...
La pagina si sta caricando...
La pagina si sta caricando...
La pagina si sta caricando...
La pagina si sta caricando...
La pagina si sta caricando...
La pagina si sta caricando...
La pagina si sta caricando...
La pagina si sta caricando...
La pagina si sta caricando...
La pagina si sta caricando...
La pagina si sta caricando...
La pagina si sta caricando...
La pagina si sta caricando...
La pagina si sta caricando...
La pagina si sta caricando...
La pagina si sta caricando...
La pagina si sta caricando...
La pagina si sta caricando...
La pagina si sta caricando...
La pagina si sta caricando...
La pagina si sta caricando...
La pagina si sta caricando...
La pagina si sta caricando...
La pagina si sta caricando...
La pagina si sta caricando...
La pagina si sta caricando...
La pagina si sta caricando...
La pagina si sta caricando...
La pagina si sta caricando...
La pagina si sta caricando...
La pagina si sta caricando...
La pagina si sta caricando...
La pagina si sta caricando...
La pagina si sta caricando...
La pagina si sta caricando...
La pagina si sta caricando...
La pagina si sta caricando...
La pagina si sta caricando...
La pagina si sta caricando...
La pagina si sta caricando...
La pagina si sta caricando...
La pagina si sta caricando...
La pagina si sta caricando...
La pagina si sta caricando...
La pagina si sta caricando...
La pagina si sta caricando...
La pagina si sta caricando...
La pagina si sta caricando...
La pagina si sta caricando...
La pagina si sta caricando...
La pagina si sta caricando...
La pagina si sta caricando...
La pagina si sta caricando...
La pagina si sta caricando...
La pagina si sta caricando...
La pagina si sta caricando...
La pagina si sta caricando...
La pagina si sta caricando...
La pagina si sta caricando...
La pagina si sta caricando...
La pagina si sta caricando...
La pagina si sta caricando...
La pagina si sta caricando...
La pagina si sta caricando...
La pagina si sta caricando...
La pagina si sta caricando...
La pagina si sta caricando...
La pagina si sta caricando...
La pagina si sta caricando...
La pagina si sta caricando...
La pagina si sta caricando...
La pagina si sta caricando...
La pagina si sta caricando...
La pagina si sta caricando...
La pagina si sta caricando...
La pagina si sta caricando...
La pagina si sta caricando...
La pagina si sta caricando...
La pagina si sta caricando...
La pagina si sta caricando...
La pagina si sta caricando...
La pagina si sta caricando...
La pagina si sta caricando...
La pagina si sta caricando...
La pagina si sta caricando...
La pagina si sta caricando...
La pagina si sta caricando...
La pagina si sta caricando...
La pagina si sta caricando...
La pagina si sta caricando...
La pagina si sta caricando...
La pagina si sta caricando...
La pagina si sta caricando...
La pagina si sta caricando...
La pagina si sta caricando...
La pagina si sta caricando...
La pagina si sta caricando...
La pagina si sta caricando...
La pagina si sta caricando...
La pagina si sta caricando...
La pagina si sta caricando...
La pagina si sta caricando...
La pagina si sta caricando...
La pagina si sta caricando...
La pagina si sta caricando...
La pagina si sta caricando...
La pagina si sta caricando...
La pagina si sta caricando...
La pagina si sta caricando...
La pagina si sta caricando...
La pagina si sta caricando...
La pagina si sta caricando...
La pagina si sta caricando...
La pagina si sta caricando...
La pagina si sta caricando...
La pagina si sta caricando...
La pagina si sta caricando...
La pagina si sta caricando...
La pagina si sta caricando...
La pagina si sta caricando...
La pagina si sta caricando...
La pagina si sta caricando...
La pagina si sta caricando...
La pagina si sta caricando...
La pagina si sta caricando...
La pagina si sta caricando...
La pagina si sta caricando...
La pagina si sta caricando...
La pagina si sta caricando...
La pagina si sta caricando...
La pagina si sta caricando...
La pagina si sta caricando...
La pagina si sta caricando...
La pagina si sta caricando...
La pagina si sta caricando...
La pagina si sta caricando...
La pagina si sta caricando...
La pagina si sta caricando...
La pagina si sta caricando...
La pagina si sta caricando...
La pagina si sta caricando...
La pagina si sta caricando...
La pagina si sta caricando...
La pagina si sta caricando...
La pagina si sta caricando...
La pagina si sta caricando...
La pagina si sta caricando...
La pagina si sta caricando...
La pagina si sta caricando...
La pagina si sta caricando...
La pagina si sta caricando...
La pagina si sta caricando...
La pagina si sta caricando...
La pagina si sta caricando...
La pagina si sta caricando...
La pagina si sta caricando...
La pagina si sta caricando...
La pagina si sta caricando...
La pagina si sta caricando...
La pagina si sta caricando...
La pagina si sta caricando...
La pagina si sta caricando...
La pagina si sta caricando...
La pagina si sta caricando...
La pagina si sta caricando...
La pagina si sta caricando...
La pagina si sta caricando...
La pagina si sta caricando...
La pagina si sta caricando...
La pagina si sta caricando...
La pagina si sta caricando...
La pagina si sta caricando...
La pagina si sta caricando...
La pagina si sta caricando...
La pagina si sta caricando...
La pagina si sta caricando...
La pagina si sta caricando...
La pagina si sta caricando...
La pagina si sta caricando...
La pagina si sta caricando...
La pagina si sta caricando...
La pagina si sta caricando...
La pagina si sta caricando...
La pagina si sta caricando...
La pagina si sta caricando...
La pagina si sta caricando...
La pagina si sta caricando...
La pagina si sta caricando...
La pagina si sta caricando...
La pagina si sta caricando...
La pagina si sta caricando...
La pagina si sta caricando...
La pagina si sta caricando...
La pagina si sta caricando...
La pagina si sta caricando...
La pagina si sta caricando...
La pagina si sta caricando...
La pagina si sta caricando...
La pagina si sta caricando...
La pagina si sta caricando...
La pagina si sta caricando...
La pagina si sta caricando...
La pagina si sta caricando...
La pagina si sta caricando...
La pagina si sta caricando...
La pagina si sta caricando...
La pagina si sta caricando...
La pagina si sta caricando...
La pagina si sta caricando...
La pagina si sta caricando...
La pagina si sta caricando...
La pagina si sta caricando...
La pagina si sta caricando...
La pagina si sta caricando...
La pagina si sta caricando...
La pagina si sta caricando...
La pagina si sta caricando...
La pagina si sta caricando...
La pagina si sta caricando...
La pagina si sta caricando...
La pagina si sta caricando...
La pagina si sta caricando...
La pagina si sta caricando...
La pagina si sta caricando...
La pagina si sta caricando...
La pagina si sta caricando...
La pagina si sta caricando...
La pagina si sta caricando...
La pagina si sta caricando...
La pagina si sta caricando...
La pagina si sta caricando...
La pagina si sta caricando...
La pagina si sta caricando...
La pagina si sta caricando...
La pagina si sta caricando...
La pagina si sta caricando...
La pagina si sta caricando...
La pagina si sta caricando...
La pagina si sta caricando...
La pagina si sta caricando...
La pagina si sta caricando...
La pagina si sta caricando...
La pagina si sta caricando...
La pagina si sta caricando...
La pagina si sta caricando...
La pagina si sta caricando...
La pagina si sta caricando...
La pagina si sta caricando...
La pagina si sta caricando...
La pagina si sta caricando...
La pagina si sta caricando...
La pagina si sta caricando...
La pagina si sta caricando...
La pagina si sta caricando...
La pagina si sta caricando...
La pagina si sta caricando...
La pagina si sta caricando...
La pagina si sta caricando...
La pagina si sta caricando...
La pagina si sta caricando...
La pagina si sta caricando...
La pagina si sta caricando...
La pagina si sta caricando...
La pagina si sta caricando...
La pagina si sta caricando...
La pagina si sta caricando...
La pagina si sta caricando...
La pagina si sta caricando...
La pagina si sta caricando...
La pagina si sta caricando...
La pagina si sta caricando...
La pagina si sta caricando...
La pagina si sta caricando...
La pagina si sta caricando...
La pagina si sta caricando...
La pagina si sta caricando...
La pagina si sta caricando...
La pagina si sta caricando...
La pagina si sta caricando...
La pagina si sta caricando...
La pagina si sta caricando...
La pagina si sta caricando...
La pagina si sta caricando...
La pagina si sta caricando...
La pagina si sta caricando...
La pagina si sta caricando...
La pagina si sta caricando...
La pagina si sta caricando...
La pagina si sta caricando...
La pagina si sta caricando...
La pagina si sta caricando...
La pagina si sta caricando...
La pagina si sta caricando...
La pagina si sta caricando...
La pagina si sta caricando...
La pagina si sta caricando...
La pagina si sta caricando...
La pagina si sta caricando...
La pagina si sta caricando...
La pagina si sta caricando...
La pagina si sta caricando...
La pagina si sta caricando...
La pagina si sta caricando...
La pagina si sta caricando...
La pagina si sta caricando...
La pagina si sta caricando...
La pagina si sta caricando...
La pagina si sta caricando...
La pagina si sta caricando...
La pagina si sta caricando...
La pagina si sta caricando...
La pagina si sta caricando...
La pagina si sta caricando...
La pagina si sta caricando...
La pagina si sta caricando...
La pagina si sta caricando...
La pagina si sta caricando...
La pagina si sta caricando...
La pagina si sta caricando...
La pagina si sta caricando...
La pagina si sta caricando...
La pagina si sta caricando...
La pagina si sta caricando...
La pagina si sta caricando...
La pagina si sta caricando...
La pagina si sta caricando...
La pagina si sta caricando...
La pagina si sta caricando...
La pagina si sta caricando...
La pagina si sta caricando...
La pagina si sta caricando...
La pagina si sta caricando...
La pagina si sta caricando...
La pagina si sta caricando...
La pagina si sta caricando...
La pagina si sta caricando...
La pagina si sta caricando...
La pagina si sta caricando...
La pagina si sta caricando...
La pagina si sta caricando...
La pagina si sta caricando...
La pagina si sta caricando...
La pagina si sta caricando...
La pagina si sta caricando...
La pagina si sta caricando...
La pagina si sta caricando...
La pagina si sta caricando...
La pagina si sta caricando...
La pagina si sta caricando...
La pagina si sta caricando...
La pagina si sta caricando...
La pagina si sta caricando...
La pagina si sta caricando...
La pagina si sta caricando...
La pagina si sta caricando...
La pagina si sta caricando...
La pagina si sta caricando...
La pagina si sta caricando...
La pagina si sta caricando...
La pagina si sta caricando...
La pagina si sta caricando...
La pagina si sta caricando...
La pagina si sta caricando...
La pagina si sta caricando...
La pagina si sta caricando...
La pagina si sta caricando...
La pagina si sta caricando...
La pagina si sta caricando...
La pagina si sta caricando...
La pagina si sta caricando...
La pagina si sta caricando...
La pagina si sta caricando...
La pagina si sta caricando...
La pagina si sta caricando...
La pagina si sta caricando...
La pagina si sta caricando...
La pagina si sta caricando...
La pagina si sta caricando...
La pagina si sta caricando...
La pagina si sta caricando...
La pagina si sta caricando...
La pagina si sta caricando...
La pagina si sta caricando...
La pagina si sta caricando...
La pagina si sta caricando...
La pagina si sta caricando...
La pagina si sta caricando...
La pagina si sta caricando...
La pagina si sta caricando...
La pagina si sta caricando...
La pagina si sta caricando...
La pagina si sta caricando...
La pagina si sta caricando...
La pagina si sta caricando...
La pagina si sta caricando...
La pagina si sta caricando...
La pagina si sta caricando...
La pagina si sta caricando...
La pagina si sta caricando...
La pagina si sta caricando...
La pagina si sta caricando...
La pagina si sta caricando...
La pagina si sta caricando...
La pagina si sta caricando...
La pagina si sta caricando...
La pagina si sta caricando...
La pagina si sta caricando...
La pagina si sta caricando...
La pagina si sta caricando...
La pagina si sta caricando...
La pagina si sta caricando...
La pagina si sta caricando...
La pagina si sta caricando...
La pagina si sta caricando...
La pagina si sta caricando...
La pagina si sta caricando...
La pagina si sta caricando...
La pagina si sta caricando...
La pagina si sta caricando...
La pagina si sta caricando...
La pagina si sta caricando...
La pagina si sta caricando...
La pagina si sta caricando...
La pagina si sta caricando...
La pagina si sta caricando...
La pagina si sta caricando...
La pagina si sta caricando...
La pagina si sta caricando...
La pagina si sta caricando...
La pagina si sta caricando...
La pagina si sta caricando...
La pagina si sta caricando...
La pagina si sta caricando...
La pagina si sta caricando...
La pagina si sta caricando...
La pagina si sta caricando...
La pagina si sta caricando...
La pagina si sta caricando...
La pagina si sta caricando...
La pagina si sta caricando...
La pagina si sta caricando...
La pagina si sta caricando...
La pagina si sta caricando...
La pagina si sta caricando...
La pagina si sta caricando...
La pagina si sta caricando...
La pagina si sta caricando...
La pagina si sta caricando...
La pagina si sta caricando...
La pagina si sta caricando...
La pagina si sta caricando...
La pagina si sta caricando...
La pagina si sta caricando...
La pagina si sta caricando...
La pagina si sta caricando...
La pagina si sta caricando...
La pagina si sta caricando...
La pagina si sta caricando...
La pagina si sta caricando...
La pagina si sta caricando...
La pagina si sta caricando...
La pagina si sta caricando...
La pagina si sta caricando...
La pagina si sta caricando...
La pagina si sta caricando...
La pagina si sta caricando...
La pagina si sta caricando...
La pagina si sta caricando...
La pagina si sta caricando...
La pagina si sta caricando...
La pagina si sta caricando...
La pagina si sta caricando...
La pagina si sta caricando...
La pagina si sta caricando...
La pagina si sta caricando...
La pagina si sta caricando...
La pagina si sta caricando...
La pagina si sta caricando...
La pagina si sta caricando...
La pagina si sta caricando...
La pagina si sta caricando...
La pagina si sta caricando...
La pagina si sta caricando...
La pagina si sta caricando...
La pagina si sta caricando...
La pagina si sta caricando...
La pagina si sta caricando...
La pagina si sta caricando...
La pagina si sta caricando...
La pagina si sta caricando...
La pagina si sta caricando...
La pagina si sta caricando...
La pagina si sta caricando...
La pagina si sta caricando...
La pagina si sta caricando...
La pagina si sta caricando...
La pagina si sta caricando...
La pagina si sta caricando...
La pagina si sta caricando...
La pagina si sta caricando...
La pagina si sta caricando...
La pagina si sta caricando...
La pagina si sta caricando...
La pagina si sta caricando...
La pagina si sta caricando...
La pagina si sta caricando...
La pagina si sta caricando...
La pagina si sta caricando...
La pagina si sta caricando...
La pagina si sta caricando...
La pagina si sta caricando...
La pagina si sta caricando...
La pagina si sta caricando...
La pagina si sta caricando...
La pagina si sta caricando...
La pagina si sta caricando...
La pagina si sta caricando...
La pagina si sta caricando...
La pagina si sta caricando...
La pagina si sta caricando...
La pagina si sta caricando...
La pagina si sta caricando...
La pagina si sta caricando...
La pagina si sta caricando...
La pagina si sta caricando...
La pagina si sta caricando...
La pagina si sta caricando...
La pagina si sta caricando...
La pagina si sta caricando...
La pagina si sta caricando...
La pagina si sta caricando...
La pagina si sta caricando...
La pagina si sta caricando...
La pagina si sta caricando...
La pagina si sta caricando...
La pagina si sta caricando...
La pagina si sta caricando...
La pagina si sta caricando...
La pagina si sta caricando...
La pagina si sta caricando...
La pagina si sta caricando...
La pagina si sta caricando...
La pagina si sta caricando...
La pagina si sta caricando...
La pagina si sta caricando...
La pagina si sta caricando...
La pagina si sta caricando...
La pagina si sta caricando...
La pagina si sta caricando...
La pagina si sta caricando...
La pagina si sta caricando...
La pagina si sta caricando...
La pagina si sta caricando...
La pagina si sta caricando...
La pagina si sta caricando...
La pagina si sta caricando...
La pagina si sta caricando...
La pagina si sta caricando...
La pagina si sta caricando...
La pagina si sta caricando...
La pagina si sta caricando...
La pagina si sta caricando...
La pagina si sta caricando...
La pagina si sta caricando...
La pagina si sta caricando...
La pagina si sta caricando...
La pagina si sta caricando...
La pagina si sta caricando...
La pagina si sta caricando...
La pagina si sta caricando...
La pagina si sta caricando...
La pagina si sta caricando...
La pagina si sta caricando...
La pagina si sta caricando...
La pagina si sta caricando...
La pagina si sta caricando...
La pagina si sta caricando...
La pagina si sta caricando...
La pagina si sta caricando...
La pagina si sta caricando...
La pagina si sta caricando...
La pagina si sta caricando...
La pagina si sta caricando...
La pagina si sta caricando...
La pagina si sta caricando...
La pagina si sta caricando...
La pagina si sta caricando...
La pagina si sta caricando...
La pagina si sta caricando...
La pagina si sta caricando...
La pagina si sta caricando...
La pagina si sta caricando...
La pagina si sta caricando...
La pagina si sta caricando...
La pagina si sta caricando...
La pagina si sta caricando...
La pagina si sta caricando...
La pagina si sta caricando...
La pagina si sta caricando...
La pagina si sta caricando...
La pagina si sta caricando...
La pagina si sta caricando...
La pagina si sta caricando...
La pagina si sta caricando...
La pagina si sta caricando...
La pagina si sta caricando...
La pagina si sta caricando...
La pagina si sta caricando...
La pagina si sta caricando...
La pagina si sta caricando...
La pagina si sta caricando...
La pagina si sta caricando...
La pagina si sta caricando...
La pagina si sta caricando...
La pagina si sta caricando...
La pagina si sta caricando...
La pagina si sta caricando...
La pagina si sta caricando...
La pagina si sta caricando...
La pagina si sta caricando...
La pagina si sta caricando...
La pagina si sta caricando...
La pagina si sta caricando...
La pagina si sta caricando...
La pagina si sta caricando...
La pagina si sta caricando...
La pagina si sta caricando...
La pagina si sta caricando...
La pagina si sta caricando...
La pagina si sta caricando...
La pagina si sta caricando...
La pagina si sta caricando...
La pagina si sta caricando...
La pagina si sta caricando...
La pagina si sta caricando...
La pagina si sta caricando...
La pagina si sta caricando...
La pagina si sta caricando...
La pagina si sta caricando...
La pagina si sta caricando...
La pagina si sta caricando...
La pagina si sta caricando...
La pagina si sta caricando...
La pagina si sta caricando...
La pagina si sta caricando...
La pagina si sta caricando...
-
 1
1
-
 2
2
-
 3
3
-
 4
4
-
 5
5
-
 6
6
-
 7
7
-
 8
8
-
 9
9
-
 10
10
-
 11
11
-
 12
12
-
 13
13
-
 14
14
-
 15
15
-
 16
16
-
 17
17
-
 18
18
-
 19
19
-
 20
20
-
 21
21
-
 22
22
-
 23
23
-
 24
24
-
 25
25
-
 26
26
-
 27
27
-
 28
28
-
 29
29
-
 30
30
-
 31
31
-
 32
32
-
 33
33
-
 34
34
-
 35
35
-
 36
36
-
 37
37
-
 38
38
-
 39
39
-
 40
40
-
 41
41
-
 42
42
-
 43
43
-
 44
44
-
 45
45
-
 46
46
-
 47
47
-
 48
48
-
 49
49
-
 50
50
-
 51
51
-
 52
52
-
 53
53
-
 54
54
-
 55
55
-
 56
56
-
 57
57
-
 58
58
-
 59
59
-
 60
60
-
 61
61
-
 62
62
-
 63
63
-
 64
64
-
 65
65
-
 66
66
-
 67
67
-
 68
68
-
 69
69
-
 70
70
-
 71
71
-
 72
72
-
 73
73
-
 74
74
-
 75
75
-
 76
76
-
 77
77
-
 78
78
-
 79
79
-
 80
80
-
 81
81
-
 82
82
-
 83
83
-
 84
84
-
 85
85
-
 86
86
-
 87
87
-
 88
88
-
 89
89
-
 90
90
-
 91
91
-
 92
92
-
 93
93
-
 94
94
-
 95
95
-
 96
96
-
 97
97
-
 98
98
-
 99
99
-
 100
100
-
 101
101
-
 102
102
-
 103
103
-
 104
104
-
 105
105
-
 106
106
-
 107
107
-
 108
108
-
 109
109
-
 110
110
-
 111
111
-
 112
112
-
 113
113
-
 114
114
-
 115
115
-
 116
116
-
 117
117
-
 118
118
-
 119
119
-
 120
120
-
 121
121
-
 122
122
-
 123
123
-
 124
124
-
 125
125
-
 126
126
-
 127
127
-
 128
128
-
 129
129
-
 130
130
-
 131
131
-
 132
132
-
 133
133
-
 134
134
-
 135
135
-
 136
136
-
 137
137
-
 138
138
-
 139
139
-
 140
140
-
 141
141
-
 142
142
-
 143
143
-
 144
144
-
 145
145
-
 146
146
-
 147
147
-
 148
148
-
 149
149
-
 150
150
-
 151
151
-
 152
152
-
 153
153
-
 154
154
-
 155
155
-
 156
156
-
 157
157
-
 158
158
-
 159
159
-
 160
160
-
 161
161
-
 162
162
-
 163
163
-
 164
164
-
 165
165
-
 166
166
-
 167
167
-
 168
168
-
 169
169
-
 170
170
-
 171
171
-
 172
172
-
 173
173
-
 174
174
-
 175
175
-
 176
176
-
 177
177
-
 178
178
-
 179
179
-
 180
180
-
 181
181
-
 182
182
-
 183
183
-
 184
184
-
 185
185
-
 186
186
-
 187
187
-
 188
188
-
 189
189
-
 190
190
-
 191
191
-
 192
192
-
 193
193
-
 194
194
-
 195
195
-
 196
196
-
 197
197
-
 198
198
-
 199
199
-
 200
200
-
 201
201
-
 202
202
-
 203
203
-
 204
204
-
 205
205
-
 206
206
-
 207
207
-
 208
208
-
 209
209
-
 210
210
-
 211
211
-
 212
212
-
 213
213
-
 214
214
-
 215
215
-
 216
216
-
 217
217
-
 218
218
-
 219
219
-
 220
220
-
 221
221
-
 222
222
-
 223
223
-
 224
224
-
 225
225
-
 226
226
-
 227
227
-
 228
228
-
 229
229
-
 230
230
-
 231
231
-
 232
232
-
 233
233
-
 234
234
-
 235
235
-
 236
236
-
 237
237
-
 238
238
-
 239
239
-
 240
240
-
 241
241
-
 242
242
-
 243
243
-
 244
244
-
 245
245
-
 246
246
-
 247
247
-
 248
248
-
 249
249
-
 250
250
-
 251
251
-
 252
252
-
 253
253
-
 254
254
-
 255
255
-
 256
256
-
 257
257
-
 258
258
-
 259
259
-
 260
260
-
 261
261
-
 262
262
-
 263
263
-
 264
264
-
 265
265
-
 266
266
-
 267
267
-
 268
268
-
 269
269
-
 270
270
-
 271
271
-
 272
272
-
 273
273
-
 274
274
-
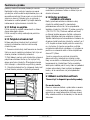 275
275
-
 276
276
-
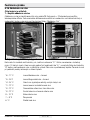 277
277
-
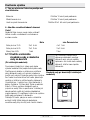 278
278
-
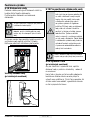 279
279
-
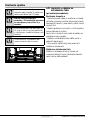 280
280
-
 281
281
-
 282
282
-
 283
283
-
 284
284
-
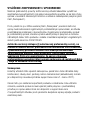 285
285
-
 286
286
-
 287
287
-
 288
288
-
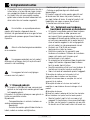 289
289
-
 290
290
-
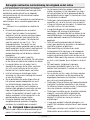 291
291
-
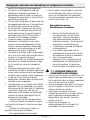 292
292
-
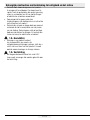 293
293
-
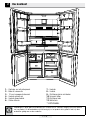 294
294
-
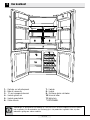 295
295
-
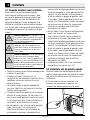 296
296
-
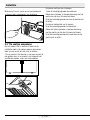 297
297
-
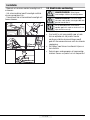 298
298
-
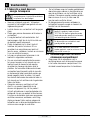 299
299
-
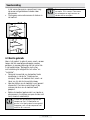 300
300
-
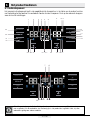 301
301
-
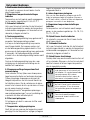 302
302
-
 303
303
-
 304
304
-
 305
305
-
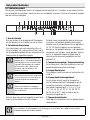 306
306
-
 307
307
-
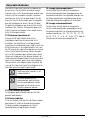 308
308
-
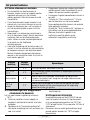 309
309
-
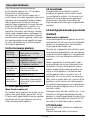 310
310
-
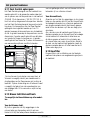 311
311
-
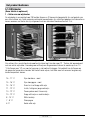 312
312
-
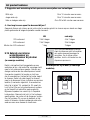 313
313
-
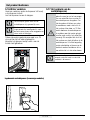 314
314
-
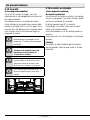 315
315
-
 316
316
-
 317
317
-
 318
318
-
 319
319
-
 320
320
-
 321
321
-
 322
322
-
 323
323
-
 324
324
-
 325
325
-
 326
326
-
 327
327
-
 328
328
-
 329
329
-
 330
330
-
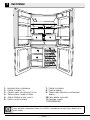 331
331
-
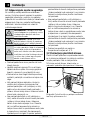 332
332
-
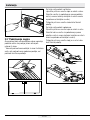 333
333
-
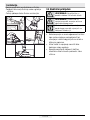 334
334
-
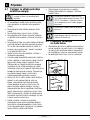 335
335
-
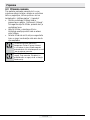 336
336
-
 337
337
-
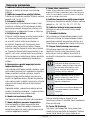 338
338
-
 339
339
-
 340
340
-
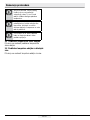 341
341
-
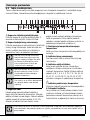 342
342
-
 343
343
-
 344
344
-
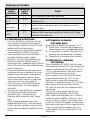 345
345
-
 346
346
-
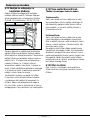 347
347
-
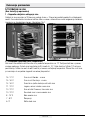 348
348
-
 349
349
-
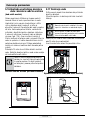 350
350
-
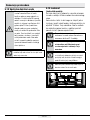 351
351
-
 352
352
-
 353
353
-
 354
354
-
 355
355
-
 356
356
-
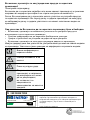 357
357
-
 358
358
-
 359
359
-
 360
360
-
 361
361
-
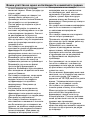 362
362
-
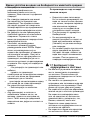 363
363
-
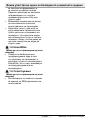 364
364
-
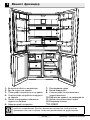 365
365
-
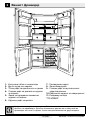 366
366
-
 367
367
-
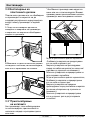 368
368
-
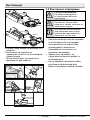 369
369
-
 370
370
-
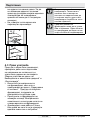 371
371
-
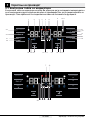 372
372
-
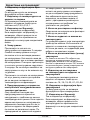 373
373
-
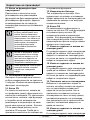 374
374
-
 375
375
-
 376
376
-
 377
377
-
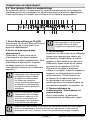 378
378
-
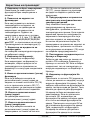 379
379
-
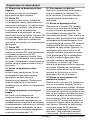 380
380
-
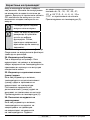 381
381
-
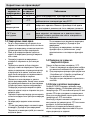 382
382
-
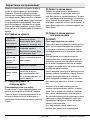 383
383
-
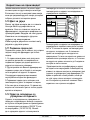 384
384
-
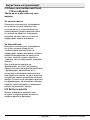 385
385
-
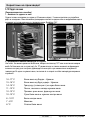 386
386
-
 387
387
-
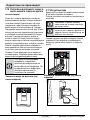 388
388
-
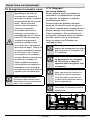 389
389
-
 390
390
-
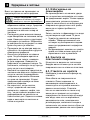 391
391
-
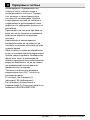 392
392
-
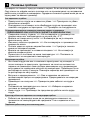 393
393
-
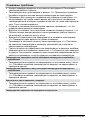 394
394
-
 395
395
-
 396
396
-
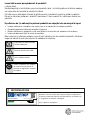 397
397
-
 398
398
-
 399
399
-
 400
400
-
 401
401
-
 402
402
-
 403
403
-
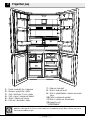 404
404
-
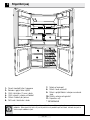 405
405
-
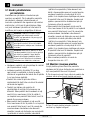 406
406
-
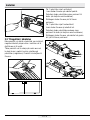 407
407
-
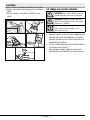 408
408
-
 409
409
-
 410
410
-
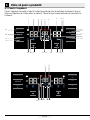 411
411
-
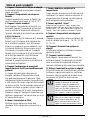 412
412
-
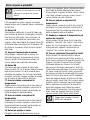 413
413
-
 414
414
-
 415
415
-
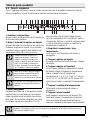 416
416
-
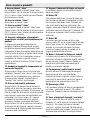 417
417
-
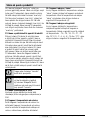 418
418
-
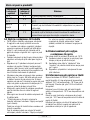 419
419
-
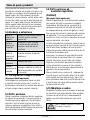 420
420
-
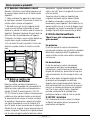 421
421
-
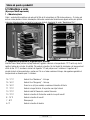 422
422
-
 423
423
-
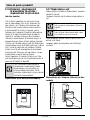 424
424
-
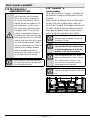 425
425
-
 426
426
-
 427
427
-
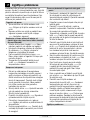 428
428
-
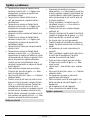 429
429
-
 430
430
-
 431
431
-
 432
432
-
 433
433
-
 434
434
-
 435
435
-
 436
436
-
 437
437
-
 438
438
-
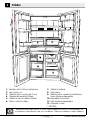 439
439
-
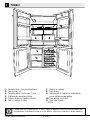 440
440
-
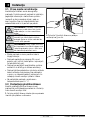 441
441
-
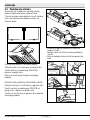 442
442
-
 443
443
-
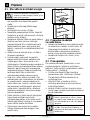 444
444
-
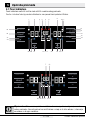 445
445
-
 446
446
-
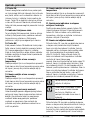 447
447
-
 448
448
-
 449
449
-
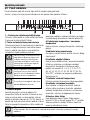 450
450
-
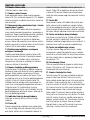 451
451
-
 452
452
-
 453
453
-
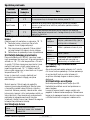 454
454
-
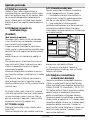 455
455
-
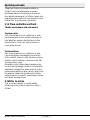 456
456
-
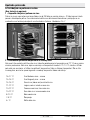 457
457
-
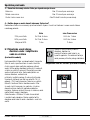 458
458
-
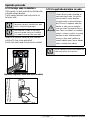 459
459
-
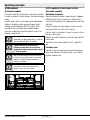 460
460
-
 461
461
-
 462
462
-
 463
463
-
 464
464
-
 465
465
-
 466
466
-
 467
467
-
 468
468
-
 469
469
-
 470
470
-
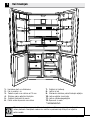 471
471
-
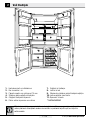 472
472
-
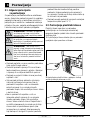 473
473
-
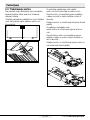 474
474
-
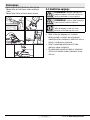 475
475
-
 476
476
-
 477
477
-
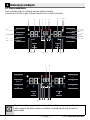 478
478
-
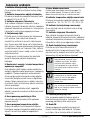 479
479
-
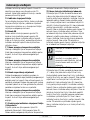 480
480
-
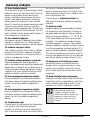 481
481
-
 482
482
-
 483
483
-
 484
484
-
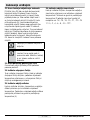 485
485
-
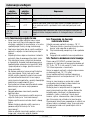 486
486
-
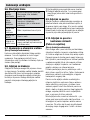 487
487
-
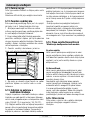 488
488
-
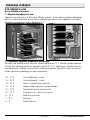 489
489
-
 490
490
-
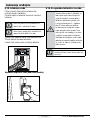 491
491
-
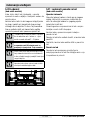 492
492
-
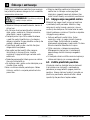 493
493
-
 494
494
-
 495
495
-
 496
496
-
 497
497
-
 498
498
-
 499
499
-
 500
500
-
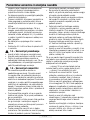 501
501
-
 502
502
-
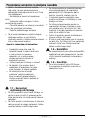 503
503
-
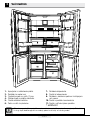 504
504
-
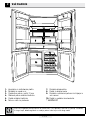 505
505
-
 506
506
-
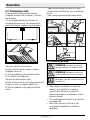 507
507
-
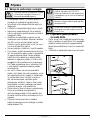 508
508
-
 509
509
-
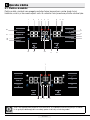 510
510
-
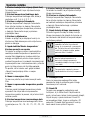 511
511
-
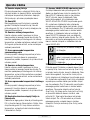 512
512
-
 513
513
-
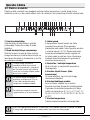 514
514
-
 515
515
-
 516
516
-
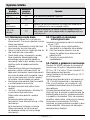 517
517
-
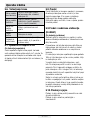 518
518
-
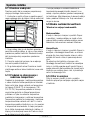 519
519
-
 520
520
-
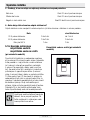 521
521
-
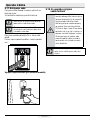 522
522
-
 523
523
-
 524
524
-
 525
525
-
 526
526
-
 527
527
-
 528
528
-
 529
529
-
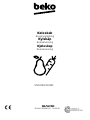 530
530
-
 531
531
-
 532
532
-
 533
533
-
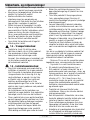 534
534
-
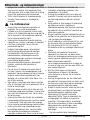 535
535
-
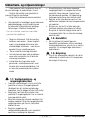 536
536
-
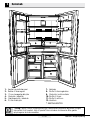 537
537
-
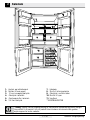 538
538
-
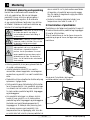 539
539
-
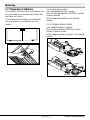 540
540
-
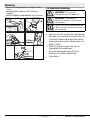 541
541
-
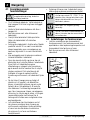 542
542
-
 543
543
-
 544
544
-
 545
545
-
 546
546
-
 547
547
-
 548
548
-
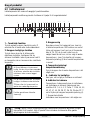 549
549
-
 550
550
-
 551
551
-
 552
552
-
 553
553
-
 554
554
-
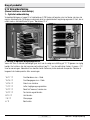 555
555
-
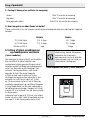 556
556
-
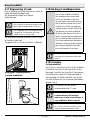 557
557
-
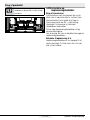 558
558
-
 559
559
-
 560
560
-
 561
561
-
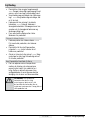 562
562
-
 563
563
-
 564
564
-
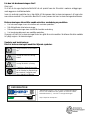 565
565
-
 566
566
-
 567
567
-
 568
568
-
 569
569
-
 570
570
-
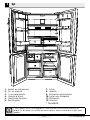 571
571
-
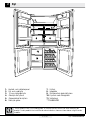 572
572
-
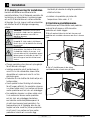 573
573
-
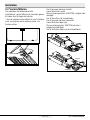 574
574
-
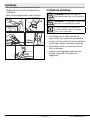 575
575
-
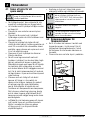 576
576
-
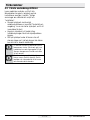 577
577
-
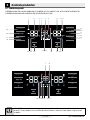 578
578
-
 579
579
-
 580
580
-
 581
581
-
 582
582
-
 583
583
-
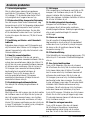 584
584
-
 585
585
-
 586
586
-
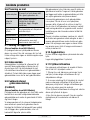 587
587
-
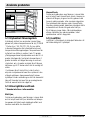 588
588
-
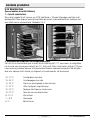 589
589
-
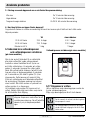 590
590
-
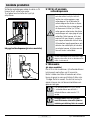 591
591
-
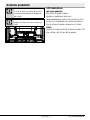 592
592
-
 593
593
-
 594
594
-
 595
595
-
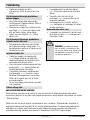 596
596
-
 597
597
-
 598
598
-
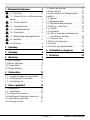 599
599
-
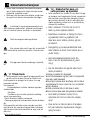 600
600
-
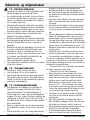 601
601
-
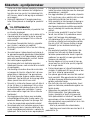 602
602
-
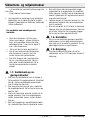 603
603
-
 604
604
-
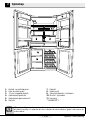 605
605
-
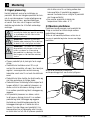 606
606
-
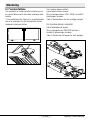 607
607
-
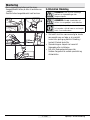 608
608
-
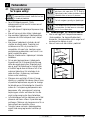 609
609
-
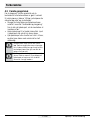 610
610
-
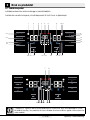 611
611
-
 612
612
-
 613
613
-
 614
614
-
 615
615
-
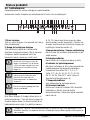 616
616
-
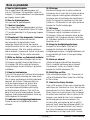 617
617
-
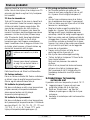 618
618
-
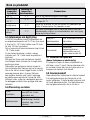 619
619
-
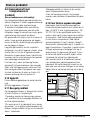 620
620
-
 621
621
-
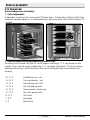 622
622
-
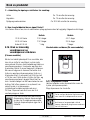 623
623
-
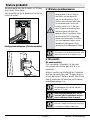 624
624
-
 625
625
-
 626
626
-
 627
627
-
 628
628
-
 629
629
-
 630
630
-
 631
631
-
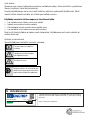 632
632
-
 633
633
-
 634
634
-
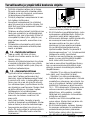 635
635
-
 636
636
-
 637
637
-
 638
638
-
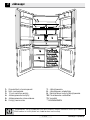 639
639
-
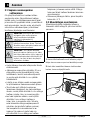 640
640
-
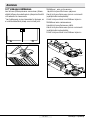 641
641
-
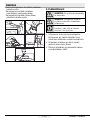 642
642
-
 643
643
-
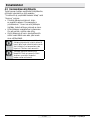 644
644
-
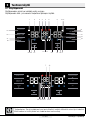 645
645
-
 646
646
-
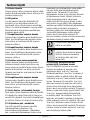 647
647
-
 648
648
-
 649
649
-
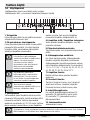 650
650
-
 651
651
-
 652
652
-
 653
653
-
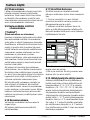 654
654
-
 655
655
-
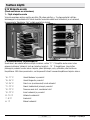 656
656
-
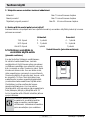 657
657
-
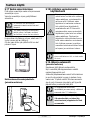 658
658
-
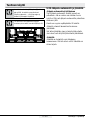 659
659
-
 660
660
-
 661
661
-
 662
662
-
 663
663
-
 664
664
-
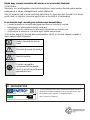 665
665
-
 666
666
-
 667
667
-
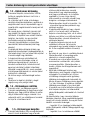 668
668
-
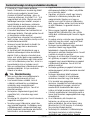 669
669
-
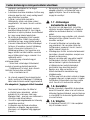 670
670
-
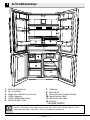 671
671
-
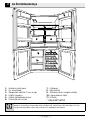 672
672
-
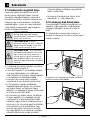 673
673
-
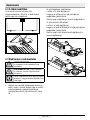 674
674
-
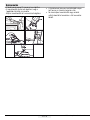 675
675
-
 676
676
-
 677
677
-
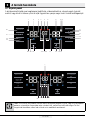 678
678
-
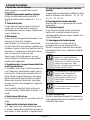 679
679
-
 680
680
-
 681
681
-
 682
682
-
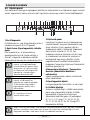 683
683
-
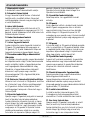 684
684
-
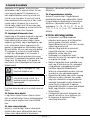 685
685
-
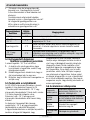 686
686
-
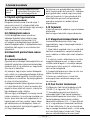 687
687
-
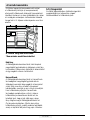 688
688
-
 689
689
-
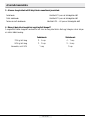 690
690
-
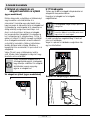 691
691
-
 692
692
-
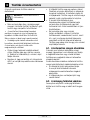 693
693
-
 694
694
-
 695
695
-
 696
696
-
 697
697
-
 698
698
-
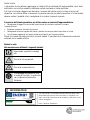 699
699
-
 700
700
-
 701
701
-
 702
702
-
 703
703
-
 704
704
-
 705
705
-
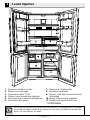 706
706
-
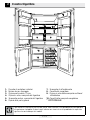 707
707
-
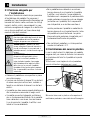 708
708
-
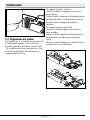 709
709
-
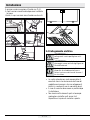 710
710
-
 711
711
-
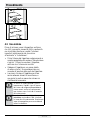 712
712
-
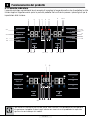 713
713
-
 714
714
-
 715
715
-
 716
716
-
 717
717
-
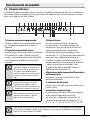 718
718
-
 719
719
-
 720
720
-
 721
721
-
 722
722
-
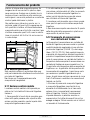 723
723
-
 724
724
-
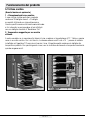 725
725
-
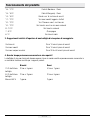 726
726
-
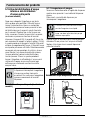 727
727
-
 728
728
-
 729
729
-
 730
730
-
 731
731
-
 732
732
-
 733
733
-
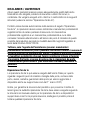 734
734
-
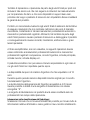 735
735


in altre lingue
- français: Beko GN1406231XBN Manuel utilisateur
- slovenčina: Beko GN1406231XBN Používateľská príručka
- dansk: Beko GN1406231XBN Brugermanual