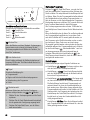
Zanussi THE4750 Manuale utente
- Categoria
- Asciugatrici
- Tipo
- Manuale utente

EN
User manual 2
FR
Notice d'utilisation 16
DE
Benutzerinformation 31
IT
Istruzioni per l’uso 46
Tumble Dryer
Sèche-linge
Wäschetrockner
Asciugabiancheria
THE 4750

Contents
Important safety information _ _ _ _ _ _ _ _ _ _ _ _ _ 2
Environment _ _ _ _ _ _ _ _ _ _ _ _ _ _ _ _ _ _ _ _ 4
Installation _ _ _ _ _ _ _ _ _ _ _ _ _ _ _ _ _ _ _ _ _ 4
Product description _ _ _ _ _ _ _ _ _ _ _ _ _ _ _ _ _ 6
Control panel _ _ _ _ _ _ _ _ _ _ _ _ _ _ _ _ _ _ _ _ 7
Before first use _ _ _ _ _ _ _ _ _ _ _ _ _ _ _ _ _ _ _ 7
Programme chart _ _ _ _ _ _ _ _ _ _ _ _ _ _ _ _ _ _ 7
Sorting and preparing laundry _ _ _ _ _ _ _ _ _ _ _ _ 9
Daily use _ _ _ _ _ _ _ _ _ _ _ _ _ _ _ _ _ _ _ _ _ 10
Cleaning and maintenance _ _ _ _ _ _ _ _ _ _ _ _ _ 12
What to do if ... _ _ _ _ _ _ _ _ _ _ _ _ _ _ _ _ _ _ 13
Technical data _ _ _ _ _ _ _ _ _ _ _ _ _ _ _ _ _ _ _ 14
Machine settings _ _ _ _ _ _ _ _ _ _ _ _ _ _ _ _ _ _ 14
Subject to change without notice
Important safety information
Important! In the interest of your safety and to ensure the
correct use, before installing and first using the appliance,
read this user manual carefully, including its hints and
warnings. To avoid unnecessary mistakes and accidents,
it is important to ensure that all people using the
appliance are thoroughly familiar with its operation and
safety features. Save these instructions and make sure that
they remain with the appliance if it is moved or sold, so
that everyone using it through its life will be properly
informed on appliance use and safety.
- Please read the instruction book before using
this appliance.
General safety
• It is dangerous to alter the specifications or attempt to
modify this product in any way.
• This appliance is not intended for use by persons (in-
cluding children) with reduced physical and sensory
conditions or lack of experience and knowledge, unless
they have been given supervision or instruction con-
cerning use of the appliance by a person responsible
for their safety.
• Make sure that small children and pets do not climb
inside the drum. To avoid this, please check into the
drum before using.
• Any objects such as coins, safety pins, nails, screws,
stones or any other hard, sharp material can cause ex-
tensive damage and must not be placed into the ma-
chine.
• In order to avoid danger of fires caused by excessive
drying, do not use appliance to dry the following items:
Cushions, quilts etc. (these items accumulate heat).
• Items such as foam rubber (latex foam), shower caps,
waterproof textiles, rubber backed articles and clothes
or pillows fitted with foam rubber pads should not be
dried in the tumble dryer.
• Always unplug the appliance after use, cleaning and
maintenance.
• Under no circumstances should you attempt to repair
the machine yourself. Repairs carried out by inexper-
ienced persons may cause injury or serious malfunc-
tioning. Contact your local Service Centre. Always in-
sist on genuine spare parts.
• Items that have been soiled with substances such as
cooking oil acetone, petrol, kerosene, spot removers,
turpentine, waxes and wax removers should be washed
in hot water with an extra amount of detergent before
being dried in the tumble dryer.
• Danger of explosion: Never tumble dry items that have
been in contact with inflammable solvents (petrol, me-
thylated spirits, dry cleaning fluid and the like). As
these substances are volatile, they could cause an ex-
plosion. Only tumble dry items washed with water.
• Risk of fire: items that have been spotted or soaked
with vegetable or cooking oil constitute a fire hazard
and should not be placed in the tumble dryer.
• If you have washed your laundry with stain remover
you must execute an extra rinse cycle before loading
your tumble dryer.
• Please make sure that no gas lighters or matches have
accidentally been left in pockets of garments incase
they are loaded into appliance
2

Warning!
• Risk of fire! Never stop a tumble dry before the
end of the drying cycle unless all items are
quickly removed and spread out so that the heat
is dissipated.
• Lint must not be allowed to accumulate around
the tumble dryer.
• Risk of electric shock! Do not spray down the appliance
with jets of water.
• The final part of a tumble dryer cycle occurs without
heat ( cool down cycle ) to ensure that the items are left
at a temperature that ensures that items will not be
damaged.
• The tumble dryer is not to be used if industrial chemi-
cals have been used for cleaning.
• Ensure you have good ventilation in the installation
room to avoid the back flow of gases into the room
from appliances burning other fuels, including open
fires.
Installation
• This appliance is heavy. Care should be taken when
moving it.
• When unpacking the appliance, check that it is not
damaged. If in doubt, do not use it and contact the
Service Centre.
• All packaging must be removed before use. Serious
damage can occur to the product and to property if this
is not adhered to. See relevant section in the user man-
ual.
• Any electrical work required to install this appliance
should be carried out by a qualified electrician or com-
petent person.
• If the machine is situated on a carpeted floor, please
adjust the feet in order to allow air to circulate freely
under the appliance.
• After having installed the appliance, check that it is not
pressing or standing on its electrical supply cable.
• If the tumble dryer is placed on top of a washing ma-
chine, it is compulsory to use the stacking kit (optional
accessory).
Use
• This appliance is designed for domestic use. It must
not be used for purposes other than those for which it
was designed.
• Only wash fabrics which are designed to be machine
dried. Follow the instructions on each garment label.
• Do not dry unwashed items in the tumble dryer.
• Do not overload the appliance. See the relevant section
in the user manual.
• Clothes which are dripping wet should not be placed in
the dryer.
• Garments which have been in contact with volatile pe-
troleum products should not be machine dried. If vola-
tile cleaning fluids are used, care should be taken to
ensure that the fluid is removed from the garment be-
fore placing in the machine.
• Never pull the power supply cable to remove the plug
from the socket; always take hold of the plug itself.
• Never use the tumble dryer if the power supply cable,
the control panel, the working surface or the base are
damaged so that the inside of the tumble dryer is ac-
cessible.
• Fabric softeners, or similar products should be used as
specified by the fabric softener instructions.
• Caution - hot surface : Do not touch the door light cov-
er surface when the light is switched on.
(Only dryers equipped with internal drum light)
Child safety
• This machine is not intended for use by young children
or infirm persons without supervision.
• Children often do not recognise the hazards associated
with electrical appliances. Children should be super-
vised to ensure that they do not play with the appli-
ance.
Warning!
• Danger of suffocation! The packaging compo-
nents (e.g. plastic film, polystyrene) can be dan-
gerous to children - Keep them out of children’s
reach.
• Keep all detergents in a safe place out of children’s
reach.
• Make sure that children or pets do not climb inside the
drum.
3

Environment
The symbol on the product or on its packaging
indicates that this product may not be treated as
household waste. Instead it should be taken to the
appropriate collection point for the recycling of electrical
and electronic equipment. By ensuring this product is
disposed of correctly, you will help prevent potential
negative consequences for the environment and human
health, which could otherwise be caused by inappropriate
waste handling of this product. For more detailed
information about recycling of this product, please contact
your local council, your household waste disposal service
or the shop where you purchased the product.
Environmental information
The packaging materials are environmentally friendly and
can be recycled. The plastic components are identified by
markings, e.g. >PE<, >PS<, etc. Please dispose of the
packaging materials in the appropriate container at the
community waste disposal facilities.
Important! The heat pump of your tumble dryer contains a
closed refrigerant circuit filled with a refrigerant which is
free from fluoro-chloro-hydrocarbons. The refrigerant
circuit in the heat pump must not be damaged.
Warning! When a unit is no longer being used:
•
Pull the plug out of the socket.
• Cut off the cable and plug and dispose of them.
• Dispose of the door catch. This prevents children from
trapping themselves inside and endangering their lives.
Installation
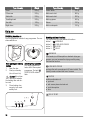
Transporting the appliance
Important! Only tip the appliance on its left side to
transport (see illustration), if it cannot be transported in an
upright position.
Warning! If the appliance was not transported in an
upright position, leave it to stand for 12 hours
before connecting it to the electricity supply and using it
for the first time, so that the oil can flow back to the
compressor. Otherwise the compressor could be
damaged.
Appliance positioning
• It is recommended that, for your convenience, the ma-
chine is positioned close to your washing machine.
• The tumble dryer must be installed in a clean place,
where dirt does not build up.
• Air must be able to circulate freely all round the appli-
ance. Do not obstruct the front ventilation grille or the
air intake grilles at the back of the machine.
• To keep vibration and noise to a minimum when the
dryer is in use, it should be placed on a firm, level sur-
face.
• Once in its permanent operating position, check that
the dryer is absolutely level with the aid of a spirit lev-
el. If it is not, raise or lower the feet until it is.
• The feet must never be removed. Do not restrict the
floor clearance through deeppile carpets, strips of
wood or similar. This might cause heat built-up which
would interfere with the operation of the appliance.
Important!
• The hot air emitted by the tumble dryer can reach tem-
peratures of up to 60°C. The appliance must therefore
not be installed on floors which are not resistant to
high temperatures.
• When operating the tumble dryer, the room tempera-
ture must not be lower than +5°C and higher than
+35°C, as it may affect the performance of the appli-
ance.
• Should the appliance be moved, it must be transported
vertically.
• The appliance must not be installed behind the locka-
ble door, a sliding door a door with a hinge on the op-
posite side to that of the appliance in such a way that a
full opening of the dryer is restricted.
4

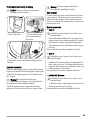
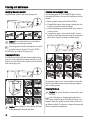
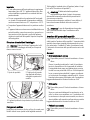
Removing transport safety packaging
Caution! Before use all parts of the transport
packaging must be removed.
1. Open loading door 2. Pull off adhesive strips
from inside machine on
top of drum.
3. Remove foil hose and polystyrene padding from the
machine.
Electrical connection
Details on mains voltage, type of current and the fuses re-
quired should be taken from the type plate. The type plate
is fitted near the loading aperture (see “Product descrip-
tion” chapter).
Warning! The manufacturer declines any
responsibility for damage or injury through failure
to comply with the above safety precautions.
Should the appliance power supply cable need to be
replaced, this must be carried out by our Service Center.
Warning! The power supply cable must be
accessible after installing the machine.
Door reversal
To make it easier to load or unload the laundry, the door
can be reversed. The door must only be reversed by an
authorised service engineer. Please contact your local
Service Force Centre. The engineer will carry out the door
reversal at your cost.
Special accessories
• stack kit
Available from your Service Force Centre or your
specialist dealer
These intermediate installation kits can be used to ar-
range the dryer and an washing machine (60 cm wide,
front loaded) as a space-saving washer/dryer stack.
The washing machine is at the bottom and the dryer is
at the top.
Read carefully the instructions supplied with the kit.
• drain kit
Available from your Service Force Centre or your
specialist dealer
Installation kit for direct draining of condensate into a
basin, siphon, gully, etc. The condensate tank then no
longer has to be drained, it must however remain in its
intended position in the machine.
Read carefully the instructions supplied with the kit.
• pedestal with the drawer
Available from your Service Force Centre or your
specialist dealer
To situate the dryer in optimal high and have some ad-
ditional space to store (e.g. laundry).
Read carefully the instructions supplied with the kit.
5

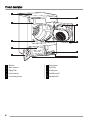
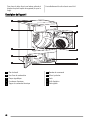
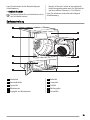
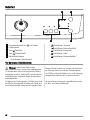
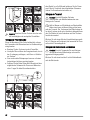
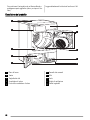
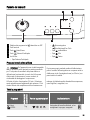
Product description
1
8
9
10
2
3
4
5
6
7
1
Worktop
2
Water reservoir
3
Rating Plate
4
Heat exchanger
5
Heat exchanger door
6
Control panel
7
Fluff filters
8
Loading door
9
Ventilation grille
10
Adjustable feet
6

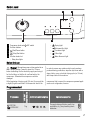
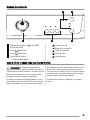
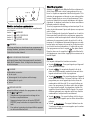
Control panel
1
2
3
45
1
Programme knob and
OFF switch
2
Function buttons
3
Start/Pause button
4
Delay Start button
5
Function status led:
– Delay time lights
–
Drying light
–
Anticrease/End light
–
Condenser light
–
Filters light
–
Water Reservoir light
Before first use
Warning! If the appliance was not transported in an
upright position, leave it to stand for 12 hours
before connecting it to the electricity supply and using it
for the first time, so that the oil can flow back to the
compressor. Otherwise the compressor could be
damaged.
In order to remove any residues which may have been
produced during production, wipe the dryer drum with a
damp cloth or carry out a brief drying cycle (ca. 30 min.)
with damp cloths in the machine.
At the beginning of drying cycle (3-5 min.) there could be
a slightly higher sound level. It is because of start of the
compressor that is normal for compressor powered appli-
ances such: refrigerators, freezers .
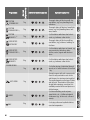
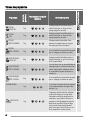
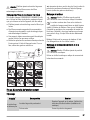
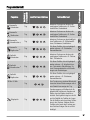
Programme chart
Programmes
max. load
(weight when dry)
Additional functions/options Application/properties
Care mark
COTTON
EXTRA DRY
7 kg
, , ,
Thorough drying of thick or multi- lay-
ered fabrics, e.g. terry towelling items,
bathrobes.
7

Programmes
max. load
(weight when dry)
Additional functions/options Application/properties
Care mark
COTTON
STRONG DRY
7 kg
, , ,
Thorough drying of thick or multi- lay-
ered fabrics, e.g. terry towelling items,
bathrobes.
COTTON
STORAGE DRY
1)
7 kg
, , ,
Thorough drying of fabrics of even thick-
nesses, e.g. terry towelling items, knit-
wear, towels.
COTTON
IRON DRY
1)
7 kg
, , ,
For thin fabrics which are also to be ir-
oned, e.g. knitwear, cotton shirts.
SYNTHETICS
EXTRA DRY
3 kg
, , ,
Thorough drying of thick or multi-lay-
ered fabrics, e.g. pullovers, bedding, ta-
ble linen.
SYNTHETICS
STORAGE DRY
1)
3 kg
, , ,
For thin fabrics which are not ironed, e.g.
easy care shirts, table linen, baby
clothes, socks, lingerie with bones or
wires.
SYNTHETICS
IRON DRY
3 kg
, , ,
For thin fabrics which are also to be ir-
oned, e.g. knitwear, cotton shirts.
30 MIN 60 MIN
1 kg
, ,
For further drying of individual items of
laundry or for small volumes of less than
1 kg.
EASY IRON
1 kg
, , ,
Special program with anti-crease mecha-
nism for easy care fabrics such shirts
and blouses; for minimum ironing effort.
The results depends on the type of fabric
and its finish. Place fabrics in the dryer
straight after spinning; once dried, im-
mediately remove fabrics and place on a
clothes hanger.
JEANS
7 kg
, , ,
For leisure clothing, such as jeans,
sweat-shirts, etc., of different material
thicknesses (e.g. at the neck, cuffs and
seams).
MIX
3 kg
, , ,
For drying cotton and synthetic fabrics,
uses low temperature.
8

Programmes
max. load
(weight when dry)
Additional functions/options Application/properties
Care mark
WOOL CARE
1 kg
,
Special programme for briefly treating
woollens with warm air, after they have
been dried naturally, worn or stored for
long periods. Wool fibres stand up and
the wool becomes soft and cosy. Recom-
mendation: Remove fabrics immediately
after drying.
COOLING
7 kg
Special programme, lasting around 10
minutes, for refreshing or gently cleaning
textiles with commercially available dry
cleaning sets. (Only use those products
which are declared as suitable for the
drier by the manufacturer; please observe
the manufacturer’s instructions for use.)
1) In accordance with IEC61121
Sorting and preparing laundry
Sorting laundry
• Sort by fabric type:
– Cotton/linen for programmes in COTTONS pro-
gramme group.
– Mixtures and synthetics for programmes in SYN-
THETICS programme group.
• Sort by care label: The care labels mean:
Drying in the tumble dryer possible in prin-
ciple
Drying at normal temperature
Drying at reduced temperature
Drying in the tumble dryer not possible
Important! Do not place in the appliance any wet laundry
which is not specified on the care label as being suitable
for tumble-drying.
This appliance can be used for all wet laundry items which
are labelled as suitable for tumble-drying.
• Do not dry new, coloured textiles together with light-
coloured laundry items. Textile colours may bleed.
• Do not dry cotton jersey and knitwear with the EXTRA
DRY programme. Items may shrink!
Preparing laundry
• To avoid laundry becoming tangled: close zips, button
up duvet covers and tie loose ties or ribbons (e.g. of
aprons).
• Empty pockets. Remove metal items (paper clips, safe-
ty pins, etc).
• Turn items with double-layered fabrics inside out (e.g.
with cotton-lined anoraks, the cotton layer should be
outermost). These fabrics will then dry better.
Important! Do not overload the appliance. Observe max.
loading volume.
Laundry weights
Type of laundry Weight
Bathrobe 1200 g
Napkin 100 g
Quilt cover 700 g
9

Type of laundry Weight
Sheet 500 g
Pillow case 200 g
Tablecloth 250 g
Towelling towel 200 g
Tea cloth 100 g
Night dress 200 g
Type of laundry Weight
Ladies' briefs 100 g
Man's work shirt 600 g
Man's work shirt 200 g
Man's pyjamas 500 g
Blouse 100 g
Men's underpants 100 g
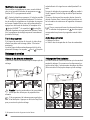
Daily use
Switching machine on
Turn the programme selector to any programme. The ma-
chine switches on.
Door opening and laundry
loading
1. Open the door.
2. Load your laundry
(do not force it in).
Caution! Do not jam
laundry in between
the loading door and rub-
ber seal.
3. Close loading door
securely. Lock must
audibly lock.
Selecting the programme
Turn the programme se-
lector dial to the required
programme. The light
START/PAUSE starts to
flash.
1 2 3
4
Selecting additional functions
You can choose from the additional functions:
button 1 -
INTENSIVE
button 2 -
LONG ANTI-CREASE
button 3 -
BUZZER
button 4 -
DELAY
INTENSIVE
If the laundry is still damp after a standard drying pro-
gramme, you can increase the drying result by using
the Intensive function.
LONG ANTI-CREASE
prolongs the anti-crease phase to 90 mins in total. The
laundry remains relaxed and free of creases.
BUZZER
audible confirmation of:
• cycle end
• anti-crease phase start and end
• cycle interruption
• error
DELAY START
10

allows to delay the start of a drying programme: 3 or 6
or 9 hours
1. select the drying programme and additional dry-
ing options
2. press the DELAY START button repeatedly until
the desired delay start is chosen
3. to activate the delay timer, press the Start/Pause
button
Starting the programme
Press Start/Pause button to start the dryer after having
selected the programme and the options. The relevant
light will stop flashing. If the programme selector dial is
turned to another position, when the machine is running,
the buzzer will sound and the programme phase indicator
lights will flash. The drum turns alternately in both direc-
tions during drying.
All drying programmes end with a 10 minute cooling
phase. You may remove the laundry after this phase.
If the door of the appliance or the small door at the bottom
is opened while the programme is running, this button
must be pressed again after closing the door in order to
restart the programme from the point at which it was inter-
rupted. This button must be depressed also after a power
failure and after having reinserted the water reservoir, if it
has been emptied in the middle of a programme after
lighting up of light
Water reservoir.
In both cases the light of the
Start/Pause button flash-
es to remind you that the start button needs to be pressed
again.
Indicator lights
These lights indicate the following functions:
•
Drying light: This light indicates that the appliance
is in the drying phase.
•
End of programme light: This light is on at the end
of the cooling phase, during the anticreasing phase
and at the end of the programme.
•
Water reservoir light: This light indicates that the
appliance is in the drying phase. This light comes on at
the end of the programme to remind you that the water
reservoir must be emptied out. If this light illuminates
during a programme this means that the water reservoir
is full. The buzzer sounds, the programme stops, the
light of the Start/Pause button flashes. This light
comes on also when the water reservoir is not inserted
correctly.
•
Filter light: This light illuminates at the end of the
programme to remind you that the filters must be
cleaned.
•
Condenser light: It comes on every 3 cycles to re-
mind you that the condenser must be cleaned.
Changing programme
To change a programme which has been selected by mis-
take once the programme has started, first turn the pro-
gramme selector to
- OFF position. The programme is
cancelled.
The programme can no longer be changed directly
once the programme has started. If nevertheless
there is an attempt to change the programme on the pro-
gramme knob or if an function button (excluding the
BUZZER button
1)
) is pressed, led on the START/
PAUSE button starts flashing temporarily in red. The dry-
ing programme is not however affected by this (laundry
protection).
At the end of the programme
If the laundry is not removed at the end of the cycle, the
dryer performs an anticreasing phase (duration: 30 mi-
nutes maximum).
If you do not remove the laundry, the dryer will stop auto-
matically at the end of the anticreasing phase. Lights
End of programme , and Water reservoir remain lit
and the buzzer sounds for 2 minutes.
Turn the programme selector dial to
to switch the ma-
chine off. Remove the laundry from the drum and carefully
check that the drum is empty.
If you do not intend to carry out another wash, close the
water tap. Leave the door open to prevent the formation of
mildew and unpleasant smells.
If you open and then close the door before turning
the selector dial to
all the lights corresponding
to the phases making up the performed programme come
on.
After each use
• Clean the filters.
• Empty the water reservoir.
1) Only dryers with buzzer button
11

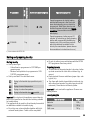
Cleaning and maintenance
Emptying the water reservoir
Empty the water reservoir after every drying cycle.
Caution! The condensed water is not suitable for
drinking or for preparing foodstuffs.
If the programme has been interrupted as a result of
the water reservoir being full: Press the START/
PAUSE button to continue the drying cycle.
Cleaning fluff filters
The filters collect all the fluff which accumulates during
drying. To ensure that the dryer works perfectly, the fluff
filters (micro-fine filter and fine strainer) must be cleaned
after every drying cycle.
Caution! Never operate the dryer without fluff filters
or with damaged or blocked fluff filters.
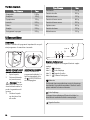
Cleaning heat exchanger filters
If the warning lamp HEAT EXCHANGER lights, the heat
exchanger fluff filters in the base of the appliance must be
cleaned
• Never operate the dryer without the fluff filters.
• Clogged filters cause higher energy consumption (dry-
ing cycle elongation) and dryer damage.
• A dirty heat pump can only be cleaned up by means of
a costly process.
• As necessary, approx. once every 6 months, remove
the fluff from the heat exchanger using the sponge sup-
plied. When doing this, please use rubber gloves.
6 *
9
7
10
* if necessary (approx. once every 6 months) remove the
fluff from the heat exchanger using the sponge supplied
(put on rubber gloves)
Cleaning the drum
Caution! Do not use abrasives or steel wool to clean
the drum.
Lime in the water or cleaning agents may form a
barely visible lining on the inside of the drum. The
degree to which the laundry has been dried is then no lon-
ger detected reliably. The laundry is damper than expected
when removed from the appliance.
12

Use a standard domestic cleaner (e.g. vinegar-based
cleaner) to wipe down the inside of the drum and drum
ribs.
Clean control panel and housing
Caution! Do not use furniture cleaners or aggressive
cleaning agents to clean the machine.
Use a damp cloth to wipe down the control panel and
housing.
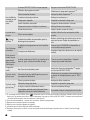
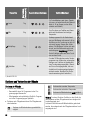
What to do if ...
Troubleshooting by yourself
Problem
1)
Possible cause Remedy
Dryer does not
work.
Dryer not connected to mains supply.
Plug in at mains socket. Check fuse in fuse box
(domestic installation).
Loading door opened. Close loading door
The START PAUSE button not pressed. Press the START PAUSE button.
Unsatisfactory
drying results.
Incorrect programme set.
Set suitable programme.
2)
Fluff filters clogged.
Clean fluff filters.
3)
Heat exchanger clogged.
Clean heat exchanger.
3)
Max. loading exceeded. Respect max. loading volume.
Covered ventilation grill. Uncover ventilation grill in base area.
Residue inside the drum. Clean the drum inside.
High water hardness.
Set suitable water hardness
4)
.
Loading door
does not close
Filters not locked in place.
Install fine filter and/or snap course filter into
place.
Err
(
Error
) on
the LCD.
5)
Attempt to change parameters after start of the
programme.
Turn the dryer off and on. Set requested param-
eters.
No drum light
Programme selector in OFF position.
Turn it to DRUM LIGHT (if available) or to any
programme.
Defective light bulb. Replace light bulb (see next section).
Abnormally
elapsing time
on the LCD
5)
Time to end is calculated on the basis of: type,
volume and dampness of laundry.
Automatic process; this is not a machine fault.
Programme in-
active
Full water reservoir.
Empty water reservoir
3)
, press START PAUSE
button.
Drying cycle to
short
Small laundry volume./Too dry laundry for se-
lected programme.
Select time programme or higher drying level
(e.g. EXTRA DRY ).
Drying cycle to
long
6)
Fluff filters clogged. Clean fluff filters.
To high loading volume. Respect max. loading volume.
13

Laundry insufficiently spun. Spun adequately the laundry.
Particularly high room temperature - no ma-
chine fault.
Lower the room temperature if possible.
1) In case of error message on the LCD (e.g.
E51
- only dryers with the LCD): Switch the dryer off and on. Set programme. Press the
START PAUSE button. Does not work? - inform local service and quote the error code.
2) follow program recommendation - see
Programme overview
chapter
3) see
Care and cleaning
chapter
4) see
Machine settings
chapter
5) only dryers with the LCD
6) Note: After around 5 hours the drying cycle ends automatically (see
Drying cycle complete
section).
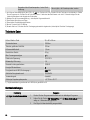
Technical data
height x width x depth 85 x 60 x 58 cm
drum volume 108 l
depth with the load door opened 109 cm
adjustable height 1.5 cm
the appliance weight 52 kg
maximum load volume 7 kg
voltage 220-230 V
necessary fuse 6 A
total power 1050 W
energy efficiency class A
energy consumption kWh/cycle
1)
2,35 kWh
annual energy consumption 159,9 kWh
type of use Domestic
permitted ambient temperature + 5°C to + 35°C
1) 7 kg of cotton, centrifuged at 1000 rpm with reference to EN 61121
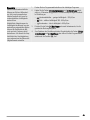
Machine settings
Setting Implementation
BUZZER permanent off
1. Turn the programme selector to any programme.
2.
Press simultaneously the
INTENSIVE and LONG ANTI-CREASE
buttons and hold down for approx. 5 seconds.
3. The buzzer is by default always off.
14

Water hardness
Water contains, a variable quantity
of limestone and mineral salts of
which quantities vary according to
geographical locations thus vary-
ing its conductivity values.
Relevant variations of the conduc-
tivity of the water compared to
those prefixed by the factory could
slightly influence the residual hu-
midity of the laundry at the end of
the cycle. Your dryer allows you to
regulate the sensitivity of the dry-
ing sensor based on conductivity
values of the water.
1. Turn the programme selector to any programme.
2.
Press simultaneously the
LONG ANTI-CREASE and START/PAUSE
buttons and hold down for approx. 5 seconds. Lights show the current set-
ting:
–
Water Reservoir - low conductivity <300 micro S/cm
–
Filter - medium conductivity 300-600 micro S/cm
–
Condenser - high conductivity >600 micro S/cm
3.
Press the
START/PAUSE button sequentially until you set desired lev-
el.
4.
To memorize setting press simultaneously the the
LONG ANTI-
CREASE and
START/PAUSE buttons or turn knob to OFF position
15

Sommaire
Avertissements importants _ _ _ _ _ _ _ _ _ _ _ _ _ 16
Environnement _ _ _ _ _ _ _ _ _ _ _ _ _ _ _ _ _ _ _ 18
Installation _ _ _ _ _ _ _ _ _ _ _ _ _ _ _ _ _ _ _ _ 18
Description de l'appareil _ _ _ _ _ _ _ _ _ _ _ _ _ _ 20
Bandeau de commande _ _ _ _ _ _ _ _ _ _ _ _ _ _ _ 21
Avant d'utiliser le sèche-linge pour la première fois _ 21
Tableau des programmes _ _ _ _ _ _ _ _ _ _ _ _ _ _ 22
Tri et préparation du linge _ _ _ _ _ _ _ _ _ _ _ _ _ 23
Utilisation quotidienne _ _ _ _ _ _ _ _ _ _ _ _ _ _ _ 24
Nettoyage et entretien _ _ _ _ _ _ _ _ _ _ _ _ _ _ _ 26
En cas d'anomalie de fonctionnement _ _ _ _ _ _ _ _ 27
Caractéristiques techniques _ _ _ _ _ _ _ _ _ _ _ _ 29
Réglages de l'appareil _ _ _ _ _ _ _ _ _ _ _ _ _ _ _ 29
Sous réserve de modifications
Avertissements importants
Important Pour votre sécurité et pour garantir une
utilisation correcte de l'appareil, lisez attentivement cette
notice d'utilisation, ainsi que ses conseils et
avertissements, avant d'installer et d'utiliser l'appareil
pour la première fois. Pour éviter tout risque d’erreur ou
d’accident, veillez à ce que toute personne qui utilise
l'appareil connaisse bien son fonctionnement et ses
fonctions de sécurité. Conservez cette notice d'utilisation
avec votre appareil. Si l'appareil doit être vendu ou cédé à
une autre personne, assurez-vous que la notice
d'utilisation l'accompagne. Le nouvel utilisateur pourra
alors être informé du fonctionnement de celui-ci et des
avertissements s'y rapportant.
veuillez lire la notice d'utilisation avant d'utiliser
l'appareil.
Consignes générales de sécurité
• Il est interdit de modifier ou d'essayer de modifier les
caractéristiques techniques de cet appareil.
• Cet appareil n'est pas destiné à être utilisé par des en-
fants ou des personnes dont les capacités physiques
ou sensorielles, ou le manque d'expérience ou de con-
naissance les empêchent d'utiliser l'appareil sans ris-
que lorsqu'ils sont sans surveillance ou en l'absence
d'instruction d'une personne responsable qui puisse
leur assurer une utilisation de l'appareil sans danger.
• Assurez-vous que ni les enfants ni les animaux domes-
tiques ne pénètrent dans le tambour. Pour éviter cela,
vérifiez l'intérieur du tambour avant chaque utilisation
de l'appareil.
• Les objets tels que les pièces de monnaie, les épingles
de sûreté, les clous, les vis, les cailloux ou tout autre
objet dur, tranchant, peuvent provoquer d'importants
dégâts et ne doivent pas être placés dans l'appareil.
• Pour éviter les risques d'incendie dus à un séchage ex-
cessif, n'utilisez pas l'appareil pour le séchage des piè-
ces de linge suivantes : coussins, oreillers, couvertures
matelassées et similaires (ces pièces accumulent la
chaleur).
• Les pièces contenant de l'éponge de caoutchouc
(mousse de latex), les bonnets de bains, tissus imper-
méables, articles renforcés de caoutchouc ou vête-
ments et taies d'oreiller rembourrés d'éponge de caout-
chouc ne doivent pas être séchés dans un sèche-linge.
• Débranchez toujours l'appareil après son utilisation,
nettoyage et entretien.
• N'essayez en aucun cas de réparer l'appareil vous-mê-
me. Les réparations effectuées par du personnel non
qualifié peuvent provoquer des blessures ou le mau-
vais fonctionnement de l'appareil. Contactez le Service
Après-vente de votre magasin vendeur. Exigez des piè-
ces de rechange certifiées Constructeur.
• Le linge sale, taché d'huile culinaire, d'acétone, d'es-
sence, de kérosène, de produit détachant, de térében-
thine, de cire ou de décapant pour cire doit être lavé à
l'eau chaude avec une plus grande quantité de lessive
avant d'être séché dans le sèche-linge.
• Risque d'explosion : ne séchez jamais du linge qui se-
rait entré en contact avec des solvants inflammables
(essence, alcool dénaturé, fluide de nettoyage à sec et
similaire). Ces substances sont volatiles et pourraient
causer une explosion. Ne séchez que du linge lavé à
l'eau.
• Risque d'incendie : le linge taché ou imbibé d'huile vé-
gétale ou d'huile culinaire peut être à l'origine d'un in-
cendie et ne doit pas être placé dans le sèche-linge.
• Si le linge a été lavé avec un produit détachant, effec-
tuez un cycle de rinçage supplémentaire avant de le
mettre dans le sèche-linge.
16

• Vérifiez que les poches des vêtements à sécher ne con-
tiennent pas de briquet à gaz ni d'allumettes avant de
les placer dans l'appareil.
Avertissement
• Risque d'incendie ! N'arrêtez jamais le sèche-lin-
ge avant la fin du cycle de séchage à moins de
sortir immédiatement tout le linge et de le déplier
pour mieux dissiper la chaleur.
• Éliminez régulièrement les peluches présentes
autour du sèche-linge.
• Risque de choc électrique ! N'utilisez jamais d'appa-
reils à vapeur ou à haute pression pour nettoyer l'appa-
reil.
• Le cycle de séchage se termine par une phase sans
chauffage (cycle de refroidissement) pour éviter que le
linge ne reste longtemps à haute température et ne su-
bisse des dommages.
• Ne séchez jamais dans l'appareil d'articles ayant été
traités avec des produits chimiques, tels que les pro-
duits utilisés pour le nettoyage à sec.
• Aérez suffisamment la pièce pour éviter le reflux de gaz
provenant d'appareils utilisant d'autres combustibles.
Installation
• Cet appareil est lourd. Faites attention lors de son dé-
placement.
• Déballez l'appareil et vérifiez qu'il n'est pas endomma-
gé. En cas de doute, ne l'utilisez pas et contactez le
magasin vendeur.
• Avant d'utiliser l'appareil, enlevez tous les éléments de
protection de transport. En cas de non-respect de cette
recommandation, l'appareil ou les accessoires risquent
d'être sérieusement endommagés. Voir le chapitre cor-
respondant dans cette notice d'utilisation.
• Ne confiez les travaux électriques de votre habitation
nécessaires à l'installation de votre appareil qu'à un
électricien qualifié.
• Si l'appareil est placé sur une moquette, ajustez les
pieds afin de permettre à l'air de circuler librement
sous l'appareil.
• Après avoir installé l'appareil, vérifiez qu'il n'écrase
pas le cordon d'alimentation.
• Si le sèche-linge est placé au-dessus d'un lave-linge,
utilisez le kit de superposition (accessoire en option).
Usage prévu
• Cet appareil est destiné à un usage particulier. Ne l'uti-
lisez pas à des fins commerciales ou industrielles ou
pour d'autres buts que celui pour lequel il a été conçu.
• Ne séchez en machine que les articles pouvant suppor-
ter ce traitement. Suivez les indications se trouvant sur
l'étiquette dont chaque article est muni.
• N'introduisez dans le sèche-linge que du linge propre.
• Ne surchargez pas l'appareil. Voir le chapitre corres-
pondant dans cette notice d'utilisation.
• Ne placez pas de linge non essoré dans le sèche-linge.
• Ne séchez pas en machine les articles entrés en contact
avec des détachants volatiles. Si de tels détachants
sont utilisés avant le lavage en machine, il faudra at-
tendre que le produit se soit évaporé avant d'introduire
les articles dans l'appareil.
• Le cordon d'alimentation ne doit jamais être tiré au ni-
veau du cordon ; mais toujours au niveau de la prise.
• N'utilisez jamais le sèche-linge si le cordon d'alimen-
tation, le bandeau de commande, le plan de travail ou
la base sont endommagés et permettent l'accès à l'inté-
rieur de l'appareil.
• Les assouplissants ou autres produits similaires doi-
vent être utilisés conformément aux instructions de
leur fabricant.
• Attention - surface chaude : Ne touchez pas le cache de
l'ampoule d'éclairage de porte quand l'éclairage est en
fonctionnement.
(Uniquement les sèche-linge avec éclairage intérieur
du tambour)
Sécurité enfants
• Cet appareil ne doit pas être utilisé par de jeunes en-
fants ou des personnes infirmes sans supervision.
• Les enfants ne sont pas toujours conscients des dan-
gers associés à l'utilisation des appareils électriques.
Veillez à ce que les enfants ne jouent pas avec l'appa-
reil.
Avertissement
• Risque d'étouffement ! Les matériaux d'emballa-
ge (par ex. les films plastiques, le polystyrène)
représentent un danger pour les enfants - Gar-
dez-les hors de leur portée.
• Rangez les détergents en lieu sûr, hors de la portée des
enfants.
17

• Assurez-vous que ni les enfants ni les animaux domes-
tiques ne pénètrent dans le tambour.
Environnement
Le symbole sur le produit ou son emballage indique
que ce produit ne peut être traité comme déchet ménager.
Il doit plutôt être remis au point de ramassage concerné,
se chargeant du recyclage du matériel électrique et
électronique. En vous assurant que ce produit est éliminé
correctement, vous favorisez la prévention des
conséquences négatives pour l’environnement et la santé
humaine qui, sinon, seraient le résultat d’un traitement
inapproprié des déchets de ce produit. Pour obtenir plus
de détails sur le recyclage de ce produit, veuillez prendre
contact avec le bureau municipal de votre région, votre
service d’élimination des déchets ménagers ou le magasin
où vous avez acheté le produit.
Où aller avec les appareils usagés?
Partout où des appareils neufs sont vendus, mais aussi
dans un centre de collecte ou une entreprise de
récupération officiels SENS.
La liste des centres de collecte officiels SENS est
disponible sous www.sens.ch.
Informations liées à la protection de l'environnement
Les matériaux d'emballage respectent l'environnement et
sont recyclables. Les éléments en plastique sont identifiés
par les sigles >PE<, >PS<, etc. Veuillez jeter les matériaux
d'emballage dans le conteneur approprié du centre de col-
lecte des déchets de votre commune.
Important Dans la pompe à chaleur de votre sèche-linge
se trouve un circuit frigorifique fermé doté d'un réfrigérant
ne contenant pas de HCFC. Le circuit frigorifique de la
pompe à chaleur ne doit pas être endommagé.
Avertissement Si vous n'utilisez plus votre appareil :
•
Débranchez-le.
• Coupez le cordon d'alimentation au ras de l'appareil et
jetez-le avec la prise.
• Démontez le loquet de la porte. Cela évitera aux enfants
de s'enfermer dans l'appareil et de mettre ainsi leur vie
en danger.
Installation
Transport de l'appareil
Important Inclinez l'appareil vers la gauche (voir
illustration) s'il n'est pas possible de le transporter
verticalement.
Avertissement Si l'appareil n'a pas été transporté en
position verticale, laissez-le pendant 12 heures en
position verticale avant de le brancher de manière à ce
que l'huile retourne vers le compresseur. Si vous ne
suivez pas cette consigne, le compresseur pourrait être
endommagé.
Emplacement
• Par commodité, il est conseillé d'installer l'appareil
près de votre lave-linge.
• Le sèche-linge doit être installé dans un lieu propre, à
l'abri de la poussière.
• L'air doit pouvoir circuler librement tout autour de l'ap-
pareil. N'obstruez pas la grille d'aération frontale ou les
grilles d'entrée d'air à l'arrière de l'appareil.
• Pour limiter au maximum les vibrations et le bruit pen-
dant le fonctionnement du sèche-linge, installez-le sur
une surface robuste et horizontale.
• Après l'installation du sèche-linge, vérifiez qu'il est
bien d'aplomb à l'aide d'un niveau à bulle. S'il n'est
pas d'aplomb, rectifiez en relevant ou en abaissant les
pieds.
• Les pieds ne doivent jamais être retirés. Veillez à ne
pas limiter la circulation de l'air au sol par des tapis à
longs poils, des baguettes de bois, etc. Cela pourrait
produire une accumulation de chaleur qui nuirait au
fonctionnement de l'appareil.
18

Important
• La température de l'air chaud dégagé par le sèche-lin-
ge peut atteindre 60 °C. L'appareil ne doit donc pas
être installé sur des sols non résistants aux températu-
res élevées.
• Pendant le fonctionnement du sèche-linge, la tempéra-
ture ambiante ne doit pas être inférieure à +5 °C ou su-
périeure à +35 °C pour ne pas compromettre les per-
formances de l'appareil.
• Si l'appareil doit être déplacé, transportez-le verticale-
ment.
• L'appareil ne doit pas être installé derrière une porte à
serrure, une porte coulissante ou une porte battante
dotée d'une charnière du côté opposé de celle de l'ap-
pareil qui pourrait empêcher l'ouverture complète du
sèche-linge.
Retrait des protections de transport
Attention Avant de mettre l'appareil en service, il est
impératif d'enlever tous les éléments de protection
de transport.
1. Ouvrez la porte 2. Retirez les rubans adhé-
sifs à l'intérieur de l'appa-
reil, sur le tambour.
3. Enlevez la gaine plastique avec le rembourrage en
polystyrène de l'appareil.
Branchement électrique
Contrôlez les caractéristiques électriques de l'appareil
(tension d'alimentation, type de courant, fusibles, etc.) sur
la plaque signalétique. La plaque signalétique est située
près de la porte (voir le chapitre "Description du produit").
Avertissement Le fabricant décline toute
responsabilité en cas de dommage ou blessure,
suite au non-respect des consignes de sécurité
susmentionnées.
Le remplacement du cordon d'alimentation de l'appareil
doit être effectué par le service après-vente de votre
magasin vendeur.
Avertissement Le cordon d'alimentation doit être
accessible après l'installation de l'appareil.
Réversibilité de la porte
Pour faciliter le chargement ou le déchargement du linge,
le sens d'ouverture de la porte peut être changé de droite
à gauche. La réversibilité de la porte ne doit être effectuée
que par un technicien qualifié. Contactez le service après-
vente de votre magasin vendeur. Le service après-vente
vous facturera alors l'intervention.
Accessoires spéciaux
• kit de superposition
Disponible auprès du service après-vente de votre
magasin vendeur
Ces kits de superposition permettent d'installer en co-
lonne un sèche-linge et un lave-linge (60 cm de lar-
geur, à chargement frontal) afin de gagner de l'espace.
Le lave-linge doit être posé sur le sol et le sèche-linge
installé au-dessus.
Lisez attentivement la notice fournie avec le kit.
• kit de vidange
Disponible auprès du service après-vente de votre
magasin vendeur
Kit d'installation qui permet de vidanger directement
dans l'évier ou un siphon l'eau de condensation qui se
forme pendant chaque cycle de séchage. il n'est plus
nécessaire de vider le bac d'eau de condensation mais
celui-ci doit rester en place dans l'appareil.
Lisez attentivement la notice fournie avec le kit.
• socle à tiroir
Disponible auprès du service après-vente de votre
magasin vendeur
19

Pour placer le sèche-linge à une hauteur optimale et
disposer de plus d'espace de rangement (ex. pour le
linge).
Lisez attentivement la notice fournie avec le kit.
Description de l'appareil
1
8
9
10
2
3
4
5
6
7
1
Plan de travail
2
Bac d'eau de condensation
3
Plaque signalétique
4
Condenseur thermique
5
Trappe du condenseur thermique
6
Bandeau de commande
7
Filtres à peluches
8
Porte
9
Grille d'aération
10
Pied réglable
20
La pagina si sta caricando...
La pagina si sta caricando...
La pagina si sta caricando...
La pagina si sta caricando...
La pagina si sta caricando...
La pagina si sta caricando...
La pagina si sta caricando...
La pagina si sta caricando...
La pagina si sta caricando...
La pagina si sta caricando...
La pagina si sta caricando...
La pagina si sta caricando...
La pagina si sta caricando...
La pagina si sta caricando...
La pagina si sta caricando...
La pagina si sta caricando...
La pagina si sta caricando...
La pagina si sta caricando...
La pagina si sta caricando...
La pagina si sta caricando...
La pagina si sta caricando...
La pagina si sta caricando...
La pagina si sta caricando...
La pagina si sta caricando...
La pagina si sta caricando...
La pagina si sta caricando...
La pagina si sta caricando...
La pagina si sta caricando...
La pagina si sta caricando...
La pagina si sta caricando...
La pagina si sta caricando...
La pagina si sta caricando...
La pagina si sta caricando...
La pagina si sta caricando...
La pagina si sta caricando...
La pagina si sta caricando...
La pagina si sta caricando...
La pagina si sta caricando...
La pagina si sta caricando...
La pagina si sta caricando...
-
 1
1
-
 2
2
-
 3
3
-
 4
4
-
 5
5
-
 6
6
-
 7
7
-
 8
8
-
 9
9
-
 10
10
-
 11
11
-
 12
12
-
 13
13
-
 14
14
-
 15
15
-
 16
16
-
 17
17
-
 18
18
-
 19
19
-
 20
20
-
 21
21
-
 22
22
-
 23
23
-
 24
24
-
 25
25
-
 26
26
-
 27
27
-
 28
28
-
 29
29
-
 30
30
-
 31
31
-
 32
32
-
 33
33
-
 34
34
-
 35
35
-
 36
36
-
 37
37
-
 38
38
-
 39
39
-
 40
40
-
 41
41
-
 42
42
-
 43
43
-
 44
44
-
 45
45
-
 46
46
-
 47
47
-
 48
48
-
 49
49
-
 50
50
-
 51
51
-
 52
52
-
 53
53
-
 54
54
-
 55
55
-
 56
56
-
 57
57
-
 58
58
-
 59
59
-
 60
60


Zanussi THE4750 Manuale utente
- Categoria
- Asciugatrici
- Tipo
- Manuale utente
in altre lingue
- English: Zanussi THE4750 User manual
- français: Zanussi THE4750 Manuel utilisateur
- Deutsch: Zanussi THE4750 Benutzerhandbuch
