Rockford Fosgate T3-BMW-SUB Installation & Operation
- Tipo
- Installation & Operation

Installation assistance available at:
www.rockfordfosgate.com/rftech
ROCKFORDFOSGATE.COM
600 South Rockford Drive • Tempe, Arizona 85281 United States
Direct: (480) 967-3565 • Toll Free: (800) 669-9899
Printed in Germany
052215
1230-59840-01-A
Installation & Operation
T3-BMW-SUB
BMW
®
DIRECT FIT
SUBWOOFER
Serial Number: Date of Purchase:

32
Dear Customer,
Congratulations on your purchase of the world’s finest brand of car audio
products. At Rockford Fosgate we are fanatics about musical reproduc-
tion at its best, and we are pleased you chose our product. Through
years of engineering expertise, hand craftsmanship and critical testing
procedures, we have created a wide range of products that reproduce
music with all the clarity and richness you deserve.
For maximum performance we recommend you have your new Rockford
Fosgate product installed by an Authorized Rockford Fosgate Dealer,
as we provide specialized training through Rockford Technical Training
Institute (RTTI). Please read your warranty and retain your receipt and
original carton for possible future use.
Great product and competent installations are only a piece of the puzzle
when it comes to your system. Make sure that your installer is using
100% authentic installation accessories from Rockford Fosgate in your
installation. Rockford Fosgate has everything from RCA cables and
speaker wire to power wire and battery connectors. Insist on it! After all,
your new system deserves nothing but the best.
To add the finishing touch to your new Rockford Fosgate image, order
your Rockford accessories, which include everything from T-shirts to
hats.
Visit our web site for the latest information on all Rockford products;
www.rockfordfosgate.com
or, in the U.S. call 1-800-669-9899 or FAX 1-800-398-3985. For all other
countries, call +001-480-967-3565 or FAX +001-480-966-3983.
Table of Content
If, after reading your manual, you still have questions regarding this
product, we recommend that you see your Rockford Fosgate dealer. If you
need further assistance, you can call us direct at 1-800-669-9899. Be sure
to have your serial number, model number and date of purchase available
when you call.
Safety
This symbol with “WARNING” is intended
to alert the user to the presence of important
instructions. Failure to heed the instructions
will result in severe injury or death.
This symbol with “CAUTION” is intended to
alert the user to the presence of important
instructions. Failure to heed the instructions
can result in injury or unit damage.
• To prevent injury and damage to the unit, please read and follow the
instructions in this manual. We want you to enjoy this system, not get
a headache.
• If you feel unsure about installing this system yourself, have it installed
by a qualified Rockford Fosgate technician.
Introduction
©2015 Rockford Corporation. All Rights Reserved. ROCKFORD FOSGATE and associated logos where applicable are registered trademarks of Rockford Corporation
in the United States and/or other countries. All other trademarks are the property of their respective owners. Specifications subject to change without notice.
PRACTICE SAFE SOUND
Continuous exposure to sound pressure levels over 100dB may cause
permanent hearing loss. High powered auto sound systems may
produce sound pressure levels well over 130dB. Use common sense
and practice safe sound.
PRATIQUEZ UNE ÉCOUTE SANS RISQUES
Une exposition continue à des niveaux de pression acoustique upérieurs à
100 dB peut causer une perte d’acuité auditive permanente. Les systèmes
audio de forte puissance pour auto peuvent produire des niveaux de
pression acoustique bien au-delà de 130 dB. Faites preuve de bon sens et
pratiquez une écoute sans risques
PRACTIQUE EL SONIDO SEGURO
El contacto continuo con niveles de presión de sonido superiores a 100
dB puede causar la pérdida permanente de la audición. Los sistemas de
sonido de alta potencia para automóviles pueden producir niveles de
presión de sonido superiores a los 130 dB. Aplique el sentido común y
practique el sonido seguro.
PRAKTIZIEREN SIE SICHEREN SOUND
Fortgesetzte Geräuschdruckpegel von über 100 dB können beim
Menschen zu permanentem Hörverlust führen. Leistungsstarke
Autosoundsysteme können Geräuschdruckpegel erzeugen, die weit über
130 dB liegen. Bitte wenden Sie gesunden Menschenverstand an und
praktizieren Sie sicheren Sound.
OSSERVATE LE REGOLE DEL SUONO SENZA PERICOLI
La costante esposizione a livelli di pressione acustica al di sopra dei
100dB possono causare la perdita permanente dell’udito. I sistemi
audio ad alta potenza possono produrre livelli di pressione acustica ben
superiori ai 130dB. Si consiglia il buon senso e l’osservanza delle regole
del suono senza pericoli
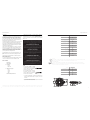
Specifications
Model T3-BMW-SUB
Nominal Impedance (Ohms) 4 Ω
Frequency Response (Hz) 30 - 250
Voice Coil Diameter - inch
(mm)
1.5
(38)
Displacement - cu. ft.
(Liter)
N/A
Fs - Free Air Resonance (Hz) 38
Qts 0.49
Vas - cu. ft.
(Liter)
1.43
(40.59)
Xmax - inch
(mm)
0.24
(6.1)
SPL (dB @ 1w/1m) 87.8
Power Handling - Watts
(RMS/Peak)
150/300
Model T3-BMW-SUB
A - Overall Diameter - inch
(mm)
8.5
(216)
B- Screw Hole Dia. - inch (mm)
6.4
(162)
C- Mounting Dia - inch (mm)
7.7
(196)
D - Mounting Depth - inch
(mm)
1.2
(31)
CEA 2031
Power handling on Rockford Fosgate speakers conform to CEA-2031 industry standards. This means your speaker has the capacity to handle
power under continuous demand, not instantaneous power handling that over time can damage voice coils.
VERIFIED WITH KLIPPEL
To adorn the ‘Verified with Klippel’ mark, the qualifying company’s loudspeaker engineering personnel must be trained and certified by
Klippel prior to using the three separate Klippel systems to design, develop and test. Rockford Fosgate has made the investment in Klippel to
deliver the best possible speakers and subwoofers to their customers.
2 Introduction
3 Specifications
4-5 Installation
Removal
Replacement
6-7 Additional Languages
French
Spanish
German
Italian
8 Limited Warranty Information
A
B
D
C

54
Installation
Contents
• 8” Subwoofer
Installation Considerations
The following is a list of tools needed for installation:
This section focuses on some of the vehicle considerations for installing
your direct fit subwoofer. For the purpose of this manual, the vehicle shown
as reference is a 2014 BMW X1. Other vehicles may differ depending on
model, year and options. Consult your vehicle’s service manual for model
specific information.
Under Seat Subwoofer Replacement
• Ratchets
• Torx screwdriver / bits
• #2 Phillips Screw Driver
• Pick or small blade screwdriver
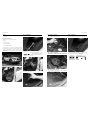
Step 1 - Seat Removal
Remove the bolts that hold the seat track to the floor.
Once all of the bolts are removed, tilt the seat back to provide access to
the subwoofer.
Do not unplug the wires under the seat. Doing
so could generate a WARNING light on the dash
of the car and require a trip to the dealership to
get cleared.
Step 2 - Subwoofer Cover Removal
Remove cover to expose subwoofer.
Step 3 - Subwoofer Removal
Remove the screws that hold the subwoofer in place. Lift the subwoofer out
of floor pocket and unplug the factory harness.
Step 4 - Subwoofer Installation
Plug factory harness into the new Rockford subwoofer. Place the new
subwoofer into floor pocket and use the factory screws to mount subwoofer.
Step 5 - Reinstall Subwoofer Cover
Once you have the subwoofer plugged in and mounted securely, reattach
the subwoofer cover using the factory screws.
Step 6 - Reinstall Seat
After you have the subwoofer cover installed and secure, place the seat
back down onto the floor. Tighten the factory bolts to manufacturer’s specs.
For Vehicle Model Application Refer To Our Vehicle Fit Guide
www.rockfordfosgate.com/products/vehiclefitguide
Installation
Make
Vehicle Fitment Guide
Model
Body Style
Year
Installation Videos

76
Françias Español Deutsch Italiano
Contenu
Subwoofer 8”
Considérations d’installation
Voici une liste d’outils nécessaires pour l’installation :
• Clé à cliquet
• Tournevis Torx / Embouts
• Tournevis cruciforme n° 2
• Pic ou petit tournevis à lame plate
Cette section traite de points concernant le véhicule dont il faut tenir
compte pour l’installation de votre subwoofer à montage direct. Aux fins
de ce manuel, le véhicule illustré comme référence est une BMW X1 2014.
Les autres véhicules peuvent varier en fonction du modèle, de l’année et
des options. Consulter le manuel de service du véhicule pour des informa-
tions spécifiques au modèle.
Remplacement du subwoofer sous le siège
Étape 1 - Dépose du siège
Retirer les boulons qui maintiennent le rail du siège au sol.
Une fois tous les boulons retirés, incliner le siège vers l’arrière pour ac-
céder au subwoofer.
Attention : Ne pas débrancher les fils sous le siège et ce, pour ne pas
générer un voyant d’AVERTISSEMENT sur le tableau de bord du véhicule
qui ne peut être effacé que par le concessionnaire.
Étape 2 - Dépose du couvercle de subwoofer
Retirer le couvercle pour exposer le subwoofer.
Étape 3 - Dépose du subwoofer
Retirer les vis qui maintiennent le subwoofer en place. Soulever le sub-
woofer du compartiment au sol et débrancher le faisceau d’usine.
Étape 4 - installation du subwoofer
Brancher le faisceau d’usine dans le nouveau subwoofer Rockford. Plac-
er le nouveau subwoofer dans le compartiment au sol et utiliser les vis
d’usine pour monter le subwoofer.
Étape 5 - Réinstallation du couvercle de subwoofer
Une fois le subwoofer branché et monté correctement, rattacher le cou-
vercle du subwoofer à l’aide des vis d’usine.
Étape 6 - Réinstallation du siège
Une fois le couvercle du subwoofer installé et fixé, remettre le siège sur le
sol. Serrer les boulons d’usine aux spécifications du fabricant.
Pour l’application de modèle de véhicule, consultez notre guide
d’adaptation des véhicules
www.rockfordfosgate.com/products/vehiclefitguide
Índice
Subwoofer de 8 pulg.
Consideraciones para la instalación
La siguiente es una lista de herramientas necesarias para la instalación:
• Llave de trinquete
• Destornillador Torx / Brocas
• Destornillador Phillips No. 2
• Punzón o un destornillador de hoja plana
Esta sección se enfoca en algunas de las consideraciones del vehículo
para la instalación de su subwoofer de ajuste directo. Para los fines de este
manual, el vehículo mostrado como referencia es un BMW X1 de 2014. Es
posible que otros modelos sean distintos teniendo en cuenta el modelo, el
año y las opciones. Consulte el manual de servicio de su vehículo por la
información específica de su modelo.
Reemplazo del subwoofer de abajo del asiento
Paso 1 - Extracción del asiento
Extraiga los pernos que sostienen el riel del asiento contra el piso.
Una vez que haya extraído todos los pernos, incline el asiento hacia atrás
para proporcionar acceso al subwoofer.
Precaución:
No desenchufe los cables abajo del asiento. Hacerlo podría generar una
luz de ADVERTENCIA en el tablero del automóvil y exigiría un viaje a la
concesionaria para eliminarla.
Paso 2 - Extracción de la cubierta del subwoofer
Extraiga la cubierta para exponer el subwoofer.
Paso 3 - Extracción del subwoofer
Extraiga los tornillos que sostienen en su sitio el subwoofer. Levante el
subwoofer fuera del bolsillo en el piso y desenchufe el arnés de la fábrica.
Paso 4 - Instalación del subwoofer
Enchufe el arnés de fábrica en el nuevo subwoofer de Rockford. Coloque el
subwoofer nuevo en el bolsillo del piso y use los tornillos de fábrica para
instalar el subwoofer.
Paso 5 - Vuelva a instalar la cubierta del subwoofer
Una vez que tenga el subwoofer enchufado y montado de manera segura,
vuelva a fijar la cubierta del subwoofer usando los tornillos de fábrica.
Paso 6 - Vuelva a instalar el asiento
Después que haya instalado la cubierta del subwoofer y que la haya ase-
gurado, coloque el asiento de nuevo sobre el piso. Apriete los pernos de
fábrica de acuerdo a las especificaciones del fabricante.
Para ver los modelos de vehículos para la aplicación consulte nuestra
Vehicle Fit Guide (Guía de correspondencia para vehículos)
www.rockfordfosgate.com/products/vehiclefitguide
Inhalt
8 Zoll Subwoofer
Informationen zur Installation
Liste der erforderlichen Werkzeuge für die Installation:
• Ratsche
• Torx-Schraubendreher / Spitzen
• Kreuzschlitzschraubendreher Größe 2
• Pickel oder kleiner flacher Schlitzschraubendreher
Dieser Abschnitt enthält einige Informationen zum Einbau des Direct Fit
Subwoofers im Auto. Für die Zwecke dieses Handbuchs wird ein BMW X1
2014 als Beispiel verwendet. Andere Fahrzeuge können sich je nach Mod-
ell, Jahr und Optionen davon unterscheiden. Spezifische Informationen
zum Modell finden Sie im Handbuch Ihres Fahrzeugs.
Auswechseln des Subwoofers unter dem Sitz
1. Schritt - Sitz ausbauen
Bolzen entfernen, die die Sitzschienen am Boden befestigen.
Nachdem alle Bolzen entfernt wurden, den Sitz zurück lehnen, um Zugang
zum Subwoofer zu haben.
Vorsicht: Nicht die Kabel unter dem Sitz herausziehen. Dies kann eine
WARNLEUCHTE im Armaturenbrett aufleuchten lassen, die vom Händler
deaktiviert werden muss.
2. Schritt - Subwoofer-Abdeckung ausbauen
Abdeckung ausbauen, um den Subwoofer freizulegen.
3. Schritt - Subwoofer ausbauen
Die Schrauben lösen, die den Subwoofer in Position halten. Den Sub-
woofer aus der Mulde im Boden herausheben und das Original-Kabelband
herausziehen.
4. Schritt - Subwoofer einbauen
Das Original-Kabelband in den neuen Rockford-Subwoofer einstecken.
Den neuen Subwoofer in der Mulde am Boden positionieren und mit den
Originalschrauben befestigen.
5. Schritt - Subwoofer-Abdeckung wieder anbringen
Nachdem der Subwoofer wieder eingesteckt und fest montiert wurde, die
Subwoofer-Abdeckung mit den Originalschrauben befestigen.
6. Schritt - Sitz wieder einbauen
Nachdem die Subwoofer-Abdeckung installiert und gesichert wurde, den
Sitz wieder auf dem Boden positionieren. Die Originalbolzen nach den An-
leitungen des Herstellers anziehen.
Informationen zur Verwendung in verschiedenen Fahrzeugmodellen finden
Sie in unserem Fit Guide.
www.rockfordfosgate.com/products/vehiclefitguide
Contenuto
Subwoofer da 8 pollici
Considerazioni sull’installazione
Elenco di strumenti necessari per l’installazione:
• Bussola
• Cacciavite Torx / Punte
• Cacciavite a croce #2
• Picco o piccolo cacciavite a lama piatta
Questa sezione spiega alcune considerazioni relative al veicolo per
l’installazione del subwoofer direct fit. In questo manuale il veicolo illus-
trato da prendere a riferimento è una BMW X1 2014. Altri veicoli potreb-
bero essere diversi secondo il modello, l’anno e le opzioni. Consultare
il libretto di manutenzione del veicolo per informazioni specifiche sul
modello.
Sostituzione del subwoofer sottosedile
1o passo - Rimozione del sedile
Svitare i bulloni che fissano il sedile alle staffe sul fondo.
Dopo avere rimosso i bulloni, inclinare indietro il sedile per potere ac-
cedere al subwoofer.
Attenzione: Non staccare i cavi sotto il sedile. Ciò può attivare una SPIA
sul cruscotto della macchina e necessitare una visita dal concessionario
per disattivarla.
2o passo - Rimozione della custodia del subwoofer
Rimuovere la custodia per accedere al subwoofer.
3o passo - Rimozione del subwoofer
Svitare le viti che fissano il subwoofer. Alzare il subwoofer dall’alloggiamento
e staccare il cablaggio di fabbrica.
4o passo - Installazione del subwoofer
Inerire il cablaggio di fabbrica nel nuovo subwoofer Rockford. Posizionare
il nuovo subwoofer nell’alloggiamento e usare le viti di fabbrica per mon-
tare il subwoofer.
5o passo - Ri-installazione del coperchio del subwoofer
Dopo avere collegato il subwoofer e dopo averlo fissato rimontare il
coperchio con le viti di fabbrica.
6o passo - Ri-installazione del sedile
Dopo avere installato e fissato il coperchio del subwoofer posizionare il
sedile sul fondo. Serrare i bulloni di fabbrica secondo le specifiche del
produttore.
Per applicazioni in base al modello di veicolo fare riferimento alla nostra
guida di montaggio.
www.rockfordfosgate.com/products/vehiclefitguide

8
Rockford Corporation offers a limited warranty on Rockford Fosgate products on the following terms:
Length of Warranty
POWER Amplifiers – 2 Years
BMW
®
Direct Fit Speakers – 2 Years
Source Units – 1 Year
All other products - 1 Year
Any Factory Refurbished Product – 90 days (receipt required)
What is Covered
This warranty applies only to Rockford Fosgate products sold to consumers by Authorized Rockford Fosgate Dealers in the United States of America or its
possessions. Product purchased by consumers from an Authorized Rockford Fosgate Dealer in another country are covered only by that country’s Distribu-
tor and not by Rockford Corporation.
Who is Covered
This warranty covers only the original purchaser of Rockford product purchased from an Authorized Rockford Fosgate Dealer in the United States. In order
to receive service, the purchaser must provide Rockford with a copy of the receipt stating the customer name, dealer name, product purchased and date of
purchase.
Products found to be defective during the warranty period will be repaired or replaced (with a product deemed to be equivalent) at Rockford’s discretion.
What is Not Covered
1. Damage caused by accident, abuse, improper operations,water, theft, shipping.
2. Any cost or expense related to the removal or reinstallation of product.
3. Service performed by anyone other than Rockford or an Authorized Rockford Fosgate Service Center.
4. Any product which has had the serial number defaced, altered, or removed.
5. Subsequent damage to other components.
6. Any product purchased outside the U.S.
7. Any product not purchased from an Authorized Rockford Fosgate Dealer.
Limit on Implied Warranties
Any implied warranties including warranties of fitness for use and merchantability are limited in duration to the period of the express warranty set forth
above. Some states do not allow limitations on the length of an implied warranty, so this limitation may not apply. No person is authorized to assume for
Rockford Fosgate any other liability in connection with the sale of the product.
How to Obtain Service
Contact the Authorized Rockford Fosgate Dealer you purchased this product from. If you need further assistance, call 1-800-669-9899 for Rockford Cus-
tomer Service. You must obtain an RA# (Return Authorization number) to return any product to Rockford Fosgate. You are responsible for shipment of
product to Rockford.
EU Warranty
This product meets the current EU warranty requirements, see your Authorized dealer for details.
Warranty
-
 1
1
-
 2
2
-
 3
3
-
 4
4
-
 5
5


Rockford Fosgate T3-BMW-SUB Installation & Operation
- Tipo
- Installation & Operation
in altre lingue
- English: Rockford Fosgate T3-BMW-SUB
- français: Rockford Fosgate T3-BMW-SUB
- Deutsch: Rockford Fosgate T3-BMW-SUB
Documenti correlati
-
 Rockford Fosgate Element Ready M2D2-10IB Installation & Operation Manual
-
Rockford Fosgate T2S2-16 Installation & Operation
-
Rockford Fosgate T1S1-12 Installation & Operation Manual
-
 Rockford Fosgate RM112D2 Manuale utente
-
 Rockford Fosgate M2 ELEMENT READY M2D2-10SB Manuale utente
-
 Rockford Fosgate M1D4-12B Manuale utente
-
 Rockford Fosgate T1S1-12 Manuale del proprietario
-
 Rockford Fosgate Prime R1S4-10 Installation & Operation
-
Rockford Fosgate PRIME R2-200X2 Manuale utente
-
 Rockford Fosgate PMX-0 Manuale del proprietario


