Rockford Fosgate PMX-0 Manuale del proprietario
- Tipo
- Manuale del proprietario

Installation & Operation
PMX-0
DIGITAL MEDIA
RECEIVER
Serial Number: Date of Purchase:
Installation assistance available at:
www.rockfordfosgate.com/rftech
ROCKFORDFOSGATE.COM
600 South Rockford Drive • Tempe, Arizona 85281 United States
Direct: (480) 967-3565 • Toll Free: (800) 669-9899
Printed in China
121715
1230-59541-01-B

2
Dear Customer,
Congratulations on your purchase of the world’s finest brand of
audio products. At Rockford Fosgate we are fanatics about musical
reproduction at its best, and we are pleased you chose our product.
Through years of engineering expertise, hand craftsmanship
and critical testing procedures, we have created a wide range of
products that reproduce music with all the clarity and richness you
deserve.
For maximum performance we recommend you have your new
Rockford Fosgate product installed by an Authorized Rockford Fos-
gate Dealer, as we provide specialized training through Rockford
Technical Training Institute (RTTI). Please read your warranty and
retain your receipt and original carton for possible future use.
Great product and competent installations are only a piece of the
puzzle when it comes to your system. Make sure that your installer
is using 100% authentic installation accessories from Rockford
Fosgate in your installation. Rockford Fosgate has everything from
RCA cables and speaker wire to power wire and battery connec-
tors. Insist on it! After all, your new system deserves nothing but
the best.
To add the finishing touch to your new Rockford Fosgate image,
order your Rockford accessories, which include everything from
T-shirts to hats.
Visit our web site for the latest information on all Rockford
products;
www.rockfordfosgate.com
or, in the U.S. call 1-800-669-9899 or FAX 1-800-398-3985. For all other
countries, call +001-480-967-3565 or FAX +001-480-966-3983.
Table of Contents
If, after reading your manual, you still have questions regarding this
product, we recommend that you see your Rockford Fosgate dealer. If you
need further assistance, you can call us direct at 1-800-669-9899. Be sure
to have your serial number, model number and date of purchase available
when you call.
Safety
This symbol with “WARNING” is intended
to alert the user to the presence of important
instructions. Failure to heed the instructions
will result in severe injury or death.
This symbol with “CAUTION” is intended to
alert the user to the presence of important
instructions. Failure to heed the instructions
can result in injury or unit damage.
To prevent injury and damage to the unit, please read and follow the instruc-
tions in this manual. We want you to enjoy this system, not get a headache.
If you feel unsure about installing this system yourself, have it installed by a
qualified Rockford Fosgate technician.
Before installation, disconnect the battery negative (-) terminal to prevent
damage to the unit, fire and/or possible injury.
FCC Compliance Statement
This equipment has been tested and found to comply with the limits for a
Class B digital device, pursuant to part 15 of the FCC Rules. These limits are
designed to provide more reasonable protection against harmful interference
in a residential installation.
Operation is subjected to the following two conditions: (1) This device may
not cause harmful interference, and (2) the device must accept any interfer-
ence received, including interference that may cause undesired operation.
This equipment generates, uses, and can radiate radio frequency energy
and, if not installed and used in accordance with the instructions, may cause
harmful interference to radio communications. However, there is no guaran-
tee that interference will not occur in a particular installation. If this equip-
ment does cause harmful interference to radio or television reception, which
can be determined by turning the equipment off and on, you are encouraged
to try to correct the interference by one of the following measures:
• Reorient or relocate the receiving antenna.
• Increase the separation between the equipment and receiver.
• Connect the equipment into an outlet on a circuit different from that to
which the receiver is connected.
• Consult the dealer or an experienced radio/TV technician for help
Introduction
PRACTICE SAFE SOUND
Continuous exposure to sound pressure levels over 100dB
may cause permanent hearing loss. High powered auto sound
systems may produce sound pressure levels well over 130dB.
Use common sense and practice safe sound.
2 Introduction
3 Specifications
3 Wiring
4 Design Features
5 Installation/Mounting
5 Operation
Basic Operation
USB
AUX (Auxiliary Input)
Bluetooth
®
6 Troubleshooting
7- French, Spanish, German and Italian
- Limited Warranty Information
©2015 Rockford Corporation. All Rights Reserved. PUNCH® and associated logos where applicable, are registered trademarks of Rockford Corporation in the United States and/
or other countries. iPhone and iPod are trademarks of Apple Inc., registered in the U.S. and other countries. The Bluetooth
®
word mark and logos are registered trademarks owned
by Bluetooth SIG, Inc. and any use of such marks by Rockford Corporation is under license. All other trademarks are the property of their respective owners. Specifications subject to
change without notice.

3
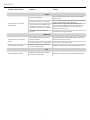
Specifications / Wiring Diagram
Model PMX-0
Operating Voltage 10.5V - 16V
Fuse Rating 3A
Max. RCA Output Voltage 2V
Output Impedance 500Ω
Bluetooth 3.0, AVRCP & A2DP
USB Output 1A (Charging Only)
iPod, iPhone Compatibility Bluetooth
®
Only
Android Compatibility Bluetooth
®
Only
CEA 2006
Power ratings on Rockford Fosgate source units conform to CEA-2006 industry standards. These guide-
lines mean your source unit’s output power ratings are REAL POWER numbers, not inflated marketing
ratings.
USB
BLACK
BLACK
BLACK
YELLOW
PURPLE
GREY
BLUE/WHITE
AMPLIFIER REMOTE
BATTERY (+12v)
GROUND
IGNITION
RED
RED
RED (REAR LINE OUT RIGHT)
WHITE (REAR LINE OUT LEFT)
RED (FRONT LINE OUT RIGHT)
WHITE (FRONT LINE OUT LEFT)
RED (AUX IN RIGHT)
WHITE (AUX IN LEFT)
RED (SUB-W OUT)
WHITE (SUB-W OUT)
IN
OUT
REAR LINE OUT
FRONT LINE OUT
AUX INPUT
SUBWOOFER LINE OUT
USB INPUT

4
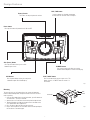
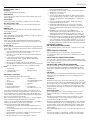
Design Features
Mounting
To mount the unit, you will need to find a flat surface with adequate
clearance behind that provides enough clearance for the unit and all it’s
necessary wiring.
1. Once you have determined a mounting location, you will need to cut
a circular hole 2” (52mm) in diameter.
2. After the hole is cut slide the unit and wiring into through the hole.
3. Take the U bracket and slide over the two studs on the back of the
unit. Tighten down with supplied nuts.
4. Press on the trim bezel on the front side of the unit.
5. Plug in all wiring harnesses and cables. Refer to the wiring diagram
for wire harness connection types.
SRC
PMX-0
Panel
Bracket
Source Unit
Nuts
Rotary Encoder
This knob is for adjusting the main volume.
REV / FWD button
Use these buttons to skip back and forward
through channels or tracks with a short press.
Power button
Pressing this button will power the unit ON and OFF.
PLAY / PAUSE button
Press this button to play or pause your music. This
button also acts as a MUTE when the source is in
AUX mode.
SRC (Power) Button
Pressing this button allows you to switch
between input sources.
SUB Buttons
Pressing these buttons allow you to adjust the
subwoofer output UP or DOWN (0-12).
Fig. 1
DIMMER button
Pressing this button will allow you to select
between the two brightness values for the display.
Fig. 2

5
Installation / Mounting / Operation
Basic Operation
TURNING THE UNIT ON / OFF
Press the POWER button to turn the unit ON or OFF
ADJUSTING THE VOLUME
Rotate encoder knob left or right to the desired volume level. You will
hear a beep when the VOLUME has reached it’s maximum volume level.
ADJUSTING THE SUBWOOFER OUTPUT
Press the SUB + or SUB- buttons to adjust the output level. You will
hear a beep with the settings have reached their minimum and maximum
setting.
SELECTING A SOURCE TO PLAY
Press the SRC button to scroll through and select the audio source of
your choice. An audible notification will let you know what source is
selected (BLUETOOTH MODE>AUXILLARY MODE).
USB Operation
The USB port on the back of the device is for firmware updates and
charging devices only. Using it as an audio source will not work.
AUX Operation
After your device is plugged into the source unit, this feature allows you
to play music from your device. To select the AUX source, press the SRC
button until you hear “AUXILIARY MODE” over the speakers. You will use
your plugged in device to control song/track selection, PLAY/PAUSE and
track skip FWD/REV.
Bluetooth
®
Operation
To pair your device to the source unit, you will need to go to your
Bluetooth settings on your device and select “Rockford PMX0”.
After the initial pairing of your device, the volume will be set at 25%
volume. You will need to set the Volume on your device to 100% for
maximum sound.
Once your device is paired to the source unit, this feature allows you to
control playback from your device directly from the unit. To select the
BLUETOOTH source option on the source unit, simply press the SRC
button until you hear “BLUETOOTH MODE”.
To play or pause a song, short press the PLAY/PAUSE button.
To skip a track forward, short press the FWD button. To skip a track
backwards, short press the REV button.
Contents
Installation Considerations
The following is a basic list of tools needed for installation:
This section focuses on some of the vehicle considerations for installing
your new source unit. Pre-planning your system layout and best wiring
routes will save installation time. When deciding on the layout of your
new system, be sure that each component will be easily accessible for
making adjustments.
If you feel unsure about installing this system yourself, have it installed
by a qualified Rockford Audio technician.
Before installation, disconnect the battery negative (-) terminal to prevent
damage to the unit, fire and/or possible injury.
Before beginning any installation, follow these simple rules:
1. Be sure to carefully read and understand the instructions before
attempting to install the unit.
2. For safety, disconnect the negative lead from the battery prior to
beginning the installation.
3. For easier assembly, we suggest you run all wires prior to mounting
your unit in place.
4. Route all of the RCA cables close together and away from any high
current wires.
5. Use high quality connectors for a reliable installation and to minimize
signal or power loss.
6. Think before you drill! Be careful not to cut or drill into gas tanks, fuel
lines, brake or hydraulic lines, vacuum lines or electrical wiring when
working on any vehicle.
7. Never run wires underneath the vehicle. Running the wires inside the
vehicle provides the best protection.
8. Avoid running wires over or through sharp edges. Use rubber
or plastic grommets to protect any wires routed through metal,
especially the firewall.
9. ALWAYS protect the battery and electrical system from damage with
proper fusing. Install the appropriate fuse holder and fuse on the
+12V power wire within 18” (45.7 cm) of the battery terminal.
10. When grounding to the chassis of the vehicle, scrape all paint from
the metal to ensure a good, clean ground connection. Grounding
connections should be as short as possible and always be connected
to metal that is welded to the main body, or chassis, of the vehicle.
Seatbelt bolts should never be used for connecting to ground.
• Volt/Ohm meter
• Wire strippers
• Wire crimpers
• Wire cutters
• #2 Phillips screwdriver
• Battery post wrench
• Hand held drill w/ assorted
bits
• Heat shrink tubing
• Soldering iron
• Solder
• Heat gun
• 7mm wrench
• Source Unit
• U Bracket & Nuts
• Installation & Operation
Manual

6
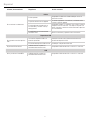
Symptom Diagnosis Remedy
Basic
Source unit does not turn on.
Blown fuse Check fuse of the unit, replace with correct rating.
Vehicle’s ignition is off
If connected following the instructions, the unit will not
operate with ignition off.
Voltage applied to Red wire is not
between 10.5 & 16 volts or there is no
voltage present
Check battery, connections and fuses and repair or replace
as necessary. If voltage is above +16 volts, have the
electrical system inspected by an authorized service center.
Unit is not properly grounded Check wiring and repair as necessary.
USB Devices
USB device cannot be inserted
The USB device has been inserted in
the wrong direction
Reversing the connection direction of the USB device, try
reinserting.
The USB device connector is broken Replace with a new USB device.
USB device will not charge
Extension cable may not be plugged in
properly or bad
Check extension cable or replace if needed.
AUX
No audio in MP3 mode
Extension cable may not be plugged in
properly or bad
Check extension cable or replace if needed.
Troubleshooting

7
Français
Caractéristiques de conception - Fig. 1
Encodeur rotatif
Ce bouton sert à ajuster le volume principal.
Bouton REV/FWD
Utiliser ces boutons pour sauter en arrière et en avant parmi les chaînes
ou les pistes avec une pression courte.
Bouton Power (Alimentation)
Appuyer sur ce bouton va activer ou désactiver l’unité.
Bouton SRC (Alimentation)
Appuyer sur ce bouton permet de basculer entre les sources d’entrée.
Bouton DIMMER (GRADATEUR)
Appuyer sur ce bouton pour sélectionner entre les valeurs de luminosité
de l’affichage.
Boutons SUB
Ces boutons permettent d’ajuster la sortie du subwoofer vers le haut ou
vers le bas (0-12).
Bouton PLAY/PAUSE (LECTURE/PAUSE)
Appuyer sur ce bouton pour jouer ou pauser la musique. Ce bouton sert
aussi de VEILLEUSE quand la source est en mode AUX.
Montage - Fig. 2
Pour monter l’unité, il faudra une surface plate disposant d’un dégagement
adéquat derrière qui offre suffisamment de dégagement pour l’unité et tout
son câblage nécessaire.
1. Une fois que l’emplacement de montage aura été déterminé, il faudra
couper un trou circulaire de 77 mm de diamètre.
2. Une fois le trou coupé, faire glisser l’unité et le câblage à travers le
trou.
3. Prendre le support en U et faire glisser les deux goujons sur l’arrière
de l’unité. Serrer avec les écrous fournis.
4. Appuyer sur la lunette profilée sur le devant de l’unité.
5. Brancher les faisceaux de câblage et les câbles. Consulter le schéma
de câblage pour les types de connexion de faisceaux de câbles.
Contenu
Considérations d’installation
Voici une liste de base des outils nécessaires pour l’installation :
Cette section se concentre sur certaines des considérations automobiles
pour l’installation de la nouvelle unité source. Pré-planifier l’aménagement
du système et les meilleures voies de câblage fera gagner du temps en
installation. Lors de la décision de l’aménagement du nouveau système,
s’assurer que chaque composant soit facilement accessible pour effectuer
des réglages.
En cas de question sur l’installation de ce système soi-même, le faire
installer par un technicien qualifié Audio Rockford.
Avant l’installation, débrancher la borne négative (-) de la batterie pour
prévenir tout dommage matériel, tout incendie et/ou des blessures
éventuelles.
Avant de commencer toute installation, suivre ces simples règles :
1. Faire attention de lire attentivement et de comprendre les instructions
avant de tenter l’installer l’unité.
2. Par mesure de sécurité, débrancher le fil négatif de la batterie avant
de commencer l’installation.
3. Pour faciliter l’assemblage, il est conseillé d’acheminer tous les fils
avant de monter l’unité en place.
• Unité source
• Support en U et écrous
• Manuel d’installation et
d’exploitation
• Voltmètre/Ohmmètre
• Dénudeuse
• Sertisseuse
• Coupe-fils
• Tournevis cruciforme n° 2
• Clé de borne de batterie
• Perceuse portative avec
embouts assortis
• Tubulure thermorétractable
• Fer à souder
• Soudage
• Pistolet thermique
• Clé de 7 mm
4. Acheminer tous les câbles RCA près les uns des autres et à l’écart
des fils à haute intensité.
5. Utiliser des connecteurs de haute qualité pour une installation fiable
et pour minimiser la perte de signal ou d’alimentation.
6. Penser avant de percer ! Faire attention de ne pas couper ni percer
dans les réservoirs à essence, les canalisations de carburant, les
conduites de freins ou conduites hydrauliques, les lignes de vide ou
le câblage électrique lors de toute opération sur un véhicule.
7. Ne jamais acheminer les fils sous le véhicule. Acheminer les fils à
l’intérieur du véhicule fournit la meilleure protection.
8. Éviter d’acheminer les fils sur ou à travers des bords coupants.
Utiliser des œillets en caoutchouc ou en plastique pour protéger les
fils acheminés dans du métal, en particulier le pare-feu.
9. TOUJOURS protéger la batterie et le système électrique de tout
dommage grâce à des fusibles appropriés. Installer le porte-fusible
approprié et le fusible sur le fil d’alimentation de +12 V dans les 45,7
cm (18 po) de la borne de batterie.
10. Lors de la mise à la terre au châssis du véhicule, gratter toute
peinture du métal pour assurer une bonne connexion à la masse
propre. Les raccordements de mise à la terre doivent être aussi courts
que possible et toujours connectés au métal qui est soudé au corps
principal, ou au châssis, du véhicule. Les boulons de ceinture de
sécurité ne doivent jamais être utilisés pour raccorder à la terre.
Fonctionnement de base
ACTIVER/DÉSACTIVER L’UNITÉ
Appuyer sur le bouton POWER (Alimentation) pour ACTIVER ou DÉSAC-
TIVER l’unité
RÉGLAGE DU VOLUME
Faire tourner le bouton d’encodeur vers la gauche ou vers la droite au
niveau de volume souhaité. Un bip se fera entendre lorsque le VOLUME
aura atteint le niveau de volume maximum.
RÉGLAGE DE LA SORTIE DU SUBWOOFER
Appuyer sur le bouton SUB + ou SUB- pour régler le niveau de sortie.
Un bip se fera entendre lorsque les paramètres ont atteint leur réglage
minimum et maximum.
SÉLECTIONNER UNE SOURCE À JOUER
Appuyer sur le bouton SRC pour faire défiler et sélectionner la source
audio de son choix. Une notification sonore indiquera quelle source est
sélectionnée (MODE BLUETOOTH>MODE AUXILIAIRE).
Fonctionnement USB
Le port USB sur le dos du périphérique est réservé aux mises à jour
du logiciel et à charger les périphériques uniquement. L’utiliser comme
source audio ne fonctionnera pas.
Fonctionnement AUX
Une fois le périphérique branché dans l’unité source, cette fonction
permet de jouer de musique à partir du périphérique. Pour sélectionner
la source AUX, appuyer sur le bouton SRC jusqu’à ce que l’on entende «
AUXILIARY MODE » (Mode auxiliaire) sur les haut-parleurs. On utilisera
le périphériques branché pour contrôler la sélection de chanson/piste,
PLAY/PAUSE et saut de piste FWD/REV.
Fonctionnement de Bluetooth®
Pour coupler le périphérique avec l’unité source, il faudra aller aux
paramètres Bluetooth sur le périphérique et sélectionner « Rockford
PMX0 ».
Après le couplage initial du périphérique, le volume sera réglé à 25 % du
volume. Il faudra régler le volume sur le périphérique à 100 % pour un
son maximum.
Une fois le périphérique appairé à l’unité source, cette fonction permet de
contrôler la lecture à partir du périphérique directement de l’unité. Pour
sélectionner l’option de source BLUETOOTH sur l’unité source, il suffit
d’appuyer sur le bouton SRC jusqu’à ce que l’on entende « BLUETOOTH
MODE » (Mode Bluetooth).
Pour jouer ou pauser une chanson, appuyer brièvement sur le bouton
PLAY/PAUSE.
Pour sauter une piste vers l’avant, appuyer brièvement sur le bouton FWD.
Pour sauter une piste vers l’arrière, appuyer brièvement sur le bouton REV.

8
Français
Symptôme/Avertissement Diagnostic Solution
De base
L'unité source ne se met pas en
marche.
Fusible grillé
Vérifier le fusible de l'unité, remplacer avec le calibre
approprié.
L'allumage du véhicule est désactivé
Si connectée selon les instructions, l'unité ne fonctionnera
pas avec l'allumage désactivé.
La tension appliqué sur le fil rouge
n'est pas entre 10,5 et16 volts ou
absence de toute tension
Vérifier la batterie, les connexions et les fusibles, et réparer
ou remplacer selon les besoins. Si la tension est supérieure
à +16 volts, faire inspecter le système électrique par un
centre de service homologué.
L'unité n'est pas correctement mise à
la masse.
Vérifier le câblage et réparer selon les besoins.
Périphériques USB
Le périphérique USB ne peut pas
être inséré
Le périphérique USB a été inséré dans
le mauvais sens
Inverser le sens de connexion du périphérique USB, essayer
de le réinsérer.
Le connecteur du périphérique USB
est cassé.
Le remplacer par un nouveau périphérique USB.
Périphérique USB ne se charge pas
Rallonge ne peut pas être correctement
branché ou mauvaise
Remplacez-le par un nouveau périphérique USB ..
AUX
MP3 ne joue pas
Une erreur d'écriture s'est produite. Le
format MP3 n'est pas compatible.
S'assurer que MP3 a été écrit dans un format pris en charge

9
Español
Características de diseño - Fig. 1
Codificador giratorio
Esta perilla es para ajustar el volumen principal.
Botón REV / FWD
Use estos botones para desplazarse hacia atrás y adelante a través de
canales o pistas presionando brevemente.
Botón de encendido
Presionar este botón encenderá (ON) y apagará (OFF) la unidad.
Botón SRC (encendido)
Presionar este botón le permite conmutar entre fuentes de entrada.
Botón DIMMER (ATENUADOR)
Presionar este botón le permitirá seleccionar entre dos valores de brillo
para la pantalla.
Botones SUB
Presionar estos botones le permite ajustar la salida del subwoofer para
SUBIR (UP) o BAJAR (DOWN) (0-12).
Botón PLAY/PAUSE (REPRODUCCIÓN/PAUSA)
Presione este botón para reproducir o pausar su música. Este botón
también actúa como MUTE (SILENCIAMIENTO) cuando la fuente está en
el modo AUX (AUXILIAR).
Montaje - Fig 2.
Para montar la unidad, deberá encontrar una superficie plana con espacio
suficiente atrás para que proporcione suficiente separación para la unidad
y todo el cableado necesario.
1. Una vez que haya determinado un lugar para el montaje, tendrá que
cortar un agujero circular de 2 pulg. (52mm) de diámetro.
2. Después de haber cortado el agujero deslice la unidad y el cableado
a través del agujero.
3. Tome el soporte en “U” y deslícelo arriba de la parte posterior de la
unidad. Apriete hacia abajo usando las tuercas proporcionadas.
4. Presione el marco decorativo en el lado delantero de la unidad.
5. Enchufe todos los arneses de cableado y los cables. Consulte el
diagrama de cableado para ver los tipos de conexión de arneses de
cables.
Índice
Consideraciones para la instalación
La siguiente es una lista básica de herramientas necesarias para la
instalación:
Esta sección se enfoca en algunas de las consideraciones del vehículo
para instalar la unidad de fuente nueva. Preplanear la distribución de su
sistema y las rutas de cableado le ahorrará• tiempo de instalación. Cu-
ando decida la distribución de su nuevo sistema asegúrese de que pueda
acceder fácilmente a cada componente para hacer los ajustes.
Si no está seguro si debe hacer la instalación de este sistema usted
mismo, haga que lo instale un técnico calificado de Rockford Audio.
Antes de efectuar la instalación, desconecte el terminal negativo (-) de la
batería para evitar daños a la unidad, incendio y/o posiblemente lesiones.
Antes de comenzar cualquier instalación, siga estas simples normas:
1. Asegúrese de leer cuidadosamente y de entender las instrucciones
antes de tratar de instalar la unidad.
2. Por seguridad, desconecte el conductor negativo de la batería antes
de comenzar la instalación.
3. Para facilitar el montaje, sugerimos que tienda todos los cables antes
de montar su unidad en el sitio.
• Unidad fuente
• Soporte en “U” y tuercas
• Manual de Instalación y
Operación
• Multímetro
• Pelacables
• Alicates de engarzar
• Pinza de corte
• Destornillador Phillips No. 2
• Llave para bornes de batería
• Taladro de mano con brocas
varias
• Tubos termocontraíbles
• Soldador
• Soldadura
• Pistola de aire caliente
• Llave de 7mm
4. Tienda todos los cables RCA cerca unos de otros y alejados de los
cables de alta corriente.
5. Utilice conectores de alta calidad para tener una instalación confiable
y para reducir al mínimo las pérdidas de señal o de potencia.
6. ¡Piense siempre antes de perforar! Tenga cuidado de no cortar ni
perforar tanques de combustible, tuberías de combustible, de frenos
o hidráulicas, tuberías de vacío o cableado eléctrico al trabajar en
cualquier vehículo.
7. Nunca tienda cables abajo del vehículo. Tender los cables dentro del
vehículo proporciona la mejor protección.
8. Evite tender cables arriba o a través de bordes filosos. Use arandelas
aislantes de caucho para proteger los cables tendidos a través de
metal, especialmente en la mampara cortafuegos.
9. Proteja SIEMPRE la batería y el sistema eléctrico contra daños
usando los fusibles correspondientes. Instale el portafusibles y los
fusible correspondientes en el cable de +12 V a una distancia menor
de 18 pulg. (45,7 cm) del terminal de la batería.
10. Al conectar la tierra del chasis del vehículo raspe la pintura del metal
para asegurar una conexión buena y limpia a tierra. Las conexiones a
tierra se deben hacer lo más cortas posibles y siempre conectadas a
metal que esté soldado a la carrocería o al chasis del vehículo. Nunca
debe usar los pernos del cinturón de seguridad para la conexión a
tierra.
Funcionamiento básico
PARA ENCENDER Y APAGAR (ON/OFF) LA UNIDAD.
Presione el botón POWER (encendido) para encender la unidad o para
apagarla (ON u OFF).
AJUSTE DEL VOLUMEN
Haga girar la perilla del codificador a la izquierda o a la derecha al nivel
de volumen deseado. Escuchará un tono cuando el VOLUMEN haya
alcanzado su nivel de volumen máximo.
AJUSTE DE LA SALIDA DEL SUBWOOFER
Presione los botones SUB + o SUB- para ajustar el nivel de la salida.
Escuchará un tono cuando la configuración haya alcanzado su ajuste
máximo y mínimo.
SELECCIÓN DE UNA FUENTE PARA REPRODUCIR
Presione el botón SRC para desplazarse a través y seleccionar la fuente de
audio de su preferencia. Una notificación audible le informará qué fuente
se ha seleccionado (BLUETOOTH MODE>AUXILLARY MODE).
Operación USB
El puerto USB en la parte posterior del dispositivo solamente es para
actualizaciones de firmware y dispositivos de carga. Usarlo como una
fuente de audio no funcionará.
Operación AUX
Después que su dispositivo esté conectado a la unidad fuente, esta
característica le permite reproducir música desde su dispositivo. Para
seleccionar la fuente AUX, presione el botón SRC hasta que escuche
“AUXILIARY MODE” (MODO AUXILIAR) a través de los altavoces. Usted
utilizará su dispositivo enchufado para controlar la selección de cancio-
nes/pistas, PLAY/PAUSE y omisión de pista FWD/REV.
Operación de Bluetooth®
Para conectar su dispositivo a la unidad fuente, debe ir a su configuración
de Bluetooth en su dispositivo y seleccionar “Rockford PMX0”.
Después de la conexión inicial del dispositivo, el volumen se configurará
al 25% del volumen. Tendrá que reponer el Volumen de su dispositivo al
100% para tener sonido máximo.
Después que su dispositivo esté conectado a la unidad fuente, esta
característica le permite controlar la reproducción de su dispositivo
directamente desde la unidad. Para seleccionar la opción de fuente
BLUETOOTH en la unidad fuente, simplemente presione el botón SRC
hasta que escuche “BLUETOOTH MODE”.
Para reproducir o pausar una canción, presione brevemente el botón
PLAY/PAUSE.
Para omitir una pista y avanzar, presione brevemente el botón FWD. Para
omitir una pista y retroceder, presione brevemente el botón REV.

10
Español
Síntoma / Asesoramiento Diagnóstico Acción correctiva
Básica
No se enciende la unidad fuente
Fusible quemado
Compruebe el fusible de la unidad cambie por uno con la
calificación correcta.
La ignición del vehículo está apagada
Si conecta siguiendo las instrucciones, la unidad no funcio-
nará con la ignición apagada.
El voltaje aplicado al alambre rojo no
está entre 10.5 y 16 voltios o no hay
voltaje presente
Compruebe la batería, las conexiones y los fusibles, y repare o
reemplace como sea necesario. Si el voltaje es mayor de +16
voltios, haga que un centro de servicio autorizado inspeccione
el sistema eléctrico.
El amplificador no está correctamente
conectado a tierra
Revise las conexiones y repárelas como sea necesario
Dispositivos USB
No se puede insertar el dispositivo
USB
Se insertó en dispositivo USB en la
dirección equivocada
Intente reinsertar de nuevo invirtiendo la dirección de la
conexión del dispositivo USB.
El conector del dispositivo USB está roto Cambie por un dispositivo USB nuevo
Dispositivo USB no cobrará
Cable de extensión no podrá ser
conectado correctamente o malo
Compruebe el cable de extensión o sustituir si es necesario.
AUX
No hay sonido en el modo MP3
Cable de extensión no podrá ser
conectado correctamente o malo
Compruebe el cable de extensión o sustituir si es necesario

11
Deutsch
Design-Elemente - Abb. 1
Drehgeber
Dieser Knopf regelt die Hauptlautstärke.
REV/FWD-Taste
Durch kurzes Drücken dieser Tasten durch die Kanäle oder Titel zurück-
oder vorspringen.
Einschalttaste
Durch Drücken dieser Taste wird das Gerät EIN- und AUS-geschaltet.
SRC (Netzschalter)-Taste
Durch Drücken dieser Taste kann man zwischen den Eingangsquellen
umschalten.
DIMMER-Taste
Durch Drücken dieser Taste kann man zwischen zwei Helligkeitswerten
des Displays auswählen.
SUB-Tasten
Durch Drücken diese Tasten wird der Subwoofer-Ausgang nach oben (UP)
oder unten (DOWN) eingestellt (0-12).
PLAY/PAUSE-Taste
Diese Taste für die Musik-Wiedergabe oder Unterbrechnung drücken.
Diese Taste dient gleichzeitig als MUTE-Taste (Stummschalttaste), wenn
die Quelle im AUX-Modus ist.
Einbau - Abb. 2
Für den Einbau des Gerätes eine flache Oberfläche mit genügend Freiraum
hinten finden, um genügend Abstand für das Gerät und alle erforderlichen
Kabel zu haben.
1. Nach der Festlegung der Befestigungsstelle ein rundes Loch mit
einem Durchmesser von 52 mm ausschneiden.
2. Nach dem Ausschneiden des Lochs das Gerät und die Kabel durch
das Loch führen.
3. U-Form-Halterung herausnehmen und über die zwei Stifte
auf der Rückseite des Geräts schieben. Mit den mitgelieferten
Schraubenmuttern festziehen.
4. Die Fassung auf die Vorderseite des Geräts aufdrücken.
5. Alle Kabelbäume und Kabel einstecken. Weitere Informationen zu den
Arten von Kabelbaumanschlüssen sind im Schaltplan enthalten.
Inhalt
Informationen zum Einbau
Liste der erforderlichen Werkzeuge für den Einbau:
Dieser Abschnitt enthält einige Informationen zum Einbau des neuen
Source-Geräts im Fahrzeug. Vorausplanung des Systemlayouts und der
besten Verkabelungsrouten spart Zeit beim Einbau. Bei der Wahl eines
Layouts für das neue System prüfen, ob alle Komponenten leicht erreich-
bar sind, um Einstellungen vorzunehmen.
Wenn Sie beim Einbau des Geräts unsicher sind, lassen Sie es bitte von
einem qualifizierten Rockford-Fosgate-Techniker einbauen.
Entfernen Sie vor dem Einbau den negativen Batteriepol, um Schäden am
Gerät, Brand und mögliche Verletzungen zu vermeiden.
Vor dem Einbau diese einfachen Regeln befolgen:
1. Vor dem Einbau des Geräts die Anleitungen sorgfältig durchlesen
und verstehen.
2. Aus Sicherheitsgründen vor dem Einbau das negative Kabel von der
Batterie trennen.
3. Um die Montage zu erleichtern, empfehlen wir, alle Kabel vor der
Befestigung des Source-Geräts zu verlegen.
4. Alle RCA-Kabel dicht zusammen und möglichst weit von
• Source-Gerät
• U-Form-Halterung und
Schraubenmuttern
• Installation &
Betriebsanleitung
• Spannungsmesser (Volt/
Ohm)
• Abisolierzange
• Drahtkripper
• Drahtschere
• Kreuzschraubenzieher Nr. 2
• Batteriestützenschlüssel
• Handbohrer mit
verschiedenen Bohrerspitzen
• Schrumpfschlauch
• Lötkolben
• Lot
• Heißluftpistole
• Schraubenschlüssel 7 mm
Hochstromkabeln entfernt verlegen.
5. Nur Qualitätsstecker verwenden, um einen zuverlässigen Einbau zu
gewährleisten und Signal- und
6. Stromverlust zu minimieren.
7. Vorsicht vor dem Bohren! Bei Arbeiten am Fahrzeug darauf achten,
nicht in den Benzintank, in die Benzin-, Brems- oder hydraulischen
Leitungen, Vakuumleitungen oder Elektrokabel zu schneiden oder
zu bohren.
8. Kabel nie unter dem Fahrzeug verlegen. Verlegen der Kabel im
Fahrzeug bietet den besten Schutz.
9. Verlegen der Kabel über oder durch scharfe Kanten vermeiden.
Gummi- oder Plastik-Dichtungshülsen verwenden, um Kabel zu
schützen, die durch Metall verlegt werden, insbesondere durch die
Feuerwand.
10. Die Batterie und das elektrische System IMMER durch
ordnungsgemäße Sicherungen vor Beschädigung schützen. Die
entsprechende Sicherungshalterung und Sicherung auf dem +12V
Stromkabel maximal 45,7 cm vom Batteriepol entfernt installieren.
11. Bei der Erdung über das Fahrgestell alle Farbe vom Metall abkratzen,
um eine gute, saubere Erdung zu gewährleisten. Erdleitungen sollten
so kurz wie möglich und stets an Metall angeschlossen sein, das an
der Karosserie oder am Fahrgestell des Fahrzeugs angeschweißt ist.
Niemals die Bolzen von Sicherheitsgurten für die Erdung verwenden.
Grundlegende Funktionen
EIN- UND AUSSCHALTEN DES GERÄTS
Die Einschalttaste drücken, um das Gerät ein- (ON) oder auszuschalten
(OFF).
EINSTELLUNG DER LAUTSTÄRKE
Den Drehgeber-Knopf nach links oder rechts auf die gewünschte
Lautstärke drehen. Wenn die maximale LAUTSTÄRKE erreicht ist, ertönt
ein Signalton.
EINSTELLUNG DES SUBWOOFER-AUSGANGS
Die Tasten SUB + oder SUB- drücken, um den Ausgangspegel einzustel-
len. Wenn die Einstellungen ihren minimalen und maximalen Wert erreicht
haben, ertönt ein Signalton.
AUSWAHL EINER SOURCE FÜR DIE WIEDERGABE
Die SRC-Taste drücken, um durch die Audioquellen zu blättern und die
gewünschte Audioquelle auszuwählen. Eine hörbare Meldung teilt mit,
welche Quelle ausgewählt wurde (BLUETOOTH-MODUS>AUXILLARY-
MODUS).
USB-Betrieb
Der USB-Anschluss auf der Rückseite des Geräts dient nur für Firmware-
Aktualisierungen und Ladegeräte. Der Anschluss funktioniert nicht als
Audioquelle.
AUX-Betrieb
Nachdem das Gerät an das Source-Gerät angeschlossen ist, kann über
diese Funktion Musik über das Gerät wiedergegeben werden. Zur Auswahl
der AUX-Quelle die SRC-Taste drücken, bis „AUXILIARY-MODUS“ über
die Lautsprecher zu hören ist. Sie können mit ihrem angeschlossenen
Gerät die Auswahl von Song/Titel, PLAY/PAUSE und Titel überspringen
FWD/REV steuern.
Bluetooth®-Betrieb
Um Ihr Gerät mit dem Source-Gerät zu verbinden, gehen Sie zu Ihren
Bluetooth-Einstellungen auf Ihrem Gerät und wählen Sie „Rockford
PMX0“.
Nach dem ersten Pairing Ihres Geräts ist die Lautstärke auf 25 % der
Lautstärke eingestellt. Sie müssen die Lautstärke auf Ihrem Gerät für
maximalen Klang auf 100 % einstellen.
Nachdem Ihr Gerät mit dem Source-Gerät verbunden ist, kann über diese
Funktion die Wiedergabe von Ihrem Gerät direkt über das Source-Gerät
gesteuert werden. Um die Source-Option BLUETOOTH auf dem Source-
Gerät auszuwählen, einfach die SRC-Taste drücken, bis „BLUETOOTH-
MODUS“ ertönt.
Für die Wiedergabe oder Pause eines Songs die Taste PLAY/PAUSE kurz
drücken.
Um einen Titel vorwärts zu überspringen, die FWD-Taste kurz drücken.
Um einen Titel rückwärts zu überspringen, die REV-Taste kurz drücken.

12
Deutsch
Symptom / Beschreibung Diagnose Lösung
Grund
Source-Gerät kann nicht einge-
schaltet werden.
Sicherung durchgebrannt
Die Sicherung des Geräts prüfen und ggf mit der richtigen
Stärke ersetzen.
Zündung des Fahrzeugs ist ausgestellt.
Falls nach den Anleitungen angeschlossen wird das Gerät bei
ausgeschalteter Zündung nicht funktionieren.
Die auf den roten Draht angelegte Span-
nung liegt nicht zwischen 10,5 und 16
Volt oder die Spannung ist unzureichend.
Batterie, Anschlüsse und Sicherungen überprüfen und
reparieren oder nach Bedarf ersetzen. Wenn die Spannung
über +16 Volt liegt, die Elektrik von einem autorisierten
Servicezentrum prüfen lassen.
Das Gerät ist nicht ordnungsgemäß
gesichert
Die Kabel prüfen und ggf. reparieren.
USB-Geräte
USB-Gerät kann nicht eingeführt
werden
Das USB-Gerät wurde in der falschen
Richtung eingeführt
Nach Umkehrung der Verbindungsrichtung des USB-Geräts
Einführung nochmals versuchen.
Der USB-Geräteanschluss ist beschädigt Durch ein neues USB-Gerät ersetzen.
USB-Gerät wird nicht geladen
Verlängerungskabel nicht richtig oder
schlecht eingesteckt werden
Überprüfen Sie Verlängerungskabel oder bei Bedarf ersetzen.
AUX
Keine Wiedergabe von MP3
Verlängerungskabel nicht richtig oder
schlecht eingesteckt werden
Überprüfen Sie Verlängerungskabel oder bei Bedarf ersetzen.

13
Italiano
Caratteristiche del design - Fig. 1
Encoder rotativo
La manopola regola il volume principale.
Pulsante REV / FWD (inversione / avanzamento)
Usare questi pulsanti per saltare al canale o brano precedente o succes-
sivo premendo brevemente.
Pulsante di accensione
Premendo questo pulsante si ACCENDE e SPEGNE l’unità.
Pulsante SRC (Alimentazione)
Premendo questo pulsante si sceglie la fonte di ingresso.
Pulsante DIMMER (Reostato)
Premendo questo pulsante si seleziona uno dei due valori di luminosità
del display.
Pulsanti SUB
Premendo questi pulsanti si regola l’uscita del subwoofer UP (su) o
DOWN (giù) (0-12).
Pulsante PLAY / PAUSE (Riproduzione/Pausa)
Premere questo pulsante per riprodurre o sospendere la musica. Questo
pulsante ha anche la funzione MUTE per la disattivazione dell’audio
quando la fonte è nella modalità AUX.
Montaggio - Fig. 2
Per montare l’unità trovare una superficie piana con spazio libero dietro
per avere spazio sufficiente per l’unità e tutto il cablaggio necessario.
1. Dopo avere scelto il luogo di montaggio tagliare un foro circolare con
un diametro di 52 mm.
2. Dopo aver tagliato il foro far passare l’unità e il cablaggio attraverso
il foro.
3. Prendere la staffa a forma U e farla scivolare sopra i due perni sul
retro dell’unità. Fissare con i dadi forniti avvitandoli.
4. Premere la cornice sulla parte frontale dell’unità.
5. Inserire tutti i cablaggi e cavi. Fare riferimento al diagramma per i tipi
di connessione dei cablaggi.
Contenuto
Considerazioni sull’installazione
Segue l’elenco di base degli strumenti necessari per l’installazione:
Questa sezione spiega alcune considerazioni relative al veicolo per
l’installazione della nuova unità di fonte. La pianificazione della con-
figurazione del sistema e dei migliori percorsi per il cablaggio ridurrà i
tempi d’installazione. Nel decidere la configurazione del nuovo sistema
accertarsi che ogni componente sarà facilmente accessibile per potere
effettuare modifiche.
Se non siete sicuri come installare il sistema voi stessi, fatelo installare da
un tecnico audio qualificato della Rockford.
Prima dell’installazione staccare il terminale negativo (-) per prevenire
danni all’unità, incendi e/o lesioni.
Prima di procedere con l’installazione seguire queste semplici regole:
1. Leggere attentamente le istruzioni e comprenderle prima di iniziare
l’installazione dell’unità.
2. Per motivi di sicurezza staccare il terminale negativo della batteria
prima di iniziare l’installazione.
3. Per facilitare l’assemblaggio consigliamo di passare tutti i cavi nella
posizione d’installazione prima di montare l’unità.
4. Condurre tutti i cavi RCA vicini tra di loro e lontani dagli altri cavi ad
alta tensione.
• Unità di fonte
• Staffa a forma U e dadi
• Manuale d’installazione e
funzionamento
• Multimetro Volt/Ohm
• Pinze spellafili
• Crimpatrici
• Tronchesi
• Cacciavite a croce #2
• Chiave inglese per il polo
della batteria
• Trapano portatile con varie
punte
• Tubazione termoretraibile
a caldo
• Saldatore
• Lega per saldatura
• Pistola termica
• Chiave inglese da 7 mm
5. Usare connettori di alta qualità per un’installazione affidabile e per
minimizzare la perdita di segnale o potenza.
6. Attenzione prima di trapanare! Attenzione a non tagliare o trapanare
il serbatoio della benzina, le tubazioni del carburante, le linee freno
o idrauliche, le linee da vuoto o i cavi elettrici quando si lavora su
qualsiasi veicolo.
7. Mai passare i cavi sotto il veicolo. Si ottiene la protezione migliore
facendo scorrere i cavi all’interno del veicolo.
8. Evitare di passare i cavi sopra o attraverso bordi taglienti. Usare
guarnizioni in gomma o plastica per proteggere i cavi che si fanno
passare attraverso il metallo, soprattutto la parete parafiamma.
9. Proteggere SEMPRE la batteria e il sistema elettrico da danni usando
fusibili adatti. Installare fusibile e portafusibili adeguati sul cavo di
alimentazione da +12V entro 45,7 cm dal terminale della batteria.
10. Quando si collega la messa a terra al telaio del veicolo, raschiare tutta
la vernice dal metallo per garantire una connessione a terra pulita e
salda. Le connessioni a terra dovrebbero essere più corti possibile
e sempre connesse al metallo saldato alla carrozzeria principale o al
telaio del veicolo. Mai usare i bulloni delle cinture di sicurezza per la
connessione a terra.
Funzionamento di base
ACCENDERE E SPEGNERE L’UNITÀ ON/OFF
Premere a lungo il pulsante di accensione per accendere ON o spegnere
OFF l’unità.
REGOLARE IL VOLUME
Ruotare la manopola dell’encoder verso sinistra o verso destra per
selezionare il livello di volume desiderato. Si sentirà un segnale acustico
quando il VOLUME ha raggiunto il livello di volume massimo.
REGOLARE L’USCITA DEL SUBWOOFER
Premere i pulsanti SUB+ o SUB- per regolare il livello di uscita. Si sentirà
un segnale acustico quando le impostazioni hanno raggiunto il valore
minimo e massimo.
SELEZIONARE UNA FONTE PER LA RIPRODUZIONE
Premere il pulsante SRC per scorrere attraverso le opzioni e selezionare
la fonte audio prescelta. Una notifica udibile indica quale fonte è stata
selezionata (MODALITÀ BLUETOOTH>MODALITÀ AUXILLARY).
Funzionamento USB
La porta USB sul retro del dispositivo è solo per gli aggiornamenti firm-
ware e la ricarica dei dispositivi. Non funziona come fonte audio.
Funzionamento AUX
Dopo avere collegato il dispositivo all’unità di fonte, questa funzione con-
sente di riprodurre la musica dal dispositivo. Per selezionare la fonte AUX
premere il pulsante SRC fino a quando si sente “MODALITÀ AUX” emesso
dagli altoparlanti. Usare il dispositivo connesso per scegliere la selezione
di brani/tracce, PLAY/PAUSE e saltare la traccia FWD/REV.
Funzionamento Bluetooth®
Per effettuare il pairing del dispositivo all’unità di fonte andare alle
impostazioni Bluetooth sul dispositivo e selezionare “Rockford PMX0”.
Dopo il pairing iniziale del dispositivo il volume sarà impostato su 25%.
Impostare il volume sul dispositivo su 100% per livello massimo di
potenza sonora.
Dopo avere effettuato il pairing del dispositivo con l’unità di fonte, questa
funzione consente di controllare la riproduzione dal dispositivo diretta-
mente dall’unità. Per selezionare l’opzione di fonte BLUETOOTH sull’unità
di fonte, premere semplicemente il pulsante SRC fino a quando si sente
“MODALITÀ BUETOOTH”.
Per riprodurre o sospendere un brano, premere brevemente il pulsante
PLAY/PAUSE.
Per saltare avanti di un brano, premere brevemente il pulsante FWD. Per
saltare indietro di un brano, premere brevemente il pulsante REV.

14
Italiano
Sintomo / Descrizione Diagnosi Soluzione
Di base
L'unità di fonte non si accende.
Fusibile bruciato
Controllare il fusibile sull'unità, cambiarlo con la portata
corretta.
L'accensione del veicolo è spenta
Se collegata seguendo le istruzioni, l'unità non funzionerà con
l'accensione spenta.
La tensione applicata al cavo rosso non
è tra 10,5 e 16 Volt o non vi è tensione
presente.
Controllare la batteria, i collegamenti e i fusibili e riparare o
cambiare se necessario. Se la tensione supera +16 volt, fare
ispezionare il sistema da un centro di assistenza autorizzato.
L'unità non ha la messa a terra adeguata Controllare i cavi e riparare se necessario.
Dispositivi USB
Impossibile inserire il dispositivo
USB
Il dispositivo USB è stato inserito nella
direzione sbagliata
Invertire la direzione di collegamento del dispositivo USB e
provare a reinserirlo.
Il connettore del dispositivo USB è rotto Sostituire con un nuovo dispositivo USB.
Dispositivo USB non addebiterà
Prolunga potrebbe non essere collegato
in modo corretto e nel male
Controllare il cavo di estensione o sostituire se necessario.
AUX
Nessun audio in modalità MP3
Prolunga potrebbe non essere collegato
in modo corretto e nel male
Controllare il cavo di estensione o sostituire se necessario.

15

16
Rockford Corporation offers a limited warranty on Rockford Fosgate products on the following terms:
Length of Warranty
POWER Amplifiers – 2 Years
BMW
®
Direct Fit Speakers – 2 Years
Source Units – 1 Year
All other products – 1 Year
Any Factory Refurbished Product – 90 days (receipt required)
What is Covered
This warranty applies only to Rockford Fosgate products sold to consumers by Authorized Rockford Fosgate Dealers in the United States of America or its
possessions. Product purchased by consumers from an Authorized Rockford Fosgate Dealer in another country are covered only by that country’s Distribu-
tor and not by Rockford Corporation.
Who is Covered
This warranty covers only the original purchaser of Rockford product purchased from an Authorized Rockford Fosgate Dealer in the United States. In order
to receive service, the purchaser must provide Rockford with a copy of the receipt stating the customer name, dealer name, product purchased and date of
purchase.
Products found to be defective during the warranty period will be repaired or replaced (with a product deemed to be equivalent) at Rockford’s discretion.
What is Not Covered
1. Damage caused by accident, abuse, improper operations,water, theft, shipping.
2. Any cost or expense related to the removal or reinstallation of product.
3. Service performed by anyone other than Rockford or an Authorized Rockford Fosgate Service Center.
4. Any product which has had the serial number defaced, altered, or removed.
5. Subsequent damage to other components.
6. Any product purchased outside the U.S.
7. Any product not purchased from an Authorized Rockford Fosgate Dealer.
Limit on Implied Warranties
Any implied warranties including warranties of fitness for use and merchantability are limited in duration to the period of the express warranty set forth
above. Some states do not allow limitations on the length of an implied warranty, so this limitation may not apply. No person is authorized to assume for
Rockford Fosgate any other liability in connection with the sale of the product.
How to Obtain Service
Contact the Authorized Rockford Fosgate Dealer you purchased this product from. If you need further assistance, call 1-800-669-9899 for Rockford
Customer Service. You must obtain an RA# (Return Authorization number) to return any product to Rockford Fosgate. You are responsible for shipment of
product to Rockford.
EU Warranty
This product meets the current EU warranty requirements, see your Authorized dealer for details.
Warranty
-
 1
1
-
 2
2
-
 3
3
-
 4
4
-
 5
5
-
 6
6
-
 7
7
-
 8
8
-
 9
9
-
 10
10
-
 11
11
-
 12
12
-
 13
13
-
 14
14
-
 15
15
-
 16
16


Rockford Fosgate PMX-0 Manuale del proprietario
- Tipo
- Manuale del proprietario
in altre lingue
Documenti correlati
-
Rockford Fosgate PMX-2 Manuale utente
-
 Rockford Fosgate PMX-3 Manuale utente
-
 Rockford Fosgate Polaris PMX-P2 Istruzioni per l'uso
-
 Rockford Fosgate PMX-HD9813 Manuale del proprietario
-
 Rockford Fosgate T3-BMW-SUB Installation & Operation
-
 Rockford Fosgate PUNCH PMX-BTUR Installation & Operation Manual
-
Rockford Fosgate PMX-8BB Manuale utente
-
 Rockford Fosgate PUNCH PMX-BTUR Installation & Operation Manual
-
 Rockford Fosgate Punch PMX-5 Manuale del proprietario
-
 Rockford Fosgate Punch P325.1 Manuale utente


