
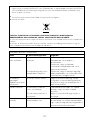
SoupEasy
TYPE CBL01
Instructions
Istruzioni
Instrucciones
Bedienungsanleitungen
Gebruiksaanwijzing
Instrukcja obsługi
Instruções

English 2 - 8
Nederlands 9 - 16
Français 17 - 24
Deutsch 25 - 33
Italiano 34 - 41
Português 42 - 49
Español 50 - 57
Dansk 58 - 64
Svenska 65 - 71
Norsk 72 - 78
Suomi 79 - 85
Türkçe 86 - 92
Česky 93 - 100
Magyar 101 - 108
Polski 109 - 116
Eλληνικά 117 - 125
Slovenčina 126 - 132
Українська 133 - 140
´¸∂w
١٤٧ - ١٤١

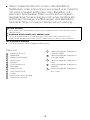
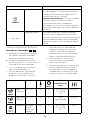
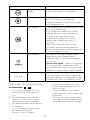
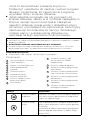
MAX 1.5L
MIN 1.0L
1
12
13
3
2
4
5
6
7
8
9
10
11
14 15 16 17

1
2
MAX 1.5L
MIN 1.0L
1 2
3 4
5
6

1
2
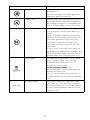
Max
3
MIN
PAUSE
'BEEP' X 10
End
KEEP WARM
X 1
X 1 X 2 X 3 X 4
7
8 9
10
11

3 min
x 2 1L
1
2
CANCEL
'BEEP' X 5
2s
12
13 14
15
16

2
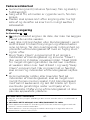
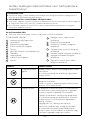
Safety
O
Read these instructions carefully and retain for
future reference.
O
Remove all packaging and any labels.
O
If the plug or cord is damaged it must, for safety
reasons, be replaced by Kenwood or an authorised
Kenwood repairer in order to avoid a hazard.
O
DO NOT touch the sharp blades. Handle the blades
with care to avoid injury when emptying the goblet,
removing the blade from the goblet and during
cleaning.
O
CAUTION: Avoid contact with steam coming out
of the spout area when pouring and out of the lid
during operation.
O
Caution: the outside of the goblet and motor unit
will get hot during use and will remain HOT after
the appliance is switched off. Always remove the
lid using the lid handle and lift and pour using the
goblet handle.
O
Be careful if hot liquid is poured into the appliance
as it can be ejected out of the appliance due to
sudden steaming.
O
Never use a damaged appliance. Get it checked or
repaired: see ‘Service and Customer Care’.
O
Never leave the appliance unattended when it is
operating.
O
Do not fill below the 1 litre minimum level or exceed
the 1.5 litre maximum fill level marked on the inside
of the goblet.
O
CAUTION: Before removing the lid from the goblet
switch off and wait until the blades have completely
stopped.
O
Always switch off the appliance and disconnect
from the supply if it is left unattended and before
assembling, disassembling or cleaning.
O
Do not operate the appliance when empty or below
the minimum fill level.
O
Never let the top section of the motor unit, cord or
plug get wet.
O
Do not let excess cord hang over the edge of a table
or worktop or touch hot surfaces.

O
This appliance should only be used on a stable, flat
heat resistant surface or table.
O
This appliance is not suitable for chopping meat or
processing ice or frozen ingredients.
O
Do not use for heating milk.
O
This appliance is not intended to be operated by
means of an external timer or separate remote-
control system.
O
Misuse of your appliance can result in injury.
O
WARNING: Be careful to avoid any spillage on the
connector, during cleaning, filling or pouring.
O
The heating element surface is subject to residual
heat after use.
O
Caution: Do not operate the appliance on an
inclined surface.
O
Always attach the power supply connector to the
appliance first, then plug into the power supply. To
disconnect, switch off, remove plug from the power
supply first and then the power supply connector
from the appliance.
O
The connector must be removed before the
appliance is cleaned and the connector socket must
be dried before the appliance is used again.
O
Appliances can be used by persons with reduced
physical, sensory or mental capabilities or lack of
experience and knowledge if they have been given
supervision or instruction concerning use of the
appliance in a safe way and if they understand the
hazards involved.
O
Children should be supervised to ensure that they
do not play with the appliance.
O
This appliance shall not be used by children. Keep
the appliance and its cord out of reach of children.
O
Only use the appliance for its intended domestic
use. Kenwood will not accept any liability if the
appliance is subject to improper use, or failure to
comply with these instructions.
Food safety
O
Cook meat (including poultry), fish and seafood
thoroughly.
3

Before plugging in
O
Make sure your electricity supply is the same as the one shown on the underside of your
appliance.
O
This appliance conforms to EC Regulation 1935/2004 on materials and articles intended
to come into contact with food.
Before Using For The First Time
O
Wash the parts: see ‘Care and Cleaning’ section.
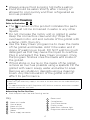
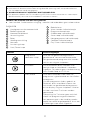
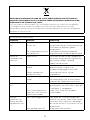
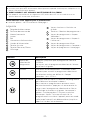
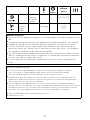
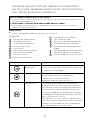
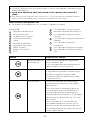
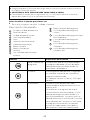
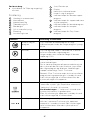
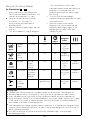
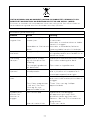
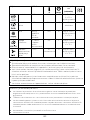
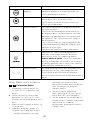
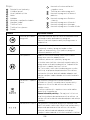
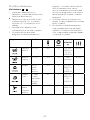
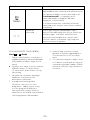
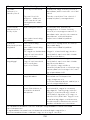
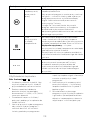
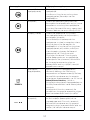
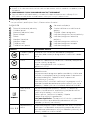
Key
1
Motor unit handle
2
Control panel
3
Motor unit/lid
4
Processing blade
5
Goblet
6
Power supply connector
7
Power cord
8
Cancel button
9
Start/Pause button
10
Display screen
11
Keep Warm indicator light
12
Programme selector button
O
Always ensure food is piping hot before eating.
O
Food should be eaten shortly after cooking or
allowed to cool quickly and then refrigerated as
soon as possible.
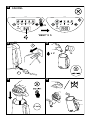
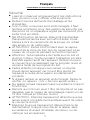
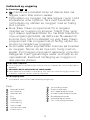
Care and Cleaning
Refer to illustration
13
-
16
O
The marked on the product indicates the parts
that must not be immersed in water or any other
liquids.
O
Do not immerse the motor unit or goblet in water.
Keep the connectors clean and dry. Wipe the
overhead motor unit and outside of the goblet with
a damp cloth, then dry.
O
Use the ‘Easy Clean’ programme to clean the inside
of the goblet and blades. Add 1 litre water and 2
drops of washing up liquid. DO NOT add too much
detergent as this may cause the liquid to overflow.
Plug in and select the ‘Easy Clean’ program. Once
the program finishes rinse the blade and inside of
the goblet.
O
If food sticks or burns on the inside of the goblet,
remove as much as possible using a spatula. Fill the
goblet with warm soapy water and allow to soak.
Remove any stubborn deposits using a cleaning
brush. Any discolouration of the goblet will not
affect its performance.
4

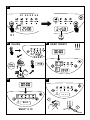
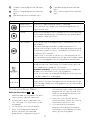
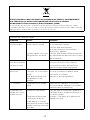
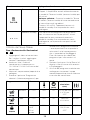
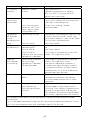
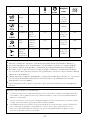
Function Function explained
Programme
selector button
Press until required programme is selected.
The indicator light under the selected programme will
light up and flash.
Cancel Press and hold down for 2 seconds at any time to cancel
the selected programme. The selection will default back
to Smooth Soup and 23:00.
Start/Pause Press once after the programme is selected to start the
countdown.
To pause a programme during operation press this
button and the light under the selected programme and
the display screen will flash. Countdown will pause for a
maximum of 3 minutes.
Note: After 3 minutes of no activity the programme will
be cancelled and the appliance will go into standby mode
until it is unplugged or any of the buttons are pressed.
Keep Warm At the end of the 'Smooth' and 'Chunky' Soup
programmes the Soup Maker will automatically go into
the 'Keep Warm' mode for 40 minutes.
Smooth soup only - During the 'Keep Warm' mode the
blades will intermittently stir the ingredients.
After 40 minutes has elapsed the appliance with go into
standby mode until unplugged.
Standby mode Once a programme has finished or there is no activity for
more than 3 minutes the appliance will automatically go
into standby mode until unplugged or any of the buttons
are pressed.
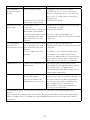
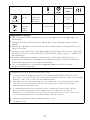
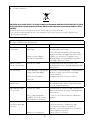
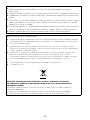
To use your Soup Maker
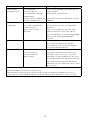
Refer to Illustrations
1 2 3 4 5 6 7 8 9 10
11 12 13 14 15 16 17 18 19 20
21 22 23 24 25 26 27 28 29 30
31 32 33 34 35 36 37 38 39 40
-
1 2 3 4 5 6 7 8 9 10
11
12 13 14 15 16 17 18 19 20
21 22 23 24 25 26 27 28 29 30
31 32 33 34 35 36 37 38 39 40
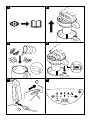
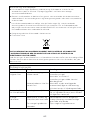
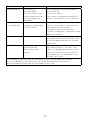
1 Add the food to the goblet. For best
results always add the liquid last.
l
Ensure the fill level is between the
1.0 L MIN and 1.5 L MAX mark inside
the goblet.
2 Fit the motor unit/lid and plug in.
3 Press the 'Programme selector'
button to select the required
programme – keep pressing until
the indicator light under the relevant
programme will light up and flash.
Refer to the programme chart for
timing information.
4 Press the 'Start/Pause' button
and the display screen will start to
countdown and
: will flash.
5 At the end of the selected
programme unplug and remove
the motor unit/lid before lifting or
pouring from the goblet.
1
2
3
4
5
6
7
8
9
10
11
12
13
14
15
16
17
18
19
20
21
22
23
24
25
26
27
28
29
30
31
32
33
34
35
36
37
38
39
40
41
42
43
44
45
46
47
48
49
50
51
52
53
54
55
56
57
58
59
60
61
62
63
64
65
66
67
68
69
70
71
72
73
74
75
76
77
78
79
80
81
82
83
84
85
86
87
88
89
90
91
92
93
94
95
96
97
98
99
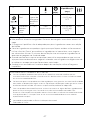
Smooth Soup programme indicator
light
1
2
3
4
5
6
7
8
9
10
11
12
13
14
15
16
17
18
19
20
21
22
23
24
25
26
27
28
29
30
31
32
33
34
35
36
37
38
39
40
41
42
43
44
45
46
47
48
49
50
51
52
53
54
55
56
57
58
59
60
61
62
63
64
65
66
67
68
69
70
71
72
73
74
75
76
77
78
79
80
81
82
83
84
85
86
87
88
89
90
91
92
93
94
95
96
97
98
99
Chunky Soup programme indicator
light
1
2
3
4
5
6
7
8
9
10
11
12
13
14
15
16
17
18
19
20
21
22
23
24
25
26
27
28
29
30
31
32
33
34
35
36
37
38
39
40
41
42
43
44
45
46
47
48
49
50
51
52
53
54
55
56
57
58
59
60
61
62
63
64
65
66
67
68
69
70
71
72
73
74
75
76
77
78
79
80
81
82
83
84
85
86
87
88
89
90
91
92
93
94
95
96
97
98
99
Blend programme indicator light
1
2
3
4
5
6
7
8
9
10
11
12
13
14
15
16
17
18
19
20
21
22
23
24
25
26
27
28
29
30
31
32
33
34
35
36
37
38
39
40
41
42
43
44
45
46
47
48
49
50
51
52
53
54
55
56
57
58
59
60
61
62
63
64
65
66
67
68
69
70
71
72
73
74
75
76
77
78
79
80
81
82
83
84
85
86
87
88
89
90
91
92
93
94
95
96
97
98
99
Compote programme indicator
light
1
2
3
4
5
6
7
8
9
10
11
12
13
14
15
16
17
18
19
20
21
22
23
24
25
26
27
28
29
30
31
32
33
34
35
36
37
38
39
40
41
42
43
44
45
46
47
48
49
50
51
52
53
54
55
56
57
58
59
60
61
62
63
64
65
66
67
68
69
70
71
72
73
74
75
76
77
78
79
80
81
82
83
84
85
86
87
88
89
90
91
92
93
94
95
96
97
98
99
Easy Clean programme indicator
light
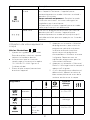
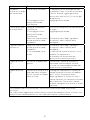
4 5

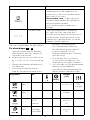
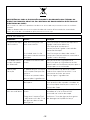
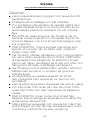
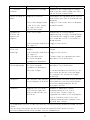
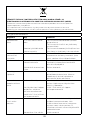
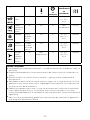
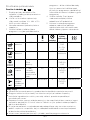
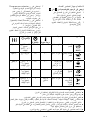
Programme Qty
°C
(mins)
Blending
Cycle
(secs)
Smooth
Soup
1 L – 1.5 L 100 23 3 X 30s
ON
2 X 30s
OFF
40 mins
Chunky
Soup
1 L – 1.5 L 100 25 No
blending
40 mins
Compote 800g Fruit
150ml
liquid
100 21 6 X 10s
ON/10s
OFF
N/A
Easy
Clean
1 L water
2 drops of
washing up
liquid
60 3 6 X 15s
ON/15s
OFF
N/A
Blend
Drinks
Chilled
Soups
1 L – 1.5 L No heating 4 6 X 25s
ON/15s
OFF
N/A
Hints and Tips
O
Do not process frozen food allow to defrost before adding to the goblet.
O
The blend programme is not suitable for chopping dry ingredients without liquid.
O
Cut ingredients into even sized pieces as this will assist with even cooking.
O
Use the 'Pause' function to add food items such as milk, cream, yoghurt etc., during
the last 10 minutes of cooking. This will prevent food burning or sticking to the
bottom of the goblet.
O
When making soups and where required we recommend that meats are browned
and vegetables sautéed in a pan on the stove prior to adding to the blending goblet
to ensure cooked thoroughly.
O
If you require a smoother result after cooking use the blending programme.
Service and Customer Care
O
If you experience any problems with the operation of your appliance, before
requesting assistance refer to the ‘Troubleshooting Guide’ section in the manual or visit
www.kenwoodworld.com.
O
Please note that your product is covered by a warranty, which complies with all legal
provisions concerning any existing warranty and consumer rights in the country where
the product was purchased.
O
If your Kenwood product malfunctions or you find any defects, please send it or bring it
to an authorised KENWOOD Service Centre. To find up to date details of your nearest
authorised KENWOOD Service centre visit www.kenwoodworld.com or the website
specific to your Country.
O
Designed and engineered by Kenwood in the UK.
O
Made in China.
6

IMPORTANT INFORMATION FOR CORRECT DISPOSAL OF THE PRODUCT IN
ACCORDANCE WITH THE EUROPEAN DIRECTIVE ON WASTE ELECTRICAL AND
ELECTRONIC EQUIPMENT (WEEE)
At the end of its working life, the product must not be disposed of as urban waste. It must
be taken to a special local authority differentiated waste collection centre or to a dealer
providing this service.
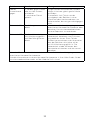
Troubleshooting Guide
Problem Cause Solution
Soup Maker not
operating.
No power and no lights
on.
The motor unit is not
locked on correctly.
Check Soup Maker is plugged into the
power supply.
Check that the power supply
connector is fitted to the goblet
correctly.
Check that overhead motor unit/lid is
fitted and connected to handle area
correctly.
Motor Unit/lid
cannot be fitted.
Goblet overfilled. Remove some of the ingredients and
ensure the ingredients is spread evenly
to allow the lid to be fitted.
Excessive
vibrations.
The appliance is unstable
and not on a flat surface.
Too much ingredients
being processed.
This appliance should only be used on
a stable, flat heat resistant surface or
table.
Remove some of the ingredients.
---- shown on
screen.
Appliance in standby
mode.
Unplug if the cooking process is
finished or press any button to
reactivate the Soup Maker.
Liquid splashing
out of spout area.
Goblet overfilled.
Easy Clean programme –
more than 1 litre of water
added and too much
detergent added.
Check that ingredients not filled above
the max level marked inside the goblet.
Add 1 litre water and 2 drops of
washing up liquid.
Ingredients
burning on the
bottom of the
goblet.
Milk being heated.
Insucient liquid added.
The appliance is not designed to heat
up milk. Use the 'Pause' function and
add milk, cream etc within last 5-10
minutes of the programme.
Add more liquid.
7

Troubleshooting Guide
Problem Cause Solution
Poor Blending
performance.
Insucient processing
time.
Insucient liquid added.
Large pieces of food or
too much ingredients
being processed.
Restart the programme and blend for
longer.
Add more liquid.
Remove some of the ingredients and
chopped the food down into small
even sized pieces.
Food insuciently
cooked
Large pieces of food or
too much ingredients
being processed.
Raw meat being cooked.
Remove some of the ingredients and
chopped the food down into small
even sized pieces.
It is recommend that meats are
browned in a pan on the stove prior
to adding to the blending goblet to
ensure cooked thoroughly.
Error code E0 Overfill sensor faulty. Contact your nearest authorised
Kenwood Service Centre or visit
www.kenwoodworld.com to arrange
repair.
Error code EF Goblet filled above MAX
mark and overfill sensor
activated.
Unplug the appliance, remove the
motor unit and leave to cool for
3 minutes. Remove some of the
ingredients and ensure that not filled
above the MAX level. Refit the motor
unit, plug in and operate as normal.
If the problem persists contact your nearest authorised Kenwood Service Centre.
To find up to date details of your nearest Kenwood Service Centre visit
www.kenwoodworld.com or the website specific to your country.
8

Nederlands
Vouw voor het lezen a.u.b. de voorpagina met illustraties uit
Veiligheid
O
Lees deze instructies zorgvuldig door en bewaar ze
voor toekomstig gebruik.
O
Verwijder de verpakking en alle labels.
O
Als de stekker of het snoer beschadigd is, moet het
om veiligheidsredenen door Kenwood of een door
Kenwood geautoriseerd reparatiebedrijf vervangen
worden, om gevaar te voorkomen.
O
Raak de scherpe messen NIET aan. Behandel de
messen tijdens het verwijderen en schoonmaken van
de beker met zorg om letsel te voorkomen.
O
LET OP: Vermijd contact met stoom als deze tijdens
het afgieten uit de tuit of het deksel komt.
O
Let op: de buitenzijde van de beker en de
motoreenheid wordt tijdens het gebruik heet en
blijft HEET nadat het apparaat is uitgeschakeld.
Verwijder altijd het deksel met behulp van de
dekselgreep en hef en giet met behulp van de
speciale greep.
O
Wees voorzichtig wanneer u hete vloeistof in de
keukenmachine giet, omdat deze vloeistof plotseling
in de vorm van stoom weer uit het apparaat kan
ontsnappen.
O
Gebruik nooit een beschadigd apparaat. Laat
het nakijken of repareren: zie 'Onderhoud en
klantenservice'.
O
Laat het apparaat nooit onbeheerd terwijl het aan
staat.
O
Vul niet onder het minimumniveau van 1 liter of
boven het maximumniveau van 1,5 liter: dit is aan de
binnenkant van de beker aangegeven.
O
LET OP: Vooraleer het deksel van de beker te
verwijderen, moet u wachten tot de bladen volledig
zijn gestopt.
O
Schakel het apparaat altijd uit en koppel het los
van het stopcontact als deze onbeheerd wordt
achtergelaten vóór montage, demontage of
reiniging.
9

O
Gebruik het apparaat niet als het leeg is of onder
het minimale vulniveau is.
O
Laat het bovenste gedeelte van de motoreenheid,
het snoer of de stekker nooit nat worden.
O
Laat het snoer nooit over de rand van een tafel of
werkblad hangen of in aanraking komen met hete
oppervlakken.
O
Dit apparaat mag alleen worden gebruikt op een
stabiele, vlakke, hittebestendige ondergrond of tafel.
O
Dit apparaat is niet geschikt voor het hakken van vlees
of het verwerken van ijs of bevroren ingrediënten.
O
Gebruik het niet voor het verwarmen van melk.
O
Deze machine kan niet worden bediend met een
externe timer of een afzonderlijke afstandsbediening.
O
Misbruik van dit apparaat kan persoonlijk letsel
veroorzaken.
O
WAARSCHUWING: Wees voorzichtig met morsen
op de connector, tijdens het reinigen, vullen of
gieten.
O
Het oppervlak van het verwarmingselement is na
gebruik onderhevig aan restwarmte.
O
Voorzichtig: Gebruik het apparaat niet op een
hellend oppervlak.
O
Sluit altijd eerst de voedingsaansluiting aan op het
apparaat en steek dan de stekker in het stopcontact.
Om het apparaat uit te schakelen, moet u eerst
de stekker uit het stopcontact halen, uitzetten en
vervolgens de voedingsaansluiting verwijderen.
O
De stekker moet worden verwijderd voordat het
apparaat wordt gereinigd en de stekkerdoos moet
worden gedroogd voordat het apparaat weer wordt
gebruikt.
O
Dit apparaat kan worden gebruikt door personen
met verminderde lichamelijke, sensorische of
geestelijke capaciteiten of gebrek aan ervaring en
kennis mits ze onder toezicht staan of instructie
hebben gekregen over het veilige gebruik van het
apparaat, en de betrokken risico’s begrijpen.
O
Op kinderen moet toezicht gehouden worden om
er zeker van te zijn dat ze niet met het apparaat
spelen.
O
Dit apparaat mag niet door kinderen worden
10

gebruikt. Houd het apparaat en het snoer buiten
het bereik van kinderen.
O
Gebruik het apparaat alleen voor het huishoudelijke
gebruik waarvoor het is bedoeld. Kenwood kan niet
aansprakelijk worden gesteld in als het apparaat is
misbruikt of als deze instructies niet zijn opgevolgd.
Voedselveiligheid
O
Kook vlees (ook gevogelte), vis en zeevruchten
grondig.
O
Zorg er altijd voor dat het voedsel heet en gaar is
voordat u gaat eten.
O
Het voedsel moet kort na het koken worden
gegeten of snel worden afgekoeld en vervolgens
worden zo snel mogelijk worden gekoeld.
Onderhoud en reiniging
Zie afbeeldingen
13
-
16
O
Het op het product geeft de onderdelen aan die
niet mogen worden ondergedompeld in water of
andere vloeistoffen.
O
Dompel de motoreenheid of de beker niet onder in
water. Houd de connectoren schoon en droog. Veeg
de bovenliggende motoreenheid en de buitenkant
van de beker schoon met een vochtige doek, dan
drogen.
O
Gebruik het 'Easy Clean' programma om de
binnenkant van de beker en de messen te reinigen.
Voeg 1 liter water toe en 2 druppels afwasmiddel.
Voeg NIET te veel afwasmiddel toe, omdat dit de
vloeistof kan doen overlopen. Sluit het apparaat
aan en selecteer het programma 'Easy Clean'. Als
het programma klaar is, spoel dan het mes en de
binnenkant van de beker af.
O
Als het voedsel aan de binnenkant van de beker
blijft plakken of verbrandt is, verwijder dan zoveel
mogelijk met behulp van een spatel. Vul de beker
met warm zeepwater en laat weken. Verwijder
hardnekkige afzettingen met een reinigingsborstel.
Eventuele verkleuringen van de beker hebben geen
invloed op de prestaties.
11

Voordat u de stekker in het stopcontact steekt
O
Controleer of de elektriciteitsvoorziening dezelfde spanning heeft als op de onderkant
van het apparaat wordt aangegeven.
O
WAARSCHUWING: DIT APPARAAT MOET GEAARD ZIJN.
O
Dit apparaat voldoet aan EG Verordening 1935/2004 inzake materialen en voorwerpen
die bestemd zijn om met levensmiddelen in contact te komen.
Voordat u de machine voor het eerst gebruikt
O
Lees het deel ‘Onderhoud en reiniging’, voordat u de onderdelen gaat schoonmaken.
Legenda
1
Handgreep van de motoreenheid
2
Bedieningspaneel
3
Motoreenheid/deksel
4
Verwerkingsmes
5
Beker
6
Voedingsaansluiting
7
Netsnoer
8
Annuleringsknop
9
Start/Pauze knop
10
Beeldscherm
11
Warm houden indicatielampje
12
Programmakeuzeknop
13
Gladde soep indicatielampje
14
Grove soep indicatielampje
15
Mengprogramma indicatielampje
16
Compote indicatielampje
17
Easy Clean indicatielampje
Functies Functie uitgelegd
Programma
selecteren knop
Druk tot het gewenste programma is
geselecteerd. Het controlelampje onder
het geselecteerde programma zal worden
verlicht en zal gaan knipperen.
Annuleren Om te annuleren drukt u op een wille-
keurige knop en houd deze 2 seconden
ingedrukt. De selectie gaat standaard terug
naar Gladde Soep en 23:00 uur.
Start/Pauze Druk eenmaal op de knop nadat het
programma is geselecteerd om het aftellen
te beginnen.
Om een programma tijdens gebruik te
Pauzeren, drukt u op deze knop en het
licht onder het geselecteerd programma
en het display zal gaan knipperen. Aftellen
zal voor maximaal 3 minuten worden
gepauzeerd.
Opmerking: Na 3 minuten geen activiteit
wordt het programma geannuleerd en
het apparaat gaat in de stand-by-modus
totdat het wordt losgekoppeld of als er een
willekeurige knop wordt ingedrukt.
12

Function Function explained
Warm houden Aan het einde van de 'Glad' en 'Grove'.
Soepprogramma's de Soepmaker zal
automatisch in de Warm Houden modus'
gaan voor 40 minuten.
Alleen gladde soep - Tijdens de Warm
Houden-modus worden de ingredienten
met tussenpozen geroerd.
Na 40 minuten gaat het apparaat in
standby.
Standby mode Zodra een programma is voltooid of
er is geen activiteit voor meer dan 3
minuten gaat het apparaat automatisch in
stand-bymodus totdat de stekker uit het
stopcontact is gehaald of een van de de
knoppen worden ingedrukt.
Om uw soepmaker te gebruiken
Zie afbeeldingen
1
-
12
1 Voeg het voedsel toe aan de beker.
Voor de beste resultaten voegt u als
laatste de vloeistof toe.
O
Zorg ervoor dat het vulniveau tussen
de 1,0 L MIN- en 1,5 L MAX-markering
is.
2 Monteer de motoreenheid/deksel en
sluit deze aan.
3 Druk op de "Programmakiezer".
knop om het gewenste programma
te kiezen - blijf drukken tot
het indicatielampje onder het
betreffende programma oplicht.
en gaat knipperen. Zie het
programmaboekje voor informatie
over de timing.
4 Druk op de knop 'Start/Pauze'.
en het scherm zal beginnen met
Aftellenen en
: zal gaan knipperen.
5 Aan het einde van het geselecteerde
programma ontkoppelt en
verwijderd u de motoreenheid/het
deksel voordat u de beker afgiet.
Programma Qty
° C
(mins)
Mengen
(sec)
Gladde
Soep
1 L – 1,5 L 100 23 3 X 30s AAN
2 x 30s UIT
40 min
Niet
mengen
Grove
Soep
1 L – 1,5 L 100 25 Niet
mengen
40 min
Compote 800g Fruit,
150 ml
vloeistof
100 21 6 X 10s
AAN/10s
UIT
N/A
Easy
Clean
1 L water
2 druppels
afwasmiddel
100 3 6 X 15s
AAN/15s
UIT
N/A
13

Programma Qty
° C
(mins)
Mengen
(sec)
Gemengde
drankjes
Koude
Soepen
1 L – 1,5 L Geen
verwarming
4 6 X 25s
AAN/15s
UIT
N/A
Tips
O
Verwerk bevroren voedsel niet, laat het eerst ontdooien alvorens het aan de beker
toe te voegen.
O
Het mengprogramma is niet geschikt voor het snijden van droge ingrediënten
zonder vloeistof.
O
Snij de ingrediënten in even grote stukken omdat dit helpt bij het gelijkmatig koken.
O
Gebruik de 'Pauze' functie om tijdens de laatste 10 minuten van het koken
voedingsmiddelen toe te voegen zoals melk, room, yoghurt enz. Dit voorkomt dat
het voedsel verbrandt of aan de bodem van de beker blijft plakken.
O
Bij het maken van soepen en waar nodig adviseren wij om het vlees te bruinen.
Groenten worden het beste in een pan op het fornuis gebakken voordat ze aan de
mengbeker worden toegevoegd. Hierdoor worden ze grondig worden gekookt.
O
Als u een gladder resultaat wenst na het koken, gebruik dan het mengprogramma.
Onderhoud en klantenservice
O
Als u problemen ondervindt met de werking van de machine, raadpleegt u de informatie
onder ‘Problemen oplossen’ in deze handleiding of gaat u naar www.kenwoodworld.com.
O
Dit product is gedekt door een garantie die voldoet aan alle wettelijke regels voor
bestaande garanties en consumentenrechten die gelden in het land waar het product is
gekocht.
O
Als uw Kenwood product niet goed functioneert of als u defecten opmerkt, kunt u het
naar een erkend Service Center van KENWOOD sturen of brengen. Voor informatie over
het KENWOOD Service Center in uw buurt gaat u naar www.kenwoodworld.com of naar
de specifieke website in uw land.
O
Ontworpen en ontwikkeld door Kenwood in het VK.
O
Vervaardigd in China.
14

Problemen oplossen
Probleem Oorzaak Oplossing
Soepmaker werkt
niet.
Geen stroom en geen
lichten aan.
De stroomvoorziening zit
niet goed vast.
Controleer of de Soepmaker is
aangesloten op de Stroomvoorziening.
Controleer of de beker goed is
aangesloten.
Controleer of de bovenliggende
motoreenheid/het deksel gemonteerd
Deksel of
stroomeenheid
past niet
Beker te vol Verwijder enkele van de ingrediënten
en ervoor zorgen dat de ingrediënten
gelijkmatig worden verdeeld
zodat het deksel past.
Teveel trillingen Het apparaat is niet
stabiel
Teveel ingredienten
worden verwerkt.
Dit apparaat mag alleen worden
gebruikt op een stabiel, vlak
hittebestendig oppervlak of tafel.
Verwijder een aantal van de
ingrediënten.
---- op het scherm Apparaat in standby
mode.
Trek de stekker uit het stopcontact als
het kookproces klaar of druk op een
knop om de Soepmaker reactiveren.
Spetteren uit de
tuit
Beker te vol
Easy Clean programma –
Meer dan 1 liter water en
teveel afwasmiddel.
Controleer of de ingrediënten niet zijn
gevuld boven het maximale niveau dat
in de beker is aangegeven.
Voeg 1 liter water en 2 druppels
afwasmiddel.
Aan de
onderkant van
de pan branden
ingredienten aan.
Melk wordt opgewarmd.
NIet genoeg vloeistof
Het apparaat is niet ontworpen om
melk te verwarmen. Gebruik de 'Pauze'
functie en melk, room enz. toevoegen
binnen de laatste 5-10 minuten van het
programma.
Voeg meer vloeistof toe.
BELANGRIJKE INFORMATIE VOOR DE JUISTE VERWIJDERING VAN HET PRODUCT
VOLGENS DE EUROPESE RICHTLIJN BETREFFENDE AFGEDANKTE ELEKTRISCHE EN
ELEKTRONISCHE APPARATUUR (AEEA)
Aan het einde van de levensduur van het product mag het niet samen met het gewone
huishoudelijke afval worden verwijderd. Het moet naar een speciaal centrum voor
gescheiden afvalinzameling van de gemeente worden gebracht, of naar een verkooppunt
dat deze service verschaft.
15
La pagina si sta caricando...
La pagina si sta caricando...
La pagina si sta caricando...
La pagina si sta caricando...
La pagina si sta caricando...
La pagina si sta caricando...
La pagina si sta caricando...
La pagina si sta caricando...
La pagina si sta caricando...
La pagina si sta caricando...
La pagina si sta caricando...
La pagina si sta caricando...
La pagina si sta caricando...
La pagina si sta caricando...
La pagina si sta caricando...
La pagina si sta caricando...
La pagina si sta caricando...
La pagina si sta caricando...
La pagina si sta caricando...
La pagina si sta caricando...
La pagina si sta caricando...
La pagina si sta caricando...
La pagina si sta caricando...
La pagina si sta caricando...
La pagina si sta caricando...
La pagina si sta caricando...
La pagina si sta caricando...
La pagina si sta caricando...
La pagina si sta caricando...
La pagina si sta caricando...
La pagina si sta caricando...
La pagina si sta caricando...
La pagina si sta caricando...
La pagina si sta caricando...
La pagina si sta caricando...
La pagina si sta caricando...
La pagina si sta caricando...
La pagina si sta caricando...
La pagina si sta caricando...
La pagina si sta caricando...
La pagina si sta caricando...
La pagina si sta caricando...
La pagina si sta caricando...
La pagina si sta caricando...
La pagina si sta caricando...
La pagina si sta caricando...
La pagina si sta caricando...
La pagina si sta caricando...
La pagina si sta caricando...
La pagina si sta caricando...
La pagina si sta caricando...
La pagina si sta caricando...
La pagina si sta caricando...
La pagina si sta caricando...
La pagina si sta caricando...
La pagina si sta caricando...
La pagina si sta caricando...
La pagina si sta caricando...
La pagina si sta caricando...
La pagina si sta caricando...
La pagina si sta caricando...
La pagina si sta caricando...
La pagina si sta caricando...
La pagina si sta caricando...
La pagina si sta caricando...
La pagina si sta caricando...
La pagina si sta caricando...
La pagina si sta caricando...
La pagina si sta caricando...
La pagina si sta caricando...
La pagina si sta caricando...
La pagina si sta caricando...
La pagina si sta caricando...
La pagina si sta caricando...
La pagina si sta caricando...
La pagina si sta caricando...
La pagina si sta caricando...
La pagina si sta caricando...
La pagina si sta caricando...
La pagina si sta caricando...
La pagina si sta caricando...
La pagina si sta caricando...
La pagina si sta caricando...
La pagina si sta caricando...
La pagina si sta caricando...
La pagina si sta caricando...
La pagina si sta caricando...
La pagina si sta caricando...
La pagina si sta caricando...
La pagina si sta caricando...
La pagina si sta caricando...
La pagina si sta caricando...
La pagina si sta caricando...
La pagina si sta caricando...
La pagina si sta caricando...
La pagina si sta caricando...
La pagina si sta caricando...
La pagina si sta caricando...
La pagina si sta caricando...
La pagina si sta caricando...
La pagina si sta caricando...
La pagina si sta caricando...
La pagina si sta caricando...
La pagina si sta caricando...
La pagina si sta caricando...
La pagina si sta caricando...
La pagina si sta caricando...
La pagina si sta caricando...
La pagina si sta caricando...
La pagina si sta caricando...
La pagina si sta caricando...
La pagina si sta caricando...
La pagina si sta caricando...
La pagina si sta caricando...
La pagina si sta caricando...
La pagina si sta caricando...
La pagina si sta caricando...
La pagina si sta caricando...
La pagina si sta caricando...
La pagina si sta caricando...
La pagina si sta caricando...
La pagina si sta caricando...
La pagina si sta caricando...
La pagina si sta caricando...
La pagina si sta caricando...
La pagina si sta caricando...
La pagina si sta caricando...
La pagina si sta caricando...
La pagina si sta caricando...
La pagina si sta caricando...
La pagina si sta caricando...
La pagina si sta caricando...
La pagina si sta caricando...
La pagina si sta caricando...
-
 1
1
-
 2
2
-
 3
3
-
 4
4
-
 5
5
-
 6
6
-
 7
7
-
 8
8
-
 9
9
-
 10
10
-
 11
11
-
 12
12
-
 13
13
-
 14
14
-
 15
15
-
 16
16
-
 17
17
-
 18
18
-
 19
19
-
 20
20
-
 21
21
-
 22
22
-
 23
23
-
 24
24
-
 25
25
-
 26
26
-
 27
27
-
 28
28
-
 29
29
-
 30
30
-
 31
31
-
 32
32
-
 33
33
-
 34
34
-
 35
35
-
 36
36
-
 37
37
-
 38
38
-
 39
39
-
 40
40
-
 41
41
-
 42
42
-
 43
43
-
 44
44
-
 45
45
-
 46
46
-
 47
47
-
 48
48
-
 49
49
-
 50
50
-
 51
51
-
 52
52
-
 53
53
-
 54
54
-
 55
55
-
 56
56
-
 57
57
-
 58
58
-
 59
59
-
 60
60
-
 61
61
-
 62
62
-
 63
63
-
 64
64
-
 65
65
-
 66
66
-
 67
67
-
 68
68
-
 69
69
-
 70
70
-
 71
71
-
 72
72
-
 73
73
-
 74
74
-
 75
75
-
 76
76
-
 77
77
-
 78
78
-
 79
79
-
 80
80
-
 81
81
-
 82
82
-
 83
83
-
 84
84
-
 85
85
-
 86
86
-
 87
87
-
 88
88
-
 89
89
-
 90
90
-
 91
91
-
 92
92
-
 93
93
-
 94
94
-
 95
95
-
 96
96
-
 97
97
-
 98
98
-
 99
99
-
 100
100
-
 101
101
-
 102
102
-
 103
103
-
 104
104
-
 105
105
-
 106
106
-
 107
107
-
 108
108
-
 109
109
-
 110
110
-
 111
111
-
 112
112
-
 113
113
-
 114
114
-
 115
115
-
 116
116
-
 117
117
-
 118
118
-
 119
119
-
 120
120
-
 121
121
-
 122
122
-
 123
123
-
 124
124
-
 125
125
-
 126
126
-
 127
127
-
 128
128
-
 129
129
-
 130
130
-
 131
131
-
 132
132
-
 133
133
-
 134
134
-
 135
135
-
 136
136
-
 137
137
-
 138
138
-
 139
139
-
 140
140
-
 141
141
-
 142
142
-
 143
143
-
 144
144
-
 145
145
-
 146
146
-
 147
147
-
 148
148
-
 149
149
-
 150
150
-
 151
151
-
 152
152
-
 153
153
-
 154
154


Kenwood CBL01 Manuale del proprietario
- Tipo
- Manuale del proprietario
- Questo manuale è adatto anche per
in altre lingue
- français: Kenwood CBL01 Le manuel du propriétaire
- slovenčina: Kenwood CBL01 Návod na obsluhu
- dansk: Kenwood CBL01 Brugervejledning