MSI A88X-G41 PC Mate V2 Manuale del proprietario
- Categoria
- Schede madri
- Tipo
- Manuale del proprietario
Questo manuale è adatto anche per

A88X-G41 PC Mate V2
Motherboard
G52-77931XP
Preface

ii
Preface
Preface
Copyright Notice
The material in this document is the intellectual property of MICRO-STAR
INTERNATIONAL. We take every care in the preparation of this document, but no
guarantee is given as to the correctness of its contents. Our products are under
continual improvement and we reserve the right to make changes without notice.
Trademarks
All trademarks in this manual are properties of their respective owners.
MSI
®
is registered trademark of Micro-Star Int’l Co.,Ltd.
NVIDIA
®
is registered trademark of NVIDIA Corporation.
ATI
®
is registered trademark of AMD Corporation.
AMD
®
is registered trademarks of AMD Corporation.
Intel
®
is registered trademarks of Intel Corporation.
Windows
®
is registered trademarks of Microsoft Corporation.
AMI
®
is registered trademark of American Megatrends Inc.
Award
®
is a registered trademark of Phoenix Technologies Ltd.
Sound Blaster
®
is registered trademark of Creative Technology Ltd.
Realtek
®
is registered trademark of Realtek Semiconductor Corporation.
JMicron
®
is registered trademark of JMicron Technology Corporation.
Netware
®
is registered trademark of Novell, Inc.
Lucid
®
is trademark of LucidLogix Technologies, Ltd.
VIA
®
is registered trademark of VIA Technologies, Inc.
ASMedia
®
is registered trademark of ASMedia Technology Inc.
iPad, iPhone, and iPod are trademarks of Apple Inc.
Qualcomm Atheros and Killer are trademarks of Qualcomm Atheros Inc.
Revision History
Revision Revision History Date
V3.0 First release 2013/ 10
V3.1 Add A88X-G41 PC Mate 2013/ 12
V3.2 Add A58-G41 PC Mate 2014/ 02
V3.3 For A88X-G41 PC Mate V2 2015/ 02

Preface
iii
Preface
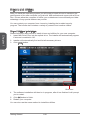
Smartphone Application
MSI
+
is a smart web gadget that works as a shopping navigator and
provides specs comparison for IT buyers. With a simple tap of the
variety of choices and, if product details are required, you may easily
download user manuals within minutes. Better yet, the power calculator
provides accurate estimates of power unit capacity for DIY users.
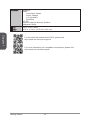
Technical Support
If a problem arises with your system and no solution can be obtained from the user’s
manual, please contact your place of purchase or local distributor. Alternatively,
please try the following help resources for further guidance.
Visit the MSI website for technical guide, BIOS
updates, driver updates, and other information:
http://www.msi.com/support/
http://register.msi.com/

iv
Preface
Preface
Safety Instructions
Always read the safety instructions carefully.
Keep this User’s Manual for future reference.
Keep this equipment away from humidity.
The openings on the enclosure are for air convection hence protects the equipment
from overheating. DO NOT COVER THE OPENINGS.
Make sure the voltage of the power source is at 110/220V before connecting the
equipment to the power inlet.
Place the power cord such a way that people can not step on it. Do not place
anything over the power cord.
Always Unplug the Power Cord before inserting any add-on card or module.
All cautions and warnings on the equipment should be noted.
Never pour any liquid into the opening that can cause damage or cause electrical
shock.
If any of the following situations arises, get the equipment checked by service
personnel:
The power cord or plug is damaged.
Liquid has penetrated into the equipment.
The equipment has been exposed to moisture.
The equipment does not work well or you can not get it work according to
User’s Manual.
The equipment has been dropped and damaged.
The equipment has obvious sign of breakage.
DO NOT LEAVE THIS EQUIPMENT IN AN ENVIRONMENT ABOVE 60
o
C (140
o
F),
IT MAY DAMAGE THE EQUIPMENT.

Preface
v
Preface
CE Conformity
Hereby, Micro-Star International CO., LTD declares that this device is
in compliance with the essential safety requirements and other relevant
provisions set out in the European Directive.
FCC-B Radio Frequency Interference Statement
This equipment has been tested and found to comply with the limits for a Class B
digital device, pursuant to Part 15 of the FCC Rules. These limits are designed to
provide reasonable protection against harmful interference in a residential installation.
This equipment generates, uses and can radiate radio frequency energy and, if not
installed and used in accordance with the instructions, may cause harmful interference
to radio communications. However, there is no guarantee that interference will not
occur in a particular installation. If this equipment does cause harmful interference to
and on, the user is encouraged to try to correct the interference by one or more of the
measures listed below.
Reorient or relocate the receiving antenna.
Increase the separation between the equipment and receiver.
the receiver is connected.
Consult the dealer or an experienced radio/television technician for help.
Notice 1
compliance could void the user’s authority to operate the equipment.
Notice 2
Shielded interface cables and A.C. power cord, if any, must be used in order to comply
with the emission limits.
VOIR LA NOTICE D’INSTALLATION AVANT DE RACCORDER AU RESEAU.
This device complies with Part 15 of the FCC Rules. Operation is subject to the
following two conditions:
1) this device may not cause harmful interference, and
2) this device must accept any interference received, including interference that may
cause undesired operation.
Micro-Star International
MS-7793

vi
Preface
Preface
Radiation Exposure Statement
This equipment complies with FCC radiation exposure limits set forth for an
uncontrolled environment. This equipment and its antenna should be installed and
operated with minimum distance 20 cm between the radiator and your body. This
equipment and its antenna must not be co-located or operating in conjunction with any
other antenna or transmitter.
European Community Compliance Statement
The equipment complies with the RF Exposure Requirement 1999/519/EC, Council
Recommendation of 12 July 1999 on the limitation of exposure of the general public
Directive.
Taiwan Wireless Statements
Japan VCCI Class B Statement
Korea Warning Statements

Preface
vii
Preface
California, USA:
The button cell battery may contain perchlorate material and requires
special handling when recycled or disposed of in California.
For further information please visit:
Taiwan:
For better environmental protection, waste batteries should be collected
separately for recycling or special disposal.
European Union:
Batteries, battery packs, and accumulators should not be disposed of
as unsorted household waste. Please use the public collection system
to return, recycle, or treat them in compliance with the local regulations.
Battery Information
Chemical Substances Information
In compliance with chemical substances regulations, such as the EU REACH
Regulation (Regulation EC No. 1907/2006 of the European Parliament and the
Council), MSI provides the information of chemical substances in products at:
http://www.msi.com/html/popup/csr/evmtprtt_pcm.html
CAUTION: There is a risk of explosion, if battery is incorrectly replaced.
Replace only with the same or equivalent type recommended by the manufacturer.

viii
Preface
Preface
WEEE (Waste Electrical and Electronic Equipment) Statement
ENGLISH
To protect the global environment and as an environmentalist, MSI must
remind you that...
Under the European Union (“EU”) Directive on Waste Electrical and
13, 2005, products of “electrical and electronic equipment” cannot be
discarded as municipal wastes anymore, and manufacturers of covered
electronic equipment will be obligated to take back such products at the end of their
useful life. MSI will comply with the product take back requirements at the end of life
of MSI-branded products that are sold into the EU. You can return these products to
local collection points.
DEUTSCH
Gemäß der Richtlinie 2002/96/EG über Elektro- und Elektronik-Altgeräte dürfen
Elektro- und Elektronik-Altgeräte nicht mehr als kommunale Abfälle entsorgt werden.
MSI hat europaweit verschiedene Sammel- und Recyclingunternehmen beauftragt,
die in die Europäische Union in Verkehr gebrachten Produkte, am Ende seines
Zeitpunkt ausschliesslich an einer lokalen Altgerätesammelstelle in Ihrer Nähe.
FRANÇAIS
Au sujet de la directive européenne (EU) relative aux déchets des équipement
que les produits électriques et électroniques ne peuvent être déposés dans les
les points de collecte.

Preface
ix
Preface
ESPAÑOL
MSI como empresa comprometida con la protección del medio ambiente, recomienda:
Bajo la directiva 2002/96/EC de la Unión Europea en materia de desechos y/o
equipos electrónicos, con fecha de rigor desde el 13 de agosto de 2005, los productos
los contenedores habituales de su municipio, los fabricantes de equipos electrónicos,
están obligados a hacerse cargo de dichos productos al termino de su período de
vida. MSI estará comprometido con los términos de recogida de sus productos
estos productos en el punto limpio establecido por el ayuntamiento de su localidad o
NEDERLANDS
Om het milieu te beschermen, wil MSI u eraan herinneren dat….
De richtlijn van de Europese Unie (EU) met betrekking tot Vervuiling van Electrische
kunnen niet meer beschouwd worden als vervuiling. Fabrikanten van dit soort
producten worden verplicht om producten retour te nemen aan het eind van hun
SRPSKI
sredini, MSI mora da vas podesti da…
POLSKI

x
Preface
Preface
TÜRKÇE
MAGYAR
ITALIANO
Per proteggere l’ambiente, MSI, da sempre amica della natura, ti ricorda che….
In base alla Direttiva dell’Unione Europea (EU) sullo Smaltimento dei Materiali Elettrici
ed Elettronici, Direttiva 2002/96/EC in vigore dal 13 Agosto 2005, prodotti appartenenti
alla categoria dei Materiali Elettrici ed Elettronici non possono più essere eliminati
del loro ciclo di vita. È possibile portare i prodotti nel più vicino punto di raccolta

Preface
xi
Preface
CONTENTS
Chapter 1 Getting Started............................................................................1-1
Packing Contents ................................................................................................. 1-2
Optional Accessories ...........................................................................................1-2
Assembly Precautions ..........................................................................................1-3
..................................................................................1-4
Connectors Quick Guide ...................................................................................... 1-7
Back Panel Quick Guide ......................................................................................1-9
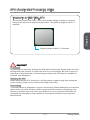
APU (Accelerated Processing Units) ................................................................. 1-11
Introduction to FM2/ FM2+ APU .................................................................. 1-11
............................................................................1-12
Memory ..............................................................................................................1-14
Dual-Channel mode Population Rule .......................................................... 1-14
Mounting Screw Holes .......................................................................................1-15
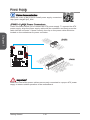
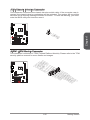
Power Supply ..................................................................................................... 1-16
JPWR1~2: ATX Power Connectors .............................................................1-16
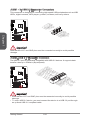
Expansion Slots .................................................................................................1-17
PCI_E1~4: PCIe Expansion Slots ................................................................1-17
Video/ Graphics Cards ...................................................................................... 1-18
Single Video Card Installation ......................................................................1-18
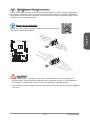
AMD CrossFire™ (Multi-GPU) Technology ................................................. 1-19
Internal Connectors ............................................................................................1-21
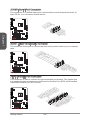
SATA1~6: SATA Connectors .....................................................................1-21
CPUFAN,SYSFAN1~3: Fan Power Connectors .......................................... 1-22
JFP1, JFP2: System Panel Connectors ...................................................... 1-23
............................................... 1-24
JCI1: Chassis Intrusion Connector .............................................................. 1-25
JCOM1: Serial Port Connector ....................................................................1-26
Jumpers .............................................................................................................1-27
JBAT1: Clear CMOS Jumper .......................................................................1-27
Drivers and Utilities ............................................................................................1-28
Total Installer ...............................................................................................1-28
Chapter 2 Quick Installation ........................................................................2-1
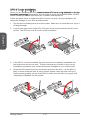
APU Installation ....................................................................................................2-2
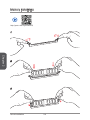
Memory Installation .............................................................................................. 2-4
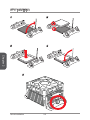
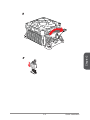
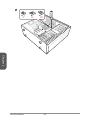
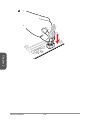
Motherboard Installation .......................................................................................2-5
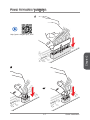
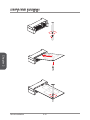
Power Connectors Installation .............................................................................2-7
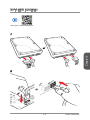
SATA HDD Installation .........................................................................................2-9
mSATA SSD Installation ....................................................................................2-10

xii
Preface
Preface
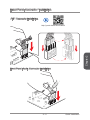
Front Panel Connector Installation .....................................................................2-11
JFP1 Connector Installation .........................................................................2-11
Front Panel Audio Connector Installation .................................................... 2-11
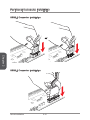
Peripheral Connector Installation ....................................................................... 2-12
USB2.0 Connector Installation .....................................................................2-12
USB3.0 Connector Installation .....................................................................2-12
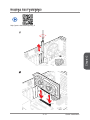
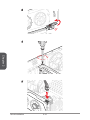
Graphics Card Installation ..................................................................................2-13
Chapter 3 BIOS Setup ................................................................................. 3-1
Entering Setup .....................................................................................................3-2
Entering BIOS Setup .....................................................................................3-2
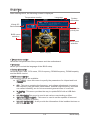
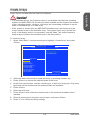
Overview ..............................................................................................................3-3
Operation .............................................................................................................3-5
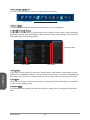
SETTINGS ...........................................................................................................3-6
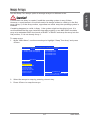
System Status ................................................................................................3-6
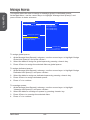
Advanced .......................................................................................................3-7
Boot .............................................................................................................3-13
Security ........................................................................................................3-14
..................................................................................................3-15
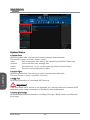
OC ......................................................................................................................3-16
M-FLASH ...........................................................................................................3-21
OC PROFILE .....................................................................................................3-22
HARDWARE MONITOR ....................................................................................3-23
Appendix A AMD RAID............................................................................... A-1
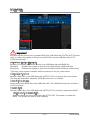
Introduction ..........................................................................................................A-2
.......................................A-3
Understanding the Colour Code ....................................................................A-3
......................................................................................................A-4
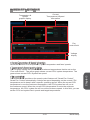
Create Arrays .......................................................................................................A-5
Delete Arrays .......................................................................................................A-6
Swap Arrays .........................................................................................................A-7
Manage Spares ....................................................................................................A-8
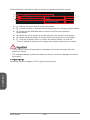
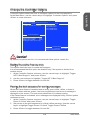
Change the Controller Options .............................................................................A-9
Booting the system from an array ..................................................................A-9
Pausing the boot sequence for warning messages .......................................A-9
Change the Staggered Spinup Count ..........................................................A-10
Installing Driver ..................................................................................................A-11
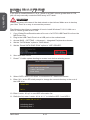
Installing OS on 2.2TB RAID ..............................................................................A-12

Chapter 1
Getting Started
Thank you for choosing the A88X-G41 PC Mate V2 Series (MS-7793 v3.X)
ATX motherboard. The A88X-G41 PC Mate V2 Series motherboards are
based on AMD
®
A88X
AMD
®
FM2+/ FM2 processor, the A88X-G41 PC Mate V2
Series motherboards deliver a high performance and professional desktop
platform solution.

Chapter 1
1-2
Getting Started
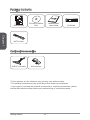
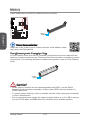
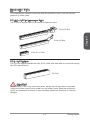
Packing Contents
* These pictures are for reference only and may vary without notice.
* The packing contents may vary according to the model you purchased.
* If you need to purchase the optional accessories or request part numbers, please
visit the MSI website at http://www.msi.com/index.php or consult the dealer.
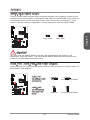
SATA Cable
Optional Accessories
M-Connector
Disc
Motherboard
User Guide
I/O Shield
Motherboard
USB 3.0 Bracket

Chapter 1
1-3
Getting Started
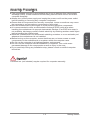
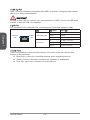
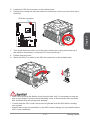
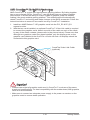
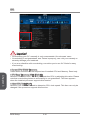
Assembly Precautions
The components included in this package are prone to damage from electrostatic
discharge (ESD). Please adhere to the following instructions to ensure successful
computer assembly.
before installing or removing any computer component.
Ensure that all components are securely connected. Loose connections may cause
Hold the motherboard by the edges to avoid touching sensitive components.
It is recommended to wear an electrostatic discharge (ESD) wrist strap when
handling the motherboard to prevent electrostatic damage. If an ESD wrist strap is
not available, discharge yourself of static electricity by touching another metal object
before handling the motherboard.
Store the motherboard in an electrostatic shielding container or on an antistatic pad
whenever the motherboard is not installed.
Before turning on the computer, ensure that there are no loose screws or metal
components on the motherboard or anywhere within the computer case.
Do not use the computer in a high-temperature environment.
Do not boot the computer before installation is completed. This could cause
permanent damage to the components as well as injury to the user.
technician.
Important
A screwdriver (not included) may be required for computer assembly.

Chapter 1
1-4
Getting Started
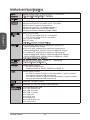
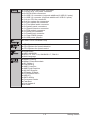
CPU
Support
AMD Socket FM2+ A-Series/Athlon™ Processors*
* Also support FM2 A-Series/Athlon™ Processors
Chipset AMD A88X
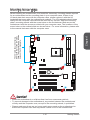
Memory
Support
2x DDR3 memory slots supporting up to 32GB
Dual channel memory architecture
Expansion
Slots
2x PCIe x16 slots
- PCI_E2 supports PCIe 3.0 x16 speed*
- PCI_E4 supports PCIe 2.0 x4 speed
2x PCIe 2.0 x1 slots
3x PCI slots
* Only FM2+ processors can support PCIe 3.0
Graphics 1x VGA port, supporting a maximum resolution of
1x DVI-D port, supporting a maximum resolution of
1x HDMI port, supporting a maximum resolution of
* Only support when using an FM2+ APU
Multi-GPU
Support
Supports 2-Way AMD
®
CrossFire
TM
Technology*
* Supports Windows 7 and Windows 8.
Storage AMD A88X Chipset
- 6x SATA 6Gb/s ports
- Supports RAID 0, RAID1, RAID5 and RAID 10
USB AMD A88X Chipset
- 4x USB 3.0 ports (2 ports on the back panel, 2 ports available
through the internal USB connectors)
- 10x USB 2.0 ports (4 ports on the back panel, 6 ports available
through the internal USB connectors)
Audio Realtek
®
ALC887 Codec
LAN Realtek
®
RTL8111E Gigabit LAN controller
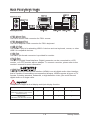
Back Panel
Connectors
1x PS/2 keyboard port
1x PS/2 mouse port
4x USB 2.0 ports
2x USB 3.0 ports
1x VGA port
1x DVI-D port
1x HDMI port
1x LAN (RJ45) port
3x audio jacks

Chapter 1
1-5
Getting Started
Internal
Connectors
1x 24-pin ATX main power connector
1x 8-pin ATX 12V power connector
6x SATA 6Gb/s connectors
3x USB 2.0 connectors (supports additional 6 USB 2.0 ports)
1x USB 3.0 connector (supports additional 2 USB 3.0 ports)
1x 4-pin CPU fan connector
2x 4-pin system fan connectors
1x 3-pin system fan connector
1x Front panel audio connector
2x System panel connectors
1x Chassis Intrusion connector
1x TPM module connector
1x Serial port connector
1x Parallel port connector
1x Clear CMOS jumper
2x USB power jumpers
I/O
Controller
Fintek 71878 Controller Chip
Hardware
Monitor
CPU/System temperature detection
CPU/System fan speed detection
CPU/System fan speed control
BIOS
Features
UEFI AMI BIOS
ACPI 5.0, PnP 1.0a, SM BIOS 2.7, DMI 2.0
Multi-language
Special
Features
Military Class 4
Military Class Essentials
OC Genie 4
Click BIOS 4
AMD CrossFire
AMD Dual Graphics
4K UHD Support
3 Display Outputs
PCI Express Gen 3
USB 3.0
SATA 6Gb/s
Command Center
Fast Boot
Live Update 6
M-Flash

Chapter 1
1-6
Getting Started
Software Drivers
MSI
- Command Center
- Super Charger
- Live Update 6
- Fast Boot
7-ZIP
Norton Internet Security Solution
Network Genie
Form
Factor
ATX Form Factor
12 in. x 8.4 in. (30.5 cm x 21.4 cm)
For the latest information about CPU, please visit
http://www.msi.com/cpu-support/
For more information on compatible components, please visit
http://www.msi.com/test-report/

Chapter 1
1-7
Getting Started
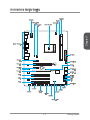
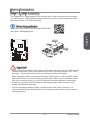
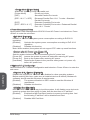
Connectors Quick Guide
Back Panel
APU Socket
CPUFAN
DIMM2
JUSB1
JPWR1
SATA3_4
JAUD1
PCI_E1
JUSB3
JTPM1
DIMM1
JPWR2
JCI1
SYSFAN2
JBAT1
SATA2
SATA5_6
JUSB2
JFP1
PCI_E2
PCI_E3
PCI_E4
PCI1
PCI2
JFP2
JUSB_PW2
SATA1
SYSFAN1
SYSFAN3
JUSB_PW1
JUSB4
JLPT1
JCOM1
PCI3

Chapter 1
1-8
Getting Started
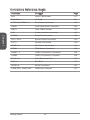
Connectors Reference Guide
Port Name Port Type Page
APU FM2+/ FM2 Socket 1-11
Back Panel I/O Ports 1-9
CPUFAN,SYSFAN1~3 Fan Power Connectors 1-22
JAUD1 Front Panel Audio Connector 1-26
JBAT1 Clear CMOS Jumper 1-27
JCI1 Chassis Intrusion Connector 1-25
JCOM1 Serial Port Connector 1-26
JFP1, JFP2 System Panel Connectors 1-23
JLPT1 Parallel Port Header 1-26
JPWR1~2 ATX Power Connectors 1-16
JTPM1 TPM Module Connector 1-25
JUSB4 USB 3.0 Expansion Connector 1-24
PCI_E1~4 PCIe Expansion Slots 1-17
PCI1~3 PCI Slots 1-17
SATA1~6 SATA Connectors 1-21
JUSB_PW1, JUSB_PW2 USB Power Jumpers 1-27
La pagina si sta caricando...
La pagina si sta caricando...
La pagina si sta caricando...
La pagina si sta caricando...
La pagina si sta caricando...
La pagina si sta caricando...
La pagina si sta caricando...
La pagina si sta caricando...
La pagina si sta caricando...
La pagina si sta caricando...
La pagina si sta caricando...
La pagina si sta caricando...
La pagina si sta caricando...
La pagina si sta caricando...
La pagina si sta caricando...
La pagina si sta caricando...
La pagina si sta caricando...
La pagina si sta caricando...
La pagina si sta caricando...
La pagina si sta caricando...
La pagina si sta caricando...
La pagina si sta caricando...
La pagina si sta caricando...
La pagina si sta caricando...
La pagina si sta caricando...
La pagina si sta caricando...
La pagina si sta caricando...
La pagina si sta caricando...
La pagina si sta caricando...
La pagina si sta caricando...
La pagina si sta caricando...
La pagina si sta caricando...
La pagina si sta caricando...
La pagina si sta caricando...
La pagina si sta caricando...
La pagina si sta caricando...
La pagina si sta caricando...
La pagina si sta caricando...
La pagina si sta caricando...
La pagina si sta caricando...
La pagina si sta caricando...
La pagina si sta caricando...
La pagina si sta caricando...
La pagina si sta caricando...
La pagina si sta caricando...
La pagina si sta caricando...
La pagina si sta caricando...
La pagina si sta caricando...
La pagina si sta caricando...
La pagina si sta caricando...
La pagina si sta caricando...
La pagina si sta caricando...
La pagina si sta caricando...
La pagina si sta caricando...
La pagina si sta caricando...
La pagina si sta caricando...
La pagina si sta caricando...
La pagina si sta caricando...
La pagina si sta caricando...
La pagina si sta caricando...
La pagina si sta caricando...
La pagina si sta caricando...
La pagina si sta caricando...
La pagina si sta caricando...
La pagina si sta caricando...
La pagina si sta caricando...
La pagina si sta caricando...
La pagina si sta caricando...
La pagina si sta caricando...
La pagina si sta caricando...
La pagina si sta caricando...
La pagina si sta caricando...
-
 1
1
-
 2
2
-
 3
3
-
 4
4
-
 5
5
-
 6
6
-
 7
7
-
 8
8
-
 9
9
-
 10
10
-
 11
11
-
 12
12
-
 13
13
-
 14
14
-
 15
15
-
 16
16
-
 17
17
-
 18
18
-
 19
19
-
 20
20
-
 21
21
-
 22
22
-
 23
23
-
 24
24
-
 25
25
-
 26
26
-
 27
27
-
 28
28
-
 29
29
-
 30
30
-
 31
31
-
 32
32
-
 33
33
-
 34
34
-
 35
35
-
 36
36
-
 37
37
-
 38
38
-
 39
39
-
 40
40
-
 41
41
-
 42
42
-
 43
43
-
 44
44
-
 45
45
-
 46
46
-
 47
47
-
 48
48
-
 49
49
-
 50
50
-
 51
51
-
 52
52
-
 53
53
-
 54
54
-
 55
55
-
 56
56
-
 57
57
-
 58
58
-
 59
59
-
 60
60
-
 61
61
-
 62
62
-
 63
63
-
 64
64
-
 65
65
-
 66
66
-
 67
67
-
 68
68
-
 69
69
-
 70
70
-
 71
71
-
 72
72
-
 73
73
-
 74
74
-
 75
75
-
 76
76
-
 77
77
-
 78
78
-
 79
79
-
 80
80
-
 81
81
-
 82
82
-
 83
83
-
 84
84
-
 85
85
-
 86
86
-
 87
87
-
 88
88
-
 89
89
-
 90
90
-
 91
91
-
 92
92


MSI A88X-G41 PC Mate V2 Manuale del proprietario
- Categoria
- Schede madri
- Tipo
- Manuale del proprietario
- Questo manuale è adatto anche per
in altre lingue
Documenti correlati
-
MSI A88XI AC Manuale del proprietario
-
MSI MS-7851v2.1 Manuale del proprietario
-
MSI GP66 Leopard (Intel® 10th Gen) (GeForce 30 Series) Manuale del proprietario
-
-
-
MSI Trident X Plus 9th Manuale utente
-
-
-
-
MSI 990FXA-GD65 Manuale del proprietario