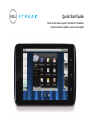
Dell STREAK mobile Guida Rapida
- Categoria
- Smartphone
- Tipo
- Guida Rapida
Questo manuale è adatto anche per

Guide d’information rapide | Schnellstart-Handbuch
Guida introduttiva rapida | Guía de inicio rápido
Quick Start Guide

2

Quick Start Guide

About Notes
NOTE: A NOTE indicates important information that helps you make better use of your
device.
__________________
Information in this document is subject to change without notice.
© 2010 Dell Inc. All rights reserved.
Dell
™
, the DELL logo, and Streak
™
are trademarks of Dell Inc.
November 2010 P/N 8TWH2 Rev. A03

3
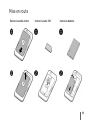
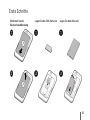
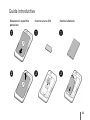
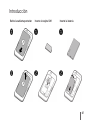
Getting Started
Remove the back cover Insert the SIM card Insert the battery

4
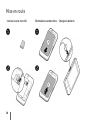
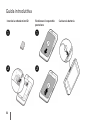
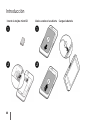
Getting Started
Insert the microSD card Replace the back cover Charge the battery

5
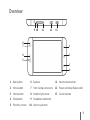
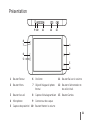
Overview
9 10 11 12 13
5
1
2
3
4
6
7
8
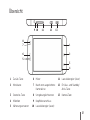
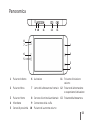
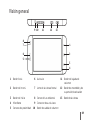
1 Back button 6 Earpiece 11 Volume down button
2 Menu button 7 Front-facing camera lens 12 Power and Sleep/Wake button
3 Home button 8 Ambient light sensor 13 Camera button
4 Microphone 9 Headphone connector
5 Proximity sensors 10 Volume up button

6
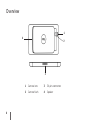
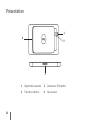
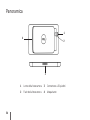
Overview
1
2
3
4
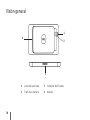
1 Camera lens 3 30-pin connector
2 Camera flash 4 Speaker

7
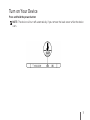
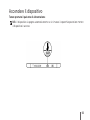
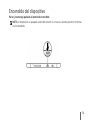
Turn on Your Device
Press and hold the power button
NOTE: The device will turn off automatically if you remove the back cover while the device
is on.

8
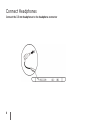
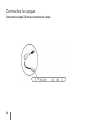
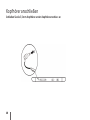
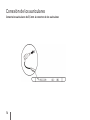
Connect Headphones
Connect the 3.5 mm headphones to the headphone connector

9
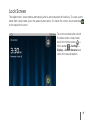
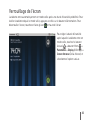
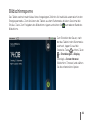
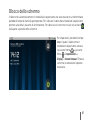
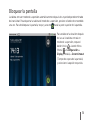
Lock Screen
The tablet enters sleep mode automatically after a preset duration of inactivity. To wake up the
tablet from sleep mode, press the power button once. To unlock the screen, touch and drag
to the top of the screen.
To set the duration after which
the tablet enters sleep mode,
touch the Home button →
Menu button → Settings→
Display→ Screen timeout and
select the required option.

10
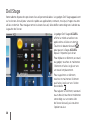
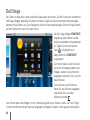
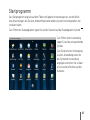
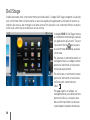
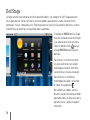
Dell Stage
Your tablet has seven Home screens that you can customize. The Dell Stage widgets appear
on the Home screens and provide quick access to recently used applications, contacts, music,
pictures, and so on. To navigate across the Home screens, flick your finger to the right or left
on the screen.
The Dell Stage HOME widget
displays the current weather and
your most recent applications.
Touch the Home button
to go
to Stage HOME from any screen.
To move an item such as a
shortcut or widget, touch and
hold the item and drag it to a new
location.
To delete an item, touch and hold
the item and drag it to the trash
icon
.
To add a widget, shortcut, or
folder touch and hold your finger
on an empty area on the Home
screen, and then touch the
required option.

11
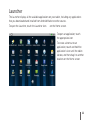
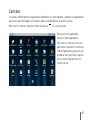
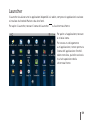
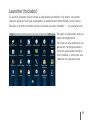
Launcher
The Launcher displays all the available applications on your tablet, including any applications
that you downloaded and installed from Android Market or other sources.
To open the Launcher, touch the Launcher icon
on the Home screen.
To open an application, touch
the appropriate icon.
To create a shortcut to an
application, touch and hold the
application’s icon until the tablet
vibrates, and then drag it to another
location on the Home screen.

12
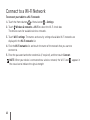
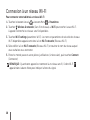
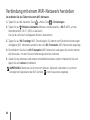
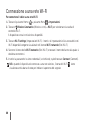
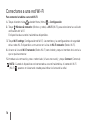
Connect to a Wi-Fi Network
To connect your tablet to a Wi-Fi network:
Touch the Home button 1.
→ Menu button → Settings.
Touch 2.
Wireless & networks→ Wi-Fi to select the Wi-Fi check box.
The device scans for available wireless networks.
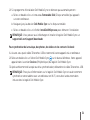
Touch 3. Wi-Fi settings. The names and security settings of available Wi-Fi networks are
displayed in the Wi-Fi networks list.
Flick the 4. Wi-Fi networks list and touch the name of the network that you want to
connect to.
Enter the password and other credentials (if required), and then touch 5. Connect.
NOTE: When your device is connected to a wireless network, the Wi-Fi icon
appears in
the status bar to indicate the signal strength.

13
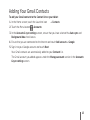
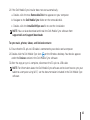
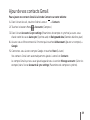
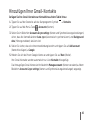
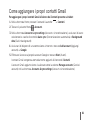
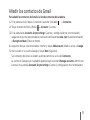
Adding Your Gmail Contacts
To add your Gmail contacts to the Contact list on your tablet:
In the Home screen, touch the Launcher icon 1.
→ Contacts.
Touch the Menu button 2.
→ Accounts.
In the 3. Accounts & sync settings screen, ensure that you have selected the Auto-sync and
Background data check boxes.
Ensure that you are connected to the Internet and touch 4. Add account→ Google.
Sign in to your Google account and touch 5. Next.
Your Gmail contacts are automatically added to your Contacts list.
The Gmail account you added appears under the Manage accounts section in the Accounts
& sync settings screen.

14
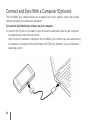
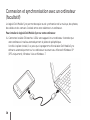
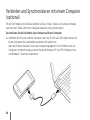
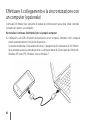
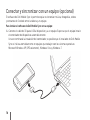
Connect and Sync With a Computer (Optional)
The Dell Mobile Sync software allows you to copy or sync music, photos, videos, and Outlook
contacts between your tablet and a computer.
To install the Dell Mobile Sync software on your computer:
Connect the 30-pin-to-USB cable to your device and a computer. Wait for your computer 1.
to automatically install the device driver.
After the driver installation is complete, the Dell Mobile Sync installer may start automatically
on computers running the Microsoft Windows XP (SP3 only), Windows Vista, and Windows 7
operating systems.

15
If the Dell Mobile Sync installer does not start automatically: 2.
Double-click the new a. Removable Disk that appears on your computer.
Navigate to the b. Dell Mobile Sync folder on the removable disk.
Double-click the c. InstallDellMSync.exe file to start the installation.
NOTE: You can also download and install the Dell Mobile Sync software from
support.dell.com/support/downloads.
To sync music, photos, videos, and Outlook contacts:
Ensure that the 30-pin-to-USB cable is connected to your device and a computer.1.
Double-click the Dell Mobile Sync icon 2.
on the Windows desktop. Your device appears
under the Devices section in the Dell Mobile Sync software.
After the copy or sync is complete, disconnect the 30-pin-to-USB cable.3.
NOTE: For information about the Dell Mobile Sync software and to learn how to sync your
tablet to a computer using Wi-Fi, see the documentation included in the Dell Mobile Sync
software.

16
For More Information
To learn more about the features and settings available on your tablet, see the User’s Manual
available on the SD card on your tablet or at support.dell.com/manuals.
To view the User’s Manual available on the SD card, launch the QuickOffice application and
then select Memory card.

Guide d’information rapide

À propos des remarques
REMARQUE : une REMARQUE indique des informations importantes qui peuvent vous
aider à mieux utiliser l’appareil.
__________________
Les informations contenues dans ce document sont sujettes à modification sans préavis.
© 2010 Dell Inc. Tous droits réservés.
Dell
™
, le logo DELL et Streak
™
sont des marques de Dell Inc.
Novembre 2010 N/P 8TWH2 Rév. A03
La pagina si sta caricando...
La pagina si sta caricando...
La pagina si sta caricando...
La pagina si sta caricando...
La pagina si sta caricando...
La pagina si sta caricando...
La pagina si sta caricando...
La pagina si sta caricando...
La pagina si sta caricando...
La pagina si sta caricando...
La pagina si sta caricando...
La pagina si sta caricando...
La pagina si sta caricando...
La pagina si sta caricando...
La pagina si sta caricando...
La pagina si sta caricando...
La pagina si sta caricando...
La pagina si sta caricando...
La pagina si sta caricando...
La pagina si sta caricando...
La pagina si sta caricando...
La pagina si sta caricando...
La pagina si sta caricando...
La pagina si sta caricando...
La pagina si sta caricando...
La pagina si sta caricando...
La pagina si sta caricando...
La pagina si sta caricando...
La pagina si sta caricando...
La pagina si sta caricando...
La pagina si sta caricando...
La pagina si sta caricando...
La pagina si sta caricando...
La pagina si sta caricando...
La pagina si sta caricando...
La pagina si sta caricando...
La pagina si sta caricando...
La pagina si sta caricando...
La pagina si sta caricando...
La pagina si sta caricando...
La pagina si sta caricando...
La pagina si sta caricando...
La pagina si sta caricando...
La pagina si sta caricando...
La pagina si sta caricando...
La pagina si sta caricando...
La pagina si sta caricando...
La pagina si sta caricando...
La pagina si sta caricando...
La pagina si sta caricando...
La pagina si sta caricando...
La pagina si sta caricando...
La pagina si sta caricando...
La pagina si sta caricando...
La pagina si sta caricando...
La pagina si sta caricando...
La pagina si sta caricando...
La pagina si sta caricando...
La pagina si sta caricando...
La pagina si sta caricando...
La pagina si sta caricando...
La pagina si sta caricando...
La pagina si sta caricando...
La pagina si sta caricando...
-
 1
1
-
 2
2
-
 3
3
-
 4
4
-
 5
5
-
 6
6
-
 7
7
-
 8
8
-
 9
9
-
 10
10
-
 11
11
-
 12
12
-
 13
13
-
 14
14
-
 15
15
-
 16
16
-
 17
17
-
 18
18
-
 19
19
-
 20
20
-
 21
21
-
 22
22
-
 23
23
-
 24
24
-
 25
25
-
 26
26
-
 27
27
-
 28
28
-
 29
29
-
 30
30
-
 31
31
-
 32
32
-
 33
33
-
 34
34
-
 35
35
-
 36
36
-
 37
37
-
 38
38
-
 39
39
-
 40
40
-
 41
41
-
 42
42
-
 43
43
-
 44
44
-
 45
45
-
 46
46
-
 47
47
-
 48
48
-
 49
49
-
 50
50
-
 51
51
-
 52
52
-
 53
53
-
 54
54
-
 55
55
-
 56
56
-
 57
57
-
 58
58
-
 59
59
-
 60
60
-
 61
61
-
 62
62
-
 63
63
-
 64
64
-
 65
65
-
 66
66
-
 67
67
-
 68
68
-
 69
69
-
 70
70
-
 71
71
-
 72
72
-
 73
73
-
 74
74
-
 75
75
-
 76
76
-
 77
77
-
 78
78
-
 79
79
-
 80
80
-
 81
81
-
 82
82
-
 83
83
-
 84
84


Dell STREAK mobile Guida Rapida
- Categoria
- Smartphone
- Tipo
- Guida Rapida
- Questo manuale è adatto anche per
in altre lingue
- English: Dell STREAK mobile Quick start guide
- français: Dell STREAK mobile Guide de démarrage rapide
- español: Dell STREAK mobile Guía de inicio rápido
- Deutsch: Dell STREAK mobile Schnellstartanleitung
Documenti correlati
-
Dell Mobile Streak 7 Guida Rapida
-
-
-
-
Dell STREAK mobile Manuale del proprietario
-
-
-
-
Dell STREAK mobile Manuale del proprietario
-