Audio Design AS 152S Manuale del proprietario
- Categoria
- Altoparlanti della soundbar
- Tipo
- Manuale del proprietario

• LA-152-S
• LA-1652-S
• LA-1T
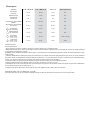
components

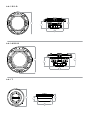
LA-1652-S
LA-152-S
LA-1T

HOCHTON/TWEETER
TIEETON EINGANG
IN
-6dB -3dB -0dB
WOOFER
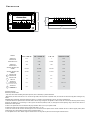
Model
LA-152-S LA-1652-S LA-1T Crossover
Nominal
Diameter
5.25” 6.5” 1” N/A
Description
2-way 2-way Tweeter N/A
Nominal
Impedance
4 Ω 4 Ω 4 Ω N/A
Power Handling
(MAX)
100 watts 125 watts 100 watts N/A
Power Handling
(RMS)
35 watts 45 watts 35 watts N/A
Mounting
Diameter
4.7” 5.7” 2.0” N/A
Mounting
Depth
1.9” 2.4” 0.8” N/A
Overall
Diameter
(including grille)
6.2” 7.2” 2.5” 3.3” x 5.1”
Overall
Height
(including grille)
2.8” 3.5” 1.1” 1.3”
Crossover
Installation
Preliminary Considerations:
• If you feel unsure about installing this system yourself, have it installed by a qualified technician.
• Think before you drill! Be careful not to cut or drill into gas tanks, fuel lines, brake or hydraulic lines, vacuum lines or electrical wiring when working on any
vehicle.
CAUTION: Before installation, disconnect the battery negative (-) terminal to prevent damage to the unit, fire and/or possible injury.
1. Determine where the speakers will be mounted. Ensure an area large enough for the speaker to mount evenly. Be sure that the mounting location is deep
enough for the speaker to fit; if mounting in a door, operate all functions (windows, locks, etc.) through their entire operating range to ensure there will be no
interference from the speaker.
2. Refer to the specification chart to determine the proper diameter hole to cut for your speaker model.
3. Mark the locations for the mounting screws. Drill the holes with a 1/8” bit.
4. Route the wires from the crossover and through the cutout and connect to the speaker and/or tweeter terminals. Be sure to observe proper polarity when
connecting the wires. The speaker’s positive terminal is indicated with a “+”.
5. Fit the speaker to the cutout. Mount using the enclosed screws. Fit the grille into place and mount using the enclosed screws.
La pagina si sta caricando...
La pagina si sta caricando...
La pagina si sta caricando...

Modello
LA-152-S LA-1652-S LA-1T Crossover
Diametro
nominale
133 mm 165 mm 25 mm N/A
Descrizione
2 vie 2 vie Tweeter N/A
Impedenza
nominale
4 Ω 4 Ω 4 Ω N/A
Capacità di potenza
(massima)
100 watt 125 watt 100 watt N/A
Capacità di potenza
(RMS)
35 watt 45 watt 35 watt N/A
Diametro
di montaggio
120 mm 144 mm 51 mm N/A
Profondità
di montaggio
49 mm 61 mm 20 mm N/A
Diametro
complessivo
(inclusa la mascherina)
158 mm 184 mm 64 mm 84 mm x 130 mm
Altezza
complessivo
(inclusa la mascherina)
72 mm 90 mm 28 mm 33 mm
Installazione
Considerazioni preliminari:
• Se si teme di non riuscire a installare il sistema da se stessi, incaricare dell’installazione un tecnico qualificato.
• Pensarci prima di fare fori col trapano! Quando si lavora su un veicolo, fare sempre attenzione a non intaccare o praticare fori nel serbatoio e nelle tubature
della benzina, nelle tubature idrauliche o in quelle dei freni, nelle tubature sottovuoto e nelle linee dell’impianto elettrico.
ATTENZIONE: prima dell’installazione, scollegare il terminale negativo (-) della batteria per evitare danni all’unità, incendio e/o il rischio di lesioni.
1. Stabilire in quale posizione montare i diffusori. Accertarsi che l’area sia sufficientemente spaziosa per montare i diffusori in modo uguale. Accertarsi che
il luogo di montaggio sia profondo a sufficienza per il diffusore; quando si monta su in una portiera, controllare che tutte le funzioni (finestre, serrature, ecc.)
funzionino liberamente senza interferire con il diffusore.
2. Per determinare la dimensione di foro corretta per il proprio modello di diffusore vedere la tabella dei dati tecnici.
3. Marcare le posizioni per le viti di montaggio. Praticare i fori con una punta da trapano di 1/8 di pollice (3,2 mm).
4. Portare i fili dal crossover e attraverso il foro e collegarli ai terminali del diffusore/tweeter. Quando si esegue la connessione, accertarsi di osservare la polarità
corretta. Il terminale positive del diffusore è contrassegnato con il segno “+”.
5. Inserire il diffusore nel foro. Montare servendosi delle viti in dotazione. Posizionare la mascherina di copertura e fissare con le viti in dotazione.
Italiano
Informazioni sulla garanzia limitata
I prodotti acquistati dai consumatori da rivenditori autorizzati Lightning Audio situati fuori degli USA sono coperti dalla garanzia offerta dal distributore autoriz-
zato Lightning Audio per ilo Paese nel quale il prodotto stato acquistato.

L
imited
W
arranty
I
nformation
Lightning Audio offers a limited warranty on products subject to the following terms:
• Length of warranty:
Speakers - One year replacement warranty from date of original purchase - requires proof of purchase.
Amplifiers - One year replacement warranty from date of original purchase - requires proof of purchase.
• What is covered:
This warranty applies only to Lightning Audio products sold to consumers by an authorized Lightning Audio Dealer in the United States
of America. Products purchased by consumers from an authorized Lightning Audio Dealer located outside of the USA are covered by
the authorized Lightning Audio Distributor for the country in which the products were purchased.
• Who is covered:
This warranty covers only the original purchaser of Lightning Audio product purchased from an authorized Lightning Audio Dealer
in the United States. In order to receive service, the purchaser must provide Lightning Audio with a dated copy of the sales receipt
stating the customer name, dealer name and product(s) purchased. Products found to be defective during the warranty period will be
replaced (with a product deemed to be equivalent at Lightning Audio’s sole discretion) by Lightning Audio.
• What is not covered:
1. Damage caused by accident, misuse, abuse, improper installation or operation, water or moisture, excessive heat, theft, or ship-
ping
2. Any cost or expense related to the removal or reinstallation of product
3. Items previously repaired, serviced or modified by an unauthorized service center
4. Any product which has had the serial number defaced, altered, or removed
5. Subsequent damage to other components
6. Any product purchased outside the U.S.
7. Any product not purchased from an authorized Lightning Audio Dealer
• Limit on implied warranties
Any implied warranties of fitness for use and merchantability are limited in duration to the period of the express warranty set forth
above. Some states do not allow limitations on the length of an implied warranty, so this limitation may not apply. No person is autho-
rized to assume for Lightning Audio any other liability in connection with the sale of the product.
• How to obtain service
Defective products should be returned to your local authorized Lightning Audio Dealer for warranty service or, you may call 1-888-
881-8186 for Lightning Audio customer service. You must obtain an RA# (Return Authorization number) prior to returning any
product to Lightning Audio. Return Authorizations are valid for 30 days. You are responsible for the shipment of defective product to
Lightning Audio and you MUST include valid proof of purchase. Mark your RA# clearly on outside of your shipping carton. Products
received without a valid RA# will be refused and returned to sender at sender’s expense.
955 N. Fiesta Blvd, Suite 4
•
Gilbert, Arizona 85233 U.S.A.
•
(800)726-8178
-
 1
1
-
 2
2
-
 3
3
-
 4
4
-
 5
5
-
 6
6
-
 7
7
-
 8
8


Audio Design AS 152S Manuale del proprietario
- Categoria
- Altoparlanti della soundbar
- Tipo
- Manuale del proprietario
in altre lingue
Documenti correlati
Altri documenti
-
 Lightning Audio Storm X1.2000.1D Manuale utente
-
Lightning Audio Strive S4.200.2 Installation & Operation Manual
-
Polk Audio SR5250 Manuale utente
-
 Lightning Audio S4.525C Installation & Operation Manual
-
LD Systems Contractor CIWS 62 Manuale utente
-
Orion Car Audio Cobalt CO650 Manuale utente
-
-
 Rockford Fosgate FRC3257 Manuale utente
-
 Rockford Fosgate Punch FRC3205 Manuale utente


