
-Please read this assembly manual carefully prior to assembling this product.
- Lesen Sie sich vor der Montage des Produkts diese Montageanleitung sorgfältig durch.
- Veuillez lire attentivement le présent manuel d’assemblage avant de monter ce produit.
- Lees deze montagehandleiding zorgvuldig voordat u dit product in elkaar gaat zetten.
- Leggere attentamente questo manuale di montaggio prima di montare il prodotto.
- Antes de montar este producto, lea atentamente este manual de montaje.
- Läs den här monteringshandboken noggrant före användning av den här produkten.
- Lue tämä asennusohje huolellisesti ennen tämän tuotteen asennusta.
Attention, Achtung, Attention, Attentie, Attenzione, Atención, Giv akt, Huomio
Assembly manual
Montageanleitung
Manuel d’assemblage
Montagehandleiding
Manuale di montaggio
Manual de montaje
Monteringshandbok
Asennusohje
GET YOUR
COMPLETE
USER MANUAL
ONLINE
http://manuals.tunturi.com
WWW
IMPORTANT
FEEL BETTER EVERY DAY
www.tunturi.com
GB
DE
FR
NL
IT
ES
SV
SU
i
TRAINING
Download Free
Tunturi Training App
TRAINING
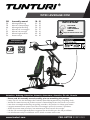
WT80 LEVERAGE GYM
18 - 21
22 - 25
26 - 29
30 - 33
34 - 37
38 - 41
42 - 45
46 - 49


3
WT80 Leverage Gym
A

4
WT80 Leverage Gym
i
B

5
WT80 Leverage Gym
1454
2020
398
2585
1171
2192
1495
3785
3392
600
C
D-0

6
WT80 Leverage Gym
D-1

7
WT80 Leverage Gym
D-2

8
WT80 Leverage Gym
D-3

9
WT80 Leverage Gym
D-4

10
WT80 Leverage Gym
D-5

11
WT80 Leverage Gym
D-6

12
WT80 Leverage Gym
D-7

13
WT80 Leverage Gym
D-8

14
WT80 Leverage Gym
D-9

15
WT80 Leverage Gym
U-1

16
WT80 Leverage Gym
-10°
0°
10°
20°
30°
40°
50°
60°
70°
84°
0°
5°
10°
15°
U-2
U-3

17
WT80 Leverage Gym
117 cm
182 cm
220 cm
MAX.
180 KG
MAX.
250 KG
MAX.
250 KG
MAX.
100 KG
W-1
W-1
KG Lbs
100 2200
180 400
250 550

18
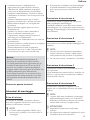
USER MANUAL ON OUR WEBSITE
To reduce the impact on the environment,
you will only find the assembly steps in this manual.
To learn how to use and maintain this product,
please download the user manual from:
English
manuals.tunturi.com
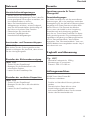
Welcome
Important Safety Instructions
This manual is an essential part of your training
equipment please read all instructions in this
manual before you start using this equipment. The
following precautions must always be followed:
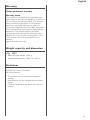
Index
Welcome ����������������������������������������� 18
Important safety notice ������������������ 18
Important assembly information ���� 19
Before you start ��������������������������������������������19
Description illustration A ������������������������������19
Description illustration B ������������������������������19
Description illustration C ������������������������������19
Description illustration D ������������������������������19
Fasten Nuts and Bolts ����������������������������������19
Free area (Fig� D-0) ��������������������������������������� 20
Additional information ���������������������������������20
Use�������������������������������������������������� 20
Weight plate storage bars ����������������������������20
Unfolding and folding� ���������������������������������20
Adjusting the backrest inclination ����������������20
Adjusting the vertical seat position �������������20
Warranty ����������������������������������������� 21
Weight capacity and dimension ������ 21
Disclaimer ��������������������������������������� 21
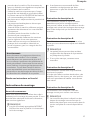
Important safety notice
This exercise equipment is built for optimum
safety. However, certain precautions apply
whenever you operate a piece of exercise
equipment. Be sure to read the entire manual
before you assemble or operate your equipment.
In particular, note the following safety precautions:
- Keep children and pets away from the
equipment at all times. DO NOT leave
children unattended in the same room with the
equipment.
- Only one person at a time should use the
equipment.
- If the user experiences dizziness, nausea, chest
pain, or any other abnormal symptoms, STOP
the workout at once. CONSULT A PHYSICIAN
IMMEDIATELY.
Position the equipment on a clear, levelled
surface. DO NOT use the equipment near water
or outdoors.
- Keep hands away from all moving parts.
- Always wear appropriate workout clothing
when exercising. DO NOT wear robes or other
clothing that could become caught in the
equipment. Running or aerobic shoes are also
required when using the equipment.
Use the equipment only for its intended
use as described in this manual. DO NOT
use attachments not recommended by the
manufacturer.
- Do not place any sharp object around the
equipment.
- Disabled person should not use the equipment.
- Before using the equipment to exercise, always
do stretching exercises to properly warm up.
- Never operate the equipment if the equipment
is not functioning properly.
- A spotter is recommended during exercise.

19
English
- This equipment is designed and intended
for home and consumer use only, not for
commercial use.
Warning:
Before beginning any exercise program, consult
your physician. This is especially important for
individuals over the age of 35 or persons with
pre-existing health problems.
Read all instructions before using any fitness
equipment.
Tunturi New fitness bv. assumes no
responsibility for personal injury or property
damage sustained by or through the use of this
product.
Save these instructions!
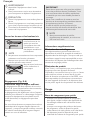
Important assembly information
Before you start
We recommend to use two adjustable wrenches
to assemble your product. If you have metric sized
wrenches in correct size this is fine too.
‼ NOTE
• Suitable (adjustable) wrenches are “NOT”
provided with the product, neither included
in the assembly kit.
• It is strongly recommended that this
equipment is assembled by two or more
people to avoid possible injury.
Description illustration A
The illustration shows what the trainer will looks
like after the assembly is completed.
You can use this as a reference during your
assembly, but do follow the assembly steps
always in the correct sequence as showed in the
illustrations.
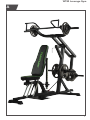
Description illustration B
The illustration shows what components and parts
you should find when un-boxing your product.
‼ NOTE
• Small parts can be hidden/ packed in hollow
spaces in the Styrofoam product protection
• If a part is missing, contact your dealer.
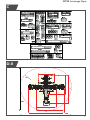
Description illustration C
The illustration shows the hardware kit that comes
with your product.
The hardware kit contains bolts, washers, screws,
nuts etc. and the required tools to properly fit
your trainer.
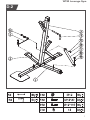
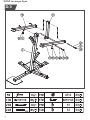
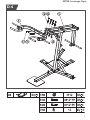
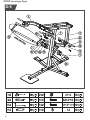
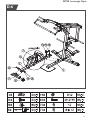
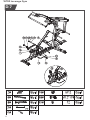
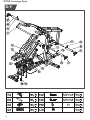
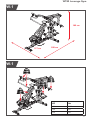
Description illustration D
The illustrations shows you in the correct following
order how to assembly your trainer best.
‼ NOTE
• Part numbers shown in the assembly steps
are commencing with the spare part drawing
that can be found in the online full version
user manual.
⚠ WARNING
• Assemble the equipment in the given order.
• Carry and move the equipment with at least
two persons.
⚠ CAUTION
• Place the equipment on a firm, level surface.
• Place the equipment on a protective base to
prevent damage to the floor surface.
• Refer to the illustrations for the correct
assembly of the equipment.
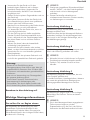
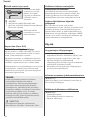
Fasten Nuts and Bolts
Securely tighten all
Nuts and Bolts after all
components have been
assembled in current
and previous steps.

20
English
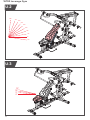
‼ NOTE
• Do not over tighten any component with
pivoting function.
• Make sure all pivoting components are able
to move freely.
Do not tighten all Nuts
and Bolts in this step.
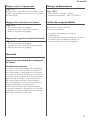
Free area (Fig� D-0)
Adequate space is a prerequisite for use�
The free area should be no less than 0.6m greater
than the *training area in the directions from
which the equipment is accessed.
The free area must also include the area for
emergency dismount. Where equipment is
positioned adjacent to each other, the value of
the free area may be shared.
*Training area is the maximum length/width/
height of the trainer, including moving parts, been
measured to its maximum length/ width/ height
during use.
IMPORTANT
Because your trainer will/ can set in the first
using hours, we recommend you do a quick
check on the hardware you have fitted during
your assembly.
We suggest tightening all bolts and nuts once
again after the first few workout sessions
(approximate 10 hours).
Just to assure the bolts and nuts are
still tightened well for your trainer’s best
performance.
‼ NOTE
• We recommend checking the hardware
regularly, at least once every 3 months.
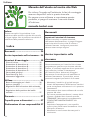
Additional information
Packaging disposal
Government guidelines ask that we reduce the
amount of waste material disposed of in land fill
sites. We therefore ask that you dispose of all
packaging waste responsibly at public recycling
centres.
End of life disposal
We at Tunturi hope you enjoy many years of
enjoyable use from your fitness trainer. However,
a Time will come when your fitness trainer will
come to the end of its useful life. Under ‘European
WEEE Legislation you are responsible for the
appropriate disposal of your fitness trainer to a
recognised public collection facility.
Use
Weight plate storage bars
- When using the weight-plates storage bars for
weight plates, do make sure to use sufficient
locking supports to secure your weight plates
at all times.
- When store weight-plates on the storage bars,
do make sure you divide the weigh-plates
evenly over left and right side.
- Never exceed the maximum weight capacity of
the weight plate storage bar.
Unfolding and folding�
(Fig� U-1)
Please pull out the lock pin from the joint and fold
the equipment, then securing by the lock pin.
Adjusting the backrest inclination
(Fig� U-2)
- Pull the adjustment knob.
- Move the backrest to the required position.
- Release the adjustment knob.
Adjusting the vertical seat position
(Fig� U-3)
- Pull the adjustment knob.
- Move the seat to the required position.
- Release the adjustment knob.
La pagina si sta caricando...
La pagina si sta caricando...
La pagina si sta caricando...
La pagina si sta caricando...
La pagina si sta caricando...
La pagina si sta caricando...
La pagina si sta caricando...
La pagina si sta caricando...
La pagina si sta caricando...
La pagina si sta caricando...
La pagina si sta caricando...
La pagina si sta caricando...
La pagina si sta caricando...
La pagina si sta caricando...
La pagina si sta caricando...
La pagina si sta caricando...
La pagina si sta caricando...
La pagina si sta caricando...
La pagina si sta caricando...
La pagina si sta caricando...
La pagina si sta caricando...
La pagina si sta caricando...
La pagina si sta caricando...
La pagina si sta caricando...
La pagina si sta caricando...
La pagina si sta caricando...
La pagina si sta caricando...
La pagina si sta caricando...
La pagina si sta caricando...
La pagina si sta caricando...
La pagina si sta caricando...
La pagina si sta caricando...
-
 1
1
-
 2
2
-
 3
3
-
 4
4
-
 5
5
-
 6
6
-
 7
7
-
 8
8
-
 9
9
-
 10
10
-
 11
11
-
 12
12
-
 13
13
-
 14
14
-
 15
15
-
 16
16
-
 17
17
-
 18
18
-
 19
19
-
 20
20
-
 21
21
-
 22
22
-
 23
23
-
 24
24
-
 25
25
-
 26
26
-
 27
27
-
 28
28
-
 29
29
-
 30
30
-
 31
31
-
 32
32
-
 33
33
-
 34
34
-
 35
35
-
 36
36
-
 37
37
-
 38
38
-
 39
39
-
 40
40
-
 41
41
-
 42
42
-
 43
43
-
 44
44
-
 45
45
-
 46
46
-
 47
47
-
 48
48
-
 49
49
-
 50
50
-
 51
51
-
 52
52


in altre lingue
- français: Tunturi WT80
- español: Tunturi WT80
- Deutsch: Tunturi WT80
- Nederlands: Tunturi WT80
- eesti: Tunturi WT80
- svenska: Tunturi WT80
Documenti correlati
-
Tunturi WT80 Manuale del proprietario
-
-
-
-
-
-
-
-
-