Roland PK-6 Manuale del proprietario
- Categoria
- Strumenti musicali
- Tipo
- Manuale del proprietario


WARNING
– To reduce the risk of fire or electric shock, do not expose this device to rain or moisture.
For Canada
This Class B digital apparatus meets all requirements of the Canadian Interference-Causing Equipment Regulations.
NOTICE
AVIS
For the USA
FEDERAL COMMUNICATIONS COMMISSION
RADIO FREQUENCY INTERFERENCE STATEMENT
This equipment has been tested and found to comply with the limits for a Class B digital device, pursuant to Part 15 of the
FCC Rules. These limits are designed to provide reasonable protection against harmful interference in a residential
installation. This equipment generates, uses, and can radiate radio frequency energy and, if not installed and used in
accordance with the instructions, may cause harmful interference to radio communications. However, there is no guarantee
that interference will not occur in a particular installation. If this equipment does cause harmful interference to radio or
television reception, which can be determined by turning the equipment off and on, the user is encouraged to try to correct the
interference by one or more of the following measures:
— Reorient or relocate the receiving antenna.
— Increase the separation between the equipment and receiver.
— Connect the equipment into an outlet on a circuit different from that to which the receiver is connected.
— Consult the dealer or an experienced radio/TV technician for help.
This device complies with Part 15 of the FCC Rules. Operation is subject to the following two conditions:
(1) This device may not cause harmful interference, and
(2) This device must accept any interference received, including interference that may cause undesired operation.
Unauthorized changes or modification to this system can void the users authority to operate this equipment.
This equipment requires shielded interface cables in order to meet FCC class B Limit.
This product complies with the requirements of European Directive EMC 2004/108/EC.
For EU Countries
For EU countries
For the USA
For Canada
WARNING
This product contains chemicals known to cause cancer, birth defects and other reproductive harm, including lead.
For C.A. US
(
Proposition 65
)
For C.A. US (Proposition 65)
IMPORTANT: THE WIRES IN THIS MAINS LEAD ARE COLOURED IN ACCORDANCE WITH THE FOLLOWING CODE.
BLUE:
BROWN:
As the colours of the wires in the mains lead of this apparatus may not correspond with the coloured markings identifying
the terminals in your plug, proceed as follows:
The wire which is coloured BLUE must be connected to the terminal which is marked with the letter N or coloured BLACK.
The wire which is coloured BROWN must be connected to the terminal which is marked with the letter L or coloured RED.
Under no circumstances must either of the above wires be connected to the earth terminal of a three pin plug.
NEUTRAL
LIVE
For the U.K.
For the UK
PK-6_multi.book Page 2 Friday, January 13, 2012 1:58 PM

r
ENGLISH ENGLISH ENGLISH ENGLISH ENGLISH ENGLISH
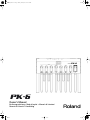
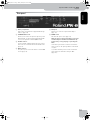
Thank you, and congratulations on your choice of the Roland PK-6 Dynamic MIDI Pedal.
Features
•Thirteen-note pedal keyboard with dynamics
• Easy to use and to set up, thanks to its display.
•Features four modes: MONO, POLY, DRUM, and MIDI CONTROLLER.
The PK-6 can be used to transmit chords (polyphonic mode) or notes (monophonic mode) to an external arranger keyboard,
MIDI module, organ, etc. It may also come in handy for guitar and bass players who need to add notes or chords to their
parts and therefore wish to control a MIDI-compatible sound module. After selecting a drum set on the receiving MIDI
instrument, the PK-6 can even be used to play drum parts with your feet. In addition, the PK-6 can transmit other MIDI com-
mands that can be used to control Music Style/Rhythm playback on an arranger module (like the BK-7m) or an arranger key-
board.
• HOLD, OCTAVER BASS and PORTAMENTO footswitches.
These footswitches allow you to hold the last note you played, to add a note one octave below the note you actually play
and to create glides between one note and the next.
• Convenient SHIFT footswitch for instant access to the PK-6’s parameters.
• You can decide to control parameters like expression, filter cutoff frequency, resonance, etc., with and external foot switch
(EXTERNAL PEDAL jack) by connecting an optional expression pedal (Roland EV-5), an optional pedal switch (Roland DP-
series) or an optional foot switch (BOSS FS-5U).
•The MIDI Merge function (MIDI IN to MIDI OUT) combines MIDI messages the PK-6 receives from an external MIDI device
with the ones you generate by playing it and transmits all MIDI data to a receiving MIDI device.
•Three-way power supply.
The PK-6 can be powered using 6 alkaline AA-type batteries (supplied), using an optional adaptor or via its PK OUT socket (if
you connect it to device that has a PK IN socket).
The explanations in this manual include illustrations that depict what should typically be shown by the display. Note, how-
ever, that your unit may incorporate a newer, enhanced version of the system (e.g., include newer sounds), so what you
actually see in the display may not always match what appears in the manual.
Before using this instrument, carefully read “Using the unit safely” auf S. 4 and “Important notes” auf S. 6. Those sections provide infor-
mation concerning the proper operation of the PK-6. Additionally, in order to feel assured that you have gained a good grasp of every
feature provided by your new unit, the manual should be read in its entirety. The manual should be saved and kept on hand as a conve-
nient reference.
Copyright © 2011 ROLAND EUROPE. All rights reserved. No part of this publication may be reproduced in any form without the written permission of Roland Europe S.p.a.
Roland and GS are either registered trademarks or trademarks of Roland Corporation in the United States and/or other countries.
Owner’s Manual
PK-6_multi.book Page 3 Friday, January 13, 2012 1:58 PM

4
r
Dynamic MIDI Pedal
PK-6
Using the unit safely
Do not disassemble or modify by yourself
• Do not open (or modify in any way) the unit or its AC
adaptor.
.................................................................................................
Do not repair or replace parts by yourself
.
• Do not attempt to repair the unit, or replace parts within
it (except when this manual provides specific instructions
directing you to do so). Refer all servicing to your retailer,
the nearest Roland Service Center, or an authorized
Roland distributor, as listed on the “Information” page
.................................................................................................
Don’t use or store in locations that are
• Subject to temperature extremes (e.g., direct sunlight
in an enclosed vehicle, near a heating duct, on top of
heat-generating equipment); or are
• Damp (e.g., baths, washrooms, on wet floors); or are
• Exposed to steam or smoke; or are
• Subject to salt exposure; or are
• Humid; or are
• Exposed to rain; or are
• Dusty or sandy; or are
• Subject to high levels of vibration and shakiness.
.................................................................................................
Don’t place in an unstable location
•Make sure you always have the unit placed so it is level
and sure to remain stable. Never place it on stands that
could wobble, or on inclined surfaces.
.................................................................................................
Use only the specified adaptor and the
correct voltage
• Be sure to use only the PSB-1U AC adaptor, and make
sure the line voltage at the installation matches the input
voltage specified on the AC adaptor's body. Other AC
adaptors may use a different polarity, or be designed for
a different voltage, so their use could result in damage,
malfunction, or electric shock.
.................................................................................................
Use only the PSB-1U AC adaptor power
cord
• Use only the PSB-1U power-supply cord. Also, the sup-
plied power cord must not be used with any other device.
................................................................................................
Do not bend the power cord or place heavy
objects on it
• Do not excessively twist or bend the power cord, nor
place heavy objects on it. Doing so can damage the cord,
producing severed elements and short circuits. Damaged
cords are fire and shock hazards!
................................................................................................
Don’t allow foreign objects or liquids to
enter the unit; never place containers with
liquid on the unit
• Never allow foreign objects (e.g., flammable material,
coins, pins) or liquids (e.g., water or juice) to enter this
unit. Doing so may cause short circuits, faulty operation,
or other malfunctions.
................................................................................................
Turn off the unit if an abnormality or mal-
function occurs
•Immediately turn the power off, remove the AC adaptor
from the outlet, and request servicing by your retailer,
the nearest Roland Service Center, or an authorized
Roland distributor, as listed on the “Information” page
when:
• The AC adaptor, the power-supply cord, or the plug
has been damaged; or
• If smoke or unusual odor occurs
• Objects have fallen into, or liquid has been spilled onto
the unit; or
• The unit has been exposed to rain (or otherwise has
become wet); or
• The unit does not appear to operate normally or exhibits a
marked change in performance.
................................................................................................
Used for instructions intended to alert
the user to the risk of injury or material
damage should the unit be used
improperly.
* Material damage refers to damage or
other adverse effects caused with
respect to the home and all its
furnishings, as well to domestic
animals or pets.
Used for instructions intended to alert
the user to the risk of death or severe
injury should the unit be used
improperly.
The ● symbol alerts the user to things that must be
carried out. The specific thing that must be done is
indicated by the design contained within the circle. In
the case of the symbol at left, it means that the power-
cord plug must be unplugged from the outlet.
The symbol alerts the user to important instructions
or warnings.The specific meaning of the symbol is
determined by the design contained within the
triangle. In the case of the symbol at left, it is used for
general cautions, warnings, or alerts to danger.
The symbol alerts the user to items that must never
be carried out (are forbidden). The specific thing that
must not be done is indicated by the design contained
within the circle. In the case of the symbol at left, it
means that the unit must never be disassembled.
PK-6_multi.book Page 4 Friday, January 13, 2012 1:58 PM

Using the unit safely
Dynamic MIDI Pedal PK-6
r
5
ENGLISH ENGLISH ENGLISH ENGLISH ENGLISH ENGLISH
Adults must provide supervision in places
where children are present
•When using the unit in locations where children are
present, be careful so no mishandling of the unit can
take place. An adult should always be on hand to provide
supervision and guidance.
.................................................................................................
Do not drop or subject to strong impact
• Protect the unit from strong impact.
(Do not drop it!)
.................................................................................................
Do not share an outlet with an unreason-
able number of other devices
• Do not force the unit's power-supply cord to share an
outlet with an unreasonable number of other devices. Be
especially careful when using extension cords—the total
power used by all devices you have connected to the
extension cord's outlet must never exceed the power rat-
ing (watts/amperes) for the extension cord. Excessive
loads can cause the insulation on the cord to heat up and
eventually melt through.
.................................................................................................
Do not use overseas
• Before using the unit in a foreign country, consult with
your retailer, the nearest Roland Service Center, or an
authorized Roland distributor, as listed on the “Informa-
tion” page.
.................................................................................................
Handle batteries carefully
.
• Batteries must never be recharged, heated, taken apart,
or thrown into fire, or water.
• Never expose batteries to excessive heat such as sun-
shine, fire or the like.
• Incorrect handling of batteries, rechargeable batteries, or
a battery charger can cause leakage, overheating, fire, or
explosion. Before use, you must read and strictly observe
all of the precautions that accompany the batteries,
rechargeable batteries, or battery charger.
• If used improperly, batteries may explode or leak and
cause damage or injury. In the interest of safety, please
read and observe the following precautions.
• Carefully follow the installation instructions for bat-
teries, and make sure you observe the correct polarity.
• Avoid using new batteries together with used ones. In
addition, avoid mixing different types of batteries.
• Remove the batteries whenever the unit is to remain
unused for an extended period of time.
• Never keep batteries together with metallic objects
such as ballpoint pens, necklaces, hairpins, etc.
• Used batteries must be disposed of in compliance with
whatever regulations for their safe disposal that may
be observed in the region in which you live
Place in a well ventilated location
• The unit and the AC adaptor should be located so their
location or position does not interfere with their proper
ventilation.
.................................................................................................
Grasp the plug when connecting or dis-
connecting the AC adaptor
•Always grasp only the plug on the AC adaptor cord when
plugging into, or unplugging from, an outlet or this unit.
................................................................................................
Periodically clean the AC adaptor’s plug
• At regular intervals, you should unplug the AC adaptor
and clean it by using a dry cloth to wipe all dust and
other accumulations away from its prongs. Also, discon-
nect the power plug from the power outlet whenever the
unit is to remain unused for an extended period of time.
Any accumulation of dust between the power plug and
the power outlet can result in poor insulation and lead to
fire.
................................................................................................
Manage cables for safety
.
• Try to prevent cords and cables from becoming entan-
gled. Also, all cords and cables should be placed so they
are out of the reach of children.
................................................................................................
Avoid climbing on top of the unit, or plac-
ing heavy objects on it
• Never climb on top of, nor place heavy objects on the
unit.
................................................................................................
Do not connect or disconnect the AC
adaptor with wet hands
• Never handle the AC adaptor or its plugs with wet hands
when plugging into, or unplugging from, an outlet or
this unit.
................................................................................................
Disconnect everything before moving the
unit
• Before moving the unit, disconnect the AC adaptor and
all cords coming from external devices.
................................................................................................
Unplug the AC adaptor from the outlet
before cleaning
• Before cleaning the unit, turn off the power and unplug
the AC adaptor from the outlet.
................................................................................................
If there is a possibility of lightning strike,
disconnect the AC adaptor from the outlet
•Whenever you suspect the possibility of lightning in your
area, disconnect the AC adaptor from the outlet.
................................................................................................
Handle leaking batteries carefully
• If fluid has leaked from a battery, make sure not to touch
it with your bare hands.
• If any of the leaking fluid gets into your eyes, the loss of
vision may result. Do not rub your eyes; use clean water
to flush them thoroughly. Then, promptly see a doctor.
• Burning of the skin or dermatitis may result if fluid has
gotten onto your skin or clothing. Use clean water to
flush affected areas thoroughly; then, promptly see a
doctor.
• Using a soft cloth, carefully wipe any remaining fluid from the
inside of the battery compartment. Then, install new batteries.
PK-6_multi.book Page 5 Friday, January 13, 2012 1:58 PM

Important notes
6
r
Dynamic MIDI Pedal
PK-6
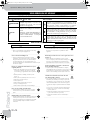
1. Important notes
In addition to the items listed under “Using the unit safely” auf S. 4, please read and observe the following:
Power supply
• Do not connect this unit to same electrical outlet that is being
used by an electrical appliance that is controlled by an inverter
(such as a refrigerator, washing machine, microwave oven, or air
conditioner), or that contains a motor. Depending on the way in
which the electrical appliance is used, power supply noise may
cause this unit to malfunction or may produce audible noise. If it is
not practical to use a separate electrical outlet, connect a power
supply noise filter between this unit and the electrical outlet.
• The AC adaptor will begin to generate heat after long hours of
consecutive use. This is normal, and is not a cause for concern.
• To prevent malfunction and equipment failure, always make sure
to turn off the power on all your equipment before you make any
connections.
•With the factory settings, the PK-6 will automatically be switched
off 240 minutes (4 hours) after you stop playing or operating the
unit. If you don't want the unit to turn off automatically, change
the “Auto Off” setting to “Off” as described on S. 25.
Note:
The settings you were editing will be lost when the
unit is turned off. If you want to keep your settings, you
must save your settings before turning the unit off.
Power supply: Use of Batteries
•When installing or replacing batteries, always turn this unit off
and disconnect any other devices you may have connected. This
way, you can prevent malfunction and damage.
• The life of the supplied batteries may be limited, since its primary
purpose was to enable testing.
• If operating this unit on batteries, please use alkaline batteries.
Placement
• This device may interfere with radio and television reception. Do
not use it in the vicinity of such receivers.
• Noise may be produced if wireless communications devices, such
as cell phones, are operated in the vicinity of this unit. Such noise
could occur when receiving or initiating a call, or while conversing.
Should you experience such problems, you should relocate such
wireless devices so they are at a greater distance from this unit, or
switch them off.
• Do not expose the unit to direct sunlight, place it near devices that
radiate heat, leave it inside an enclosed vehicle, or otherwise sub-
ject it to temperature extremes. Excessive heat can deform or dis-
color the unit.
•When moved from one location to another where the temperature
and/or humidity is very different, water droplets (condensation)
may form inside the PK-6. Damage or malfunction may result if
you attempt to use the unit in this condition. Therefore, before
using the unit, you must allow it to stand for several hours, until
the condensation has completely evaporated.
• Do not allow objects to remain on top of the keyboard. This can be
the cause of malfunction, such as keys ceasing to produce sound.
• Depending on the material and temperature of the surface on
which you place the unit, its rubber feet may discolor or mar the
surface.
You can place a piece of felt or cloth under the rubber feet to pre-
vent this from happening. If you do so, please make sure that the
unit will not slip or move accidentally.
• Do not put anything that contains water (e.g. flower vases) on the
PK-6. Also, avoid the use of insecticides, perfumes, alcohol, nail
polish, spray cans, etc., near the unit. Swiftly wipe away any liquid
that spills on the unit using a dry, soft cloth.
Maintenance
• For everyday cleaning wipe the unit with a soft, dry cloth or one
that has been slightly dampened with water. To remove stubborn
dirt, use a cloth impregnated with a mild, non abrasive detergent.
Afterwards, be sure to wipe the unit thoroughly with a soft, dry
cloth.
• Never use benzene, thinner, alcohol or solvents of any kind, to
avoid the possibility of discoloration and/or deformation.
Repairs and Data
•Please be aware that all data contained in the unit's memory may
be lost when the unit is sent for repairs. Important data should
always be backed up in another MIDI device (e.g., a sequencer), or
written down on paper (when possible). During repairs, due care is
taken to avoid the loss of data. However, in certain cases (such as
when circuitry related to memory itself is out of order), we regret
that it may not be possible to restore the data, and Roland
assumes no liability concerning such loss of data.
Additional precautions
•Please be aware that the contents of memory can be irretrievably
lost as a result of a malfunction, or the improper operation of the
unit. To protect yourself against the risk of loosing important data,
we recommend that you periodically save a backup copy of impor-
tant data you have stored in the unit's memory, in another MIDI
device (e.g., a sequencer).
• Unfortunately, it may be impossible to restore the contents of data
that was stored in the unit’s memory once it has been lost. Roland
Corporation assumes no liability concerning such loss of data.
• Use a reasonable amount of care when using the PK-6’s buttons,
other controls and jacks/connectors. Rough handling can lead to
malfunctions.
• Never strike or apply strong pressure to the display.
•When connecting/disconnecting cables, grasp the connector
itself—never pull on the cable. This way you will avoid causing
shorts, or damage to the cable’s internal elements.
• To avoid disturbing others nearby, try to keep the unit's volume at
reasonable levels.
• The sound of pedals being struck and vibrations produced by play-
ing an instrument can be transmitted through a floor or wall to an
unexpected extent. Please take care not to cause annoyance to
others nearby.
•When you need to transport the unit, package it in the box
(including padding) that it came in, if possible. Otherwise, you will
need to use equivalent packaging materials.
• Use only the specified expression pedal (Roland EV-series, sold
separately) or pedal switch (Roland DP-series, BOSS FS-5U). By
connecting any other expression pedal or footswitch, you risk
causing malfunction and/or damage the unit.
•When you operate the pedals, please be careful not to get your
fingers pinched between the movable part and the panel. In places
where small children are present, make sure that an adult provides
supervision and guidance.
PK-6_multi.book Page 6 Friday, January 13, 2012 1:58 PM

Important notes
Dynamic MIDI Pedal PK-6
r
7
ENGLISH ENGLISH ENGLISH ENGLISH ENGLISH ENGLISH
Contents
1. Important notes. . . . . . . . . . . . . . . . . . . . . . . . . . . . . . . . . . . . . . . . . . . . . . . . . . . . . . . . . . . . . . . . . . . .6
2. Panel description . . . . . . . . . . . . . . . . . . . . . . . . . . . . . . . . . . . . . . . . . . . . . . . . . . . . . . . . . . . . . . . . . . .8
Front panel. . . . . . . . . . . . . . . . . . . . . . . . . . . . . . . . . . . . . . . . . . . . . . . . . . . . . . . . . . . . . . . . . . . . . . . . . . . . . . .8
Rear panel . . . . . . . . . . . . . . . . . . . . . . . . . . . . . . . . . . . . . . . . . . . . . . . . . . . . . . . . . . . . . . . . . . . . . . . . . . . . . . .9
3. Preparations before using the PK-6. . . . . . . . . . . . . . . . . . . . . . . . . . . . . . . . . . . . . . . . . . . . . . . . . . .10
Inserting batteries . . . . . . . . . . . . . . . . . . . . . . . . . . . . . . . . . . . . . . . . . . . . . . . . . . . . . . . . . . . . . . . . . . . . . . .10
Battery life . . . . . . . . . . . . . . . . . . . . . . . . . . . . . . . . . . . . . . . . . . . . . . . . . . . . . . . . . . . . . . . . . . . . . . . . . . . . . . . . . . . . . 10
Battery charge indication . . . . . . . . . . . . . . . . . . . . . . . . . . . . . . . . . . . . . . . . . . . . . . . . . . . . . . . . . . . . . . . . . . . . . . . . 10
Using an AC adaptor (optional) . . . . . . . . . . . . . . . . . . . . . . . . . . . . . . . . . . . . . . . . . . . . . . . . . . . . . . . . . . . .11
Connecting the PK-6 to an external instrument with its PK cable . . . . . . . . . . . . . . . . . . . . . . . . . . . . . .11
Connecting the PK-6 to an external MIDI device . . . . . . . . . . . . . . . . . . . . . . . . . . . . . . . . . . . . . . . . . . . . .12
Using both the PK-6 and a MIDI keyboard controller . . . . . . . . . . . . . . . . . . . . . . . . . . . . . . . . . . . . . . . . .13
Connecting an optional expression pedal or footswitch to PK-6 . . . . . . . . . . . . . . . . . . . . . . . . . . . . . . .13
4. Using the PK-6’s modes . . . . . . . . . . . . . . . . . . . . . . . . . . . . . . . . . . . . . . . . . . . . . . . . . . . . . . . . . . . .14
MONO mode . . . . . . . . . . . . . . . . . . . . . . . . . . . . . . . . . . . . . . . . . . . . . . . . . . . . . . . . . . . . . . . . . . . . . . . . . . . .14
POLY mode. . . . . . . . . . . . . . . . . . . . . . . . . . . . . . . . . . . . . . . . . . . . . . . . . . . . . . . . . . . . . . . . . . . . . . . . . . . . . .14
DRUM mode . . . . . . . . . . . . . . . . . . . . . . . . . . . . . . . . . . . . . . . . . . . . . . . . . . . . . . . . . . . . . . . . . . . . . . . . . . . .15
MIDI CONTROLLER mode. . . . . . . . . . . . . . . . . . . . . . . . . . . . . . . . . . . . . . . . . . . . . . . . . . . . . . . . . . . . . . . . . .16
Using the PK-6’s performance functions . . . . . . . . . . . . . . . . . . . . . . . . . . . . . . . . . . . . . . . . . . . . . . . . . . . .17
HOLD function. . . . . . . . . . . . . . . . . . . . . . . . . . . . . . . . . . . . . . . . . . . . . . . . . . . . . . . . . . . . . . . . . . . . . . . . . . . . . . . . . . 17
OCTAVER BASS function . . . . . . . . . . . . . . . . . . . . . . . . . . . . . . . . . . . . . . . . . . . . . . . . . . . . . . . . . . . . . . . . . . . . . . . . . 17
PORTAMENTO function . . . . . . . . . . . . . . . . . . . . . . . . . . . . . . . . . . . . . . . . . . . . . . . . . . . . . . . . . . . . . . . . . . . . . . . . . . 18
Cross Portamento function. . . . . . . . . . . . . . . . . . . . . . . . . . . . . . . . . . . . . . . . . . . . . . . . . . . . . . . . . . . . . . . . . . . . . . . 18
5. Other useful functions . . . . . . . . . . . . . . . . . . . . . . . . . . . . . . . . . . . . . . . . . . . . . . . . . . . . . . . . . . . . .19
Transpose function. . . . . . . . . . . . . . . . . . . . . . . . . . . . . . . . . . . . . . . . . . . . . . . . . . . . . . . . . . . . . . . . . . . . . . .19
Octave function . . . . . . . . . . . . . . . . . . . . . . . . . . . . . . . . . . . . . . . . . . . . . . . . . . . . . . . . . . . . . . . . . . . . . . . . .19
Sending program change messages to external devices (PG). . . . . . . . . . . . . . . . . . . . . . . . . . . . . . . . . . .20
MIDI transmit channels. . . . . . . . . . . . . . . . . . . . . . . . . . . . . . . . . . . . . . . . . . . . . . . . . . . . . . . . . . . . . . . . . . .21
6. Advanced settings (Parameter mode) . . . . . . . . . . . . . . . . . . . . . . . . . . . . . . . . . . . . . . . . . . . . . . . . .23
Basic operation in Parameter mode . . . . . . . . . . . . . . . . . . . . . . . . . . . . . . . . . . . . . . . . . . . . . . . . . . . . . . . .23
Saving the settings (Write Function). . . . . . . . . . . . . . . . . . . . . . . . . . . . . . . . . . . . . . . . . . . . . . . . . . . . . . . .23
Parameter settings . . . . . . . . . . . . . . . . . . . . . . . . . . . . . . . . . . . . . . . . . . . . . . . . . . . . . . . . . . . . . . . . . . . . . . .24
Archiving and restoring your settings (MIDI Dump) . . . . . . . . . . . . . . . . . . . . . . . . . . . . . . . . . . . . . . . . . .26
Getting ready to archive/restore . . . . . . . . . . . . . . . . . . . . . . . . . . . . . . . . . . . . . . . . . . . . . . . . . . . . . . . . . . . . . . . . . . 26
Archiving your settings to the external sequencer . . . . . . . . . . . . . . . . . . . . . . . . . . . . . . . . . . . . . . . . . . . . . . . . . . . 26
Transmitting your settings back to the PK-6 . . . . . . . . . . . . . . . . . . . . . . . . . . . . . . . . . . . . . . . . . . . . . . . . . . . . . . . . 26
Restoring the settings to the factory condition (Factory Reset) . . . . . . . . . . . . . . . . . . . . . . . . . . . . . . . .26
7. Appendix. . . . . . . . . . . . . . . . . . . . . . . . . . . . . . . . . . . . . . . . . . . . . . . . . . . . . . . . . . . . . . . . . . . . . . . . .27
Troubleshooting . . . . . . . . . . . . . . . . . . . . . . . . . . . . . . . . . . . . . . . . . . . . . . . . . . . . . . . . . . . . . . . . . . . . . . . . .27
Specifications. . . . . . . . . . . . . . . . . . . . . . . . . . . . . . . . . . . . . . . . . . . . . . . . . . . . . . . . . . . . . . . . . . . . . . . . . . .28
8. MIDI Implementation . . . . . . . . . . . . . . . . . . . . . . . . . . . . . . . . . . . . . . . . . . . . . . . . . . . . . . . . . . . . 159
MIDI Implementation Chart . . . . . . . . . . . . . . . . . . . . . . . . . . . . . . . . . . . . . . . . . . . . . . . . . . . . . . . . . . . . . .161
PK-6_multi.book Page 7 Friday, January 13, 2012 1:58 PM

Panel description
8
r
Dynamic MIDI Pedal
PK-6
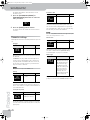
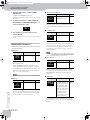
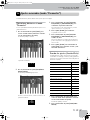
2. Panel description
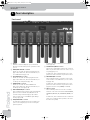
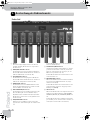
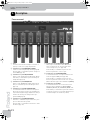
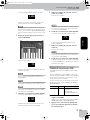
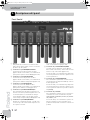
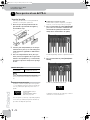
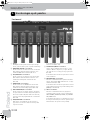
Front panel
A
Display
This three-character display keeps you informed
about the current function, mode or parameter value
you set.
B
MONO/MIDI CHANNEL footswitch
Allows you to enable the PK-6’s monophonic mode
(page 14). In Shift mode, this footswitch allows you
to set MIDI channels (page 21).
C
POLY/TRANSPOSE footswitch
Allows you to enable the PK-6’s polyphonic mode
(page 14). In Shift mode, this footswitch allows you
to change the transposition (page 19).
D
DRUM/OCTAVE footswitch
Allows you to enable the PK-6’s DRUM mode
(page 15). In Shift mode, this footswitch allows you
to change the octave (page 19).
E
MIDI CONTROLLER/PG footswitch
This footswitch sets the PK-6 to control the playback/
pattern selection of Music Styles/Rhythms on an
external arranger instrument (page 16). In Shift
mode, it allows you to send MIDI Program Change
messages (page 20).
F
HOLD/PARAMETER footswitch
Pressing this footswitch allows you to hold the note
your are currently playing even after releasing the
pedal in question.
In Shift mode, this footswitch selects Parameter
mode (page 23).
G
OCTAVER BASS/DOWN footswitch
Allows you to switch Octaver Bass mode on and off.
When on, the PK-6 adds a lower note to the one you
are playing (page 17).
In Shift mode, this footswitch allows you to select
parameters from a list and to set parameter values.
H
PORTAMENTO/UP footswitch
This footswitch activates or switches off the Porta-
mento function of the MIDI device you are control-
ling (page 18).
In Shift mode, this footswitch allows you to select
parameters from a list and to set parameter values
(opposite direction of the [DOWN] footswitch).
I
SHIFT footswitch
This footswitch provides access to the secondary
functions of the other footswitches: MIDI CHANNEL,
TRANSPOSE, OCTAVE, PG, PARAMETER, DOWN, and
UP.
In Shift mode, this footswitch is used to confirm the
values you set with the PK-6’s pedals (see the num-
bers above the pedals).
B
A
CDE FGHI
PK-6_multi.book Page 8 Friday, January 13, 2012 1:58 PM

Rear panel
Dynamic MIDI Pedal PK-6
r
9
ENGLISH ENGLISH ENGLISH ENGLISH ENGLISH ENGLISH
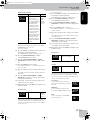
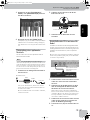
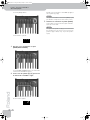
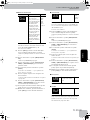
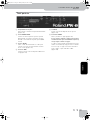
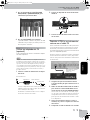
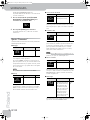
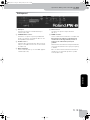
Rear panel
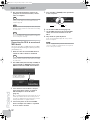
A
Battery compartment
This is where you install the 6 supplied LR6 AA-type
batteries (page 10).
B
EXTERNAL PEDAL socket
Allows you to connect an optional expression pedal
(Roland EV-5), an optional pedal switch (Roland DP-
series) or an optional footswitch (BOSS FS-5U).
C
PK OUT connector
Use the PK cable supplied with the PK-6 to connect
this socket to an external instrument’s PK IN socket
(page 11).
D
MIDI connectors
They allow you to connect the PK-6 to external MIDI
devices (page 12).
E
DC IN jack
Allows you to connect an optional AC adaptor
(page 11).
F
POWER switch
This turns the power on/off (page 12).
With the factory settings, the PK-6’s power will
automatically be switched off 240 minutes (4
hours) after you stop playing or operating the
PK-6.
If the PK-6’s power has been turned off automati-
cally, you can use the [Power] switch to turn it back
on again.
If you don’t want the power to turn off automati-
cally, change the “Auto Off” setting to “OFF”
(page 25).
A
BC D EF
PK-6_multi.book Page 9 Friday, January 13, 2012 1:58 PM

Preparations before using the PK-6
10
r
Dynamic MIDI Pedal PK-6
3. Preparations before using the PK-6
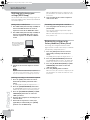
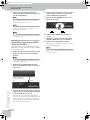
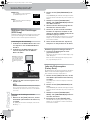
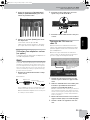
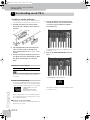
Inserting batteries
The PK-6 can be powered with the 6 supplied LR6
AA-type batteries or equivalent replacement batte-
ries.
1.
Remove the lid from the PK-6’s battery
compartment by pressing the tab and lifting
the lid.
2.
Insert 6 AA-type batteries (supplied) into
the battery compartment (3 on either side),
taking care to orient them in accordance
with the “+” and “–” indications.
3.
Close the battery compartment: first insert
the catches on the lid into the matching
cavities, then push the lid down firmly until
you hear a click.
Battery life
NOTE
The battery life given here is only an approximation. It will
vary depending on the frequency and conditions of use.
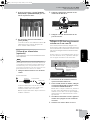
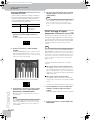
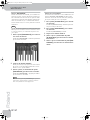
Battery charge indication
If, while using batteries, three dots “…” appear in the
display, the remaining battery power is low. In this
case, replace the batteries at your earliest conveni-
ence.
If the three dots and the display message flash, you
need to replace the batteries right away (or use an
optional adaptor).
■ Checking the battery charge
The PK-6 also allows you to check the remaining bat-
tery charge at any time:
1.
Press the [SHIFT/ENTER] footswitch to acti-
vate the secondary footswitch functions
(the indications below the footswitches).
The [SHIFT] indicator lights. The display shows “---”.
2.
Press the [HOLD/PARAMETER] footswitch.
The [PARAMETER] indicator flashes.
The display will indicate “rEt” to signal the PK-6 is
now in Parameter mode.
Continued use Approximately 16 hours
. . .
Mon
Lit three dots: remaining battery power
is low.
Flashing three dots and current mes-
sage: replace batteries now.
ret
PK-6_multi.book Page 10 Friday, January 13, 2012 1:58 PM

Using an AC adaptor (optional)
Dynamic MIDI Pedal PK-6
r
11
ENGLISH ENGLISH ENGLISH ENGLISH ENGLISH ENGLISH
3.
Press the [OCTAVER BASS/DOWN] or [POR-
TAMENTO/UP] footswitch to select the “Bat”
parameter.
4.
Press the [ENTER] pedal to confirm.
The display shows the battery status from 0 to 100.
“100” means full charge, “0” means that you need to
replace batteries right away.
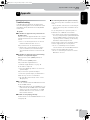
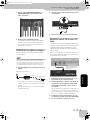
Using an AC adaptor (optional)
The PK-6 can also be powered with an optional PSB-1U
adapter.
NOTE
Be sure to use only the AC adaptor recommended for the PK-6
(PSB-1U). Also, make sure the line voltage at the installation
matches the input voltage specified on the AC adaptor’s body.
Other AC adaptors may use a different polarity, or be designed
for a different voltage, so their use could result in damage,
malfunction, or electric shock.
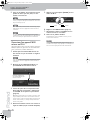
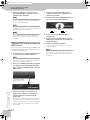
1.
Connect the power cord to the optional AC
adaptor.
Place the AC adaptor so the side with the indicator
faces upwards and the side with textual information
faces downwards.
The indicator will light once you plug the AC adaptor
into a wall outlet.
2.
Connect the optional AC adaptor to the
PK-6’s DC IN socket.
3.
Plug the power cord into a power outlet.
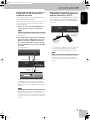
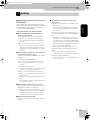
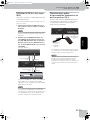
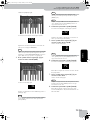
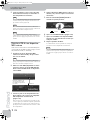
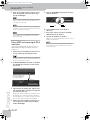
Connecting the PK-6 to an external
instrument with its PK cable
Use the PK cable that is supplied with the PK-6 to con-
nect the external instrument and PK-6. This connection
system will allow the external instrument to power the
PK-6 (so that you don’t need batteries or an optional
adaptor).
The PK-6 will be turned on/off by the power switch of
the external instrument, regardless of the position of
the PK-6’s own power switch.
1.
Make sure that the external instrument’s
power is turned off and the volume is mini-
mized.
2.
Use the PK cable that is supplied with the
PK-6 to connect the external instrument’s
PK IN connector to the PK-6’s PK OUT con-
nector.
Once everything is properly connected, be sure to fol-
low the procedure below to turn on their power. If
you turn on equipment in the wrong order, you risk
causing malfunction or equipment failure.
3.
Turn on the power of the external instru-
ment and adjust the volume as explained in
the its owner’s manual.
4.
Check whether the PK-6 is on as well.
To the PK-6’s DC IN connector
AC adaptor
Power cord
To an AC outlet
Indicator
To a wall outlet
C-200
(Other compatible instruments
are: Roland AT-350C, AT-900C,
V-Combo, etc.)
PK-6_multi.book Page 11 Friday, January 13, 2012 1:58 PM

Preparations before using the PK-6
12
r
Dynamic MIDI Pedal PK-6
5.
Play the pedal keyboard. If you hear the
pedal part of external instrument, connec-
tions are complete.
NOTE
If the external instrument’s Pedal part sounds in the wrong
octave, you can transpose the note numbers the PK-6
transmits (page 19).
NOTE
To prevent malfunction and equipment failure, always turn
down the volume, and turn off all the units before making
any connections.
NOTE
This unit is equipped with a protection circuit. A brief inter-
val (a few seconds) after turning the unit on is requested
before it will operate normally.
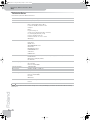
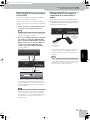
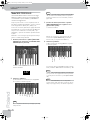
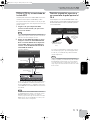
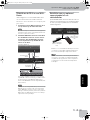
Connecting the PK-6 to an external
MIDI device
You can use your PK-6 as a MIDI controller for a MIDI
tone generator (Roland arranger keyboard, synthesizer,
sound module, etc.),
1.
Make sure that the external MIDI device is
turned off and its volume is minimized.
NOTE
To prevent malfunction and equipment failure, always turn
down the volume, and turn off all the units before making
any connections.
2.
Use a MIDI cable (commercially available) to
connect the PK-6’s MIDI OUT socket to the
MIDI IN connector of MIDI external device.
3.
Insert batteries into the PK-6’s compart-
ment (page 10) or connect an optional
PSB-1U adaptor to its DC IN socket
(page 11).
Once everything is properly connected, be sure to fol-
low the procedure below to turn on their power. If
you turn on equipment in the wrong order, you risk
causing malfunction or equipment failure.
4.
Turn on the power of the external MIDI
device and adjust the volume as explained
in the its owner’s manual.
5.
Press the PK-6’s [POWER] switch positioned
in the rear panel.
6.
Set the PK-6’s MIDI channel (page 21).
7.
Set the MIDI channel on the external MIDI
device to match the channel set for the
PK-6.
8.
Play the PK-6’s pedal keyboard.
If the external instrument plays the notes, connec-
tions are complete.
NOTE
This unit is equipped with a protection circuit. A brief inter-
val (a few seconds) after turning the unit on is requested
before it will operate normally.
BK-7m, BK-5, JUPITER-80 (or any
other MIDI-compatible instrument
with an internal tone generator)
MIDI IN
MIDI OUT
On Off
PK-6_multi.book Page 12 Friday, January 13, 2012 1:58 PM

Using both the PK-6 and a MIDI keyboard controller
Dynamic MIDI Pedal PK-6
r
13
ENGLISH ENGLISH ENGLISH ENGLISH ENGLISH ENGLISH
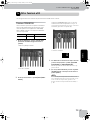
Using both the PK-6 and a MIDI
keyboard controller
You can also control an external MIDI module using
both a MIDI keyboard and the PK-6.
This allows you to use both your hands and your feet to
control either the same part or two different parts of
the external module.
1.
Make sure that the external MIDI device is
turned off and its volume is minimized.
NOTE
To prevent malfunction and equipment failure, always turn
down the volume, and turn off all the units before making
any connections.
2.
Use a MIDI cable (commercially available) to
connect the PK-6’s MIDI OUT socket to the
MIDI IN connector of MIDI external device.
Use another MIDI cable to connect the key-
board’s MIDI OUT socket to the PK-6’s MIDI
IN socket.
In this scenario, the messages the PK-6 receives via
its MIDI IN socket are mixed (“merged”) with the
PK-6’s MIDI messages and transmitted via its MIDI
OUT socket to the external MIDI module (“Soft Thru”
function).
NOTE
The exact copy of the MIDI data received via the PK-6’s
MIDI IN socket is also sent out from its MIDI THRU socket.
Though you could also use this connection scenario, be
aware that it only works if your MIDI module has two MIDI
IN sockets. Therefore, the “merge” approach is usually more
practical.
Connecting an optional expression
pedal or footswitch to PK-6
The PK-6 provides an EXTERNAL PEDAL socket to which
you can connect an optional footswitch (Roland DP-
series or BOSS FS-5U) or an expression pedal (Roland
EV-series).
If you connect a footswitch, you can select the func-
tion it should perform (page 24). By default, the
footswitch will control the “Expression” function.
NOTE
Use only the specified expression pedal (Roland EV-series,
sold separately) or pedal switch (Roland DP-series, BOSS
FS-5U). By connecting any other expression pedal or
footswitch, you risk causing malfunction and/or damage
the unit.
BK-7m, BK-5, JUPITER-80, etc.
MIDI IN
MIDI OUT
MIDI OUT
MIDI IN
Data sent by the
keyboard
Data sent by the PK-6
Optional footswitch
(Roland DP-series,
BOSS FS-5U)
—or—
Optional expression
pedal (Roland EV-
series)
PK-6_multi.book Page 13 Friday, January 13, 2012 1:58 PM

Using the PK-6’s modes
14
r
Dynamic MIDI Pedal PK-6
4. Using the PK-6’s modes
The PK-6 can be used in one of four modes: MONO, POLY, DRUM, or MIDI CONTROLLER. Each mode is intended for a dif-
ferent application, so be sure to read the following so as to select the mode that is most convenient for you.
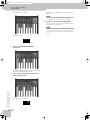
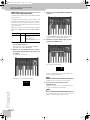
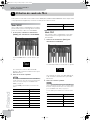
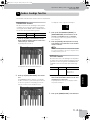
MONO mode
This mode enables the PK-6 to play in monophonic
mode. This means that only one note message is trans-
mitted at any one time. At power on, the PK-6 is in
MONO mode.
1.
If necessary, press the [MONO] footswitch
to select MONO mode.
The MONO indicator lights and the display shows:
At the same time, a “Mono Mode ON” control change
message is transmitted to PK-6’s MIDI OUT socket
(CC126, v= 0).
2.
Play the pedal keyboard.
NOTE
By default, MONO mode transmits on MIDI channel “2”,
which corresponds to the bass part of Roland arranger key-
boards. To change the MIDI channel for MONO mode, ple-
ase see page 21.
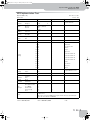
The following table lists the functions available in
MONO mode:
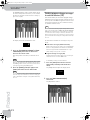
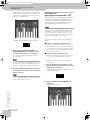
POLY mode
This mode enables the PK-6 to play in polyphonic mode,
meaning that several note messages can be transmitted
simultaneously (to play chords).
1.
Press the [POLY] footswitch to select POLY
mode.
The POLY indicator lights and the display shows:
At the same time, a “Poly Mode ON” control change
message is transmitted to the PK-6’s MIDI OUT socket
(CC127, v= 0).
2.
Play the pedal keyboard.
NOTE
By default, POLY mode transmits on MIDI channel “11”,
which corresponds to the “Note-To-Arranger” (NTA) part of
Roland arranger keyboards. To change the MIDI channel for
POLY mode, please see page 21.
The following table lists the functions available in
POLY mode:
Function in MONO mode Refer to page
HOLD 17
OCTAVER BASS 17
PORTAMENTO 18
OCTAVE 19
TRANSPOSE 19
RETRIGGER 24
VELOCITY 24
Mon
PC (Program Change) 20
Function in POLY mode Refer to page
HOLD 17
OCTAVER BASS 17
PORTAMENTO 18
OCTAVE 19
Function in MONO mode Refer to page
Pol
PK-6_multi.book Page 14 Friday, January 13, 2012 1:58 PM

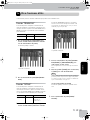
DRUM mode
Dynamic MIDI Pedal PK-6
r
15
ENGLISH ENGLISH ENGLISH ENGLISH ENGLISH ENGLISH
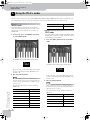
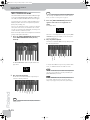
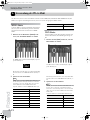
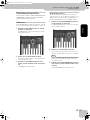
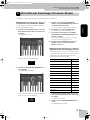
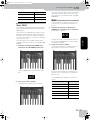
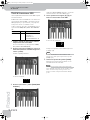
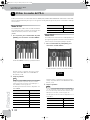
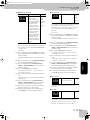
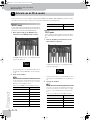
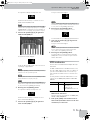
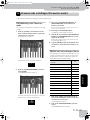
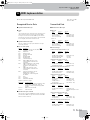
DRUM mode
This mode enables the PK-6 to send note messages to
trigger drum instrument sounds on external MIDI
devices.
There are two note maps (i.e. note number assignments
to the PK-6’s pedals). “drM” is the factory map that can-
not be overwritten. The second, “drU”, is programmable,
allowing you to trigger whichever sounds you like.
Both maps already contain useful note number assign-
ments for GM/GM2/GS-compatible MIDI sound sources.
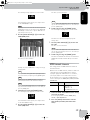
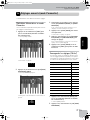
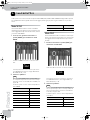
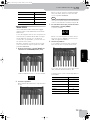
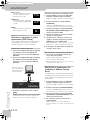
1.
Press the [DRUM] foot switch to select
DRUM mode (Factory Set).
The DRUM indicator lights and the display shows:
2.
Play the pedal keyboard.
The PK-6’s pedals now transmit the following note
numbers:
This allows you to play the basic instruments (kick,
rim, snare, hihat, toms, etc.) of a GM/GM2/GS-com-
patible sound module.
NOTE
By default, DRUM mode transmits on MIDI channel “10”,
which usually corresponds to the Drum part. To change the
MIDI channel for DRUM mode, please see page 21.
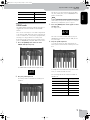
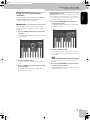
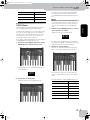
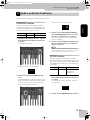
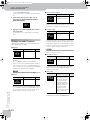
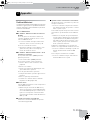
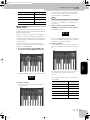
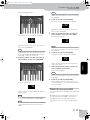
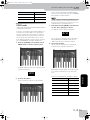
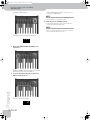
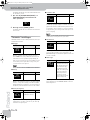
3.
Press the [DRUM] foot switch again to select
the User Set.
The display shows:
This is the second note number map. (If you press
[DRUM] again, the display reverts to “drM”, the fac-
tory note map.)
4.
Play the pedal keyboard.
If you do not change the “drU” assignments, the
PK-6’s pedals now transmit the following note num-
bers:
To assign other note numbers to the pedals in “drU”
mode, see “Drum User Edit” auf S. 25.
The following table lists the functions available in
DRUM mode:
TRANSPOSE 19
VELOCITY 24
PC (Program Change) 20
Function in POLY mode Refer to page
drM
36
37
38
39
40 41
42
43
44
45
46
47 48
Function in DRUM mode Refer to page
HOLD 17
OCTAVER BASS 17
OCTAVE (only for “drM”) 19
TRANSPOSE (only for “drM”) 19
VELOCITY 24
PC (Program Change) 20
drU
64
63
62
61
60 66
65
54
69
68
67
71 73
PK-6_multi.book Page 15 Friday, January 13, 2012 1:58 PM

Using the PK-6’s modes
16
r
Dynamic MIDI Pedal PK-6
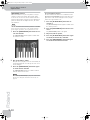
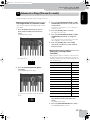
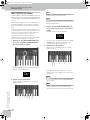
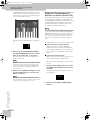
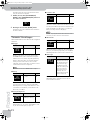
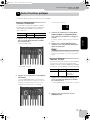
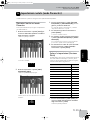
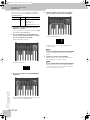
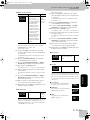
MIDI CONTROLLER mode
This mode enables the PK-6 to transmit MIDI messages
to an external Roland backing keyboard or module. In
this mode, the pedals do NOT transmit note messages.
Select this mode if you want to start/stop Music Style/
Rhythm playback and select accompaniment patterns
(Fill-In, Intro, Ending, etc.).
There are two assignment sets (i.e. groups of pedal func-
tions). “Ctr” is the factory set that cannot be overwrit-
ten. The second, “CtU”, is programmable, allowing you to
control whichever functions you like.
Both sets already contain useful assignments for Roland
arranger keyboards and modules.
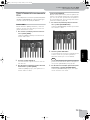
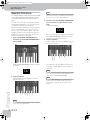
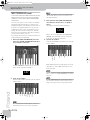
1.
Press the [MIDI CONTROLLER] footswitch to
select MIDI CONTROLLER mode (Factory
Control).
The MIDI CONTROLLER indicator lights and the dis-
play shows:
2.
Play the pedal keyboard.
The PK-6’s now transmits MIDI messages that per-
form the following functions:
NOTE
The above assignments work for the majority of Roland
arranger devices.
NOTE
By default, the messages are transmitted on MIDI channel
“10”. To change the MIDI channel in accordance with the
device you want to control, please see page 21.
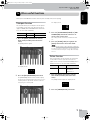
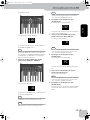
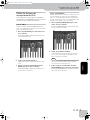
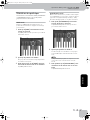
3.
Press the [MIDI CONTROLLER] footswitch
again to select the user assignment set
(CtU).
The display shows:
This is the second assignment set. (If you press [MIDI
CONTROLLER] again, the display reverts to “Ctr”, the
factory assignments.)
4.
Play the pedal keyboard.
The PK-6 now transmits MIDI messages that perform
the following functions:
To assign other MIDI messages to the pedals in “CtU”
mode, see “MIDI Controller User Edit” auf S. 25.
NOTE
The function that allows you to edit the “CtU” assignments
can also be selected directly by pressing and holding the
[MIDI CONTROLLER] footswitch.
NOTE
In MIDI CONTROLLER mode, the following functions are
not available: Hold, Octaver Bass, Portamento, Octave,
Transpose, Retrigger, Velocity and PC (Program Change).
Ctr
Start
Intro1
Fill Up1
Intro4
Fill Up2
Fill Up3
Break Mute
Fill Down1
Ending4
Fill Down2
Ending1
Fill Down3
Stop
CtU
Start
Old Fill to Variation
–
Old Fill to Original
–
–
Break Mute
–
Old Intro
–
Old Ending
–
Stop
PK-6_multi.book Page 16 Friday, January 13, 2012 1:58 PM

Using the PK-6’s performance functions
Dynamic MIDI Pedal PK-6
r
17
ENGLISH ENGLISH ENGLISH ENGLISH ENGLISH ENGLISH
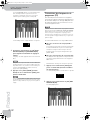
Using the PK-6’s performance
functions
The PK-6 provides 3 footswitches (HOLD, OCTAVER BASS
and PORTAMENTO) that allows you to influence/
enhance the notes played via the pedals.
HOLD function
When the [HOLD] indicator lights, briefly pressing a
pedal is enough to sound long notes on the external
instrument.
1.
Press the [HOLD] footswitch to activate the
function.
The [HOLD] indicator lights to indicate that the hold
function is active.
2.
Play on the PK-6’s pedals.
The notes you play are held until you play different
notes.
3.
Press the [HOLD] foot switch again to switch
off the function.
The [HOLD] indicator goes dark to indicate that the
hold function is not active.
OCTAVER BASS function
When this function is on, a note is added to the lowest
note you play. The added note can be 1~4 octaves lower
than the lowest note you played (by default –1). Please
see page 24 for how to set the octave value.
1.
Press the [OCTAVER BASS] footswitch to
activate the function.
The [OCTAVER BASS] indicator lights to indicate that
the function is active.
2.
Play on the PK-6’s pedals.
The lowest note you play is doubled by a note that is
one or several octaves lower (the octave interval can
be changed).
NOTE
Press and hold [OCTAVER BASS] to jump to the function
that allows you to change the octaver value (“oCv”). See
page 24.
3.
Press the [OCTAVER BASS] footswitch again
to switch off the function.
The [OCTAVER BASS] indicator goes dark to indicate
that the function is not active.
PK-6_multi.book Page 17 Friday, January 13, 2012 1:58 PM

Using the PK-6’s modes
18
r
Dynamic MIDI Pedal PK-6
PORTAMENTO function
When this function is on, the note pitches no longer
change in clearly defined steps: they produce glides
from one note to the next. Use the “Portamento Time”
parameter (page 24) to specify the speed at which those
glides are carried out. The higher the value, the slower
the transitions.
NOTE
This function controls the Portamento parameter of the MIDI
device the PK-6 is connected to. If the external instrument
doesn’t support Portamento, this footswitch has no effect.
1.
Press the [PORTAMENTO] footswitch to acti-
vate the function.
The [PORTAMENTO] indicator lights to indicate that
the function is active.
2.
Play on the PK-6’s pedals.
Now, the notes you play seem to be controlled by an
automatic pitch bend effect. The speed of the effect
can be changed.
3.
Press the [PORTAMENTO] footswitch again
to switch off the function.
The [PORTAMENTO] indicator goes dark to indicate
that the function is not active.
NOTE
Press and hold [PORTAMENTO] to jump to the function that
allows you to change the Portamento Time (“Por”). See
page 24.
Cross Portamento function
The Cross Portamento function is a combination of the
OCTAVER and PORTAMENTO functions. It produces note
glides between the lowest and highest notes you play
and creates a spectacular effect.
1.
Press the [OCTAVER BASS] footswitch to
activate it.
The [OCTAVER BASS] indicator lights to indicate that
the function is active.
2.
Press the [PORTAMENTO] footswitch to acti-
vate it.
The [PORTAMENTO] indicator also lights.
3.
Play on the PK-6’s pedals.
4.
Press the [OCTAVER BASS] footswitch again
to switch off Octaver Bass function.
5.
Press the [PORTAMENTO] footswitch again
to switch off Portamento function.
PK-6_multi.book Page 18 Friday, January 13, 2012 1:58 PM

Other useful functions
Dynamic MIDI Pedal PK-6
r
19
ENGLISH ENGLISH ENGLISH ENGLISH ENGLISH ENGLISH
5. Other useful functions
Below please find additional functions that may come in handy while you are playing.
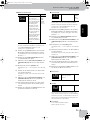
Transpose function
This function allows you to transpose the note pitches
of the pedals in semi-tone steps. The interval you set
applies to MONO, POLY and DRUM modes and cannot
be set for each mode individually.
1.
Press the [SHIFT] footswitch to activate
Shift mode (secondary footswitch func-
tions).
The [SHIFT] indicator lights.
The display shows:
2.
Press the [POLY/TRANSPOSE] footswitch.
The [TRANSPOSE] indicator flashes and the display
shows the current transposition interval. If you selec-
ted this parameter by mistake and do not want to
change it, proceed to step (4).
The display shows:
3.
Press the [OCTAVER BASS/DOWN] or [POR-
TAMENTO/UP] footswitch to decrease or
increase the current value.
This setting will be used until you switch the PK-6
off.
4.
Press the [ENTER] pedal (far right) or the
[SHIFT] footswitch to leave Shift mode.
NOTE
You can save this setting so that it will still be available the
next time the power is turned on. To save the setting, pro-
ceed as described in “Saving the settings (Write Function)”
auf S. 23.
Octave function
This function allows you to transpose the note pitches
of the pedals in octave steps. The interval you set
applies to the currently selected mode (MONO, POLY or
DRUM) and can be set for each mode individually.
1.
Press the [SHIFT] footswitch to activate
Shift mode (secondary footswitch func-
tions).
The [SHIFT] indicator lights. The display shows:
2.
Press the [DRUM/OCTAVE] footswitch.
Function Value Default
Transpose –5~6 0
---
Function Value Default
Octave 0~–8 MONO mode= 2
POLY mode= 4
DRUM mode = 2
0
---
PK-6_multi.book Page 19 Friday, January 13, 2012 1:58 PM

Other useful functions
20
r
Dynamic MIDI Pedal PK-6
The [OCTAVE] indicator flashes and the display shows
the current transposition interval. If you selected this
parameter by mistake and do not want to change it,
proceed to step (4).
The display shows the current Octave value:
3.
Press the [OCTAVER BASS/DOWN] or [POR-
TAMENTO/UP] footswitch to decrease or
increase the current value.
This setting will be used until you switch the PK-6
off.
NOTE
You can also set the octave interval with the PK-6’s pedals
(0~9). See the figures above the pedals. In this case, press
the [ENTER] pedal to confirm your setting. You can cancel
your input by pressing the [CANCEL] pedal.
4.
Press the [ENTER] pedal (far right) or the
[SHIFT] footswitch to leave Shift mode.
NOTE
You can save this setting so that it will still be available the
next time the power is turned on. To save the setting, pro-
ceed as described in “Saving the settings (Write Function)”
auf S. 23.
Sending program change messages
to external devices (PG)
This function allows you to transmit program change
and bank select messages (“memory selection clusters”)
on the fly. These are MIDI messages that cause an exter-
nal instrument or device to select a different memory
(i.e. another sound or effect).
NOTE
The PK-6 memorizes the last program change number sent in
each of the following modes: MONO, POLY, DRUM, MIDI CON-
TROLLER, but it will cancel these settings when it is switched
off. You can save these settings so that they will still be avai-
lable the next time the power is turned on. To save the setting,
proceed as described in “Saving the settings (Write Function)”
auf S. 23.
The PG function transmits the following messages as a
group:
■ Bank Select messages (CC00 and CC32)
Bank select messages are used to select sound banks
(if the receiving instrument contains several banks).
These messages must be transmitted before a pro-
gram change message to be effective.
■ Program Change messages (PC)
Program change messages allow you to select up to
128 memories on a remote MIDI device.
To transmit a memory selection cluster:
1.
Press the [SHIFT] footswitch to activate
Shift mode (secondary footswitch func-
tions).
The [SHIFT] indicator lights. The display shows:
2.
Press the [MIDI CONTROLLER/PG]
footswitch.
The [PG] indicator flashes.
2
---
PK-6_multi.book Page 20 Friday, January 13, 2012 1:58 PM
La pagina si sta caricando...
La pagina si sta caricando...
La pagina si sta caricando...
La pagina si sta caricando...
La pagina si sta caricando...
La pagina si sta caricando...
La pagina si sta caricando...
La pagina si sta caricando...
La pagina si sta caricando...
La pagina si sta caricando...
La pagina si sta caricando...
La pagina si sta caricando...
La pagina si sta caricando...
La pagina si sta caricando...
La pagina si sta caricando...
La pagina si sta caricando...
La pagina si sta caricando...
La pagina si sta caricando...
La pagina si sta caricando...
La pagina si sta caricando...
La pagina si sta caricando...
La pagina si sta caricando...
La pagina si sta caricando...
La pagina si sta caricando...
La pagina si sta caricando...
La pagina si sta caricando...
La pagina si sta caricando...
La pagina si sta caricando...
La pagina si sta caricando...
La pagina si sta caricando...
La pagina si sta caricando...
La pagina si sta caricando...
La pagina si sta caricando...
La pagina si sta caricando...
La pagina si sta caricando...
La pagina si sta caricando...
La pagina si sta caricando...
La pagina si sta caricando...
La pagina si sta caricando...
La pagina si sta caricando...
La pagina si sta caricando...
La pagina si sta caricando...
La pagina si sta caricando...
La pagina si sta caricando...
La pagina si sta caricando...
La pagina si sta caricando...
La pagina si sta caricando...
La pagina si sta caricando...
La pagina si sta caricando...
La pagina si sta caricando...
La pagina si sta caricando...
La pagina si sta caricando...
La pagina si sta caricando...
La pagina si sta caricando...
La pagina si sta caricando...
La pagina si sta caricando...
La pagina si sta caricando...
La pagina si sta caricando...
La pagina si sta caricando...
La pagina si sta caricando...
La pagina si sta caricando...
La pagina si sta caricando...
La pagina si sta caricando...
La pagina si sta caricando...
La pagina si sta caricando...
La pagina si sta caricando...
La pagina si sta caricando...
La pagina si sta caricando...
La pagina si sta caricando...
La pagina si sta caricando...
La pagina si sta caricando...
La pagina si sta caricando...
La pagina si sta caricando...
La pagina si sta caricando...
La pagina si sta caricando...
La pagina si sta caricando...
La pagina si sta caricando...
La pagina si sta caricando...
La pagina si sta caricando...
La pagina si sta caricando...
La pagina si sta caricando...
La pagina si sta caricando...
La pagina si sta caricando...
La pagina si sta caricando...
La pagina si sta caricando...
La pagina si sta caricando...
La pagina si sta caricando...
La pagina si sta caricando...
La pagina si sta caricando...
La pagina si sta caricando...
La pagina si sta caricando...
La pagina si sta caricando...
La pagina si sta caricando...
La pagina si sta caricando...
La pagina si sta caricando...
La pagina si sta caricando...
La pagina si sta caricando...
La pagina si sta caricando...
La pagina si sta caricando...
La pagina si sta caricando...
La pagina si sta caricando...
La pagina si sta caricando...
La pagina si sta caricando...
La pagina si sta caricando...
La pagina si sta caricando...
La pagina si sta caricando...
La pagina si sta caricando...
La pagina si sta caricando...
La pagina si sta caricando...
La pagina si sta caricando...
La pagina si sta caricando...
La pagina si sta caricando...
La pagina si sta caricando...
La pagina si sta caricando...
La pagina si sta caricando...
La pagina si sta caricando...
La pagina si sta caricando...
La pagina si sta caricando...
La pagina si sta caricando...
La pagina si sta caricando...
La pagina si sta caricando...
La pagina si sta caricando...
La pagina si sta caricando...
La pagina si sta caricando...
La pagina si sta caricando...
La pagina si sta caricando...
La pagina si sta caricando...
La pagina si sta caricando...
La pagina si sta caricando...
La pagina si sta caricando...
La pagina si sta caricando...
La pagina si sta caricando...
La pagina si sta caricando...
La pagina si sta caricando...
La pagina si sta caricando...
La pagina si sta caricando...
La pagina si sta caricando...
La pagina si sta caricando...
La pagina si sta caricando...
La pagina si sta caricando...
La pagina si sta caricando...
La pagina si sta caricando...
La pagina si sta caricando...
La pagina si sta caricando...
-
 1
1
-
 2
2
-
 3
3
-
 4
4
-
 5
5
-
 6
6
-
 7
7
-
 8
8
-
 9
9
-
 10
10
-
 11
11
-
 12
12
-
 13
13
-
 14
14
-
 15
15
-
 16
16
-
 17
17
-
 18
18
-
 19
19
-
 20
20
-
 21
21
-
 22
22
-
 23
23
-
 24
24
-
 25
25
-
 26
26
-
 27
27
-
 28
28
-
 29
29
-
 30
30
-
 31
31
-
 32
32
-
 33
33
-
 34
34
-
 35
35
-
 36
36
-
 37
37
-
 38
38
-
 39
39
-
 40
40
-
 41
41
-
 42
42
-
 43
43
-
 44
44
-
 45
45
-
 46
46
-
 47
47
-
 48
48
-
 49
49
-
 50
50
-
 51
51
-
 52
52
-
 53
53
-
 54
54
-
 55
55
-
 56
56
-
 57
57
-
 58
58
-
 59
59
-
 60
60
-
 61
61
-
 62
62
-
 63
63
-
 64
64
-
 65
65
-
 66
66
-
 67
67
-
 68
68
-
 69
69
-
 70
70
-
 71
71
-
 72
72
-
 73
73
-
 74
74
-
 75
75
-
 76
76
-
 77
77
-
 78
78
-
 79
79
-
 80
80
-
 81
81
-
 82
82
-
 83
83
-
 84
84
-
 85
85
-
 86
86
-
 87
87
-
 88
88
-
 89
89
-
 90
90
-
 91
91
-
 92
92
-
 93
93
-
 94
94
-
 95
95
-
 96
96
-
 97
97
-
 98
98
-
 99
99
-
 100
100
-
 101
101
-
 102
102
-
 103
103
-
 104
104
-
 105
105
-
 106
106
-
 107
107
-
 108
108
-
 109
109
-
 110
110
-
 111
111
-
 112
112
-
 113
113
-
 114
114
-
 115
115
-
 116
116
-
 117
117
-
 118
118
-
 119
119
-
 120
120
-
 121
121
-
 122
122
-
 123
123
-
 124
124
-
 125
125
-
 126
126
-
 127
127
-
 128
128
-
 129
129
-
 130
130
-
 131
131
-
 132
132
-
 133
133
-
 134
134
-
 135
135
-
 136
136
-
 137
137
-
 138
138
-
 139
139
-
 140
140
-
 141
141
-
 142
142
-
 143
143
-
 144
144
-
 145
145
-
 146
146
-
 147
147
-
 148
148
-
 149
149
-
 150
150
-
 151
151
-
 152
152
-
 153
153
-
 154
154
-
 155
155
-
 156
156
-
 157
157
-
 158
158
-
 159
159
-
 160
160
-
 161
161
-
 162
162
-
 163
163
-
 164
164


Roland PK-6 Manuale del proprietario
- Categoria
- Strumenti musicali
- Tipo
- Manuale del proprietario
in altre lingue
- English: Roland PK-6 Owner's manual
- français: Roland PK-6 Le manuel du propriétaire
- español: Roland PK-6 El manual del propietario
- Deutsch: Roland PK-6 Bedienungsanleitung
- Nederlands: Roland PK-6 de handleiding
Documenti correlati
Altri documenti
-
Yamaha PSR-S770 Manuale utente
-
Yamaha PSR-S710 Manuale del proprietario
-
Yamaha PSR-S750 Manuale del proprietario
-
Yamaha P-515 Manuale del proprietario
-
Yamaha PSR-SX900 Manuale del proprietario
-
Casio SP-34 Manuale utente
-
Casio pedale Unità SP-30 Manuale utente
-
Huntleigh FD3 Instructions For Use Manual