RetroSound 068216476M Custom Panels Guida d'installazione
- Tipo
- Guida d'installazione

©2020 Retro Manufacturing, LLC | Published: 08/18/21
MODERN SOUND FOR YOUR CLASSIC
Kick Panel
Installation Guide
The information enclosed in this installation guide is intended to provide a general outline to assist
you during the process of installation. This guide does not cover every installation possibility,
vehicle, or aspect of the installation process.
Retro Manufacturing, LLC, or its subsidiaries assume no responsibility for proper or improper
installation. Every attempt has been made to make this installation guide as informative as
possible. This guide may be updated from time to time, and specications are subject to change
without notice. Please check our website (www.retromanufacturing.com) for the latest updates.
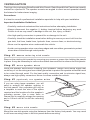
Kick Panel

Remove the existing kick panels by removing any screws or press clips holding the panels
in place. It may be necessary to remove the rubber door seal rst to remove the kick panels.
Route the speaker wires before installing your speakers. Always avoid sharp edges that
could fray or cut the wiring and use rubber grommets to protect the speaker wires that need
to be routed through metal. For the best quality connection and to minimize signal loss,
always use high-quality connectors. Never run wires outside the vehicle.
Mount the new kick panels using the fasteners from the factory kick panels. You may need
to drill new mounting holes in the kick panels before mounting.
INSTALLATION
Thank you for purchasing RetroSound® Kick Panels. RetroSound® Kick Panels are expertly
molded for a perfect t. The speaker mounts are angled to direct sound upwards towards
the listener for better stereo imaging.
Precautions
It is best to consult a professional installation specialist to help with your installation.
Important Installation Guidelines:
• Carefully read and understand the instructions before attempting installation.
• Always disconnect the negative (-) battery terminal before beginning any work.
Failure to do so may result in damage to the unit, re, injury, or death.
• Use high-quality connectors to prevent re or damage to the unit.
• Carefully check the installation area before drilling to ensure you won’t drill into the
gas tank, fuel lines, brake lines, hydraulic lines, vacuum lines, or electrical wiring.
• Never run the speaker wires underneath the vehicle.
• Avoid running speaker wires over sharp edges and use rubber grommets to protect
wires when routed through metal panels.
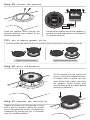
Step #4 Mount Kick Panels
Step #1 Remove Existing Kick Panels
Step #2 Route Speaker Wires
Step #3 (Optional) Cut Speaker Holes
If you are using larger speakers, you will
need to enlarge the speaker opening in
the kick panels. Use a speaker grill ring as
a template to mark the size of the space
required and the locations for the speaker’s
mounting screws. Use a razor knife or
Dremel tool to carefully enlarge the opening
and a 1/8-inch drill bit to drill the mounting
holes.
Kick Panel

Step #5 Connect the Speakers
Step #6 Mount the Speakers
Step #7 Complete the Installation
Kick Panel
Kick Panel
Kick Panel
Feed the speaker wires through the
speaker opening and connect to the
speaker terminals.
Connect the negative wire to the negative (-)
speaker terminal and positive to the positive
(+) speaker terminal.
Fit the speaker into the cutout and
secure it using the supplied screws.
If needed, place a speed clip over
each drilled hole before mounting
the speaker. (Some models may
require placing the grill base before
placing the speaker.)
Tighten all screws until the speaker is snug
and in place to prevent rattling. Be careful
not to overtighten the screws. Complete the
installation by placing the grill (if included)
over the installed speaker.
POSITIVE TERMINAL (LARGE)
NEGATIVE TERMINAL (SMALL)
NEGATIVE
POSITIVE
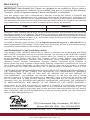
TIP: How to Remove Speaker Grills
To remove speaker grills either pull up on the grill’s ring (Type A) or push down on the grill’s ring (Type B).
Type B: Push down to removeType A: Pull up to remove

www.retromanufacturing.com
IMPORTANT: RetroSound® Kick Panels are designed to be modied to t your particu-
lar mounting requirement. However, once modied, they are not covered by this warranty.
Therefore, verify the speaker/vehicle t before modication or installation.
Your kick panels come with a manufacturer’s warranty covering any defects in materials and
workmanship. Retro Manufacturing, LLC (collectively referred to as “the warranter”), at its option, will
either (a) repair your unit with new or refurbished parts or (b) replace it with a new or refurbished unit.
The warranty period starts from the original purchase date and is valid for the length of time indicated
in the chart below. The decision to repair or replace will be made by the warranter.
ITEMITEM WARRANTYWARRANTY
Kick Panels One (1) Year
During the “Parts” warranty period, there will be no charge for parts. You must mail in your unit during
the warranty period at your expense. This warranty only applies to products purchased directly from
Retro Manufacturing or an authorized dealer. This warranty is extended only to the original purchaser
of a new product that was not sold “as is.” A purchase receipt or other proof of the original purchase
date is required for warranty service.
To handle a warranty issue, contact us at tech@retromanufacturing.com or 888.325.1555 for a
Return Authorization (RA) number. A RA number must accompany all returns and warranty issues.
Any product received without a RA number will be refused.
LIMITED WARRANTY-LIMITS AND EXCLUSIONS
This warranty ONLY COVERS failures due to defects in materials and workmanship and DOES
NOT COVER normal wear and tear or cosmetic damage. The warranty ALSO DOES NOT COVER
damages that occurred during shipment, failures which are caused by products not supplied
by the warranter, failures that result from accident, misuse, abuse, neglect, bug infestation,
mishandling, misapplication, alteration, faulty installation, set-up adjustment, maladjustment of
consumer control, improper maintenance, improper antenna, inadequate signal reception or
pickup, power line surge, improper voltage supply, lightning, modification, commercial use (such as
use in hotels, offices, restaurants, or other business uses) or rental use of the product, or service
by anyone other than Retro Manufacturing, LLC, or damage that is attributable to acts of God.
THERE ARE NO EXPRESS WARRANTIES EXCEPT AS LISTED UNDER LIMITED WARRANTY.
THE WARRANTER IS NOT LIABLE FOR INCIDENTAL OR CONSEQUENTIAL DAMAGES
RESULTING FROM THE USE OF THIS UNIT OR ARISING OUT OF ANY BREACH OF
THIS WARRANTY. (As examples, this excludes damages for lost time, the cost of having
someone remove or re-install an installed unit if applicable, travel to and from the servicer, and
loss of media, data, or other memory contents. The items listed are not exclusive but are for
illustration only.) ALL EXPRESS AND IMPLIED WARRANTIES, INCLUDING THE WARRANTY
OF MERCHANTABILITY, ARE LIMITED TO THE PERIOD OF THE LIMITED WARRANTY.
Some states do not allow the exclusion or limitation of incidental or consequential damages or
limitations on how long an implied warranty lasts, so the exclusions may not apply to you. This
warranty gives you specific legal rights, and you may also have other rights which vary from state to
state. If a problem with this unit develops during or after the warranty period, you may contact your
dealer or Retro Manufacturing, LLC.
©2020 Retro Manufacturing, LLC | Published: 08/18/21
7470 Commercial Way, Henderson, NV 89011
Phone: 888.325.1555 • Fax: 702.483.2229
Warranty
-
 1
1
-
 2
2
-
 3
3
-
 4
4


RetroSound 068216476M Custom Panels Guida d'installazione
- Tipo
- Guida d'installazione
in altre lingue
Altri documenti
-
Rockford Fosgate power T252-S Installation & Operation Manual
-
Rockford Fosgate T1 T-S Installation & Operation Manual
-
Rockford Fosgate T165-S Installation & Operation Manual
-
Audio Design T265-S Manuale del proprietario
-
 Rockford Fosgate T4652-S Installation & Operation Manual
-
Rockford Fosgate Punch P152-S Manuale del proprietario
-
Rockford Fosgate Punch P152-S Installation & Operation Manual
-
Rockford Fosgate Punch P152-S Installation & Operation Manual
