
XT11GT Pro
Tactical Extreme Output Flashlight User Manual
Thank you for choosing Klarus products!
Please read the user manual fully before use.
XT11GT Pro V2.0说明书
尺寸:55mm x100mm
材质:80g书纸
版本:A0
(EN)English
Specifications
Package
How to use
User Setting #2: Outdoor Setting
Lockout/Unlock
Intelligent Thermal Protection System (ITS)
User Setting Operations
User Setting #1: Tactical Setting
Sperren / Entsperren
Benutzereinstellungsvorgänge Benutzereinstellung
Nr. 1: Taktische Einstellung
Benutzereinstellung Nr. 2: Außeneinstellung
ANSI
Model: XT11GT Pro
Dimensions: Φ35mm(1.38") x Φ25.4mm(1") x 139.7mm(5.5")
LED: Luminus SST-70-WCS-H50 R4
Output: 3300LM
Working Voltage: 2.8V-6.4V
Charge Current: 5V/1A
Charge Time: 4h
Compatible Batteries: 1 x 18650 or 2 x CR123A
Waterproof: IPX8
Weight: 121.1g (4.27oz) (w/o battery)
Warranty: 5 Years
Note: The above data has been measured in accordance with
international flashlight testing standards ANSI/NEMA FL1 using
one KLARUS 18650 3100mAh battery under laboratory
conditions. The data may vary slightly during actual use due to
battery type, individual usage habits and environmental factors.
Note: please charge the battery when its capacity is low
otherwise the flashlight is not able to change brightness level or
brightness will become dark.
(Factory Default Setting: #1 Tactical Setting)
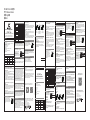
When the light is OFF, click and
hold the MODE switch for 5
seconds, when the indicator
flashing red/green, then click
the Primary switch without releasing
the MODE switch at the same time.
Primary Switch: click to turn ON in TURBO mode, click again to
turn OFF.
MODE Switch: click to enter STROBE, click and hold for 2
User Setting Change
ON/OFF
Primärschalter: Klicken Sie zum Einschalten im TURBO-Modus
und erneut zum Ausschalten.
MODE-Schalter: Klicken Sie, um STROBE aufzurufen, und halten
Sie die Taste 2 Sekunden lang gedrückt, um STROBE
beizubehalten.
AN AUS
MODE-Schalter: Wenn diese Option aktiviert ist, klicken Sie auf,
um die Modi TURBO (3300LM) → HIGH (1200LM) → MEDIUM
(200LM)→ LOW (10LM) → Cycle zu durchlaufen. Klicken und
halten Sie 2 Sekunden lang, um STROBE aufzurufen.
Helligkeitsstufe ändern
Primärschalter: Klicken Sie zum Einschalten im TURBO-Modus
und erneut zum Ausschalten. MODE-Schalter: Klicken Sie, um
NIEDRIG aufzurufen, und halten Sie 1 Sekunde lang gedrückt,
um NIEDRIG beizubehalten.
AN AUS
MODE-Schalter: Wenn diese Option aktiviert ist, klicken Sie auf,
um durch die Modi TURBO (3300LM) → HIGH (1200LM) →
MEDIUM (200LM) → LOW (10LM) zu wechseln.
Schrauben Sie die Endkappe um eine
halbe Umdrehung ab, um den
Stromkreis zu unterbrechen, und
schrauben Sie sie zum Entriegeln
zurück. (Es wird empfohlen, die
Taschenlampe zu sperren, wenn sie
längere Zeit gelagert, getragen oder
transportiert wird.)
Helligkeitsstufe ändern
Primary Switch: click to turn ON in TURBO mode, click again
to turn OFF. MODE Switch: click to enter LOW, click and hold
for 1 second to keep LOW.
ON/OFF
MODE Switch: when ON, click to cycle through modes TURBO
(3300LM) → HIGH (1200LM) → MEDIUM (200LM) → LOW (10LM)
→ Cycle. Click and hold for 2 seconds to enter STROBE.
seconds to keep STROBE.
Change Brightness Level
MODE Switch: when ON, click to cycle through modes TURBO
(3300LM) → HIGH (1200LM) → MEDIUM (200LM) → LOW (10LM)
→ Cycle, click and hold for 3 seconds to enter SOS mode.
Unscrew the tailcap by half-turn to cut
off the circuit, screw it back to unlock.
(Recommend to lockout the flashlight
when it is stored, carried or transported
for a long period of time).
When the flashlight is in Turbo mode, brightness will be
automatically adjusted according to the temperature of the
flashlight body to protect the LED and internal components and
ensure safety and stability.
XT11GT Pro uses Type-C USB charging, and is compatible
with any USB Type-C cable, wall charger or car charger.
Charging Indicator:
Red: Charging in progress
Green: Charging complete
Yellow Flashing: Battery problem (battery inserted not 18650
battery or battery orientation reversed or battery destroyed)
Battery Capacity Indicator
Recharging
• During use, flashlight's surface temperature will increase,
especially when higher lumen output. The maximum safe
operating surface temperature of the flashlight is 60/140.
• Please fully charge battery before initial use. Included battery
is charged to less than 50% as a safety measure and will not
power the flashlight at full output and standard runtime.
• To maintain waterproof rating, please lubricate the O-ring with
silicone safe lubricant and replace worn O-rings as needed.
• Do not make the eyes contact directly with light.
• Do not disassemble or modify this flashlight which can cause
damage and will void the warranty.
• For long term storage, remove the battery and store in a cool
and dry place. Recommend to charge the battery per 3 months.
Usage and Maintenance
After power-on, the indicator will flash for 5 seconds.
• Green, 70%-100% capacity remaining.
• Orange, 30%-70% capacity remaining.
• Red, less than 30% capacity remaining.
• Red flashing, less than 10% capacity remaining.
Insert battery with
positive terminal
towards lamp
Screw the
tailcap tightly
Twist off
the tailcap
(1) (2) (3)
Change Brightness Level
Battery Installation
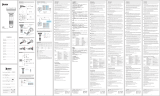
Product
Flashlight 1
1
1
1
1
1
1
1
Charging Cable
Clip
Waterproof O Ring
Battery
Holster
Lanyard
User Manual
QTY QTYProduct
Note:
• Product specifications of this printing is accurate, any updates
will be reflected in the physical product. There may be slight
difference between photographic and actual product.
• KLARUS reserve the right to make the final determination of
terms and conditions in this manual.
• KLARUS guarantees the flashlight against defects in material
and workmanship. Flashlight products that are found to be
defective under normal use within 5 years of the purchase date
will be repaired or replaced without charge.
• Klarus offers 1 year warranty for all rechargeable batteries.
Warranty
Blocco / Sblocco
Interruttore MODE: quando ON, fare clic per scorrere tra le
modalità TURBO (3300LM) → HIGH (1200LM) → MEDIUM (200LM)
→ LOW (10LM) → Ciclo, fare clic e tenere premuto per 3 secondi
per accedere alla modalità SOS.
Svitare il tappo di coda di mezzo giro
per interrompere il circuito, riavvitare
per sbloccare. (Consiglia di bloccare
la torcia quando viene riposta,
trasportata o trasportata per un lungo
periodo di tempo).
Cambia livello di luminosità
(FR)Francais
Comment utiliser
Modification des paramètres utilisateur
(paramètre par défaut: #1 réglage tactique)
Verrouillage / déverrouillage
Opérations de réglage utilisateur
Réglage utilisateur no 1: réglage tactique
Réglage utilisateur n ° 2: réglage extérieur
Lorsque le voyant est éteint,
cliquez et maintenez le
commutateur MODE pendant
5 secondes, lorsque l'indicateur
clignote en rouge / vert, puis
cliquez sur le commutateur
principal sans relâcher le
commutateur MODE en même temps.
Interrupteur principal: cliquez pour activer en mode TURBO,
cliquez à nouveau pour désactiver.
Commutateur de MODE: cliquez pour entrer STROBE, cliquez et
maintenez pendant 2 secondes pour garder STROBE.
ALLUMÉ ÉTEINT
Commutateur de MODE: lorsque activé, cliquez pour faire défiler
les modes TURBO (3300LM) → HIGH (1200LM) → MEDIUM
(200LM) → LOW (10LM) → Cycle. Cliquez et maintenez pendant
2 secondes pour entrer STROBE.
Modifier le niveau de luminosité
Interrupteur principal: cliquez pour activer en mode TURBO,
cliquez à nouveau pour désactiver. Commutateur de MODE:
cliquez pour entrer MEUGLER, cliquez et maintenez pendant
1 seconde pour garder MEUGLER.
ALLUMÉ ÉTEINT
Commutateur de MODE: lorsqu'il est sur ON, cliquez pour faire
défiler les modes TURBO (3300LM) → HIGH (1200LM) →
MEDIUM (200LM) → LOW (10LM) → Cycle, cliquez et maintenez
pendant 3 secondes pour entrer en mode SOS.
Dévissez le capuchon arrière d'un
demi-tour pour couper le circuit,
revissez-le pour le déverrouiller.
(Recommandez de verrouiller la
lampe de poche lorsqu'elle est
stockée, transportée ou transportée
pendant une longue période).
Modifier le niveau de luminosité
(ES)Espanol
Cómo utilizar
Cambio de configuración del usuario (configuración
predeterminada de fábrica: Configuración táctica #1)
Bloqueo / Desbloqueo
Operaciones de configuración del usuario
Configuración del usuario #1: Configuración táctica
Configuración del usuario no 2: Configuración al
aire libre
Cuando la luz está apagada,
haga clic y mantenga
presionado el interruptor MODE
durante 5 segundos, cuando el
indicador parpadee en
rojo / verde, luego haga clic en
el interruptor primario sin soltar
el interruptor MODE al mismo tiempo.
Interruptor primario: haga clic para ENCENDER en modo TURBO,
haga clic nuevamente para APAGAR.
Interruptor MODE: haga clic para ingresar STROBE, haga clic y
mantenga presionado durante 2 segundos para mantener STROBE.
ENCENDIDO APAGADO
Interruptor de MODO: cuando está ENCENDIDO, haga clic para
alternar entre los modos TURBO (3300LM) → ALTO (1200LM)
→ MEDIO (200LM) → BAJO (10LM) → Ciclo. Haga clic y
mantenga presionado durante 2 segundos para ingresar a STROBE.
Cambiar nivel de brillo
Interruptor primario: haga clic para ENCENDER en modo TURBO,
haga clic nuevamente para APAGAR. Interruptor MODE: haga
clic para ingresar a BAJO, haga clic y mantenga presionado
durante 1 segundo para mantener BAJO.
ENCENDIDO APAGADO
Interruptor de MODO: cuando está ENCENDIDO, haga clic para
alternar entre los modos TURBO (3300LM) → ALTO (1200LM) →
MEDIO (200LM) → BAJO (10LM) → Ciclo, haga clic y mantenga
presionado durante 3 segundos para ingresar al modo SOS.
Desenrosque la tapa trasera media vuelta
para cortar el circuito, atorníllela para
desbloquearla. (Se recomienda bloquear
la linterna cuando se almacena, transporta
o transporta durante un largo período de
tiempo).
Cambiar nivel de brillo
If problems develop after 5 years from the date of purchase,
KLARUS will charge for parts and repairs. The total repair fee
will be assessed according to the cost of the replacement
materials. If damage to the light is substantial, KLARUS will
contact the customer via the dealer with a quote.
Limited Lifetime Warranty
accompanied by pictures or a short video demonstration if
necessary.
3) Provide the name and store of the dealer you made the
purchase from; and a copy of the proof of purchase.
Scan the QR code and receive the latest update from
KLARUS media account or KLARUS official website.
• If this flashlight does not perform as specified, the product will
be repaired or replaced as described above.
• Please contact your original KLARUS dealer for replacement
and repairs.
• If the warranty issue cannot be resolved by the dealer, please
contact KLARUS at [email protected] for assistance.
Please provide the following information to expedite the process:
1) List the serial number on the light.
2) Include a detailed description identifying the issue,
Warranty Procedure
Website Facebook
(IT)Italia
Come usare
Modifica impostazioni utente (impostazione
predefinita di fabbrica: #1 impostazione tattica)
Operazioni di impostazione dell'utente
Impostazione dell'utente n. 1: impostazione tattica
Impostazione utente n. 2: impostazione esterna
Quando la luce è spenta, fare
clic e tenere premuto
l'interruttore MODE per 5
secondi, quando l'indicatore
lampeggia in rosso / verde,
quindi fare clic sull'interruttore
primario senza rilasciare
contemporaneamente l'interruttore MODE.
Interruttore principale: fare clic per accendere in modalità TURBO,
fare di nuovo clic per spegnere.
Interruttore MODE: fare clic per accedere a STROBE, fare clic e
tenere premuto per 2 secondi per mantenere STROBE.
ACCESO SPENTO
Interruttore MODE: quando ON, fare clic per scorrere tra le
modalità TURBO (3300LM) → HIGH (1200LM) → MEDIUM (200LM)
→ LOW (10LM) → Cycle. Fare clic e tenere premuto per 2
secondi per accedere a STROBE.
Cambia livello di luminosità
Interruttore principale: fare clic per accendere in modalità TURBO,
fare di nuovo clic per spegnere. Interruttore MODE: fare clic per
accedere a BASSO, fare clic e tenere premuto per 1
secondo per mantenere BASSO.
ACCESO SPENTO
XT11GT Pro
战术强光手电使用说明书
(CN)中文
产品参数
ANSI标准参数
使用及维护
产品使用方法
装箱清单
一、模式切换(默认战术模式):
充电提示:
操作模式一:战术模式
开启/关闭
亮度调节
亮度调节
售后/保修条款
二、操作模式说明:
操作模式二:户外模式
开启/关闭
锁键与解锁
智能温控系统
电量指示
如何充电
电池安装
注:
部件名称 数量 部件名称 数量
深圳市凯瑞兹电子科技有限公司
微信公众号
Primary switch
MODE switch
l'interruttore MODE
sull'interruttore
Specification
Mode High
Turbo LowMedium Strobe SOS
ANSI lumens(LM) 3300
1.8 4
29440 10400
1200
12
1940
410 240 100
200
120
64
20
10 3300
4
200
32
Runtime(h)
Beam intensity(cd)
Beam distance(m)
Waterproof IPX8
1.2m
18GT-IMR31 Battery
ANSI lumens(LM)
1
10400
1200
1.5
4200
240 130
400
16
900
60
60 1200
2
Runtime(h)
Beam intensity(cd)
Beam distance(m)
2*CR123A Battery
Impact Resistance
光通量(LM) 3300
1.8 4
29440 10400
1200
12
1940
410 240 100
200
120
64
20
10 3300
4
200
32
续航时间(h)
光强度(cd)
射程(m)
光通量(LM)
续航时间(h)
光强度(cd)
射程(m)
防水级别 IPX8(顶部距离水面2米,连续60分钟,性能不受影响,不漏水)
1.2m(水泥地)
18GT-IMR31
1
10400
1200
1.5
4200
240 130
400
16
900
60
60 1200
2
2*CR123A
防跌落
KLARUS LIGHTING TECHNOLOGY CO., LIMITED
Address: 8/F, E Building, Longjing Industrial Science Park,
335 Bulong Rd, Bantian St. Longgang District, Shenzhen,
China, 518000.
Phone: +86-755-27700110
Email: service@klaruslight.com
Website: www.klaruslight.com
available at BrightGuy.com
-
 1
1

in altre lingue
- English: KLARUS XT11GT Pro User manual
- español: KLARUS XT11GT Pro Manual de usuario
- 日本語: KLARUS XT11GT Pro ユーザーマニュアル
Documenti correlati
Altri documenti
-
 WUBEN A1 Manuale utente
-
Fenix C6 V3.0 Manuale utente
-
OLIGHT S30R2 Manuale utente
-
OL-Olight Olight S2R II Cu 1150 Lumens Magnetic Rechargeable Variable Output Side Switch LED Flashlight,with 18650 Battery and SKYBEN Battery Case (Limited Edition Cu) Manuale utente
-
NITECORE Ultra Comact Dual-Fuel Searchlight Manuale utente
-
 SKYBEN Olight S1 MINI Cree XM-L2 LED 600 Lumens Ultra Compact USB Rechargeable LED Flashlight Manuale utente
-
OLIGHT Baton Pro LED Monochrome Torch Rechargeable 2000 lm 540 h 107 g Manuale utente
-
-
-

