
K10 Manual
Klarus 10th Anniversary
Limited Edition
Thank you for choosing Klarus products!
Please read the user manual fully before use.
(EN)English
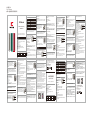
Specifications
• Model: K10
• Dimensions: 24mm(0.94”) x 24mm(0.94”) x 97.8mm(3.85”)
• LED: CREE XP-L HD V6
• Output: 1200LM
• Input Voltage: 2.0-4.2V
• Recharging Voltage: 5V/2A
• Battery: 1 x 163401 x CR123A compatible
• Waterproof Rating: IPX8
• Weight: 87.9g(3.10oz)/60.3g(2.13oz)w/o Battery
• Warranty: 5 years
Package
Product Product
1 1 1 1 1
Charging
Cable Manual O Ring Battery
QTY
Note
The above data are collected by Klarus under laboratory conditions.
Different conditions may result in different data in use.
ANSI
Mode
Specification Turbo High Medium Low SOSStrobe
ANSI lumens(LM)
Runtime(h)
Beam intensity(cd)
Beam distance(m)
Impact resistance(m)
Waterproof IPX8(2 Meters Submersible)
1
350 100 10 1200 100
1.7 7.5 55 3 12
8500 2496 700 50
185 100 53 14
1200
300
+1.4
1.5min
(DE)Deutsch
Wie benutzt man
Wenn Sie ausgeschaltet sind,
drücken Sie den Modus-Schalter 5
Sekunden lang. Drücken Sie den
Hauptschalter nach unten, wenn
die Anzeigelampe rot / grün blinkt, um den Einstellschalter
abzuschließen.
1) Switch-Einstellungen (Standardeinstellung: Taktische
Einstellung)
Primary SwitchClick to turn ON at HIGH, click again to turn OFF
MODE SwitchPress to turn ON at LOW, press and hold for 1 second
Mode 2: Outdoor Setting
ON/OFF
MODE SwitchPress to change output in order of Low→Medium→
High→Turbo→Cyclepress and hold for 3 seconds to enter SOS
mode
Output Adjustment
Instructions
When OFF, press and hold MODE
switch for 5 seconds. Press down
MAIN switch when the Indicator
Lamp flashes Red/Green to
complete Setting switch.
Primary Switch: Click to turn ON at High, click again to turn OFF
MODE SwitchPress to turn on STROBE, press and hold for 2
seconds for CONSTANT STROBE
1) Switch Settingsdefault: Tactical Setting
1) Mode Controls
Mode 1: Tactical Mode
ON/OFF
MODE SwitchPress to change output in order of Turbo→ High→
Medium→ Low→ Cyclehold for 2 seconds to enter STROBE mode
Output Adjustment
Primary Switch
Mode Switch
The indicator lamp will turn on to display battery
capacity for 5 seconds after the flashlight is
turned ON. The indicator lamp will turn off after 5
seconds.
Green70%-100%
Orange30%-70%
Red<30%
Red Flashing<10%Please recharge the
battery ASAPOnly applies to 16340 Lithium ion
battery)
Lock / Unlock
Intelligent Temperature Control System
Capacity Indicator
Loosen the tail cap half a circle to lock
disable the flashlight’s functions, tighten the
tail cap to unlock and enable functions.
Locking the light is recommended during
travel or long term storage)
When at maximum output, the flashlight will automatically adjust
output based on the surface temperature, in order to protect the
LED and components, and increase in-hand comfort.
Indicator lamp
Hauptschalter
MODE-Schalter
Hauptschalter: Klicken Sie hier, um an der High einzuschalten,
klicken Sie erneut, um auszuschalten.
Modus-Switch: Drücken Sie, um den Strobe einzuschalten, und
halten Sie sie für 2 Sekunden für den konstanten Strobe gedrückt.
Ausgangspegel:
Modusschalter: Drücken Sie, um die Ausgabe in der Reihenfolge
des Turbo→ High → Medium→ Niedrig→ Zyklus; Halten Sie 2
Sekunden lang gedrückt, um den Strobe-Modus aufzurufen.
2) Modussteuerung:
Modus 1: Taktischer Modus
Modus 2: Außeneinstellung
AN AUS
Hauptschalter: Klicken Sie hier, um an der High einzuschalten,
klicken Sie erneut, um auszuschalten.
Modusschalter: Drücken Sie, um bei Niedrig einzuschalten, und
halten Sie sie 1 Sekunde lang für konstant niedrig.
Ausgangspegel:
Modusschalter: Drücken Sie, um den Ausgang in der Reihenfolge
von niedrig → Medium→ hoch → Turbo → Zyklus; Halten Sie 3
Sekunden lang gedrückt, um den SOS-Modus aufzurufen.
AN AUS
Lösen Sie den Heckkappe einen halben Kreis,
um die Funktionen der Taschenlampe zu
deaktivieren, die Schwanzkappe festzuziehen,
um Funktionen freizuschalten und zu aktivieren.
(Verriegelung des Lichts wird während der
Reise- oder Langzeitlagerung empfohlen)
Wenn bei maximaler Ausgabe die Taschenlampe basierend auf der
Oberflächentemperatur automatisch eingestellt wird, um die LED
und die Komponenten zu schützen und den Handkomfort zu
erhöhen.
Sperren / Entsperren
Intelligentes Wärmeschutzsystem (ITS)
Interruttore principale: fare clic per attivare in alto in alto, fare
nuovamente clic per disattivare.
Interruttore in modalità: premere per accendere a basso, premere e
tenere premuto per 1 secondo per costante basso.
Regolazione dell'uscita
Interruttore della modalità: Premere per modificare l'uscita in ordine
di basso (10LM) → Medio (100LM) → Alto (350 lm) → Turbo
(1200LM) → ciclo; premere e tenere premuto per 3 secondi per
accedere alla modalità SOS.
Interruttore principale: fare clic per attivare in alto in alto, fare
nuovamente clic per
disattivare.
Modalità Interruttore: premere per accendere strobo, premere e
tenere premuto per 2 secondi per lo strobo costante.
Output Adjustment
Interruttore in modalità: Premere per modificare l'uscita in ordine di
Turbo → Alto → Mezzo → Basso → Ciclo; Tenere premuto per 2
secondi per accedere alla modalità strobo.
2. Impostazioni:
Impostazione 1: impostazione tattica
ACCESO SPENTO
Allestimento 2: impostazione all'aperto
ACCESO SPENTO
Allentare il tappo della coda mezza cerchio per
bloccare la disattivazione delle funzioni della
torcia, serrare il tappo della coda per sbloccare e
abilitare le funzioni. (Blocco della luce è
raccomandato durante il viaggio o lo stoccaggio a
lungo termine)
Blocca sblocca
Quando alla massima uscita, la torcia elettrica regolerà
automaticamente l'uscita in base alla temperatura della superficie,
al fine di proteggere il LED e i componenti e aumentare il comfort
della mano.
Sistema di controllo della temperatura intelligente
Le voyant s'allume pour afficher la
capacité de la batterie pendant 5
secondes une fois la lampe de poche
allumée. Le voyant s'effondrera après 5
secondes.
Vert: 70% -100%;
Orange: 30% à 70%;
Rouge: <30%;
Clignotant rouge: <10%; (veuillez
recharger la batterie dès que possible) (s'applique uniquement à la
batterie de 16340 lithium ion)
Indicateur de capacité
Lorsque vous désactivez, appuyez
sur le bouton MODE enfoncé
pendant 5 secondes. Appuyez sur
le basculement principal lorsque le
voyant clignote en rouge / vert pour
terminer le commutateur de
réglage complet.
Interrupteur principal: Cliquez pour activer High, cliquez à nouveau
pour désactiver.
Commutateur de mode: Appuyez sur pour allumer à bas,
maintenez-la enfoncée pendant
1 seconde pour être basse constante.
Interrupteur principal: Cliquez pour activer High, cliquez à nouveau
pour désactiver.
Commutateur de mode: Appuyez sur pour allumer le stroboscope,
maintenez enfoncé pendant 2 secondes pour le stroboscope
constant.
Réglage de la sortie
Interrupteur de mode: Appuyez sur pour modifier la sortie dans
l'ordre de Turbo → HIGH → Moyen → LOW → Cycle; maintenez
pendant 2 secondes pour entrer en mode Strobe.
1) Basculer entre les modes (mode tactique par défaut):
2) Paramètres:
Réglage 1: Réglage tactique
ALLUMÉ ÉTEINT
Cadre 2: Cadre extérieur
ALLUMÉ ÉTEINT
Indikatorlampe
An beiden Enden des Batteriefachs gibt es Federn, um den Akku
vor Aufprall zu schützen.
Die Indikatorlampe schaltet sich ein, um
die Batteriekapazität 5 Sekunden lang,
nachdem die Taschenlampe eingeschaltet
ist. Die Anzeigelampe schaltet sich nach
5 Sekunden aus.
Grün: 70% -100%;
Orange: 30% -70%;
Rot: <30%;
Rotes Blinken: <10%; (bitte laden Sie den Akku so schnell wie
möglich auf) (gilt nur für 16340 Lithium-Ionen-Akku)
Batteriekapazitätsanzeige
Schlagschutzmechanismus:
(FR)Francais
Instructions
Interrupteur
principal
Commutateur
MODE
Quando spento, tenere premuto e
tenere premuto l'interruttore per 5
secondi. Premere il commutatore
principale quando la spia lampeggia
la spia rossa / verde per completare
l'interruttore di impostazione.
Réglage de la sortie
Commutateur de mode: Appuyez sur pour modifier la sortie par
ordre de faible → Moyen → HIGH → Turbo → Cycle; maintenez
enfoncé pendant 3 secondes pour entrer en mode SOS.
1) Impostazione delle impostazioni (impostazione predefinita:
impostazione tattica):
Indicateur de
batterie
Desserrez le capuchon de la queue un
demi-cercle pour verrouiller désactiver les
fonctions de la lampe de poche, serrez le
capuchon de la queue pour déverrouiller et
activer les fonctions. (Le verrouillage de la
lumière est recommandé lors du stockage de
voyage ou à long terme)
Verrouillage / déverrouillage
Le voyant s'allume pour afficher la capacité de
la batterie pendant 5 secondes une fois la
lampe de poche allumée. Le voyant
s'effondrera après 5 secondes.
Vert: 70% -100%;
Orange: 30% à 70%;
Rouge: <30%;
Clignotant rouge: <10%; (veuillez recharger la
batterie dès que possible) (s'applique
uniquement à la batterie de 16340 lithium ion)
Lorsque, à la sortie maximale, la lampe de poche ajustera
automatiquement la sortie en fonction de la température de surface,
afin de protéger les DEL et les composants et augmenter le confort
de la main.
Il y a des ressorts aux deux extrémités du compartiment de la
batterie pour protéger la batterie de l'impact.
Système de contrôle de la température intelligente
Indicateur de capacité
Mécanisme de protection d'impact:
Interruttore
principale
Modalità
Interruttore
(IT)Italiano
Indicazioni
K10说明书 A0
尺寸:70x 130mm
材质:90g铜版纸双铜,双面彩色印刷
Titanium Green Red
Interruptor principal: haga clic para encender en ALTO, haga clic de
nuevo para apagar to
Interruptor de MODO: presione para encender en BAJO, presione y
mantenga presionado durante 1 segundo para BAJO CONSTANTE
Ajuste de salida
Interruptor de MODO: Presione para cambiar la salida en orden de
Bajo → Medio → Alto → Turbo → Ciclo presione y mantenga
presionado durante 3 segundos para ingresar al modo SOS.
Interruptor principal: haga clic para encender en alto, haga clic de
nuevo para apagar
Interruptor de MODO: presione para encender el STROBE,
presione y mantenga presionado durante 2 segundos para
STROBE CONSTANTE
Ajuste de salida
Interruptor de MODO: Presione para cambiar la salida en orden de
Turbo → Alto → Medio → Bajo → Ciclo manténgalo presionado
durante 2 segundos para ingresar al modo STROBE.
2. Configuración:
Configuración 1: Configuración táctica
ENCENDIDO APAGADO
Configuración 2: Configuración al aire libre
ENCENDIDO APAGADO
Indicatore della
batteria
Indicador de
bateria
Afloje la tapa trasera medio círculo para
bloquear, desactivar las funciones de la linterna,
apriete la tapa trasera para desbloquear y
habilitar funciones. (Se recomienda bloquear la
luz durante el viaje o el almacenamiento a largo
plazo)
Bloqueo y desbloqueo
Warranty
Cuando esté en la salida máxima, la linterna ajustará automática-
mente la salida en función de la temperatura de la superficie, para
proteger el LED y los componentes, y aumentar la comodidad en la
mano.
Sistema de control de temperatura inteligente
Hay resortes en ambos extremos del compartimento de la batería
para proteger la batería de impactos
Mecanismo de protección contra impactos
La luz indicadora se encenderá para mostrar
la capacidad de la batería durante 5 segundos
después de que se encienda la linterna. La
lámpara indicadora se apagará después de 5
segundos.
Verde: 70% -100%;
Naranja: 30% -70%;
Rojo: <30%;
Rojo intermitente: <10%; Recargue la batería
lo antes posible Solo se aplica a la batería de
iones de litio 16340)
Indicador de capacidad
Ci sono molle su entrambe le estremità del vano batteria per
proteggere la batteria dall'impatto.
Meccanismo di protezione da impatto
Cuando esté APAGADO, mantenga
presionado el interruptor MODE
durante 5 segundos. Presione el
interruptor PRINCIPAL cuando la
lámpara indicadora parpadee en rojo /
1) Configuración del interruptor
predeterminado: Configuración táctica
Interruptor
principal
Interruptor
de MODO
(ES)Español
Direcciones
(CN)中文
K10产品说明书
凯瑞兹·十周年,限量纪念款
感谢阁下惠顾本公司产品,使用前敬请详细阅读说明书
Usage and Maintenance
• During use, flashlight's surface temperature will increase,
especially when higher lumen
output. The maximum safe operating surface temperature of the
flashlight is 60/140.
• Please fully charge battery before initial use. Included battery is
charged to less than
50% as a safety measure and will not power the flashlight at full
output and standard runtime.
• To maintain waterproof rating, please lubricate the O-ring with
silicone safe lubricant and replace worn O-rings as needed.
• Do not make the eyes contact directly with light.
• Do not disassemble or modify this flashlight which can cause
damage and will void the warranty.
• For long term storage, remove the battery and store in a cool and
dry place. Recommend to charge the battery per 3 months.
• KLARUS guarantees the flashlight against defects in material and
workmanship. Flashlight
products that are found to be defective under normal use within 5
years of the purchase date will be repaired or replaced without
charge.
If problems develop after 5 years from the date of purchase,
KLARUS will charge for parts and repairs. The total repair fee will be
assessed according to the cost of the replacement materials. If
damage to the light is substantial, KLARUS will contact the
customer via the dealer with a quote.
• If this flashlight does not perform as specified, the product will be
repaired or replaced as described above.
• Please contact your original KLARUS dealer for replacement and
repairs.
• If the warranty issue cannot be resolved by the dealer, please
contact KLARUS at [email protected] for assistance.
Please provide the following information to expedite the process:
1) List the serial number on the light.
2) Include a detailed description identifying the issue, accompanied
by pictures or a short video demonstration if necessary.
3) Provide the name and store of the dealer you made the
purchase from; and a copy of the proof of purchase.
Limited Lifetime Warranty
Warranty Procedure
Note
• Product specifications of this printing is accurate, any updates will
be reflected in the physical product. There may be slight difference
between photographic and actual product.
• KLARUS reserve the right to make the final determination of terms
and conditions in this manual.
• Scan the QR code and receive the latest update from KLARUS
media account or KLARUS official website.
Scan the QR code and received the latest updates from
KLARUS media account or KLARUS official website.
KLARUS LIGHTING TECHNOLOGY CO., LIMITED
Address: 8/F, E Building, Longjing Industrial Science Park,
335 Bulong Rd, Bantian St. in Longgang District, Shenzhen,
China, 518000.
Phone: +86-755-27700110
Email: [email protected]
Website: www.klaruslight.com
Website Facebook
产品参数
产品型号:K10
尺 寸:24mm x 24mm x 97.8mm
灯 珠:CREE XP-L HD V6
光 通 量:1200LM
工作电压:2.0-4.2V
电池规格:1 X 16340(兼容1 X CR123A)
防水等级:IPX8
重 量:87.9g(钛版)、60.3g(铝版)(不含电池)
质 保:5年
装箱清单
1 1 1 1 1
手电 电池充电线 防水圈 说明书部件名称
数量
IPX8
1
1200 300 350 100 10 1200 100
+1.4 1.5min 1.7 7.5 55 3 12
8500 2496 700 50
185 100 53 14
ANSI标准参数
项目
光通量(lm)
续航时间(h)
光强度(cd)
射程(m)
防跌落(m)
防水级别
模式 极亮 高亮 中亮 低亮 爆闪 SOS
注:以上数据来源于凯瑞兹实验室,不同使用环境可能会对以上数据产
生影响,如有偏差,请以实物为准。
产品使用方法
锁键与解锁
智能温控系统
一、 模式切换(默认战术模式)
二、操作模式说明
操作模式一:战术模式
开启/关闭
操作模式二:户外模式
开启/关闭
关机状态下,长按MODE开关5秒,当指
示灯红/绿交替闪烁时,同时按下主开
关,切换模式成功。
主开关:单按开启高亮档;再次按下,手电筒关闭。
MODE开关:按下开启爆闪;长按2秒,锁定爆闪。
亮度调节
MODE开关:单按改变亮度,依次为极亮→高亮→中亮→低亮→循环;
长按2秒,开启爆闪。
亮度调节
MODE开关:单按改变亮度,依次为低亮→中亮→高亮→极亮→循环;
长按3秒进入SOS模式。
主开关:单按开启高亮档位;再次按下,手电筒关闭。
MODE开关:按下开启低亮档;长按1秒,锁定低亮档。
旋松手电尾盖半圈,手电筒不能点亮;重新扭紧尾
盖,锁定解除。(长时间存储、携带或运输时,建议旋
松手电尾盖)。
在最高亮档时,会根据手电筒温度自动调节输出亮度,以保护LED和内
部元器件,并增强手握舒适度。
电量指示
防震保护机制
指示灯在开机后点亮5秒指示电池电量,5秒后关
闭。
绿色:70%-100%;
橙色:30%-70%;
红色:30%以下;
开机后红灯一直闪烁:低于10%;(持续提醒用户电
量不足)(此电量指示功能只针对16340锂离子电
池)
电池仓两端有弹簧防震,保护电池,防止电池受到较大冲击。
防震保护机制
1.手电在使用过程中,手电表面温度在60度以下属于正常情况,请放心
使用。
2.充电电池出厂时只有50%以下电量,直接使用不能达到最高亮度和
正常续航时间,首次使用请将电池充满。
3.为达到最佳防水性能,请定期检查防水O圈的完整性,并请适量涂抹
润滑硅脂于防水O圈上以延长其使用寿命。如O圈损坏,请及时更换
原厂O圈以确保您所使用之产品的优异防水性能。
4.请勿将手电筒的光线直接照射人类或动物的眼睛,以免对眼睛造成
伤害。
5.长时间不使用手电筒时,请将电池取出,并建议每3个月进行一次充电。
售后/保修条款
1.15天保换:凯瑞兹产品自售出日起15天内,在正常使用情况下,若出
现质量问题,可免费更换同型号产品。若该产品已停止生产,则调换
该型号升级品或不低于原产品性能的其它产品。
2.5年质保:凯瑞兹产品自售出日起5年内,在正常使用情况下,若出现
质量问题,享受免费维修服务。
3.充电电池保修期为1年,产品附加配件不在保修范围内。
4.终身有限保修:因不当使用引起的产品损坏或超出免费保修时间的
产品,我司将提供有偿保修,费用以实际更换材料费用为准,不另收
取人工费。
主开关
MODE开关
※ 产品升级、规格参数如有更新,恕不另行通知,实际产品的形式和颜
色则可能与实物所显示略有不同,请以实物为准。深圳市凯瑞兹电子科
技有限公司拥有对说明书内容的最终解释权和修改权。
扫码关注凯瑞兹微信公众号或登录凯瑞兹官网,可获取最新的资讯。
地址:深圳市龙岗区坂田街道龙景科技园E栋8楼
邮编:518000
电话:400-631-0169
邮箱:service@klaruslight.com
网站:www.klaruslight.cn
深圳市凯瑞兹电子科技有限公司
电量指示灯
微信公众号 凯瑞兹官网
for CONSTANT LOW
verde para completar el interruptor de configuración. • Klarus offers 1 year warranty for all rechargeable batteries.
-
 1
1

in altre lingue
- English: KLARUS K10 User manual
- français: KLARUS K10 Manuel utilisateur
- Deutsch: KLARUS K10 Benutzerhandbuch
- 日本語: KLARUS K10 ユーザーマニュアル
Documenti correlati
Altri documenti
-
 MAGICSHINE MOH15 Manuale utente
-
NITECORE MH25 Pro Manuale utente
-
Fenix LD50 Manuale utente
-
NITECORE TM9K LTP Manuale utente
-
OLIGHT Warrior 3S Rechargeable Tactical Flashlight Manuale utente
-
 SKYBEN Olight S1 MINI Cree XM-L2 LED 600 Lumens Ultra Compact USB Rechargeable LED Flashlight Manuale utente
-
-
NITECORE Ultra Comact Dual-Fuel Searchlight Manuale utente
-
NITECORE MT21C Manuale utente
-
OLIGHT Baton Pro LED Monochrome Torch Rechargeable 2000 lm 540 h 107 g Manuale utente

