AgfaPhoto Realipix Pocket P Manuale utente
- Tipo
- Manuale utente

Download de gebruikershandleiding op:
Obtenha o manual do usuário em:
Pobierz instrukcję obsługi na:
Získejte uživatelskou příručku na:
Получить руководство пользователя на:
www.gtcompany.fr/en/customer-support/
User Manual
Manuel d’utilisation
Benutzerhandbuch
Manual de usuario
Manuale d’uso
Használati utasítás
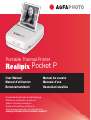
Portable Thermal Printer
Pocket P

2
EN USER MANUAL .............................................................................. 3
FR MANUEL D’UTILISATION ........................................................ 9
DE BENUTZERHANDBUCH .........................................................15
ES MANUAL DE USUARIO ..........................................................21
IT MANUALE D’USO .....................................................................27
HU HASZNÁLATI UTASÍTÁS ......................................................33

3
EN
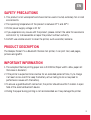
SAFETY PRECAUTIONS
1. This product is not waterproof and should not be used in humid, extremely hot or cold
environments.
2. The operating temperature of the product is between 0° C and 45° C.
3. Printer power supply voltage is DC 5V.
4. If you experience any issues with the product, please contact the seller for assistance
and do not try to disassemble or repair the product without authority.
5. Do NOT use volatile solvent to clean the printer, such as alcohol, benzene.
PRODUCT DESCRIPTION
The Realipix Pocket P is a Bluetooth thermal mini printer, it can print text, web pages,
pictures and graffiti.
IMPORTANT INFORMATION
1. The accepted thermal printing paper size is 57x30mm (Paper width x Max. paper roll
thickness in diameter)
2. If the printer is expected to be inactive for an extended period of time, try to charge
it at least once a month to keep the battery active. Failing to do so may lead to
performance issues with the battery.
3. To ensure a good Bluetooth connection, the printer should be within 5 meters in open
field of the external Bluetooth device.
4. Pulling the paper during printing is not recommended as it may damage the printer.

EN
4
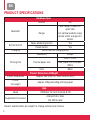
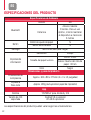
PRODUCT SPECIFICATIONS
Hardware Spec.
Bluetooth
Version 4.0
Range
Max. range: 8 meters in
open field.
For optimal usability, keep
device within a range of 5
meters
Button/Switch Paper advancing button Yes
Power button Yes
Charging Micro USB (for charging only)
Printing Info.
Resolution 203dpi
Thermal paper size
Width: 57mm
Max. paper roll thickness:
30mm
Color Black
Product Dimensions & Weight
Printer Dimensions Approx. 102 x 80 x 37.5mm (4x3x1.5 inch)
Printer
net weight Approx. 158g (excluding printing paper)
App
Name “PAPERGo” for both Android & iOS
Supported O/S version Android 5.0 or later
iOS 10.0 or later
Product specifications are subject to change without prior notices.

EN
5
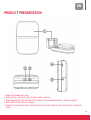
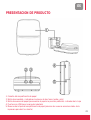
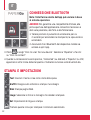
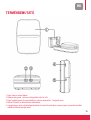
PRODUCT PRESENTATION
1. Paper roll compartment cover
2. Power button - two-tone light indicators (green and blue)
3. Paper advancing button (to advance the paper to the preferred position) - red light indicator
4. Micro USB port (for battery charging)
5. Paper roll compartment cover notches (press the notches on both sides of the printer to open the
cover)

EN
6
Note: It takes 3 hours or longer to fully charge the built-in battery.
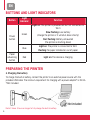
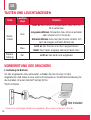
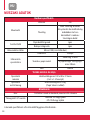
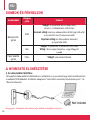
BUTTONS AND LIGHT INDICATORS
Button Light
Indicator Function
Power
button
Green
Light on: The printer is powered on but not connected to
Wi-Fi
Slow flashing: Low battery
(charge the printer or it will shut down shortly)
Fast flashing: Battery exhausted
(the printer is shutting down)
Blue Light on: The printer is connected to Wi Fi
Flashing: No paper installed or out of paper
Paper
advancing
button
Red Light on: The device is charging
PREPARING THE PRINTER
1. Charging the battery
To charge the built-in battery, connect the printer to an external power source with the
provided USB cable. The minimum requirement for charging with a power adaptor* is 5V/1A.
*Not included

EN
7
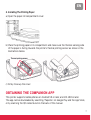
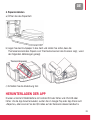
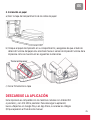
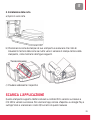
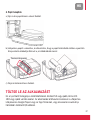
2. Installing The Printing Paper
a) Open the paper roll compartment cover.
b) Place the printing paper in its compartment and make sure the thermal sensing side
of the paper is facing towards the printer’s thermal printing sensor as shown in the
illustrations below:
c) Firmly close up the cover.
OBTAINING THE COMPANION APP
This printer supports mobile phones on Android 5.0 or later, and iOS 10.0 or later.
The app can be downloaded by searching “PaperGo” on Google Play and the App Store,
or by scanning the QR codes found on the back of this manual.

EN
8
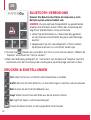
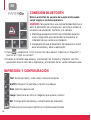
BLUETOOTH PAIRING
Note: The App’s user interface may vary depending on the OS.
ANDROID To ensure optimal compatibility, when first
opening the application please allow access to location data,
photos and camera.
1. Press and hold the power button for approx. 2 seconds to
power on the printer, the green light indicator will light up.
2. Make sure the Bluetooth of the mobile device is turned
on, then open the app.
3. Press and choose “Click to scan the new device“.
Select “PaperGo’ and click “Click to connect”.
4. When the connection is successful, “Connected” (on Android) and “PaperGo” (on iOS)
will appear under the printer icon and the green light indicator will change to blue.
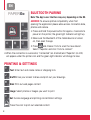
PRINTING & SETTINGS
Text: Enter text and create notes or shopping lists.
Graffiti: Use your screen to draw and print out your drawings.
Web: Print out web pages content.
Image: Select photos or images you want to print.
Set: Access language and printing concentration settings.
Press this icon to print out selected content.

9
FR
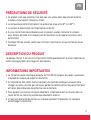
PRÉCAUTIONS DE SÉCURITÉ
1. Ce produit n’est pas étanche et ne doit pas être utilisé dans des environnements
humides, extrêmement chauds ou froids.
2. La température de fonctionnement du produit se situe entre 0° C et 45° C.
3. La tension d’alimentation de l’imprimante est de 5V.
4. Si vous rencontrez des problèmes avec le produit, veuillez contacter le vendeur
pour obtenir de l’aide et n’essayez pas de démonter ou de réparer le produit sans
autorisation.
5. N’utilisez PAS de solvant volatil pour nettoyer l’imprimante, tel que de l’alcool ou du
benzène.
DESCRIPTION DU PRODUIT
La Realipix Pocket P est une mini imprimante thermique Bluetooth qui peut imprimer du
texte, des pages Web, des images et des dessins.
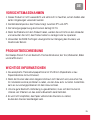
INFORMATIONS IMPORTANTES
1. Le format de papier thermique accepté est 57x30 mm (largeur du papier x épaisseur
maximale du rouleau de papier en diamètre).
2. Si l’imprimante doit rester inactive pendant une période prolongée, essayez de la
charger au moins une fois par mois pour garder la batterie active. Ne pas le faire peut
entraîner des problèmes de performances de batterie.
3. Pour garantir une bonne connexion Bluetooth, l’imprimante doit se trouver dans un
rayon de 5m ou moins du périphérique Bluetooth externe.
4. Il n’est pas recommandé de tirer sur le papier pendant l’impression car cela peut
endommager l’imprimante.

10
FR
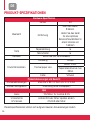
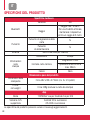
CARACTÉRISTIQUES PRODUIT
Caractéristiques
Bluetooth
Version 4.0
Portée
Portée max. : 8m.
Pour une utilisation
optimale, essayez de garder
l’appareil dans un rayon de
5 mètres
Bouton Ajustement papier Oui
Bouton d’allumage Oui
Recharge Micro USB (recharge uniquement)
Information
d’impression
Résolution 203dpi
Taille papier thermique
Largeur : 57mm
Épaisseur rouleau
max. : 30mm
Couleur Noir
Dimensions et poids du produit
Dimensions Environ 102 x 80 x 37.5mm (4 x 3 x 1.5 pouces)
Poids net Environ 158g (sans papier)
Application
Nom “PAPERGo” pour Android & iOS
Version OS supportées Android 5.0 ou plus
iOS 10.0 ou plus
Les caractéristiques produit peuvent varier en fonction des mises à jour.

11
FR
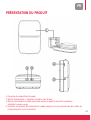
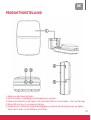
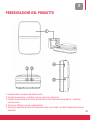
PRÉSENTATION DU PRODUIT
1. Couvercle du compartiment à papier
2. Bouton d’alimentation - indicateurs lumineux (vert et bleu)
3. Bouton d’ajustement du papier (pour faire avancer le papier à la position souhaitée) -
indicateur lumineux rouge
5. Encoches du couvercle du compartiment à papier (appuyez sur les encoches des deux côtés de
l’imprimante pour ouvrir le couvercle)

12
FR
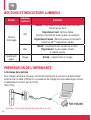
Remarque : Une charge complète peut prendre 3h ou plus.
BOUTONS ET INDICATEURS LUMINEUX
Bouton Indicateur
Lumineux Fonctions
Bouton
d’allumage
Vert
Allumé : L’imprimante est allumée mais n’est pas
connectée au Wi-Fi
Clignotement lent : Batterie faible
(chargez l’imprimante avant qu’elle ne s’éteigne)
Clignotement rapide : Batterie épuisée
(l’imprimante
s’éteint au 10ème clignotement rapide)
Bleu
Allumé : L’imprimante est connectée en Wi-Fi
Clignotement : Aucun papier installé
ou papier épuisé
Ajustement
papier Rouge Allumé : L’appareil est en charge
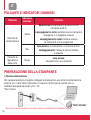
PRÉPARATION DE L’IMPRIMANTE
1. Recharge de la batterie
Pour charger la batterie intégrée, connectez l’imprimante à une source d’alimentation
externe avec le câble USB fourni. La puissance de charge minimum requise pour utiliser
un adaptateur secteur* est de 5V/1A.
*Non inclus

13
FR
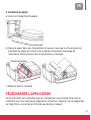
2. Installation du papier
a) Ouvrez le compartiment à papier
b) Placez le papier dans son compartiment et assurez vous que le côté de détection
thermique du papier est orienté vers le capteur d’impression thermique de
l’imprimante, comme indiqué dans les illustrations ci-dessous :
c) Refermez bien le couvercle
TÉLÉCHARGER L’APPLICATION
Cette imprimante est compatible avec les smartphones sous Android 5.0 et plus et
iOS10.0 et plus. Pour télécharger l’application, recherchez "PaperGo” sur le Google Play
ou l’App Store, ou scannez les QR codes au dos de ce manuel.

14
FR
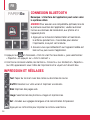
CONNEXION BLUETOOTH
R
emarque : L’interface de l’application peut varier selon
le système utilisé.
ANDROID Pour assurer une compatibilité optimale, lors de
la première ouverture de l'application, veuillez autoriser
l'accès aux données de localisation, aux photos et à
l'appareil photo.
1. Appuyez sur le bouton d’alimentation et maintenez-
le enfoncé pendant env. 2 secondes pour allumer
l’imprimante, le voyant vert s’allume.
2. Assurez-vous que le Bluetooth sur l’appareil mobile est
bien activé, puis ouvrez l’application.
3. Appuyez sur et choisissez « Click to scan the new device », puis sélectionnez
« PaperGo » et appuyer sur « click to connect »
4. Une fois la connexion établie, les mentions « Connecté » (sur Android) et « PaperGo »
(sur iOS) apparaissent sous l’icône de l’imprimante et le voyant vert devient bleu.
IMPRESSION ET RÉGLAGES
Text: Tapez du texte et créez des notes ou des listes de course.
Graffiti: Dessinez sur votre écran et imprimez vos dessins.
Web: Imprimez des pages web.
Image: Sélectionnez des photos ou images et imprimez-les.
Set : Accédez aux réglages de langues et de concentration d’impression.
Appuyez sur cette icône pour imprimer le contenu sélectionné.

15
DE
VORSICHTSMASSNAHMEN
1. Dieses Produkt ist nicht wasserdicht und sollte nicht in feuchten, extrem heißen oder
kalten Umgebungen verwendet werden.
2. Die Betriebstemperatur des Produkts liegt zwischen 0°C und 45°C.
3. Die Versorgungsspannung des Druckers beträgt DC 5V.
4. Wenn Sie Probleme mit dem Produkt haben, wenden Sie sich bitte an den Verkäufer
und versuchen Sie nicht, das Produkt selbst zu zerlegen oder zu reparieren.
5. Verwenden Sie KEINE flüchtigen Lösungsmittel zur Reinigung des Druckers, wie
Alkohol oder Benzol.
PRODUKTBESCHREIBUNG
Der Realipix Pocket P ist ein Bluetooth-Thermo-Minidrucker, der Text, Webseiten, Bilder
und Graffiti druckt.
WICHTIGE INFORMATIONEN
1. Das akzeptierte Thermodruckpapierformat ist 57x30 mm (Papierbreite x max.
Papierrollendicke im Durchmesser).
2. Wenn der Drucker über einen längeren Zeitraum nicht benutzt wird, versuchen Sie,
ihn mindestens einmal pro Monat zu laden, um den Akku aktiv zu halten. Andernfalls
kann es zu Leistungsproblemen mit dem Akku kommen.
3. Um eine gute Bluetooth-Verbindung zu gewährleisten, muss sich der Drucker im
Umkreis von 5 Metern um das externe Bluetooth-Gerät befinden.
4. Es wird nicht empfohlen, das Papier während des Druckens zu ziehen,
da dies den Drucker beschädigen kann.

16
DE
PRODUKT-SPEZIFIKATIONEN
Hardware-Spezifikation
Bluetooth
Version 4.0
Entfernung
Max. Reichweite:
8 Metern.
Halten Sie das Gerät
für eine optimale
Benutzerfreundlichkeit in
einem Umkreis von
5 Metern
Taste Papierabrollung Ja
Netzschalter Ja
Aufladen Micro USB (nur zum Aufladen)
Druckinformationen.
Auflösung 203dpi
Thermal paper size
Breite: 57mm
Papierrollendicke bei max:
30mm
Farbe Schwarz
Produktabmessungen und Gewicht
Druckerabmessungen Etwa 102 x 80 x 37.5mm (4 x 3 x 1.5 Zoll)
Drucker Nettogewicht Etwa 158g (ohne Druckpapier)
App
Name “PAPERGo” für Android & iOS
Unterstützte
O/S-Version
Android 5.0 oder höher Updates ändern.
iOS 10.0 oder höher
Produktspezifikationen können sich aufgrund neuerer Aktualisierungen ändern.

17
DE
PRODUKTVORSTELLUNG
1. Abdeckung des Papierrollenfachs
2. Ein/Aus-Schalter - zweifarbige Leuchtanzeigen (grün und blau)
3. Papiervorschubtaste (um das Papier in die bevorzugte Position vorzuschieben) - rote Leuchtanzeige
4. Mikro-USB-Anschluss (zum Laden der Batterie)
5. Einkerbung zum Öffnen der Papierrollenfachabdeckung (drücken Sie die Einkerbungen auf beiden
Seiten des Druckers, um die Abdeckung zu öffnen)

18
TASTEN UND LEUCHTANZEIGEN
Taste Leuchtan-
zeige Funktion
Netzs-
chalter
Grün
Licht an: Der Drucker ist eingeschaltet, aber nicht mit
Wi-Fi verbunden.
Langsames Blinken: Schwacher Akku (Drucker aufladen
oder schaltet sich in Kürze ab)
Schnelles Blinken: Akku leer (der Drucker schaltet sich
nach 10-maligem schnellen Blinken ab)
Blau Licht an: Der Drucker ist an Wi-Fi angeschlossen
Blinkt: Kein Papier eingelegt oder kein Papier mehr
Papiera-
brollung Rot Licht an: Das Gerät wird aufgeladen
VORBEREITUNG DES DRUCKERS
1. Aufladung der Batterie
Um den eingebauten Akku aufzuladen, schließen Sie den Drucker mit dem
mitgelieferten USB-Kabel an eine externe Stromquelle an. Die Mindestanforderung für
das Aufladen mit einem Netzteil* beträgt 5V/1A.
*Nicht enthalten
DE
Hinweis: Das vollständige Aufladen des eingebauten Akkus dauert mindestens 3 Stunden.

19
DE
2. Papierinstallation
a) Öffnen Sie das Papierfach
b) Legen Sie das Druckpapier in das Fach und stellen Sie sicher, dass die
Thermosensorseite des Papiers zum Thermodrucksensor des Druckers zeigt , wie in
den folgenden Abbildungen gezeigt.
c) Schließen Sie die Abdeckung fest.
HERUNTERLADEN DER APP
Drucker unterstützt Mobiltelefone mit Android 5.0 oder höher und iOS 10.0 oder
höher. Um die App herunterzuladen, suchen Sie im Google Play oder App Store nach
«PaperGo», oder scannen Sie die QR-Codes auf der Rückseite dieses Handbuchs.

20
DE
BLUETOOTH-VERBINDUNG
Hinweis: Die Benutzeroberfläche der App kann je nach
Betriebssystem unterschiedlich sein.
ANDROID Um eine optimale Kompatibilität zu gewährleisten,
erlauben Sie bitte beim ersten Öffnen der Anwendung den
Zugriff auf Standortdaten, Fotos und Kamera.
1. Halten Sie die Netztaste ca. 2 Sekunden lang gedrückt,
um den Drucker einzuschalten; die grüne Leuchtanzeige
leuchtet.
2. Vergewissern Sie sich, dass Bluetooth uf Ihrem mobilen
Smartphone aktiviert ist, und öffnen Sie die App.
3. Drücken Sie Drücken Sie und wählen Sie "Click to scan the new device”. Wählen Sie
”PaperGo” und klicken Sie ”Click to connect”.
4. Wenn die Verbindung erfolgreich ist, “Connected” (auf Android) und ”PaperGo” (auf iOS)
erscheinen unter dem Druckersymbol und die grüne Leuchtanzeige wechselt zu blau.
DRUCKEN & EINSTELLUNGEN
Text: Geben Sie Text ein, um Notizen oder Einkaufslisten zu erstellen.
Graffiti: Benutzen Sie Ihren Bildschirm, um Ihre Zeichnungen zu zeichnen und auszudrucken.
Web: Drucken Sie den Inhalt der Webseiten aus.
Image: Wählen Sie die Fotos oder Bilder aus, die Sie drucken möchten.
Set: Zugriff auf Sprach- und Druckeinstellungen.
Drücken Sie dieses Symbol, um den ausgewählten Inhalt drucken.
La pagina si sta caricando...
La pagina si sta caricando...
La pagina si sta caricando...
La pagina si sta caricando...
La pagina si sta caricando...
La pagina si sta caricando...
La pagina si sta caricando...
La pagina si sta caricando...
La pagina si sta caricando...
La pagina si sta caricando...
La pagina si sta caricando...
La pagina si sta caricando...
La pagina si sta caricando...
La pagina si sta caricando...
La pagina si sta caricando...
La pagina si sta caricando...
La pagina si sta caricando...
La pagina si sta caricando...
La pagina si sta caricando...
La pagina si sta caricando...
-
 1
1
-
 2
2
-
 3
3
-
 4
4
-
 5
5
-
 6
6
-
 7
7
-
 8
8
-
 9
9
-
 10
10
-
 11
11
-
 12
12
-
 13
13
-
 14
14
-
 15
15
-
 16
16
-
 17
17
-
 18
18
-
 19
19
-
 20
20
-
 21
21
-
 22
22
-
 23
23
-
 24
24
-
 25
25
-
 26
26
-
 27
27
-
 28
28
-
 29
29
-
 30
30
-
 31
31
-
 32
32
-
 33
33
-
 34
34
-
 35
35
-
 36
36
-
 37
37
-
 38
38
-
 39
39
-
 40
40


AgfaPhoto Realipix Pocket P Manuale utente
- Tipo
- Manuale utente
in altre lingue
Altri documenti
-
Zink ZIP Manuale utente
-
Citizen CT-S851II Manuale utente
-
Citizen CT-S651II Manuale utente
-
Citizen CT-S801II Manuale utente
-
Citizen CT-S601II Manuale utente
-
Citizen CT-S751 Manuale utente
-
Citizen CT-E651 Manuale utente
-
HP DesignJet T1700 Printer series Istruzioni per l'uso
-
-