
C51335_V10_05/07/2019
FR
EN
DE
ES
RU
2-8 / 54-56
9-14 / 54-56
15-20 / 54-56
21-27 / 54-56
28-34 / 54-56
NEOSTART 320
NEOSTART 420
NEOSTART 620
www.gys.fr
CN
35-40 / 54-56
NL
41-47 / 54-56
IT
48-53 / 54-56

2
NEOSTART 320 / 420 / 620
FR
Notice originale
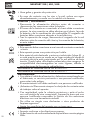
INSTRUCTIONS DE SÉCURITÉ
Ce manuel d’utilisation comprend des indications sur le
fonctionnement de votre appareil et les précautions à suivre pour
votre sécurité. Merci de le lire attentivement avant la première
utilisation et de le conserver soigneusement pour toute relecture
future. Ces instructions doivent être lues et bien comprises avant
toute opération. Toute modification ou maintenance non indiquée
dans le manuel ne doit pas être entreprise. Tout dommage corporel
ou matériel dû à une utilisation non-conforme aux instructions de ce
manuel ne pourra être retenu à la charge du fabricant. En cas de
problème ou d’incertitude, veuillez consulter une personne qualifiée
pour manier correctement l’appareil. Cet appareil doit être utilisé
uniquement pour faire de la recharge ou du démarrage dans les
limites indiquées sur l’appareil et le manuel. Il faut respecter les
instructions relatives à la sécurité. En cas d’utilisation inadéquate ou
dangereuse, le fabricant ne pourra être tenu responsable.
Appareil destiné à un usage à l’intérieur. Il ne doit pas être exposé
à la pluie.
Cet appareil peut être utilisé par des enfants âgés d’au moins 8 ans
et par des personnes ayant des capacités physiques, sensorielles
ou mentales réduites ou dénuées d’expérience ou de connaissance,
s’ils (si elles) sont correctement surveillé(e)s ou si des instructions
relatives à l’utilisation de l’appareil en toute sécurité leur ont été
données et si les risques encourus ont été appréhendés. Les enfants
ne doivent pas jouer avec l’appareil. Le nettoyage et l’entretien
par l’usager ne doivent pas être effectués par des enfants sans
surveillance.
A n’utiliser en aucun cas pour charger des piles ou des batteries
non-rechargeables.
Ne pas utiliser l’appareil, si le cordon d’alimentation ou la fiche de
secteur sont endommagés.
Ne jamais charger une batterie gelée ou endommagée.
Ne pas couvrir l’appareil.
Ne pas placer l’appareil à proximité d’une source de chaleur et à
des températures durablement élevées (supérieures à 50°C).
Ne pas obstruer les ouvertures de ventilation. Se référer à la partie
installation avant d’utiliser l’appareil.
Le mode de fonctionnement ainsi que les restrictions applicables à
l’utilisation sont expliqués ci-après dans ce mode d’emploi.
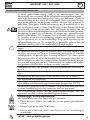
Risque d’explosion et d’incendie!
Une batterie en charge peut émettre des gaz explosif.
• Pendant la charge, la batterie doit être placée dans un
emplacement bien aéré.
• Eviter les flammes et les étincelles. Ne pas fumer.
• Protéger les surfaces de contacts électriques de la batterie à
l’encontre des courts-circuits.

3
NEOSTART 320 / 420 / 620
FR
Notice originale
Risque de projection d’acide !
• Porter des lunettes et des gants de protection.
• En cas de contact avec les yeux ou la peau, rincer immédiatement
à l’eau et consulter un médecin sans tarder.
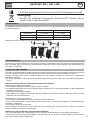
Connexion / déconnexion :
• Déconnecter l’alimentation avant de brancher ou de débrancher
les connexions sur la batterie.
• La borne de la batterie non reliée au châssis doit être connectée la
première. L’autre connexion doit être effectuée sur le châssis loin
de la batterie et de la canalisation de combustible. Le chargeur
de batterie doit alors être raccordé au réseau.
• Après l’opération de charge, débrancher le chargeur de batterie
du réseau puis retirer la connexion du châssis et enfin la connexion
de la batterie, dans l’ordre indiqué.
Raccordement :
• Cet appareil doit être raccordé à un socle de prise de courant
relié à la terre.
• Cet appareil est muni d’une protection par fusible
• Ce matériel destiné aux environnements industriels (classe A) n’est
pas prévu pour être utilisé dans un site résidentiel où le courant
électrique est fourni par le réseau public d’alimentation basse
tension. Il peut y avoir des difficultés potentielles pour assurer
la compatibilité électromagnétique dans ces sites, à cause des
perturbations conduites, aussi bien que rayonnées à fréquence
radioélectrique.
Ce matériel est conforme à la CEI 61000-3-12.
Ce matériel est conforme à la CEI 61000-3-11.
Entretien :
• Si le câble d’alimentation est endommagé, il doit être remplacé
par le fabricant, son service après-vente ou des personnes de
qualification similaire afin d’éviter un danger.
• L’entretien doit être effectué que par une personne qualifiée
• Avertissement ! Débrancher toujours la fiche de la prise secteur
avant d’effectuer des travaux sur l’appareil.
• Régulièrement, enlever le capot et dépoussiérer à la soufflette.
En profiter pour faire vérifier la tenue des connexions électriques
avec un outil isolé par un personnel qualifié.
• N’utiliser en aucun cas des solvants ou autres produits nettoyants
agressifs
• Nettoyer les surfaces de l’appareil à l’aide d’un chiffon sec.
Réglementation :
• Appareil conforme aux directives européennes.
• La déclaration de conformité est disponible sur notre site internet.

4
NEOSTART 320 / 420 / 620
FR
Notice originale
• Marque de conformité EAC (Communauté économique
Eurasienne).
Mise au rebut :
• Ce matériel fait l’objet d’une collecte sélective. Ne pas jeter dans
une poubelle domestique.
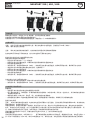
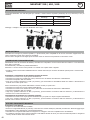
DESCRIPTION GÉNÉRALE
Les appareils NEOSTART sont destinés à la recharge et au démarrage des batteries au plomb à l’électrolyte liquide 12 V
(6 éléments) et 24 V (12 éléments) :
Recharge Démarrage
Neostart 320 40 - 400 Ah 35 - 120 Ah
Neostart 420 25 - 600 Ah 35 - 160 Ah
Neostart 620 45 - 900 Ah 45 - 200 Ah
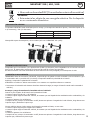
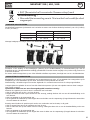
Montage de la poignée et des roues (seulement pour le NEOSTART 420 et 620) :
ALIMENTATION ÉLECTRIQUE
Vérier que l’alimentation et ses protections (fusible et/ou disjoncteur) sont compatibles avec le courant nécessaire en
utilisation. L’appareil doit être placé de façon telle que la che de prise de courant soit accessible.
Ils doivent être reliés à une prise 230 V monophasée AVEC terre protégée par un disjoncteur 16 A.
RACCORDEMENT ET DÉBRANCHEMENT
IMPORTANT ! Avant tout raccordement à une batterie, vérier que l’appareil n’est pas connecté au réseau d’alimentation
et que le commutateur est sur OFF.
D’autre part, vérier la polarité de votre batterie.
Attention : les câbles ne doivent pas être pincés ou en contact avec des surfaces chauffantes ou coupantes.
• Déconnecter de la batterie tout système électronique pendant la charge (ne pas charger la batterie lorsqu’elle est
connectée sur le véhicule).
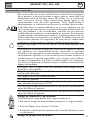
Démarrage et charge d’une batterie installée sur le véhicule :
Avant toute tentative de charge ou de démarrage d’une batterie installée sur véhicule, s’assurer que la batterie est bon état.
Dans le cas où le pôle négatif de la batterie est branché sur le châssis
• Brancher la pince rouge sur le pôle + de la batterie.
• Brancher la pince noire sur le châssis du véhicule, de façon à ce qu’elle soit éloignée des canalisations de combustible
et de la batterie.
• Brancher l’appareil au réseau d’alimentation.
• Après utilisation, mettre le commutateur sur OFF, déconnecter d’abord le chargeur du réseau d’alimentation puis
débrancher la pince noire et enn la pince rouge.
Certains véhicules ont le pôle positif de la batterie branché sur le châssis, dans ce cas :
• Brancher la pince noire sur le pôle négatif de la batterie.
• Brancher la pince rouge sur le châssis du véhicule, de façon à ce qu’elle soit éloignée des canalisations de combustible
et de la batterie.

5
NEOSTART 320 / 420 / 620
FR
Notice originale
• Brancher l’appareil au réseau d’alimentation.
• Après utilisation, mettre le commutateur sur OFF, déconnecter d’abord le chargeur du réseau d’alimentation puis
débrancher la pince rouge et enn la pince noire.
Charge d’une batterie non-connectée au véhicule :
• Brancher la pince rouge sur le pôle positif de la batterie et la pince noire sur le pôle négatif de la batterie.
• Après utilisation, mettre le commutateur sur OFF, déconnecter d’abord le chargeur du réseau d’alimentation puis
débrancher la pince rouge et enn la pince noire.
UTILISATION EN MODE CHARGEUR
Précautions préalables
• Choisir un local abrité et sufsamment aéré ou spécialement aménagé.
• Enlever les bouchons de la batterie (si celle-ci en est munie) et s’assurer que le niveau de liquide (électrolyte) est
sufsant. Dans le cas contraire ajouter de l’eau déminéralisée et nettoyer soigneusement les bornes et cosses de la
batterie.
• Vérier que la capacité de la batterie en Ampère-heure et la tension en Volt sont compatibles avec votre chargeur.
• Nous recommandons de déconnecter de la batterie tout système électronique pendant la charge (ne pas charger la
batterie lorsqu’elle est connectée sur le véhicule). Risque d’endommagement de l’électronique du véhicule.
Surveillance et état de charge
ATTENTION : ces appareils sont de type traditionnel. La charge de batteries nécessitera une surveillance et cette charge
ne s’arrêtera que lorsque l’opérateur placera le commutateur sur la position «OFF» ou déconnectera l’appareil de la
prise secteur.
Lorsque la batterie est chargée, une ébullition du liquide (électrolyte) contenu dans la batterie débute. Il est conseillé
d’interrompre la charge au début de ce phénomène pour éviter d’endommager la batterie.
Par ailleurs, si la batterie est connectée sur un véhicule, une charge prolongée sans surveillance est susceptible
d’endommager l’électronique embarquée. De même qu’une batterie sulfatée refusant la charge provoquera les mêmes
risques dés le début du branchement.
La n de la charge se détecte soit par la position de l’aiguille de l’ampèremètre lorsque celle-ci se trouve entre 0 et 10
A soit par un temps de charge supérieur à 10 h.
Batterie étanche
Pour charger une batterie hermétique, il est nécessaire d’être extrêmement prudent. Il faut procéder lentement à la
charge tout en contrôlant constamment la tension aux bornes de la batterie. Il est conseillé d’interrompre la charge
lorsque la tension atteint 14,4 V pour une batterie 12 V et 28,8 V pour une batterie 24 V. Cette tension est mesurable à
l’aide d’un testeur de batterie ou voltmètre.
Charge
Une fois le chargeur connecté sur la batterie en suivant les recommandations (voir raccordement et débranchement),
Pour le NEOSTART 320 :
- mettre le commutateur en position CHARGE ou BOOST 1 en respectant la capacité de la batterie.
Attention : En mode Boost 1, la protection thermique est susceptible d’être activée en début de charge si la batterie
est fortement déchargée.
CHARGE (12-24 V) BOOST 1 (12-24 V)
Neostart 320 40 - 160 Ah (11 A) 90 - 400 Ah (27 A)
Pour le NEOSTART 420 et 620 :
- mettre le commutateur en position CHARGE 1 ou CHARGE 2 en respectant la capacité de la batterie.
CHARGE 1 (12-24 V) CHARGE 2 (12-24 V)
Neostart 420 25 - 90 Ah (6 A) 90 - 300 Ah (20 A)
Neostart 620 45 - 140 Ah (10 A) 140 - 450 Ah (30 A)
Après utilisation suivre les recommandations de débranchement.
Charge de plusieurs batteries simultanément
Il est possible de charger plusieurs batteries simultanément en les connectant en parallèle. Les bornes positives reliées
à la pince rouge et les bornes négatives reliées à la pince noire. Ces batteries ou regroupement de batteries doivent être
de même tension 12 ou 24V. La charge en série n’est pas recommandée.

6
NEOSTART 320 / 420 / 620
FR
Notice originale
UTILISATION EN MODE DÉMARREUR
Précautions préalables
• Ne pas déconnecter la batterie du véhicule. Le branchement de la batterie peut entraîner la perte d’information et une
éventuelle impossibilité de redémarrage.
Démarrage
Une fois le démarreur connecté sur la batterie en suivant les recommandations (voir raccordement et débranchement),
il peut être nécessaire d’effectuer une précharge an d’apporter l’énergie indispensable pour un démarrage.
Pour effectuer la précharge mettre le commutateur sur la position «BOOST 2» pour le NEOSTART 320 et «BOOST» pour
le NEOSTART 420 et 620.
NEOSTART 320 :
Instantané Précharge 5 min
Neostart
320
12 V 35 - 60 Ah 60 - 120 Ah
24 V 35 - 45 Ah 45 - 90 Ah
NEOSTART 420 et 620 :
Instantané Précharge 5 min
Neostart 420 35 - 80 Ah 80 - 160 Ah
Neostart 620 45 - 100 Ah 100 - 200 Ah
Pour effectuer le démarrage mettre le commutateur sur la position «START». Se rendre au poste de contrôle du véhicule.
En tournant la clé, la fonction démarreur s’active. Cette fonction doit être arrêtée dès le démarrage du véhicule. Il est
recommandé d’effectuer l’opération à 2 pour que la personne proche du NEOSTART puisse enclancher la position START
au dernier moment et stopper l’appareil dès que le véhicule a démarré.
Si le moteur ne démarre pas, attendre 2 minutes entre 2 tentatives de démarrage. La durée de la tentative doit être de
3 sec maximum.
Nb : Un véhicule qui ne démarre pas est susceptible d’être affecté par un problème autre qu’une batterie en mauvais
état : alternateur, bougie de préchauffage,…
Après utilisation suivre les recommandations de débranchement.
PROTECTIONS
Cet appareil a été conçu avec un maximum de protections :
• Les pinces de charge sont entièrement isolées.
• Un fusible assure la protection contre l’inversion de polarité et les courts-circuits :
- Neostart 420 et 620 : ref. 054547, calibre 200 A (type SIBA V-Fuse / open type)
- Neostart 320 : ref. 054639, calibre 150 A (type Littlefuse BF1 / 32 V)
Le remplacement demande une intervention manuelle.
• Un disjoncteur, en face avant, assure la protection contre les surcharges du transfomateur ou le démarrage en position
charge. Si celui-ci disjoncte, un ré-enclenchement manuel est nécessaire.
• La protection thermique est assurée par un thermostat (refroidissement environ 1/4h). Le voyant vert s’éteint en cas
de surchauffe.
BATTERIES SULFATÉES OU ENDOMMAGÉES
Les NEOSTART ne détectent pas les batteries sulfatées ou endommagées.
• La batterie est profondément endommagée si en charge, l’aiguille de l’ampèremètre dévie rapidement vers des
intensités très élevées. La batterie est dénitivement hors d’usage.
• dans le cas d’une batterie sulfatée : mettre l’appareil sur l’allure la plus forte «BOOST» pour le Neostart 420 et 620 ou
«BOOST 2» pour le Neostart 320 et surveiller régulièrement si l’ampèremètre indique un courant de charge. Dés que le
courant de charge s’élève, se positionner sur la charge adaptée à la batterie. S’il n’y a pas d’amélioration au bout de 5
heures, la batterie est dénitivement hors d’usage.
Attention - Cette opération doit impérativement être effectuée avec la batterie déconnectée du véhicule !

7
NEOSTART 320 / 420 / 620
FR
Notice originale
ANOMALIES, CAUSES, REMÈDES
Anomalies Causes Remèdes
L’ampèremètre de l’appareil ne dévie
pas
Problème d’alimentation secteur Vérier votre alimentation secteur
Vérier si l’appareil est sur la position
chargeur
Pinces en court-circuit ou inversion
de polarité
Vérier si les fusibles ne sont pas
fondus et que le disjoncteur est
enfoncé.
La batterie que vous souhaitez
charger est défaillante
Contrôler à l’aide d’un voltmètre la
tension à ses bornes. Si cette tension
monte instantanément à plus de 2,5V
par élément la batterie peut être
sulfatée ou endommagée
Erreur de tension (12 -24 V) Vérier que le commutateur est la
bonne position (12 ou 24V)
Suite à une utilisation intensive, votre
appareil s’est mis en coupure
thermique
Patientez 1/4h pour laisser l’appareil
refroidir
Le chargeur est correctement
branché mais il ne charge pas la
batterie
Fusible grillé Remplacer le fusible
Mauvais contact pinces Nettoyer les bornes de la batterie et
des pinces. Vérier l’état des câbles
et des pinces.
Mauvaise position de charge Vérier la cohérence entre la position
de charge et la tension de la batterie
Suite à une utilisation intensive, votre
appareil s’est mis en coupure
thermique
Patientez 1/4h pour laisser l’appareil
refroidir
L’aiguille de l’ampèremètre monte
au-delà de la raduation maximale
alors que le réglage du commutateur
est au minimum.
La batterie est profondément
déchargée
Maintenir la charge en conservant le
réglage minimum.
Erreur de tension (12 - 24 V) Vérier que le commutateur est sur
la bonne position (12 ou 24V)
La batterie a des éléments en
court-circuit
Batterie endomagée. Changer la
batterie
Le fusible grille à chaque fois dès
qu’il est remplacé
Inversion de polarité Brancher la pince + à la borne + de
la batterie et la pince – à la borne
– de la batterie
Mauvaise position de charge Vérier la cohérence entre la position
de charge et la tension de la batterie
Surconsommation de courant sur la
batterie
Ne pas tirer de courant de la batterie
durant la charge
L’appareil charge une batterie 12V
sur une position 24V
Mettre le commutateur sur la position
12V.
L’appareil disjoncte Vous effectuez des démarrages en
laissant votre appareil sur la position
« charge »
Positionner impérativement le
commutateur de l’appareil sur la
position « démarreur » sous peine
d’endommager votre appareil.
Réenclencher le disjoncteur
Vous chargez une batterie de 12V en
position 24V
Mettre le commutateur sur la position
12V.
Après une journée de charge, le
voyant de n de charge ne s’allume
pas.
La batterie est endomagée Changer la batterie.
L’appareil charge une batterie 24V en
position 12V.
Mettre le commutateur sur la position
24V.

8
NEOSTART 320 / 420 / 620
FR
Notice originale
GARANTIE
La garantie couvre tous défauts ou vices de fabrication pendant 2 ans, à compter de la date d’achat (pièces et main
d’oeuvre).
La garantie ne couvre pas :
• Toutes autres avaries dues au transport.
• L’usure normale des pièces (Ex. : câbles, pinces, etc.).
• Les incidents dus à un mauvais usage (erreur d’alimentation, chute, démontage).
• Les pannes liées à l’environnement (pollution, rouille, poussière).
En cas de panne, retourner l’appareil à votre distributeur, en y joignant :
- un justicatif d’achat daté (ticket de sortie de caisse, facture….)
- une note explicative de la panne.

9
NEOSTART 320 / 420 / 620
EN
Translation of the original instructions
SAFETY INSTRUCTIONS
This manual includes guidelines on the operation of your device and
the precautions to follow for your own safety. Ensure it is read carefully
before first use and keep it handy for future reference.These instructions
should be read and understood before anyone operates the product.
Any modifications or maintenance that are not specified in the manual
should not be undertaken. The manufacturer is not liable for any injury
or damage due to non-compliance with the instruction manual. In
case of problems or uncertainties, please consult a qualified person
that is able to handle the device correctly. This device should only be
used for charging and starting within the limits indicated on the device
and in the manual. The safety instructions must be followed. In case of
improper or unsafe use, the manufacturer cannot be held responsible.
Device suitable for indoor use only. Do not expose to rain or
excessive moisture.
This device may be used by children from age 8 and by persons
with reduced physical, sensory or mental capabilities or lack of
experience and knowledge, provided that they are under supervision
or have been told how to use the device safely and are aware of
the potential risks. Children must not use the device as a plaything.
Cleaning and servicing tasks may not be carried out by children
unless they are supervised.
Do not use for charging non-rechargeable batteries
Do not operate the device with a damaged power supply cord or
a damaged mains plug.
Never charge a frozen or damaged battery.
Do not cover the device
Do not place the device near a fire or subject it to heat or to longterm
temperatures exceeding 50°C
Do not obstruct the cooling vents. Refer to the installation section
before operating the machine.
The automatic mode of operation and usage restrictions are
explained below in these operating instructions.
Risk of explosion and re!
A battery being charged can emit explosive gas.
• During the charge, the battery must be placed in a well ventilated
area.
• Avoid flames and sparks. Do not smoke.
• Protect the electrical contacts of the battery against short-circuiting.
Acid projection hazard!
• Wear safety goggles and protective gloves
• If your eyes or skin come into contact with battery acid, rinse the
affected part of the body with plenty of water and seek immediate
medical assistance.

10
NEOSTART 320 / 420 / 620
EN
Translation of the original instructions
Connection / disconnection:
• Disconnect the power supply before connecting/disconnecting
the device to/from the battery
• The terminal of the battery that is not connected to the car frame
must be connected first. The other connection must be made on
the car frame, far from the battery and the fuel line. The battery
charger must be connected to the power supply network.
• After the charging process, disconnect the battery charger from
the power supply network and remove the connector from the
car frame and then the connector from the battery, in this order.
Connection:
• This device must be connected to an earthed power supply.
• This machine is fuse-protected.
• This equipment is intended for industrial environments (class A)
and not for residential sites where the electric current is supplied
by the public low-voltage power supply network. There may be
potential difficulties in ensuring electromagnetic compatibility on
these sites, because of the conducted interferences, as well as
radiated radioelectrical frequency.
This hardware is compliant with the IEC 61000-3-12.
This equipment complies with the IEC 61000-3-11.
Maintenance:
• If the power supply cable is damaged, it must be replaced by the
manufacturer, its service agent or an equally qualified person.
• Service should be performed by a qualified person.
• Warning! Always remove the power plug from the wall socket
before carrying out any work on the device.
• Regularly take off the cover and remove dust with an air gun. Take
the opportunity to have a qualified person check the electrical
connections with an insulated tool.
• Under no circumstances should solvents or other aggressive
cleaning agents be used.
• Clean the device’s surfaces with a soft, dry cloth.
Regulations :
• The device complies with European Directive.
• The certificate of compliance is available on our website.
• EAC conformity mark (Eurasian Economic Commission)
Disposal:
• This product should be disposed of at an appropriate recycling
facility. Do not dispose of in domestic waste.

11
NEOSTART 320 / 420 / 620
EN
Translation of the original instructions
GENERAL DESCRIPTION
The NEOSTART range is designed to charge and start lead-acid batteries, 12V (6 elements) and 24V (12 elements) :
Recharge Starting
Neostart 320 40 - 400 Ah 35 - 120 Ah
Neostart 420 25 - 600 Ah 35 - 160 Ah
Neostart 620 45 - 900 Ah 45 - 200 Ah
Assembling the handle and the wheels (only for the NEOSTART 420 et 620 ) :
POWER SUPPLY
Check that the power supply and its protection (fuse and/or circuit breaker) are compatible with the current needed by
the machine. The device must be positioned so that the socket is always accessible.
The machine must be connected to a single phase socket (230 V) WITH earth protected by a 16A circuit breaker.
CONNECTION AND DISCONNECTION
IMPORTANT ! Before any connection to a vehicle battery, make sure that the booster isn’t connected to the mains and
that the booster’s switch is set to OFF (if applicable).
Also, check the battery polarity.
Warning : the cables must not be kinked or in contact with hot or sharp surfaces.
• Disconnect any electronic system from the battery during the charge (do not charge the battery when it’s connectd
to the vehicle).
Start and charge a battery in-situ :
In the event that the negative terminal is plugged to the car’s chassis :
• Connect the red clamp to the battery’s positive + terminal.
• Connect the black clamp to the vehicle’s chassis, make sure it is a safe distance from the battery and the fuel/exhaust pipe.
• Connect the device to the mains.
• After use, set the switch to OFF, disconnect the charger from the mains then remove the black clamp, followed by
the red clamp.
Some vehicles have the positive terminal connected to the chassis , in that case :
• Connect the black clamp to the battery’s negative - terminal.
• Connect the red clamp to the vehicle’s chassis, make sure it is a safe distance from the battery and the fuel/exhaust
pipe (any combustible piping).
• Connect the device to the mains.
• After use, set the switch to OFF, disconnect the charger from the mains then remove the red clamp, followed by the
black clamp.
Charging a battery when disconnected from the vehicle :
• Connect the red clamp to the battery’s positive terminal and the black clamp to the battery’s negative terminal.
• After use, set the switch to OFF, disconnect the charger from the mains then remove the red clamp, followed by the
black clamp.

12
NEOSTART 320 / 420 / 620
EN
Translation of the original instructions
USE IN CHARGING MODE
Preliminary precautions
• Choose a sheltered and well ventilated area, or a dedicated battery charging area.
• Remove the battery caps (if applicable) and make sure that the liquid level (electrolyte) is sufcient. If not, add
demineralised water and carefully clean the battery lugs and terminals.
• Check that the battery capacity (Ampere hour Ah) and the voltage (Volt V) are compatible with your charger.
• We recommend disconnecting the whole electronic system battery while charging (do not charge the battery when
connected to the vehicle). Risk of vehicle electronics damage.
Charge monitoring and state of charge
WARNING : These are traditionnal chargers. The battery charge will require monitoring and the charge will stop when
the operator will set the switch to «OFF» or disconnect the charger from the mains
Once the battery is charged, the liquid (electrolye) contained in the battery will boil. When this starts, it is recommended
to stop the charge to prevent any damage to the battery.
Moreover, if the battery is connected to the vehicle (in-situ), a prolonged unmonitored charge may damage the vehicle’s
on-board electronics. A sulfated battery that cannot be charged can potentially lead to damage of the on-board
electronics, as soon as the connection starts.
The end of the charge is when the anmeter’s pin is indicated a value between 0 and 10 A, or by a charge time of 10 h.
Sealed battery
For a sealed battery, it is necessary to be extra careful. The charge must be performed while constantly monitoring
the voltage at the battery terminals. It is recommended to stop the charge when the voltage reaches 14.4 V for a 12 V
battery and 28.8 V for a 24 V battery. This voltage can be measured with a volmeter.
Charge
Once the charger is connected to the vehicle battery while following the instructions (see connections and disconnections),
For the NEOSTART 320 :
- Set the switch to CHARGE or BOOST 1 with regards to the battery capacity..
Warning : In Boost 1 mode, the thermal protection may activate if the battery is deeply discharged.
CHARGE (12-24V) BOOST 1 (12-24V)
Neostart 320 40 - 160 Ah (11A) 90 - 400 Ah (27A)
For the NEOSTART 420 and 620 :
- Set the switch to CHARGE 1 or CHARGE 2 with regards to the battery capacity.
CHARGE 1 (12-24V) CHARGE 2 (12-24V)
Neostart 420 25 - 90 Ah (6A) 90 - 300 Ah (20A)
Neostart 620 45 - 140 Ah (10A) 140 - 450 Ah (30A)
After usage, follow the recommended disconnection procedure.
Charging several batteries simultaneously.
It is possible to charge several batteries simultaneously by connecting them in parallel. The positive terminals connected
to the red clamp and the negative terminals connected to the black clamp. These batteries or battery groups must be
of the same voltage, 12V or 24V.
Charging batteries in series is not recommended.
USE IN STARTER MODE
Preliminary precautions
• Do not disconnect the battery fom the vehicle. Connecting the battery can lead to the vehicle’s memory loss and a
potential impossibility to restart it.
Start
Once the charger is connected to the vehicle battery while following the instructions (see connections and disconnections),
it may be necessary to perform a pre charge in order to start the vehicle.
To perform a pre charge, set the switch to «BOOST 2» for the NEOSTART 320 and «BOOST» for the NEOSTART 420
and 620.

13
NEOSTART 320 / 420 / 620
EN
Translation of the original instructions
NEOSTART 320 :
Instantaneous 5 min pre charge
Neostart
320
12 V 35 - 60 Ah 60 - 120 Ah
24 V 35 - 45 Ah 45 - 90 Ah
NEOSTART 420 and 620 :
Instantaneously 5 min pre charge
Neostart 420 35 - 80 Ah 80 - 160 Ah
Neostart 620 45 - 100 Ah 100 - 200 Ah
To start the vehicle, set the switch to «START». Reach the vehicle controls. By turning the key, the start mode activates.
This mode must be stopped once the vehicle is started. It is recommended to do this with 2 people so that the person
close to the NEOSTART can switch to START at the exact moment and stop the device once the vehicle has startted.
If your engine does not start, wait 2 minutes between each start attempt. The attempt must last 3 seconds at most.
Nb : If the vehicle does not start, it may be a problem other than a faulty battery e.g. alternator, glowplug…
After the use, follow the disconnection procedure.
PROTECTIONS
These clamps have been designed for maximum protection :
• The charging clamps are fully insulated.
• A fuse guarantees protection against polarity inversion and short circuits.
- Neostart 420 and 620 : ref. 054547, calibre 200 A (type SIBA V-Fuse / open type)
- Neostart 320 : ref. 054639, calibre 150 A (type Littlefuse BF1 / 32 V)
Replacing it requires manual intervention..
• A breaker, on the front panel, guarantees protection against tranformer overloads and start attempts in charge mode.
If the breaker trips, it needs to be manually activated.
• The thermal protection is monitored by a thermostat (cooling for approximately 1/4h). The green indicator switches
off in the even of overheating.
SULFATED OR DAMAGED BATTERIES
The NEOSTART does not detect sulfated or damaged batteries.
• The battery is badly damaged when in charge, the anmeter pin goes up quicky to very high intensities. The battery is
permanently damaged.
• In the event of a sulfated battery : set the device to «BOOST» for the Neostart 420 and 620 or «BOOST 2» for
the Neostart 320 ad regularly check that the amperemeter indicates a charging current. As soon as the charging
current rises, set a charge that matches the battery capacity. If there are no improvement after 5 hours, the battery is
permanently damaged.
Warning - This must be done with the battery disconnected from the vehicle !
TROUBLESHOOTING
Symptoms Causes Remedies
The machine's anmeter does not
uctuate .
Power supply problem. Check your mains power supply.
Check that the device is on charge mode.
Clamps in short circuit or polarity
reversal.
Check that the fuses have not melted and that the
circuit breaker is not tripped
The battery that you are trying to
charge is faulty.
Check the terminals' voltage with a voltmeter. If this
voltage jumps instantaneously to 2.5V per element,
the battery may be sulfated or damaged.
Voltage error (12 -24V) Chck that the switch is on the right setting (12 or
24V)
Following intensive use, your device
has entered thermal protection mode.
Wait 1/4h so the device can cool down.

14
NEOSTART 320 / 420 / 620
EN
Translation of the original instructions
The charger is properly connected
but it does not charge the battery
Blown fuse Replace the fuse by a new one.
Bad clamp connections. Clean the terminals and the clamps. Check the state
of the cables and clamps.
Wrong charge settings Check that the selected voltage matches the battery
voltage.
Following intensive use, your device
has entered thermal protection mode.
Wait 1/4h so the device can cool down.
The anmeter's pin goes above the
maximum marking while the
device is set to minimum intensity.
The battery is deeply discharged. Keep charging using the minimum setting .
Voltage error (12 -24V) Chck that the switch is on the right setting (12 or
24V)
Your battery has elements in short
circuit.
Damaged battery Replace the battery.
The fuse blows every time it is
replaced
Polarity reversal Connect the + clamp to the battery's (+) and the +
clamp to the battery's (-).
Wrong charge settings Check that the selected voltage matches the battery
voltage.
Current overconsumption on the
battery
Do not draw any of the battery's current during the
charge
The machine is charging a 12V battery
in 24V mode
Set the switch to 12V.
The fuse trips. Starts are attempted while the device is
in charge mode.
Make sure to set the switch to « start » to prevent
damage to the machine. Reset the circuit breaker.
You are charging a 12V battery in 24V
mode
Set the switch to 12V.
After charging for a whole day,
the end of charge indicator does
not switch on.
The battery is damaged Change the battery.
The machine is charging a 24V battery
in 12V mode
Set the switch to 24V.
WARRANTY
The warranty covers faulty workmanship for 2 years from the date of purchase (parts and labour).
The warranty does not cover:
• Transit damage.
• Normal wear of parts (eg. : cables, clamps, etc..).
• Damages due to misuse (power supply error, dropping of equipment, disassembling).
• Environment related failures (pollution, rust, dust).
In case of failure, return the unit to your distributor together with:
- The proof of purchase (receipt etc ...)
- A description of the fault reported

15
NEOSTART 320 / 420 / 620
DE
Übersetzung der Originalbetriebsanleitung
SICHERHEITSANWEISUNGEN
Diese Betriebsanleitung enthält Sicherheits- und Betriebshinweise.
Bitte lesen Sie diese Anleitung aufmerksam durch, bevor Sie das
Gerät zum ersten Mal benutzen und bewahren Sie diese sorgfältig
auf. Die Nichteinhaltung dieser Anweisungen und Hinweise kann
mitunter zu schweren Personen- und Sachschäden führen. Nehmen
Sie keine Wartungarbeiten oder Veränderungen am Gerät vor,
wenn diese nicht explizit in der Anleitung genannt werden. Der
Hersteller haftet nicht für Verletzungen oder Schäden, die durch
unsachgemäße Handhabung dieses Gerätes enstanden sind. Bei
Problemen oder Fragen zum korrekten Gebrauch dieses Gerätes,
wenden Sie sich bitte an entsprechend qualifiziertes und geschultes
Fachpersonal. Dieses Gerät darf ausschließlich zum Starten für die
in der Anleitung oder auf dem Gerät genannten Anforderungen
genutzt werden. Die Sicherheitshinweise müssen in jedem Fall
beachtet werden. Im Fall einer unangemessenen oder gefährlichen
Verwendung kann der Hersteller nicht haftbar gemacht werden.
Schützen Sie das Gerät vor Feuchtigkeit und Nässe.
Schützen Sie das Gerät vor unbefugtem Gebrauch. Kinder unter 8
Jahren düfen nicht mit diesem Gerät spielen. Befinden sich Kinder
oder Personen mit eingeschränkten körperlichen oder geistigen
Fähigkeiten sowie Personen ohne explizite Erfahrung im Umgang
mit dem Produkt in der Nähe des Gerätes, sorgen Sie bitte für
ausreichend Schutz und Kontrolle bei Benutzung des Gerätes.
Laden Sie nie defekte oder nicht aufladbare Batterien.
Benutzen Sie das Gerät nicht, wenn der Stecker, die Klemmen oder
das Zubehör defekt ist.
Laden Sie niemals eine beschädigte oder gefrorene Batterie.
Decken Sie das Gerät während der Nutzung nicht ab.
Lagern Sie das Gerät nicht in der Nähe einer Wärmequelle oder
bei dauerhaft hohen Temperaturen (über 50°C).
Blockieren Sie nicht die Belüftungsöffnungen des Gerätes. Bitte
beachten Sie den Punkt «Installation» der Betriebsanleitung vor
Gebrauch des Gerätes.
Der Automatik-Modus sowie die Einschränkungen bei der Benutzung
werden nachfolgend in der Betriebsanleitung erklärt.
Explosions- und Brandgefahr!
Während des Ladevorgangs können explosive Gase entstehen.
• Während des Ladevorgangs muss die Batterie in einem gut
belüfteten Bereich plaziert werden.
• Vermeiden Sie Funken und Flammen. Rauchen Sie nicht!
• Schützen Sie die Pole der Batterie vor Kurzschlüssen.
Es besteht die Gefahr von Säurespritzern!

16
NEOSTART 320 / 420 / 620
DE
Übersetzung der Originalbetriebsanleitung
• Tragen Sie eine Schutzbrille und Handschuhe.
• Bei Kontakt der Batteriesäure mit den Augen oder der Haut
gründlich mit Wasser nachspülen und sofort einen Arzt aufsuchen.
Verbinden/Trennen
• Trennen Sie das Gerät vom Spannungsnetz bevor Sie Kabel und
Zangen anschließen oder trennen.
• Versichern Sie sich immer, dass die rote Klemme zuerst mit dem
«+» Pol der Batterie verbunden wird. Falls es nötig ist die schwarze
Klemme mit der Fahrzeugkarosserie zu verbinden, versichern
Sie sich, dass es einen Sicherheitsabstand von der Batterie zum
Benzintank/Aufspuff gibt. Achten Sie während der Ladung auf
einen frei zugänglichen Netzanschluss.
• Beachten Sie am Ende des Ladevorgangs folgendes: Trennen Sie
erst das Gerät vom Stromnetz und entfernen Sie dann erst die
Klemmen von der Batterie.
Anschluss
• Beachten Sie die Anschlussreihenfolge.
• Dieses Gerät ist mit einer Schutzsicherung ausgestattet.
• Dieses GYS Gerät ist ein Gerät der Klasse A und eignet sich für
den industriellen und professionellen Gebrauch. In einem anderen
Umfeld ist die elektromagnetische Verträglichkeit schwieriger zu
gewährleisten.
Das Gerät entspricht der Norm ICE 61000-3-12.
Das Gerät entspricht der Norm ICE 61000-3-11.
Wartung:
• Ist das Ladegerät und/oder die Kabel defekt/beschädigt, geben
Sie das Ladegerät zur Reparatur zum Hersteller bzw. an einen
geeigneten Fachbetrieb.
• Die Wartung und Reparatur darf nur von entsprechend geschultem
und qualifiziertem Fachpersonal durchgeführt werden.
• Achtung! Alle Kontrollarbeiten oder Wartungen dürfen nur
duchgeführt werden, wenn das Gerät ausgeschaltet und die
Stromversorgung unterbrochen ist.
• Öffnen Sie regelmäßig das Gehäuse und entfernen Sie Staub
und andere Ablagerungen. Beachten Sie hierbei die geltenden
Sicherheitsvorschriften.
• Benutzen Sie niemals Lösungsmittel oder anderen aggressiven
Reinigungsprodukte.
• Reinigen Sie die Oberfläche des Gerätes mithilfe eines trockenen
Lappen.
Richtlinien:
• Das Gerät entspricht den europäischen Richtlinien und Normen.
• Die Konformitätserklärung finden Sie auf unsere Webseite.

17
NEOSTART 320 / 420 / 620
DE
Übersetzung der Originalbetriebsanleitung
• EAC-Konformitätszeichen (Eurasische Wirtschaftsgemeinschaft)
Entsorgung:
• Produkt für selektives Einsammeln (Sondermüll). Werfen Sie es
daher nicht in den Hausmüll!
BESCHREIBUNG
Die NEOSTART wurden konzipiert, um 12V (6 Elemente) und 24V (12 Elemente) Bleibatterien mit üssigen Elektrolyt
zu laden und starten.
Starten Démarrage
Neostart 320 40 - 400Ah 35 - 120Ah
Neostart 420 25 - 600Ah 35 - 160Ah
Neostart 620 45 - 900Ah 45 - 200Ah
Montage von Griff und Rädern (nur für die NEOSTART 420 und 620):
NETZANSCHLUSS
Überprüfen Sie, ob Stromversorgung und Schutzeinrichtungen (Netzabsiecherung) zum Betrieb des Gerätes ausreichen
sind. Die Geräte sollen mit einem 16A Schuko-Stecker angeshloßen werden und benötigen einen Netzanschluss von
230V/16A + Schutzleiter.
ANSCHLUSS UND TRENNEN
WICHTIG! Vor dem Anschluss an die Batterie ist sicherzustellen, dass das Gerät nicht an das Spannungsnetz angeschlossen
ist und der Schalter auf OFF steht (falls vorhanden). Darüber hinaus ist die Polarität der Batterie zu prüfen.
Achtung: Die Kabel unter keinen Umständen abknicken oder direktem Kontakt mit heißen oder scharfkantigen
Oberächen aussetzen.
• Bei Laden, das Gerät von allem Stromkreis abschalten (laden Sie die Batterie nicht wenn es im Fahrzeug angeschlos-
sen ist).
Laden und Starten einer am Fahrzeug angeschlossenen Batterie
Bei Massepuknt = Minuspol der Batterie
• Die rote Anschlussklemme mit dem Pluspol der Batterie verbinden.
• Die schwarze Anschlussklemme an einer blanken Stelle der Karosserie, in ausreichendem Abstand zu Brennstofeitungen
und Batterie, anklemmen.
• Das Gerät am Stromnetz anschließen.
• Nach Gebrauch den Schalter auf OFF stellen. Erst das Ladegerät vom Stromnetz trennen, danach die schwarze Klemme.
Zuletzt die rote Klemme abklemmen.
Bei Massepunkt = Pluspol der Batterie:
• Die schwarze Anschlussklemme mit dem Pluspol der Batterie verbinden.
• Die rote Anschlussklemme an einer blanken Stelle der Karosserie, in ausreichendem Abstand zu Brennstofeitungen
und Batterie, anklemmen.
• Das Gerät am Stromnetz anschließen.
• Nach Gebrauch den Schalter auf OFF stellen. Erst das Ladegerät vom Stromnetz trennen, danach die schwarze
Klemme. Zuletzt die rote Klemme abklemmen.
Laden einer nicht im Fahrzeug angeschlossenen Batterie:
• Die rote Anschlussklemme mit dem Pluspol und die schwarze Anschlussklemme an den Minuspol anschließen.
• Nach Gebrauch den Schalter auf OFF stellen. Erst das Ladegerät vom Stromnetz trennen, danach die rote Klemme.
Zuletzt die schwarze Klemme abklemmen.

18
NEOSTART 320 / 420 / 620
DE
Übersetzung der Originalbetriebsanleitung
GEBRAUCH IM LADEMODUS
Sicherheitshinweise
• Benutzen Sie die Geräte nur in gut belüfteten, trockenen Innenräumen.
• Falls vorhanden, entfernen Sie die Batteriezellendeckel und prüfen Sie den Flüssigkeitsstand. Falls nötig mit destilliertem
Wasser auffüllen. Reinigen Sie Batteriekontakte und -pole.
• Vergewissen Sie sich, dass Kapazität (im Ampere-Stunden) und Spannung (in Volt) der Batterie mit der Kapazität des
Ladegerätes übereinstimmen.
• Wir empfehlen, die gesamte Elektronik Batterietrenn während des Ladevorgangs (der Akku nicht aufgeladen werden,
wenn mit dem Fahrzeug verbunden). Gefahr Fahrzeugelektronik Schäden.
Überwachung und Ladestatus
ACHTUNG! Bei diesen Geräten handelt es sich um traditionnelle Geräte, die eine manuelle Ladungsüberwachung
erfordern. Bei Überladung der Batterie beginnt die sogenannte Gitterkorrosion, welche sich durch «Gasen» bemerkbar
macht. Hierbei wird das in der Schwefelsäure bendliche Wasser eletrolytisch ersetzt; aus dem dabei entsehenden
Sauerstoff und Wasserstoff bildet sich hochexplosives Knallgas. Es ist daher absolut notwendig den Ladevorgang sofort
nach Vollladung der Batterie zu beenden, um mögliche Schäden an Batterie oder Bordelektronik zu verhindern und
weitere Gefahren zu auszuschließen.
Sie erkennen das Ende das Ladevorgangs, wenn sich die Amperemeter-Nadel zwischen 0 und 10A bendet oder die
Ladezeit von 10 Stunden überschritten wird.
Wartungsfreie Batterien
Beim Laden von wartungsfreie Batterien ist äußerste Vorsicht geboten: Der Ladevorgang darf nur langsam und unter
städiger Überwachung erfolgen. Es wird empfohlen den Vorgang zu beenden, wenn 14,4V (bei 12V Batterien) bzw.
28,8V (bei 24V Batterien) erreicht sind. Die Spannung kann mit einem voltmeter oder Batterietester gemessen werden.
Laden
Sobald das Gerät den Anweisungen entsprechend an der Batterie angeschlossen wurde (s. Abschnitt «Anschluss und
Trennen»).
Für das NEOSTART 320 :
- Stellen Sie den Schalter auf Position CHARGE oder BOOST 1, je nach Batteriekapazität.
Achtung: Bei tiefentladenen Batterien kann im Modus BOOST 1 möglicherweise der Überhitzungsungsschutz aktiviert
werden.
BOOST 1 (12-24V) BOOST 1 (12-24 V)
Neostart 320 40 - 160Ah (11A) 90 - 400Ah (27A)
Für das NEOSTART 420 und 620 :
- Stellen Sie den Schalter auf Position CHARGE 1 oder CHARGE 2, je nach Batteriekapazität.
CHARGE 1 (12-24V) CHARGE 2 (12-24V)
Neostart 420 25 - 90Ah (6A) 90 - 300Ah (20A)
Neostart 620 45 - 140Ah (10A) 140 - 450Ah (30A)
Folgen Sie nach Gebrauch des Gerätes den entsprechenden Anweisungen des Abschnittes «Anschluss und Trennen».
Laden mehrerer Batterien in Parallelschaltung
In Parallelschaltung können mehrere Batterien gleichzeitig geladen werden. Schließen Sie die rote Zange am Pluspol und
die schwarze Zange am Minuspol der Batterie an. Das Laden von in Reihe geschalteten Batterien ist nicht empfehlenswert.
GEBRAUCH IM STARTMODUS
Sicherheitshinweise
• Klemmen Sie unter keinen Umständen die Batterie vom Fahrzeug ab! Das Abklemmen kann Informationsverlust
verursachen und allenfalls einen weiteren Startversuch verhindern.
Starten
Sobald das Gerät den anweisungen entsprechen an der Batterie angeschlossen wurde (s. Abschnitt «Anschluss und
Trennen»), ist gegebenenfalls ein Vorladen der Batterie notwendig, um über ausreichend Energie für den Gerätegebrauch
zu verfügen. Um einen Vorladervorgang zu beginnen, stellen Sie den Schalter auf «BOOST 2» für das NEOSTART 320
und «BOOST» die NEOSTART 420 und 620.
NEOSTART 320 :
Sofort Vorladen 5 Min.
Neostart
320
12V 35 - 60Ah 60 - 120Ah
24V 35 - 45Ah 45 - 90Ah

19
NEOSTART 320 / 420 / 620
DE
Übersetzung der Originalbetriebsanleitung
NEOSTART 420 et 620 :
Sofort Vorladen 5 Min.
Neostart 420 35 - 80Ah 80 - 160Ah
Neostart 620 45 - 100Ah 100 - 200Ah
Um einen Startvorgang zu beginnen stellen Sie den Schalter auf «START». Nehmen Sie auf dem Fahrsitz des Fahrzeugses
Paltz. Mit Starten des Motors starten Sie ebenfalls die Startfunktion. Springt der Motor an, muss das Gerät sofort
ausgeschaltet werden. Es empfehlt sich daher zu zweit zu arbeiten.
Sollte der Motor nicht anspringen wiederholen Sie nach 2-minütiger Wartezeit den Vorgang. Warten Sie 2 Minuten
zwischen jedem weiteren Startversuch. Der Startversuch selbst darf maximal 3 Sek. lang sein.
Hinweis: Springt der Motor auch nach mehreren Zündversuchen nicht an liegt das Problem entweder an einer entladenen
Batterie (-> Auaden) oder wird anderweitig verursacht (Mechanik, Elektronik, Batteriedefekt,...).
Folgen Sie nach Gebrauch des Gerätes den entsprechenden Anweisungen des Abschnittes «Anschluss und Trennen».
SCHUTZFUNKTIONEN
Ihr Gerät wurde mit einer Vielzahl von Schutzfunktionen ausgestattet:
• Vollisolierte Ladeklemmen.
• Schutz vor Verpolung und Kurzschluss: eine Sicherung schützt das Gerät.
- Neostart 420 und 620 : Art. -Nr 054547, Leistung 200A (Typ SIBA V-Fuse / offener Typ)
- Neostart 320 : ref. 054639, Leistung 150A (Typ Littlefuse BF1/32V)
Manueller Austausch.
• Schutz vor Überhitzung des Trafos bzw. Überladung der Batterie im Lademodus wird durch einen Schutzschalter auf
der Vorderseite des Gerätes gewährleistet. Bei Aulösung muss dieser manuell wieder eingeschaltet werden.
• Überhitzungsschutz: Das Gerät ist mit einem Thermoschalter ausgestattet (15min Abkühlzeit). Bei Überhitzung erlischt
die grüne Thermoschutzanzeige.
SULFATIERTE ODER BESCHÄDIGTE BATTERIEN
Die NEOSTART erkennen nicht, ob Batterien sulfatiert oder beschädigt sind.
• Ihre Batterie ist schwer beschädigt, wenn die Ampermeter-Nadel bereits zu Beginn des Ladevorgangs auf eine hohe
Stromstärke schnellt. Die Batterie kann nicht mehr verwendet werden.
• Bei sulfatierten Batterien: Stellen Sie den höchstmöglichen Ladestrom «BOOST» für die Neostart 420 und 620 oder
«BOOST 2» für das Neostart 320 ein und starten Sie den Ladevorgang. Prüfen Sie regelmäßig, ob das Amperemeter
einen Ladestrom anzeigt. Steigt deiser, schalten Sie umgehend auf einen für Ihre Batterie angepassten Ladestron
zurück. Sollte der Ladestrom auch nach 5 Std. nicht angestiegen sein, ist Ihre Batterie mit großer Wahrscheinlichkeit
irreparabel beschädigt. Achtung! Führen Sie diesen Vorgang ausschließlich bei abgeklemmter Fahrzeugbatterie durch!
BETRIEBSSTÖRUNG, URSACHEN, ABHILFEN
Fehler Ursache Lösung
Das Amperemeter schlägt nicht aus. Kein oder schlechter Netzkontakt. Überprüfen Sie den Netzanschluss.
Überprüfen Sie, ob sich das Gerät im
Lademodus bendet.
Kurzschluss oder Verpolung der
Klemmen.
Überprüfen Sie die Sicherung und
überprüfen Sie die Netzabsicherung.
Die zu ladende Batterie ist stark
beschädigt.
Überprüfen Sie mit einem Voltmeter
die Batteriespannung. Ist die
Spannung höher als 2,5V pro Zelle,
ist die Batterie sulfatiert oder
beschädigt.
Spannungsfehler (12V oder 24V) Achten Sie auf die richtige
Spannungswahl (12 oder 24V).
Intensiver Gebrauch des Gerätes
führt zu thermischer Überlastung.
Warten Sie ca. 1/4 Std. bis sich das
Gerät abgekühlt hat.

20
NEOSTART 320 / 420 / 620
DE
Übersetzung der Originalbetriebsanleitung
Das Ladegerät ist korrekt
angeschlossen, trotzdem wird die
Batterie nicht aufgeladen.
Schutzsicherung geschmolzen Ersetzen Sie die Schutzsicherung.
Schlechter Kontakt an den Klemmen Reinigen Sie die Hülsen der Batterie
und der Klemmen. Prüfen Sie den
Zustan der Kabel und der Klemmen.
Falsche Ladestufe Prüfen Sie, ob die Ladestufe mit der
Batteriespannung übereinstimmt.
Intensiver Gebrauch des Gerätes
führt zu thermischer Überlastung.
Warten Sie ca. 1/4 Std. bis sich das
Gerät abgekühlt hat.
Bei Minimum-Stellung des
Drehknopfes steigt die Stromanzeige
über das Maximum.
Die Batterie ist tiefentladen. Ladung mit Minimaleinstellung
weiterführen.
Sapnnungsfehler (12V oder 24V) Achten Sie auf die richtige
Spannungswahl (12 oder 24V).
Kurschluss durch Batterie Batterie beschädigt. Tauschen Sie die
Batterie aus.
Die Gerätesicherung brennt immer
wieder durch.
Verpolung der Polklemmen. Schließen Sie die + Klemme am +
Pol der Batterie und die - Klemme am
- Pol der Batterie an.
Falsche Ladestufe Prüfen Sie, ob die Ladestufe mit der
Batteriespannung übereinstimmt.
Die Batterie verbraucht zu viel Strom Laden Sie die Batterie nicht auf,
wenn sie noch im Fahrzeug
angeschlossen ist.
Das Ladegerät lädt eine 12V-Batterie
im 24V-Modus.
Die Ladespannung auf 12V einstellen
Das Gerät schaltet sich ab. Sie versuchen das Fahrzeug zu
starten, obwohl sich das Gerät im
Lademodus bendet.
Schalten Sie das Gerät in den
«START»-Modus, um eine
Beschädigung Ihres Gerätes zu
verhindern und überprüfen Sie die
Sicherungen.
Auaden einer 12V Batterie mit 24V
Spannung.
Achten Sie auf die richtige
Spannungswahl (12 oder 24V).
Sie haben das Gerät einen Tag lang
aufgeladen und die Anzeige zum
Ende des Ladevorgangs leuchtet
nicht.
Die Batterie ist beschädigt. Die Batterie ersetzen
Auaden einer 12V Batterie mit 24V
Spannung.
Die Ladespannung auf 24V einstellen
HERSTELLERGARANTIE
Die Garantieleistung des Herstellers erfolgt ausschließlich bei Fabrikations- oder Materialfehlern, die binnen 24
Monate nach Kauf angezeigt werden (nachweis Kaufbeleg). Nach Anerkenntnis des Garantieanspruchs durch den
Hersteller bzw. seines Beauftragten erfolgen eine für den Käufer kostenlose Reparatur und ein kostenloser Ersatz von
Ersatzteilen. Die Garantiezeitraum bleibt aufgrund erfolgter Garantieleistungen unverändert.
Ausschluss:
Die Garantieleistung erfolgt nicht bei Defekten, die durch unsachgemäßen Gebruach, Sturz oder harte Stöße sowie
durch nicht autorisierte Reparaturen oder durch Transportschäden, die infolge des Einsendens zur Reparatur,
hervorgerufen worden sind. Keine Garantie wird für Verschleißteile (z. B. Kabel, Klemmen, Vorsatzscheiben usw.)
sowie bei Gebruachsspuren übernommen.
Das betreffende Gerät bitte immer mit Kaufbeleg und kurzer Fehlerbeschreibung ausschließlich über den
Fachhandel einschicken. Die Reparatur erfolgt erst nach Erhalt einer schriftlichen Akzeptanz (unterschrift) des zuvor
Kostenvoranschlags durch den Besteller. Im Fall einer Garantieleistung trägt der Hersteller ausschließlich die Kosten
für den Rückversand an den Fachhändler.
La pagina si sta caricando...
La pagina si sta caricando...
La pagina si sta caricando...
La pagina si sta caricando...
La pagina si sta caricando...
La pagina si sta caricando...
La pagina si sta caricando...
La pagina si sta caricando...
La pagina si sta caricando...
La pagina si sta caricando...
La pagina si sta caricando...
La pagina si sta caricando...
La pagina si sta caricando...
La pagina si sta caricando...
La pagina si sta caricando...
La pagina si sta caricando...
La pagina si sta caricando...
La pagina si sta caricando...
La pagina si sta caricando...
La pagina si sta caricando...
La pagina si sta caricando...
La pagina si sta caricando...
La pagina si sta caricando...
La pagina si sta caricando...
La pagina si sta caricando...
La pagina si sta caricando...
La pagina si sta caricando...
La pagina si sta caricando...
La pagina si sta caricando...
La pagina si sta caricando...
La pagina si sta caricando...
La pagina si sta caricando...
La pagina si sta caricando...
La pagina si sta caricando...
-
 1
1
-
 2
2
-
 3
3
-
 4
4
-
 5
5
-
 6
6
-
 7
7
-
 8
8
-
 9
9
-
 10
10
-
 11
11
-
 12
12
-
 13
13
-
 14
14
-
 15
15
-
 16
16
-
 17
17
-
 18
18
-
 19
19
-
 20
20
-
 21
21
-
 22
22
-
 23
23
-
 24
24
-
 25
25
-
 26
26
-
 27
27
-
 28
28
-
 29
29
-
 30
30
-
 31
31
-
 32
32
-
 33
33
-
 34
34
-
 35
35
-
 36
36
-
 37
37
-
 38
38
-
 39
39
-
 40
40
-
 41
41
-
 42
42
-
 43
43
-
 44
44
-
 45
45
-
 46
46
-
 47
47
-
 48
48
-
 49
49
-
 50
50
-
 51
51
-
 52
52
-
 53
53
-
 54
54


GYS NEOSTART 420 Manuale del proprietario
- Tipo
- Manuale del proprietario
- Questo manuale è adatto anche per
in altre lingue
- français: GYS NEOSTART 420 Le manuel du propriétaire
- español: GYS NEOSTART 420 El manual del propietario
- Deutsch: GYS NEOSTART 420 Bedienungsanleitung
- Nederlands: GYS NEOSTART 420 de handleiding
Documenti correlati
-
GYS NEOSTART 420 Scheda dati
-
GYS START UP 80 Manuale del proprietario
-
GYS NEOSTART 620 Scheda dati
-
GYS GYSTART 1224 T Manuale del proprietario
-
-
GYS NEOSTART 320 - 12/24V Scheda dati
-
-
GYS START 200 Manuale del proprietario
-
-
