
THERMAL TRANSFER PRINTER
IMPRIMANTE A TRANSFERT TERMIQUE
THERMOTRANSFERDRUCKER
IMPRESORA POR TRANSFERENCIA TÉRMICA
STAMPANTE A TRASFERIMENTO TERMICO
ENGLISH
FRANÇAIS
DEUTSCH
ESPAÑOL
ITALIANO
OPERATION AND MAINTENANCE MANUAL
NOTICE D'UTILISATION ET ENTRETIEN
BEDIENUNGSANLEITUNG
MANUAL DE USO Y MANTENIMIENTO
MANUALE D'USO E MANUTENZIONE
10 M 075
This manual is the property of
Cembre
: any reproduction is forbidden without written permission.
Ce manuel est la proprieté de
Cembre
: toute reproduction est interdite sauf autorisation écrite.
Der Firma
Cembre
bleibt das Eigentumsrecht der Bedienungsanleitung vorbehalten.
Ohne vorherige schriftliche Genehmigung darf die Bedienungsanleitung weder vollständig noch teilweise vervielfältigt werden.
Este manual es propriedad de
Cembre
. Toda reproducción está prohibida sin autorización escrita.
Questo manuale è di proprietà della
Cembre
: ogni riproduzione é vietata se non autorizzata per scritto.
Cembre Ltd.
Dunton Park
Kingsbury Road, Curdworth - Sutton Coldfield
West Midlands B76 9EB (Great Britain)
Tel.: 01675 470440 - Fax: 01675 470220
E-mail: [email protected]
www.cembre.co.uk
Cembre S.p.A.
Via Serenissima, 9
25135 Brescia (Italia)
Telefono: 030 36921
Telefax: 030 3365766
E-mail: [email protected]
www.cembre.it
Cembre S.a.r.l.
22 Avenue Ferdinand de Lesseps
91420 Morangis (France)
Tél.: 01 60 49 11 90 - Fax: 01 60 49 29 10
B.P. 37 - 91421 Morangis Cédex
E-mail: [email protected]
www.cembre.fr
Cembre España S.L.
Calle Verano, 6 y 8 - P.I. Las Monjas
28850 Torrejón de Ardoz - Madrid (España)
Teléfono: 91 4852580
Telefax: 91 4852581
E-mail: [email protected]
www.cembre.es
Cembre AS
Fossnes Senter
N-3160 Stokke (Norway)
Phone: (47) 33361765
Telefax: (47) 33361766
E-mail: [email protected]
www.cembre.no
Cembre GmbH
Heidemannstraße 166
80939 München (Deutschland)
Telefon: 089/3580676
Telefax: 089/35806777
E-mail: [email protected]
www.cembre.de
Cembre Inc.
Raritan Center Business Park
181 Fieldcrest Avenue
Edison, New Jersey 08837 (USA)
Tel.: (732) 225-7415 - Fax: (732) 225-7414
E-mail: [email protected]
www.cembreinc.com
ww w.c em br e. co m
cod. 6261290
Certified Environmental
Management System
Certified Occupational
Health & Safety
Management System
Certified Quality
Management System

FIG. 1 / BILD 1
ENGLISH ...................................................................... Page 2
FRANÇAIS..................................................................... Page 12
DEUTSCH ..................................................................... Seite 22
ESPAÑOL .................................................................... Página 32
ITALIANO..................................................................... Pagina 42
Arti-
colo
Colore
MG2-ETR 991600
Nero
MG2-ETR 991601
Blu
MG2-ETR 991602
Rosso
MG2-ETR 991603
Verde
MG2-ETR 991607
Argento
.54.
.1.
Deutsch
----------------------------------------------------------------------------------------------------------------------
I
NFORMATION FÜR DEN BENUTZER
gemäß der “Richtlinien 2002/95/EG und 2002/96/EG in Bezug auf den
reduzierten Gebrauch von gefährlichen Substanzen in elektrischen und elektronischen Geräten, sowie auf die
Abfallentsorgung”.
Das durchkreuzte Zeichen auf dem Mülleimer, welches auf dem Gerät oder seiner Verpackung angebracht ist, zeigt an,
dass das Produkt am Ende seiner Lebenszeit getrennt von den anderen Abfällen entsorgt werden muss.
Die getrennte Abfallsammlung des vorliegenden zu entsorgenden Geräts wird vom Hersteller organisiert und verwaltet.
Der Besitzer, der sich des Geräts entledigen will, muss sich daher mit dem Hersteller in Verbindung setzen und das von
ihm angenommene System für die getrennte Sammlung des zu entsorgenden Geräts befolgen.
Eine angemessene getrennte Sammlung, damit das Gerät für das Recycling, die Behandlung und die umweltfreun-
dliche Entsorgung vorbereitet werden kann, trägt dazu bei, mögliche negative Auswirkungen auf die Umwelt und auf
den Gesundheitszustand zu vermeiden und begünstigt die Wiederverwertung und das Recycling der Materialien des
Geräts.
Bei widerrechtlicher Entsorgung des Produkts durch den Benutzer werden die vom Gesetz vorgesehen Verwaltungs-
sanktionen angewandt.
Español
----------------------------------------------------------------------------------------------------------------------
INFORME PARA LOS USUARIOS
en los términos de las
Directivas 2002/95/CE y 2002/96/CE, relativas a la
reducción en el empleo de sustancias peligrosas en los equipos eléctricos y electrónicos, además de la elimina-
ción de los desechos”.
El símbolo del contenedor de basura cruzado por un aspa que aparece en el equipo o sobre su embalaje indica que,
al nal de su ciclo de vida útil, el producto debe ser eliminado independientemente de otros desechos.
La recogida selectiva del presente equipo, llegado al nal de su ciclo de vida, es organizada y manejada por el fabri-
cante. El usuario que desee deshacerse del presente equipo deberá, por lo tanto, contactar con el fabricante y seguir el
sistema adoptado por el mismo para permitir la recogida por separado del equipo que ha concluido su ciclo de vida.
La adecuada recogida selectiva, para el sucesivo envío del equipo dado de baja al reciclaje, al tratamiento y al saneamiento
ambiental compatible, contribuye a evitar posibles efectos negativos sobre el medio ambiente y sobre la salud favoreciendo
el reempleo y el reciclaje de los materiales que componen el equipo.
La eliminación abusiva del equipo por parte del propietario implica la aplicación de las sanciones administrativas pre-
vista por la legislación vigente.
Italiano
------------------------------------------------------------------------------------------------------------------------
INFORMAZIONE AGLI UTENTI
ai sensi dell’art. 13 del Decreto Legislativo 25 Luglio 2005, n. 151 “
Attuazione
delle Direttive 2002/95/CE e 2002/96/CE, relative alla riduzione dell’uso di sostanze pericolose nelle apparecchia-
ture elettriche ed elettroniche, nonché allo smaltimento dei riuti”.
Il simbolo del cassonetto barrato riportato sull’apparecchiatura o sulla sua confezione indica che il prodotto, alla ne
della sua vita utile, deve essere raccolto separatamente dagli altri riuti.
La raccolta differenziata della presente apparecchiatura giunta a ne vita è organizzata e gestita dal produttore. L’uten-
te che vorrà disfarsi della presente apparecchiatura dovrà quindi contattare il produttore e seguire il sistema che questo
ha adottato per consentire la raccolta separata dell’apparecchiatura giunta a ne vita.
L’adeguata raccolta differenziata per l’avvio successivo dell’apparecchiatura dismessa al riciclaggio, al trattamento ed
allo smaltimento ambientalmente compatibile contribuisce ad evitare possibili effetti negativi sull’ambiente e sulla salute
e favorisce il reimpiego e/ il riciclo dei materiali di cui è composta l’apparecchiatura.
Lo smaltimento abusivo del prodotto da parte del detentore comporta l’applicazione delle sanzioni amministrative di cui
all'articolo 50 e seguenti del D.Lg. n. 22/1997.
La pagina sta caricando ...
La pagina sta caricando ...

1
2
3
7
10
8
9
5
4
6
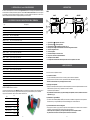
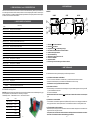
FRONT
SIDE
REAR
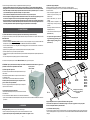
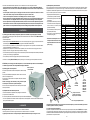
3. DESCRIPTION
1 - GREEN LED : power on.
2 - YELLOW LED : printing cycle.
3 - ORANGE LED : error signal (see section 7).
4 - RED button: opening/closing carriage.
5 - Carriage.
6 - Lid.
7 - USB socket.
8 - Power supply socket.
9 - Power ON/OFF switch.
10 - Compartment with 2A phase and neutral protection fuses.
Carry out the following procedure step by step:
4.1) Connect the cables
– Connect the USB cable between the PC and the USB socket (7) on the rear of MG2.
– Check the supply voltage is correct then connect the power supply cable between socket (8) on the rear of MG2 and
an EARTHED mains power supply.
4.2) Switch the machine ON
– Operate the ON/OFF switch (9) on the rear of MG2 to commence the start-up cycle.
When the GREEN LED (1) lights up, MG2 is ready for use.
• Do not press the RED button (4) before the GREEN LED lights up. If this happens restart MG2 (See section 7).
4.3) Install the GENIUS operating software
– The "GENIUS SUITE" CD provided with MG2 contains the driver and operating software required, which should be installed
following the procedure shown in the software installation instruction. Facility to receive software updates from the internet
(www.cembre.com) by direct connection or via network or portable memory device.
4.4) Open/close the carriage
– Press the RED button (4) on the front of MG2 to open the carriage.
Press the button again to close the carriage.
• Ensure there is sufcient space in front of MG2 to allow the carriage to open completely.
• Do not interfere with the carriage during opening and closing operations.
4. INITIAL SET UP
LAYOUT:
.4.
.51.
8. RESA ALLA
Cembre
PER REVISIONE
In caso di guasto contattare il nostro Agente di Zona il quale Vi consiglierà in merito e Vi fornirà le istruzioni necessarie per
l’invio della stampante alla nostra Sede; se possibile, allegare copia del Certicato di Collaudo a suo tempo fornito dalla
Cembre
con la stampante oppure, in mancanza di altri riferimenti, indicare la data approssimativa di acquisto.
Articolo Colore
MG2ETR 991600
Nero
MG2ETR 991601
Blu
MG2ETR 991602
Rosso
MG2ETR 991603
Verde
MG2ETR 991607
Argento
MG2ETR 991606
Bianco
Articolo
Descrizione
MG2-PWC
991000
Piastra per targhette MG-TPM
MG2-PLT
991002
Piastra per targhette, etichette, targhe e prodotti serieFLAT
MG2-QTB
9 91011
Piastra per targhette per morsetti MG-CPM-01, -02, -03, -04, -07
MG2-PTD
991007
Piastra per targhette MG-TDM
MG2-PTM
991010
Piastra per targhette MG-TDM0
MG2-MTB
991008
Piastra per targhette per morsetti MG-CPM-01 (5x7 mm)
MG2-WTB
991004
Piastra per targhette per morsetti MG-CPM-05,-12
MG2-STB
991005
Piastra per targhette per morsetti MG-CPM-06
MG2-CTB
991006
Piastra per targhette per morsetti MG-CPM-10
MG2-LTB
991013
Piastra per targhette per morsetti MG-CPM-09
MG2-TWC
991502
Supporto in PET per piastra MG2-PWC
MG2-TTB
991512
Supporto in PET per piastra MG2-PTB
MG2-TLT
991522
Supporto in PET per piastra MG2-PLT
MG2-TTD
991563
Supporto in PET per piastra MG2-PTD
MG2-TMT
991513
Supporto in PET per piastra MG2-MTB
MG2-TGT
991532
Supporto in PET per piastra MG2-GTB
MG2-TWT
991542
Supporto in PET per piastra MG2-WTB
MG2-TST
991552
Supporto in PET per piastra MG2-STB
MG2-TCT
991562
Supporto in PET per piastra MG2-CTB
MG2-CNP
992150
Panni di ricambio per MG2-CKP (Kit da 5 pezzi)
MG2-CKP
991670
Kit pulizia testa di stampa (piastra, panni e spray)
VAL P18-M
Contenitore carrellato con maniglia telescopica
9. ACCESSORI PER MG2 FORNIBILI A RICHIESTA
NASTRI DI STAMPA monocromatici
I nastri di stampa sono una componente molto importante per raggiungere il risultato nale.
I nastri monocromatici MG2-ETR garantiscono elevata resistenza all'abrasione, allo sfregamento e all'azione degli agenti
chimici (esano, alcool etilico, ...) ed atmosferici (raggi UV, umidità). Norma: CEI 16-7 ed.1997-06.
Sono forniti in sviluppo da 200 metri lineari, con larghezza di 120 mm e diametro interno di 28 mm.

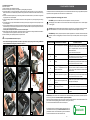
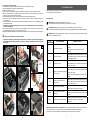
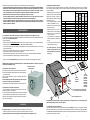
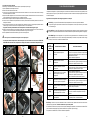
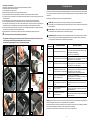
4.5) Install the printer ribbon
Remove the lid, then:
1 Rotate the media guide completely downwards.
2 Extract both feed (rear) and take up (front) spindles by carefully pulling them upwards.
3 Fit the printer ribbon on to the feed spindle (rear), locating the slot in the ribbon spool fully on to the key on the spindle.
When viewed from the front of MG2, the key should be on the right hand side with the lead of the ribbon underneath, facing
forward.
4 Relocate the loaded feed spindle rmly into its seatings in MG2. Unroll sufcient ribbon to pass under the rear guide bar
and guide plate and over the template.
5 Continue unrolling the ribbon until it has passed under the front lower guide bar and is protruding through the carriage
aperture.
6 Fit the ribbon take up spool provided with MG2 onto the take up spindle (front), locating the slot in the spool fully on to the
key on the spindle.
7 Using the carriage/template as a convenient base, position the take up spool at the end of the protruding printer ribbon such
that the white cog is on the left hand side (viewed from the front). Ensure the ribbon is square to the spool and attach the
end of it to the spool with adhesive tape.
• Carefully and accurately wind a few turns of ribbon around the spool.
8 While carefully pulling ribbon through MG2, relocate the loaded take up spindle into its seatings in MG2. Ensure the ribbon
is correctly aligned on the front guide bars, without, tears, folds or creases.
9 Rotate the media guide completely upwards, then replace the lid.
Do not operate MG2 without the lid in place.
• We recommend cleaning the print head at each ribbon replacement, using only the genuine cleaning kit MG2-CKP
991670 CLEANING KIT following the procedure in section 5.1.
.50.
7. SOLUZIONE DEI PROBLEMI
La stampante è dotata di un sistema di diagnostica; errori e/o anomalie nel funzionamento vengono segnalati dai led presenti
sul pannello frontale, agli allarmi ottici è associato anche un allarme acustico.
Signicati e interpretazione dei messaggi ottico acustici
LED VERDE (1): Il led rimane illuminato quando la stampante è in tensione e pronta all'uso.
Il led lampeggia quando è fallito il test di riconoscimento della testa di stampa oppure la testa non risulta collegata
o è danneggiata.
LED GIALLO (2): Il led si illumina lampeggiando durante la fase di stampa con conseguente movimento del carrello.
Il led rimane illuminato in caso di mancato riconoscimento della piastra di interfaccia (piastra non idonea).
LED ARANCIO (3): funzione principale di questo led è quella di segnalare errori o anomalie nel funzionamento della
stampante; il numero di lampeggi/beeps consecutivi denisce il tipo di anomalia presente, secondo la seguente
tabella:
N° DI
LAMPEGGI / BEEPS
DESCRIZIONE DELL'ERRORE POSSIBILI SOLUZIONI
1
Nastro di stampa esaurito o mancante
Controllare che il nastro non sia rotto o mancante e che
segua il percorso corretto all’interno della stampante, pro-
cedere con il riposizionamento corretto del nastro e/o la
sostituzione dello stesso.
Spegnere e riaccendere la stampante
3
Mancato abbassamento della testa di
stampa
Spegnere e riaccendere la stampante.
Premere il pulsante (4) per far muovere il carrello control-
lando che questo si muova in modo corretto
4
Mancato sollevamento della testa di
stampa
Spegnere e riaccendere la stampante.
Premere il pulsante (4) per far muovere il carrello control-
lando che questo si muova in modo corretto
5
Mancato raggiungimento della posi-
zione "0" o "completamente fuori" del
carrello di caricamento
Spegnere e riaccendere la stampante. Premere il pulsan-
te (4) per far muovere il carrello controllando che questo
si muova in modo corretto. Rimuovere eventuali ostacoli
davanti al carrello
6
Movimento del carrello di caricamento
non corretto, posizione non regolare
Spegnere e riaccendere la stampante.
Premere il pulsante (4) per far muovere il carrello control-
lando che questo si muova in modo corretto
7
Mancata lettura del sensore sulle
piastre di interfaccia oppure sensore
mancante
Controllare che la piastra montata sul carrello sia quella
corretta, riprovare a stampare
8...11
Errore nel linguaggio di stampa o dri-
ver di stampa non corretti
Controllare che le impostazioni deI Drivers e del Software
siano corrette, riavviare la stampante e riprovare a stam-
pare.
12.....
Errori dovuti all'elettronica della stam-
pante
Riavviare la stampante, se il problema persiste, contattare
la
Cembre
.
PULSANTE (4): questo pulsante oltre a comandare l'uscita o l'entrata del carrello, permette anche di accedere a speciche
funzioni di programmazione riservate solamente a personale qualicato.
Mantenendo premuto il pulsante per più di 6 sec in fase di accensione della stampante si accederà alla modalità di TEST
(tale modalità è indicata dal lampeggiamento simultaneo dei led giallo e arancio).
Per uscire dalle modalità TEST basterà riavviare la stampante.
Per qualsiasi necessità, informazioni sull'utilizzo della stampante o in
caso di malfunzionamento, rivolgersi al Servizio Assistenza chiamando
gratuitamente il numero verde da tutta Italia, nei giorni feriali dal lunedì
al venerdì dalle 8.00 alle 12.00 e dalle 13.00 alle 17.00.
Numero verde
800.852.355
Slot
Key
Media guide
Feed guide
plate
Guide
bar
Ribbon
Ribbon
Slot
Key
Adhesive
tape
Cog
Guide
bar
Cog
Spindle
.15.
1
9
8
2
3
5
6
4
7

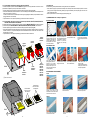
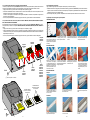
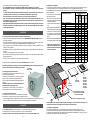
4.6) Mount the support templates
Different templates are supplied with MG2 to suit the range of printable materials.
Each template is identied by a sensor to ensure it matches the material selected for printing.
Proceed as follows:
– Select the template appropriate to the
medium to be printed according to the
table alon side.
– Press the RED button (4) to open the
carriage.
– Carefully position the template on the
carriage, locating it correctly on the pins
provided.
Positioning is identical for all versions of
template (See FIG. A)
– Load a sheet of the medium to be printed
(See section 4.7).
• An optic-acoustic signal will indicate
any possible wrong positioning of the
template during the printing process
(See section 7).
Template
MG2-PLT
Locating pins corresponding
to apertures in the underside
of templates
1
Carriage fully open
2
3
Support templates each have a protective PET blank on their upper side.
If this needs to be replaced due to contamination, damage or wear, use only genuine
Cembre
spare parts.
Do not use a template without its protective blank.
4.7) Load media sheets for printing
A sheet of media comprises a number of identical moulded or die-cut blanks. Available in a variety of sizes, materials and
colours to suit all applications, the range of media is shown in the
Cembre
“IDENTIFICATION AND LABELLING SYSTEMS”
catalogue.
Template
MG2-PWC
FIG. A
4
Template
MG2-QTB
MG2-LTB *
MG2-WTB *
MG2-STB *
MG2-CTB *
MG2-MTB *
MG2-PTD *
(*) Templates available separately .
.6.
.49.
5.1) Pulizia della testa termica di stampa (operazione raccomandata ad ogni cambio del nastro)
Di seguito viene descritta la procedura per la pulizia della testa di stampa da effettuarsi con lo specico KIT DI PULIZIA
MG2-CKP 991670:
– Spegnere la stampante.
– Accendere la stampante mantenendo premuto per meno di 6 secondi il pulsante rosso (4) sul pannello frontale della
stampante no a quando il led giallo (2) lampeggerà in "MODALITA' PULIZIA TESTA DI STAMPA".
– Una volta rilasciato il pulsante rosso i leds giallo e arancio lampeggeranno e il led verde resterà acceso, il carrello di ca-
ricamento (5) rimarrà aperto.
– Applicare lo spray pulente sul panno e montare la piastra (fornita nel kit di pulizia) sul carrello.
– Premere il pulsante rosso per avviare la procedura di pulizia.
– Terminato il processo di pulizia, il carrello si fermerà in posizione estratta e la stampante resterà operativa per ulteriori cicli
di pulizia.
– Per uscire dalla procedura di pulizia spegnere e riaccendere la stampante.
A richiesta sono disponibili i panni di ricambio MG2-CNP 992150 (set 5 pz) per il kit di pulizia.
ATTENZIONE: per la pulizia della testa di stampa non utilizzare assolutamente utensili metallici o spigolosi che
potrebbero causare danni irreparabili alla testa stessa.
5.2) Pulizia degli altri componenti
Per rimuovere la polvere all'interno della stampante utilizzare un pen-
nello morbido.
Parti metalliche e plastiche utilizzare un panno morbido inumidito con
un detergente neutro.
Tracce di adesivo o parti di etichette utilizzare alcool denaturato.
Durante la pulizia porre attenzione che gocce di liquido non ven-
gano in contatto con le parti elettriche.
A ne lavoro, spegnere la stampante e coprirla sempre con la specica
copertura fornita in dotazione.
5.3) Sostituzione dei fusibili di protezione
I circuiti elettrici della stampante sono protetti da sovracorrenti tramite
due fusibili da 2A.
In caso di sostituzione utilizzare fusibili nuovi con le medesime caratteristiche.
– Aprire il cassetto fusibili sul retro della stampante estrarre il pacchetto contenente i due fusibili e sostituirli quindi, reinserire
il pacchetto.
Markingenius MG2 è garantito un anno per vizi e difetti d'origine.
La testa di stampa è esclusa dalla garanzia in quanto considerata materiale di consumo.
La garanzia decade qualora vengano utilizzate parti di ricambio non originali
Cembre
.
5. MANUTENZIONE
6. GARANZIA
Per ottenere i migliori risultati di stampa è consigliabile attenersi alle seguenti regole:
• Utilizzare solamente materiali di consumo (schede, nastri di stampa ecc.) originali Cembre/General Marking.
• Maneggiare con cura le schede una volta estratte dalla confezione ed evitare di toccare l’area di stampa con le dita.
• Prima della stampa controllare sempre la pulizia delle schede onde evitare la presenza di sporco o di residui
vari; eventualmente pulire la supercie di stampa con un panno morbido.
• Tenere le schede da stampare all’interno delle loro confezioni in un luogo asciutto e pulito.
• Quando si stampano schede già parzialmente utilizzate assicurarsi che non ci siano bave sporgenti lungo i bordi
di tranciatura o targhette rivolte verso l’alto che potrebbero danneggiare la testa di stampa.
• Quando si stampano schede già parzialmente utilizzate assicurarsi di lanciare il le di stampa opportunamente
modicato sul numero di tessere effettivamente presenti sulla scheda; lanciare una stampa completa inserendo
una scheda parzialmente utilizzata potrebbe danneggiare irreparabilmente la testa di stampa.
Copertura protettiva
MG2-COV 991680
PRINTABLE MEDIA:
TEMPLATE TO BE USED:
MG2-PWC
MG2-QTB
MG2-LTB*
MG2-WTB*
MG2-STB*
MG2-CTB*
MG2-MTB*
MG2-PLT MG2-PTD*
MG-TPMF tags for holders
•
MG-TPM tags for holders
•
MG-TDM tags without holders
•
MG-ETF tie-on tags
•
MG-KMP wraparound cable markers
•
MG-CPM terminal markers
•
MG-CPMF terminal markers
•
MG-VYB terminal labels
•
MG-TAP legends, 15mm
•
MG-TAPW legends, 9mm
•
MG-TAR legends
•
MG-DOG dog tags
•
MG-TAA self adhesive legends
•
MG-VYT self adhesive vinyl labels
•
MG-VCT self adhesive vinyl labels
•
MG-PYT self adhesive polyester labels
•
MG-SAT security labels
•
MG-PTS push button legends
•
MG-PLC PLC tags
•
MG-17.5 modular legends and labels
•
MG-VRT marker plates
•
MG-SIGNS legends and signs
•

Sheet of at media,
eg legends MG-TAPW,
etc
Sheet of cable tags
MG-TPM
Sheet
MG-CPM-...
MG-TDM-...
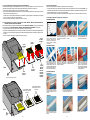
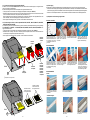
4.7.1) Position mediasheets on the MG2-PLT support template
All die-cut sheets of at media are printed on the MG2-PLT template and have two holes to locate on pins mounted on the template:
– Press the RED button (4) to open the carriage already tted with the template (See section 4.6).
– Position the sheet by hand, tting its holes fully over the corresponding locating pins on the template; the side to be printed
must face upwards (See FIGS. B and C).
Once loaded, the sheet must be at, square, clean and without protrusions, bends or kinks; this allows correct positioning
of the print head during the printing cycle.
– Press the RED button (4) to close the carriage.
4.7.2) Position media sheets on the MG2-PWC, MG2-PTD*, MG2-QTB, MG2-LTB*, MG2-WTB*, MG2-STB*, MG2-CTB*
MG2-MTB* support templates
The cable tags are printed on the MG2-PWC and MG2-PTD* templates, while MG-CPM terminal block markers on MG2-QTB,
MG2-LTB*, MG2-WTB*, MG2-STB*, MG2-CTB* or MG2-MTB* templates:
– Press the RED button (4) to open the carriage already equipped with the template (See section 4.6).
– Position the sheet by hand such that the open ‘rst’ row of tags/markers is nearest to MG2 with the locating lugs on the
underside of the sheet inserted fully into the corresponding holes in the template (See FIGS. B and C).
Once loaded, the sheet must be at, square, clean and without protrusions, lifted or bent components; this allows correct
positioning of the print head during the printing cycle.
4
Template
MG2-PLT
Template
MG2-PWC
Template
MG2-QTB
MG2-LTB *
MG2-WTB *
MG2-STB *
MG2-CTB *
MG2-MTB *
MG2-PTD *
Open ‘rst’ row of
tags/markers should be
nearest to MG2
Open ‘rst’ row of
tags/markers should be
nearest to MG2
FIG. B
FIG. C
4
(*) Templates available separately .
.7.
TARGHETTE MG-TAPW
Possono essere stampate con
diversi fonts; gli steli sono iden-
ticabili per una facile rintraccia-
bilità sullo schema. Inoltre accan-
to ad ogni targhetta è possibile
riportare il modello di tubetto da
inserire.
La scheda stampata viene divi-
sa in lische piegando e spezzan-
do gli estremi di giunzione.
L’inserimento del tubetto PM può
essere quindi effettuato diretta-
mente sulle lische senza stacca-
re la targhetta.
Esempio di targhette MG-TPM
in tubetto trasparente per la
siglatura di cavi.
Il risultato nale sul cavo si pre-
senta perfetto, protetto nel tem-
po da agenti chimici ed atmo-
sferici.
TARGHETTE MG-CPM
Dopo aver staccato dalla scheda
lo stelo stampato, innestare le
targhette direttamente sui morsetti.
Posizionare le targhette, procede-
re al distacco dello stelo ruotan-
dolo verso l'alto.
Staccato lo stelo la morsettiera
risulterà così siglata.
Procedere al distacco dalla sche-
da dell'intero modulo stampato.
Innestare direttamente le targhet-
te sui morsetti.
La morsettiera risulterà così
siglata.
Permettono di ottenere ottimi
risultati graci con i diversi fonts
di sistema. L’operatore può ripor-
tare sulla parte ssa della scheda
i dati di schema o di lavoro.
Quando stampate, le tessere si
dividono facilmente in strisce.
Il distacco delle singole targhette
è semplice e preciso e sui bordi
non rimangono residui.
Esempio di targhette MG-TAPW
su prolo RTR-TAPW con coper-
chio trasparente RT-CCWS.
TARGHETTE MG-TPM
4.8) Procedura di stampa
Dopo aver caricato il prodotto da stampare sulla piastra, procedere alla stampa.
– Impostare i dati nel programma (riferirsi al manuale del software) e cliccare sul tasto “STAMPA” per iniziare la fase di
stampa; il carrello verrà richiamato all'interno della stampante e gradualmente espulso no a fermarsi automaticamente
a ne ciclo con la scheda stampata.
– Togliere la scheda dalla piastra e procedere al distacco delle varie targhette spezzando gli estremi di giunzione.
4.9) Esempi di utilizzo di alcuni tipi di targhette.
.48.
Singole
Modulari

MG-TAPW LEGENDS
High quality thermal transfer
printing typically allows more
characters to be accommo-
dated than ink based systems.
Reference data may also be
printed on the stems and sprues
to assist installation.
Individual tags or strips of printed
tags are easily removed from the
sheet for immediate use.
Transparent PM tag holders may
be pre-tted before removing
the tags from the sheet.
Example of an MG-TPM tagin
a PM holder mounted on a
single core cable.
The long life print is perfectly pro-
tected against chemical and
atmospheric degradation.
MG-CPM TERMINAL BLOCK MARKERS
Single
Modular
A stem of printed markers is re
moved,
complete, from the sheet, and the
markers tted onto the terminal blocks
without removal from the stem
.
The stem is carefully detached from
the mounted markers.
T
he group of terminal blocks is
quickly and easily marked.
A strip of printed, joined markers
is removed from the sheet.
The strip is tted onto the termi-
nal blocks.
The group of terminal blocks is
quickly and easily marked.
High quality printing of fonts and
graphics suit a wide range of ap-
plications including component
identication, rating plates and
signage. Reference data may
also be printed on the counter-
foil to assist installation.
Alternatively, fully printed sheets
are easily divided into strips.
Individual MG-TAPW legends
are simply and precisely remo-
ved from partially printed sheets
for immediate use, leaving no
obstructions to prevent the
remainder of the sheet being
printed.
Example of an MG-TAPW
legend mounted on RTR-TAPW
rail with a transparent RT-CCWS
cover.
MG-TPM CABLE TAGS
.8.
.47.
4.8) Printing cycle
Ensure there is a genuine printable medium correctly positioned on the template then:
– Set the data in the program, proceed via Print Setup to Print Preview (Consult user manual) then press F6 to start the
printing cycle; the carriage will close then gradually open again automatically, until it stops fully open at the end of the
cycle, with the sheet printed.
– Remove printed sheet and continue loading/print preview/printing cycle.
4.9) MARKINGENIUS media - examples of applications.
Targhette
MG-TAPW
ecc.
Targhette
MG-TPM
Targhette
MG-CPM-...
MG-TDM-...
4.7.1) Posizionamento delle schede su piastra di interfaccia tipo MG2-PLT
Le schede stampabili con piastra di interfaccia MG2-PLT dispongono di due fori per permetterne un corretto e univoco
posizionamento sulla piastra; per il loro posizionamento è sufciente:
– Premere il pulsante (4) per ottenere la fuoriuscita del carrello già provvisto di piastra (vedi § 4.6).
– Posizionare manualmente la scheda inserendone a fondo i fori nelle spine presenti sulla piastra; il lato da stampare dovrà
essere rivolto in alto (Rif. a FIG. B e C).
La scheda, una volta caricata, dovrà risultare piana e senza angoli, spigoli piegati o sollevati; questo permetterà un corretto
appoggio della testa in fase di stampa.
– A posizionamento avvenuto, premere il pulsante (4) per richiudere il carrello di caricamento.
4.7.2) Posizionamento delle schede su piastre di interfaccia tipo MG2-PWC, MG2-PTD*, MG2-QTB, MG2-LTB*,
MG2-WTB*, MG2-STB*, MG2-CTB*, MG2-MTB*
Per posizionare le schede con targhette segnacavo su piastre di interfaccia MG2-PWC e MG2-PTD* o le schede con targhette
per morsetti sulle piastre MG2-QTB, MG2-LTB*, MG2-WTB*, MG2-STB*, MG2-CTB*, MG2-MTB*, sarà sufciente:
– Premere il pulsante (4) per ottenere la fuoriuscita del carrello già provvisto di piastra (vedi § 4.6).
– Appoggiare manualmente la scheda sulla piastra in modo da bloccarne il movimento; i riferimenti in rilievo sotto la scheda
dovranno coincidere con i fori presenti sulla piastra e le estremità laterali dovranno essere rivolte verso l'interno della
stampante (Rif. a FIG. B e C).
– A posizionamento avvenuto, premere il pulsante (4) per richiudere il carrello di caricamento.
4
Piastra
di interfaccia
MG2-PLT
Piastra
di interfaccia
MG2-PWC
Piastra
di interfaccia
MG2-QTB
MG2-LTB *
MG2-WTB *
MG2-STB *
MG2-CTB *
MG2-MTB *
MG2-PTD *
Estremità laterali
rivolte verso l'interno
della stampante
Estremità laterali
rivolte verso l'interno
della stampante
FIG. B
FIG. C
4
(*) Piastre fornibili a richiesta.

5.1) Clean the print head (recommended at each ribbon replacement)
Using only a genuine MG2-CKP 991670 CLEANING KIT, proceed as follows:
– Close the MARKINGENIUS program.
– Switch MG2 OFF.
– Switch MG2 ON and press the RED button (4) for less than 6 seconds until the YELLOW LED (2) starts blinking.
– Release the RED button. The YELLOW and ORANGE LEDs blink while the green LED remains lit and the carriage (5)
remains open. MG2 is then in ‘Cleaning mode’.
– Remove the current printing template.
– Attach a new cleaning pad to the cleaning template and spray cleaning uid across its full width.
Correctly locate the template on the carriage.
– Press the RED button to start the cleaning cycle.
– At the completion of the cleaning cycle the carriage will stay open and MG2 in ‘Cleaning mode’ should it be necessary to
repeat the cleaning cycle.
– To exit from ‘Cleaning mode’, switch MG2 OFF, then ON again after a few seconds.
Remove the cleaning template, detach and discard the used cleaning pad then store the components of the cleaning kit
in their original packaging in a dust free, dry environment.
Do not re-use cleaning pads, sets of 5 spare pads are available, order part code MG2-CNP 992150.
WARNING: Use only genuine Cembre/General Marking cleaning materials and methods with MG2. The use of any
other materials or methods may cause irrevocable damage to the print head and/or void any remaining warranty.
5.2) Routine cleaning
Keep internal and particularly moving parts free from dust by wiping with
a soft cloth.
To remove stains or residue from external metal and plastic parts, use a
soft cloth just dampened with a neutral detergent.
Remove grease, print and adhesive residue from templates with alcohol
cleaner and a clean, soft cloth.
Do not allow uids to come into contact with electrical parts or the
ribbon or to remain on moving parts.
Wipe up all spills.
As much as possible, avoid the ingress of environmental contamination, eg
dust, into MG2. Fit the protective cover when not in use.
5.3) Replace fuses
MG2s electrical circuits are protected against overcurrent by two 2A phase
and neutral fuses in compartment (10) located at the back of MG2.
Replacement fuses must have exactly the same characteristics as the ones replaced.
– Disconnect MG2 from the mains supply before opening fuse compartment (10).
Ensure fuses and compartment are correctly relocated before reconnecting the mains supply.
Markingenius MG2 is guaranteed for one year against inherent faults and defects.
The print head is classed as a consumable and not covered by the guarantee.
The guarantee is void if parts used are not
Cembre
original ones.
5. MAINTENANCE
6. WARRANTY
For the best printing results, we recommend:
• Using only genuine Cembre/General Marking materials (media, printer ribbons, spares and cleaning kits).
• Handling blank media sheets carefully to avoid touching the print surface with the ngers.
• Before printing, always check the cleanliness of the sheets. If necessary wipe the surface with a soft cloth.
• Keeping new or partially used sheets clean and dry, eg in their original packaging.
• When printing partially used sheets, ensure there are no protruding sprues, burrs along the sheared edges or
tags bent upwards which may damage the print head.
• When printing partially used sheets, ensure the Jump function is used correctly to avoid printing non-existent
media, contaminating the support template and possibly causing irrevocable damage to the print head.
Protective cover
MG2-COV 991680
.46.
.9.
4.6) Montaggio delle piastre di interfaccia
Per posizionare il prodotto da siglare (targhette segnacavo, targhette o strisce per morsetti, etichette per componenti, targhe
quadro ecc.) sul carrello di caricamento, è necessario dotare quest'ultimo di una specica piastra di interfaccia.
Le piastre di interfaccia sono provviste di un sensore di riconoscimento che garantisce il corretto abbinamento con il prodotto
da siglare. Posizionare la piastra procedendo come indicato di seguito:
– Scegliere la piastra adatta al prodotto da
siglare (vedi tabella a lato).
– Premere il pulsante rosso (4) per ottenere
l'apertura del carrello.
– Appoggiare la piastra sul carrello posizio-
nandola tramite le due spine di riferimento
in modo che il sensore sia rivolto verso il
basso.
Il posizionamento è identico per tutte le
tipologie di piastra (Rif. a FIG. A).
– A questo punto è possibile caricare le schede
di stampa (vedi § 4.7).
• In fase di stampa un segnale ottico-acu-
stico segnalerà l'eventuale non corretto
posizionamento della piastra (vedi § 7).
Piastra
di interfaccia
MG2-PLT
Spine di riferimento da inserire
nei forI ricavati sotto la piastra
1
Carrello completamente estratto
2
3
PRODOTTO DA SIGLARE:
PIASTRA DA UTILIZZARE:
MG2-PWC
MG2-QTB
MG2-LTB*
MG2-WTB*
MG2-STB*
MG2-CTB*
MG2-MTB*
MG2-PLT MG2-PTD*
MG-TPMF Targhette segnacavo per tubetti
•
MG-TPM Targhette segnacavo per tubetti
•
MG-TDM Targhette segnacavo senza tubetti
•
MG-ETF Targhette segnacavo a fascetta
•
MG-KMP Segnacavo adesivi
•
MG-CPM Targhette per morsetti
•
MG-CPMF Strisce per morsetti
•
MG-VYB Etichette per morsetti
•
MG-TAP Targhette per cavi e componenti
•
MG-TAPW Targhette per cavi e componenti
•
MG-TAR Targhette per cavi e componenti
•
MG-DOG Targhette per cavi e componenti
•
MG-TAA Targhette adesive per componenti
•
MG-VYT Etichette adesive per componenti
•
MG-VCT Etichette adesive per componenti
•
MG-PYT Etichette adesive per componenti
•
MG-SAT Etichette di sicurezza
•
MG-PTS Targhette per pulsanti
•
MG-PLC Targhette per PLC
•
MG-17.5 Targhette ed etichette modulari
•
MG-VRT Targhe quadro
•
MG-SIGNS
Targhe ed etichette di segnalazione
quadro
•
Piastra
di interfaccia
MG2-PWC
Piastra
di interfaccia
MG2-QTB
MG2-LTB *
MG2-WTB *
MG2-STB *
MG2-CTB *
MG2-MTB *
MG2-PTD *
FIG. A
4
(*)
Piastre fornibili a richiesta.
Ogni piastra di interfaccia è dotata di un "tappetino" bianco o supporto protettivo in PET che, in caso di necessità (es.
sporcizia o deterioramento) può essere rimosso e sostituito. Tale supporto è disponibile come accessorio a richiesta .
4.7) Caricamento delle schede di stampa
Il prodotto da stampare è realizzato su di un supporto prefustellato denominato SCHEDA. Le schede sono di varie tipologie;
dimensioni, materiali, colori e variano a seconda dell'utilizzo di destinazione. Riferendosi al catalogo
Cembre
“PRODOTTI
PER SIGLATURA INDUSTRIALE” scegliere la scheda idonea all'applicazione da eseguire, quindi procedere al suo posizio-
namento sulla piastra d'interfaccia.

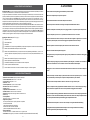
7. TROUBLESHOOTING
MG2 is equipped with self-diagnostics which notify the user in the event of certain ‘fault’ situations by means of a combina-
tion of ashing LEDs and an audible alarm.
Alarm indications
GREEN LED (1): remains lit when MG2 is ON and ready for use.
This LED blinks when the print head malfunctions or is disconnected or damaged.
YELLOW LED (2): blinks during the print cycle process with the relative movement of the carriage.
This LED re mains lit when the wrong template is located on the carriage (template does not match the medium selected).
ORANGE LED (3): mainly signals MG2 errors or failures, the nature of which are identied by the number of LED
blinks and audible beeps, as follows:
N° OF
BLINKS / BEEPS
FAULT DESCRIPTION POSSIBLE SOLUTION
1
Printer ribbon not present
Check condition of the ribbon and that it threaded
correctly.
Switch MG2 OFF and then ON again after a few
seconds.
3
Print head not lowered
Switch MG2 OFF and then ON again after a few seconds.
Press the RED button (4) to move the carriage and ensu-
re it is operating correctly.
4
Print head not raised
Switch MG2 OFF and then ON again after a few seconds.
Press the RED button (4) to move the carriage and ensure
it is operating correctly.
5
Carriage not in correct starting position
or out of position
Switch MG2 OFF and then ON again after a few seconds.
Press the RED button (4) to move the carriage and ensure
it is operating correctly.
Remove any obstacles preventing full movement of the
carriage.
6
Carriage not moving correctly or in
wrong position
Switch MG2 OFF and then ON again after a few seconds.
Press the RED button (4) to move the carriage and ensu-
re it is operating correctly.
7
Support template not identied
Ensure the correct template is being used. Switch MG2
OFF and then ON again after a few seconds.
8...11
System software or printer driver
malfunction
Check the printer driver and system default settings are
correct. Switch MG2 OFF and then ON again after a few
seconds
12.....
MG2 electronic controller malfunction
Switch MG2 OFF and then ON again after a few seconds
If the problem persists please contact Cembre,
see section 7
RED BUTTON (4): Authorised user only TEST mode, accessed by pressing RED BUTTON (4) for more than 6 seconds
during the initial start up cycle, is indicated by the YELLOW and ORANGE LEDs blinking simultaneously.
Inadvertent access may be cancelled by switching MG2 OFF and then ON again after a few seconds.
.10.
.45.
4.5) Caricamento del nastro di stampa
Per il caricamento o la sostituzione del nastro di stampa slare la copertura superiore, quindi:
1 Ruotare completamente verso il basso il deettore anteriore.
2 Estrarre i rulli tirandoli verso l'alto.
3 Inlare a fondo il nastro di stampa sul rullo frizionato allineandone un'asola con la spina di riferimento del rullo.
4 Bloccare il rullo spingendolo a fondo all'interno delle sue sedi. Srotolare il nastro come mostrato in gura, facendolo
passare sotto la guida e sotto la piastrina di riscontro.
5 Srotolare ulteriormente il nastro sotto la testa di stampa no alla sua fuoriuscita dal lato opposto.
6 Inlare a fondo sul rullo di svolgimento il supporto di cartone (anima), fornito in dotazione, polarizzando l'asola con la
spina di riferimento.
7 Con del nastro adesivo, ssare l'estremità del nastro di stampa sull’anima di cartone in modo che l'ingranaggio del rullo
si presenti dal lato corretto.
• Consigliamo di arrotolare perfettamente per alcuni giri il nastro di stampa sull’anima di cartone per ottenere
un corretto riavvolgimento.
8 Far scorrere il nastro sulle guide e bloccare il rullo in sede spingendolo a fondo in modo che il nastro sia ben teso e si
posizioni perfettamente lungo le due guide, come mostrato in gura.
9 Rialzare completamente il deettore che rimarrà bloccato nella posizione di lavoro e riposizionare la copertura superiore.
Mai avviare la stampante priva di copertura superiore.
• Consigliamo di effettuare la pulizia della testa di stampa ad ogni cambio del nastro di stampa, utilizzando il
KIT DI PULIZIA MG2-CKP 991670 disponibile a catalogo. Per eseguire correttamente la procedura di pulizia
riferirsi al § 5.1
.
Rulli
Asola
Spina di
riferimento
Deettore
Piastrina
Guida
Nastro
Nastro
Asola
Spina di
riferimento
Nastro
adesivo
Ingranaggio
Guida
Ingranaggio
1
9
8
2
3
5
6
4
7
Deettore
abbassato

In the case of a breakdown contact our Area Agent who will advise on the problem and provide the necessary instructions
on how to dispatch the printer to our nearest Service Centre; if possible, attach a copy of the Test Certicate supplied
by
Cembre
together with MG2 or, if no other references are available, indicate the approximate purchase date and MG2
serial number.
8. RETURN TO
Cembre
FOR REPAIR
.44.
1
2
3
7
10
8
9
5
4
6
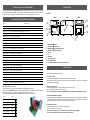
ANTERIORE LATERALE POSTERIORE
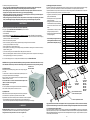
3. DESCRIZIONE
1 - Led verde : stampante in tensione.
2 - Led giallo : fase di stampa.
3 - Led arancio : segnalazione errori (riferirsi al § 7).
4 - Pulsante rosso: apertura/chiusura del carrello di caricamento delle schede.
5 - Carrello di caricamento schede.
6 - Copertura superiore.
7 - Connettore USB per il collegamento al PC.
8 - Presa per il collegamento del cavo di alimentazione.
9 - Interruttore di rete ON/OFF.
10 - Cassetto contenente due fusibili di protezione da 2A fase/neutro.
Seguire nell'ordine le seguenti operazioni:
4.1) Connessione dei cavi
– Collegare il cavo USB proveniente dal PC al connettore (7) posto sul retro della stampante.
– Vericare che la tensione di rete sia corretta, quindi collegare il cavo di alimentazione alla presa (8).
• Collegare il cavo di rete ad una presa provvista di messa a terra.
4.2) Accensione della stampante
– Premere l'interruttore di rete (9) posto sul retro della stampante; seguirà una fase di inizializzazione terminata la quale si
otterrà l'accensione del led verde (1) "stampante in tensione".
La stampante è pronta per l'uso.
• Non mantenere premuto il pulsante (4) in fase di accensione della stampante, in tal caso riavviare nuovamente
la stampante (vedi § 7).
4.3) Installazione del software operativo "GENIUS"
– Riferirsi al relativo CD d'installazione (GENIUS SUITE) seguendo le procedure descritte nel foglio istruzioni fornito con la
stampante. Eventuali aggiornamenti del software “GENIUS” sono scaricabili dal sito www.cembre.it.
4.4) Apertura/chiusura del carrello di caricamento
– Premendo il pulsante rosso (4) posto sul pannello frontale della stampante, si otterrà l'uscita del carrello di caricamento,
per la chiusura basterà premere nuovamente tale pulsante.
• Accertarsi che davanti alla stampante vi sia spazio sufciente per la fuoriuscita completa del carrello.
• Mai forzare il movimento del carrello in fase di apertura o chiusura.
4. MESSA IN FUNZIONE
VISTE:
PRINTER RIBBONS monochrome
MG2-ETR monochrome ribbons are formulated to produce high quality print on a variety of materials while providing high
resistance to abrasion, chemicals (eg Petrol, Ethyl Alcohol) and atmospheric agents (eg UV, humidity).
Ribbon length 200m, width 120 mm, internal diameter 28 mm.
Part code
Description
MG2-PWC
991000
Support template for tags MG-TPM
MG2-PLT
991002
Support template for legends, labels&signs and all serieFLAT media
MG2-QTB
9 91011
Support template for terminal block markers MG-CPM-01, -02, -03, -04, -07
MG2-PTD
991007
Support template for markers tags MG-TDM
MG2-PTM
991010
Support template for markers tags MG-TDM0
MG2-MTB
991008
Support template for terminal block markers MG-CPM-01 41094
MG2-WTB
991004
Support template for terminal block markers MG-CPM-05, -12
MG2-STB
991005
Support template for terminal block markers MG-CPM-06
MG2-CTB
991006
Support template for terminal block markers MG-CPM-10
MG2-LTB
991013
Support template for terminal block markers MG-CPM-09
MG2-TWC
991502
PET blank for template MG2-PWC
MG2-TTB
991512
PET blank for template MG2-PTB
MG2-TLT
991522
PET blank for template MG2-PLT
MG2-TTD
991563
PET blank for template MG2-PTD
MG2-TMT
991513
PET blank for template MG2-MTB
MG2-TGT
991532
PET blank for template MG2-GTB
MG2-TWT
991542
PET blank for template MG2-WTB
MG2-TST
991552
PET blank for template MG2-STB
MG2-TCT
991562
PET blank for template MG2-CTB
MG2-CNP
992150
Replacement pads for MG2-CKP (5 pieces)
MG2-CKP
991670
Print head cleaning kit
VAL P18-M
Plastic case for transporting MG2
9. MG2 ACCESSORIES AVAILABLE SEPARATELY
Part code
Colour
MG2ETR 991600
black
MG2ETR 991601
blue
MG2ETR 991602
red
MG2ETR 991603
green
MG2ETR 991607
silver
MG2ETR 991606
white
.11.

.12.
.43.
FRANÇAIS
Markingenius MG2 un nuovo sistema di siglatura a trasferimento termico realizzato per soddisfare tutte le necessità di
identicazione di conduttori e componenti elettrici, in conformità a quanto previsto dalla norma CEI 16-7 ed.1997-06.
Si tratta di una stampante ad alta risoluzione, basata su tecnologia a trasferimento termico, in grado di siglare supporti per
cavi e per morsetti, targhette per pulsanti e tutta la componentistica di un quadro elettrico. Tutti i prodotti
Cembre
della
famiglia MG possono essere siglati con i fonts true type di Windows, in nero o a colori, ad altissima velocità. E' possibile
riprodurre cIiparts, disegni, codici a barra ed immagini bitmap, anche in dimensioni molto piccole. Per le sue caratteristiche
(compattezza, ergonomicità, pulizia, assenza di rumorosità) è adatto anche all’impiego in ufcio, come una qualsiasi peri-
ferica. Ogni nastro monocromatico ha un’autonomia di oltre 300.000 targhette MG-TPMF 4x10mm, calcolata con copertura
totale della supercie; in funzione del tipo di supporto stampato e grazie al sistema di ottimizzazione del consumo del nastro
tempi e costi di stampa possono essere ulteriormente ottimizzati e l’autonomia può aumentare sensibilmente. Alimentazio-
ne e scarico del carrello sono rapidi; le piastre di supporto fornite con Markingenius MG2 consentono di stampare tutti i
prodotti a catalogo e sono facilmente intercambiabili. La tessera stampata è subito pronta per l’utilizzo poiché il pigmento
del nastro si deposita sul supporto ed essicca istantaneamente.
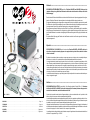
Markingenius "MG2" include (riferirsi alla FIG. 1 a pag. 1):
– Stampante base.
– Cavo di alimentazione.
– Cavo USB.
– CD "GENIUS SUITE" contenente il Sofware "GENIUS" (comprensivo di driver di stampa, licenza e manuale d'uso).
– Piastra di interfaccia MG2-PWC 991000 per siglare cavi.
– Piastra di interfaccia MG2-QTB 991011 per siglare morsetti con targhette tipo MG-CPM-01, -02, -03, -04, -07.
(per siglare morsetti con targhette MG-CPM-05, -06, -10, -12, -13 richiedere separatamente le piastre speciche).
– Piastra di interfaccia MG2-PLT 991002 per siglare targhette.
– Nastro d stampa nero MG2-ETR 991600.
– Supporto in cartone MG2-CRB 991654 per il riavvolgimento del nastro di stampa.
– Copertura protettiva MG2-COV 991680.
– Manuale d'uso e manutenzione + istruzioni per l’installazione del software + certicato di garanzia.
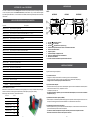
– Modalità di funzionamento: stampa mediante trasferimento termico
– Tensione di alimentazione: 230 V 50 Hz - 115 V 60 Hz
– Corrente: (230 V / 115 V): 0.6 A / 1.2 A
– Potenza: 140 W
– Velocità di stampa: 9 sec. per una scheda completa
– Risoluzione max.: 300x300 o 300x600 DPI
– Interfacce: USB 1.1
– Temperatura di funzionamento: da +15° a + 35° C
– Umidita' relativa: da 30% a 80% senza condensa
– Dimensioni: lunghezza 382 mm, larghezza 230 mm, altezza 221 mm
– Peso: 9,6 kg
– Area stampabile:
larghezza max.110 mm - lunghezza max.140 mm
– Requisiti di sistema:
PC con processore Pentium 4 (2,4 GHz), equivalente o superiore.
512 Mb di memoria RAM
2 Gb di spazio disponibile su disco
risoluzione scheda video e monitor 1024x768
sistemi operativi Windows, Windows XP service pack 2, Windows VISTA e 7.
– Nastro di stampa:
diametro interno 28 mm - diametro esterno 53 mm - larghezza 120 mm
– Certicazioni: marcatura CE (in conformità alle Direttive Europee 2006/42/CE e 2004/108/CE)
1. CARATTERISTICHE GENERALI
2. SPECIFICHE TECNICHE
AVERTISSEMENT
• Avant d’utiliser l’imprimante, lire attentivement le présent manuel.
• Ne jamais démarrer l’imprimante sans qu’elle soit munie de son couvercle supérieure.
• Pendant l'utilisation, tenir les mains loin des pièces en mouvement
• Pendant les opérations d’entretien, débrancher l’imprimante de l’alimentation électrique
• Utiliser l’imprimante dans un milieu propre, sur un appui stable et avec le couvercle supérieur toujours fermé.
• Dans le cas d’utilisation en atelier ou sur un chantier, couvrir l’imprimante quand elle n’est pas utilisée.
• Pendant le remplacement du ruban d’impression, ne jamais insérer d’objet coupant ou pointu (par ex. tourne
vis ou cutter) dans l’imprimante an d’éviter d’endommager irréparablement la tête.
• Maintenir les plateaux d'interface toujours propres et sans résidus d’encre.
• Maintenir le chariot de chargement de l’imprimante toujours propre.
• Ne pas utiliser des plateaux d’épaisseurs différentes de celle des originales; ceci pourrait bloquer la machine
ou endommager la tête d’impression.
• Imprimer toujours toute typologie de produit en utilisant le plateau adéquat, en contrôlant que le matériel soit
po sitionné correctement et qu’il ne constitue pas un obstacle au fonctionnement de l’imprimante.
• Manipuler avec soin les cartes une fois extraites de l’emballage et éviter de toucher la zone d’impression avec
les doigts.
• Avant l’impression, contrôler toujours le nettoyage des cartes an d’éviter la présence de saleté ou de résidus
divers; le cas échéant, nettoyer la surface d’impression avec un chiffon doux.
• Conserver les cartes à imprimer à l’intérieur de leur emballage, dans un endroit sec et propre.
• Quand on imprime les cartes déjà partiellement utilisées, s’assurer qu’il n’y ait pas de bavures saillantes sur
les bords des repères ou de plaquettes tournées vers le haut qui pourraient endommager la tête d’impression.
• Quand on imprime les cartes déjà partiellement utilisées, s’assurer de lancer le chier d’impression opportuné
ment modié en fonction du nombre de repères effectivement présents sur la carte; lancer une impression
complète en insérant une carte partiellement utilisée pourrait endommager irréparablement la tête.
• Ne jamais utiliser l’imprimante avec des cartes ou rubans d’impression non originaux Cembre/General Marking.
• Nous conseillons d’effectuer le nettoyage de la tête d’impression à l’occasion de chaque remplacement du
ruban d’impression; utiliser le KIT de nettoyage prévu à cet effet disponible au catalogue.

Markingenius MG2 est un nouveau système de marquage (apposition de sigle) à transfert thermique réalisé pour satisfaire
tous les besoins d’identication de conducteurs et de composants électriques.
Il s’agit d’une imprimante à haute résolution, basée sur la technologie du transfert thermique, en mesure de marquer des
repères pour câbles et pour bornes, les plaquettes pour boutons-poussoirs et tous les composants d’une armoire électrique.
Tous les produits
Cembre
de la famille MG peuvent être marqués avec des polices True Type de Windows, en noir ou
en couleurs, à très haute vitesse. Il est possible de reproduire des cIiparts, des dessins, des codes à barre et des images
bitmap, même en dimensions très petites. Pour ses caractéristiques (compacité, ergonomicité, nettoyage, absence de bruit)
elle est adaptée également à l’emploi au bureau, comme un périphérique quelconque.
Chaque ruban monochromatique a une autonomie de plus de 300 000 plaquettes MG-TPMF 4x10mm, calculée sur la cou-
verture totale de la surface; en fonction du type de support imprimé et grâce au système d’optimisation de consommation du
ruban, les temps et coûts d’impression peuvent être ultérieurement optimisés et l’autonomie peut augmenter sensiblement.
L’alimentation et la sortie du chariot sont rapides; les plateaux de support fournis avec la Markingenius MG2 permettent
d’imprimer tous les produits en catalogue et sont facilement interchangeables. La carte imprimée est tout de suite prête à
l’utilisation puisque le pigment du ruban se dépose sur le support et sèche instantanément.
Markingenius "MG2" inclut (Voir FIG. 1 pag. 1):
– Imprimante de base
– Câble d’alimentation
– Câble USB
– CD "GENIUS SUITE" ontenant le logiciel GENIUS (compris le pilote d’impression, la licence et le manuel d'utilisation).
– Plateau d’interface MG2-PWC 991000 pour marquer les câbles
– Plateau d’interface MG2-QTB 991011 pour marquer les bornes avec plaquettes type MG-CPM-01, -02, -03, -04, -07.
(demander séparément les plateaux spéciques pour marquer les bornes avec plaquettes MG-CPM-05, -06, -10,
-12, -13).
– Plateau d’interface MG2-PLT 991002 pour marquer les plaques
– Ruban d’impression noir MG2-ETR 991600
– Centre MG2-CRB 991654 pour le ré-enroulement du ruban d’impression
– Housse de protection MG2-COV 991680
– Notice d'utilisation et d’entretien + instructions d’installation de logiciel + certicat de garantie
– Modalité de fonctionnement: imprime par transfert thermique
– Tension d’alimentation: 230 V 50 Hz - 115 V 60 Hz
– Courant (230 V / 115 V): 0.6 A / 1.2 A
– Puissance: 140 W
– Vitesse d’impression: 9 s pour une carte complète
– Résolution max.: 300x300 ou 300x600 DPI
– Interface: USB 1.1
– Température de fonctionnement: de + 15° à + 35° C
– Humidité relative: de 30% à 80% sans condensation
– Dimensions: longueur 382 mm, largeur 230 mm, hauteur 221 mm
– Poids: 9,6 kg
– Zone imprimable:
largeur max. 110 mm - longueur max.140 mm
– Exigences de système:
PC avec processeur Pentium 4 (2 GHz), équivalent ou supérieur.
512 Mb de mémoire RAM
2 Gb d’espace disponible sur le Disque Dur
résolution carte vidéo et moniteur 1024x768
systèmes d’exploitation Windows XP SP4, VISTA, 7.
– Ruban d’impression:
diamètre interne 28 mm - diamètre externe 53 mm - largeur 120 mm
– Certications: marquage CE (en conformité aux Directives Européennes 2006/42/CE et 2004/108/CE)
1. CARACTERISTIQUES GENERALES
2. SPECIFICATION TECHNIQUES
.42.
.13.
AVVERTENZE
• Prima di utilizzare la stampante leggere attentamente il presente manuale.
• Mai avviare la stampante priva di copertura superiore.
• Durante l'utilizzo mantenere le mani lontane dalle parti in movimento
• Durante le operazioni di manutenzione scollegare la stampante dall'alimentazione elettrica
• Utilizzare la stampante in un ambiente pulito, su un appoggio stabile con il coperchio superiore sempre chiuso.
• Coprire la stampante, quando non in uso, specialmente se utilizzata in ofcina o in cantiere.
• Durante la sostituzione del nastro di stampa non inserire mai nulla di tagliente o appuntito (ad es. cacciavite
o taglierino) nella stampante, onde evitare di danneggiare irreparabilmente la testa di stampa.
• Mantenere le piastre di interfaccia sempre pulite e libere da eventuali residui d’inchiostro.
• Mantenere Il carrello della stampante sempre pulito.
• Non applicare alcun tipo di spessore alle piastre originali; questo potrebbe bloccare la macchina o danneggiare
la testa di stampa.
• Stampare sempre ogni tipologia di prodotto utilizzando la piastra adeguata, controllando che il materiale sia
posizionato correttamente e che non costituisca ostacolo al funzionamento della stampante.
• Maneggiare con cura le schede una volta estratte dalla confezione ed evitare di toccare l’area di stampa con
le dita.
• Prima della stampa controllare sempre la pulizia delle schede onde evitare la presenza sporco o di residui
vari; eventualmente provvedere a pulire la supercie di stampa mediante un panno morbido.
• Tenere le schede da stampare all’interno delle loro confezioni in un luogo asciutto e pulito.
• Quando si stampano schede già parzialmente utilizzate assicurarsi che non ci siano bave sporgenti lungo i
bordi di tranciatura o targhette rivolte verso l’alto che potrebbero danneggiare la testa di stampa.
• Quando si stampano schede già parzialmente utilizzate assicurarsi di lanciare il le di stampa opportunamente
modicato sul numero di tessere effettivamente presenti sulla scheda; lanciare una stampa completa inserendo
una scheda parzialmente utilizzata potrebbe danneggiare irreparabilmente la testa.
• Non utilizzare mai la stampante con schede o nastri di stampa non originali Cembre/General Marking.
• Consigliamo di effettuare la pulizia della testa di stampa in occasione di ogni cambio del nastro di stampa;
utilizzare l’apposito KIT di pulizia disponibile a catalogo.
ITALIANO
La pagina sta caricando ...
La pagina sta caricando ...
La pagina sta caricando ...
La pagina sta caricando ...
La pagina sta caricando ...
La pagina sta caricando ...
La pagina sta caricando ...
La pagina sta caricando ...
La pagina sta caricando ...
La pagina sta caricando ...
La pagina sta caricando ...
La pagina sta caricando ...
La pagina sta caricando ...
La pagina sta caricando ...
-
 1
1
-
 2
2
-
 3
3
-
 4
4
-
 5
5
-
 6
6
-
 7
7
-
 8
8
-
 9
9
-
 10
10
-
 11
11
-
 12
12
-
 13
13
-
 14
14
-
 15
15
-
 16
16
-
 17
17
-
 18
18
-
 19
19
-
 20
20
-
 21
21
-
 22
22
-
 23
23
-
 24
24
-
 25
25
-
 26
26
-
 27
27
-
 28
28


in altre lingue
- English: Cembre MARKINGenius MG2 User manual
- français: Cembre MARKINGenius MG2 Manuel utilisateur
- español: Cembre MARKINGenius MG2 Manual de usuario
- Deutsch: Cembre MARKINGenius MG2 Benutzerhandbuch
Documenti correlati
Altri documenti
-
Behringer Monopoly Guida Rapida
-
WMF Filterkartusche Istruzioni per l'uso
-
Sharp R-23AM Manuale utente
-
 Amco Veba 805 Warning, Operating And Maintenance Manual
-
Hilti PLT 300 Manuale utente
-
Tamiya 1/16 Panzer IV Ausf.J Manuale del proprietario
-
Dometic RO400BC,230V Manuale utente
-
-
Alpina ETR 900J Manuale utente
-
Chief PWC2000 Guida d'installazione
