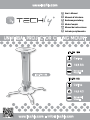
Techly ICA-PM 18M Manuale utente
- Categoria
- Supporti per proiettori
- Tipo
- Manuale utente
Questo manuale è adatto anche per
La pagina sta caricando ...

2
www.techly.com
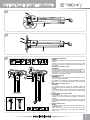
UNIVERSAL PROJECTOR CEILING MOUNT
CAUTION: This projector mount
must be securely attached to the
ceiling. If the mount is not properly
installed it may fall, resulting in
possible injury and/or damage.
ACHTUNG: Diese Projektor-
Halterung muss sicher an der
Wand befestigt werden. Wird die
Montage nicht auf korrekte und
stabile Art und Weise durchgeführt, könnte dies
zum Herunterfallen der Halterung und dadurch zu
Sach- oder Personenschaden führen.
AVVERTENZA: Questa staffa per
proiettore deve essere ssata
al softto in modo sicuro. Se il
montaggio non è stato effettuato in
modo corretto e stabile, ciò potrebbe causare la
caduta della staffa, determinando lesioni o danni
a cose e persone.
MAINTENANCE: Check that the bracket is secure
and safe to use at regular intervals (at least every
three months)
WARTUNG: Überprüfen Sie, ob die Halterung ist
sicher und sicher, in regelmäßigen Abständen zu
verwenden (mindestens alle drei Monate)
MANUTENZIONE: Vericare la sicurezza del
montaggio e dell'uso della staffa a intervalli regolari
(almeno ogni tre mesi)
IT
Gentile Cliente,
grazie per aver scelto un prodotto Techly.
Istruzioni disimballaggio
• Aprire il cartone con cura, rimuovere il contenuto e
distenderlo su un cartone o altro materiale protettivo
per evitare danni.
• Vericare che il contenuto della confezione corrisponda
alla lista delle parti nella pagina successiva per assicurarsi
che tutti i componenti siano presenti e non siano
danneggiati. Non utilizzare parti difettose o danneggiate.
• Leggere attentamente le istruzioni riportate nel presente
manuale prima di procedere all’installazione.
• Tenere sempre questo manuale per future
consultazioni.
Assicurarsi dell'integrità del muro prima di procedere
all'installazione. Rispettare tassativamente il peso
massimo dell'apparecchiatura supportata indicato
sulla confezione. Se il materiale di ssaggio di cui avete
bisogno non è incluso, consultate la vostra ferramenta
locale per individuare il materiale di montaggio indicato
per la vostra applicazione. Il produttore non si assume
alcuna responsabilità in caso di ancoraggio non corretto.
Importanti informazioni
sulla sicurezza
Leggere cortesemente le istruzioni prima di cominciare
l’installazione e seguire scrupolosamente tutte le
indicazioni contenute qui. Utilizzare adeguati dispositivi
di sicurezza durante l’intallazione.
Contattare del personale qualicato per effettuare
l’installazione:
• Se non avete compreso le indicazioni contenute
in questo manuale o avete dei dubbi in merito alla
sicurezza dell’installazione.
• Se non siete sicuri circa la tipologia del muro dove
effettuare l’installazione del supporto.
• Assicurarsi che la supercie di appoggio sia in grado di
sostenere in sicurezza sia il peso dell'apparecchiatura
che tutto l'hardware e i componenti collegati.
Il prodotto è inteso esclusivamente per uso interno.
Non utilizzate il prodotto per uno scopo o in una
congurazione non espressamente specicata in
queste istruzioni. Si declina qualsiasi responsabilità
per danni derivanti da un errato assemblaggio, errato
montaggio o uso non corretto del prodotto. Al termine
delle operazioni di montaggio assicurarsi che il tutto sia
stato effettuato a regola d'arte.
EN
Dear Customer,
thanks for choosing a Techly product.
Unpacking Instructions
• Carefully open the carton, remove contents and lay
out on cardboard or other protective surface to avoid
damage.
• Check package contents against the Supplied Parts
List in the next page to assure that all components
were received undamaged. Do not use damaged or
defective parts.
• Carefully read all instructions before attempting
installation.
• Please keep this user's manual for future consultations.
Make sure before installing the Integrity of the wall.
Do not exceed the maximum weight specied on
the packaging. If the hardware you need for your
installation is not included, please consult your local
hardware store for proper mounting hardware for the
application. We are not responsible in case the mount is
not properly installed.
Important
Safety Information
Please read this instruction before beginning the
installation, and carefully follow all herein contained
recommendations. Use proper safety equipment during
installation.
Please call a qualied installation contractor for help if
you:
• Don't understand these directions or have any doubts
about the safety of the installation.
• Are uncertain about the nature of your wall, consult a
qualied installation contractor.
• Make sure that the supporting surface will safely
support the combined weight of the equipment and
all the attached hardware and components.
The product is intended for use indoor only.
Do not use this product for any purpose or in any
conguration not explicitly specied in this instruction.
We hereby disclaim any and all liability for injury or
damage arising from incorrect assembly, incorrect
mounting, or incorrect use of this product. At the end of
the installation make sure the procedure was correctly
observed.
DE
Sehr geehrter Kunde,
danke, dass Sie sich für ein Produkt von
Techly entschieden haben.
Anweisungen zum Auspacken
• Öffnen Sie den Karton vorsichtig, entnehmen Sie den
Inhalt und breiten Sie ihn auf einem Karton oder anderem
schützenden Material aus, um Schäden zu vermeiden.
• Überprüfen Sie, ob der Inhalt der Verpackung der
Teileliste auf der nächsten Seite entspricht, um
sicherzustellen, dass alle Bauteile vorhanden und
nicht beschädigt sind. Verwenden Sie keine defekten
oder schadhaften Teile.
• Lesen Sie, bevor Sie mit der Installation beginnen, die
Anweisungen in dieser Anleitung aufmerksam durch.
• Bewahren Sie diese Anleitung zum späteren
Nachschlagen stets auf.
Versichern Sie sich vor der Installation der Unversehrtheit
der Wand. Beachten Sie unbedingt das auf der
Verpackung angegebene Höchstgewicht des Geräts.
Sollte das Befestigungsmaterial, das Sie benötigen,
nicht im Lieferumfang enthalten sein, wenden Sie sich
an Ihren Eisenwarenhändler vor Ort, um das für Ihren
Bedarf erforderliche Montagematerial festzustellen. Der
Hersteller haftet nicht im Fall unkorrekter Verankerung.
Wichtige Informationen
zur Sicherheit
Lesen Sie vor der Installation bitte alle Anweisungen
und befolgen Sie alle hier enthaltenen Angaben
genau. Verwenden Sie bei der Installation geeignete
Sicherheitsvorrichtungen.
Wenden Sie sich in den folgenden Fällen zum Ausführen
der Installation an Fachleute:
• Wenn Sie die in dieser Anleitung enthaltenen Angaben
nicht verstanden haben oder Zweifel hinsichtlich der
Sicherheit der Installation haben.
• Wenn Sie nicht sicher sind, ob die Mauer, an der der
Träger installiert werden soll, geeignet ist.
• Stellen Sie sicher, dass die Auageäche wird sicher
Unterstützung für das Gewicht des Geräts und all die
angeschlossene Hardware und Komponenten.
Das Produkt ist ausschließlich für den Gebrauch in
Gebäuden vorgesehen.
Verwenden Sie das Produkt nicht für Zwecke oder in einer
Konguration, die in dieser Anleitung nicht ausdrücklich
genannt werden. Jegliche Haftung aufgrund von Schäden
durch fehlerhaften Zusammenbau, falsche Montage oder
unkorrekte Verwendung des Produkts ist ausgeschlossen.
Nach den Montagevorgängen sicherstellen, dass alle
Schritte fachgerecht ausgeführt wurden.
La pagina sta caricando ...
La pagina sta caricando ...

1a
1b
2a
5
www.techly.com
UNIVERSAL PROJECTOR CEILING MOUNT
A
A
A
A
1
3
2
X
W-C
1
3
2
X
W-C
1
3
2
X
W-C
1
3
2
X
W-C
A
A
W-C
W-A
EN
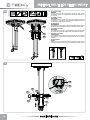
For wooden Ceiling Mounting
WARNING
Installers are responsible to provide hardware for other types of mounting
situations.
Installers must verify that the supporting surface will safely support
the combined weight of the equipment and all attached hardware and
components.
IT
Per installazione su softto in legno
ATTENZIONE
Gli installatori devono vericare che l'hardware utilizzato per l'installazione
sia quello indicato alle diverse esigenze e situazioni di montaggio.
Gli installatori devono vericare che la supercie di supporto sia in grado
di supportare in modo sicuro il peso combinato dell'apparecchiatura e
dell'hardware e dei altri elementi installati.
DE
Für Holzdeckenmontage
WARNHINWEIS
Installateure sind dafür verantwortlich, die nötige Hardware für andere
Arten von Montagen bereitzustellen.
Der Installateur muss überprüfen, dass die Auageäche das Gewicht
des Gerätes und die angeschlossene Hardware, sowie Komponenten
trägt.
FR
Pour installation sur plafond en bois
ATTENTION
Les installateurs doivent vérier que l’hardware utilisé pour
l’installation corresponde aux indications pour les diverses situations de
montage.
Les installateurs doivent vérier que la supercie du support puisse
porter en toute sécurité le poids de l’appareil et des autres éléments
installés.
ES
Para la instalación en el techo de madera
ESTAR ATENTO
Los instaladores deben vericar que el hardware utilizado para la
instalación es que indica las diferentes necesidades y situaciones de
instalación.
Los instaladores deben vericar que la supercie de apoyo es capaz de
soportar el peso combinado de los equipos y hardware y otros elementos
instalados.
PL
Montaż w sucie z drewna
UWAGA
W przypadku montażu na powierzchni innego typu należy zaopatrzyć się
w odpowiedni sprzęt.
Należy upewnić się, że powierzchnia nośna utrzyma łączny ciężar
uchwytu oraz zamocowanego do niego sprzętu oraz dodatkowych
komponentów.
55mm
(2.2")

3
2b
universal projector ceiling mount
6
www.techly.com
2
1
W-B
W-C
W-A
2
1
W-B
W-C
W-A
M-M
B
M-M
2
1
W-B
W-C
W-A
2
1
W-B
W-C
W-A
W-B
W-C
W-A
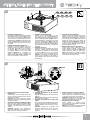
EN
For Concrete ceiling
WARNING
Installers must verify that the supporting surface will safely support
the combined weight of the equipment and all attached hardware and
components.
IT
Per softti in cemento
ATTENZIONE
Gli installatori devono vericare che la supercie di supporto sia in grado
di supportare in modo sicuro il peso combinato dell'apparecchiatura e
dell'hardware e dei altri elementi installati.
DE
Für Betondecke
WARNHINWEIS
Der Installateur muss überprüfen, dass die Auageäche das Gewicht des
Gerätes und die angeschlossene Hardware, sowie Komponenten trägt.
FR
Pour Plafond en ciment
ATTENTION
Les installateurs doivent vérier que la supercie du support puisse porter
en toute sécurité le poids de l’appareil et des autres éléments installés.
ES
Para techo de hormigón
ESTAR ATENTO
Los instaladores deben vericar que la supercie de apoyo es capaz de
soportar el peso combinado de los equipos y hardware y otros elementos
instalados.
PL
Na sucie betonu
UWAGA
Należy upewnić się, że powierzchnia nośna utrzyma łączny ciężar uchwytu
oraz zamocowanego do niego sprzętu oraz dodatkowych komponentów.
M-M
M-L
M-M
M-L
M-J
M-I
M-N
M-K
B
60mm
(2.4")

4
5
universal projector ceiling mount
7
www.techly.com
C
C
C
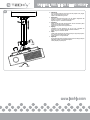
EN
Hanging the Projector onto the Assembled
Pivot Bracket
Guide the hook slots of the adapter bracket into
the bars in the pivot bracket and secure with two
screws and two washers.
Important: make sure the projector is correctly
hooked and the screws are tightened safely before
releasing the projector.
IT
Agganciare il proiettore alla staffa già installata
Far scorrere i perni presenti sulla staffa a softto
all'interno delle scanalature presenti sulla staffa
adattatore e poi ssare il tutto con due viti e due
rondelle.
Importante: assicurarsi che il proiettore sia
agganciato correttamente e le viti siano strette in
modo sicuro prima di rilasciare il proiettore.
DE
Anhängen des Projektors an die montierte
Pivot-Halterung
Anhängen des Projektors an die montierte Pivot-
Halterung
Wichtig: Stellen Sie sicher, das der Projektor fest
hängt bevor Sie ihn loslassen
FR
Enclencher le projecteur sur le support déjà
installé.
Fare coulisser les broches présentes sur le support
au plafond à l’intérieur des rainures présentes sur
le support adapteur, et xer le tout avec 2 vis et 2
rondelles.
Important: s’assurer que le projecteur soit
enclenché correctement et que les vis soient
serrées de facon sure avant de relacher le
projecteur.
ES
Cuelgue el proyector al soporte ya instalado
Deslice los pernos en el soporte al techo en el
interior de las ranuras en el adaptador de soporte
y luego je con dos tornillos y dos arandelas.
Importante: Asegúrese de que el proyector está
aggangiato correctamente y los tornillos estén
bien apretados antes de soltar el proyector.
PL
Wieszanie projaktora na uchwycie
Zawieś projektor na hakach uchwytu
zamocowanego do sutu, zabezpiecz przykręcają
dwie śruby z podkładkami.
Ważne: Upewnij się, że projektor jest poprawnie
zawieszony oraz, że śruby są przykręcone.
EN
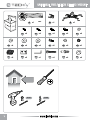
Installing the Adapter Bracket
Place the projector bracket as close as possible to
the projector's center of gravity. Position the holes
of the arms over mounting holes. Note: if there
are only three mounting holes using three arms of
adapter bracket. Important: if the projector does
not have at least three mounting holes, do not use
this adapter bracket. Tighten all screws but do not
over tighten.
IT
Installazione della staffa di adattamento
Posizionare la staffa del proiettore il più vicino
possibile al centro del proiettore. Posizionare i
fori dei bracci della staffa sui fori di montaggio
sul proiettore. Nota: se ci sono solo tre fori
di montaggio utilizzare tre bracci della staffa
adattatore. Importante: se il proiettore non
dispone di almeno tre fori di montaggio, non
utilizzare questa staffa adattatore. Stringere tutte
le viti ma non stringerle in modo eccessivo.
DE
Installation der Adapterhalterung
Plazieren Sie die Projektorhalterung so nah
wie möglich an den Projektorschwerpunkt.
Positionieren Sie die Bohrungen der Trägerschienen
über die Befestigungslöcher. Hinweis: Falls nur
drei Bestigungslöcher vorhanden sind, nehmen
Sie nur drei Trägerschienen. Wichtig: Falls nicht
wenigstens drei Befestigungslöcher vorhanden
sind, verwenden Sie nicht die Adapterhalterung.
Ziehen Sie alle Schrauben fest an, ohne diese zu
überdrehen.
FR
Installation du support
Positionner le support du projecteur le plus près
possible du centre du projecteur. Positionner les
trous des bras du support aux trous de montage
du projecteur. Note: se il n’y a que 3 trous de
montage, utiliser 3 bras du support adapteur.
Important: si le projecteur ne dispose pas d’au
moins 3 trous de montage, ne pas utiliser ce
support adapteur. Serrer toutes les vis mais pas
excessivement.
ES
Instalación del soporte adaptador
Coloque el soporte en el proyector lo más cerca
posible del centro del proyector. Coloque los
oricios de los brazos del soporte en los oricios
de montaje del proyector. Nota: Si sólo hay tres
agujeros de montaje con los tres brazos del
adaptador de soporte. Importante: Si el proyector
no tiene al menos tres oricios de montaje, no
utilice este soporte adaptador. Apriete todos los
tornillos sin apretar en exceso.
PL
Montaż nóżek mocujących do projektora
Umieść uchwyt wraz z nóżkami jak najbliżej
środka ciężkości projektora. Zrównaj otwory
nóżek z otworami na projektorze. Uwaga: Jeśli
projektor posiada trzy otwory, użyj trzech nóżek.
Ważne: Jeśli projektor nie posiada co najmniej
trzech otworów, nie używaj tego uchwytu. Dokręć
wszystkie śruby, ale nie zbyt mocno..
M-J
M-I
M-K
M-A M-B M-C M-D
M-E M-F M-G M-H

6
+15° -15°
-15°
+15°
360 °
universal projector ceiling mount
www.techly.com
EN
Adjustment
You can slightly tighten the screw to secure the projector at any angles,
when it has become loose during use.
Adjust to the desidered angle or tilt.
IT
Regolazione
Si possono leggermente stringere le viti per ssare l'angolazione del
proiettore, nel caso in cui si allentino durante l'uso.
Regolare l'angolo o l'inclinazione desiderata.
DE
Einstellung
Sollten sich die Schrauben gelockert haben, können Sie diese in jedem
Winkel des Projektors leicht nachziehen.
Stellen Sie den gewünschten Kippwinkel ein.
FR
Réglage
Possibilité de serrer légèrement les vis pour xer l’angulation du
projecteur, en cas qu’elles se déssèrent pendant l’utilisation.
Régler l’angle ou l’inclination désirée.
ES
Ajuste
Puede apretar ligeramente los tornillos para jar el ángulo del proyector,
en el caos que se suelte durante el uso.
Ajuste el ángulo o el ángulo deseado.
PL
Regulacja
W przypadku poluzowania się śrub w trakcie używania, należy je dokręcić
ustawiając projektor pod odpowiednik kątem.
Ustaw pożądany kąt nachylenia.
-
 1
1
-
 2
2
-
 3
3
-
 4
4
-
 5
5
-
 6
6
-
 7
7
-
 8
8


Techly ICA-PM 18M Manuale utente
- Categoria
- Supporti per proiettori
- Tipo
- Manuale utente
- Questo manuale è adatto anche per
in altre lingue
- English: Techly ICA-PM 18M User manual
- français: Techly ICA-PM 18M Manuel utilisateur
- español: Techly ICA-PM 18M Manual de usuario
- Deutsch: Techly ICA-PM 18M Benutzerhandbuch
- polski: Techly ICA-PM 18M Instrukcja obsługi