Caple ST850SS Technical information
- Categoria
- Potenza pistole termiche
- Tipo
- Technical information
Questo manuale è adatto anche per

ISTRUZIONI PER L’USO S901-S902
INSTRUCTIONS FOR USE S901-S902
INSTRUCCIONES DE USO S901-S902
INFORMAZIONI COMMERCIALI PER I CONSUMATORI
COMMERCIAL INFORMATION FOR THE CONSUMER
INFORMACIONES COMERCIALES PARA EL CLIENTE
IT
GB
ES
INFORMAZIONI TECNICHE
TECHNICAL INFORMATION
INFORMACIONES TÉCNICAS
TYPE: FSLC

Il simbolo sul prodotto o sulla confezione indica che il prodotto non deve es-
sere considerato come un normale riuto domestico, ma deve essere portato nel punto di
raccolta appropriato per il riciclaggio di apparecchiature elettriche ed elettroniche. Provve
-
dendo a smaltire questo prodotto in modo appropriato, si contribuisce a evitare potenziali
conseguenze negative per l’ambiente e per la salute, che potrebbero derivare da uno smal-
timento inadeguato del prodotto. Per informazioni più dettagliate sul riciclaggio di questo
prodotto, contattare l’ucio comunale, il servizio locale di smaltimento riuti o il negozio in
cui è stato acquistato il prodotto. Questo elettrodomestico è marcato conformemente alla Di-
rettiva Europea 2002/96/CE sui riuti da apparecchiature elettriche ed elettroniche (WEEE).
The symbol on the product or on its packaging indicates that this product may
not be treated as household waste. Instead it shall be handed over to the applicable col-
lection point for the recycling of electrical and electronic equipment. By ensuring this
product is disposed of correctly, you will help prevent potential negative consequen-
ces for the environment and human health, which could otherwise be caused by inappro-
priate waste handling of this product. For more detailed information about recycling of
this product, please contact your local city oce, your household waste disposal ser-
vice or the shop where you purchased the product. This appliance is marked according to
the European directive 2002/96/EC on waste electrical and electronic equipment (WEEE).
El símbolo en el producto o en su embalaje indica que este producto no se puede
tratar como desperdicios normales del hogar. Este producto se debe entregar al punto de reco-
lección de equipos eléctricos y electrónicos para reciclaje. Al asegurarse de que este producto
se deseche correctamente, usted ayudará a evitar posibles consecuencias negativas para el
ambiente y la salud pública, lo cual podría ocurrir si este producto no se manipula de forma
adecuada. Para obtener información más detallada sobre el reciclaje de este producto, pón-
gase en contacto con la administración de su ciudad, con su servicio de desechos del hogar
o con la tienda donde compró el producto. Este electrodomestico està marcado conforme a la
directiva Europea 2000/96/CE sobre los residuos de aparatos elèctricos y electrònicos (WEEE).
2
IT
GB
ES

CONTENTS
Warnings
Uses
Installation
Working
Maintenance
7
GB

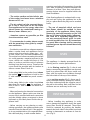
WARNINGS
- The cooker surface and the inferior part
of the cooker hood must be at a minimun
distance of 65 cm.
- The air sucked can’t be conveyed throu-
gh or into a duct used to let out fumes
from appliances fed by energy other than
electric power (eg. centralized heating, ra-
diators, water-heaters, etc.).
- Attention: remove any possible pvc lm
from the stainless steel.
- To evacuate the air outlet, please comply
with the pertaining rules given by compe-
tent authorities.
- Provide the room with an adequate aeration
when a cooker hood and appliances fed by
energy other than electric power (gas-, oil-,
or coal- stoves, etc.) are used simultaneously.
The cooker hood, when evacuating the sucked
air, could generate a negative pressure in the
room- which can’t exceed the limit of 0.04
mbar, in order to avoid the suck of exhausts
deriving from the heat-source. Therefore the
room should be provided with air-intakes to
allow a costant ow of fresh air.
If the rating lable in the cooker-hood shows
the symbol , the appliance is built in class
II° and it does not need any earth connec-
tion.
If the rating lable in the cooker-hood does
not show the symbol , the appliance is
built in class I° and it needs the earth con-
nection.
- When performing the electrical connections
on the appliance, please make sure that the
current-tap is provided with earth connection
and that voltage values correspond to those
indicated on the label placed inside the ap-
pliance itself.
- Before carrying out any cleaning or main-
taining operations, the appliance needs to be
removed from the electric grid. If the applian-
ce is not provided with a non-separable exi-
ble cable and plug, or with another device
8
ensuring omnipolar disconnections from the
grid, with an opening distance between the
contacts of at least 3 mm, then such discon-
necting devices must be supplied within the
xed installation.
If the xed appliance is endowed with a sup-
ply cord and a plug, the appliance has to be
put in a place where the plug can be reached
easily.
- The use of materials which can burst
into ames should be avoided in close
proximity of the appliance. When frying,
please pay particular attention to re risk
due to oil grease. Being highly inamma-
ble, fried oil is especially dangerous. Do
not use uncovered electric grills. In order
to avoid possible re risk, all instructions
for grase-lter cleaning and for removing
eventual grease deposits should be strictly
followed.
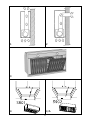
USES
The appliance is already arranged both for
ltering and for suction performances.
- In its ltering version (Fig.1), the air and
fumes conveyed by the appliance are depured
both by a grease lter and by an active coal
lter, and put again into circulation through
the hole made on the top of the cabinet.
- In its sucking version (Fig.2), fumes are di-
rectly conveyed outside, through an evacua-
tion duct connected with the superior part of
the wall or the ceiling. Both coal lter and air
deector are not necessary in this case.
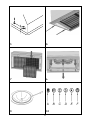
INSTALLATION
- Before installing the appliance, in order
not to damage the appliance itself, the metal
grase lter should be removed. These lter
could be removed by pushing the handles
towards the back side of the cooker hood and
turning it downwards to unfasten it from its
slot. (Fig.3).

9
Essential precautions to respect before in
-
stalling the appliance are the following:
To have made a cut-out on the bottom of the
cabinet which is suitable to hold the appliance
in position (g.4 for S901, g. 4A for S902).
- prepare the power supply.
- prepare a hole for the exhaust of the air
both in the ltering and in the exhauting ver-
sion.
To install the appliance, adjust the position
of the stop side-springs using the appropria-
te screws (g.5), according to the thickness
of the board previously drilled, on which the
appliance will be xed.
Insert the built-in unit in the hole made in the
cabinet until the stop click of the side- sprin-
gs is heard and the built-in unit is blocked.
Insert the screws provided in the holes inside
the appliance (g.6) to block it completely.
Put the grease lter again
Blocking of the stop valve
Warning!
Before connecting the exible exhausting
pipe to the motor, make sure the stop valve,
which is on the air outlet of the motor, can
swing.
Exausting version
Connect the ange to the exhausting hole
with an appropriate pipe. Connect the ap-
pliance with the electrical mains through the
supply cord.
Filtering version
Connect the ange with a pipe suitable to
convey the air to the top of the cabinet. Con-
nect the appliance with the electrical mains
through the supply cord.
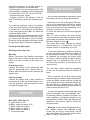
Mod. S901-S902 (g. 10)
A: Light switch on/o
B: Motor switch on speed 1/o
C: Motor switch on speed 2
D: Motor switch on speed 3
E: Motor switch on speed 4
F: 10-minutes timer
WORKING
MAINTENANCE
- An accurate maintenance guarantees good
functioning and long-lasting performance.
- Particular care is due to the grease lter pa-
nel. It can be removed by pushing its special
handle toward the back-side of the cooker
hood and turning the lter downwards so to
unfasten it from its slot (Fig.3).
To insert the lter just perform the opposite
operation.
After 30 hours working, the push button
control panel will signal the saturation of the
grease lter by lighting all the buttons. Press
the timer button to reset .
The grease lter needs cleaning by regular
hand-washing or in dishwashers every two
months at least or depending on its use.
- In case the appliance is used in its ltering
version, the active coal lter (Fig.7) needs to
be periodically replaced. The coal lter can
be removed by removing the grease lter
rst (Fig.3), and by pulling its special plastic
tongue until it is unfastened from its slot.
Re-insert the coal lter by operating in the
opposite way.
The coal lter needs replacing depending
on the use, but however every six months at
least.
- How to remove the oil tank. After having
removed the grease lters and eventually the
active coal lters, please hold the oil tank up
by one hand and ioosen the three handles by
the other hand as showed in g.8. Then let
the tank slide downwards making attention in
order to avoid the leak of oil.
- To clean the appliance itself tepid water and
neutral detergent are recommended, whi-
le abrasive products should be avoided. For
steel appliances specialized detergents are
recommended (please follow the instructions
indicated o the product itself to obtain the
desired results).
- Warning! To take down the appliance from
the cabinet, remove the denitive xing
screws (g. 6) using a screw-driver, get o
the grease lters (g.3) and the active carbon
lters, if they are inserted (g. 7).

10
Act on the small handle of the springs, which
are inside the built-in unit, with the neces-
sary strength to unhook the appliance from
the cabinet.
* If the supply cord is damaged, it must be
replaced by the manufacturer or its sevice
agent or a similarly qualied person in order
to avoid a hazard.
To replace the dichroic lamp, remove the
lamp (g.9) by inserting a screwdriver or
another sharp too between the lamp and its
chrom support and replace it with a l’appareil
lamp of the same kind.

15
1
2
3
4/A
4

16
5
6
10
9
7
8
-
 1
1
-
 2
2
-
 3
3
-
 4
4
-
 5
5
-
 6
6
-
 7
7
-
 8
8


Caple ST850SS Technical information
- Categoria
- Potenza pistole termiche
- Tipo
- Technical information
- Questo manuale è adatto anche per
in altre lingue
- English: Caple ST850SS