
Mobilteil in Betrieb nehmen
Dieses Mobilteil können Sie als zusätzliches Mobilteil an einer geeigne-
ten Basis (z. B. D10x / D112 / D150 / D200 / D300) anmelden.
1. Öffnen Sie das Akkufach und stecken Sie
den Stecker des Akkupacks sorgfältig in
die Buchse (der Anschluss ist verpolungs-
sicher).
2. Legen Sie den Akkupack mit der Markie-
rung „This side up“ nach oben in das Akku-
fach und verlegen Sie das Kabel so, dass
der Deckel aufgeschoben werden kann.
3. Schieben Sie den Akkufachdeckel wieder
auf, bis er spürbar einrastet.
Damit das Mobilteil vollständig geladen wird, muss es mindestens 16
Stunden in die Ladestation gesetzt werden (Stromversorgung der La-
destation prüfen!).
Wichtig: Verwenden Sie unbedingt nur den mitgelieferten Akku-
pack. Auch bei einem späteren Austausch darf nur dieser Akku-
typ verwendet werden. Stellen Sie sicher, dass die Steckdose mit
dem Netzgerät jederzeit zugänglich ist, um das Gerät schnell
vom Netz trennen zu können.
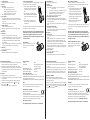
Bildwahltasten
Klappen Sie die Abdeckung auf und legen
Sie ein Foto oder Bild von der Größe 14,5 x
26,8 mm ein. Klappen Sie die Abdeckung
wieder herunter.
Technische Daten
Standard DECT
Stromversorgung Input: AC 100-240V 50/60Hz
Output: DC 6V 450mA
Akkupack 2,4 V, 500 mAh, NiMH
Optimale Umgebungstemp. 0 ˚C bis 45 ˚C
Optimale relative Luftfeuchte 20 % bis 80 %
Netzteil-Informationen
VTech (Qingyuan) Plastic & Electronics Co. Ltd.
VT04EEU06045, Input 100-240V AC 50/60Hz 150mA, Output 6VDC, 450mA
Shen Zhen Ruijing Industrial Co. Ltd.
RJ-AS060450E002, Input 100-240V AC 50/60Hz 150mA, Output 6VDC, 450mA
Hinweis
Weitere Informationen zur Bedienung, Entsorgung und Garantie finden
Sie in der Bedienungsanleitung zu Ihrer Basistation.
Konformitätserklärung
Dieses Gerät erfüllt die Anforderungen der EU−Richtlinie:
2014/53/EU.
Die Konformität mit der o. a. Richtlinie wird durch das CE−Zeichen auf
dem Gerät bestätigt. Für die komplette Konformitätserklärung nutzen
Sie bitte den kostenlosen Download von unserer Website
www.switel.com/support.
Telgo AG, Route D’Agy 16, 1763 Granges-Paccot, Switzerland
Mobilteil anmelden
1. Zum Anmelden eines neuen Bildwahl-Mobilteils drücken Sie die
Ruftaste an der Basisstation für ca. 5 s. (Piepton).
2. Stellen Sie das neue Mobilteil einfach in die Ladeschale. Die
schnell blinkende rote LED zeigt den Anmeldevorgang an. Ist die
Anmeldung abgeschlossen (dies kann bis zu 60 s dauern), hören
Sie einen Bestätigungston.
Mobilteil abmelden
Zum Abmelden des Mobilteils haben Sie zwei Möglichkeiten:
1. Nutzen Sie den entsprechenden Menüpunkt zum Abmelden eines
Mobilteils im Menü des Basisgerätes.
2. Drücken Sie am Bildwahl-Mobilteil im Ruhezustand schnell nachei-
nander die folgenden Tasten: [VOL+]- - [VOL-]- - [VOL+]-
[VOL-]- .
Sie hören einen kurzen Doppelton zur Bestätigung.
D11
Bedienungsanleitung
User‘s Manual
Manuel de l‘utilisateur
DEUTSCH
ENGLISH
FRANÇAIS
Please read carefully before using this equipment.
Service
Bei technischen Fragen nutzen Sie bitte das Service-Formular auf unserer
Webseite:
http://www.switel.com/de/produktanfragen-und-technische-unterstuetzung/
In the case of technical questions, please use the service form on our website:
http://www.switel.com/en/product-information-technical-support/
En cas des questions téchniques, veuillez, s'il vous plaît utiliser le formulaire
de service sur notre site: http://www.switel.com/fr/support-technique/
Per supporto tecnico compilare il seguente modulo sul nostro sito:
http://www.switel.com/en/product-information-technical-support/
V1.1 / 05.2019
1
2
26.8 mm
14.5 mm
1
2
6
5
3
4
7
8
9
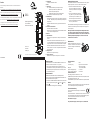
1 Anrufanzeige
- Blinkt bei eintreffendem Anruf.
2 Hörer
3 Ladeanzeige
- Rot (leuchtet): Akku wird geladen (in Ladestation)
(blinkt in langen Intervallen): Akku fast leer
(blinkt schnell): Anmeldung läuft
(blinkt): Nicht angemeldet oder außer Reichweite
- Blau (leuchtet): Verstärkerfunktion eingeschaltet
4 Bildwahltasten
- Die Rufnummern für diese Tasten müssen im Menü „Tastenspei-
cher“ (M1 ... M4) hinterlegt sein (siehe Bedienungsanleitung des
Basisgerätes).
Im Ruhezustand drücken, um die gespeicherte Rufnummer zu
wählen.
5 Anrufen-Taste/Flash-Taste
- Im Ruhezustand: Anruf annehmen.
- Während eines Gesprächs: Drücken für Flash-Funktion zur Nut-
zung von Netz-Leistungsmerkmalen.
6 Mikrofon
7 Lautstärketasten
- Während eines Gesprächs: Hörer-/Lautsprecherlautstärke ein-
stellen.
Zum Ein-/Ausschalten der Verstärkerfunktion Taste „Vol+“ ca.
3 s drücken. Bei aktivierter Verstärkerfunktion leuchtet die Lade-
anzeige blau und es sind 3 weitere Lautstärkestufen verfügbar.
- Im Ruhezustand: Ruftonlautstärke einstellen. Die neue Laut-
stärke ertönt für ca. 30s. Zum vorzeitigen Beenden drücken Sie
die Auflegen-Taste.
8 Auflegen-Taste
- Während eines Gesprächs: Auflegen.
9 Lautsprecher-Taste
- Während eines Gesprächs: Lautsprecher ein-/ausschalten.

Connect the photo handset
You can register this handset as an additional handset on a suitable
base (eg D10x / D112 / D150 / D200 / D300).
1. Open the battery compartment and plug
the battery pack connector firmly into the
jack (the connection has polarity protec-
tion).
2. Place the supplied rechargeable battery
with the label THIS SIDE UP facing up and
tuck the wires inside the battery compart-
ment.
3. Slide the battery compartment cover to-
wards the centre of the handset until it
clicks into place.
For a full charge, the handset must be left in the charger for at least 16
hours (check the charger’s power supply!).
Important: Use only the battery pack supplied with this product.
If the battery pack needs to be replaced later on the same type
must be used. For pluggable equipment, the socket-outlet
(power adaptor) shall be installed near the equipment and shall
be easily accessible.
Photo dial keys
Open the cover and insert a photo or pic-
ture of 14.5 x 26.8 mm. Fold down the
cover again.
Technical details
Standard DECT
Power supply Input: AC 100-240V 50/60Hz
Output: DC 6V 450mA
Rechargeable battery pack 2.4 V, 500 mAh, NiMH
Optimum ambient temperature 0˚C to 45˚C
Optimum relative humidity 20% to 80%
Power adaptor information
VTech (Qingyuan) Plastic & Electronics Co. Ltd.
VT04EEU06045, Input 100-240V AC 50/60Hz 150mA, Output 6VDC, 450mA
Shen Zhen Ruijing Industrial Co. Ltd.
RJ-AS060450E002, Input 100-240V AC 50/60Hz 150mA, Output 6VDC, 450mA
Note
For further information on operation, disposal and warranty, please
refer to the operating instructions for your base station.
Declaration of conformity
This device fulfils the requirements stipulated in the
EU directive: 2014/53/EU.
Conformity with the above mentioned directive is confirmed by the CE
symbol on the device. To view the complete Declaration of Conformity,
please refer to the free download available on our website
www.switel.com/support.
Telgo AG, Route D’Agy 16, 1763 Granges-Paccot, Switzerland
1 Incoming call light
- Flashes when there is an incoming call.
2 Earpiece
3 Charge LED
- Red (steady): Charging on the cradle
(long flashes): Battery power is low
(flashing quickly): Registration in progress
(flashing): Not registered or out of range
- Blue (steady): Booster function activated
4 Photo dial keys
- The telephone numbers for these keys must be stored in the
menu "Memory keys" (M1 ... M4) / (refer to the user guide for the
main device).
In idle mode, press to dial the stored number.
5 Call key / Flash key
- In idle mode: Press to answer a call.
- Whilst in a call: Press to enter flash function to use network
features.
6 Microphone
7 Volume keys
- Whilst in a call: Set the handset / speaker volume.
To switch the amplifier function on / off, press the "Vol +" button
for approx. 3 s. When the amplifier function is activated, the
charge LED lights up blue and there are 3 additional volume
levels available.
- In idle mode: Set the ringer volume. The new volume sounds for
about 30s. To quit prematurely, press the end call key.
8 End call key
- Press to hang up during a call.
9 Hands-free key
- Whilst in a call: Activate/deavtivate the loudspeaker.
1
2
26.8 mm
14.5 mm
Register the photo handset
1. To register a new photo dial handset to the base station, press the
page key on the base unit for about 5 seconds (Beep).
2. Simply place the new handset in the charging cradle. The fast
flashing red LED indicates the registration process. When registra-
tion is complete (this can take up to 60 seconds), you will hear a
confirmation tone.
De-register
To de-register the handset, you have two options:
1. Use the appropriate menu item to deregister a handset in the menu
of the main device.
2. In idle state, press the following buttons quickly one after the
other at the photo dial handset: [VOL+] - - [VOL-] - -
[VOL+] - [VOL-] - .
The handset will emit a “bi bi“ as confirmation tone.
Mise en service du mobile
Vous pouvez enregistrer ce combiné en tant que combiné
supplémentaire sur une base appropriée (par exemple, D10x / D112 /
D150 / D200 / D300).
1. Ouvrir le compartiment batterie et insérer
soigneusement la fiche dans la douille
(protégée contre inversion de polarité).
2. Mettre le set d’accumulateurs, l’inscription
« This side up » vers le haut, dans le com-
partiment et disposer le câble de sorte que
le couvercle peut être déplacé.
3. Remettre le couvercle du compartiment
jusqu’à ce qu’il s’enclenche.
Pour recharger le mobile complètement, il faut le laisser au moins 16
heures dans le bloc de chargement (vérifier l’alimentation du bloc de
chargement !).
Important : N’utilisez absolument que la batterie d’accumula-
teurs livrée. Utiliser uniquement ce type d'accumulateur même
en cas d’échange ultérieur. Assurez-vous que le bloc et la prise
sont toujours accessibles et qu’on peut rapidement débrancher
le téléphone de la prise.
Touches d'appel direct avec photo
Ouvrez le cache et placez-y une photo ou
une image mesurant 14,5 x 26,8 mm. Re-
fermez le cache.
Données techniques
Standard DECT
Alimentation (chargeur) Entrée : 100-240VAC 50/60Hz
Sortie : 6 VDC 450 mA
Batterie d’accumulateurs 2,4 V, 500 mAh, NiMH
Température ambiante optimale 0˚C à 45˚C
Hygrométrie relative optimale 20% à 80%
Informations d'alimentation
VTech (Qingyuan) Plastic & Electronics Co. Ltd.
VT04EEU06045, Input 100-240V AC 50/60Hz 150mA, Output 6VDC, 450mA
Shen Zhen Ruijing Industrial Co. Ltd.
RJ-AS060450E002, Input 100-240V AC 50/60Hz 150mA, Output 6VDC, 450mA
Remarque
Pour en savoir plus sur le fonctionnement, l’entretien et la garantie,
consultez la notice d’utilisation de votre base.
Déclaration de conformité
Cet appareil répond aux exigences de la directive UE :
2014/53/EU. La conformité avec la directive citée ci-avant est
confirmée par le marquage CE apposé sur cet appareil. Pour obtenir la
déclaration de conformité complète, veuillez la télécharger
gratuitement sur notre site internet : www.switel.com/support.
Telgo AG, Route D’Agy 16, 1763 Granges-Paccot, Switzerland
1 Affichage d’appel
- Clignote lors d’un appel externe.
2 Combiné
3 Voyant de charge
- Rouge (brille) : Accumulateur est en cours de chargement
(dans la base)
(clignote à de longs intervalles) : Accumulateur presque vide
(clignote rapidement) : Enregistrement est en cours
(clignote) : Non enregistré ou hors de portée
- Bleu (brille) : Fonction d’amplification activée
4 Touches d'appel direct avec photo
- Les numéros d'appel de ces touches doivent être enregistrés
dans le menu « Touches Mémoire » (M1 ... M4) (voir le Manuel de
l‘utilisateur de la base).
Appuyer en mode repos pour composer le numéro d'appel enre-
gistré.
5 Touche Appeler/Touche Flash
- En mode veille : accepter un appel.
- Pendant une conversation : Appuyer pour la fonction Flash pour
utiliser les caractéristiques réseau.
6 Microphone
7 Touches volume
- Pendant une conversation : régler le volume du combiné/haut-
parleur.
Appuyer sur la touche « Vol+ » pendant environ 3 s pour acti-
ver/désactiver la fonction d’amplification. Quand la fonction
d'amplification est activée, le voyant de charge brille en bleu et 3
niveaux de volume supplémentaires sont disponibles.
- Au repos : régler le volume de la sonnerie. Le nouveau volume
retentit pendant environ 30 s. Pour quitter plus tôt, appuyer sur
la touche raccrocher.
8 Touche accrocher
- en cours de conversation : accrocher.
9 Touche haut-parleur
- Pendant une conversation : activer/désactiver le hautparleur.
Enregistrement d'un combiné
1. Pour enregistrer un nouveau combiné à touche d'appel direct avec
photo, appuyez sur la touche d'appel de la base pendant environ
5 s. (bip).
2. Placez simplement le nouveau combiné dans le chargeur de bu-
reau. La LED rouge clignant rapidement indique le processus d’en-
registrement. Vous entendez une tonalité de confirmation après
achèvement de l’enregistrement (cela peut durer jusqu’à 60 s).
Supprimer un combiné
Vous avez deux possibilités pour supprimer un combiné :
1. Utilisez l’option de menu appropriée pour désenregistrer un com-
biné du menu de la base.
2. Appuyez successivement sur les touches suivantes en mode repos
sur le combiné à touches d'appel direct avec photo : [VOL+]- -
[VOL-]- - [VOL+]- [VOL-]- . Vous entendez une double tona-
lité courte de confirmation.
1
2
26.8 mm
14.5 mm

Messa in funzione dell’unità mobile
È possibile registrare questo portatile come ricevitore aggiuntivo su
una base adeguata (ad es. D10x / D112 / D150 / D200 / D300).
1. Aprire lo scomparto batterie e inserire ac-
curatamente la spina del battery pack
nella presa (il collegamento è a prova di
errore).
2. Inserire il battery pack nello scomparto
batterie con il contrassegno “This side up”
verso l’alto e posare il cavo in modo tale
che il coperchio possa essere aperto spin-
gendo.
3. Spingere nuovamente il coperchio dello
scomparto batterie, finché non scatta per-
cettibilmente in posizione.
Affinché l’unità mobile si carichi completamente, deve essere lasciata
per almeno 16 ore sulla stazione di carica (controllare l’alimentazione
della stazione di carica).
Importante: Utilizzare tassativamente solo il gruppo batteria in
dotazione. È consentito utilizzare solo questo tipo di batteria
anche se viene sostituita successivamente. Accertarsi che la
presa con l'alimentatore sia sempre accessibile onde poter scol-
legare rapidamente l'apparecchio dalla rete.
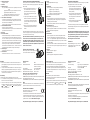
Tasti di selezione delle immagini
Aprire il coperchio e inserire una foto o im-
magine delle dimensioni 14,5 x 26,8 mm.
Chiudere di nuovo il coperchio.
Dati tecnici
Standard DECT
Alimentazione (stazione di carica) Entrata: 100-240VAC 50/60Hz
Uscita: 6 VDC 450 mA
Gruppo batteria 2,4 V, 500 mAh, NiMH
Temper. ambiente ottimale da 0 °C a 45 °C
Umidità relativa dell’aria ottimale dal 20 % all’80 %
Informazioni sull'alimentazione
VTech (Qingyuan) Plastic & Electronics Co. Ltd.
VT04EEU06045, Input 100-240V AC 50/60Hz 150mA, Output 6VDC, 450mA
Shen Zhen Ruijing Industrial Co. Ltd.
RJ-AS060450E002, Input 100-240V AC 50/60Hz 150mA, Output 6VDC, 450mA
Nota
Ulteriori informazioni sull'uso, sullo smaltimento e sulla garanzia sono
reperibili nelle istruzioni per l'uso del proprio base.
Dichiarazione di conformità
Quest'apparecchio corrisponde ai requisiti della
direttiva UE: 2014/53/EU.
La conformità con la direttiva sopra citata viene confermata con il
simbolo CE sull'apparecchio. La dichiarazione di conformità completa
la puo scaricare gratuitamente dal nostro sito web allo
www.switel.com/support.
Telgo AG, Route D’Agy 16, 1763 Granges-Paccot, Switzerland
1
2
26.8 mm
14.5 mm
D11
Manuale utente
Manual de instrucciones
Handleiding
ITALIANO
ESPAÑOL
NEDERLANDS
Please read carefully before using this equipment.
Service
Bei technischen Fragen nutzen Sie bitte das Service-Formular auf unserer
Webseite:
http://www.switel.com/de/produktanfragen-und-technische-unterstuetzung/
In the case of technical questions, please use the service form on our website:
http://www.switel.com/en/product-information-technical-support/
En cas des questions téchniques, veuillez, s'il vous plaît utiliser le formulaire
de service sur notre site: http://www.switel.com/fr/support-technique/
Per supporto tecnico compilare il seguente modulo sul nostro sito:
http://www.switel.com/en/product-information-technical-support/
V1.1 / 05.2019
1
2
6
5
3
4
7
8
9
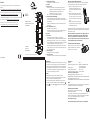
1 Visualizzazione chiamate
- Lampeggia in caso di chiamata in arrivo.
2 Ricevitore
3 Display di carica
- Rosso (acceso): Batteria in carica (nella stazione di carica)
(lampeggia a lunghi intervalli): batteria quasi scarica
(lampeggia rapidamente): collegamento in corso
(lampeggia): non collegato o fuori campo
- Blu (acceso): Funzione amplificatore attivata
4 Tasti di selezione delle immagini
- I numeri di telefono per questi tasti devono essere salvati nel
menù „Tasti memoria“ (M1 ... M4) / (vedere le istruzioni per l'uso
dell'unità base).
Premere in modalità sleep per comporre il numero di telefono
memorizzato.
5 Tasto chiamata/tasto flash
- In standby: ricevere telefonate.
- Durante una conversazione: premere per la funzione flash per
l’uso delle caratteristiche di prestazione della rete.
6 Microfono
7 Tasti volume
- Durante una conversazione: Regolare il volume degli
auricolari/altoparlante. Per attivare/disattivare la funzione am-
plificatore premere il tasto „Vol+“ per ca. 3 secondi. Quando la
funzione amplificatore è attivata, l'indicatore di carica si illumina
in blu e sono disponibili 3 livelli di volume aggiuntivi.
- In modalità sleep: Regolare il volume della suoneria. Il nuovo
volume suona per ca. 30 secondi. Per interromperlo prima pre-
mere il tasto di riaggancio.
8 Tasto di riaggancio
- Durante una conversazione: Riaggancio.
9 Tasto altoparlante
- Durante una conversazione: Accendere/spegnere l’altoparlante.
Registrazione
1. Premere il tasto chiamata della stazione di base per ca. 5 s. (beep)
per collegare un nuovo portatile per la selezione delle immagini.
2. Basta inserire un nuovo portatile nella base di carica. Il LED rosso
che lampeggia velocemente indica il processo di collegamento in
corso. Quando il collegamento è terminato (può durare fino a 60
secondi), si avvertirà un tono di conferma.
Annulla
Sono disponibili due opzioni per disconnettere il portatile:
1. Utilizzare la voce di menu appropriata per annullare la registra-
zione di un portatile nel menu dell'unità di base.
2. In stato di inattività premere rapidamente uno dopo l'altro i se-
guenti tasti sul portatile di selezione delle immagini: [VOL+]- -
[VOL-]- - [VOL+]- [VOL-]- . Si avvertirà un breve doppio tono
di conferma.

De handset in bedrijf stellen
U kunt dit toestel aanmelden als een extra handset op een geschikte
basis (bijv. D10x / D112 / D150 / D200 / D300).
1. Open het batterijvak en steek de stekker
van het accupack zorgvuldig in de ingang
(de aansluiting is beschermd tegen omge-
keerde polariteit).
2. Let het accupack in het batterijvak met de
markering "This side up" naar boven ge-
richt en leg de kabel zo, dat het deksel
erop kan schuiven.
3. Schuif het deksel terug op het batterijvak
en zorg ervoor dat het vastklikt.
Om de handset volledig op te laden, moet hij minstens 16 uur in het
laadstation blijven staan (controleer of de spanning naar het laadsta-
tion ingeschakeld is!).
Belangrijk: Gebruik uitsluitend het meegeleverde accupack. Ook
wanneer u later het accupack vervangt, mag u alleen dit type ac-
cupack gebruiken. Zorg ervoor dat het stopcontact met de adap-
ter op elk moment toegankelijk is, om het toestel snel los te
kunnen koppelen van het stroomnet.
Fototoetsen
Klap de afdekking open en leg er een foto
of afbeelding van 14,5 x 26,8 mm in. Klap
de afdekking weer dicht.
Technische gegevens
Standaard DECT
Stroomvoorziening
Opgen. vermogen: 100-240VAC 50/60Hz
Uitg. vermogen: 6 VDC 450 mA
Accupack 2,4 V, 500 mAh, NiMH
Optimale omgevingstemp. 0˚C tot 45˚C
Optimale rel. luchtvochtigheid 20% tot 80%
Informatie over de voeding
VTech (Qingyuan) Plastic & Electronics Co. Ltd.
VT04EEU06045, Input 100-240V AC 50/60Hz 150mA, Output 6VDC, 450mA
Shen Zhen Ruijing Industrial Co. Ltd.
RJ-AS060450E002, Input 100-240V AC 50/60Hz 150mA, Output 6VDC, 450mA
Opmerking
Meer informatie over de bediening, afvalverwijdering en garantie vindt
u in de bedieningshandleiding van uw basisstation.
Conformiteitsverklaring
Dit apparaat voldoet aan de Europese richtlijn:
2014/53/EU.
De conformiteit met bovengenaamde richtlijn wordt bevestigd door het
CE-kenteken op het apparaat.
De volledige conformiteitsverklaring kunt u gratis downloaden van
onze website www.switel.com/support.
Telgo AG, Route D’Agy 16, 1763 Granges-Paccot, Switzerland
Puesta en funcionamiento del terminal inalámbrico
Puede registrar este terminal inalámbrico como terminal inalámbrico
adicional en una base adecuada (por ejemplo, D10x / D112 / D150 /
D200 / D300).
1. Abra el compartimento de la batería y co-
necte cuidadosamente el conector del
pack de baterías en la toma correspon-
diente (conexión protegida contra polari-
zación inversa).
2. Coloque el pack de baterías en el compar-
timento de la batería con el lado marcado
con «This side up» señalando hacia arriba
y tienda el cable, de modo que sea posible
cerrar la tapa.
3. Vuelva a cerrar la tapa del compartimento
de la batería hasta que encastre de forma
audible.
El terminal inalámbrico deberá permanecer al menos 16 horas en la
estación de carga para su carga completa (comprobar la alimentación
de corriente de la estación de carga).
Importante: Utilice únicamente el pack de batería que se le sumi-
nistra. Incluso si más adelante reemplaza la batería deberá se-
guir utilizando el mismo modelo de batería.
Asegúrese de que en
todo momento haya accesibilidad entre el enchufe y la fuente de ali-
mentación para poder desconectar rápidamente el aparato de la red
eléctrica en caso necesario.
Teclas de selección de imagen
Abra la tapa e inserte una foto o imagen de
14,5 x 26,8 mm. Vuelva a cerrar la tapa.
Datos técnicos
Estándar DECT
Fuente de alimentación Entrada: 100-240 VAC 50/60 Hz
Salida: 6 V CC 450 mA
Pack de batería 2,4 V, 500 mAh, NiMH
Temperatura ambiente óptima De 0 °C hasta 45 °C
Humedad relativa del aire óptima De 20 % a 80 %
Información sobre la fuente de alimentación
VTech (Qingyuan) Plastic & Electronics Co. Ltd.
VT04EEU06045, Input 100-240V AC 50/60Hz 150mA, Output 6VDC, 450mA
Shen Zhen Ruijing Industrial Co. Ltd.
RJ-AS060450E002, Input 100-240V AC 50/60Hz 150mA, Output 6VDC, 450mA
Nota
Encontrará más información acerca del funcionamiento, eliminación y
garantía en el manual de instrucciones de su estación base.
Declaración de conformidad
Este dispositivo cumple con los requisitos de la
Directiva de la UE: 2014/53/EU.
La conformidad con la directiva mencionada anteriormente se
confirma mediante el símbolo CE que aparece en el dispositivo. Para
acceder a la declaración de conformidad completa, utilice la descarga
gratuita de nuestro sitio web www.switel.com/support.
Telgo AG, Route D’Agy 16, 1763 Granges-Paccot, Switzerland
1 Indicador de llamada
- Parpadea al llamar.
2 Auricular
3 Indicador de carga
- Rojo (encendido): La batería se está cargando (en la estación de
carga)
(parpadea a intervalos largos): La batería está casi vacía
(parpadea rápido): Notificación en curso
(parpadea normal): No registrado o fuera de alcance
- Azul (encendido): Función de amplificación encendida
4 Teclas de selección de imagen
- Los números de teléfono para estas teclas deben almacenarse
en el menú "Teclas memoria" (M1 ... M4) / (ver instrucciones de
funcionamiento de la unidad base).
Presione en modo inactivo para marcar el número almacenado.
5 Tecla de llamada/tecla flash
- En reposo: responder una llamada.
- Durante una llamada: Presione para acceder a la función de flash
para utilizar las funciones de red.
6 Micrófono
7 Botones de volumen
- Durante una llamada: Ajusta el volumen del auricular/altavoz.
Para activar/desactivar la función del amplificación presione la
tecla "Vol +" durante aprox. 3 s. En caso de que la función de am-
plificación esté activa se ilumina en azul el indicador de carga y,
además, existen 3 niveles de volumen adicionales disponibles.
- En modo reposo: Ajusta el volumen del tono de llamada. El
nuevo volumen se oirá durante unos 30 s. Presione la tecla de fi-
nalizar llamada para abandonar la opción antes de tiempo.
8 Tecla de colgar
- Durante una conversación: colgar.
9 Tecla de altavoz
- Durante una conversación: conectar / desconectar el altavoz.
1 Oproep
- Knippert bij binnenkomende oproep.
2 Hoorn
3 Laadindicator
- Rood (brandt): accu wordt geladen (in laadstation)
(knippert traag): accu bijna leeg
(knippert snel): aanmelding bezig
(knippert): niet aangemeld of buiten bereik
- Blauw (brandt): versterker ingeschakeld
4 Fototoetsen
- De telefoonnummers voor deze toetsen moeten in het menu
„Pratende geheugen“ (M1 ... M4) opgeslagen zijn (zie gebruiks-
aanwijzing van de basiseenheid).
In ruststand erop drukken om het telefoonnummer te bellen.
5 Bel-toets/Flash-toets
- In ruststand: oproep beantwoorden..
- Tijdens een gesprek: indrukken voor flash-functie om extra func-
ties van uw telefoonnet te gebruiken.
6 Microfoon
7 Volumetoetsen
- Tijdens een gesprek: volume van hoorn/luidspreker instellen.
Voor het in-/uitschakelen van de volumeversterker de toets
„Vol+“ ca. 3 s ingedrukt houden. Bij geactiveerde volumeverster-
ker brandt de laadindicator blauw en zijn nog 3 andere volumeni-
veaus beschikbaar.
- In ruststand: volume van beltoon instellen. Het nieuwe volume is
30 seconden te horen. Op dit voortijdig te stoppen, drukt u op de
opleg-toets.
8 Opleggen
- Tijdens een gesprek: opleggen.
9 Luidspreker-toets
- Tijdens een gesprek: luidspreker aan/uit-schakelen.
Registrar
1. Pulse la tecla de llamada en la estación base durante unos 5 se-
gundos (pitido) para registrar una nueva selección de imagen en el
terminal inalámbrico.
2. Coloque el nuevo terminal inalámbrico en la estación de carga. El
LED rojo que parpadea rápidamente indica el proceso de registro.
En cuanto finalice el registro (puede tardar hasta 60 segundos) es-
cuchará un tono de confirmación.
Dar de baja
Para dar de baja el teléfono inalámbrico tiene dos opciones:
1. Use el elemento de menú apropiado para cancelar el registro de un
teléfono en el menú de la unidad base.
2. Seleccione en modo reposo en la selección de imagen del terminal
inalámbrico rápidamente la siguiente secuencia de teclas: [VOL+]-
- [VOL-]- - [VOL+]- [VOL-]- . Escuchará un pitido doble
corto como confirmación.
1
2
26.8 mm
14.5 mm
Handset registreren
1. Om een nieuwe fototoets-handset aan te melden, houdt u de bel-
toets van het basisstation 5 sec. ingedrukt (pieptoon).
2. Zet de nieuwe handset in het laadstation. De snel knipperende
rode indicator geeft aan dat de handset wordt aangemeld. Is de
aanmelding voltooid (dit kan tot 60 sec. duren), hoort u een piep-
toon ter bevestiging.
Afmelden
U kunt de handset op twee manieren afmelden:
1. Gebruik het juiste menu-item om een handset af te melden in het
menu van het basisstation.
2. Druk op de fototoets-handset in ruststand snel achter elkaar op de
volgende toetsen: [VOL+]- - [VOL-]- - [VOL+]- [VOL-]- .
U hoort nu tweemaal een korte pieptoon ter bevestiging.
1
2
26.8 mm
14.5 mm
-
 1
1
-
 2
2
-
 3
3
-
 4
4


in altre lingue
- français: SWITEL D11 Manuel utilisateur
- español: SWITEL D11 Manual de usuario
- Deutsch: SWITEL D11 Benutzerhandbuch
- Nederlands: SWITEL D11 Handleiding