CYBEX ATON 5 Manuale utente
- Categoria
- Sedili dell'auto
- Tipo
- Manuale utente

DEENITFRNLPLHUCZSKESPT
ATON 5
USER GUIDE
ECE R-44/04 Gr. 0+ / 0-13kg (ca. 0-18M)

1
DE – WARNUNG! Die folgende Kurzanleitung dient nur der Übersicht. Um maximale Sicherheit und maximalen
Komfort für Ihr Kind zu erreichen, ist es unbedingt notwendig, die gesamte Gebrauchsanleitung aufmerksam zu lesen.
Reihenfolge: Schale einrichten - Kind anschnallen - Sitz ins Fahrzeug einbauen.
FR – AVERTISSEMENT! Ce manuel résumé sert de synthèse seulement! Pour un maximum de protection et de
confort, il est essentiel de lire et de suivre correctement le manuel d‘instructions dans son intégralité. Ordre de lecture:
Installation du siège auto - attacher l‘enfant - attacher le siège auto dans la voiture.
HU – FIGYELMEZTETÉS! Ez a rövid tájékoztató csak áttekintésül szolgál. Gyermeke maximális védelme és
kényelme érdekében elengedhetetlen, hogy a teljes tájékoztatótalaposan elolvassa. A helyes sorrend: Gyermek ülés
|VV]HiOOtWiVD±DJ\HUPHNU|J]tWpVHDJ\HUPHNOpVNRFVLEDW|UWpQĘU|J]tWpVH
EN – WARNING! This short manual serves as an overview only. For maximum protection and best comfort for your child
it is essential to read and follow the entire instruction manual carefully. Correct Order: Baby seat initial setup - fasten
child - fasten baby seat in the car.
NL – WAARSCHUWING! De volgende korte handleiding dient enkel als overzicht! Voor een maximale bescherming en
een optimaal komfort voor uw kind, is het essentieel de volledige handleiding zorgvuldig te lezen en te volgen.
CZ – VAROVÁNÍ!7HQWRVWUXþQêQiYRGVORXåtSRX]HMDNRSĜHKOHG3URPD[LPiOQtRFKUDQXDQHMOHSãtSRKRGOtSUR9DãH
GtWČMHQH]E\WQpSĜHþtVWDGRGUåRYDWSHþOLYČYHãNHUpSRN\Q\YQiYRGXNSRXåLWt6SUiYQpSRĜDGtSRþiWHþQtQDVWDYHQt
GČWVNpVHGDþN\]DSQXWtGtWČWH]DSQXWtGČWVNpVHGDþN\YDXWČ
IT – ATTENZIONE! Queste istruzioni sono solo un sommario. Per garantire la massima sicurezza e comfort al
Vostro bambino è molto importante leggere attentamente ed interamente il manuale e seguirne scrupolosamente le
LQGLFD]LRQL2UGLQHFRUUHWWRGHOOHRSHUD]LRQL$SSURQWDUHLOVHJJLROLQR±DOODFFLDUHLOEDPELQR±¿VVDUHLOVHJJLROLQRDO
sedile dell’auto.
3/±2675=(ĩ(1,(,QVWUXNFMDWDMHVWW\ONRREUD]NRZ\PVWUHV]F]HQLHP$E\]DJZDUDQWRZDüVZRMHPXG]LHFNX
PDNV\PDOQHEH]SLHF]HĔVWZRLZ\JRGĊQDOHĪ\XZDĪQLHSU]HF]\WDüFDáąLQVWUXNFMĊ3UDZLGáRZDNROHMQRĞüZVWĊSQH
]áRĪHQLHIRWHOLND]DSLĊFLHG]LHFNDPRQWDĪIRWHOLNDZVDPRFKRG]LH
SK – VAROVANIE!7HQWRVWUXþQêQiYRGVO~åLLEDDNRSUHKĐDG3UHPD[LPiOQXRFKUDQXDQDMOHSãLHSRKRGOLHSUH9DãH
GLHĢDMHQHY\KQXWQpSUHþtWDĢDGRGUåLDYDĢVWDURVWOLYRYãHWN\SRN\Q\YQiYRGHQDSRXåLWLH6SUiYQHSRUDGLHSRþLDWRþQp
QDVWDYHQLHGHWVNpVHGDþN\]DSQXWLHGLHĢDĢD]DSQXWLHGHWVNHMVHGDþN\YDXWH
ES – ATENCIÓN! Este breve manual es sólo un resumen. Para obtener la máxima protección y mejor confort para su
hijo es esencial leer y seguir el manual de instrucciones. Orden Correcto: Instalación inicial de la silla de auto.- sentar
al niño - Fijar la silla al coche.
PT – ATENÇÃO! Este manual serve apenas como resumo. Para máxima proteção e conforto das crianças é essencial
ler e consultar o manual completo. Ordem de leitura deverá ser: Preparação e instalação da cadeira, Acomodar a
criança, Instalação da cadeira no automóvel.

2
5 | INHALT
6 | CONTENT
6 | ARGOMENTI
9
8
5
7
6
4
3
CLICK
21
DEENIT
131 | CONTENIDO
132 | CONTEÚDO
ESPT
Kurzanleitung
Short instruction
Sommario
Instructions résumées
Korte handleiding
Instrukcja skrócona
Rövid tájékoztató
Zkrácený návod
6WUXþQêQiYRG
Resumen de instrucciones
Manual reduzido
47 | CONTENU
48 | INHOUD
_63,675(ĝ&,
89 | TARTALOM
90 | OBSAH
90 | OBSAH
FRNLPLHUCZSK

3
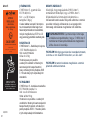
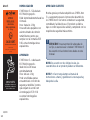
ZULASSUNG
CYBEX Aton 5 – Babyschale
ECE R44/04 Gruppe 0+
Gewicht: 0 bis 13 kg
Alter: Bis ca. 18 Monate
Nur geeignet für Fahrzeugsitze
mit Dreipunkt-Automatik-Gurt,
zugelassen nach ECE Regelung Nr.
R16 oder gleichwertigem Standard.
APPROVAL
CYBEX Aton 5 – baby car seat
ECE R44/04 group 0+
Age: To approximately 18 months
Weight: Up to 13 kg
Only suitable for use in the
OLVWHGYHKLFOHV¿WWHGZLWKSRLQW
retractor safety-belts, approved to
ECE Regulation No. 16 or other
equivalent standards.
OMOLOGAZIONE
CYBEX Aton 5 – seggiolino di
sicurezza per auto
Gruppo 0+ ECE R44/04
Età: a 18 mesi circa,
3HVR¿QRDNJ
Solo per veicoli con sedili dotati di
cinture di sicurezza automatiche
a 3 punti omologate ECE R16 o
standard equivalente
04/2015
Vielen Dank, dass Sie sich entschieden haben, den
CYBEX Aton 5 zu erwerben. Wir versichern Ihnen, dass
bei der Entwicklung des CYBEX Aton 5 Sicherheit,
Komfort und Bedienungsfreundlichkeit im Vordergrund
gestanden haben. Das Produkt wird unter besonderer
Qualitätsüberwachung hergestellt und erfüllt strengste
Sicherheitsanforderungen.
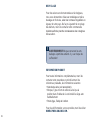
WARNUNG! Damit Ihr Kind richtig geschützt
werden kann, ist es unbedingt notwendig, den
CYBEX Aton 5 so zu verwenden, wie es in
dieser Anleitung beschrieben wird.
!
HINWEIS! Bewahren Sie diese Anleitung immer
griffbereit im dafür vorgesehenen Fach unten an der
Babyschale auf.
HINWEIS!'XUFKOlQGHUVSH]L¿VFKH$QIRUGHUXQJHQ
können Produktmerkmale abweichen.
SEHR GEEHRTE KUNDIN, SEHR GEEHRTER KUNDE!Aton 5
ATON 5
ECE R 44/04
____________
UNIVERSAL
SEMI-UNIVERSAL
0 - 13 kg
04301297
____________
CYBEX GmbH
Riedinger Str. 18, 95448 Bayreuth
Germany
Approved for CYBEX
ATON Base & Base-fix
ATON Base 2 & Base 2-fix
ATON Q Base & Q Base-fix
Base Q & Base Q-fix

4
Thank you very much for purchasing the CYBEX Aton 5.
We assure you that in the development process of the
CYBEX Aton 5 we focused on safety, comfort and user
friendliness. The product is manufactured under special
quality surveillance and complies with the strictest safety
requirements.
Ci congratuliamo con Lei per avere acquistato CYBEX
Aton 5. Le assicuriamo che nel progettare CYBEX Aton
5 i nostri principali obiettivi sono stati la sicurezza, il
comfort e la facilità di utilizzo. Il prodotto è stato elaborato
sotto uno stretto controllo qualitativo e risponde ai più
severi standard di sicurezza.
WARNING! For proper protection of your child, it is
essential to use and install the CYBEX Aton 5 accor-
ding to the instructions given in this manual.
ATTENZIONE! Per garantire un’adeguata sicureza
del Vostro bambino è molto importante che l’uso
e l’installazione di CYBEX Aton 5 siano effettuati
seguendo scrupolosamente le istruzioni fornite in
questo manuale.
!!
NOTE! According to local codes the product
characteristic can be different.
NOTE! Please always have the instruction manual at
hand and store it in the dedicated slot under the seat.
NOTA BENE! Raccomandiamo di tenere il manuale
d’istruzioni sempre a portata di mano e di conservarlo
nell’apposito alloggiamento sotto il seggiolino.
NOTA BENE! In base alle normative locali alcune
caratteristiche del prodotto potrebbero differire.
DEAR CUSTOMER GENTILE CLIENTE
DEENIT
La pagina sta caricando ...
La pagina sta caricando ...
La pagina sta caricando ...

8
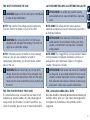
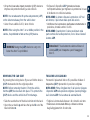
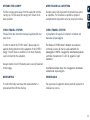
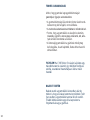
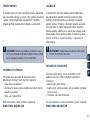
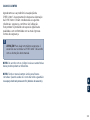
FOR THE PROTECTION OF YOUR CAR! PER LA SALVAGUARDIA DELL’AUTO
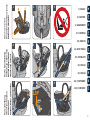
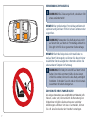
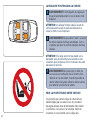
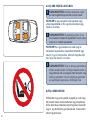
WARNING! Approval of the seat expires immediately
LQFDVHRIDQ\PRGL¿FDWLRQ
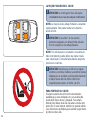
WARNING! Do not use the Aton 5 in front seats
equipped with activated front-airbag. This does not
apply to so-called side-airbags.
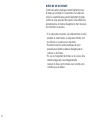
WARNING! Never hold a baby on your lap while
driving. Due to the enormous forces released in an
accident, it will be impossible to hold onto the baby.
Never use the same seat belt to secure yourself and
the child.
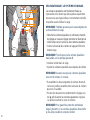
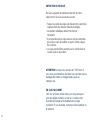
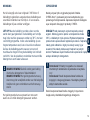
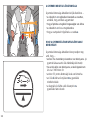
THE BEST POSITION IN THE CAR
NOTE! High volume front-airbags expand explosively.
This can result in the death or injury of the child.
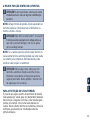
NOTE! If the baby seat is not stable or sits too steeply
in the car, you can use a blanket or a towel to
compensate. Alternatively, you should choose another
place in the car.
It is possible that some car seats that are made of soft
PDWHULDOHJYHORXUVOHDWKHUHWFPD\VKRZVLJQVRI
usage and/or discolouration. In order to avoid this, you
could, for example, place a cover or towel underneath it.
ATTENZIONE! La validità del prodotto decade
DXWRPDWLFDPHQWHLQFDVRGLPRGL¿FKHHPDQRPLV-
sioni!
ATTENZIONE! Non utilizzare CYBEX Aton 5 sui
sedili anteriori di veicoli dotati di airbag non disin-
seribile. L‘avvertimento non riguarda i cosiddetti
airbag-laterali.
ATTENZIONE! Non tenere mai in braccio il bambino
se alla guida. A causa delle notevoli forze in caso di
impatto, sarebbe impossibile riuscire a proteggerlo.
Non utilizzare mai la stessa cintura di sicurezza per
allacciare il vostro corpo e quello del bambino.
LA POSIZIONE MIGLIORE ALL’INTERNO DELL’AUTO
NOTA BENE! Gli airbag anteriori hanno apertura
automatica esplosiva e possono provocare gravi ferite o
la morte del bambino.
NOTA BENE! Se il seggiolino è in una posizione instabile
o troppo rialzata consigliamo di utilizzare un telo o un
asciugamano per compensare. Oppure, di scegliere
un‘altra collocazione nell’auto.
1HOFDVRGLVHGLOLLQPDWHULDOLSDUWLFRODUPHQWHGHOLFDWLSHU
esempio velluto, pelle, ecc.) per evitare danneggiamenti
consigliamo di di stendere un telo protettivo sotto il
seggiolino.
DEENIT
La pagina sta caricando ...

10
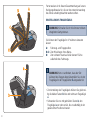
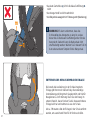
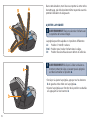
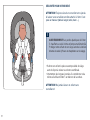
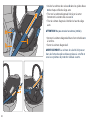
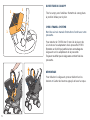
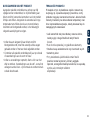
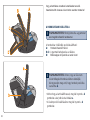
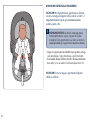
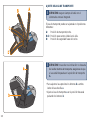
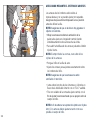
WARNING! Always secure the baby with the integra-
ted harness system.
WARNING! In order to avoid unwanted tilting of the
seat whilst carrying, make sure that the handle is
locked in the carrying position A.
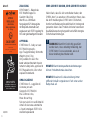
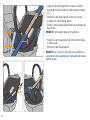
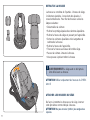
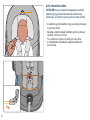
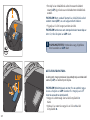
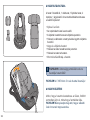
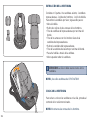
CARRYING HANDLE ADJUSTMENT
The carrying handle can be adjusted into 4 different
positions:
A: Carrying/Driving-Position.
B+C: For placing the baby in the seat.
D: Safe sitting position outside the car.
• In order to adjust the handle press buttons b on left and
right side on the handle a.
• Adjust the carrying handle a to the desired position by
pressing the buttons b.
ATTENZIONE! Allacciare sempre il bambino con il
sistema di cinture integrato.
ATTENZIONE! Per evitare il rischio di capovolgi-
mento durante il trasporto, assicuratevi sempre che
LOPDQLFRVLD¿VVDWRQHOODSRVL]LRQHGLWUDVSRUWRA.
REGOLAZIONE DEL MANICO PER IL TRASPORTO
Il manico per il trasporto può essere regolato in 4 diverse
posizioni:
A: Posizione di trasporto/di viaggio
B+C: Posizione per l‘inserimento del bambino nel
seggiolino
D: Posizione di seduta in sicurezza al di fuori
dell’auto.
• Per regolare la posizione del manico premere i
pulsanti b su ambo i lati del manico a.
• Regolare il manico a per il trasporto nella posizione
desiderata premendo i pulsanti b.
DEENIT
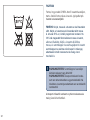
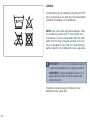
In this context, we would also like to refer to you to our
cleaning instructions, which must absolutely be followed
EHIRUHWKH¿UVWXVHRIWKHVHDW
Con l‘occasione ricordiamo di fare riferimento anche
alle istruzioni per il lavaggio, che devono essere seguite
scrupolosamente prima dell‘utilizzo.

11
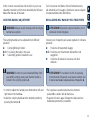
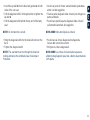
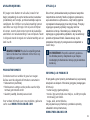
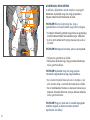
• Die Kopfstütze muss so eingestellt werden, dass max.
zwei Finger breit oder weniger zwischen Schulter des
Kindes und Kopfstütze frei bleiben.
• Ziehen Sie den Verstellschlaufe r an der Oberseite der
Kopfstütze nach oben, und führen Sie die Kopfstütze in
die gewünschte Position.
• In den untersten Positionen der Kopfstütze, kann die
Sitzeinlage durch Falten des unteren Bereiches als
Sitzverkleinerer für Neugeborene verwendet werden.
ANPASSEN DER KOPFSTÜTZE
HINWEIS! Nur eine in optimaler Höhe eingestellte
Kopfstütze gewährt ihrem Kind größtmöglichen Schutz
und Komfort. Die Höhenverstellung kann in acht
Positionen erfolgen.
r

12
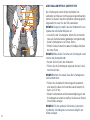
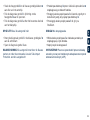
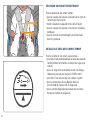
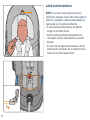
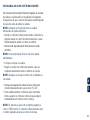
• The headrest must be adjusted to leave free two
¿QJHUV¶ZLGWKEHWZHHQWKH&KLOG¶µVVKRXOGHUDQGWKH
headrest.
• Activate the adjustable handle ring on the upper side of
the headrest
r and bring the headrest into the required
position.
• In the lowest positions of the headrest, the seat insert
can be used as a newborn support by simply folding the
lower part.
• Il poggiatesta deve essere regolato per lasciare appena
lo spazio di due dita tra le spalle e il poggiatesta.
• per regolare il poggiatesta tirare la leva
rFRPHGDIRWR
e portarlo alla posizione corretta.
• Nella posizione più bassa del poggiatesta, l‘inserto se-
duta, con la parte inferiore ripiegata, può essere usato
come supporto per neonato.
ADJUSTING THE HEADREST REGOLAZIONE DEL POGGIATESTA
NOTE! Only when adjusted to the most suitable height
does the headrest offer your child the highest degree of
protection and safety. The height of the headrest can be
adjusted to eight different positions.
ATTENZIONE! Il poggiatesta offre il grado di sicurezza
e protezione maggiore solo regolato nella posizione più
corretta. Il poggiatesta può essere regolato in otto diverse
posizioni.
DEENIT
La pagina sta caricando ...

14
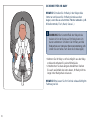
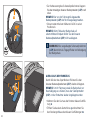
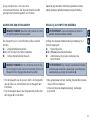
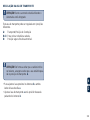
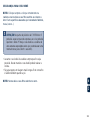
NOTE! Always pull on the shoulder belt c never pull on
the shoulder pads d.
ATTENZIONE! Tirare sempre le cinture alla posizione c;
mai tirare la parte delle spalline di protezione d.
NOTE! Make sure that the shoulder belts c are not
twisted or crossed over.
ATTENZIONE! Assicuratevi che le cinture c non siano
attorcigliate prima di legare il bambino.
• Put the child in the child seat.
• Adjust the shoulder belts cWR¿WH[DFWO\RYHU\RXU
child‘s shoulders.
• Sedere il bambino nel seggiolino auto.
• Regolare le cinture di sicurezza c per portarle sempre
nella posizione più corretta .
• Bring both belt tongues t together and lock them into
place in the belt buckle e with an audible “CLICK”.
• Gently and cautiously pull on the central adjuster belt g,
in order to tighten the shoulder belts c until they lie
against the body of your child.
• Congiungete entrambi gli agganci delle cinture t e
allacciateli al blocco centrale e. Sentirete un “CLICK”
quando saranno correttamente agganciate.
• Premere leggermente sul pulsante di regolazione
centrale g per correggere la lunghezza delle cinture c in
modo che restino sempre vicine al corpo del bambino.
NOTE! In order to gain optimum protection from the
Cybex Aton 5, the shoulder belts c should lie as close as
possible to the body.
ATTENZIONE! Per avere sempre una protezione ottimele
trammite Aton 5, le cinture di sicurezza c devono rimanere
sempre il più possibile vicine al corpo del bambino
DEENIT
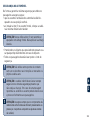
• Loosen the shoulder belts by activating the adjustment
handle on the central adjuster and simultaneously
pulling both shoulder belts upwards.
• Open the belt buckle
e E\SUHVVLQJ¿UPO\RQWKHUHG
button.
• Allentare le cinture premendo il pulsante centrale g e
SRLWLUDUHFRQWHPSRUDQHDPHQWHHQWUDPEHOHFLQWXUHF
verso l’esterno.
• Slacciare le cinture premendo forte il pulsante centrale
rosso.
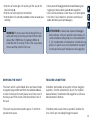
SECURING BY MEANS OF HARNESS SYSTEM PROTEZIONE MEDIANTE SISTEMA CON CINTURE
NOTE! Make sure that the child seat is free of toys and
hard objects.
ATTENZIONE! Assicuratevi che il seggiolino sia libero da
oggetti duri e/o giocattoli .
7KHVKRXOGHUEHOWVDUH¿UPO\DWWDFKHGWRWKHKHDGUHVW
and must not be adjusted separately. Make sure that the
headrest is correctly locked in place before you use the
seat.
Le cinture sono saldamente attaccate al poggiatesta e
non devono essere regolate separatamente. Assicuratevi
che il poggiatesta sia bloccato correttamente prima di
utilizzare il seggiolino.

15
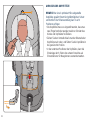
WARNUNG! Die Kunststoffteile der Babyschale
heizen sich in der Sonne auf. Ihr Baby kann sich
daran verbrennen. Schützen Sie Ihr Baby und die
%DE\VFKDOHYRULQWHQVLYHU6RQQHQHLQVWUDKOXQJ]%
indem Sie ein helles Tuch über die Schale legen).
HINWEIS! Schnallen Sie Ihr Baby in der Babyschale
immer an und lassen Sie Ihr Baby niemals aus den
$XJHQZHQQ6LHHVDXIHUK|KWHQ)OlFKHQDEVWHOOHQ]%
Wickelkommode, Tisch, Bank, Sessel...)
• Nehmen Sie Ihr Baby so oft wie möglich aus der Baby-
schale und entlasten Sie seine Wirbelsäule.
• Unterbrechen Sie dazu längere Autofahrten. Denken
Sie auch außerhalb des Autos daran, Ihr Baby nicht zu
lange in der Babyschale zu lassen.
HINWEIS! Bitte lassen Sie Ihr Kind nie unbeaufsichtigt im
Fahrzeug zurück.
SICHERHEIT FÜR IHR BABY

16
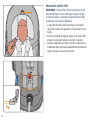
NOTE! Never leave your child in the car unattended.
NOTA BENE! Non lasciare MAI il bambino incustodito
nell’autovettura.
WARNING! Plastic parts of Aton 5 heat up in the
sun. Your baby may get burnt. Protect your baby and
WKHFDUVHDWIURPLQWHQVHH[SRVXUHWRWKHVXQHJ
putting a white blanket over the seat).
NOTE! Always secure the baby in the child seat and
never leave your child unattended when putting the Aton
RQHOHYDWHGVXUIDFHVHJGLDSHUFKDQJLQJ
table, table, bench ...).
• Take your baby out of the car seat as often as
possible in order to relax its spine.
• Interrupt longer journeys. Remember this as well, when
using the Aton 5 outside the car.
ATTENZIONE! Le parti in plastica del seggiolino
tendono a riscaldarsi se esposte al sole. Per evitare
il rischio di scottature al bambino, proteggerlo e
proteggere il seggiolino da un’eccessiva esposizione
DOVROHSHUHVHPSLRVWHQGHQGRXQWHORELDQFRVXO
seggiolino).
NOTA BENE! Allacciare sempre il bambino quando
all’interno del seggiolino e non lasciarlo mai per alcun
PRWLYRLQFXVWRGLWRTXDQGRO¶$WRQqSRVWRVXVXSHU¿FL
ULDO]DWHHVWDYRORSHULOFDPELRSDQFKLQDHFF
• Cercate di interrompere sedute troppo prolungate del
bambino nel seggiolino, sollevandolo quando possibile
per permettergli di rilassare la colonna vertebrale.
• Prevedere quindi soste durante il viaggi più lunghi. Ma
anche durante i tragitti non in automobile.
SAFETY FOR YOUR BABY SICUREZZA DEL BAMBINO
DEENIT
La pagina sta caricando ...

18
ATTENZIONE! 9HUL¿FDUHVHPSUHFKHOHVLQJROH
parti del seggiolino non siano mai bloccatie o
FRPSUHVVHDGHVHPSLRWUDODSRUWLHUDGHOOµDXWRR
durante la regolazione del sedile).
WARNING! Always ensure that the individual com-
ponents of the child seat are never compressed or
MDPPHGHJE\WKHFDUGRRURUZKLOHDGMXVWLQJWKH
back seat.)
WARNING! Never use the Aton 5 on a car seat
equipped with a front-airbag. This does not apply to
so-called side airbags.
WARNING! The child seat must always be secured
with the seat belt even if not in use. In case of an
emergency brake or accident, an unsecured child
seat may injure other passengers or yourself.
WARNING! Do not use any load bearing contact
points other than those described in the instructions
and marked in the child restraint.
In order to guarantee the best possible safety for all
passengers make sure that ...
• foldable backrests in the car are locked in their
upright position
• when installing the Aton 5 on the front passenger seat,
adjust the car seat in rearmost position
• you properly secure all objects likely to cause injury in
the case of an accident
• all passengers in the car are buckled up
ATTENZIONE! Non posizionare MAI l’Aton 5 sul sedile
anteriore passeggero in auto dotate di airbag. L’avvertenza
vale soltanto per airbag frontale, non per quelli laterali.
ATTENZIONE! Il seggiolino deve sempre essere
¿VVDWRFRQODFLQWXUDGLVLFXUH]]DGHOO¶DXWRDQFKH
quando non utilizzato. In caso di frenata brusca o di
LQFLGHQWHXQVHJJLROLQRQRQ¿VVDWRSRWUHEEHIHULUH
altri passeggeri o il guidatore.
ATTENZIONE! Non utilizzare punti di contatto portanti
diversi da quelli descritti nelle istruzioni e contrassegnati
sul sistema di ritenuta.
Per garantire la massima sicurezza di tutti i passeggeri
nell’auto è necessario …
• YHUL¿FDUHFKHWXWWLJOLVFKLHQDOLUHFOLQDELOLVLDQREHQ
¿VVDWLQHOODSRVL]LRQHHUHWWD
• nel caso l‘Aton 5 sia installato sul sedile passeggero anteri-
RUHYHUL¿FDUHFKHHVVRVLWURYLQHOODSRVL]LRQHSLDUUHWUDWD
• assicurare in modo appropriato tutti gli oggetti che potreb-
bero costituire pericolo di ferite in caso di incidente.
• che tutti i passeggeri nel veicolo abbiano le cinture allacciate.
SAFETY IN THE CAR SICUREZZA NELL’AUTO
DEENIT

19
WARNUNG! Der Sitz ist nicht für die Verwendung
mit einem 2-Punkt- oder Beckengurt geeignet. Bei
Sicherung mit einem 2-Punkt-Gurt kann es bei
einem Unfall zu schweren oder tödlichen Verlet-
zungen des Kindes kommen.
• Vergewissern Sie sich, dass der Tragebügel a in der
Fahrzeugpostion ALVWVLHKH6HLWH
• Stellen Sie die Babyschale entgegen der Fahrtrichtung
DXIGHQ)DKU]HXJVLW]'LH)HGHV.LQGHV]HLJHQLQ
Richtung Fahrzeugsitzlehne.)
• Der CYBEX Aton 5 ist auf allen Plätzen mit Dreipunkt-
Automatikgurt verwendbar. Wir empfehlen generell, den
Sitz hinten im Fahrzeug zu verwenden. Vorne ist Ihr
Kind bei einem Unfall in den meisten Fällen höheren
Gefahren ausgesetzt.
DER EINBAU INS FAHRZEUG
• Stellen Sie sicher, dass die Einbaumarkierung seitlich
am Warnaufkleber p des Sitzes parallel zum Fahrzeug-
boden steht.
• Ziehen Sie den Fahrzeuggurt heraus und führen Sie ihn
über die Babyschale.
• Rasten Sie die Schlosszunge im Fahrzeug-Gurtschloss
q ein.

20
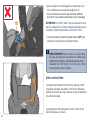
WARNING! The seat must not be used with a two-
point belt or a lap belt. When securing your child with
a two-point belt, this may result in injuries or death
of the child.
• Make sure that the carrying handle a is in the upper
position AVHHSDJH
• Place the seat against driving position on the car
VHDW7KHIHHWRIWKHEDE\SRLQWLQWKHGLUHFWLRQRIWKH
backrest of the car seat).
• CYBEX Aton 5 can be used on all seats with a
three-point automatic retractor belt. We generally
recommend to use the seat in the back of the
vehicle. In the front, your child is usually exposed to
higher risks in case of an accident.
INSTALLING THE SEAT
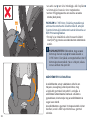
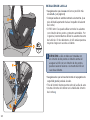
• Make sure that the horizontal marking on the safety
sticker pLVSDUDOOHOWRWKHÀRRU
• Pull the three-point belt over the child seat.
• Insert the belt tongue into the car belt buckle q.
ATTENZIONE! Il seggiolino NON può essere
utilizzato su sedili con cinture a due punti o soltanto
quella ventrale. Fissando il bambino con cinture a
due punti soltanto lo si espone a grave rischio di
ferite o di morte in caso di incidente.
• Assicurarsi che il manico per il trasporto a sia nella
posizione più rialzata A9HGLSDJ
• Collocare il seggiolino sul sedile in direzione opposta a
TXHOODGLPDUFLD,SLHGLGHOEDPELQRYHUVRORVFKLHQDOH
del sedile)
• CYBEX Aton 5 può essere utilizzato in tutti i sedili con
cinture di sicurezza automatiche a tre punti. General-
mente raccomandiamo di utilizzare il
seggiolino nei sedili posteriori dei veicoli. Se utilizzato
nel sedile anteriore, il bambino è generalmente
esposto a rischi maggiori in caso di incidente.
INSTALLAZIONE DEL SEGGIOLINO
• 9HUL¿FDUHFKHODPDUFDWXUDRUL]]RQWDOHVXOOµDGHVLYRGL
sicurezza p risulti parallela al pavimento.
• Tirare la cintura a tre punti e farla passare attorno al
seggiolino.
• ,QVHULUHLOJDQFLRGLFKLXVXUDQHOOD¿EELDq.
DEENIT

21
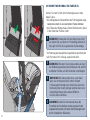
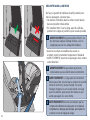
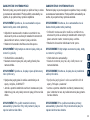
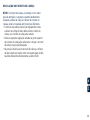
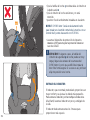
• Legen Sie den Beckengurt k in die blauen Gurtfüh-
rungen m an beiden Seiten des Babyschalen-Randes
ein.
• Straffen Sie den Beckengurt k, indem Sie am Dia-
gonalgurt l in Fahrtrichtung ziehen.
• Ziehen Sie den Diagonalgurt l hinter das Kopfende der
Babyschale.
• Führen Sie den Diagonalgurt l durch die hintere blaue
Gurtführung
n.
• Straffen Sie den Diagonalgurt l.
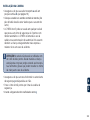
HINWEIS! Fahrzeuggurt dabei nicht verdrehen.
HINWEIS! Der Gurt muss durch die blaue Gurtführung
und unterhalb des ausgeklappten Seitenaufprallschutzes
geführt werden.

22
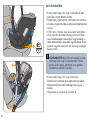
• Insert the lap belt k into the blue belt guides m on both
sides of the car seat.
• Pull the diagonal belt l in driving direction to tighten the
lap belt k.
• Pull the diagonal belt l behind the top end of the baby
seat.
• Bring the diagonal belt l into the blue belt slot n on the
back.
• Tighten the diagonal belt
l.
NOTE! Do not twist the car belt.
NOTE! The seat belt must run through the blue belt
routing and below the unfolded Linear Side-impact
Protection.
• Inserire la parte di cintura ventrale k nelle guide m su
ambo i lati del seggiolino.
• Tirare la parte diagonale della cintura
l per stringere la
parte ventrale k.
• Posizionare quindi la parte diagonale della cintura l
sull’estremità anteriore del seggiolino.
• Posizionare la cintura diagonale l nell’apposita
fessura
n di colore blu sul retro.
• Stringere la cintura diagonale l.
NOTA BENE! Non attorcigliare la cintura!
NOTA BENE! La cintura di sicurezza deve passare
all’interno degli appositi spazi blu e dietro alla protezione
LSP aperta
DEENIT
La pagina sta caricando ...

24
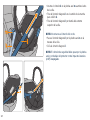
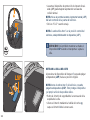
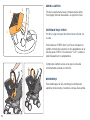
• Listen for an audible CLICK, when it locks
NOTE: When using the Aton 5 on a middle position in the
YHKLFOHLW¶VSURKLELWHGWRIROGRXWWKH/63GHYLFH
WARNING!8VLQJWKHLSP) device to carry or to
fasten the Aton 5 is prohibited.
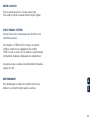
• Take the seat belt out of the blue belt slot n in the back.
• Open the car buckle q and take the lap belt k out of the
blue belt slots m.
Attenzione! E‘ Assolutamente vietato utilizzare il
sistema LSPSHULOWUDVSRUWRRSHULO¿VVDJJLRGL
Aton 5.
• Togliere la cintura dalla fessura n di colore blu sul retro.
• 6ODFFLDUHODFLQWXUDGDOOD¿EELDTHV¿ODUHODFLQWXUD
dagli alloggiamenti m di colore blu.
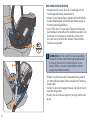
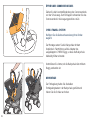
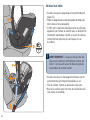
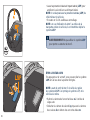
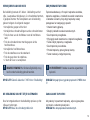
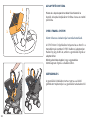
• /LIWXSWKHOLQHDUVLGHLPSDFWSURWHFWLRQ/63GHYLFHWR
improve side protection during a side collision.
• Sollevare il dispositivo
LSPSURWH]LRQHOLQHDUH
nell‘impatto laterale) per migliorare la protezione in caso
di incidente con collisione laterale.
• 9HUL¿FDUHFKHODSURWH]LRQHVLD¿VVDWDFRUUHWWDPHQWHLQ
posizione, dovrete sentire il CLICK.
NOTE:,WLVQRWDOORZHGWROLIWXSWKHVLGHSURWHFWRU/63
on the side turned away from the vehicle door.
NOTA BENE: è vietato sollevare la protezione LSP nel
lato interno, il più lontano dalla porta del veicolo.
NOTA BENE: Quando Aton 5 viene posizionato nella
parte centrale del sedile posteriore, non si deve rialzare il
sistema LSP.
REMOVING THE CAR SEAT TOGLIERE IL SEGGIOLINO
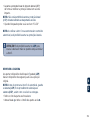
NOTE: Before removing the Aton 5 from the vehicle,
IROGWKHLSP) devices back into place. This protects the
LSP) device and the vehicle itself from damage.
NOTA BENE: Prima di togliere Aton 5 dal veicolo, ripiegare
i dispositivi LSP nella posizione originale. Questo protegge
sia il sistema LSP che la vettura da eventuali danni.
By pressing the locking device f, you can fold the device
LSP) downwards into the original position.
Premendo il pulsante di blocco f, è possibile chiudere il
GLVSRVLWLYRLSP) riponendolo in posizione originale
DEENIT
La pagina sta caricando ...

26
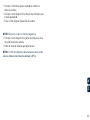
• that the Aton 5 is positioned against driving direc-
WLRQWKHIHHWRIWKHEDE\SRLQWLQWKHGLUHFWLRQRIWKH
backrest of the car seat)
• if the car seat is installed in front, that the front-
airbag is deactivated
• that Aton 5 is secured with a 3-point belt
• that the lap belt k is running through the belt slots m on
each side of the baby seat
• that the diagonal belt l is running through the blue belt
hook n on the back of the baby seat
• che il seggiolino Aton 5 sia sempre posizionato in
GLUH]LRQHFRQWUDULDDOVHQVRGLPDUFLD,SLHGLGHOEDPEL-
no devono trovarsi verso lo schienale del
sedile)
• che, nel caso il seggiolino CYBEX Aton 5 sia collocato
sul sedile anteriore, l’airbag frontale sia disattivato
• FKHLOVHJJLROLQR$WRQVLD¿VVDWRFRQFLQWXUHGL
sicurezza a tre punti
• che la parte di cintura ventrale k scorra
correttamente attraverso le apposite guide m su ambo i
lati del seggiolino
• che la parte di cintura diagonale l scorra attraverso
LOJDQFLRGL¿VVDJJLRn di colore blu sul retro del
seggiolino
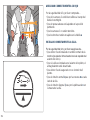
SECURING YOUR CHILD CORRECTLY FISSARE CORRETTAMENTE IL BAMBINO
INSTALLING THE BABY SEAT CORRECTLY
INSTALLARE CORRETTAMENTE IL SEGGIOLINO
For the safety of your child please check … Per la massima sicurezza del bambino raccomandiamo
GLYHUL¿FDUH«
For the safety of your child please make sure …
3HUODVLFXUH]]DGHOEDPELQRqQHFHVVDULRYHUL¿FDUH«
• LIWKHVKRXOGHUEHOWVF¿WZHOOWRWKHERG\ZLWKRXW
restricting the baby
• that the headrest is adjusted to the correct height
• if the shoulder belts c are not twisted
• if the buckle tongues t are fastened in the buckle e
• che le cinture di sicurezza per le spalle c siano ben
aderenti al suo corpo, senza stringerlo eccessivamente
• che il poggiatesta sia sempre regolato all’altezza giusta
• che le cinghie non siano in alcun modo attorcigliate
• FKHJOLDJJDQFLGHOOHFLQWXUHWVLDQREHQ¿VVDWL
DOO¶LQWHUQRGHOOD¿EELD
e
DEENIT
La pagina sta caricando ...

28
• that the car buckle q is not reaching all the way to the
blue belt slot m
• that the car belt is tight and not twisted
• WKDWWKH$WRQLVYHUWLFDOO\LQVWDOOHGRQWKHFDUVHDWVHH
marking)
• FKHLOSXQWRGL¿VVDJJLRGHOODFLQWXUDGHOO¶DXWRq non
raggiunga l’altezza delle guide m del seggiolino
• che la cintura dell’auto sia ben tesa e non attorcigliata
• che l’Aton 5 sia installato in posizione verticale sul
VHGLOHGHOO¶DXWRYHGLFRQWUDVVHJQR
DEENIT
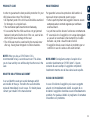
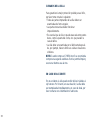
REMOVING THE INSERT TOGLIERE IL RIDUTTORE
The insert, which is preinstalled when purchased, helps
WRVXSSRUWO\LQJFRPIRUWDQG¿WIRUWKHVPDOOHVWEDELHV
In order to remove the insert please loosen the cover in
the baby seat, lift the insert a little bit and take it out of
the seat.
Il riduttore, preinstallato all’acquisto, fornisce maggiore
supporto e comfort ai bambini più piccoli. Per toglierlo
basta allentare il rivestimento del seggiolino e sollevare
delicatamente il riduttore.
The insert may be removed after approx. 3 months to
provide more space.
Il riduttore potrà essere rimosso quando il bambino ha
circa 3 mesi per concedergli maggiore spazio.
WARNING! In some cases the buckle q of the car
safety belt may be too long and reach into the belt
VORWVRIWKH&<%(;$WRQPDNLQJLWGLI¿FXOWWR
install the Aton 5 securely. If this is the case please
choose another position in the car.
ATTENZIONE!,QDOFXQLFDVLLOSXQWRGL¿VVDJJLR
della cintura q si trova in posizione più rialzata, arri-
vando all’altezza delle guide per la cintura dell’Aton
5. Ciò compromette un’installazione corretta del seg-
giolino. In questo caso raccomandiamo di scegliere
un’altra posizione per l’installazione del seggiolino.
La pagina sta caricando ...
La pagina sta caricando ...
La pagina sta caricando ...
La pagina sta caricando ...
La pagina sta caricando ...
La pagina sta caricando ...
La pagina sta caricando ...
La pagina sta caricando ...
La pagina sta caricando ...
La pagina sta caricando ...
La pagina sta caricando ...
La pagina sta caricando ...
La pagina sta caricando ...
La pagina sta caricando ...
La pagina sta caricando ...
La pagina sta caricando ...
La pagina sta caricando ...
La pagina sta caricando ...
La pagina sta caricando ...
La pagina sta caricando ...
La pagina sta caricando ...
La pagina sta caricando ...
La pagina sta caricando ...
La pagina sta caricando ...
La pagina sta caricando ...
La pagina sta caricando ...
La pagina sta caricando ...
La pagina sta caricando ...
La pagina sta caricando ...
La pagina sta caricando ...
La pagina sta caricando ...
La pagina sta caricando ...
La pagina sta caricando ...
La pagina sta caricando ...
La pagina sta caricando ...
La pagina sta caricando ...
La pagina sta caricando ...
La pagina sta caricando ...
La pagina sta caricando ...
La pagina sta caricando ...
La pagina sta caricando ...
La pagina sta caricando ...
La pagina sta caricando ...
La pagina sta caricando ...
La pagina sta caricando ...
La pagina sta caricando ...
La pagina sta caricando ...
La pagina sta caricando ...
La pagina sta caricando ...
La pagina sta caricando ...
La pagina sta caricando ...
La pagina sta caricando ...
La pagina sta caricando ...
La pagina sta caricando ...
La pagina sta caricando ...
La pagina sta caricando ...
La pagina sta caricando ...
La pagina sta caricando ...
La pagina sta caricando ...
La pagina sta caricando ...
La pagina sta caricando ...
La pagina sta caricando ...
La pagina sta caricando ...
La pagina sta caricando ...
La pagina sta caricando ...
La pagina sta caricando ...
La pagina sta caricando ...
La pagina sta caricando ...
La pagina sta caricando ...
La pagina sta caricando ...
La pagina sta caricando ...
La pagina sta caricando ...
La pagina sta caricando ...
La pagina sta caricando ...
La pagina sta caricando ...
La pagina sta caricando ...
La pagina sta caricando ...
La pagina sta caricando ...
La pagina sta caricando ...
La pagina sta caricando ...
La pagina sta caricando ...
La pagina sta caricando ...
La pagina sta caricando ...
La pagina sta caricando ...
La pagina sta caricando ...
La pagina sta caricando ...
La pagina sta caricando ...
La pagina sta caricando ...
La pagina sta caricando ...
La pagina sta caricando ...
La pagina sta caricando ...
La pagina sta caricando ...
La pagina sta caricando ...
La pagina sta caricando ...
La pagina sta caricando ...
La pagina sta caricando ...
La pagina sta caricando ...
La pagina sta caricando ...
La pagina sta caricando ...
La pagina sta caricando ...
La pagina sta caricando ...
La pagina sta caricando ...
La pagina sta caricando ...
La pagina sta caricando ...
La pagina sta caricando ...
La pagina sta caricando ...
La pagina sta caricando ...
La pagina sta caricando ...
La pagina sta caricando ...
La pagina sta caricando ...
La pagina sta caricando ...
La pagina sta caricando ...
La pagina sta caricando ...
La pagina sta caricando ...
La pagina sta caricando ...
La pagina sta caricando ...
La pagina sta caricando ...
La pagina sta caricando ...
La pagina sta caricando ...
La pagina sta caricando ...
La pagina sta caricando ...
La pagina sta caricando ...
La pagina sta caricando ...
La pagina sta caricando ...
La pagina sta caricando ...
La pagina sta caricando ...
La pagina sta caricando ...
La pagina sta caricando ...
La pagina sta caricando ...
La pagina sta caricando ...
La pagina sta caricando ...
La pagina sta caricando ...
La pagina sta caricando ...
La pagina sta caricando ...
La pagina sta caricando ...
La pagina sta caricando ...
La pagina sta caricando ...
La pagina sta caricando ...
La pagina sta caricando ...
La pagina sta caricando ...
La pagina sta caricando ...
La pagina sta caricando ...
La pagina sta caricando ...
-
 1
1
-
 2
2
-
 3
3
-
 4
4
-
 5
5
-
 6
6
-
 7
7
-
 8
8
-
 9
9
-
 10
10
-
 11
11
-
 12
12
-
 13
13
-
 14
14
-
 15
15
-
 16
16
-
 17
17
-
 18
18
-
 19
19
-
 20
20
-
 21
21
-
 22
22
-
 23
23
-
 24
24
-
 25
25
-
 26
26
-
 27
27
-
 28
28
-
 29
29
-
 30
30
-
 31
31
-
 32
32
-
 33
33
-
 34
34
-
 35
35
-
 36
36
-
 37
37
-
 38
38
-
 39
39
-
 40
40
-
 41
41
-
 42
42
-
 43
43
-
 44
44
-
 45
45
-
 46
46
-
 47
47
-
 48
48
-
 49
49
-
 50
50
-
 51
51
-
 52
52
-
 53
53
-
 54
54
-
 55
55
-
 56
56
-
 57
57
-
 58
58
-
 59
59
-
 60
60
-
 61
61
-
 62
62
-
 63
63
-
 64
64
-
 65
65
-
 66
66
-
 67
67
-
 68
68
-
 69
69
-
 70
70
-
 71
71
-
 72
72
-
 73
73
-
 74
74
-
 75
75
-
 76
76
-
 77
77
-
 78
78
-
 79
79
-
 80
80
-
 81
81
-
 82
82
-
 83
83
-
 84
84
-
 85
85
-
 86
86
-
 87
87
-
 88
88
-
 89
89
-
 90
90
-
 91
91
-
 92
92
-
 93
93
-
 94
94
-
 95
95
-
 96
96
-
 97
97
-
 98
98
-
 99
99
-
 100
100
-
 101
101
-
 102
102
-
 103
103
-
 104
104
-
 105
105
-
 106
106
-
 107
107
-
 108
108
-
 109
109
-
 110
110
-
 111
111
-
 112
112
-
 113
113
-
 114
114
-
 115
115
-
 116
116
-
 117
117
-
 118
118
-
 119
119
-
 120
120
-
 121
121
-
 122
122
-
 123
123
-
 124
124
-
 125
125
-
 126
126
-
 127
127
-
 128
128
-
 129
129
-
 130
130
-
 131
131
-
 132
132
-
 133
133
-
 134
134
-
 135
135
-
 136
136
-
 137
137
-
 138
138
-
 139
139
-
 140
140
-
 141
141
-
 142
142
-
 143
143
-
 144
144
-
 145
145
-
 146
146
-
 147
147
-
 148
148
-
 149
149
-
 150
150
-
 151
151
-
 152
152
-
 153
153
-
 154
154
-
 155
155
-
 156
156
-
 157
157
-
 158
158
-
 159
159
-
 160
160
-
 161
161
-
 162
162
-
 163
163
-
 164
164
-
 165
165
-
 166
166
-
 167
167
-
 168
168
-
 169
169
-
 170
170
-
 171
171
-
 172
172


CYBEX ATON 5 Manuale utente
- Categoria
- Sedili dell'auto
- Tipo
- Manuale utente
in altre lingue
- English: CYBEX ATON 5 User manual
- français: CYBEX ATON 5 Manuel utilisateur
- español: CYBEX ATON 5 Manual de usuario
- Deutsch: CYBEX ATON 5 Benutzerhandbuch
- Nederlands: CYBEX ATON 5 Handleiding
- português: CYBEX ATON 5 Manual do usuário
Documenti correlati
-
CYBEX ATON Manuale utente
-
CYBEX Aton 3S Guida utente
-
-
CYBEX ATON Q i-SIZE Manuale utente
-
-
-
-
-
-
mothercare ATON BASE 2 Manuale utente
Altri documenti
-
 Stell SHO 7500 Manuale utente
-
Stell SHO 4610 Manuale utente
-
Stell SHO 4620 Manuale utente
-
Stell SHO 5610 Manuale utente
-
Stell SHO 4510 Manuale utente
-
 Medisafe MediSafe Cocomoon Manuale utente
-
Stell SHO 7510 Manuale utente
-
Stell SHO 4500 Manuale utente
-
 Stell SHO 4530 Manuale utente
-
Mamas & Papas CYBEX ATON ADAPTORS Manuale del proprietario


