CYBEX ATON Manuale del proprietario
- Categoria
- Sedili dell'auto
- Tipo
- Manuale del proprietario
Questo manuale è adatto anche per
La pagina sta caricando ...
La pagina sta caricando ...
La pagina sta caricando ...
La pagina sta caricando ...

3
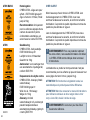
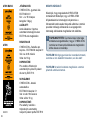
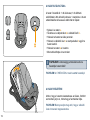
ZULASSUNG
CYBEX ATON – Babyschale
ECE R44/04 Gruppe 0+
Gewicht: 0 bis 13 kg
Alter: Bis ca. 18 Monate
EMPFOHLEN:
Für Fahrzeuge mit Dreipunkt-
Automatik-Gurt nach ECE R16
APPROVAL
CYBEX ATON – baby car seat
ECE R44/04 group 0+
Age: To approximately 18 months
Weight: Up to 13 kg
RECOMMENDED FOR:
For vehicle seats with three-point
automatic retractor belt according
to ECE R16
OMOLOGAZIONE
CYBEX ATON – seggiolino di
sicurezza per auto
Gruppo 0+ ECE R44/04
Età: a 18 mesi circa,
RACCOMANDATO PER:
Autoveicoli con sedili dotati di
sistema di cinturedi sicurezza
automatiche a tre punti secondo
la norma ECE R16
06/2013
Vielen Dank, dass Sie sich entschieden haben, den
CYBEX ATON zu erwerben. Wir versichern Ihnen, dass
bei der Entwicklung des CYBEX ATON Sicherheit,
Komfort und Bedienungsfreundlichkeit im Vordergrund
gestanden haben. Das Produkt wird unter besonderer
Qualitätsüberwachung hergestellt und erfüllt strengste
Sicherheitsanforderungen.
WARNUNG! Damit Ihr Kind richtig geschützt
werden kann, ist es unbedingt notwendig, den
CYBEX ATON so zu verwenden, wie es in dieser
Anleitung beschrieben wird.
!
HINWEIS! Bewahren Sie diese Anleitung immer
griffbereit im dafür vorgesehenen Fach unten an der
Babyschale auf.
HINWEIS!
können Produktmerkmale abweichen.
SEHR GEEHRTE KUNDIN, SEHR GEEHRTER KUNDE!
ATON
ATON BASIC

4
DEUKIT
Thank you very much for purchasing the CYBEX ATON.
We assure you that in the development process of the
CYBEX ATON we focused on safety, comfort and user
friendliness. The product is manufactured under special
quality surveillance and complies with the strictest safety
requirements.
Ci congratuliamo con Lei per avere acquistato CYBEX
ATON. Le assicuriamo che nel progettare CYBEX ATON i
nostri principali obiettivi sono stati la sicurezza, il comfort
e la facilità di utilizzo. Il prodotto è stato elaborato sotto
uno stretto controllo qualitativo e risponde ai più severi
standard di sicurezza.
WARNING! For proper protection of your child, it
is essential to use and install the CYBEX ATON
according to the instructions given in this manual.
!
ATTENZIONE! Per garantire un’adeguata sicureza
del Vostro bambino è molto importante che l’uso
e l’installazione di CYBEX ATON siano effettuati
seguendo scrupolosamente le istruzioni fornite in
questo manuale.
!
NOTE! According to local codes the product
characteristic can be different.
NOTE! Please always have the instruction manual at
hand and store it in the dedicated slot under the seat.
NOTA BENE! Raccomandiamo di tenere il manuale
d’istruzioni sempre a portata di mano e di conservarlo
nell’apposito alloggiamento sotto il seggiolino.
NOTA BENE! In base alle normative locali alcune
caratteristiche del prodotto potrebbero differire.
DEAR CUSTOMER GENTILE CLIENTE
La pagina sta caricando ...

6
DEUKIT
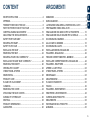
SHORT INSTRUCTION ..............................................................2
APPROVAL ................................................................................ 3
THE BEST POSITION IN THE CAR ........................................... 8
FOR THE PROTECTION OF YOUR CAR ................................. 8
CARRYING HANDLE ADJUSTMENT ...................................... 10
ADJUSTING THE SHOULDER BELTS .....................................12
SAFETY FOR YOUR BABY ......................................................14
SECURING THE BABY ............................................................ 16
SAFETY IN THE CAR .............................................................. 18
INSTALLING THE SEAT .......................................................... 20
REMOVING THE SEAT ............................................................22
SECURING YOUR CHILD CORRECTLY .................................24
INSTALLING THE BABY SEAT CORRECTLY ..........................24
REMOVING THE INSERT ....................................................... 26
OPENING THE CANOPY ........................................................ 28
CYBEX TRAVEL-SYSTEM ...................................................... 28
DEMOUNTING ......................................................................... 28
PRODUCT CARE .................................................................... 30
IN CASE OF AN ACCIDENT .................................................... 30
CLEANING ................................................................................32
REMOVING THE COVER .........................................................34
ATTACHING THE SEAT COVERS ............................................34
DURABILITY OF PRODUCT ................................................... 36
DISPOSAL ............................................................................... 38
PRODUCT INFORMATION ...................................................... 38
GUARANTEE ........................................................................... 40
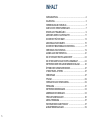
SOMMARIO ................................................................................2
OMOLOGAZIONE ...................................................................... 3
LA POSIZIONE MIGLIORE ALL’INTERNO DELL’AUTO ........... 8
PROTEGGERE I SEDILI DELL’AUTO ....................................... 8
REGOLAZIONE DEL MANICO PER IL TRASPORTO ............ 10
REGOLAZIONE DELLE CINGHIE PER LE SPALLE ................12
SICUREZZA DEL BAMBINO .....................................................14
ALLACCIARE IL BAMBINO ...................................................... 16
SICUREZZA NELL’AUTO ......................................................... 18
INSTALLAZIONE DEL SEGGIOLINO ...................................... 20
TOGLIERE IL SEGGIOLINO .....................................................22
FISSARE CORRETTAMENTE IL BAMBINO ............................24
INSTALLARE CORRETTAMENTE IL SEGGIOLINO ................24
TOGLIERE IL RIDUTTORE ...................................................... 26
APRIRE LA CAPOTTINA ......................................................... 28
CYBEX TRAVEL-SYSTEM ...................................................... 28
SMONTAGGIO ......................................................................... 28
MANUTENZIONE .................................................................... 30
IN CASO DI INCIDENTE ......................................................... 30
PULIZIA .....................................................................................32
TOGLIERE IL RIVESTIMENTO .................................................34
RIMETTERE IL RIVESTIMENTO ..............................................34
DUREVOLEZZA PRODOTTO ................................................. 36
SMALTIMENTO ........................................................................ 38
INFORMAZIONI SUL PRODOTTO .......................................... 38
GARANZIA ............................................................................... 40
CONTENT ARGOMENTI
La pagina sta caricando ...

8
DEUKIT
FOR THE PROTECTION OF YOUR CAR PER LA SALVAGUARDIA DELL’AUTO
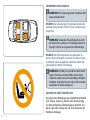
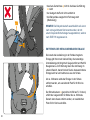
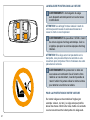
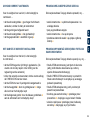
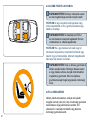
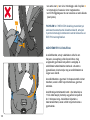
WARNING! Approval of the seat expires immediately
WARNING! Do not use the ATON in front seats
equipped with activated front-airbag. This does not
apply to so-called side-airbags.
WARNING! Never hold a baby on your lap while
driving. Due to the enormous forces released in an
accident, it will be impossible to hold onto the baby.
Never use the same seat belt to secure yourself and
the child.
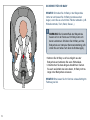
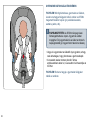
THE BEST POSITION IN THE CAR
NOTE! High volume front-airbags expand explosively.
This can result in the death or injury of the child.
NOTE! If the baby seat is not stable or sits too steeply in
the car, you can use a blanket or a towel to compensate.
Alternatively, you should choose another place in the car.
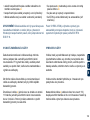
On some car seat covers which are made of a sensitive
material (e.g. velour, leather etc.) the use of child seats
may lead to traces of wear and tear. In order to avoid this,
you should put a blanket or a towel underneath the child
seat.
ATTENZIONE! La validità del prodotto decade
manomissioni!
ATTENZIONE! Non utilizzare CYBEX ATON
sui sedili anteriori di veicoli dotati di airbag non
disinseribile. L‘avvertimento non riguarda i cosiddetti
airbag-laterali.
ATTENZIONE! Non tenere mai in braccio il bambino
se alla guida. A causa delle notevoli forze in caso di
impatto, sarebbe impossibile riuscire a proteggerlo.
Non utilizzare mai la stessa cintura di sicurezza per
allacciare il vostro corpo e quello del bambino.
LA POSIZIONE MIGLIORE ALL’INTERNO DELL’AUTO
NOTA BENE! Gli airbag anteriori hanno apertura
automatica esplosiva e possono provocare gravi ferite o
la morte del bambino.
NOTA BENE! Se il seggiolino è in una posizione instabile
o troppo rialzata consigliamo di utilizzare un telo o un
asciugamano per compensare. Oppure, di scegliere
un‘altra collocazione nell’auto.
I sedili con rivestimenti particolarmente delicati (velluto,
pelle, ecc) potrebbero essere danneggiati dall’uso dei
seggiolini di sicurezza per auto. Per prevenire eventuali
segni di usura consigliamo di usare un telo sotto al
seggiolino per proteggere il sedile.
La pagina sta caricando ...

10
DEUKIT
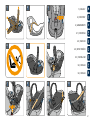
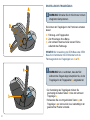
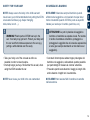
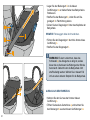
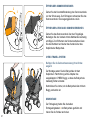
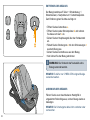
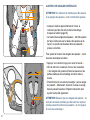
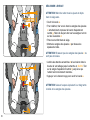
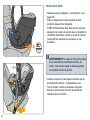
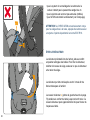
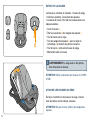
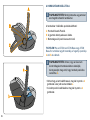
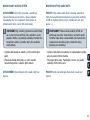
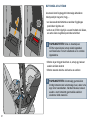
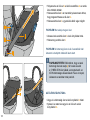
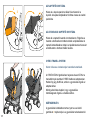
CARRYING HANDLE ADJUSTMENT REGOLAZIONE DEL MANICO PER IL TRASPORTO
WARNING! Always secure the baby with the
integrated harness system.
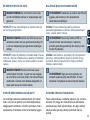
The carrying handle can be adjusted into three different
positions:
A: Carrying/Driving-Position.
B: For placing the baby in the seat.
C: Safe sitting position outside the car.
ATTENZIONE! Allacciare sempre il bambino con il
sistema di cinture integrato.
Il manico per il trasporto può essere regolato in tre
diverse posizioni:
A: Posizione di trasporto/di viaggio
B: Posizione per l‘inserimento del bambino nel seggiolino
C: Posizione di seduta in sicurezza al di fuori dell’auto.
WARNING! In order to avoid unwanted tilting of the
seat whilst carrying, make sure that the handle is
locked in the carrying position A.
In order to adjust the handle press buttons b on left and
right side on the handle a.
Adjust the carrying handle a to the desired position by
pressing the buttons b.
NOTE! When using ATON in combination with ATON
changes from A to B.
ATTENZIONE! Per evitare il rischio di
capovolgimento durante il trasporto, assicuratevi
trasporto A.
Per regolare la posizione del manico premere i
pulsanti b su ambo i lati del manico a.
Regolare il manico a per il trasporto nella posizione
desiderata premendo i pulsanti b.
NOTA BENE! Quando ATON viene utilizzato in
combinazione con la BASE, ATON Base oppure ATON
A a B.
La pagina sta caricando ...

12
DEUKIT
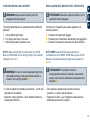
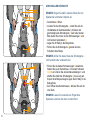
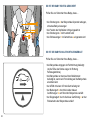
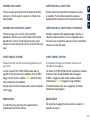
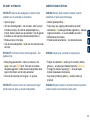
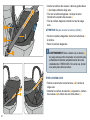
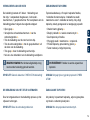
ADJUSTING THE SHOULDER BELTS REGOLAZIONE DELLE CINGHIE PER LE SPALLE
Al raggiungimento dei tre mesi circa del bambino, il
riduttore potrà essere rimosso per garantire più spazio
(vedi pagg. 26).
L’altezza delle cinghie per le spalle c dovrà essere
regolata in modo che esse scorrano attraverso le
fessure s direttamente al di sopra delle spalle del
bambino.
e.
d facendoli scorrere
sugli agganci t.
t attraverso il rivestimento e quindi
attraverso la fessura s. Reinserirlo quindi attraverso la
fessura superiore. Ripetere l’operazione da ambo i lati.
NOTE! Only if the shoulder belts c are adjusted correctly
optimum security can be provided.
NOTA BENE! La sicurezza ottimale si ottiene soltanto se
le cinghie per le spalle c sono regolate in modo corretto.
NOTA BENE!
c siano perfettamente piatte contro il sedile e non
attorcigliate, che scorrano uniformemente attraverso le
apposite fessure se.
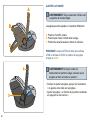
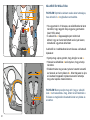
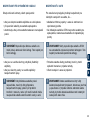
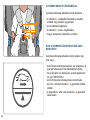
When the baby is approximately 3 months the seat
insert can be removed to provide enough space for the
child (see page 26).
The height of the shoulder belts c must be adjusted in
such a way that they run through the belt slots s directly
above the baby‘s shoulders.
Press the red button to open the buckle e.
Pull the shoulder pads d over the belt tongues t to
remove them.
First pull one buckle tongue t through the cover and out
of the belt slot s. Now insert it again through the next
higher slot. Repeat this step to the adjust the other side
as well.
NOTE! Please make sure that the shoulder belts c are
evenly through the belt slots s and down to the buckle e.
To adjust the height of the shoulder belts c please follow
the next steps:
Per regolare l’altezza delle cinghie per le spalle c seguite
il procedimento di seguito descritto:
La pagina sta caricando ...

14
DEUKIT
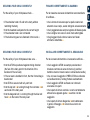
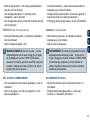
SAFETY FOR YOUR BABY SICUREZZA DEL BAMBINO
NOTE! Never leave your child in the car unattended. NOTA BENE! Non lasciare MAI il bambino incustodito
nell’autovettura.
NOTE! Always secure the baby in the child seat and
never leave your child unattended when putting the ATON
on elevated surfaces (e.g. diaper changing
table, table, bench ...).
Take your baby out of the car seat as often as
possible in order to relax its spine.
Interrupt longer journeys. Remember this as well, when
using the ATON outside the car.
NOTA BENE! Allacciare sempre il bambino quando
all’interno del seggiolino e non lasciarlo mai per alcun
rialzate (es. tavolo per il cambio, panchina, ecc).
Cercate di interrompere sedute troppo prolungate del
bambino nel seggiolino, sollevandolo quando possibile
per permettergli di rilassare la colonna vertebrale.
Prevedere quindi soste durante il viaggi più lunghi. Ma
anche durante i tragitti non in automobile.
WARNING! Plastic parts of ATON heat up in the
sun. Your baby may get burnt. Protect your baby and
the car seat from intense exposure to the sun (e.g.
putting a white blanket over the seat).
ATTENZIONE! Le parti in plastica del seggiolino
tendono a riscaldarsi se esposte al sole. Per evitare
il rischio di scottature al bambino, proteggerlo e
proteggere il seggiolino da un’eccessiva esposizione
al sole (per esempio stendendo un telo bianco sul
seggiolino).
La pagina sta caricando ...

16
DEUKIT
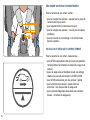
NOTE! Please remove all toys and other hard objects
from the car seat.
NOTA BENE! Rimuovere dal sedile eventuali giocattoli e
qualsiasi oggetto rigido.
NOTES! Make sure that the shoulder belts c are not
twisted.
NOTA BENE! Controllare bene che le cinghie c non siano
mai attorcigliate!
NOTE!
the baby and the shoulder belts.
NOTA BENE! Tra le spalle del bambino e le cinghie lo
spazio massimo è quello di un dito.
Open the buckle e.
To loosen pull up the shoulder belts c while pushing the
central adjuster button g and pulling the shoulder belts
c up. Please always pull the belt tongues t and not the
belt pads d.
Place your baby into the seat.
Put the shoulder belts c straight over the baby‘s
shoulders.
e.
Per allentare le cinture c, tirarle mantenendo premuto
il pulsante di regolazione centrale g. Tirare sempre gli
agganci t e non i cuscinetti d.
Adagiare il bambino nel seggiolino.
Posizionare le cinghie c sulle sue spalle.
Join the buckle tongue sections t together and insert
them into the buckle e with an audible CLICK. Pull the
central adjuster belt h
baby‘s body snugly.
Push the red button to open the buckle e.
Avvicinare i due agganci te
CLICK! Tirare la cinghia di regolazione
centrale h
bene aderenti al corpo del bambino.
e.
SECURING THE BABY ALLACCIARE IL BAMBINO
La pagina sta caricando ...

18
DEUKIT
WARNING! Never use the ATON on a car seat
equipped with a front-airbag. This does not apply to
so-called side airbags.
WARNING! The child seat must always be secured
with the seat belt even if not in use. In case of an
emergency brake or accident, an unsecured child
seat may injure other passengers or yourself.
In order to guarantee the best possible safety for all
passengers make sure that ...
foldable backrests in the car are locked in their upright
position
when installing the ATON on the front passenger seat,
adjust the car seat in rearmost position
you properly secure all objects likely to cause injury in
the case of an accident
all passengers in the car are buckled up
ATTENZIONE! Non posizionare MAI l’ATON sul
sedile anteriore passeggero in auto dotate di airbag.
L’avvertenza vale soltanto per airbag frontale, non
per quelli laterali.
ATTENZIONE! Il seggiolino deve sempre essere
quando non utilizzato. In caso di frenata brusca o di
altri passeggeri o il guidatore.
Per garantire la massima sicurezza di tutti i passeggeri
nell’auto è necessario …
nel caso l‘ATON sia installato sul sedile passeggero
arretrata
assicurare in modo appropriato tutti gli oggetti che
potrebbero costituire pericolo di ferite in caso di
incidente.
che tutti i passeggeri nel veicolo abbiano le cinture
allacciate.
SAFETY IN THE CAR SICUREZZA NELL’AUTO
La pagina sta caricando ...

20
DEUKIT
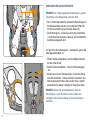
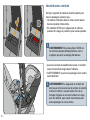
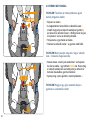
INSTALLING THE SEAT INSTALLAZIONE DEL SEGGIOLINO
WARNING! The seat must not be used with a two-
point belt or a lap belt. When securing your child
with a two-point belt, this may result in injuries or
death of the child.
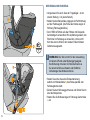
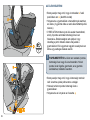
Make sure that the carrying handle a is in the upper
position A (see page 10).
Place the seat against driving position on the car
seat. (The feet of the baby point in the direction of the
backrest of the car seat).
CYBEX ATON can be used on all seats with a three-
point automatic retractor belt. We generally recommend
to use the seat in the back of the vehicle. In the front,
your child is usually exposed to higher risks in case of
an accident.
Make sure that the horizontal marking on the safety
sticker p
Pull the three-point belt over the child seat.
Insert the belt tongue into the car belt buckle q.
ATTENZIONE! Il seggiolino NON può essere
utilizzato su sedili con cinture a due punti o soltanto
quella ventrale. Fissando il bambino con cinture a
due punti soltanto lo si espone a grave rischio di
ferite o di morte in caso di incidente.
Assicurarsi che il manico per il trasporto a sia nella
posizione più rialzata A (Vedi pag. 10).
Collocare il seggiolino sul sedile in direzione opposta a
quella di marcia. (I piedi del bambino verso lo schienale
del sedile)
CYBEX ATON può essere utilizzato in tutti i sedili
con cinture di sicurezza automatiche a tre punti.
Generalmente raccomandiamo di utilizzare il seggiolino
nei sedili posteriori dei veicoli. Se utilizzato nel sedile
anteriore, il bambino è generalmente esposto a rischi
maggiori in caso di incidente.
sicurezza p risulti parallela al pavimento.
Tirare la cintura a tre punti e farla passare attorno al
seggiolino.
q.
La pagina sta caricando ...

22
DEUKIT
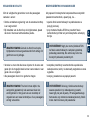
WARNING! In some cases the buckle q of the car
safety belt may be too long and reach into the belt
the ATON securely. If this is the case please choose
another position in the car.
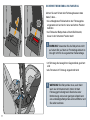
Insert the lap belt k into the blue belt guides m on both
sides of the car seat.
Pull the diagonal belt l in driving direction to tighten the
lap belt k.
Pull the diagonal belt l behind the top end of the baby
seat.
Bring the diagonal belt l into the blue belt slot n on the
back.
Tighten the diagonal belt l.
NOTE! Do not twist the car belt.
ATTENZIONE!
della cintura q si trova in posizione più rialzata,
arrivando all’altezza delle guide per la cintura
dell’ATON. Ciò compromette un’installazione
corretta del seggiolino. In questo caso
raccomandiamo di scegliere un’altra posizione per
l’installazione del seggiolino.
Inserire la parte di cintura ventrale k nelle guide m su
ambo i lati del seggiolino.
Tirare la parte diagonale della cintura l per stringere la
parte ventrale k.
Posizionare quindi la parte diagonale della cintura l
sull’estremità anteriore del seggiolino.
Posizionare la cintura diagonale l nell’apposita fessura
n di colore blu sul retro.
Stringere la cintura diagonale l.
NOTA BENE! Non attorcigliare la cintura!
Take the seat belt out of the blue belt slot n in the back.
Open the car buckle q and take the lap belt k out of the
blue belt slots m.
Togliere la cintura dalla fessura n di colore blu sul retro.
dagli alloggiamenti m di colore blu.
REMOVING THE CAR SEAT
TOGLIERE IL SEGGIOLINO
La pagina sta caricando ...

24
DEUKIT
SECURING YOUR CHILD CORRECTLY FISSARE CORRETTAMENTE IL BAMBINO
SECURING YOUR CHILD CORRECTLY INSTALLARE CORRETTAMENTE IL SEGGIOLINO
that the ATON is positioned against driving direction
(the feet of the baby point in the direction of the
backrest of the car seat)
if the car seat is installed in front, that the front airbag is
deactivated
that ATON is secured with a 3-point belt
that the lap belt k is running through the belt slots m on
each side of the baby seat
that the diagonal belt l is running through the blue belt
hook n on the back of the baby seat
For the safety of your child please make sure …
che il seggiolino ATON sia sempre posizionato in
direzione contraria al senso di marcia (I piedi del
bambino devono trovarsi verso lo schienale del sedile)
che, nel caso il seggiolino CYBEX ATON sia collocato
sul sedile anteriore, l’airbag frontale sia disattivato
sicurezza a tre punti
che la parte di cintura ventrale k scorra correttamente
attraverso le apposite guide m su ambo i lati del
seggiolino
che la parte di cintura diagonale l scorra attraverso
n di colore blu sul retro del
seggiolino
For the safety of your child please check … Per la massima sicurezza del bambino raccomandiamo
restricting the baby
that the headrest is adjusted to the correct height
if the shoulder belts c are not twisted
if the buckle tongues t are fastened in the buckle e
che le cinture di sicurezza per le spalle c siano ben
aderenti al suo corpo, senza stringerlo eccessivamente
che il poggiatesta sia sempre regolato all’altezza giusta
che le cinghie non siano in alcun modo attorcigliate
e
La pagina sta caricando ...

26
DEUKIT
that the car buckle q is not reaching all the way to the
blue belt slot m
that the car belt is tight and not twisted
that the ATON is vertically installed on the car seat (see
marking)
q non
raggiunga l’altezza delle guide m del seggiolino
che la cintura dell’auto sia ben tesa e non attorcigliata
che l’ATON sia installato in posizione verticale sul sedile
dell’auto (vedi contrassegno)
NOTE! The CYBEX ATON is exclusively made for forward
facing car seats, which are equipped with a 3-point belt
system according to ECE R16.
NOTA BENE! CYBEX ATON è adatto esclusivamente a
sedili rivolti in direzione del senso di marcia, equipaggiati
con sistemi di cinture di sicurezza a tre punti secondo le
norme ECE R16.
REMOVING THE INSERT TOGLIERE IL RIDUTTORE
The insert, which is preinstalled when purchased, helps
In order to remove the insert please loosen the cover in
the baby seat, lift the insert a little bit and take it out of
the seat.
Il riduttore, preinstallato all’acquisto, fornisce maggiore
supporto e comfort ai bambini più piccoli. Per toglierlo
basta allentare il rivestimento del seggiolino e sollevare
delicatamente il riduttore.
The insert may be removed after approx. 3 months to
provide more space.
Il riduttore potrà essere rimosso quando il bambino ha
circa 3 mesi per concedergli maggiore spazio.
The adjustable insert x (left picture top of page 33)
enhances the comfort of the child up to approx.
9 months. Later the insert can be removed to give the
child additional space.
L‘inserto regolabile x (immagine in alto a pag. 33) rende
In seguito l‘inserto potrà essere rimosso per aumentare lo
spazio al bambino più grande.
La pagina sta caricando ...

28
DEUKIT
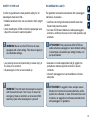
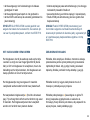
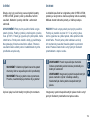
OPENING THE CANOPY APERTURA DELLA CAPOTTINA
Pull the canopy panel away from the seat and turn the
canopy up. To fold away the canopy turn it back to its
basic position.
Ruotare verso l‘alto il pannello di protezione e aprire
la capottina. Per chiudere la capottina, spingere
semplicemente il pannello verso la posizione iniziale.
OPENING THE ATON BASIC CANOPY APERTURA DELLA CAPOTTINA DI ATON BASIC
Pull the canopy cover over the carrying handle
adjustment via velcro.To fold away the canopy cover
release the velcro and pull it over the top end of the baby
seat.
Stendere il tessuto della capottina sopra il manico di
Per rimuovere la copertura, staccare il velcro e sistemare
il tessuto sul retro del sedile.
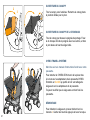
CYBEX TRAVEL-SYSTEM
CYBEX TRAVEL-SYSTEM
Please follow the instruction manual supplied with your
push chair.
Always double check if the baby seat is securly fastened
to the buggy.
In order to attach the CYBEX ATON please place it
against driving direction on the adapters of the CYBEX
buggy. You will hear an audible CLICK when the baby
seat is locked into the adapters.
Vi preghiamo di seguire le istruzioni contenute nel
manuale del passeggino.
saldamente al passeggino.
al senso di marcia sugli adattatori del passeggino
chiaramente il CLICK di aggancio negli adattatori.
DEMOUNTING
To unlock the baby seat keep the release buttons r
pressed and then lift the shell up.
Per sganciare il seggiolino tenere premuti i pulsanti r e
sollevare la scocca.
SMONTAGGIO
La pagina sta caricando ...

30
DEUKIT
PRODUCT CARE MANUTENZIONE
In order to guarantee the best possible protection for your
child, please take note of the following:
Per garantire la massima protezione del bambino è
necessario tenere presente quanto segue:
All important parts of the child seat should be examined
for damages on a regular basis.
It is essential that the child seat does not get jammed
between hard parts like the door of the car, seat rail etc.
which might cause damage to the seat.
The child seat must be examined by the manufacturer
after e.g. having been dropped or similar situations.
Tutte le parti importanti del seggiolino devono essere
eventuali danni.
Le parti meccaniche devono funzionare correttamente.
E’ essenziale che il seggiolino non venga danneggiato
a causa di un eventuale schiacciamento tra il sedile
dell’auto e la porta o da altri ostacoli solidi.
Il seggiolino dovrà essere inviato al produttore per un
controllo in caso di caduta o altri eventi similari.
WHAT TO DO AFTER AN ACCIDENT IN CASO DI INCIDENTE
In an accident the seat can sustain damages which
are invisible to the eye. Therefore the seat should be
replaced immediately in such cases. If in doubt please
contact your retailer or the manufacturer.
In caso di incidente il seggiolino può essere soggetto
a danni non immediatamente visibili. A seguito di un
incidente il seggiolino dovrebbe essere immediatamente
sostituito. Per qualsiasi dubbio vi preghiamo di contattare
il rivenditore o il produttore.
NOTE! When you buy a CYBEX ATON it is recommended
to buy a second seat cover. This allows you to clean and
dry one whilst using the other one in the seat.
NOTA BENE! Consigliamo sempre l’acquisto di un
secondo rivestimento per CYBEX ATON. Questo
consente di avere sempre il seggiolino completo di
rivestimento mentre uno dei due viene lavato e pulito.
La pagina sta caricando ...

32
DEUKIT
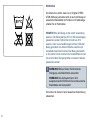
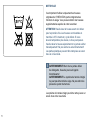
CLEANING PULIZIA
Il sistema di imbragatura integrato può essere lavato con
un detergente neutro e acqua calda.
NOTA BENE! E‘ consigliato il lavaggio prima del primo
utilizzo. Rivestimenti lavabili in lavatrice, ciclo delicato
max 30°. L‘uso di temperature più elevate può scolorire
i tessuti. Lavare separatamente e non asciugare mai a
macchina. Non asciugare alla luce diretta del sole. Le
parti in plastica possono essere pulite con detergente
neutro e acqua tiepida.
It is important to use only an original CYBEX ATON seat
cover since the cover is an essential part of the function.
You may obtain spare covers at your retailer.
Il rivestimento è una parte importante per il
funzionamento del seggiolino ed è indispensabile
utilizzare soltanto rivestimenti originali CYBEX ATON.
Rivestimenti di ricambio originali sono disponibili presso i
rivenditori autorizzati.
The integrated harness system can be cleaned with a
mild detergent and warm water.
NOTE!
time. Seat covers are machine washable at max. 30°C
on delicate cycle. If you wash it at higher temperature,
the cover fabric may lose colour. Please wash the cover
separately and never dry it mechanically! Do not dry the
cover in direct sunlight! You can clean the plastic parts
with a mild detergent and warm water.
WARNING! Please do not use chemical detergents
or bleaching agents under any circumstances!
WARNING! The integrated harness system cannot
be removed from the baby seat. Do not remove
parts of the harness system.
ATTENZIONE! Non usare MAI detergenti chimici o
agenti sbiancanti.
ATTENZIONE! Il sistema di imbragatura integrato
non può essere rimosso! Non rimuovere alcuna
parte del sistema di imbragatura dal seggiolino.
La pagina sta caricando ...

34
DEUKIT
REMOVING THE COVER RIMOZIONE DEL RIVESTIMENTO
FISSARE IL RIVESTIMENTOATTACHING THE SEAT COVERS
NOTA BENE! Fare molta attenzione a non attorcigliare
mai le cinghie per le spalle.
Per riposizionare il rivestimento sul seggiolino ripetere le
operazioni sopra descritte nell’ordine inverso.
NOTE! Do not twist the shoulder straps.
in order to put the covers back onto the seat, proceed in
the reverse order as shown above.
Open the buckle e.
Remove the shoulder pads d from shoulder belts c.
Pull the cover over the seat rim.
Pull the shoulder belts c with the buckle tongues t out of
the cover parts.
Pull the buckle e through the seat cover.
Now you can remove the cover part.
e.
Togliere i cuscinetti d dalle cinghie per le spalle c.
Tirare il rivestimento sopra al bordo del seggiolino.
c e gli agganci t dal rivestimento.
e dal rivestimento seduta.
Ora è possibile rimuovere le varie parti del rivestimento.
The cover consists of 5 parts. 1 seat cover, 1 adjustable
insert, 2 shoulder pads and 1 buckle pad. To remove the
cover please follow these steps:
Il rivestimento è costituito da cinque parti: 1 rivestimento
seduta, 1 inserto riduttore, 2 cuscinetti per le cinghie, 1
seguire il procedimento di seguito descritto:
NOTE! Use CYBEX ATON covers only! NOTA BENE! Utilizzare solo ed esclusivamente
rivestimenti CYBEX ATON originali!
WARNING! The child seat must never be used
without the cover.
ATTENZIONE! Il seggiolino di sicurezza non deve
essere MAI utilizzato senza l’apposito rivestimento.
La pagina sta caricando ...

36
DEUKIT
Since plastic materials wear out over time, e.g. from
exposure to direct sunlight, the product characteristics
may vary slightly.
As the car seat may be exposed to high temperature
differences as well as other unforseeable forces please
follow the instructions below.
Poiché con il tempo le parti in plastica tendono ad
usurarsi, per esempio per esposizione eccessiva alla luce
del sole, le caratteristiche del prodotto possono nel tempo
subire leggere variazioni.
Poiché il seggiolino può essere esposto a notevoli
variazioni di temperatura o a circostanze imprevedibili
all’interno del veicolo è in ogni caso importante prendere
nota di quanto segue:
If the car is exposed to direct sunlight for a longer
period of time, the child seat must be taken out of the
car or covered with a cloth.
Examine all plastic parts of the seat for any damages or
changes to their form or color on a yearly basis.
If you should notice any changes, you must dispose of
the seat. Changes to the fabric - in particular the fading
of color - are normal and do not constitute a damage.
Nel caso l’automobile venga lasciata al sole per un
lungo periodo consigliamo di estrarre il seggiolino
dall’abitacolo o di ripararlo con un telo di copertura.
Raccomandiamo di controllare accuratamente almeno
di rivestimento, in particolare lo sbiadimento, sono
considerate normali e non costituiscono un difetto.
DURABILITY OF PRODUCT DUREVOLEZZA PRODOTTO
La pagina sta caricando ...

38
DEUKIT
DISPOSAL SMALTIMENTO
For further information about our products please visit
WWW.CYBEX-ONLINE.COM
Per ulteriori informazioni sul prodotto vi invitiamo a
visitare il nostro sito: WWW.CYBEX-ONLINE.COM
serial number (see sticker).
brand name and type of car and the position where the
seat is mounted normally.
weight (age, size) of child.
Numero di serie (vedi adesivo)
Marca e modello dell’auto, posizione in cui il
seggiolino viene normalmente installato.
Peso (età, statura) del bambino.
Please collect the following information before:
Per qualsiasi dubbio o informazione rivolgetevi subito
al distributore. Prima di contattare il distributore
accertatevi di avere questi dati:
PRODUCT INFORMATION INFORMAZIONI TECNICHE
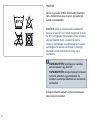
For environmental reasons we kindly ask our customers
to dispose of the beginning (packing) and at the end (seat
parts) of the lifetime of the child seat all incidental waste
properly. Waste disposal regulations may vary regionally.
In order to guarantee a proper disposal of the child seat,
please contact your communal waste management or
administration of your place of residence. In any case,
please take note of the waste disposal regulations of your
country.
Per ragioni di natura ambientale chiediamo a tutti i nostri
clienti di provvedere allo smaltimento appropriato di ogni
parte). Le norme per lo smaltimento variano localmente.
di residenza per delucidazioni in merito. In ogni caso,
seguire sempre le normative dello stato di residenza.
WARNING! Keep all packing materials away from
children. There is a risk of suffocation!
ATTENZIONE! Tenere tutte le parti dell’imballo
lontane dalla portata dei bambini. Questo per
evitare qualsiasi rischio di soffocamento!
La pagina sta caricando ...

40
DEUKIT
The following warranty applies solely in the country where
this product was initially sold by a retailer to a customer.
The warranty covers all manufacturing and material
defects, existing and appearing, at the date of purchase
or appearing within a term of three (3) years from the date
of purchase from the retailer who initially sold the product
to a consumer (manufacturer’s warranty). In the event
that a manufacturing or material defect should appear,
we will – at our own discretion – either repair the product
free of charge or replace it with a new product. To obtain
such warranty it is required to take or ship the product to
the retailer, who initially sold this product to a customer
and to submit an original proof of purchase (sales receipt
or invoice) that contains the date of purchase, the name
of the retailer and the type designation of this product.
This warranty shall not apply in the event that this
product is taken or shipped to the manufacturer or any
other person other than the retailer who initially sold this
product to a consumer. Please check the product with
respect to completeness and manufacturing or material
defects immediately at the date of purchase or, in the
event that the product was purchased in distance selling,
immediately after receipt. In case of a defect stop using
the product and take or ship it immediately to the retailer
who initially sold it. In a warranty case the product has to
be returned in a clean and complete condition. Prior to
contacting the retailer, please read this instruction manual
carefully. This warranty does not cover any damages
La seguente garanzia vale unicamente nella nazione
in cui il prodotto è stato originariamente venduto da
un rivenditore al consumatore. La garanzia copre
eventuali difetti di fabbricazione e di materiali riscontrati
all‘acquisto o entro un periodo di tre (3) anni dalla
data di acquisto presso il rivenditore (garanzia del
produttore). Nel caso venga riscontrato o appaia un
difetto di fabbricazione o di materiali nel corso di validità
della garanzia provvederemo - a nostra discrezione - a
riparare il prodotto senza costi o a sostituirlo. Per avere
diritto alla garanzia è necessario riportare o spedire il
prodotto al rivenditore presso il quale è stato acquistato
ed è indispensabile fornire la prova d‘acquisto (scontrino
dovrà contenere indicati la data di acquisto, il nome del
rivenditore e le caratteristiche del prodotto (tipo/modello).
Nessun intervento in garanzia se il prodotto verrà inviato
al produttore o a qualsiasi altra persona diversa dal
rivenditore presso il quale si è effettuato l‘acquisto. La
garanzia è valida soltanto se il prodotto è stato sottoposto
ad un accurato controllo di completezza, funzionalità
all‘acquisto e eventuali manchevolezze di produzione o di
materiali sono state prontamente segnalate. Per acquisti
a distanza, raccomandiamo di effettuare un controllo
completo al ricevimento del prodotto. In caso si riscontri
qualsiasi danneggiamento invitiamo a NON utilizzare il
prodotto e a restituirlo immediatamente al rivenditore da
cui è stato acquistato. I diritti di garanzia sono validi
WARRANTY GARANZIA
La pagina sta caricando ...
La pagina sta caricando ...
La pagina sta caricando ...
La pagina sta caricando ...
La pagina sta caricando ...
La pagina sta caricando ...
La pagina sta caricando ...
La pagina sta caricando ...
La pagina sta caricando ...
La pagina sta caricando ...
La pagina sta caricando ...
La pagina sta caricando ...
La pagina sta caricando ...
La pagina sta caricando ...
La pagina sta caricando ...
La pagina sta caricando ...
La pagina sta caricando ...
La pagina sta caricando ...
La pagina sta caricando ...
La pagina sta caricando ...
La pagina sta caricando ...
La pagina sta caricando ...
La pagina sta caricando ...
La pagina sta caricando ...
La pagina sta caricando ...
La pagina sta caricando ...
La pagina sta caricando ...
La pagina sta caricando ...
La pagina sta caricando ...
La pagina sta caricando ...
La pagina sta caricando ...
La pagina sta caricando ...
La pagina sta caricando ...
La pagina sta caricando ...
La pagina sta caricando ...
La pagina sta caricando ...
La pagina sta caricando ...
La pagina sta caricando ...
La pagina sta caricando ...
La pagina sta caricando ...
La pagina sta caricando ...
La pagina sta caricando ...
La pagina sta caricando ...
La pagina sta caricando ...
La pagina sta caricando ...
La pagina sta caricando ...
La pagina sta caricando ...
La pagina sta caricando ...
La pagina sta caricando ...
La pagina sta caricando ...
La pagina sta caricando ...
La pagina sta caricando ...
La pagina sta caricando ...
La pagina sta caricando ...
La pagina sta caricando ...
La pagina sta caricando ...
La pagina sta caricando ...
La pagina sta caricando ...
La pagina sta caricando ...
La pagina sta caricando ...
La pagina sta caricando ...
La pagina sta caricando ...
La pagina sta caricando ...
La pagina sta caricando ...
La pagina sta caricando ...
La pagina sta caricando ...
La pagina sta caricando ...
La pagina sta caricando ...
La pagina sta caricando ...
La pagina sta caricando ...
La pagina sta caricando ...
La pagina sta caricando ...
La pagina sta caricando ...
La pagina sta caricando ...
La pagina sta caricando ...
La pagina sta caricando ...
La pagina sta caricando ...
La pagina sta caricando ...
La pagina sta caricando ...
La pagina sta caricando ...
La pagina sta caricando ...
La pagina sta caricando ...
-
 1
1
-
 2
2
-
 3
3
-
 4
4
-
 5
5
-
 6
6
-
 7
7
-
 8
8
-
 9
9
-
 10
10
-
 11
11
-
 12
12
-
 13
13
-
 14
14
-
 15
15
-
 16
16
-
 17
17
-
 18
18
-
 19
19
-
 20
20
-
 21
21
-
 22
22
-
 23
23
-
 24
24
-
 25
25
-
 26
26
-
 27
27
-
 28
28
-
 29
29
-
 30
30
-
 31
31
-
 32
32
-
 33
33
-
 34
34
-
 35
35
-
 36
36
-
 37
37
-
 38
38
-
 39
39
-
 40
40
-
 41
41
-
 42
42
-
 43
43
-
 44
44
-
 45
45
-
 46
46
-
 47
47
-
 48
48
-
 49
49
-
 50
50
-
 51
51
-
 52
52
-
 53
53
-
 54
54
-
 55
55
-
 56
56
-
 57
57
-
 58
58
-
 59
59
-
 60
60
-
 61
61
-
 62
62
-
 63
63
-
 64
64
-
 65
65
-
 66
66
-
 67
67
-
 68
68
-
 69
69
-
 70
70
-
 71
71
-
 72
72
-
 73
73
-
 74
74
-
 75
75
-
 76
76
-
 77
77
-
 78
78
-
 79
79
-
 80
80
-
 81
81
-
 82
82
-
 83
83
-
 84
84
-
 85
85
-
 86
86
-
 87
87
-
 88
88
-
 89
89
-
 90
90
-
 91
91
-
 92
92
-
 93
93
-
 94
94
-
 95
95
-
 96
96
-
 97
97
-
 98
98
-
 99
99
-
 100
100
-
 101
101
-
 102
102
-
 103
103
-
 104
104
-
 105
105
-
 106
106
-
 107
107
-
 108
108
-
 109
109
-
 110
110
-
 111
111
-
 112
112
-
 113
113
-
 114
114
-
 115
115
-
 116
116
-
 117
117
-
 118
118
-
 119
119
-
 120
120
-
 121
121
-
 122
122
-
 123
123
-
 124
124


CYBEX ATON Manuale del proprietario
- Categoria
- Sedili dell'auto
- Tipo
- Manuale del proprietario
- Questo manuale è adatto anche per
in altre lingue
- English: CYBEX ATON Owner's manual
- français: CYBEX ATON Le manuel du propriétaire
- Deutsch: CYBEX ATON Bedienungsanleitung
- Nederlands: CYBEX ATON de handleiding
- slovenčina: CYBEX ATON Návod na obsluhu
- čeština: CYBEX ATON Návod k obsluze
- polski: CYBEX ATON Instrukcja obsługi
Documenti correlati
-
CYBEX ATON Manuale del proprietario
-
-
-
CYBEX Aton 3S Guida utente
-
-
mothercare COSI ATON 5 Manuale utente
-
CYBEX ATON Q i-SIZE Manuale utente
-
CYBEX ATON 5 Manuale utente
-
mothercare ATON BASE 2 Manuale utente
-