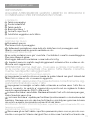
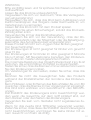
BHOOP TAIYO 0500 Manuale utente
- Categoria
- Passeggini
- Tipo
- Manuale utente

TAIYO #0500
stroller, passeggino,
Kinderwagen, poussette
User manual
Manuale utente
Benetzerhandbuch
Manuel utilisateur


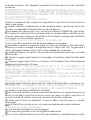
1
A
C D E
B
F
1

5a5
4
1a
2a 3
2 2a
4

5a 6 6
77 8
8 9
10

16
16a
17
11
12
13
13
14
15

18
19
20
21 21 22
23 24 24

31
31a
32
25 26
27
28 29
30 30a

33
34
34a
35 36 37
3838
39

45 46 47 48
49 50
39
40
41
42 43 44

51
52
53
5454
55
56
56
55

61 62
59 60 60
57
58
58

13
UK- Instructions for use
IMPORTANT– READ CAREFULLY AND KEEP FOR FUTURE REFE-
RENCE
CONTENT
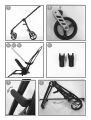
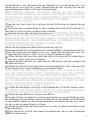
A stroller frame
B Front wheels x2
C Seat frame
D Front bar x 1
E Arches for canopy x 2
F Muho car seat adapters
TAIYO STROLLER
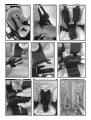
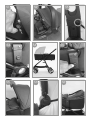
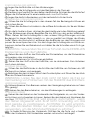
OPENING THE FRAME
1 Disconnect the hook
holding the stroller closed.
1a Pull up the handle as indicated by the arrow: the stroller will be
opened completely when you hear a click.
MOUNTING THE WHEELS
2 The rear wheels are already mounted. Check the correct assembly and that
they are free to turn
Front wheel assembly: as shown in Fig.
2a insert the metal pin into the housings front and until you hear a click . The
wheels are hooked.
WARNING: before use, move and turn manually the wheels
to accept that they are all fixed correctly in their housings.
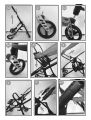
ASSEMBLY OF SEAT FRAME
3 Grasp the closed seat and insert the side guides in the side joints of the frame
until you hear a click on it when it is locked
ATTENTION: make sure that the seat is correctly hooked by
pulling it upwards
4 Grasp the handle on the back of the backrest and rotate upwards until it locks.
To ensure that the lock is successful, push the seat downwards.
The seat is hooked and ready to accommodate the cover sold separately.
(TAIYO style pack)
5 The front bar is removable. Press both keys under the bar to release it by pulling
it towards you
5a The front bar can be opened to facilitate positioning or removal of the child.
Press only one of the two keys (right or le) to release the bar from one side and
open it, letting it rotate to the sides of the frame.
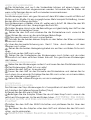
ASSEMBLY OF TAIYO STYLE PACK (lining, canopy , padded belt covers , mattress
and basket)
REMOVAL OF THE HOOD FRAME
6 Remove the front hood bows by pressing the inside of the joints gently with a
small screwdriver until the bow is released and gently pulling upwards . Repeat
the operation on the opposite side and for the rear arch

14
ATTENTION: press and pull gently to avoid breaking the pla-
stic hook ATTENTION: the front and rear arches are of dif-
ferent sizes. Do not invert them when mounting the fabric
hood.
MOUNTING THE FABRIC HOOD
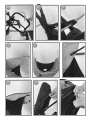
Open the Taiyo style pack, take the fabric hood and proceed as follows:
7 Insert the front bow into the front channel of the fabric hood by gently sliding
it to the other end
8 Proceed in the same way with the rear tube. ATTENTION: to facilitate the in
-
sertion of the rear tube open the zipper of the fabric hood to give less tension.
Remember to close the zipper to facilitate subsequent assembly of the hood.
ASSEMBLY OF STROLLER SEAT FABRIC
With the hood removed from the chassis, proceed as follows:
9 Take the seat and insert the rear fabric part on the frame tubes, passing the
adjustment handle inside the hole. Hook the Velcro. Push the seat down until it
adheres to the backrest
10 Open the Velcro strap under the seat and secure it by pulling it as far as pos
-
sible under the seat
11 Li the footrest by pulling the handle and insert the front part of the seat.
12 Open and hook the fabric with Velcro under the seat to the top tube to keep
the cover well positioned
ATTENTION: all operations from 9 to 12 recommend doing
them without the hood fitted and with the front bar remo
-
ved to facilitate assembly
ATTENTION: check that the 5-point belts are all on the front
of the cover and are not caught on the sides of the frame
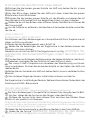
ASSEMBLING THE COMPLETE HOOD ON TAIYO
13 Gently insert the bows into the joints until you hear a click. ATTENTION: we
recommend first proceeding with the back arch and then with the front arch
14 Open the canopy and tension it
15 For an aesthetic result and optimal tension of the fabric, attach the small
elastic bands to the sides of the fabric hood to the small hooks on the hood joints,
turning them inside to pass in front of the front arch
16 Pull down the fabric ends of the hood for correct assembly
16a The canopy includes a small sun visor that can be opened at the front
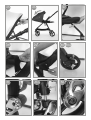
POSITIONING OF THE MATTRESS
17 Place the mattress on the stroller
18 Pass the shoulder straps and the leg divider in the eyelets.
19 The abdominal belt passes to the sides of the mattress. Push the mat firmly
against the backrest for a correct and co m fort position
20 Insert the shoulder covers and the central protection on the belts
USE OF 5-POINT BELTS
21 Insert the shoulder straps into the upper part of the lap belt buckles and se
-
cure them
22 Insert the abdominal buckles into the central buckle until you hear a click
23 To release the buckle, press simultaneously as shown in the figure
24 The stroller can welcome the child from the first months of life. Pull the shoulder

15
straps in the lower fabric guides and the lap belt in those more internal in such
a way as to have a perfect adherence to the body of the child. When the child
grows, remove the ribbons from the guides and adjust accordingly. To adjust the
length of the shoulder straps and belts, pull the tape and adjust the buckles as
shown in photo
WARNING: always use 5-point belts
ADJUST THE BACKREST AND THE FOOTREST
25 To lower or raise the backrest, pull the handle on the back of the backrest.
26 The backrest is adjustable in 3 positions
27 Pull the handle under the footrest to lower it. To raise it push upwards
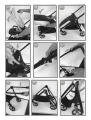
BASKET ASSEMBLY
28 Insert the Velcro straps into the slots of the footrest on the frame. Pull and lock
with Velcro
29 attach the rear part with the press-studs, passing the basket over the rear
frame tube
WARNING: do not load the basket with more than 3 kg to
avoid problems with the stability of the frame
REAR TWIN BRAKE
30 Rear wheel brake: to apply the brakes, lower
the locking lever as shown in the photo
30a Raise the brake lever to unlock the stroller.
FRONT WHEEL WHEELS
31 To release the front wheel and make it swivel, raise the lever on the front of
the wheel joint. Lower the lever and lock the wheel. NOTE: the wheel will lock au
-
tomatically when the lever is lowered. It is not necessary to reposition the wheel
straight.
ATTENTION: it is advisable to use the locked wheels on
uneven ground to get more maneuverability
31a Quick front wheel removal: press the
button and quick release of the front wheel,
the front wheels will be unlocked automatically.
REAR AND FRONT WHEELS
32 The rear wheels, and also the front ones, are removable with a double Allen
key (internal and external). Unscrew to remove the wheels if necessary , clean
them gently and reassemble.
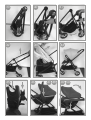
PUSHCHAIR CLOSURE
The stroller can be closed with the seat hooked both facing mum and facing the
street. For an even more compact closure, release the seat
Remove the baby
To close the stroller without a seat, proceed as in step 35. If you do NOT want to
remove the seat, skip point 35.
33 Hold a hand under the leg rest and at the same time grasp the handle on the
back of the backrest
34 Pull the handle and push the backrest forward until you hear a click to attach
it to the leg rest
34a Turn the closed seat forward
35 Press the two small buttons on the sides of the seat and pull upwards
36 Release the second safety on the right tube by rotating it downwards with
your thumb

16
37 Pull up the two locking triggers on the right and le tube
38 Turn the handle downwards
39 Pull the front legs of the stroller backwards and they will automatically lock
with the side hook on the le. The closed stroller stands alone
OPENING OF THE STROLLER
40 Place the stroller upright and release the plastic hook on the le
41 The stroller opens by itself
42 Raise the handle until it is locked
43 Grasp the handle on the back of the backrest and rotate upwards until it
locks. To ensure that the lock is successful, push the seat downwards
44 Raise the front bar to lock it in
CAR SEAT MUHO
USE OF THE CAR SEAT
The frame of the Taiyo stroller It is compatible with the MUHO car seat with adap
-
ters (included in Taiyo )
Remove the seat as in point 35.
45 Attach the adapters by inserting them in the side guides, with the button
towards the front, until you hear a locking click. ATTENTION: the adapters are right
and le and cannot be mounted inverted
46 Hold the handle of the MUHO car seat and place it over the adapters
47 Center the adapters under the handle and push the seat down to engage it
48
WARNING: make sure that the seat is properly hooked by
pulling the seat upwards
49 Press the two gray buttons on the handle and rotate it into a horizontal position
50 To release the seat, rotate the handle upwards by pressing the gray buttons
as in point 49
51 Press the two gray buttons on the seat side and pull up with two hands (for
safety) detaching the car seat from the adapters
52 Place it on the ground or on a stable surface and grasp the transport handle
53 To remove the adapters, press the two buttons on them and remove them
NOHA CARRYCOT
USE OF THE CARRYCOT WITH TAIYO
The frame of the Taiyo stroller it is compatible with Noha carrycot by means of
hooks positioned on Noha
Remove the stroller seat as in step 35.
54 Insert the side joints of the carrycot in the side rails of the frame and then push
down until you hear a CLICK . The carrycot is hooked. ATTENTION: check the cor
-
rect hooking by pulling upwards
55 To release the carrycot, press the two buttons on the plastic joints and pull the
carrycot upwards with the handle
56 The carrycot handle is foldable to lower the canopy and to reduce clutter.
Press the two buttons on the sides of the handle and rotate it
57 To raise it, pull the handle and rotate it until it clicks in a vertical position

17
58 To raise the wind wing release the buttons and raise it
The carrycot is completely removable. Refer to the NOHA carrycot instructions
BAGS LOCKING
BAG POSITIONING (Easy-Hang system, stroller mode)
59 The Taiyo stroller is equipped with an Easy-Hang system for BHOOP bags. Hook
the bag to the rings under the seat
60 Place the bag behind the rear tube between the wheels. This position is very
practical and convenient
POSITIONING OF THE BAG WITH UNIVERSAL CLAMPS (Use with Noha and Muho).
If the frame is used together with Noha and Muho the Easy-Hang system is not
available
61 Hook the universal straps inside the Bhoop bags to the Taiyo handle
62 Hook the bag.
WARNING: do not overload the bag to avoid
tipping over (max. 2kg)
WARNING
IMPORTANT - Read carefully and keep for future reference
Never leave the child unattended
Ensure that all the locking devices are engaged before use
To avoid injury ensure that the child is kept away when un
-
folding and folding this product.
Do not let the child play with this product
Always use the restraint system
Check that the pram body or seat unit or car seat attach
-
ment devices are correctly engaged before use This pro-
duct is not suitable for running or skating
Keep away from fire.
The stroller is not suitable for children of weight over 15 KG
The stroller is suitable for children aged 0 months up to 3
years. With newborn children, use the stroller in the most re
-
clined position.
The maximum load of the object holder basket is 2 kg. It
is forbidden to exceed the maximum recommended load.
Make sure the brakes are always on when you park the
stroller.
To avoid injury, make sure the child do not come into con
-
tact with the moving parts of the product during the adjust-
ment operations of the nacelle e of the stroller.
When placing or removing the baby from the seat, make
sure the brake is always on inserted.
The child may choke and slip in the leg openings.
Stroller stability may be compromised if the weights are pla
-
ced on the handle, on the back or sides of the stroller.
Do not use accessories not approved by the manufacturer.
In the event that footboards are used for the second child,
make sure that they do not compromise the stability of the

18
stroller and do not carry children weighing more than 20 kg
The child should never be le unattended in the carrycot!
Always keep the child under surveillance.
Never overload the carrycot with additional children or
objects.
The carrycot is adapts to children from birth and up around
9 months.
Never use additional mattresses in the carrycot
The carrycot and ‘suitable for a child who is not in able to
sit independently, to turn around and to pull yourself up by
leaning on your hands and knees.
Maximum child weight: 9 kg.
Never use the carrycot in the car. Use the approved MUHO
car seat
Make sure the carrycot can be securely attached to the
stroller
Do not store or use the carrycot in damp environments,
cold and at high temperatures, keep away from fire or from
heat sources.
Always carry the carrycot with the handle upright
The stroller does not replace cribs or beds. If you use the car
seat in combination with the Taiyo stroller , do not let your
child sleep in the seat for long periods. Use suitable cots,
cribs or prams
The Taiyo stroller , the Noha pram and the Muho car seat
allow use with only one child
We recommend replacing the accessories or damaged
components.
Contact the nearest dealer in case of problems
or questions about the use of the product.
CARE AND MAINTENANCE
The stroller requires regular checking by the user to make sure the moving parts
are intact.
This product can be cleaned with a damp cloth and detergents normally avai
-
lable in trade. Do not use abrasive cleaners. The hood it can be removed and
cleaned, but it must be dry first to be reused.
TAIYO STROLLER FRAME COMPOSITIONS
Structure: aluminum
The stroller complies with the standard
EN 1888 - 1: 2018

19
I - Istruzioni per l’uso
IMPORTANTE:
LEGGERE ATTENTAMENTE QUESTO LIBRETTO DI ISTRUZIONI E
CONSERVARLO PER INFORMAZIONI FUTURE.
CONTENUTO
A Telaio passeggino
B Ruote anteriori x2
C Telaio seduta
D Barra frontale x 1
E Archetti capotta x 2
F Adattatori seggiolino auto Muho
PASSEGGINO TAIYO
APERTURA DEL TELAIO
1 Disinserire il gancio
che tiene chiuso il passeggino.
1a Sollevare il maniglione come indicato dalla freccia: il passeggino sarà
aperto completamente quando sentirete un clic.
MONTAGGIO DELLE RUOTE
2 Le ruote posteriori sono gia’ montate. Controllate il corretto assemblaggio e
che siano libere di girare
Montaggio della ruota anteriore: come indicato in Fig.
2a inserire il perno in metallo negli alloggiamenti anteriori e fino a udire un clic.
Le ruote sono agganciate.
ATTENZIONE: prima dell’uso, muovere e girare manualmen-
te le ruote per accettarsi che siano tutte fissate corretta-
mente nei rispettivi alloggiamenti.
MONTAGGIO DELLA STRUTTURA DELLA SEDUTA
3 Impugnare la seduta chiusa e inserire le guide laterali nei giunti laterali del
telaio fino a udire un clic ci avvenuto aggancio
ATTENZIONE: assicurarsi che la seduta sia correttamente ag-
ganciata tirandola verso l’alto
4 Impugnare la maniglia sul retro dello schienale e ruotare verso l’alto fino a
blocco avvenuto. La seduta e’ agganciata e pronta ad accogliere la fodera
venduta separatamente. (TAIYO style pack)
5 La barra frontale e’ removibile. Premere entrambi i tasti sotto la barra per sgan
-
ciarla tirandola verso di se
5a La barra frontale e’ apribile per facilitare il posizionamento o la rimozione del
bambino. Premere uno solo dei due tasti (destra o sinistra) per sganciare la barra
da un lato e aprirla, lasciandola ruotare ai lati del telaio.
MONTAGGIO DI TAIYO STYLE PACK (fodera, capottina, copricinture imbottiti, ma
-
terassino e cestello)
RIMOZIONE DEL TELAIO CAPOTTINA
6 Rimuovere gli archetti della capottina premendo piano con un piccolo cac
-
ciavite o una punta l’interno dei giunti fino a sbloccare l’archetto e tirando de-

20
licatamente verso l’alto. Ripetere l’operazione sul lato opposto e per l’archetto
posteriore
ATTENZIONE: premere e tirare delicatamente per non rom-
pere il gancio in plastica ATTENZIONE: l’archetto anteriore e
posteriore sono di misure diverse. Non invertiteli nel montare
la capottina in tessuto.
MONTAGGIO DELLA CAPOTTINA IN TESSUTO
Aprire la confezione Taiyo style pack, prendere la capottina in tessuto e proce
-
dere come segue:
7 Inserire l’archetto anteriore nel canale anteriore della capottina in tessuto fa
-
cendolo scorrere delicatamente fino all’ altra estremita’
8 Procedere allo stesso modo con l’archetto posteriore. ATTENZIONE: per facilita
-
re l’inserimento dell’archetto posteriore aprire la cerniera della capottina in tes-
suto per dare meno tensione. Ricordatevi di richiudere la cerniera per facilitare il
montaggio successivo della capottina.
MONTAGGIO DELLA FODERA IN TESSUTO DEL PASSEGGINO
Con la capottina smontata dal telaio procedere come segue:
9 Prendere la seduta e inserire la parte in tessuto posteriore sui tubi del telaio,
facendo passare la maniglia di regolazione all’ interno del foro. Agganciare il
velcro. Spingere il sedile in basso fino a farlo aderire allo schienale
10 Aprire la cinghia con velcro sotto la seduta e fissarla tirandola il piu’ possibile
sotto il sedile
11 Alzare il poggia piedi tireando la maniglia e inserire la parte frontale della
seduta.
12 Aprire e agganciare il tessuto con velcro sotto il sedile al tubo orizzontale per
tenere ben posizionata la fodera
ATTENZIONE: tutte le operazioni da 9 a 12 consigliamo di
farle senza la capottina montata e con la barra frontale
staccata per agevolare il montaggio
ATTENZIONE: controllare che le cinture a 5 punti siano tutte
sul davanti della fodera e non siano impigliate ai lati del
telaio
MONTAGGIO DELLA CAPOTTINA COMPLETA SU TAIYO
13 Inserire delicatamente gli archetti all’ interno dei giunti fino a sentire un clic.
ATTENZIONE: consigliamo prima di procedere con l’archet-
to posteriore e successivamente con quello anteriore
14 Aprire la capottina e metterla in tensione
15 Per un risultato estetico e di tensione ottimale del tessuto, agganciare i piccoli
elastici ai lati della capottina in tessuto ai piccoli ganci sui giunti capottina, fa
-
cendoli ruotare all’ interno passando davanti all’archetto anteriore
16 Tirare verso il basso le estremita’ in tessuto della capottina per un corretto
montaggio
16a La capottina include un piccolo parasole apribile nella parte anteriore
POSIZIONAMENTO DEL MATERASSINO
17 Posizionare il materassino sul passeggino
18 Far passare gli spallacci e lo spartigambe nelle asole.
19 La cintura addominale passa ai lati del materassino. Spingere bene il mate
-
La pagina si sta caricando...
La pagina si sta caricando...
La pagina si sta caricando...
La pagina si sta caricando...
La pagina si sta caricando...
La pagina si sta caricando...
La pagina si sta caricando...
La pagina si sta caricando...
La pagina si sta caricando...
La pagina si sta caricando...
La pagina si sta caricando...
La pagina si sta caricando...
La pagina si sta caricando...
La pagina si sta caricando...
La pagina si sta caricando...
La pagina si sta caricando...
La pagina si sta caricando...
La pagina si sta caricando...
La pagina si sta caricando...
La pagina si sta caricando...
-
 1
1
-
 2
2
-
 3
3
-
 4
4
-
 5
5
-
 6
6
-
 7
7
-
 8
8
-
 9
9
-
 10
10
-
 11
11
-
 12
12
-
 13
13
-
 14
14
-
 15
15
-
 16
16
-
 17
17
-
 18
18
-
 19
19
-
 20
20
-
 21
21
-
 22
22
-
 23
23
-
 24
24
-
 25
25
-
 26
26
-
 27
27
-
 28
28
-
 29
29
-
 30
30
-
 31
31
-
 32
32
-
 33
33
-
 34
34
-
 35
35
-
 36
36
-
 37
37
-
 38
38
-
 39
39
-
 40
40


BHOOP TAIYO 0500 Manuale utente
- Categoria
- Passeggini
- Tipo
- Manuale utente
in altre lingue
- English: BHOOP TAIYO 0500 User manual
- français: BHOOP TAIYO 0500 Manuel utilisateur
- Deutsch: BHOOP TAIYO 0500 Benutzerhandbuch
Altri documenti
-
Lorelli V 3.1 Manuale utente
-
 MAST M.4 Manuale utente
-
Hauck MIAMI Manuale del proprietario
-
-
-
RECARO Citylife Manuale del proprietario
-
-
mothercare Inglesina Sketch Stroller 0724564 Guida utente
-
-
kiddy Evostar 1 Manuale utente
