
DS-KD9203 Series
Face Recognition Door Station
Diagram References
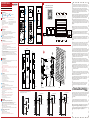
Appearance
Installation
Before you begin:
Call from Main/Sub Door Station
Call from Outer Door Station
Accessory
1
3
Terminal
2
1. Accessories that you need to prepare for installation: gang box.
2. Make sure the power supply meet the power requirements of the door station (12 VDC, 2 A).
3. Make sure all the related equipment is power-o during the installation.
4. Wire the cables before installation.
The dimension of the gang box is 364 mm (W) × 118 mm (H) × 40 mm (D).
The installation hole should be larger than the actual size. The suggested dimension of the
installation hole is 364.3 mm (W) × 118.6 mm (H) × 40.2 mm (D).
Flush Mounting
1. Cave an installation hole on the wall. Pull the cable out from the wall.
Note:
The suggested dimension of the installation hole is 364.3 mm (W) × 118.6 mm (H) × 40.2 mm (D).
The suggested length of the cables left outside is 250 mm.
2. Install the gang box into the wall.
a. Remove the plastic sheet of the gang box with the tool.
b. Insert the gang box into the installation hole. Mark the gang box screw holes’ position with a
marker, and take out the gang box.
c. Drill 4 holes according to the marks on the wall, and insert the expansion sleeves into the screw
holes.
d. Fix the gang box with 4 expansion bolts.
3. Fix the gap between the gang box and wall with concrete. Remove the mounting ears with tool after
concrete is dry. Connect the cables according to the Wiring Description in User Manual.
4. Insert the door station into the gang box. Slide the door station down and x it with 2 set screws.
Apply Silicone sealant among the joints between the device and the wall (except the lower side) to keep
the raindrop from entering.
Note: The door station can be congured via iVMS-4200 Client Software remotely.
485A+/485A-: External RS-485 Card Reader
485B+/485B-: External Elevator Controller
COM1/COM2: Common Interface
LAN: Network Signal Input
NC1/NC2: Door Lock Relay Output (Normally Close)
NO1/NO2: Door Lock Relay Output (Normally Open)
GND: Grounding DC 12 V: 12 VDC Power Input
Note: The appearance of the device vary according to dierent model. Refers to the actual device.
Note:
The debug port is used for debugging only.
Wiring description refers to the User Manual.
Conguration4
Appendix5
UD35067B
Activate Device
1. Power on the device to enter the activation page automatically.
2. Create a password and conrm it.
3. Press # to activate the door station.
Note:
Enter an 8 to 16 characters admin password.
When entering the password, taking the numeric key 2 as example, press the numeric key 2 once, the text
eld shows “2”, and press it again in 1.5 s, the text eld shows “a”, and press it again in 1.5 s, the text eld
shows “b”, and so on.
Hold 0 to enter special characters.
Press # to conrm the password.
Press * to delete the password during entering.
You are required to activate the device rst by setting a strong password for it before you can use the device.
1
Tips When Collecting/Comparing Face Picture
1
Call Resident
The door station can work as main/sub door station, and outer door station, which correspond to dierent
calling resident modes respectively.
Press number button to enter the calling page.
Enter the room No. and press call button again to call.
2
Call Center
3
Press number button to enter the calling page.
Enter Building No. + # + Unit No. + # + Room No. and press call button to call resident.
Press number button to enter the calling page.
Press center button to call. Press * to cancel during calling management center.
Keep your expression naturally when collecting or comparing face pictures.
Do not wear hat, sunglasses, or other accessories that can aect the facial recognition function.
Do not make your hair cover your eyes, ears, etc. and heavy makeup is not allowed.
In order to get a good quailty and accurate face picture, position your face looking at the camera when
collecting or comparing face pictures.
Make sure your face is in the middle of the collecting window.
The recommended distance when collecting/comparing face pictures is between 400 mm and 500 mm.
Unlock by Entering Password
Unlock by Presenting Card
The device support unlock the door by presenting card, entering password, and ngerprint. Here takes unlock
by entering password and unlock by presenting card for example.
Note: You should create the password and add the card to the device rst.
Common Password
Press number button, enter # + room No. + password + # to unlock the door.
Public Password
Note: Create the public password via iVMS-4200 Client Software remotely rst.
Press number button, enter # + public password + # to unlock the door.
Present the card on the card reading area to unlock the door.
Unlock Door
4
Tips When Importing Face Picture
2
Picture format: JPG.
Picture size cannot exceed 200 KB.
A pure background color is required. White is the best.
BTN1/BTN2: Exit Button Input
SEN1/SEN2: Door Contact Input
Camera IR Supplement Light
1 2 3
4 5
8 9
Screen
Loudspeaker 6Buttons Microphone 7Card Reading Area
Fingerprint Recognition Module TAMPER
1 2
3
6
Set Screws Screws Mounting Ears Gang Box Wall
GND
NO2
485B-
COM2
NC2
SEN2
GND
BTN2
GND
AlARM IN
AlARM IN
COM1
NC1
SEN1
GND
BTN1
GND
485A+
485A-
GND
NO1
Reserved
Debug LAN
+
-
DC 12V
485B+
RS-485B LOCK2
RS485A LOCK1
4
2
31
1
2
3
4
5
6
7
8
9
Recommended Installation Height (The distance between the
camera and the ground): 1.4 m to 1.6 m
Vertical: 41° Vertical: 41° Vertical: 41°
Horizontal: 75°
Highest Height: 1.59 m Highest Height: 1.69 m Highest Height: 1.79 m
Lowest Height: 1.21 m Lowest Height: 1.31 m Lowest Height: 1.41 m
1.4 m 1.6 m
1.5 m
118
Unit:mm
364 280
84 40
0.5 m
0.5 m
0.5 m
0.5 m
If a power adapter is provided in the device package, use the provided adapter only. If no
power adapter is provided, ensure the power adapter or other power supply complies with
Limited Power Source. Refer to the product label for the power supply output parameters.
Если адаптер питания входит в комплект поставки устройства, используйте только
прилагаемый адаптер. Если адаптер питания не входит в комплект поставки, убедитесь,
что используемый вами адаптер питания или источник питания соответствует
требованиям к ограничению мощности. Выходные параметры источника питания
указаны на его паспортной табличке.
Amennyiben a készülék csomagja tartalmaz hálózati adaptert, kizárólag a mellékelt adaptert
használja. Ha a csomag nem tartalmaz hálózati adaptert, bizonyosodjon meg, hogy a használt
hálózati adapter vagy más tápegységek megfelelnek a korlátozott áramforrásokra vonatkozó
előírásoknak. A tápegység teljesítményének paraméterei a termék címkéjén találhatók.
Wenn im Lieferumfang des Geräts ein Netzteil enthalten ist, verwenden Sie nur das
mitgelieferte Netzteil. Wenn kein Netzteil mitgeliefert wird, stellen Sie sicher, dass das Netzteil
oder eine andere Stromversorgung den Anforderungen an eine Stromquelle mit begrenzter
Leistung entspricht. Die Ausgangsparameter des Netzteils sind auf dem Produktaufkleber
angegeben.
Utilizzare solo l'alimentatore in dotazione, se incluso nella confezione del dispositivo. Se
l'alimentatore non è incluso, accertarsi di utilizzare un modello conforme allo standard sulle
fonti di alimentazione limitate. Consultare l'etichetta del prodotto per i parametri dell'uscita di
alimentazione.
Pokud je v balení zařízení dodán napájecí adaptér, používejte pouze dodaný adaptér. Pokud
není napájecí adaptér dodán, zajistěte, aby napájecí adaptér nebo jiný napájecí zdroj
vyhovovaly požadavkům na omezený zdroj napájení. Parametry výstupu napájení viz štítek
výrobku.
Ak bolo zariadenie dodané s napájacím adaptérom, použite iba dodaný adaptér. Ak napájací
adaptér nie je dodaný, uistite sa, že napájací adaptér alebo iný zdroj napájania vyhovuje
obmedzenému zdroju napájania. Parametre výstupu napájacieho zdroja nájdete na štítku
produktu.
Si un adaptateur secteur est fourni dans l’emballage de l’appareil, n’utilisez que l’adaptateur
fourni. Si aucun adaptateur secteur n’est fourni, assurez-vous que l’adaptateur secteur ou
toute autre source d’alimentation est conforme à la source d’alimentation limitée. Reportez-
vous à l’étiquette du produit pour connaître les paramètres de sortie de l’alimentation.
Jeżeli w pakiecie z urządzeniem dostarczany jest zasilacz, należy używać wyłącznie tego
zasilacza. Jeżeli zasilacz nie jest dostarczany w pakiecie z urządzeniem, należy używać zasilacza
zgodnego z wymaganiami dotyczącymi źródeł zasilania z własnym ograniczeniem (LPS, Limited
Power Source). Informacje dotyczące wymaganego zasilania podano na etykiecie produktu.
Als een voedingsadapter in de verpakking van het apparaat is geleverd, mag u alleen deze
adapter gebruiken. Als er geen voedingsadapter is meegeleverd, moet u ervoor zorgen dat de
voedingsadapter of een andere stroombron voldoet aan de Beperkte voedingsbron. Raadpleeg
het productlabel voor de parameters voor de stroomuitvoer.
Se a embalagem do dispositivo incluir um adaptador de alimentação, utilize apenas o
adaptador fornecido. Se não for fornecido um adaptador, certifique-se de que o adaptador de
alimentação ou qualquer outra fonte de alimentação está em conformidade com a Fonte de
Alimentação Limitada. Consulte a etiqueta do produto para obter os parâmetros nominais da
fonte de alimentação.
Si el paquete del dispositivo incluye un adaptador de corriente, utilice únicamente el
adaptador suministrado. Si no se suministra un adaptador de corriente, asegúrese de que el
adaptador de corriente u otra fuente de alimentación que utilice cumple con el límite de la
fuente de alimentación. Consulte la etiqueta del producto para conocer los parámetros de
salida de la fuente de alimentación.
Dacă dispozitivul se furnizează cu un adaptor de alimentare, utilizaţi-l numai pe acesta. Dacă
nu se furnizează niciun adaptor de alimentare, asiguraţi-vă că adaptorul sau o altă alimentare
electrică este compatibilă cu sursa de alimentare limitată. Pentru parametrii de ieşire ai
alimentării electrice, consultaţi eticheta produsului.
Hvis en strømadapter følger med i enhedens pakke, må du kun bruge den medfølgende
adapter. Hvis der ikke medfølger en strømadapter, skal du sikre, at strømadapteren eller en
anden strømforsyning overholder LPS (Limited Power Source). Find strømforsyningens
udgangsparametre i produktets mærkat.
Cihaz paketinde bir güç adaptörü varsa, sadece verilen adaptörü kullanın. Güç adaptörü
verilmediyse, güç adaptörünün veya diğer güç kaynağının Sınırlı Güç Kaynağı ile uyumlu
olduğundan emin olun. Güç kaynağı çıkış parametreleri için ürün etiketine bakın.
Якщо блок живлення входить у комплект поставки, використовуйте тільки наданий блок
живлення. Якщо блок живлення не входить у комплект поставки, переконайтеся, що блок
живлення або інше джерело живлення відповідає вимогам до джерел живлення
обмеженої потужності. Вимоги до вихідних параметрів джерела живлення див. на
етикетці виробу.
Jika adaptor daya disediakan dalam kemasan perangkat, hanya gunakan adaptor yang
disediakan. Jika adaptor daya tidak disediakan, pastikan adaptor daya atau catu daya lain
sesuai dengan Sumber Daya Terbatas. Lihat label produk untuk parameter output catu daya.
ကိရိယာ ထုပ္ပိုးမႈတြင္ ပါဝါ အဒက္ပတာ ထည့္သြင္းပါရွိပါက၊ ေပးထားေသာ အဒက္ပတာကိုသာ
အသံုးျပဳပါ။ ပါဝါ အဒက္ပတာ ပါရွိျခင္းမရွိပါက၊ ပါဝါရင္းျမစ္ ကန္႔သတ္မႈႏွင့္ ကိုက္ညီေသာ ပါဝါ
အဒက္ပတာ သို႔မဟုတ္ အျခား ပါဝါ ေပးသြင္းမႈမ်ားကို သံုးရန္ ဂရုျပဳပါ။ ပါဝါေပးသြင္းမႈ အထြက္
ကန္႔သတ္ခ်က္မ်ားအတြက္ ထုတ္ကုန္တြင္ ေရးသားထားခ်က္ကို ကိုးကားပါ။
Scan the QR code to get the User
Manual for detailed informa�on.
-
 1
1

Hikvision DS-KD9203-MFE6 Guida Rapida
- Tipo
- Guida Rapida
- Questo manuale è adatto anche per
in altre lingue
- English: Hikvision DS-KD9203-MFE6 Quick start guide
- français: Hikvision DS-KD9203-MFE6 Guide de démarrage rapide
- Nederlands: Hikvision DS-KD9203-MFE6 Snelstartgids
- slovenčina: Hikvision DS-KD9203-MFE6 Stručná príručka spustenia
- dansk: Hikvision DS-KD9203-MFE6 Hurtig start guide
- română: Hikvision DS-KD9203-MFE6 Ghid de inițiere rapidă
Documenti correlati
-
Hikvision DS-KIS606-P Guida Rapida
-
Hikvision DS-KD8023-E6 Manuale utente
-
-
-
-
Hikvision DS-7632NI-I2 Manuale utente
-
-
-
-