
Elves HDMI Sync BOX with
Lighting Kits
OS0600112261
OS0600112263
OS0600112267

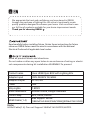
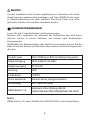
Read carefully before installing fixture. Retain these instructions for future
reference.OREiN fixture must be wired in accordance with the National
Electrical Code and all applicable local codes.
We appreciate the trust and confidence you have placed in OREIN
through the purchase of lighting Kits. We strive to continually create
quality products designed to enhance your home. Visit us online to see
our full line of products available for your home improvement needs.
Thank you for choosing OREIN.
Read all product labels and directions.
Do not make or alter any open holes in an enclosure of wiring or electri-
cal components during kit installation WARNING-To prevent
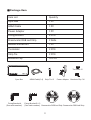
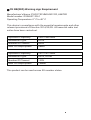
Product name
Adapter Input
Adapter Output
Power
Strip Lights
Elves HDMI Sync BOX with Lighting Kits
100V-240ACV 50/60Hz
DC12V/2A
24W
7.8FtX2
Voice assistants Amazon Alexa, Google Assistant
Control Way APP, Voice, Device
HDMI Cable (1.4) Max Support 4Kx2K
(3840x2160 4Hz/25Hz/30Hz)(4096x2160 24Hz)
Note:
HDIM Cable(1.4) Can not Support 3840x2160 50FPS/60FPS.
1

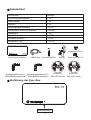
mode
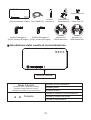
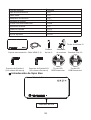
Sync Box HDMI Cable(1.4) Power Adapter
Fixing Bracket-B * 3
(See mark number)
Fixing Bracket-A
(See mark number) Dreamcolor RGB Led Strip Dreamcolor RGB Led Strip
Tie Hoder *2
Strip Tie *2 Brackets Clip *16
Package Item
Item List
Sync Box
HDMI Cable
Power Adapter
Fixing Bracket
Quantity
1 PC
1 PC
1 PC
4 PCS
Dreamcolor RGB Led Strip 2 Rolls
Manual Instruction 1 PC
2 PCSTie Holder
Strip Tie 2 PCS
Brackets Clip 16 PCS
2

mode
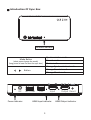
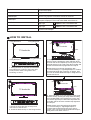
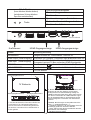
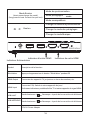
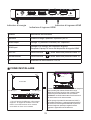
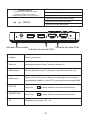
Introduction Of Sync Box
Network indicator
Mode Button
Button
Synchronization mode
Presets mode
Music mode
(short press:change the mode)
(long press at least 5s:reset the sync box)
Change Synchronization' mode
Change Presets' mode
Change Music' mode
HDMI Input indicator HDMI Output indicator Power indicator
Input Output Reset
TOPBOTTOM
DC
3

Symbol Function description
Reset
HDMI Output
USB TOP
USB BOTTOM
DC
HDMI Input
Long press "Reset"button for 5S
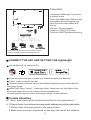
Connect TV, projector or monitor screen etc. devices
Connect PS4,Switch and other games devices/
Computer/Laptops/TV box and other HDMI sianal devices
Strip Light
Strip Light
12V/2A Power Adapter
Note:From TV backside view
Note:From TV backside view
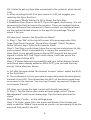
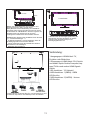
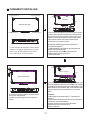
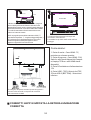
HOW TO INSTALL
1. Facing the back of TV,Paste four brackets :
Fixing Bracket-A is glued to the lower right
corner, and the other 3 are glued to the
remaining 3 corners
TV backside
Input Output Reset
TOPBOTTOM
DC
START
Input Output Reset
TOPBOTTOM
DC
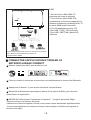
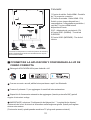
4. Finish the fixing bracket, led strips and
connection of the devices
5. Install the brackets clip on the fixing bracket
END
Input Output ResetTOPBOTTOMDC
END
TV backside
TV backside
START
Tie Holder
Strip Tie
TV backside
Fixing Bracket-A
Fixing Bracket-B
Fixing Bracket-B Fixing Bracket-B
Tie Holder
Strip Tie
Input Output Reset
TOPBOTTOM
DC
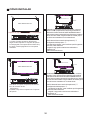
2. Facing the back of TV. start from the "start" (right
bottom corner), finishing the strips adhesion along
from the TOP to the end(left top corner), then we call
this light strip as "TOP" strip. Paste the tie holder and
fix the extra extended strip light with the strip tie.
NOTEPlease move the bar through the APP :
“.Device Settings-.Lightlength Adjust“ to confirm
that the light length just covers the TV length. Then
you can cut off the additional strips or hang them on
the back of the TV.
3. Facing the back of TV, start from the "start' (right
bottom corner), finishing the strips adhesion along
from the BOTTOM to the end(left top corner), then
we call this light strip as "BOTTOM" strip.Paste the
tie holder and fix the extra extended strip light with
the Strip tie.
NOTE: Please move the bar through the APP :
“.Device Settings-.Lightlength Adjust“ to
confirm that the light length just covers the TV
length. Then you can cut off the additional strips or
hang them on the back of the TV.
4

Trouble Shootting
5.Connect the devices via input and output port and
finally sequentially power on the HDMI sync box.
Connection:
1.Output port-HDMl cable-TV, projector
or monitor screen
2.Input port-HDMI cable-PS4,Switch and
other games devices/Computer/Lap-
tops/TV box and other HDMI sianal
devices
3.DC port-12V power adapter
4.USB port 1(TOP)-TOP led strip
5.USB port 2(BOTTOM)-Bottom led strip
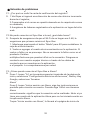
Automatic discovery devices which to be added(through BLE protocol), then follow the
instructions on App.
IMPORTANT:Select "Setting" - "Lightlength Adjust" , Make sure your Strip lights to light
on the right lenght.Then you can cutting off extra extended strips
(You can also keep them then when you change a bigger TV them can help).
Get the AiDot APP for Android or iOS
Create an account and sign in, enable your location and open your Bluetooth.
Press"+" button to add the Sync Box.
CONNECT THE APP AND SETTING THE Lightlength
Q1: Why I didn't receive the verification letter for the registration?
A: 1.Please check if you entered a wrong email address during the registration;
2.Check if the mail was stuck in the spam folder;
3.Make sure you have registered on the app instead of the website.
5

Q2: I failed to get my Sync Box connected to the network, what should
I do?
A: After ensuring the Wi-Fi of your home is 2.4G, we suggest you
resetting the Sync Box first.
1.Long press "Mode"button for 5S to Reset the Sync Box.
2.Readd the Sync Box on the APP If you fail again, donlt worry. It is not
necessary the fault or bug on the product. There are multiple factors
that can influence the connection. Please contact our technical team
via the contact details shown on the app Or the package. We will
check it for you.
Q3.How can I connect the Sync Box to Alexa?
A: Step 1: Tap "Me" at the top left corner of Home page,select'Set-
tings-Third-Party Services", Alexa & Hey Google', Select "Amazon
Alexa" When it says "AiDot with Amazon Alexa
Step 2: Tap"Sign in with Alexa, folow the on-screen instructions to link
your account. When it successfully: it means the connection is
done.Note: If you already have an Alexa APP account but have not
signed in Alexa APP. Tap "Sign in with Alexa, t will take you to the
sign-in page of Alexa APP
Step 3: If Alexa does not successfully add your AiDot devices (which
must have been already added in AiDot APP), you can add them by
saving "Alexa, discover device
A: Q4: Why the app states "No Internet Access" when I select the Wi-Fi
of the Sync Box?
B: The notification is from your phone especially some Android phone
instead of our APP. That is because the Wi-Fi of the device does have
no access to the Internet, You can tap Connect to proceed. Please do
not choose “Cancel”
Q5: How can I share the light control with family members?
A: Step 1: Tap the Home you create at home page, select "Home
Management" enter home share page, Tap the home you want to
share.
Step 2: Select "Invite... at the settings page.
Step 3: At Invite" page, fill in the name and Email of the Invitee you
want to add the "Name" here works as a note, not necessarily to be the
same aS that used in the APP
6

This device complies with part 15 of the FCC Rules. Operation is subject to the
following two conditions: (1) this device may not cause harmful interference, and
(2)this device must accept any interference received, including interference that
may cause undesired operation. Any changes or modifications not expressly
approved by the party responsible for compliance could void the user's authority to
operate the equipment.
NOTE: This equipment has been tested and found to comply with the limits for a
Class B digital device, pursuant to Part 15 of the FCC Rules. These limits are
designed to provide reasonable protection against harmful interference in a
residential installation. This equipment generates, uses and can radiate radio
frequency energy and, if not installed and used in accordance with the instruc-
tions, may cause harmful interference to radio communications.
However, there is no guarantee that interference will not occur in a particular
installation.If this equipment does cause harmful interference to radio or
television reception, which can be determined by turning the equipment off and on,
the user is encouraged to try to correct the interference by one or more of the
following measures:
-Reorient or relocate the receiving antenna.
-Increase the separation between the equipment and receiver.
-Connect the equipment into an outlet on a circuit different from that to which the
receiver is connected.
To maintain compliance with FcC's RF Exposure guidelines, This equipment
should be installed and operated with minimum 20cm distance between the
radiator and your body: Use only the supplied antenna.
FCC WARNING
Wir wissen das Vertrauen zu schatzen, das Sie OREIN durch den Kauf
von Beleuchtungssets entgegengebracht haben. Wir sind bestrebt,
kontinuierlich Qualitatsprodukte zu entwickeln, die Ihr Zuhause
verschonern. Besuchen Sie uns online, um unser vollstandiges
Produktsortiment fur Ihre Heimwerkerbedirfnisse zu sehen.
Vielen Dank dass Sie sich fur OREIN entschieden haben.
7

Vor der Installation des Geräts sorgfältig lesen. Bewahren Sie diese
Anleitung zum späteren Nachschlagen auf. Das OREÍN-Gerät muss
in Übereinstimmung mit dem National Electrical Code und allen
geltenden lokalen Vorschriften verkabelt werden.
Lesen Sie alle Produktetiketten und Anweisungen.
Machen oder verändern Sie während der Installation des Kits keine
offenen Löcher in einem Gehäuse von Kabeln oder elektrischen
Komponenten.
WARNUNG-Um Kabelschäden oder Abrieb zu vermeiden, setzen Sie die
Kabel nicht den Kanten von Blechen oder anderen scharfen Gegenstän-
den aus.
WICHTIG
SICHERHEITSWARNUNGEN:
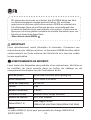
Produktname
Adaptereingang
Adapterausgang
Leistung
Lichtbänder
Elfen HDMI Sync BOX mit Beleuchtungssets
100V-240ACV 50/60Hz
DC12V/2A
24W
7.8FtX2
Voice assistants Amazon Alexa, Google Assistant
Kontrollweg APP, Sprache, Gerät
HDMI-Kabel (1.4) Maximale Unterstützung 4Kx2K
(3840x2160 4Hz/25Hz/30Hz)(4096x2160 24Hz)
Notiz:
HDIM-Kabel (1.4) kann 3840x2160 50FPS/60FPS nicht unterstützen.
8

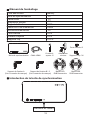
Paketartikel
mode
mode
Einführung der Sync-Box
Artikelliste
Synchronisierungsbox
HDMI Kabel
Netzteil
Befestigungsklammern
Menge
1 PC
1 PC
1 PC
4 PCS
Dreamcolor RGB-LED-Streifen 2 Rolls
Handbuch 1 PC
2 PCS
2 PCS
Krawattenhalter
Krawatte streifen
Klammern Clip 16 PCS
Synchronisierungsbox HDMI Kabel Netzteil
Dreamcolor
RGB-LED-Streifen
Dreamcolor
RGB-LED-Streifen
Krawattenhalter*2
Krawatte streifen Klammern Clip *16
Befestigungsklammern-B * 3
(Siehe Markierungsnummer)
Befestigungsklammern-A
(Siehe Markierungsnummer)
Netzwerkanzeige
9

Mode Taste
Taste
Synchronisationsmodus
Voreinstellungsmodus
Musikmodus
(kurz drücken: Modus ändern)
(mindestens 5s lang drücken:
Sync-Box zurücksetzen)
Synchronisierungsmodus ändern
Modus der Voreinstellungen ändern
Musikmodus ändern
HDMI-Eingangsanzeige HDMI-Ausgangsanzeige
Kraftmesser
Input Output ZurücksetzenOBENUNTERSEITE
DC
Symbol Bedienungsanleitung
Zurücksetzen
(HDMI-Ausgang)
USB-OBEN
USB-UNTERSEITE
DC
(HDMI-Eingang)
Langes Drücken der "Zurücksetzen"-Taste für 5S
Schließen Sie Fernseher, Projektoren oder Bildschirme usw. an.
Verbinden Sie PS4, Switch und andere Spielgeräte/
Computer/Laptops/TV-Box und andere HDMI-Signalgeräte
Streifen Licht
Streifen Licht
12V/2A Netzteil
Hinweis: Von der Rückseite des Fernsehers
Hinweis: Von der Rückseite des Fernsehers
HDMI Output
HDMI Input
TV Rückseite
ANFANG
ENDE
Input Output Zurücksetzen
OBEN
UNTERSEITEDC
Input Output Zurücksetzen
OBENUNTERSEITEDC
TV backside
Krawattenhalterr
Krawatte streifen
Befestigungsklammern-A
Befestigungsklammern-B Befestigungsklammern-B
Befestigungsklammern-B
1. Auf der Ruckseite des Fernsehers kleben Sie
vier Klammern ein: Befestigungsklammer-A
wird an der unteren rechten Ecke geklebt und
die anderen 3 werden an den verbleibenden 3
Ecken geklebt
2. Blicken Sie auf die Ruckseite des Fernsehers und
beginnen Sie mit dem "Anfang" (rechts unten).
Ecke), Beenden der Streifenhaftung entlang von
OBEN bis das Ende (linke obere Ecke), dann nennen
wir diesen Lichtstreifen als "OBEN"-Streifen. Fiigen
Sie die Krawattenhalter ein und befestigen Sie die
eXtra verlangerten Lichtstreifen mit der Krawatte
streifen.
HINWEIS: Bitte bewegen Sie den Balken durch die
APP (". Geräteeinstellungen - .
Lichtlänge Anpassen"), um zu bestätigen, dass die
Lichtlänge gerade den Fernseher abdeckt
Länge. Dann können Sie die zusätzlichen Streifen
abschneiden oder aufhängen
Rückseite des Fernsehers.
10

Verbindung:
1.Ausgangsport--HDMI-Kabel--TV,
Projektor oder Bildschirm
2.Eingangsport--HDMI-Kabel--PS4, Switch
und andere Spiele Geräte/Computer/Lap-
tops/TV-Box und andere HDMI-Signale
Geräte
3.DC-Anschluss - 12V Netzteil
4.USB-Anschluss 1 (OBEN) - OBEN
LED-Streifen
5.USB-Anschluss 2 (UNTEN) - Unterer
LED-Streifen
4. Beenden Sie die Befestigungshalterung, die
LED-Streifen und den Anschluss der Geräte
5.Bringen Sie den Klammerclip an der
Befestigungsklammer an
Blicken Sie auf die Riickseite des Fernsehers und
beginnen Sie beim "Start" (rechte untere
Ecke),Beenden der Streifenhaftung von UNTEN bis
zum Ende (linke obere Ecke),dann nennen wir diesen
Lichtstreifen als "UNTERSEITE" -Streifen. Figen Sie die
Krawatte hoder ein und fixieren Sie die extra
verlangertes Lichtband mit dem Krawatte streifen.
HINWEIS: Bitte bewegen Sie den Balken durch die APP
(". Geräteeinstellungen - .
Lichtlänge Anpassen"), um zu bestätigen, dass die
Lichtlänge gerade den Fernseher abdeckt
Länge. Dann können Sie die zusätzlichen Streifen
abschneiden oder aufhängen
Rückseite des Fernsehers.
TV Rückseite
ANFANG
ENDE
Input Output Zurücksetzen
OBEN
UNTERSEITE
DC
Input Output Zurücksetzen
OBEN
UNTERSEITEDC
TV backside
Krawattenhalter
Krawatte streifen
5.Verbinden Sie die Geräte über Ein- und Ausgangsport und
schließlich sequentiell die HDMI-Sync-Box einschalten.
11

Fehlerbehebung
Automatische Erkennungsgeräte, die hinzugefügt werden sollen (über das BLE-Protokoll), dann
befolgen Sie die Anweisungen in der App.
WICHTIG: Wählen Sie "Geräte Einstellungen" - " Lichtlänge Anpassen" Stellen Sie sicher,
dass Ihre Lichterketten leuchten auf der richtigen Länge. Dann können Sie extra verlängerte
Streifen abschneiden (Sie können sie auch behalten, wenn Sie einen größeren Fernseher
wechseln, können sie helfen).
Holen Sie sich die AiDot-APP für Android oder iOS.
Erstellen Sie ein Konto und melden Sie sich an, aktivieren Sie Ihren Standort und öffnen Sie
Ihr Bluetooth.
Drücken Sie die Taste "+", um die Sync-Box hinzuzufügen.
VERBINDEN SIE DIE APP UND EINSTELLEN DER
KORREKTEN HINTERGRUNDBELEUCHTUNG
F1: Warum habe ich kein Bestatigungsschreiben fur die Registrierung
erhalten?
A: 1.Bitte iberprufen Sie, ob Sie bei der Registrierung eine falsche
E-Mail-Adresse eingegeben haben;
2.Uberprifen Sie, ob die E-Mail im Spam-Ordner stecken geblieben ist:
3.Stellen Sie sicher, dass Sie sich in der App und nicht auf der Website
registriert haben.
F2: Ich konnte meine Sync Box nicht mit dem Netzwerk verbinden, was
soll ich tun?
A: Nachdem Sie sichergestellt haben, dass das WLAN Ihres Hauses 2,4
G betragt, empfehlen wir Ihnen, zuerst die Sync Box zurickzusetzen.
1. Driicken Sie lange auf die Taste "Mode"fir 5S, um die Sync-Box
zuriickzusetzen.
2.Figen Sie die Sync-Box erneut zur APP hinzu. Wenn Sie erneut
fehlschlagen, machen Sie sich keine Sorgen. Es ist nicht erforderlich,
dass der Fehler oder Fehler am Produkt liegt. Es gibt mehrere Faktoren,
die die Verbindung beeinflussen konnen. Bitte
12

F3.Wie kann ich die Sync Box mit Alexa verbinden?
A: Schritt 1: Tippen Sie oben links auf der Startseite auf "Ich, wahien
Sie Einstellungen-Drittanbieterdienste:, Alexa & Hey Google, wahlen
Sie 'Amazon ."Alexa"
schritt 2: Tippen Sie auf,Mit Alexa anmelden', befolgen Sie die
Anweisungen auf dem Bildschirm, um Ihr Konto zu verknuipfen.
Wenn ,AiDot mit Arnazon Alexa angezeigt wird erfolgreich: Dies
bedeutet, dass die Verbindung hergestellt wurde. Hinweis: wenn Sie
bereits ein Alexa APP-Konto haben, sich aber nicht in der Alexa APP
angemeldet haben.Tippen Sie auf "Mit Alexa anmelden', um zur
Anmeldeseite der Alexa APP ZU gelangen
Schritt 3: Wenn Alexa Ihre AiDot-Gerate nicht erfolgreich hinzufigt (die
bereits in der AiDot-APP hinzugefugt worden sein missen), konnen Sie
sie hinzufugen indem Sie "Alexa, Gerst entdecken'” speichern
A: F4: Warum meldet die App"Kein Internetzugriff" wenn ich das WLAN
der Sync Box auswahle?
B: Die Benachrichtigung kommt von Ihrem Telefon, insbesondere von
einigen Android-Telefonen anstelle unserer APP. Das liegt daran, dass
das WLAN des Gerats keinen Zugriff auf das Internet hat, konnen Sie
auf Verbinden tippen, um fortzufahren. Bitte wahlen Sie nicht "Abbrech-
en"
F5: Wie kann ich die Lichtsteuerung mit Familienmitgliedern teilen?
A: Schritt 1: Tippen Sie auf die Startseite, die Sie auf der Startseite
erstellen, wahlen Sie "Heimverwaltung', geben Sie die Seite zur
Heimfreigabe ein. Tippen Sie auf die Startseite, die Sie teilen mochten.
Schritt 2: Wahlen Sie auf der Einstellungsseite “Einladen.."
Schritt 3: Geben Sie auf der Seite "Einladen" den Namen und die E Mail
des Eingeladenen ein, den Sie hinzufugen mochten. Der "Name"
funktioniert hier als Notiz.muss nicht unbedingt mit der in der APP
verwendeten ubereinstimmen
13

Lisez attentivement avant d'installer le luminaire. Conservez ces
instructions pour référence future. Le luminaire OREÍN doit être câblé
conformément au Code national de l'électricité et à tous les codes
locaux applicables.
Lisez toutes les étiquettes des produits et les instructions. Ne faites ni
ne modifiez de trous ouverts dans un boîtier de câblage ou de
composants électriques lors de l'installation du kit.
IMPORTANT
AVERTISSEMENTS DE SÉCURITÉ:
Notiz:
Le câble HDIM (1.4) ne peut pas prendre en charge 3840x2160
50FPS/60FPS.
Wir wissen das Vertrauen zu schätzen, das Sie OREIN durch den Kauf
von Beleuchtungssets entgegengebracht haben. Wir sind Nous
apprécions la confiance que vous accordez à OREIN en achetant des
kits d'éclairage. Nous nous efforçons de créer continuellement des
produits de qualité conçus pour embellir votre maison. Visitez-nous en
ligne pour voir notre gamme complète de produits disponibles pour vos
besoins de rénovation domiciliaire.
Merci d'avoir choisi OREIN.
Nom du produit
Entrée adaptateur
Sortie de l'adaptateur
Pouvoir
Bandes Lumineuses
Elves HDMI Sync BOX with Lighting Kits
100V-240ACV 50/60Hz
DC12V/2A
24W
7.8FtX2
Assistants vocaux Amazon Alexa, Google Assistant
Manière de contrôle APP, Voix, Appareil
Câble HDMI (1.4) Max Support 4Kx2K
(3840x2160 4Hz/25Hz/30Hz)(4096x2160 24Hz)
14

mode
Introduction de la boîte de synchronisation
Indicateur de réseau
Élément de l'emballage
Liste des articles
Boîte de synchronisation
Câble HDMI
Adaptateur secteur
Support de fixation
Quantity
1 PC
1 PC
1 PC
4 PCS
Bande LED RVB Dreamcolor 2 Rolls
Instructions manuelles 1 PC
2 PCS
2 PCS
Porte-cravate
Cravate à rayures
Supports Clip 16 PCS
mode
Boîte de synchronisation Câble HDMI
Adaptateur
secteur
Bande LED
RVB Dreamcolor
Bande LED
RVB Dreamcolor
Support de fixation-B * 3
(Voir le numéro de marque)
Support de fixation-A
(Voir le numéro de marque)
Porte-cravate *2
Cravate à
ayures *2 Supports Clip *16
15

Mode Bouton
Bouton
Mode de synchronisation
Mode préréglages
Mode musiqueMusic
mode
(short press:change the mode)
(long press at least 5s:reset the sync box)
Changer le mode de synchronisation
Changer le mode des préréglages
Changer le mode Musique
Indicateur d'entrée HDMI Indicateur de sortie HDMI
Indicateur d'alimentation
Input Output RéinitialiserHAUT BAS
DC
Symbol Description de la fonction
Réinitialiser
USB HAUT
USB INFÉRIEUR
DC
Appuyez longuement sur le bouton "Réinitialiser" pendant 5S
Connectez des appareils TV, projecteur ou écran de moniteur, etc.
Connectez PS4, Switch et autres appareils de jeux/
Ordinateur/ordinateurs portables/boîtier TV et autres appareils de signal HDMI
Bande lumineuse
Bande lumineuse
12V/2A Power Adapter
Remarque: à partir de la vue arrière du téléviseur
Remarque: à partir de la vue arrière du téléviseur
HDMI Output
HDMI Input
16

1.Face à l'arrière du téléviseur, collez quatre
supports : le support de fixation A est collé
dans le coin inférieur droit et les 3 autres
sont collés sur les 3 coins restants
2. Face à l'arrière du téléviseur, commencez par le "départ"
(en bas à droitecoin),finissant l'adhérence des bandes le
long du haut à la fin (coin supérieur gauche), alors nous
appelons cette bande lumineuse comme Bande "HAUT".
Collez le Porte-cravate et fixez l'extra étendu bande
lumineuse avec le cravate à rayures
REMARQUE: Veuillez déplacer la barre dans l'APP (" .
Paramètres de l'appareil - .
Lightlength Adjust") pour confirmer que la longueur de la
lumière couvre juste le téléviseur
longueur. Ensuite, vous pouvez couper les bandes
supplémentaires ou les accrocher sur le
l'arrière du téléviseur.
3. Face à l'arrière du téléviseur, commencez par le "départ" (coin
inférieur droit),finition de l'adhérence des bandes le long du BAS
jusqu'à la fin (coin supérieur gauche),alors nous appelons cette
bande lumineuse comme bande " BAS". Collez le Porte-cravate
et fixez le bande lumineuse extra étendue avec le cravate à
rayures.
REMARQUE:
Veuillez déplacer la barre dans l'APP (" . Paramètres de
l'appareil - .
Longueur de lumière Régler") pour confirmer que la longueur
de la lumière couvre juste le téléviseur
longueur. Ensuite, vous pouvez couper les bandes
supplémentaires ou les accrocher sur le
l'arrière du téléviseur.
COMMENT INSTALLER
derrière de la télé
START
DÉBUT
FINIR
Input Output RéinitialiserHAUT BASDC
END
derrière de la télé
derrière de la télé
Input Output RéinitialiserHAUT BAS
DC
Input Output RéinitialiserHAUT BAS
DC
Input Output RéinitialiserHAUT BAS
DC
TV backside
Porte-cravate
Cravate à rayures
Support de fixation-A
Support de fixation-B
Support de fixation-B Support de fixation-B
Porte-cravate
Cravate à rayures
4.Terminer le support de fixation, les bandes led et
la connexion des appareils
5.Installez le clip des supports sur le support de
fixation
17

Dispositifs de découverte automatique à ajouter (via le protocole BLE), puis suivez les
instructions sur l'application.
IMPORTANT:Sélectionnez "Paramètres de l'appareil" - "Longueur de lumière Régler"
Assurez-vous que vos lumières de bande
s'allument sur la bonne longueur. Ensuite, vous pouvez couper des bandes supplémentaires
(Vous pouvez également les conserver lorsque vous changez un téléviseur plus grand, ils
peuvent vous aider).
Obtenez l'application AiDot pour Android ou ioS.
Créez un compte et connectez-vous, activez votre emplacement et ouvrez votre Bluetooth.
Appuyez sur le bouton "+" pour ajouter la boîte de synchronisation.
CONNECTER L'APPLICATION ET RÉGLER LE
RÉTROÉCLAIRAGE CORRECT
Lien:
1.Port de sortie--câble HDMI--TV,
projecteur ou écran de moniteur
2. Port d'entrée--câble HDMI--PS4,
commutateur et autres jeux appareils/or-
dinateur/ordinateurs portables/boîtier TV
et autres HDMI sianal dispositifs
3. Port DC-adaptateur secteur 12V
4.Port USB 1 (TOP)--TOP led bande
5.Port USB 2 (BOTTOM)--Bande LED
inférieure
5.Connectez les appareils via le port d'entrée et de sortie et
enfin, allumez séquentiellement le boîtier de
synchronisation HDMI
18

Dépannage
Q1: Pourquoi je n'ai pas reçu la lettre de vérification pour l'inscription ?
A: 1.Veuillez vérifier si vous avez entré une mauvaise adresse e-mail
lors de l'inscription ;
2.Vérifiez si le courrier a été bloqué dans le dossier spam ;
3.Assurez-vous que vous vous êtes inscrit sur l'application au lieu du
site Web.
Q2:Je n'ai pas réussi à connecter ma Sync Box au réseau, que dois-je
faire ?
A: Après vous être assuré que le Wi-Fi de votre maison est de 2,4 G,
nous vous suggérons de réinitialiser d'abord la Sync Box.
1.Appuyez longuement sur le bouton "Mode" pendant 5S pour
réinitialiser la boîte de synchronisation.
2. Ajoutez à nouveau la boîte de synchronisation sur l'application. Si
vous échouez à nouveau, ne vous inquiétez pas.
Il n'est pas nécessaire que le défaut ou le bug sur le produit. Il y a
plusieurs facteurs qui peuvent influencer la connexion.
S'il te plaît contactez notre équipe technique via les coordonnées
indiquées sur l'application ou le package. Nous le vérifierons
pour vous.
Q3.Comment connecter la Sync Box à Alexa ?
A: Étape 1 : appuyez sur "Moi" dans le coin supérieur gauche de la page
d'accueil, sélectionnez "Paramètres-Services tiers", Alexa et
Hey Google", sélectionnez "Amazon Alexa"
Étape 2 : appuyez sur « Connectez-vous avec Alexa, suivez les
instructions à l'écran pour lier votre compte. Quand il est dit
« AiDot avec Amazon Alexa avec succès : cela signifie que la
connexion est établie. Remarque : si vous avez déjà un compte
Alexa APP mais que vous ne vous êtes pas connecté à Alexa
APP.Appuyez sur « Connectez-vous avec Alexa », cela vous mènera à la
page de connexion de l'application Alexa
Étape 3: Si Alexa n'ajoute pas avec succès vos appareils AiDot (qui
doivent avoir déjà été ajoutés dans l'APP AiDot), vous pouvez
les ajouter en sauvegardant "Alexa, découvre l'appareil
19
La pagina si sta caricando...
La pagina si sta caricando...
La pagina si sta caricando...
La pagina si sta caricando...
La pagina si sta caricando...
La pagina si sta caricando...
La pagina si sta caricando...
La pagina si sta caricando...
La pagina si sta caricando...
La pagina si sta caricando...
La pagina si sta caricando...
La pagina si sta caricando...
La pagina si sta caricando...
La pagina si sta caricando...
La pagina si sta caricando...
La pagina si sta caricando...
La pagina si sta caricando...
-
 1
1
-
 2
2
-
 3
3
-
 4
4
-
 5
5
-
 6
6
-
 7
7
-
 8
8
-
 9
9
-
 10
10
-
 11
11
-
 12
12
-
 13
13
-
 14
14
-
 15
15
-
 16
16
-
 17
17
-
 18
18
-
 19
19
-
 20
20
-
 21
21
-
 22
22
-
 23
23
-
 24
24
-
 25
25
-
 26
26
-
 27
27
-
 28
28
-
 29
29
-
 30
30
-
 31
31
-
 32
32
-
 33
33
-
 34
34
-
 35
35
-
 36
36
-
 37
37


in altre lingue
- English: Orein OS0600112267 User guide
- français: Orein OS0600112267 Mode d'emploi
- español: Orein OS0600112267 Guía del usuario
- Deutsch: Orein OS0600112267 Benutzerhandbuch
Altri documenti
-
Govee H61C3 Guida utente
-
 ONFORU DT15UV Manuale utente
-
Samsung HW-Q950T Manuale utente
-
Samsung HW-Q900T Manuale utente
-
Samsung HW-Q80R Manuale utente
-
Samsung HW-N950 Manuale utente
-
Samsung HW-Q90R Manuale utente
-
Samsung HW-N850 Manuale utente
-
Samsung HW-Q70R Manuale utente
-
Samsung HW-Q70T Manuale utente
