
42/22
Ride on
Mercedes-AMG GT R
No. 460361 green
No. 460362 white
No. 460548 black
Frequency bands: 2,4 GHz | Frequency range: 2402MHz – 2480 MHz | EIRP: < 5 mW (max. power transmitted)
max. kg
25
DE - Gebrauchsanleitung
GB - Instruction
FR - Notice
IT - Istruzione
ES - Instrucción
CZ - Návodkpoužití
PL -Instrukcjaużytkowania
NL - Gebruiksaanwijzing
SK -Návodnapoužitie
DE - Geeignet für Kinder ab 3 Jahren.
Achtung: Für Kinder unter 36 Monaten nicht geeignet. ERSTICKUNGSGEFAHR!
Enthält verschluckbare Kleinteile. Von Kleinkindern unbedingt fernhalten
Dieses Spielzeug ist aufgrund seiner Höchstgeschwindigkeit nicht für Kinder
unter 3 Jahren geeignet!
• Entfernen Sie vor dem Spielbetrieb alle Schutzfolien von sämtlichen Teilen
• Dieses Gerät ist nicht dafür bestimmt, durch Personen (einschließlich Kinder) mit eingeschränk-
ten physischen, sensorischen oder geistigen Fähigkeiten oder mangels Erfahrung und/oder
mangels Wissen benutzt zu werden.
• Alters- und entwicklungsbedingt kann ein Mindestalter von 4 Jahren angebracht sein
• Max. Gewicht: < 25 kg
Vor der Montage
• Die Montage darf nur von einem Erwachsenen vorgenommen werden.
Halten Sie während der Montage Kinder fern.
• Für die Montage benötigen Sie folgende Werkzeuge (nicht enthalten):
Kreuzschlitzschraubendreher
GB - Suitable for children over 3 years.
Warning: Not suitable for children under 36 months. RISK OF SUFFOCATION!
Contains small parts which can be swallowed. Keep away necessarily from children
Due to its top speed this toy is not suitable for children under 3 years!
•
• This product is not intended for use by individuals (including children) with reduced
physical, sensory or mental capabilities or lack of experience and / or knowledge.
• Depending on development, a minimum age of 4 years could be appropriate
• Maximum weight: < 25 kg
Before assembly
• Adult required for assembly. Keep children away while assembling.
• Tools (not included) needed for assembly: screwdriver.
FR - Produit à utiliser par les enfants de plus de 3 ans.
Attention: Ne convient pas aux enfants de moins de 36 mois. DANGER D‘ETOUFFEMENT!
Contient des pièces petites qui peuvent être avalées.
Ne pas laisser à la portée de petits enfants.
Du fait de la vitesse élevée que ce modèle peut avoir il est inad apté pour
des enfants de moins de 3 ans!
•
• Ce dispositif n‘est pas destiné à être utilisé par des personnes (y compris les enfants) dont les
capacités physiques, sensorielles ou mentales ou manque d‘expérience et/ou les connais sances
pour être.
• En fonction du développement ou de l‘âge on peut également considérer 4 ans)
• Poids max. < 25 kg
Avant le montage
•
l’assemblage
• Pour l’assemblage vous avez besoin du matériel suivant (pas contenu dans le kit):
tournevis cruciforme.
IT - Adatto ai bambini dal 3 anno di vita.
Attenzione: Non adatto a bambini di età inferiore a 36 mesi. RISCHIO DI SOFFOCAMENTO!
Contiene piccoli pezzi che possono essere ingeriti.
Tenere sempre fuori dalla portata dei bambini.
A causa della velocità, la vettura non è adatto ai bambini sotto i 3 anni!
• Prima di giocare, rimuovere tutte le pellicole protettive presenti su tutte le parti
• Questo prodotto non è destinato ad essere utilizzato da persone (bambini compresi) con capacità
conoscenza.
• Dipende del sviluppo del bimbo
• Peso massimo: < 25 kg
Prima del montaggio
•
• Per il montaggio sono necessari i seguenti attrezzi (no incluso): Cacciavite.
ES - Apto para niños mayores de 3 años.
Atención: No es recomendable para los niños menores de 36 meses. RIESGO DE ASFIXIA!
Contiene piezas pequeñas. Mantenga necesariamente lejosde los niños.
Este juguete no es adecuado para menores de 3 años, por su velocidad máxima!
• Antes de jugar, quite todas las películas protectoras de todas las partes
• Es producto no es para personas (incluidos niños) con discapacidad física, mental y sensonriais.
O ninguna experiencia ni conocimiento.
• Edad y desarrollo puede ser una edad minima de 4 años
• Peso máximo: < 25 kg
Antes del montaje
• El Montaje debe ser realizado por un adulto. Mantener los niños alejado durante el montaje.
• Para el montaje se necesitan las siguientes herramientas (no incluido): Destornillador.
CZ -Určenoprodětiod3let.
Varování: NEBEZPEČÍUDUŠENÍ!
Vzhledemkmaximálnírychlosti,kterouvyvíjí,neníhračkavhodnáprodětido
3 let!
•
•
•
• Maximální hmotnost: < 25 kg
Předmontáží
•
•
DE - Allgemeine Hinweise
JAMARA e.K. übernimmt keine Haftung für Schäden, die an dem Produkt selbst oder durch dieses
entstehen, sofern diese auf falsche Bedienung oder Handhabungsfehler zurückzuführen sind. Der
Kunde allein trägt die volle Verantwortung für die richtige Bedienung und Handhabung; dies umfasst
insbesondere die Montage, den Ladevorgang, die Verwendung bis hin zur Wahl des Einsatzberei-
ches. Bitte beachten Sie hierzu die Bedienungs- und Gebrauchsanleitung, diese enthält wichtige
GB - General information
JAMARA e.K. is not liable for any damage caused to the product itself or through this, provided this
is due to improper operation or handling errors. The Customer alone bears the full responsibility for
the proper use and handling, including without limitation, the assembly, the charging process, the
use and choice of the operation area. Please refer to the operating and user instructions, it contains
important information and warnings.
FR - Remarques générales
La société JAMARA e.K. n’est pas responsable de dommages, que ce soit au niveau du modèle
ou causé par celui-ci, résultant d’une utilisation non appropriée. Seul le client est responsable con-
cernant la mise en oeuvre et l’utilisation conforme du matériel; cela va de l’assemblage, en passant
par la charge des accus et allant jusqu’au domaine d’utilisation. Pour cela, veillez lire attentivement
la notice d’assemblage et d’utilisation, celle-ci contient d’importantes informations ainsi que les con-
signes de sécurités.
IT - Informazioni generali
JAMARA e.K. non e´responsabile per danni, sostenute al prodotto stesso o attraverso questo, do-
vuti ad una gestione non corretta del articolo. Solo il cliente si assume la piena responsabilità per
la manutenzione e l´utilizzo corretto dello stesso; questo include il montaggio, la ricarica, l´utilizzo,
contengono informazioni e avvertimenti molto importanti.
ES - Información general
JAMARA e.K. no se hace responsable de los daños causados al producto en sí o por medio de
esto, a menos que esto se debe al mal funcionamiento o errores de manejo. El cliente solo tiene la
responsabilidad completa para el uso y manejo adecuado, incluyendo, sin limitaciones, el montaje,
CZ-Vyloučeníodpovědnosti
PL -Wykluczenieodpowiedzialności
-
NL - Uitsluiting van de aansprakelijkheid
-
bruik ervan indien deze schade voortvloeit van onjuiste bediening of foutief gebruik van het product.
De klant zelf is uitsluitend aansprakelijk voor de correcte bediening en juist gebruik van het product:
het omvat met name de montage, het ladingproces, het gebruik en de keuze van het toepassings-
gebied. Wij vragen gaarne kennis te nemen van de bedienings- en gebruiksaanwijzing die cruciale
gegevens en waarschuwing omvat.
SK-Vylúčeniezodpovednosti
Firma JAMARA e.K.
-
upozornenia.

2
PL-Wolnoużywaćosobomod3lat!
Uwaga! MOŻNASIĘZADŁAWIĆ!
Absolutnie
Zpowodumaksymalnej,rozwijanejprędkościtazabawkanienadajesiędla
dzieciwwiekuponiżej3lat.
• Maks. waga: < 25 kg
Przedmontażem
NL - Geschikt voor kinderen vanaf 3 jaar.
Opgelet: Niet bestemd voor kinderen jinger dan 3jaar. GEVAAR VOOR VERTIKKING!
Bevat kleine elementen, die geslikt kunnen worden.
Buiten bereik houden van kleine kinderen.
Vanwege de maximale snelheid die wordt ontwikkeld, is dit speelgoed niet voor
kinderen onder 3 jaar geschikt!
• Voordat het wordt gespeld, moet de beschermfolie van alle onderdelen worden verwijderd.
• Dit toestel is niet bestemd voor gebruik door personen (inclusief kinderen) met beperkte fysische,
sensorische, cognitieve, onbekwame vaardigheden
• Afhankelijk van leeftijd en ontwikkeling is de minimale leeftijd voor het spelen met dit speelgoed
4 jaar.
• Max. gewicht: < 25 kg
Vóór de installatie
• De installatie mag enkel door een volwassene worden uitgevoerd.
Tijdens de installatie mogen de kinderen niet in de buurt van het speelgoed verblijven.
• Het bij de installatie vereiste gereedschap (niet meegeleverd):
Kruiskopschroevendraaier
SK - Vhodné pre osoby od 3 rokov!
Pozor: NEBEZPEČENSTVOZADUSENIA!
Hračkaniejevhodnápredetido3rokovvzhľadomkmaximálnejvyvíjanej
rýchlosti.
Predmontážou
max. kg
25
DE - Konformitätserklärung
Hiermit erklärt JAMARA e.K., dass die Produkte‚ “Mercedes-AMG GT R, No. 460361, No. 460362,
No. 460548“ den Richtlinien 2014/35/EU, 2014/53/EU, 2011/65/EU und 2009/48/EG entsprechen.
-
bar: www.jamara-shop.com/Konformitaet
GB-CerticateofConformity
Hereby JAMARA e.K. declares that the products “Mercedes-AMG GT R, No. 460361, No. 460362,
No. 460548“ comply with Directives 2014/35/EU, 2014/53/EU, 2011/65/EU and 2009/48/EC.
www.jamara-shop.com/Conformity
FR - Déclaration de conformité
Par la présente, JAMARA e.K. déclare que les produits “Mercedes-AMG GT R, No. 460361,
No. 460362, No. 460548“ sont conformes aux Directives 2014/35/UE, 2014/53/UE, 2011/65/UE et
2009/48/CE.
Le texte intégral de la déclaration de conformité CE est disponible via l‘adresse suivante Adresse
www.jamara-shop.com/Konformitaet
IT - Dichiarazione di conformità
Con la presente JAMARA e.K. dichiara che i prodotti “Mercedes-AMG GT R, No. 460361,
No. 460362, No. 460548“ sono conformi alle Direttive 2014/35/UE, 2014/53/UE, 2011/65/UE e
2009/48/CE.
www.jamara-shop.com/Conformity
ES - Declaración de conformidad
Por la presente JAMARA e.K. declara que los productos “Mercedes-AMG GT R, No. 460361,
No. 460362, No. 460548“ cumplen con las Directivas 2014/35/UE, 2014/53/UE, 2011/65/UE.
-
www.jamara-shop.com/Conformity
CZ - Prohlášeníoshodě
“Mercedes-AMG GT R, No. 460361,
No. 460362, No. 460548“
ES.
:
www.jamara-shop.com/Conformity
PL-Deklaracjazgodności
“Mercedes-AMG GT R, No. 460361,
No. 460362, No. 460548“ jest zgodny z dyrektywami 2014/35/UE, 2014/53/UE, 2011/65/UE oraz
2009/48/WE.
www.jamara-shop.com/Conformity
NL - Conformiteitsverklaring
“Mercedes-AMG GT R, No. 460361,
No. 460362, No. 460548“ aan de richtlijnen 2014/35/EU, 2014/53/EU, 2011/65/EU a 2009/48/ES
voldoen.
De volledige tekst van de EU-conformiteitsverklaring is beschikbaar op het volgende internetadres:
www.jamara-shop.com/Conformity
SK - Vyhlásenie o zhode
“Mercedes-AMG GT R, No. 460361, No. 460362,
No. 460548“je v súlade so smernicami 2014/35/EU, 2014/53/EU, 2011/65/EU a 2009/48/ES.
Úplné znenie vyhlásenia o zhode EÚ je dostupné na nasledovnej internetovej adrese:
www.jamara-shop.com/Conformity
DE - Lesen Sie die komplette Bedienungsanleitung und Sicherheitshinweise sorgfältig
durch bevor Sie das Modell in Betrieb nehmen.
GB - Read the complete instructions and security instructions carefully before using the
model.
FR - Veuillez lire attentivement et entièrement la notice et les consignes de sécurités
avant tout utilisation de ce produit!
IT -
sicurezza prima di usare il modello.
ES - Lea atentamente la instruccion completa y seguridad antes de poner el modelo en
funcionamiento
CZ -
pokyny.
PL -
NL - Lees zorgvuldig de volledige handleiding en de veiligheidsinstructie voordat het
model wordt gestart.
SK -
DE -
aus den Augen.
GB - To prevent accidents and injuries, DO NOT leave your Child unattended during
operation of the vehicle. Never let your Child out of your sight while the driving a
vehicle .
FR -
conduire sans surveillance. Ne laissez pas votre enfant conduire le model hors de
votre vue.
IT -
veicolo. Non lasciate il suo bambino durante la guida del Modello fuori dalla sua
vista.
ES - Para evitar accidentes y lesiones NUNCA deje su niño desantendido a operar el
vehículo. No deje su niño mienteras conduce con el vehículo de su vista.
CZ -
PL -
bez nadzoru. Nie spuszczaj dziecka z oczu podczas jazdy modelem.
NL -
toezicht besturen. Verlies het kind nooit uit het oog wanneer het aan het spelen
met een model is.
SK -

3
DE -
gefährlichen Stellen gefahren werden. Betreiben Sie das Modell nur an Orten wie
z. B. private Parkplätze, Privatgrundstücke oder an sonstigen ungefährlichen
Plätzen. Achten Sie darauf, das keine Menschen oder Tiere gefährdet sind.
GB - DO NOT use the vehicle on public roads or places or other dangerous locations.
other safe locations. Make sure that no person or animal is endangered.
FR -
bliques, des pentes ou autres endroits dangereux. Manoeuvrez le véhicule que dans
des endroits tels que des parkings ou terrains privés ou autre emplacement pas
dangereux. Assurez-vous qu’aucune personne ou animal soient menacés.
IT - È proibito guidare il modello su strade pubbliche, aere pubbliche, in discesa o altri
luoghi pericolosi. Usare il modello solo in posti come parcheggio privato, terreno
privato oppure luoghi non pericolosi. Fare attenzion e di non mettere in pericolo viti
umane oppure animali.
ES - No usar el modelo en las vías pública o sitios, declive o sitios peligrosos. Usar el
modelo solo en puestos como aparcamiento privados, terreno privado o otros sitios
no peligrosos. Asegúrese, de no poner en riesgo personas o animales.
CZ -
PL
NL
plaatsen worden gebruikt. Het is enkel toegestaan het model op plaatsen zoals
privéparkeerterreinen, privépercelen of andere beveiligde plekken te gebruiken.
SK
DE - Das Modell hält nach dem loslassen des Gaspedals, auf einer waagrechten Fläche
selbstständig an. Das Fahrzeug besitzt keine zusätzliche Bremse, oder
Feststellbremse. Betreiben Sie das Fahrzeug deshalb nicht an Steigungen oder
Gefällen und sichern Sie es beim Abstellen gegen selbstständiges Wegrollen.
GB - The model stops after releasing the accelerator, independently on a horizontal
surface. The vehicle has no brake or parking brake. Do not operate the vehicle uphill
or downhill, and secure it when parking.
FR - Après avoir lâché la pédale des gaz (radiocommande), le modèle s’arrête par
lui-même sur une surface horizontale. La voiture n’est pas équipée de freins ou frein
à main. De ce fait n’utilisez pas ce modèle aux endroits pentus, ascendant ou
descendant, et assurez-vous que une fois votre voiture parquée, celle-ci ne peut pas
roulée par elle-même.
IT -
su una un´area piana. La vettura non è dotata né di freno manuale né freno di
sicurezza. Non usare il modello in salita oppure discesa, si rischia di perdere e/o
muoversi o scivolare mentre è fermo.
ES - El modelo frena automáticamente cuando el niño deja el pedal. El vehículo no tiene
frenos separados. No usar el modelo en subidas o declive, riesgo de perder o dañar
el modelo. Asegurarse de que el vehículo no se mueve.
CZ - Po sundání nohy z plynového pedálu se model automaticky zastaví na vodorovném
PL -
poziomie powierzchnia. Model nie posiada dodatkowego hamulca ani hamulca
NL - Nadat de voet van het pedaal wordt genomen, stopt het model automatisch op een
horizontaal oppervlak. Het model is voorzien van geen aanvullende remmen of
parkeerrem. Het voertuig mag dus niet op hellingen worden gebruikt en moet het
tijdens het parkeren tegen wegrollen worden beveiligd.
SK - Po stiahnutí nohy z plynového pedála sa model automaticky zastaví na vodorovnej
DE - ACHTUNG
Für ein sicheres Fahren stellen Sie zunächst sicher, dass Kinder zusätzlich die
folgenden Regeln begreifen und befolgen:
- Niemals andere Kinder mitnehmen. (nur für 1 Person geeignet)
- Niemals ohne Schuhe fahren.
- Niemals bei Dunkelheit fahren.
- Mit Schutzausrüstung zu benutzen.
Hände, Haare, lose Kleidung und Gegenstände von drehenden Teile entfernt halten.
Das Modell nicht in Räumen oder Hallen mit hoher Luftfeuchtigkeit (z.B. Garagen), im
Regen oder auf nassen Flächen betreiben, es besteht die Gefahr von Fehlfunktionen
oder Schäden an Elektronik und Gehäuse.
Das Modell ist nicht wasserdicht und nicht spritzwassergeschützt. Betreiben Sie es nur
sonstige verschmutzte Untergründe geeignet.
GB - DANGER
For safe driving, you should make sure that your Child understand and adheres to the
following rules:
- Always sit tight, do not get up during the ride.
- Never take additional Children for a ride. (The vehicle is only suitable for 1 person)
- Hold tight.
- Never drive without shoes.
- Never drive in the dark.
- To be used with protective equipment.
Keep hands, hair, loose clothing and any other item away from any rotating parts.
The Model should not be used in rooms or halls with high humidity, in the
rain or on wet surfaces. Risk of malfunction or damage to electronics and housing.
The model is not water- or splash-proof. Only operate on asphalted surfaces (such as
paving stones). The model is not suitable to be operated in grass or loose soil.
FR - ATTENTION
et les respectera:
- Toujours s’asseoir correctement, ne pas se lever pendant l’utilisation du véhicule.
- Ne jamais emmener d’autres enfants. (que pour une personne)
- Toujours bien se tenir.
- Ne jamais rouler sans chaussures.
- Ne jamais rouler la nuit.
- A utiliser avec un équipement de protection.
Ne pas faire fonctionner le modèle dans des salles ou locaus à forte humidité, sous la
pluie ou des surfaces mouillées sinon il y a le risque de dysfonctionnement ou de
dommage pour l’électronique et la carapace.
Ce modèle n‘est pas étanche et non protégé contre les aspersions. Fonctionne
uniquement sur des surfaces asphaltées ( par ex. Pavés). Ce modèle ne convient pas
pour une circualti on sur les prairies ou d´autres surfaces, sols poluées.
IT - ATTENZIONE
Per una guida sicura si dovrebbe fare in modo che il bambino comprende e segue
queste regole:
- Sempre stare seduto, non alzarsi mentre la guida.
- Sempre tenersi bene.
- Non guidare mai senza scarpe.
- Non guidare mai al buio.
- Da utilizzare con dispositivi di protezione.
Tenete mani, capelli e parti svolazzanti lontane da parti rotabili.
Non usare il modello in ambiente umido, sotto la pioggia oppure aeree
bagnate. Rischio di malfunzionamento e danni.
ES - ATENCIÓN
Para una conducion segura debe asegurarse de que los niños entienden y obedezcan
a las siguintes reglas:
- Siempre estar asentado, no levantar mientre se conduce.
- Siempre tener bien.
- Nunca conduzca sin zapatos.
- Nunca conducir en la oscuridad
No usar el modelo en habitaciones o salas con alta humedad, en la lluvia o en
El modelo no es impermeable y no está protegido de salpicaduras. Usar solamente en
CZ - POZOR
- Nikdy nejezdíme bez bot.
PL - UWAGA
- Siadamy zawsze stabilnie, nie wstajemy podczas jazdy.
1 osoba).
elektroniki i obudowy.
tylko na nawierzchniach asfaltowych (np. na kostkach brukowych). Model nie nadaje
No Brake

4
NL - LET OP
ze worden nageleefd:
- Blijf altijd rustig zitten, sta niet op tijdens het rijden.
- Neem nooit andere kinderen mee. (het model is geschikt voor slechts één persoon)
- Houd altijd vast.
- Rijd nooit zonder schoenen.
- Rijd nooit in het donker.
- Gebruik het beveiligingsapparaat.
regen of op natte oppervlakken omdat het gevaar bestaat dat het model niet juist zal
werken of dat de elektronica of de behuizing schade oploopt.
l op asfaltoppervlakken (bv. op straatsteen). Het model is niet geschikt voor gebruik
op weilanden of andere vervuilde oppervlakken.
SK - UPOZORNENIE
- Nikdy nejazdíme bez topánok.
- Nikdy nejazdíme po zotmení.
elektroniky a karosérie.
DE - Lieferumfang
• Modell
• Fernsteurung
• Fahrakku
• Ladegerät
• Anleitung
GB - Box content:
• Model
• Transmitter
• Battery pack
• Charger
• Audio connection cable
• Assembly tool
FR - Contenu du kit:
• Modèle
• Radiocommande
• Accu de propulsion
• Chargeur
• Notice
IT - Contenuto del kit:
• Modello
• Trasmittente
• Pacco batteria
• Caricatore
ES - Contenido del kit:
• Modelo
• Emisora
• Batería
• Cargador
CZ - Obsah krabice:
• Modelka
• Dálkové ovládání
• Pokyny
PL-Zawartośćpudełka:
• Model
• Paczka baterii
NL - Inhoud doos:
• Model
• Afstandsbediening
• Batterijpakket
• Oplader
• Audio-aansluitkabel
• Montagegereedschap
SK - Obsah balenia:
• Model
• Balenie batérií
DE - Achtung!
Der Bausatz in unmontiertem Zustand darf nicht in die Hände von Kleinkindern ge-
langen, da dieser verschluckbare Kleinteile enthält. Die Montage sollte ausschließ-
lich von einem Erwachsenen durchgeführt werden.
GB - Attention!
Keep the not mounted kit away from small children as it contains swallowable parts.
It must be assembled or checked by adult to make sure the car is assembled on the
right way before playing.
FR - Attention!
Le kit à l’état non assemblé ne doit en aucun cas être à la portée des enfants, puisqu’il
contient des pièces susceptibles d’être avalées. L´assemblage doit impérativement
êtreeectuéparunadulte.
IT - Attenzione!
Il Kit in stato non montato, non deve cadere nelle mani di bambini piccoli, in quanto
contienepiccolepartichesipossonoinghiottire.Ilmontaggiodeveessereeettuato
solo da un adulto.
ES - ¡Atención!
El Kit en el estado no montado, no debe caer en las manos de los niños pequeños,
ya que contiene piezas pequeñas que pueden ser tragadas. El montaje sólo debe ser
realizado por un adulto.
CZ -Upozornění!
Nesestavenýmodelmějtezdosahumalýchdětí,obsahujemaléčásti,kterélzespol-
knout.Sestaveníakontrolabymělabýtprovedenadospělouosobou,abybyl
automobilsestavensprávnýmzpůsobem.
PL - Uwaga!
Zestaw w stanie niezmontowanym nie może dostać się do rąk małych dzieci,
ponieważzawieramałeczęści,któremogązostaćpołknięte.Montażpowinienbyć
wykonywanywyłącznieprzezosobędorosłą.
NL - Let op!
De bouwdoos mag in niet-gemonteerde staat niet in handen van kleine kinderen val-
len, aangezien deze kleine onderdelen bevat die kunnen worden ingeslikt. Montage
mag alleen door een volwassene worden uitgevoerd.
SK - Pozor!
Súpravasavnezmontovanomstavenesmiedostaťdorúkmalýmdeťom,pretože
obsahuje malé časti, ktoré môžu prehltnúť. Montáž môže vykonávať len dospelá
osoba.
DE - Benutzung unter unmittelbarer Aufsicht von Erwachsenen!
Das Modell zu steuern erfordert ein gewisses Mindestmaß an Geschick und
Vorsicht. Machen Sie sich deshalb unbedingt vor dem Betreiben des Modells mit
seinen Eigenschaften und seiner Steuerung vertraut. Das Modell hat ein hohes
Eigengewicht. Dadurch besteht ein erhöhtes Schadens und Verletzungsrisiko im
Falle eines Kontrollverlustes. Vermeiden Sie jegliche absichtliche oder
die Gefährdung von Personen.
GB - Only use in direct supervision of an adult!
To control the vehicle a minimum skill level and caution is needed. Make sure you
are familiar with the operation of the model and its characteristics. The model is
heavy. This is an increased risk of injury and damage in the event of loss of
control. Avoid any kind of intentional or unintentional collisions with objects or
hazards to persons.
FR - Utiliser uniquement sous la surveillance d’un adulte!
Le pilotage du modèle demande une certaine dose d’adresse et de prudence. De
ce fait familiarisez-vous avec le modèle , surtout au niveau des caractéristiques et
ses commandes avant toute utilisation. Le modèle a un poids propre élevé. De
ce fait le risque de dommages ou de blessures est élevé dans le cas d’une perte
véhicules, objets ou personnes.
IT - Utilizzare solo sotto la diretta sorveglianza di un adulto!
Per manovrare il modello è indispensabile una certa abilità e cautela.
Consigliamo in questo caso di „conoscere“ prima il modello e le sue
abbastanza elevato. Per mezzo di ciò è aumentato il rischio di danno e lesioni in
caso di una perdita del controllo. Evitare qualsiasi forma d‘impatti con oggetti e/o
messa in pericolo di persone.
ES - Usado bajo la supervisión directa de un adulto!
Maniobrar el modelo requieres un cierto nivel mínimo de habilidad y prudencia.
Se recomienda en este caso de “conocer” primero el modelo y su características
de conduccion y la emisora. El modelo tiene un peso bastante alto, por eso se
aumenta el riesgo de daños y lesiones en el caso de una pérdida de control.
Evitar cualquier tipo de impacto con objetos y/o peligro de personas.
CZ - Použitíjenpoddohledemdospěléosoby!
PL - Stosowaćpodbezpośrednimnadzoremosobydorosłej!
NL - Gebruik onder direct toezicht van een volwassene!
Het besturen van het model vereist een bepaald minimum aan vaardigheden en
voorzorgsmaatregelen. Daarom is het nodig voor het gebruik van het model
kennis met zijn met de functies en het stuursysteem te nemen. Het model wordt
door zijn hoge eigen gewicht gekenmerkt. Dit kenmerk verhoogt het risico op
schade en letsel bij verloren controle. Vermijd elke, opzettelijke of onopzettelijke
botsing of aanrijding tegen voorwerpen of enige vorm van het in gevaar brengen
van andere personen.
SK - Používajtepodpriamymdohľadomdospelejosoby!

5
1
2
3
4
5
7
8
16
15
14
13
12
11
10
9
Chassis
Chassis
Chassie
Chassis
Chásis
Podvozek
Podwozie
Chassis
Podvozok
Lenkrad
Steering wheel
Volant directionnel
Sterzo
Volante
Volant
Kierownica
Stuurwiel
Volant
Windschutzscheibe
Windshield
Pare-brise
Parabrezza
Parabrisas
Szyba przednia
Voorruit
Heckspoiler
Rear Spoiler
Aileron arrière
Spoiler posteriore
Tylny spojler
Achterspoiler
Antriebsrad 2x
Driving wheels 2x
Roue d‘entraînement 2x
Ruota motrice 2x
Rueda motriz 2x
Hnací kolo 2x
Aandrijfwiel 2x
Hnacie koleso 2x
MP3 Kabel
MP3 Cable
Cable MP3
Cavo MP3
Cable MP3
MP3 kabel
Kabel MP3
MP3-kabel
MP3 kábel
Radkappe 4x
Wheel cap 4x
Protection de roue 4x
Copriruota 4x
Llanta 4x
Kryt kola 4x
4x
Wieldop 4x
Kryt kolesa 4x
Rückspiegel 2x
Rearview mirror 2x
Rétroviseur 2x
Retrovisore 2x
Retrovisor 2x
Okno auta 2x
Lusterko wsteczne 2x
Achteruitkijkspiegel 2x
Spätné zrkadlo 2x
Vorderrad 2x
Front wheel 2x
Roue avant voorwiel 2x
Ruote anteriori 2x
Ruedas delanteras 2x
2x
2x
Wiel vooraan 2x
Predné koleso 2x
Fernsteuerung
Transmitter
Radiocommande
Trasmittente
Emisora
Afstandsbediening
Splint
Split pin
Goupille
Spalato spina
Pasador
Pen
U-Scheibe 6x Ø 10 mm
Washer 6x Ø 10 mm
Rondelles 6x Ø 10 mm
Rondella 6x Ø 10 mm
Arandela 6x Ø 10 mm
Sluitring 6x Ø 10 mm
Mutter
Nut
Ecrou
Dado
Tuerca
Matice
Moer
Matica
Ladegerät
Charger
Chargeur
Caricatore
Cargador
Lader
Schrauben 1x Ø4x12
Screws 1x Ø4x12
Vita 1x Ø4x12
Tornillo 1x Ø4x12
Šroub 1x Ø4x12
Schroef 1x Ø4x12
Skrutka 1x Ø4x12
Schrauben 1x Ø5x38
Screws 1x Ø5x38
Vita 1x Ø5x38
Tornillo 1x Ø5x3
Šroub 1x Ø5x3
Schroef 1x Ø5x3
Skrutka 1x Ø5x3
6
DE - Teile
GB - Parts
FR - Pièces
IT - Parti
ES - Partes
CZ - Části
PL - Części
NL - Onderdelen
SK - Časti
1
DE
1. Montage der Hinterräder.
• Stellen Sie die Karosserie mit der Unterseite nach oben
• Stecken Sie ein Antriebsrad (6) auf das Getriebe.
• Schieben Sie eine Unterlegscheibe (14) auf die
Hinterachse.
• Fixieren Sie das Ganze mit einem Splint (13). Mit Hilfe
• Stecken Sie zum Schluss eine Abdeckung (4) auf das
Rad
• Wiederholen Sie dies auf der anderen Seite.
GB
1. Assembly of the rear wheels
• Place the body with the underside facing up.
• Attach a drive wheel (6) to the gear unit.
• Slide a washer (14) onto the rear axle.
• Fix the whole thing with a plit pin (13). Bend the ends of
the split pin back using a pair of pliers.
• Finally, put a cover (4) on the wheel
• Repeat this on the other side.
FR
1. Montage des roues arrières.
• Ajustez la carrosserie avec le dessous vers le haut.
• Montez maintenant une roue motrice (6) sur le réducteur.
• Glissez une rondelle (14) sur l‘essieu arrière.
• Fixez le tout à l‘aide d‘un Goupille (13). A l’aide d’une
pince tordez le bout de la goupille.
• Enfin, placez un couvercle (4) sur la roue.
IT
1. Montaggio delle ruote posteriori.
• Sistemare la carrozzeria con la parte inferiore rivolta
verso l‘alto.
• A questo punto montare una ruota motrice (6) sul
ingranaggio.
• Spingere una rondella (14) sull‘asse posteriore.
• Fissare il tutto con un Spalato spina (13). Con l‘aiuto di
una pinza può piegare la coppiglia.
• (4) sulla ruota.
• Ripetere l‘operazione sull‘altro lato.
ES
1. Montaje de ruedas traseras.
• Coloque la carrocería con la parte inferior hacia arriba.
• (6) en el
engranaje.
• Deslizar una arandela (14) sobre el eje trasero.
• Fijar todo con una Pasador (13). Con
• Por último, coloque una tapa (4) a la rueda.
•
CZ
1. Montážzadníchkol
•
• (6)
• (14) na zadní nápravu.
• (13).
• (4).
•
PL
1. Montażtylnychkół.
•
• (6)
• (14)
• (13)
szczypiec zagnij koniec zawleczki.
• (4)
•
NL
1. Montage van de achterwielen.
• Plaats het lichaam ondersteboven
• Plaats een aandrijfwiel (6) op de versnellingsbak.
• Schuif een ring (14) op de achteras.
• (13).
Buig het uiteinde van de splitpen met een tang.
• Plaats tot slot een hoes (4) op het wiel
• Herhaal aan de andere kant.
SK
1. Montážzadnýchkolies.
•
• (6) na prevodovku.
• (14) na zadnú nápravu.
• (13)
• (4).
• Opakujte na druhej strane.

6
DE
2. Montage der Vorderräder
• (5) auf die Vorderachse.
• Schieben Sie eine Unterlegscheibe (14) auf die
Vorderachse.
• Fixieren Sie das Ganze mit einem Splint (13). Mit Hilfe
• Stecken Sie zum Schluss eine Abdeckung (4) auf das
Rad
• Wiederholen Sie dies auf der anderen Seite.
GB
2. Assembly of the front wheels
• Attach a wheel (5) onto the axle.
• Slide a washer (14) onto the axle.
• Fix the whole thing with a plit pin (13). Bend the ends of
the split pin back using a pair of pliers.
• Finally, put a cover (4) on the wheel
• Repeat this on the other side.
FR
2. Montage des roues avant
• Montez maintenant une roue (5) sur l‘essieu.
• Glissez une rondelle (14) sur l‘essieu.
• Fixez le tout à l‘aide d‘un Goupille (13). A l’aide d’une
pince tordez le bout de la goupille.
• Enfin, placez un couvercle (4) sur la roue.
•
IT
2. Montaggio delle ruote anteriori
• A questo montare una ruota (5) sull‘asse anteriore.
• Spingere una rondella (14) sull‘asse.
• Fissare il tutto con un Spalato spina (13). Con l‘aiuto di
una pinza può piegare la coppiglia.
• (4) sulla ruota.
• Ripetere l‘operazione sull‘altro lato.
ES
2. Montaje de las ruedas delanteras
• (5) sobre el eje.
• Deslizar una arandela (14) sobre el eje
• Fijar todo con una Pasador (13). Con
• Por último, coloque una tapa (4) a la rueda.
•
CZ
2. Montážpředníchkol
• (5)
• (14)
• (13)
• (4).
•
PL
2. Montażprzednichkół
• (5)
• (14)
• (13)
zagnij koniec zawleczki.
• (4)
•
NL
2. Montage van de voorwielen
• Trek een wiel (5) op de vooras.
• Schuif een ring (14) op de vooras.
• (13). Buig het
uiteinde van de splitpen met een tang.
• Plaats tot slot een hoes (4) op het wiel
• Herhaal aan de andere kant.
SK
2. Montážprednýchkolies
• Natiahnite koleso (5) na prednú nápravu.
• (14).
• (13)
• (4).
• Opakujte na druhej strane.
2
3
2
11
15
DE
3. Montage Lenkrad
Verbinden Sie das Kabel vom Lenkrad mit dem Kabel
am Armaturenbrett. (2) in der
vorgesehenen Position und sichern es mit
der Sicherungsschraube (11) und der Mutter (15).
GB
3. Steering wheel assembly
Connect the cable from the steering wheel to the cable of the
(2)
position and secure it with the locking screwand (11) and
nut (15).
FR
3. Monter le volant
Connecter les câbles du volant à ceux du tableau de
(2) dans sa position prévue et
verrouiller à l‘aide d‘une vis (11) et de l’écroue (15).
IT
3. Montaggio volante
Collegare il cavo del volante con il cavo sul cruscot-
(2)
con la vita di bloccaggio (11) e il dado (15).
ES
3. Montaje del volante
Conectar el cable del volante con el cableen el salpicadero.
(2)
(11) y la tuerca (15).
CZ
3. Montážvolantu
Namontujte volant (2)
(11) a maticí (15).
PL
3. Montażkierownicy
(2) w zamierzonej pozycji i zabezpiecz
(11)(15).
NL
3. Montage stuurwiel
Sluit de kabel van het stuur aan op de kabel op het
dashboard. Monteer het stuur (2) in de beoogde positie en
zet het vast met de borgschroef (11) en moer (15).
SK
3. Montážvolantu
Pripojte kábel od volantu ku káblu na prístrojovej doske.
(2)
poistnou skrutkou (11) a maticou (15).

7
DE
4. Montage der Windschutzscheibe
Bringen Sie die Windschutzscheibe (8) in die vorgesehene
einrastet.
5. Montage der Rückspiegel
Drücken Sie die Rückspiegel (3) in die vorgesehene
Position bis sie einrasten.
GB
4. Attach the Windshield
(8) in the slots on the
vehicle body, push until you hear it click into place.
5. Attach the view mirrors
(3) to the designated position, and fasten
it.
FR
4. Montage du pare-brise
Mettez en place le pare-brise (8) dans la position
indiquée. Appuyez les pins dans les rainures de la
pare-brise et glissez ceux-ci en avant vers le bas jusqu’à
ce que ces derniers n’enclenchent.
5. Montage du rétroviseur
Mettez en place le rétroviseur (3) dans la position
indiquée et ils fixent.
IT
4. Montaggio Parabrezza
(8) nella posizione predisposto.
Premere il perno del parabrezza nelle scanalature e farlo
scorrerein avanti e in basso fino a farlo incas-trare.
5. Montaggio del specchietto retrovisore
(3) nella posizione
prevista e fissano.
ES
4. Montaje del parabrisas
Coloque el parabrisas (8)
Presione el pasador del parabrisas en las ranuras y
deslice hacia adelante y hacia abajo hasta que se
encaja. El desmontaje del asiento es al inverso
5. Montaje del espejo retrovisor
Coloque el espejo retrovisor (3)
deseada y lo arreglan.
CZ
4. Montážčelníhoskla
(8)
5. Montážzpětnýchzrcátek
(3)
nezaklapnou na místo.
PL
4. Montażprzedniejszyby
(8)
5. Montażlusterekwstecznych
(3)
NL
4. Montage van de voorruit
Plaats de voorruit (8) in de beoogde positie. Duw de lipjes
in de groeven totdat ze op hun plaats klikken.
5. Installatie van achteruitkijkspiegels
Duw de achteruitkijkspiegels (3) in de beoogde positie
totdat ze op hun plaats klikken.
SK
4. Montážčelnéhoskla
(8)
5. Montážspätnýchzrkadiel
(3)
nezacvaknú na miesto.
4 5
DE - Akku Anschluss
• Verbinden Sie alle Steckverbindungen wie abgebildet.
Verbinden Sie nur ineinander passende Steckverbindungen
und achten Sie darauf nichts zu verpolen.
• Vergewissern Sie sich, dass das rote Kabel (Plus) und das
schwarze Kabel (Minus) mit den jeweiligen gleichfarbigen
Anschlüssen verbunden ist.
GB - Battery connection
• Connect all connectors as shown. Only plug matching
connectors into eachother and be sure not to reverse the
polarity.
• Make sure the red wire is well connected with the red
terminal on the battery, and same as the black one.
FR - Branchement de l’accu
• Branchez les connecteurs comme indiqué dans
l’illustration. Connectez l’ensemble des connecteurs
indiqué tout en veillant à ne pas inverser la polarité.
• Assurez-vous que le câble rouge (Plus) et le câble
noir (Minus) soient bien connectés sur les câbles de
même couleur venant de l’accu.
IT - Collegamento della batteria
• Collegare i connettori come mostrato. Fare
attenzione a collegare solo delle spine adeguate tra
di loro e di non invertire i collegamenti.
•
(negativo) sono collegati ai rispettivi terminali dello
stesso colore.
ES - Conexiondebatería
• Conecte todos los conectores como se muestra.
que no se inverte la polaridad.
• Sacar el asiento y asegúrese de que el cable rojo
(positivo) y el negro (negativo) se conectan con el
color respetcivo.
CZ-připojeníbaterie
•
zásuvné spoje, které do sebe zapadají a dbejte na to, abyste
•
PL-połączeniebaterii
•
•
samego koloru.
NL - Batterij aansluiting
• Sluit alle stekkerverbindingen aan zoals afgebeeld. Sluit
alleen steekverbindingen aan die in elkaar passen en let
erop dat u de polariteit niet verwisselt.
•
(min) zijn aangesloten op hun respectieve klemmen van
dezelfde kleur.
SK - pripojenie batérie
•
zásuvné spoje, ktoré do seba zapadajú a dbajte na to, aby
•
6
DE
6. Montage des Heckspoilers
(7) in die
Nuten hinten an der Karosserie bis sie einrasten.
GB
6. Attach the rear Spoiler
Press the pins of the rear Spoiler (7) into the grooves at the
rear of the body.
FR
6. Assemblage de Heckspoiler
Appuyer les tenons de aileron arrière (7) dans les rainures
à l’arrière de la arrosserie.
IT
6. Montaggio dello spoiler
posteriore Premere i perni del spoiler posteriore (7) nelle
si incastrano.
ES
6. Montaje de la alerón trasero
(7) en las ranuras
de la parte posterior de la carrocería hasta que encajen.
CZ
6. Montážzadníhospoileru
(7)
PL
6. Montażtylnegospojlera
(7)
NL
6. Montage van de achterspoiler
Druk de pennen van de achterspoiler (7) in de groeven aan
de achterkant van de carrosserie totdat ze op hun plaats
klikken.
SK
6. Montážzadnéhospojlera
(7)

8
DE - Ladevorgang
• Das Fahrzeug muss während dem Laden ausgeschaltet sein.
• Stecken Sie das Ladegerät (4) in die Steckdose die LED leuchtet grün. Schließen Sie
das Ladegerät an der Ladebuchse an.
•
LED wieder grün ist der Akku voll geladen.
• Die Ladezeit beträgt 9 Stunden.
• Laden Sie den Akku nicht öfter als 1 x innerhalb 24 Std.
• Ladegerät und Akku erwärmen sich während des Ladevorgangs.
Achtung!
• Das Ladegerät ist kein Spielzeug.
Verwenden Sie ausschließlich das mitgelieferte Ladegerät.
• Der Akku darf nur durch einen Erwachsenen oder unter dessen Aufsicht geladen werden.
• Die Anschlussklemmen dürfen nicht kurzgeschlossen werden.
• Das Ladegerät muss regelmäßig auf Schäden an Kabel, Stecker, Gehäuse und anderen
Teilen überprüft werden. Bei festgestellten Schäden darf das Ladegerät so lange nicht
benutzt werden, bis die Schäden repariert sind.
• Lassen Sie dem Modell nach jedem Einsatz genügend Zeit um abzukühlen bevor Sie es
wieder in Betrieb nehmen. Beim Verwenden eines etwaigen Tauschakkus muss zwischen
jedem Akkuwechsel mindestens eine Abkühlphase von 15 Minuten eingehalten werden
bis das Modell wieder betrieben wird. Bei Überhitzung kann Beschädigung der Elektronik
oder Brandgefahr die Folge sein.
• Trennen Sie immer unmittelbar nach Beenden des Ladevorgangs das Modell vom
Ladegerät. Trennen Sie das Ladegerät immer unmittelbar nach Abstecken des
Modells von der Spannungsversorgung. Ein eingesteckt lassen des Modells bzw. des
Ladegeräts nach Beenden des Ladevorgangs kann zu Beschädigungen am Modell,
Ladegerät oder der Spannungsversorgung führen (Brandgefahr).
• Verwenden Sie das Ladegerät nur in trockenen Räumen.
GB - Charging Your Vehicle
• The power swich must be turned in OFF position when charging.
•
the charging socket.
•
lights green again, the battery is fully charged.
• The charge time is 9 hours.
• Do not charge the battery more than once within 24 hours.
• Charger and battery heat up during the charging process.
Warning!
• The charger is not a toy. Only use the charger supplied.
• The battery may only be charged by or under the supervision of an adult.
• The terminals must not be short-circuited.
• The charger must be checked regularly for damage to the cable, plug, housing and other
parts. If any damage is found, the charger must not be used until the damage has been
repaired.
• Let the model cool o suciently after each use before putting it back into operation.
When using an additional batteries let it cool o for minimum 15 minutes until the
model is operated again. Overheating can damage the electronics or may result in re.
• Always disconnect the model from the charger immediately after charging. Always
disconnect the charger from the power supply immediately after disconnecting the
model. Inserting the rechargeable model or charger after charging will result in damage
tothe model, charger or the power supply (re hazard).
• Use the charger only in dry rooms..
FR - Charge de la voiture
•
• The power swich must be turned in OFF position when charging.
•
la prise de charge.
• La LED de votre chargeur s‘allume en rouge tant que la batterie est en charge. Si la LED
s‘allume à nouveau en vert, la batterie est complètement chargée..
• Le temps de charge est 9 heures.
• Ne chargez votre accu pas plus d’1x en 24 heures.
• .
Avertissement !
● Le chargeur n‘est pas un jouet. Utilisez uniquement le chargeur fourni avec la batterie.
● La batterie ne doit être chargée que par un adulte ou sous sa surveillance.
● Les bornes de connexion ne doivent pas être court-circuitées.
● Le chargeur doit être contrôlé régulièrement pour vérifier que le câble, la fiche, le boîtier
et les autres pièces ne sont pas endommagés. Si des dommages sont constatés, le
chargeur ne doit pas être utilisé jusqu‘à ce que les dommages soient réparés.
● Après chaque utilisation, avant de remettre le
modèle en marche, laissez-le susamment le temps de refroidir. Laissez une phase
de 15 minutes de refroidissement lorsque vous utilisez une batterie de rechange pour
redémarrer le modèle de nouveau. En cas de surchaue, les composants
électroniques peuvent être endommagés ou un risque d´incendie peut survenir.
● Débranchez toujours après chaque arrêt la modèle du chargeur. Débranchez aussi
toujours le chargeur immédiatemment après avoir débranché la modèle de
l´alimentation. Laissez brancher la chargeur ou la modèle peuvent causer des
dommages à la modèle, à votzre chargeur ou câble d´alimentation (risque d´incendie).
• Utilisez le chargeur uniquement dans des pièces sèches.
IT - Carica del veicolo
•
• The power swich must be turned in OFF position when charging.
•
caricabatterie alla presa di ricarica.
•
illumina di nuovo verde, la batteria è completamente carica.
•
• Non caricare la batterie volte in 24 ore.
• Caricatore e batteria si riscaldano durante la carica.
Avvertimento!
• Il caricabatterie non è un giocattolo.
Utilizzare esclusivamente il caricabatterie in dotazione.
• La batteria può essere caricata solo da un adulto o sotto la sua supervisione.
• I terminali non devono essere messi in cortocircuito.
• Il caricabatterie deve essere controllato regolarmente per verificare che non vi siano
danni al cavo, alla spina, all‘alloggiamento e ad altre parti. Se si riscontrano danni, il
caricabatterie non deve essere utilizzato finché il danno non è stato riparato.
• Lasciate che il modello dopo ogni utilizzo il tempo suciente per rareddarsi prima di
rimetterlo in funzione. Quando si utilizza delle batterie per cambio deve essere
rispettato una fase di rareddamento di 15 minuti tra ogni cambio della batteria prima
di rimetterlo in funzione. Il surriscaldamento può danneggiare l’elettronica o pericolo
d’incendio possono esssere le conseguenze.
• Dopo ogni carica e importante di: Scollegare sempre subito la batteria dal caricatore ed
il caricatore dalla rete elettrica. Se dopo la carica si lascia collegato l’uno o l’altro può
causare danni alla batteria, al caricatore o addirittura alla rete elettrica (pericolo di
incendio).
• Utilizzare il caricabatterie solo in ambienti asciutti.
ES-Cargadelvehículo
• El vehículo debe estar apagado durante la carga.
• The power swich must be turned in OFF position when charging.
•
la toma de carga.
• El LED de su cargador se ilumina en rojo mientras la batería se está cargando. Si el LED
se enciende de nuevo en verde, la batería está completamente cargada.
• El tiempo de carga es de 9 horas.
• No cargue la batería mas de una vez en 24 horas.
• El cargador y la batería se calientan ligeramente durante el proceso de carga.
Apercibimiento!
• El cargador no es un juguete. Utilice únicamente el cargador incluido.
• La batería sólo puede ser cargada por un adulto o bajo su supervisión.
• Los terminales no deben estar en cortocircuito.
• El cargador debe ser revisado periódicamente para comprobar que el cable, el enchufe,
la carcasa y otras piezas no estén dañadas. Si se detectan daños, el cargador no debe
utilizarse hasta que se hayan reparado los daños.
• Deje que el modelo después de cada uso e l tiempo suciente para enfriarse antes de
volver a ponerlo en funcionamiento. Cuando se utiliza baterías para cambiar se tiene
que respetar una fase de enfriamiento de 15 minutos entre cada cambio de las baterías
antes de ponerlo de nuevo en funcionamiento. El sobrecalentamiento puede dañar la
electrónica o peligro de incendio puden ser la consecuencia.
• Después de cada carga es importante de: Desconectar siempre la modelo del cargador
y el cargador de la fuente de alimentación. Si después de la carga se deja conectado a
uno o otra puede causar daños a la modelo, cargador
• Utilice el cargador sólo en lugares secos.
Nur mit Ladegerät 12V 1000mAh, Art.-Nr. 412978 verwenden.
Only use with 12V 1000mAh charger, Ord. No. 412978
Utiliser uniquement avec chargeur 12V 1000mAh, Réf. 412978
Utilizzare solo con caricatore 12V 1000mAh, Cod. 412978
Usar solo con cargador 12V 1000mAh, Ref. 412978
Používejtepouzesnabíječkou12V1000mAh,Číslopoložky412978
Tylkozładowarką12V1000mAh,poz.412978stosowanie.
Alleen met oplader 12V 1000mAh, artikelnr. 412978 gebruiken.
Lensnabíjačkou12V1000mAh,položkač.412978použitie.

9
DE - Achtung!
Schalten Sie das Modell immer unmittelbar nach jedem Einsatz aus.
Unmittelbar nach jedem Einsatz sollte der Akku vom Modell getrennt
werden. Durch versehentliches eingeschaltet lassen oder Akku ange-
steckt lassen kann der Akku tiefenentladen werden. Durch Tiefenent-
ladung verliert der Akku an Leistung bzw. kann so stark beschädigt
werden, dass ein Laden bzw. Entladen nicht mehr möglich ist bzw. der
Akku beim Lade- oder Entladevorgang selbstentzünden kann (Brand-
gefahr). Versuchen Sie niemals tiefenentladene Akkus zu Laden bzw. zu Entladen. Die Span-
nung des Akkus sollte niemals unter 11,9 Volt fallen um eine Tiefenentladung zu vermeiden.
Der vollständig geladene Akku hat eine Spannung von ca. 13 Volt. Nach dem Gebrauch sollte
der intakte Akku umgehend nach einer Abkühlphase von min. 10 Minuten aber spätestens
nach 12h vollgeladen werden um eine anschließende Tiefenentladung durch Selbstentla-
dung zu vermeiden. Bei längerem Nichtbenutzen des Akkus bzw. Einlagerung sollte der Akku
min. alle 3 Monate auf Spannung (min. 12,3 Volt) bzw. Beschädigung überprüft und gegebe-
nenfalls aufgeladen bzw. entsorgt werden.
GB - Caution!
Always switch o the model immediately after each use. Immediately after each use the
battery should be disconnected from the model. The battery can be deeply discharged by
leaving it switched on accidentally or leaving it plugged in. Deep discharge causes the bat-
tery to lose power or can be damaged to such an extent that charging or discharging is no
longerpossibleorthebatterycanself-igniteduringchargingordischarging(rehazard).Ne-
ver attempt to charge or discharge deeply discharged batteries. The battery voltage should
never fall below 11,9 volts to avoid deep discharge. The fully charged battery has a voltage
of approx. 13 Volt. After use, the intact battery should be fully charged immediately after a
cooling phase of at least 10 minutes but at the latest after 12 hours to avoid subsequent deep
discharge by self-discharge. If the battery is not used or stored for a longer period of time,
the battery should be checked for voltage (min. 12,3 volts) or damage at least every 3 months
and charged or disposed of if necessary.
FR - Attention!
Veuillez toujours éteindre le modèle immédiatement après chaque utilisation et déconnec-
tez la batterie immédiatement après chaque utilisation du modèle. La batterie peut être
profondément déchargée si vous la laissez allumée accidentellement ou si vous les laissez
branchée. En raison d‘une décharge profonde, la batterie perd de la puissance ou peut être
endommagée à un point tel que la charge ou la décharge n‘est plus possible ou la batterie
peut s‘auto-allumer pendant le processus de charge ou de décharge (risque d‘incendie).
N‘essayez jamais de charger ou de décharger des batteries profondément déchargées. La
tension de la batterie ne doit jamais descendre en dessous de 11,9 volts pour éviter une
décharge profonde. La batterie complètement chargée a une tension d‘environ 13 Volt. Ap-
rès utilisation, la batterie intacte doit être complètement chargée immédiatement après une
phase de refroidissement d‘au moins 10 minutes mais au plus tard après 12 heures pour
éviter une décharge profonde ultérieure par autodécharge. Si la batterie n‘est pas utilisée
ou stockée pendant une plus longue période, la batterie doit être chargée au moins tous les
3moisàlatension(min.12,3volts).Vériezqu‘iln‘yapasdedommageset,sinécessaire,
rechargez ou jetez-les.
IT - Attenzione!
Spegnere sempre il modello subito dopo ogni utilizzo. Subito dopo ogni utilizzo, la batteria
deve essere scollegata dal modello. La batteria può essere scaricata completamente se viene
lasciata accesa accidentalmente o se viene lasciata inserita. La scarica profonda causa la
perdita di energia della batteria o può essere danneggiata a tal punto che la carica o la scari-
ca non è più possibile o la batteria può autoaccendersi durante la carica o la scarica (pericolo
di incendio). Non tentare mai di caricare o scaricare batterie completamente scariche. La
tensione della batteria non deve mai scendere al di sotto di
11,9 volt per evitare una scarica profonda. La batteria completamente carica ha una tensione
di circa 13 Volt. Dopo l‘uso, la batteria intatta deve essere caricata completamente subito
dopounafasedirareddamentodialmeno10minutiealpiùtardidopo12oreperevitareuna
successiva scarica profonda per autoscarica. Se la batteria non viene utilizzata o conservata
per un lungo periodo di tempo, è necessario controllarne la tensione (min. 12,3 Volt) o su
danni almeno ogni 3 mesi e, se necessario, caricarla o smaltirla.
ES - Atención!
Apague siempre el modelo inmediatamente después de cada uso. Inmediatamente después
decadauso,desconectelabateríadelmodelo.Labateríapuededescargarsecompletamente
dejándolaencendidaoinsertadaaccidentalmente.Labateríaperderáenergía o se dañará
detalmaneraqueyanoesposiblecargarlaodescargarla,oquepodríaincendiarseduran-
te el proceso de carga o descarga (peligro de incendio). Nunca intente cargar o descargar
bateríascompletamentedescargadas.Elvoltajedelabateríanuncadebeserinferiora11,9
voltiosparaevitarunadescargaprofunda.Labateríacompletamentecargadatieneunaten-
sióndeaproximadamente13voltios.Despuésdesuuso,labateríaintactadebecargarse
completamenteinmediatamentedespuésdeunafasedeenfriamientodeunmínimode10
minutos y un máximo de 12 horas para evitar una descarga profunda posterior debido a la
autodescarga.Silabateríanoseutilizaoalmacenaduranteunlargoperíododetiempo,su
tensión(mín.12,3voltios)debecomprobarseosiestándañadasalmenoscada3mesesy,
si es necesario, recargarse o desecharse.
CZ - Pozor!
Jetřebahopokaždémpoužitívypnout.Pokaždémpoužitíjenutnéodpojitakumulátorod
modelu.Pokudmodelnáhodouzůstanezapnutýnebopokudakumulátor nebude odpojen
od modelu, akumulátor se zcela vybije. Úplné vybití akumulátoru způsobí, že akumulátor
ztrácísvůjvýkonamůžesepoškoditdotakovémíry,ženabíjenínebovybíjeníakumulátoru
nebudemožné,neboběhemprocesunabíjenínebovybíjenísesamovolněvznítí(nebezpečí
vznikupožáru).Nikdy nenabíjejte nebonevybíjejtezcela vybité akumulátory.Aby nedošlo
khlubokémuvybitíakumulátoru,nesmíjehonapětínikdyklesnoutpod11,9V.Plněnabitý
akumulátormá13VAbysezabrániloúplnémuvybití,pokaždémpoužitínechejteakumulátor
nabítdoplněnabitéhostavu.Plnénabitíbymělaprobíhatpočekacídoběcca.10minutpo
použitíanejpozdějido12hodinodmomentupoužití.Pokudakumulátornebudenepoužívaný
delšídobu,jetřebahozkontrolovatnejméněkaždé3měsíceohledněsprávnéhonapětí(min.
12,3V)amožnýchpoškození.Pokudjetonutné,dobijtenebozlikvidujteakumulátor.
CZ-Nabíjení
•
•
zásuvce.
•
• Doba nabíjení je 9 hodin.
•
•
Upozornění!
● Nabíječka není hračka. Používejte pouze dodanou nabíječku.
● Baterii smí nabíjet pouze dospělá osoba nebo pod jejím dohledem.
● Svorky nesmí být zkratovány.
● Nabíječku je třeba pravidelně kontrolovat, zda není poškozený kabel, zástrčka, kryt a
další části. V případě zjištění poškození se nabíječka nesmí používat, dokud nebude
poškození odstraněno.
● Po každém použití modelu vyčkejte, až model vychladne a teprve poté jej spusťte znovu.
V případě použití dalšího akumulátoru, po změně akumulátorů a před pětovným
nastartováním modelu musí být zachována alespoň jedna fáze chlazení 15 minut.
Přehřátí může způsobit poškození elektroniky nebo nebezpečí požáru.
● Ihned po dokončení nabíjení odpojte model od nabíječky. Ihned po odpojení modelu
odpojte nabíječku od zdroje napájení. Pokud po dokončení model nebo nabíječka
nebudou odpojeny, může to způsobit poškození modelu, nabíječky nebo napájení
(nebezpečí požáru).
• Nabíječku používejte pouze v suchých místnostech.
PL-Procesładowania
•
•
•
•
•
•
Ostrzeżenie!
• Ładowarka nie jest zabawką. Należy używać wyłącznie dostarczonej ładowarki.
• Akumulator może być ładowany wyłącznie przez osobę dorosłą lub pod jej nadzorem.
• Zaciski nie mogą być zwarte.
• Ładowarkę należy regularnie sprawdzać pod kątem uszkodzeń kabla, wtyczki, obudowy
i innych części. W przypadku stwierdzenia jakichkolwiek uszkodzeń ładowarki nie wolno
używać do czasu ich naprawienia.
• Po każdym użyciu należy pozostawić wystarczającą ilość czasu na ostygnięcie modelu
przed jego ponownym uruchomieniem. W przypadku korzystania z akumulatora
zamiennego, przed ponownym uruchomieniem modelu należy odczekać co najmniej 15
minut, aby akumulator ostygł. Przegrzanie może spowodować uszkodzenie elektroniki lub
zagrożenie pożarowe.
● Bezpośrednio po zakończeniu procesu ładowania należy zawsze odłączyć model od
ładowarki. Zawsze należy natychmiast odłączyć ładowarkę po odłączeniu model od
zasilania. Pozostawienie podłączonego modelu lub ładowarki po zakończeniu
procesu ładowania może spowodować uszkodzenie modelu, ładowarki lub zasilacza
(ryzyko pożaru).
• Nabíječku používejte pouze v suchých místnostech.
NL - Laadproces
• Het voertuig moet tijdens het opladen uitgeschakeld zijn.
• Steek de oplader (4) in het stopcontact, de LED brandt groen. Sluit de oplader aan op het
oplaadcontact.
• De LED op uw oplader brandt rood zolang de batterij wordt opgeladen. Als de LED weer
groen gaat branden, is de batterij volledig opgeladen.
• De oplaadtijd is 9 uur.
• Laad de batterij niet vaker dan één keer binnen 24 uur op.
• De oplader en batterij worden warm tijdens het opladen.
Waarschuwing!
• De lader is geen speelgoed. Gebruik alleen de bijgeleverde oplader.
• De batterij mag alleen worden opgeladen door of onder toezicht van een volwassene.
• De aansluitklemmen mogen niet kortgesloten worden.
• De lader moet regelmatig worden gecontroleerd op beschadigingen aan de kabel, de
stekker, de ombouw en andere onderdelen. Als er schade wordt opgemerk, mag de lader
niet worden gebruikt totdat de schade is repareerd.
• Geef het model na elk gebruik voldoende tijd om af te koelen alvorens het opnieuw te
gebruiken. Wanneer u een vervangingsbatterij gebruikt, laat de batterij dan ten minste
15 minuten afkoelen voordat u het model weer gebruikt. Oververhitting kan leiden tot
beschadiging van de elektronica of tot brandgevaar.
● Koppel het model altijd onmiddellijk los van de oplader nadat het opladen is voltooid.
Koppel de lader altijd onmiddellijk los van de stroomvoorziening nadat u de stekker uit
het stopcontact hebt gehaald. Als het model of de lader na afloop van het laadproces
aangesloten blijft, kan dit leiden tot schade aan het model, de lader of de
stroomvoorziening (brandgevaar).
● Gebruik de lader alleen in droge ruimten.
SK-Procesnačítania
•
•
zásuvky.
•
zeleno, batéria je plne nabitá.
• Doba nabíjania je 9 hodín.
• Batériu nenabíjajte viac ako raz za 24 hodín.
•
Upozornenie!
• Nabíjačka nie je hračka.
Používajte iba dodanú nabíjačku.
• Batériu môže nabíjať len dospelá osoba alebo pod jej dohľadom.
• Svorky nesmú byť skratované.
• Nabíjačka sa musí pravidelne kontrolovať, či nie je poškodený kábel, zástrčka, kryt a iné
časti. Ak sa zistí akékoľvek poškodenie, nabíjačka sa nesmie používať, kým sa
poškodenie neopraví.
• Po každom použití nechajte model pred ďalšou prevádzkou dostatočne dlho vychladnúť.
Pri použití náhradnej batérie nechajte batériu pred ďalším spustením modelu aspoň 15
minút vychladnúť. Prehriatie môže spôsobiť poškodenie elektroniky alebo
nebezpečenstvo požiaru.
• Model vždy odpojte od nabíjačky ihneď po ukončení nabíjania. Po odpojení modelu
nabíjačku vždy okamžite odpojte od napájania. Ak ponecháte model alebo nabíjačku
zapojenú po ukončení procesu nabíjania, môže dôjsť k poškodeniu modelu, nabíjačky
alebo napájacieho zdroja (nebezpečenstvo požiaru).
• Nabíjačku používajte len v suchých miestnostiach.

10
DE - Beschreibung der Funktionen am Sender
Der Sender hat folgende Funktionen:
1. Vorwärts
2. Rückwärts
3. Bindeknopf
4. Rechts
5. Links
6. Geschwindigkeitsanpassung
7. Stopp (Sender und Modell sind ohne Funktion)
8. Geschwindigkeitsanzeige
Einlegen der Batterien in den Sender
-
ders und legen 2 AAA Batterien ein. Achten Sie auf die richtige
Polung. Schließen Sie das Batteriefach.
Binden von Sender und Modell
Falls das Modell nicht auf den Sender reagiert, drücken Sie den
Bindeknopf bis die Geschwindigkeitsanzeige dauerhaft leuchtent
und nicht mehr blinkt. Sollte es nicht funktionieren, wiederho-
len Sie den Prozess.
GB - Description of the functions on the transmitter
This transmitter has following function:
1. Forward
2. Backward
3. Binding button
4. right
5. left
6. Speed adjustment
7. Stop (Transmitter and model are non functional)
8. Speed display
Fitting the transmitter batteries
Open the battery compartment cover on the back of the transmit-
ter and put 2 AAA batteries making sure that it is corectly put in.
Then close the cover.
Binding of transmitter and model
connection button until the speed info is permanently lit and does
not blink anymore.If this does not work, repeat the process.
FR - Description des fonctions sur le émetteur
Ce émetteur a les fonctions suivantes:
1. Avant
2. Arrière
3. touche de liaison
4. Droite
5. Gauche
6. Adaptation de la vitesse
7. Stop (l'émetteur et le modèle sont sans fonction)
Mise en place des piles dans l‘émetteur
Ouvrez le couvercle du compartiment de pile au dos de
la polarité. Refermez le couvercle du compartiment.
Synchroniser le modèle avec l‘émetteur.
Si le modèle ne répond pas à l‘émetteur, appuyez sur le bouton
de connexion jusqu'à ce que l'indicateur de vitesse s'allume en
continu et cesse de clignoter. Si la procédure a échoué, re-
commencez l’opération.
IT - Descrizione delle funzioni del trasmittente
Questo trasmittenten ha le seguenti funzioni:
1. Avanti
3. Pulsante binding
4. Destra
5. Sinistra
6. Regolazione della velocità
7. Stop (trasmittente e modello sono senza funzione)
8. Visualizzazione della velocità
Montaggio delle pile nella trasmittente
Aprite il coperchio del vano batterie sul retro del trasmettitore e
introducete 2 pile AAA facendo attenzione alla polarità. Chiudere
il vano batterie.
Binding trasmettitore e modello
Se il modello non risponde alla trasmittente, premere il
accende continuamente e smette di lampeggiare. In caso che il
LED lampeggia, ripetete la procedura.
ES - Descripción de las funciones del emisora
Este emisora tiene las siguientes funciones:
1. Adelante
2. Atrás
3.
4. Derecha
6. Ajueste de la velocidad
8. Pantalla de velocidad
Instalación de las pilas en la emisora
Abra la tapa de las baterías ubicada en la parte trasera de la
-
dad. Vuelva a ponerla tapa del compartimiento de las pilas.
Binding del modelo y la emisora
hasta que el indicator de velocidad se ilumine continuamente
y deje de parpadear. Si el LED vuelve a parpadear o sigue
parpadeando, repita el proceso de combinación.
CZ-Popisfunkcínavysílači
2. Reverzní
6. Nastavení rychlosti
8. Ukazatel rychlosti
Montážbateriívysílače
Vazbavysílačeamodelu
Po-
kud to nefunguje, opakujte proces.
PL - Uwaga
Wtedynależywyłączaćgobezpośredniopokażdymużyciu.wtedy,pokażdymużyciu,należy
odłączyćakumulator od modelu.Jeżelimodel zostanie niezamierzeniewłączonylub jeżeli
akumulatorniezostanieodłączonyod modelu,wtedyakumulatorcałkowiciesięrozładuje.
Przez całkowite rozładowanie akumulator traci swoją moc bądź może zostać tak bardzo
uszkodzony, że ładowanie lub rozładowanie akumulatora nie będzie możliwe lub podczas
procesuładowania lubrozładowywania zapalisię samoistnie (niebezpieczeństwo pożaru).
Nigdy nie wolno ładować lub rozładowywać całkowicie rozładowanych akumulatorów.
W celu uniknięcia całkowitego rozładowania napięcie akumulatorów nie powinno nigdy
spaśćponiżej11,9V.Napięciewpełninaładowanegoakumulatorawynosiok.13V.Wcelu
uniknięciacałkowitegorozładowaniaspowodowanegowyładowaniemsamoistnymnależypo
użyciucałkowicienaładowaćsprawnyakumulator.Pełnenaładowanieakumulatorapowinno
nastąpićpo odczekaniu ok.10minut od użyciaoraznie później niżpoupływie12 godzin
odmomentuużycia.Wprzypadku,gdyakumulatorniebędzieużywanyprzezdłuższyokres
czasu,wtedynależysprawdzaćgoconajmniejco3miesiącepodwzględemprawidłowego
napięcia (min. 12,3 V) oraz ewentualnych uszkodzeń. W razie konieczności należy go
naładowaćlubzutylizować.
NL - Let op
Schakel het model na elk gebruik onmiddellijk uit als het model is voorzien van een aan/uit
schakelaar. Als het model een accu heeft die kan worden verwijderd of is uitgerust met een
losneembare steekverbinding, moet de accu na elk gebruik uit het model worden gehaald. De
accu kan volledig leeg raken als het model per abuis wordt ingeschakeld of de accu en het
model worden niet losgekopeld. In zo’n geval verliest de accu zijn vermogen of kan zodanig
worden beschadigd dat het laden of ontladen van de accu niet meer mogelijk is of tijdens dit
proces kan verbranden (brandgevaar). De volledig lege accu’s kunnen nooit meer worden
opgeladen of ontgeladen. Om diepe ontlading van de batterij te voorkomen, mag de spanning
nooit lager dan 11,9 V zijn. De spanning van volledig opgeladen accu is ca. 13 V. Om de diepe
ontlading veroorzaakt door de zelfontlading van de accu te voorkomen, dient de accu na
gebruik volledig te worden opgeladen. De accu dient volledig te worden opgeladen na ca.10
minuut wachttijd na gebruik en niet later dan 12 uur na gebruik. Als de accu lange tijd niet
gebruikt wordt, dient dan ten minste elke 3 maanden op correcte spanning (min. 12,3 V) en op
eventuele beschadiging te worden gecontroleerd. Indien nodig op te laden of te verwijderen.
SK - Pozor
Jepotrebnéhopokaždýmpoužitívypnúť.Pokaždompoužitíjenutnéodpojiťakumulátor
od modelu. Ak model náhodou ostane zapnutý alebo ak akumulátor nebude odpojený od
modelu, akumulátor sa úplne vybije. Úplné vybitie akumulátora spôsobí, že akumulátor
strácasvojvýkonamôžesapoškodiťdotakejmiery,ženabíjaniealebovybíjanieakumu-
látoranebudemožné,alebopočasprocesunabíjaniaalebovybíjaniasasamovoľnevznieti
(nebezpečenstvovzniku požiaru). Nikdynenabíjajtealebo nevybíjajteúplnevybité akumu-
látory.Abysazabrániloúplnémuvybitiuakumulátora,jehonapätiebynemaloklesnúťpod
11,9V.Napätieplnenabitejbatérieje13V.Abysazabrániloúplnémusamočinnémuvybitiu,
pokaždom použití opäťúplne nabitesprávny akumulátor.Plnénabitie by maloprebiehať
počakacejdobecca.10minútpopoužitíanajneskôrdo12hodínodmomentupoužitia.Ak
akumulátornebudenepoužívanýdlhšiudobu,jepotrebnéhoskontrolovaťnajmenejkaždé3
mesiaceohľadnesprávnehonapätia(min.12,3V)amožnýchpoškodení.Akjetopotrebné,
dobite alebo zlikvidujte batériu.
1
3
5
6
4
7
8
2

11
DE - Batteriehinweis:
Nicht ins Feuer werfen!
Alte und neue Batterien nicht mischen!
-
ladbare Batterien mischen!
bevor sie geladen werden!
geladen werden!
Die Anschlussklemmen dürfen nicht kurzgeschlossen werden!
GB - Battery warning:
Non-rechargeable batteries are not to be recharged!
Do not open!
Do not mix old and new batteries!
Do not mix alkaline batteries, standard (carbon-zinc) or rechar-
geable batteries!
Rechargeable batteries are to be removed from the toy before
being charged!
Rechargeable batteries are only to be charged under adult
supervision!
The supply terminals are not to be short-circuited!
FR - Informations concernant l‘accumulateur:
Les batteries non rechargeables ne doivent pas être rechargées!
Ne pas ouvrir!
Ne pas jeter au feu!
Ne pas utiliser des piles neuves et usées à la fois!
Ne pas utiliser en même temps des piles alcalines, standard
(zinc-charbon) et des accumulateurs!
Les piles rechargeables doivent être retirées du jouet!
Les batteries rechargeables ne peuvent être rechargées que
sous la surveillance d‘un adulte!
Les connexions ne doivent pas être court-circuitées!
IT - Informazioni relative alle pile:
Le batterie non ricaricabili non devono essere caricate!
Non aprire!
Non gettare nel fuoco!
Non usare contemporaneamente pile nuove e pile usate!
Non usare contemporaneamente pile alcaline, standard (zinco-
carbone) e ricaricabili!
Le batterie ricaricabili devono essere rimosse dal giocattolo!
Le batterie ricaricabili possono essere ricaricate solo sotto la
supervisione di un adulto!
ES - Advertencia sobre las baterías:
Las baterías no recargables no se pueden cargar!
No abrir!
No arrojar al fuego!
No mezcle baterías nueva y viejas!
No mezcle baterías alcalinas, estándar (carbono-zinc) o baterías
recargables!
Las baterías recargables deben retirarse del juguete!
-
CZ - Informace ohledně akumulátoru:
Nenabíjejte jednorázové baterie!
Neotvírejte!
Nedávejte dohromady staré a nové baterie!
Nedávejte dohromady alkalické a standardní (carbon-zinc) nebo
nabíjecí baterie!
T
PL - Informacja dotycząca akumulatora:
jednego rodzaju!
zabawki!
NL - Gegevens betreende de accu:
Laad geen wegwerpbatterij op!
Niet openen!
Niet in het vuur werpen!
Gebruik geen oude en nieuwe battijen tegelijkertijd!
Gebruik geen alkaline batterijen, standaard (zinkkoolstof) of
oplaadbare batterijen tegelijkertijd!
Verwijder de batterijen uit het speelgoed voordat het wordt
opgeladen!
Laad de batterijen op enkel onder toezicht van een volwassene!
Voorkom kortsluiting van de aansluitingsklemmen!
SK - Informácia ohľadom akumulátora:
Nenabíjajte jednorazové batérie!
Neotvárajte!
Nezvierajte pripojovacie svorky!
PL - Opis funkcji na nadajniku
2. Rewers
4. Prawo
Wkładaniebateriidonadajnika
baterii.
Wiązanienadajnikaimodelu
Jeślitoniezadziała,powtórzproces.
NL - Beschrijving van de functies op de zender
De zender heeft de volgende functies:
1. Vooruit
2. Omgekeerd:
3. Bindknop
4. Juist
5. Over
6. Snelheidsaanpassing
7. Stop (zender en model hebben geen functie)
8. Snelheidsindicator
De batterijen in de zender plaatsen
Open het deksel van het batterijvak aan de achterkant van de
zender en plaats 2 AAA-batterijen. Let op de juiste polariteit. Sluit
het batterijvak.
De zender en het model binden
Als het model niet op de zender reageert, drukt u op de bindknop
totdat de snelheidsindicator ononderbroken brandt en stopt met
knipperen. Als het niet werkt, herhaalt u het proces.
SK-Popisfunkciínavysielači
1. Vpred
4. Správne
Montážbateriívysielača
potom kryt zatvorte.
Väzbavysielačaamodelu
Ak to nefun-
guje, zopakujte postup.

12
DE - Funktionen
1 ON/OFF-Schalter Mit dem ON/OFF-Schalter starten Sie das Fahrzeug.
2 Schaltknopf
Vorwärts: Stellen Sie den „Forward-Backward“ Knopf in die „Forward“ Position.
Drücken Sie das Gaspedal damit das Modell vorwärts fährt.
Rückwärts: Stellen Sie den „Forward-Backward“ Knopf in die „Backward“ Position.
Drücken Sie das Gaspedal damit das Modell rückwärts fährt.
WICHTIG! Das Fahrzeug muss zu einem Stillstand kommen sobald die
Fahrtrichtung geändert werden soll. Ansonsten könnte das Getriebe
und/ oder der Motor beschädigt werden.
3 Lichtschalter
4 Geschwindigkeit
High speed - Geschwindigkeit erhöht
Low speed - Geschwindigkeit niedrig
5 Sound und Anschluß externer Audioquellen
6 Gaspedal Drücken Sie das Gaspedal damit das Modell fährt.
Nehmen Sie den Fuß vom Gaspedal stopp das Modell.
GB - Functions
1 ON/Oswitch With the ON / OFF switch you start the vehicle.
2 Shift Lever
Forward: Press the “Forward-backward switch” on the “Forward” position.
Press the “Foot pedal”, the model drives forward.
Reverse: Press the “Forward-backward switch” on the “Backward” position.
Press the “Foot pedal”, the model drives backward.
IMPORTANT! Always stop vehicle when changing the direction to avoid damage
the gears and motor.
3 Light button
4 Speed
High speed - Fast speed
Low speed - Slow speed
5 Sound and connecting external audio sources
6 Foot pedal To move the car, press the pedal down.
To brake or slow down, release pressure from the pedal.
FR - Fonctions
1 Interrupteur Marche / Arrêt
votre véhicule.
2 Bouton du changement
En avant: Placez le commutateur „avant-arrière“ en position „avant“.
En arrière: Placez le commutateur „avant-arrière“ en position „arrière“.
IMPORTANT! La voiture doit s’arrêter pour pouvoir changer de sens de marche.
Dans le cas contraire il est possible d’endommager l’entraînement
et/ou le moteur.
3 Interrupteur pour phares
4 Vitesse
High speed - Grande vitesse
Low speed - Vitesse plus petite
5 Sound et Branchement de sources d‘audio externes
6 Pédale des gaz
La voiture s’arrête dès que vous lâchez la pédale des gaz
IT - Funzioni
1 Interruttore ON/OFF Con la interruttore ON/OFF si accende la macchina.
2 Leva del cambio
Premere il pedale del gas in modo che il veicolo si muove in avanti.
Premere il pedale del gas in modo che il veicolo va retromarcia.
IMPORTANTE! Il veicolo si deve fermare quando si cambia la direzione o la verlocita.
Altrimenti si puo danneggiare l´ingranaggio e/o il motore.
3. Interruttori della luce
4 Velocità
High speed - alta velocità
Low speed - bassa velocità
5 Suono e collegamento di sorgenti audio esterne
6 Pedale del gas Premere il pedale del gas in modo che il veicolo si muove.
ES - Funciones
1 Interruptor ON/OFF Con el interruptor ON/OFF para encender el vehículo.
2 La palanca de cambios
Presione el pedal de gas de modo que el vehículo se mueve hacia adelante.
Presione el pedal de gas de modo que el vehículo se mueve hacia atras.
IMPORTANTE! Elvehículodebellegaradetenersetanprontocomosecambiala
dirección y la velocidad. Si no se puede dañar el engranaje y/ o el motor.
3 Interruptor de la luz
4 Velocidad
High speed - alta velocidad
Low speed - baja velocidad
5 Sonar y Conexión de fuentes de audio externas
6 Pedal de gas Presione el pedal de gas de modo que el vehículo se mueve.
El vehículo se frena cuando se levante el pie del gas.
CZ - Funkce
1 Spínačzapnutí/vypnutí(ON/OFF)
2 Přepínač
3 Světlaon/o
4 Rychlost
High speed - vysoká rychlost
Low speed - nízká rychlost
5 Zvukapřipojeníexterníchzdrojůzvuku
6 Plynový pedál:
PL - Funkcje
1 Włącznik/wyłącznik(ON/OFF)
2 Przełącznik:
WAŻNE! Przedzmianąkierunkulubprędkościpojazdmusistaćwmiejscu.W
przeciwnymraziemożedojśćdouszkodzeniaprzekładnii/lubsilnika.
3 Włącznikiświatła
4 Przyciskprędkości
5 Dźwiękipodłączeniezewnętrznychźródełdźwięku
6 Pedałgazu
.
NL - Functies
1 Aan/uit schakelaar (ON/OFF)
Met de aan/uit schakelaar (ON/OFF) is het mogelijk het voertuig aan- en uitzetten.
2 Schakelaar
Vooruit: Stel de knop „Forward-Backward“ in de stand „Forward“. Nadat het gaspedaal
wordt ingedrukt gaat het model vooruit.
Achteruit: Stel de knop „Forward-Backward“ in de stand „Backward“. Nadat het
gaspedaal wordt ingedrukt, gaat het model achteruit.
BELANGRIJK! Het voertuig moet stilstaan voordat de richting of snelheid wordt
gewijzigd. Anders kan de versnelling of/en motor schade oplopen
3 Lichtschakelaars
4 Snelheid
High speed - hoge snelheid
Low speed - lage snelheid
5 Geluid en aansluiting van externe audiobronnen
6 Gaspedaal Druk op het gaspedaal om het model te laten bewegen.
Haal je voet van het gaspedaal en het model stopt
SK - Funkcie
1 Spínačzapnutia/vypnutia(ON/OFF)
2 Prepínač:
DÔLEŽITÉ! Predzmenousmerualeborýchlostivozidlomusíbyťzastavené.
Vopačnomprípademôžedôjsťdopoškodeniaprevodovkya/alebo
motora.
4 Rýchlosť
5 Zvuk a pripojenie externých zdrojov zvuku
6 Plynový pedál
Ak dáte nohu z plynu, model sa zastaví.
43
15
6
2

13
DE
Problem Ursache Lösung
Der Akku lässt sich nicht mehr laden Ladegerät oder Akku defekt. Ladegerät und Akku prüfen.
Akku lässt sich nicht mehr laden obwohl Akku und Ladegerät in Ordnung
sind.
Ladebuchse defekt. Ladebuchse prüfen bzw. tauschen.
Die Fahrzeit ist sehr gering Der Akku wurde tiefenentladen oder ist verschlissen. Neuen Akku verwenden und Tiefenentladung vermeiden.
keine Funktion Akku ist nicht oder falsch angeschlossen Akku anschließen (siehe Anleitung)
Ein Aus Schalter defekt Schalter prüfen bzw. tauschen.
Lässt sich einschalten aber fährt nicht Motorkabel falsch oder nicht angeschlossen. Motorkabel prüfen und anschließen (siehe Anleitung).
Lässt sich einschalten aber fährt nicht, bzw. nur in eine Richtung Gas- oder Richtungsschalter defekt. Schalter prüfen bzw. tauschen.
Richtungsschalter defekt. Schalter prüfen bzw. tauschen.
Die aktive Sicherung löst aus und schaltet für einige Sekunden das Gerät
ab. Man hört zu Anfangs ein einmaliges Klicken
Überlastung oder elektr. Kurzschluss. Nicht überlasten bzw. Gerät überprüfen lassen.
Fahrzeug reagiert nicht auf Fernsteuerung Nicht gebunden. Bindeprozess durchführen
Keine Soundfunktion am Lenkrad/Lenker Bei Montage wurde das Kabel gerissen oder gequetscht. Das Lenkrad prüfen bzw. ersetzen.
Fahrzeug hat sehr hohen Verschleiß an Schaltern Schmutz und Feuchtigkeit beschädigen die Schalter. Nicht in Feuchtigkeit oder Schmutz wie Wiesen, Kies, Sand etc.
fahren.
Die Gummireifen lösen sich an den Rädern Auf zu heißem Untergrund oder in Schmutz gefahren. Reifen wechseln und heiße Untergründe und Schmutz vermeiden.
GB
Problem Source Solution
The battery can no longer be charged Carger or battery defective. Check charger and battery
The battery can no longer be charged although the battery and charger
are OK.
Charging socket defective Check or replace the charging socket.
The journey time is very short. The battery has been deep discharged or is worn out. Use a new battery and avoid deep discharge.
No function Battery is not or incorrectly connected. Connect the battery (see instructions)
ON/OFF switch defective. Check or replace switch.
Can be switched on but does not drive. Motor cable incorrectly connected or not connected. Check and connect motor cable (see instructions).
Can be switched on but does notmove, or only direction. Gas or direction switch defective. Check or replace switch.
Can be switched on but only travels in one direction Directional switch defective. Check or replace switch.
hear a single click at the beginning
Oberload or electrical short circuit. Do not overload or have the until checked.
Vehicle does not respond to remote control Not bound. Carry out the binding process (see instructions).
No sound function on the steering wheel/andlebar the cable was torn or crushed during assembly. Check or replace the steering wheel.
Vehicle has very high wear on switches. Dirt and moisture damage the switches. Do not drive in moisture or dirt such as meadows, gavel, sand, etc.
The rubber tyres come loose on the wheels Ridden on too hot a surface or in dirt. Change tyres and avoid hot surfaces and dirt.
FR
Problème Origine Sollution
La batterie ne peut plus être chargée Chargeur ou batterie défectueux.
La batterie ne peut plus être chargée bien que la batterie et le chargeur
soient en bon état.
Prise de charge défectueuse.
La batterie a été profondément déchargée ou est usée. Utilisez une batterie neuve et évitez les décharges profondes.
Pas de fonction La batterie n‘est pas ou mal connectée Connectez la batterie (voir instructions)
Peut être mis en marche mais ne conduit pas Le câble du moteur est mal connecté ou n‘est pas
connecté.
Peut être mis en marche mais ne bouge pas, ou seulement dans une di-
rection.
Peut être mis en marche mais ne se déplace que dans une seule direction Le commutateur directionnel est défectueux.
Le fusible actif saute et éteint l‘appareil pendant quelques secondes. Vous
entendrez un seul clic au début
Surcharge ou court-circuit électrique.
Le véhicule ne répond pas à la télécommande Non relié.
Pas de fonction sonore sur le volant/le guidon Le câble a été déchiré ou écrasé lors du montage.
Le véhicule présente une usure très importante des interrupteurs La saleté et l‘humidité endommagent les interrupteurs. Ne pas conduire dans l‘humidité ou la saleté comme les prairies,
le gravier, le sable, etc.
Les pneus en caoutchouc se détachent des roues. Monté sur une surface trop chaude ou dans la saleté Changez les pneus et évitez les surfaces chaudes et la saleté.
IT
Problema Causa Soluzione
La batteria non può più essere caricata Caricatore o batteria difettosi. Controllare il caricatore e la batteria.
La batteria non può più essere caricata anche se batteria e caricatore sono
in ordine.
Presa di ricarica difettosa Controllare o sostituire la presa di carica.
La batteria è stata scaricata profondamente o è
consumata.
Usare una batteria nuova ed evitare la scarica profonda.
Nessuna funzione La batteria non è o non è collegata correttamente. Collegare la batteria (vedi istruzioni)
Controllare o sostituire l‘interruttore.
Può essere acceso ma non si muove Cavo del motore collegato in modo errato o non collegato. Controllare e collegare il cavo del motore (vedi istruzioni).
Può essere acceso ma non si muove, o solo in una direzione Gas o interruttore di direzione difettoso. Controllare o sostituire l‘interruttore
Può essere acceso ma si muove solo in una direzione Controllare o sostituire l‘interruttore
La sicurezza attiva salta e spegne il dispositivo per alcuni secondi.
Si sentirà un singolo clic all‘inizio.
Sovraccarico o corto circuito elettrico. Non sovraccaricare o far controllare il dispositivo
Non collegato. Eseguire il processo di binding (vedi istruzioni).
Nessuna funzione sonora sul volante/manubrio
montaggio.
Controllare o sostituire il volante.
Lo sporco e l‘umidità danneggiano gli interruttori. Non guidare in ambienti umidi o sporchi come prati, ghiaia,
sabbia, ecc.
Le gomme si allentano sulle ruote

14
ES
Problema Causa Solución
La batería no se puede cargar Cargador o batería defectuosa. Compruebe el cargador y la batería.
La batería ya no se puede cargar aunque la batería y el cargador están
en orden.
Enchufe de carga defectuoso. Compruebe o sustituya la toma de carga.
La batería se ha descargado profundamente o está
desgastada.
Utilice una batería nueva y evite una descarga profunda.
La batería no está conectada o está mal conectada Conectar la batería (ver instrucciones)
Compruebe o sustituya el interruptor.
Se puede encender pero no se mueve El cable del motor está mal conectado o no está
conectado.
Comprobar y conectar el cable del motor (ver instrucciones).
Compruebe o sustituya el interruptor.
Compruebe o sustituya el interruptor.
El fusible activo salta y apaga el aparato durante unos segundos. Al prin-
cipio se oye un solo clic
Sobrecarga o cortocircuito eléctrico. No sobrecargue o hacer revisar el dispositivo.
El vehículo no responde a la emisora No está conectado Realizar el proceso de binding (ver instrucciones).
Compruebe o sustituya el volante.
El vehículo tiene un desgaste muy grande en los interruptores La suciedad y la humedad dañan los interruptores. No conduzca en lugares húmedos o sucios como prados, grava,
arena, etc.
suciedad.
-
ciedad.
CZ
Problém Zdroj Řešení
Vadná nabíjecí zásuvka.
Doba jízdy je velmi krátká.
Lze zapnout, ale nejezdí.
Vozidlo nereaguje na dálkové ovládání Není vázáno
Vehicle has very high wear on switches.
apod.
PL
Problem Przyczyna Rozwiązanie
Pojazd nie reaguje na pilota zdalnego sterowania
Pojazd nie reaguje na pilota zdalnego sterowania
silnika.
Pojazd nie reaguje na zdalne sterowanie
Vehicle has very high wear on switches.
apod.
NL
Probleem Oorzaak Oplossing
De batterij kan niet meer opgeladen worden Lader of batterij defect. Controleer lader en batterij.
De batterij kan niet meer worden opgeladen, hoewel de batterij en de lader
in orde zijn.
Laad contactdoos defect Controleer of vervang het laadcontact.
De rijtijd is erg kort De batterij is diep ontladen of versleten. Gebruik een nieuwe batterij en vermijd diepontlading.
Model werkt niet. De batterij is verkeerd aangesloten. Sluit de batterij op de juiste manier aan (zie gebruiksaanwijzing).
ON/OFF schakelaar defect. Controleer of vervang de schakelaar.
Na het aanzetten rijdt het voertuig niet. Motorkabel verkeerd of niet aangesloten. Controleer en sluit de motorkabel aan (zie gebruiksaanwijzing).
Na het aanzetten het voertuig rijdt, of slechts in één richting Gas- of richtingsschakelaar defect. Controleer of vervang de schakelaar.
Na het aanzetten rijdt het voertuing slechts ein één richting Richtingsschakelaar defect. Controleer of vervang de schakelaar.
De actieve zekering wordt geactiveerd en schakelt het apparaat voor
enkele seconden uit. Eerst is een enkele klik hoorbaar.
Belast of kortsluiting Vermijd belasing van het voertuig, of controleer het voertuig.
De auto reageert niet op de afstandsbediening Niet gebonden. Voer het bindproces uit (zie instructies).
Geen geluidsfunctie op stuurwiel/handgreep De kabel is tijdens de installatie gebroken of gekneld. Controleer het stuurwiel en vervang het indien nodig.
Schakelaars in en voertuig verslijten zeer vaak. Vuil en vocht beschadigen de schakelaars. Rijd niet in natte of verontreinigde bebieden zoals weilanden,
grind, zand, e.d.
Rubberen banden komen los op de wielen. Rijden op een de heet of verontreinigd wegdek. Verwissel banden en vermijd hete en vervuilde oppervlakken.

15
SK
Problém Príčina Riešenie
Chybná nabíjacia zásuvka
keine Funktion Batéria nie je alebo je nesprávne pripojená Pripojte batériu (pozri pokyny).
Skontrolujte a pripojte kábel motora (pozri pokyny).
smerom.
Nie je viazaná. Vykonajte proces viazania (pozri pokyny).
DE
GB
FR
IT
ES
CZ
PL
NL - Meer oplossingen voor problemen op het internet vindt u in onze FAQ op:
SK
https://jamara-shop.com/FAQ

16
No. 412620 12V 4,5 Ah
Akku
Battery
Accu
Batteria
Batería
Baterie
Bateria
Batterij
Batéria
No. 412978 12V 1000mAh
Ladegerät
Charger
Chargeur
Caricatore
Cargador
Oplader
Keine Abbildung
No illustration
Sans illustration
Non illustrazione
No ilustración
Bezilustrací
No. 404642
Schalter Ein/Aus lang./schn.
Aan/uit-schakelaar
No. 412647
Schalter Ein-/Aus
Aan/uit-schakelaar
No. 412669
Soundboard
Soundboard
Tavola armonica
Caja de resonancia
Panel audio
Klankbord
No. 412670
Rad vorne/hinten
Wheel front/rear
Roue avant/arrière
Ruota anteriore/posteriore
Rueda delantera/trasera
Wiel voor/achter
Koleso predné/zadné
No. 412671
Fernsteuerung
Transmitter
Radiocommande
Trasmittente
Emisora
Afstandsbediening
No. 412672
Getriebe
Transmission
Entraînement
Trasmissione
Engranaje
Versnellingsbak
Prevodovka
No. 412675
Ganghebel
Gear shift
Changement de vitesse
Cambio di marcia
Cambio de marchas
Versnellingspook
Radiaca páka
Keine Abbildung
No illustration
Sans illustration
Non illustrazione
No ilustración
Bezilustrací
No. 412676
Gummiring
Rubber seal
Anneau en caoutchouc
Anello di gomma
Anillo de goma
Gumowa uszczelka
Rubberen afdichting
Gumené tesnenie
No. 412968
Empfangselektronik
Receiver electronics
Eléctr. de réception
Ricevente
Receptor
Elektronika odbiorcza
Elektronica voor de receptie
Prijímacia elektronika
No. 413015
Sitz
Seat
Siège
Sedile
Asiento
Sedadlo
Siedzenie
Seat
Sídlo
DE - Ersatzteile
GB - Spare parts
FR - Pièces de rechange
IT - Pezzi di ricambio
ES - Lista de repuestos
CZ-Náhradnídíly
PL-Częścizamienne
NL - Onderdelen
SK - Náhradné diely

17
DE - Entsorgungshinweise
Batterien und Akkumulatoren dürfen nicht im Hausmüll entsorgt werden sondern müs-
Entsorgung (getrennte Sammlung) zuzuführen. Nach Gebrauch können Sie Batterien
die reizend wirken, Allergien auslösen können oder hochreaktiv sind, ist die getrennte
-
heit. Sofern die Batterien unterhalb der durchgestrichenen Abfalltonne auf Rädern mit
diese mehr als 0,0005 % Quecksilber (Hg), mehr als 0,002 % Cadmium (Cd) oder mehr
als 0,004 % Blei (Pb) enthält.
GB - Disposal restrictions
of batteries (seperate collection) appropriately. After use you can return batteries free of charge
to the retail store. As batteries contain substances that can be irritant, can cause allergy and are
highly reactive, separate collections and proper recycling is important to the environment and to your
bin on wheels it refers to that more than 0.0005% of mercury (Hg), more than 0.002% of cadmium
(Cd) or more than 0.004% Lead (Pb) is included.
FR - Consignes de recyclage
Les piles et les accumulateurs ne doivent strictement pas être jetés avec les ordures ménagères,
mais doivent être jetés séparément. Vous êtes tenues de déposer vos piles usagés dans les cen-
tres communaux de collecte (collecte sélective). Après tout utilisation, vous avez la possibilité de
substances qui peuvent causés des irritations et pouvant provoquer des allergies, il est recom-
l´environnement et votre santé. Dans la mesure où vous visualiser un symbole de poubelle avec
ces piles contiennent plus de 0,0005% de mercure (Hg), plus de plus de 0,002% de cadmium
(Cd),ou plus de 0,004% de plomb (Pb).
IT - Istruzioni per lo smaltimento
-
titi separatamente. Siete obbligati di eseguire lo smaltimento professionale delle batterie vecchie
-
merciali. Dato che le batterie contengono delle sostanze, che provocano irritazione, possono cau-
l’ambiente e la sua salute. Se le batterie, a disotto del “bidone a ruote cancellato” sono segnati con
di 0,002 % Cadmio (Cd) o piu di 0,004 % Piombo (Pb).
ES - Notas sobre el reciclado
Baterías y acumuladores no deben desecharse en la basura doméstica, pero se deben desechar
(recogida selectiva). Es posible devolver las baterías después de su uso de forma gratuita en las
causar alergias o son altamente reactivos, la recogida selectiva y el reciclaje son importantes para
más de 0,002 % de Cadmio (Cd) o más de 0,004 % de Plomo (Pb).
CZ-Informacetýkajícíselikvidace
Baterie a akumulátory se nesmí vyhazovat spolu s komunálním odpadem, ale je nutné je likvidovat
PL -Informacjedotycząceutylizacji
-
-
NL - Informatie over de afvalverwerking
Batterijen en accu`s mogen niet met het gewone huisvuil weggegooid worden, maar moeten apart
worden verwijderd. De eindgebruiker moet de gebruikte batterijen in overeenstemming met de pro-
cedures ontdoen (gescheiden inzameling van afval). Na gebruik kan de batterij kosteloos in de
veroorzaken en zijn zeer reactief, moeten om die reden afzonderlijk worden ingezameld en in
Wanneer de batterijen onder het symbool van de doorkruiste afvalbak met wielen, met chemisch
symbool Hg, Cd en Pb zijn gemarkeerd, geeft dat aan dat ze meer dan 0,0005% kwik (Hg), meer
dan 0,002% cadmium (Cd) of meer dan 0004 % lood bevatten.
SK - Informácie týkajúce sa likvidácie
alebo viac, ako 0,004 % olova.
DE - Entsorgungshinweise
Elektrogeräte dürfen nicht im Hausmüll entsorgt werden, sondern müssen getrennt
-
men und das Elektroaltgerät bei den kommunalen Sammelstellen abzugeben. Sollten
GB - Disposal restrictions
Electrical appliances must not be disposed of in domestic waste and must be disposed of separately.
the communal collection points. Should personal data be stored on the electrical appliance you must
remove them by yourself.
FR - Consignes de recyclage
Les appareils électriques ne doivent strictement pas être jetés dans les ordures ménagères, mais
appareils électriques dans les centres communaux de collectes. Si des informations personnelles
sont présents sur les appareils électriques, celles-ci doivent être retirés par vous-même avant tout
élimination du produit.
IT - Istruzioni per lo smaltimento
-
paratamente. Siete obbligati di rimuovere le batterie e portare l´apparecchi elettrici vecchi ai punti di
raccolta comunali. Qualora ci sono dati personali sul apparecchio elettrico, devono essere rimossi
da voi stessi.
ES - Notas sobre el reciclado
Aparatos eléctricos no pueden desecharse en la basura doméstica, pero se deben desechar de
forma separada. Usted está obligado, a quitar las baterías y llevar los aparatos eléctricos viejos en
los puntos de recogida comunales. En caso de que hay datos personales en el aparato eléctrico se
deben remover de usted mismo.
CZ-Informacetýkajícíselikvidace
PL-Informacjedotycząceutylizacji
-
NL - Informatie over de afvalverwerking
Elektrische apparatuur mag niet met het gewone huisvuil weggegooid worden, maar moet apart
worden verwijderd. De eindgebruiker is verplicht- indien mogelijk - om de accu te verwijderen en
elektrische apparatuur naar stedelijk afvalinzameling te leveren. Staan op het apparaat de persoon-
lijke gegevens dan moeten ze zelfstandig worden verwijderd.
SK - Informácie týkajúce sa likvidácie
-

18

19

Kopie und Nachdruck, auch auszugsweise, nur mit Genehmigung von JAMARA e.K.
All rights reserved. Copyright JAMARA e.K. 2022
Copying or reproduction in whole or part, only with the expressed permission of JAMARA e.K.
JAMARA e.K.
Inh. Manuel Natterer
Am Lauerbühl 5 - DE-88317 Aichstetten
Tel. +49 (0) 75 65/94 12-0 - Fax +49 (0) 75 65/94 12-23
[email protected] ● www.jamara.com
Service - Tel. +49 (0) 75 65/94 12-777
service@ jamara.com
DE - Servicehändler
GB - Service centre
FR - Revendeur de service
IT - Centro assistenza
ES - Servicio asistencia
CZ-Servisnícentrum
PL - Partner serwisowy
NL - Servicepartner
SK - Servisný partner
Reitter Modellbau Versand
Patricia Reitter
Degerfeldstrasse 11
DE-72461 Albstadt
Tel +49 (0) 7432 9802700
Fax +49 (0) 7432 2009594
Mail [email protected]
Web www.modellbauversand.de DE
Mooser T-Trade
Thomas Mooser
Bürgermeister-Koch-Str. 32a
DE-82178 Puchheim
Tel +49 (0) 89 1792 9867
Fax +49 (0) 89 1792 9869
Mail [email protected]
Web www.mooser-t-trade.de DE
Janus Trade D.O.O.
Distributor Jamara for Slovenia
Mail [email protected]
Web www.janustrade.si SI
JAMARA e.K.
Manuel Natterer
Am Lauerbühl 5
DE-88317 Aichstetten
Tel +49 (0) 7565 9412-0
Fax +49 (0) 7565 9412-23
Mail [email protected]
Web www.jamara.com EU
Viva-net d.o.o.
Distributor Jamara for Croatia
Ante Topic - Mimare 8
Mail [email protected]
Web www.viva-net.hr HR
Nettrade Kft.
Distributor Jamara for Hungary
1033 Budapest, Hévízi út 3/b
Tel +36 30 664 3835
Mail [email protected]
HU
PenTec s.r.o.
Distributor Jamara for Czech Republic and Slovakia
Veleslavínská 30/19
Tel +420 235 364 664
Mobil +420 739 075 380
Mail servis@topdrony.cz
Web www.topdrony.cz CZ
-
 1
1
-
 2
2
-
 3
3
-
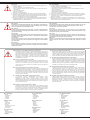 4
4
-
 5
5
-
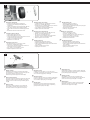 6
6
-
 7
7
-
 8
8
-
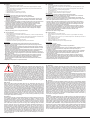 9
9
-
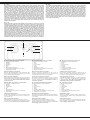 10
10
-
 11
11
-
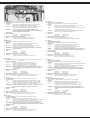 12
12
-
 13
13
-
 14
14
-
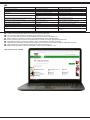 15
15
-
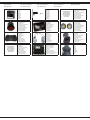 16
16
-
 17
17
-
 18
18
-
 19
19
-
 20
20


in altre lingue
- français: Jamara 460361 Mode d'emploi
- español: Jamara 460361 Instrucciones de operación
- Deutsch: Jamara 460361 Bedienungsanleitung
- Nederlands: Jamara 460361 Handleiding
- slovenčina: Jamara 460361 Návod na používanie
- polski: Jamara 460361 Instrukcja obsługi
Documenti correlati
-
Jamara 460203 Istruzioni per l'uso
-
Jamara Mercedes-Benz Antos Feuerwehr Polizei Manuale del proprietario
-
-
Jamara 403006 Istruzioni per l'uso
-
-
-
-
Jamara 460795 Istruzioni per l'uso
-
-
Jamara 405072 Istruzioni per l'uso