HellermannTyton SpotClip-Box Manuale del proprietario
- Tipo
- Manuale del proprietario

Operating instructions
Betriebsanleitung
Manuel d’utilisation
Manuale d’uso
Montagehandleiding
Instrukcja obsługi
SpotClip-Box

Europe
HellermannTyton GmbH – Austria
Rennbahnweg 65
1220 Vienna
Tel.: +43 12 59 99 55-0
Fax: +43 12 59 99 11
Email: oce@HellermannTyton.at
www.HellermannTyton.at
HellermannTyton – Czech Republic
Email: oceCZ@HellermannTyton.at
www.HellermannTyton.cz
HellermannTyton – Denmark
Industrivej 44A, 1.
4000 Roskilde
Tel.: +45 702 371 20
Fax: +45 702 371 21
Email: htdk@HellermannTyton.dk
www.HellermannTyton.dk
HellermannTyton – Finland
Sähkötie 8
01510 Vantaa
Tel.: +358 9 8700 450
Fax: +358 9 8700 4520
Email: myynti@HellermannTyton.fi
www.HellermannTyton.fi
HellermannTyton S.A.S. – France
2 rue des Hêtres - CS 80543
78197 Trappes Cedex
Tel.: +33 1 30 13 80 00
Fax: +33 1 30 13 80 60
Email: info@HellermannTyton.fr
www.HellermannTyton.fr
HellermannTyton GmbH –
Germany
Großer Moorweg 45
25436 Tornesch
Tel.: +49 4122 701-0
Fax: +49 4122 701-400
Email: info@HellermannTyton.de
www.HellermannTyton.de
HellermannTyton KFT – Hungary
Kisfaludy u. 13
1044 Budapest
Tel.: +36 1 369 4151
Fax: +36 1 369 4151
Email: oceHU@HellermannTyton.at
www.HellermannTyton.hu
HellermannTyton Ltd – Ireland
Unit A5 Cherry Orchard
Business Park
Ballyfermot, Dublin 10
Tel.: +353 1 626 8267
Fax: +353 1 626 8022
Email: sales@HellermannTyton.ie
www.HellermannTyton.co.uk
HellermannTyton S.r.l. – Italy
Via Visco, 3/5
35010 Limena (PD)
Tel.: +39 049 767 870
Fax: +39 049 767 985
Email: info@HellermannTyton.it
www.HellermannTyton.it
HellermannTyton B.V. –
Belgium/Netherlands
Vanadiumweg 11-C
3812 PX Amersfoort
Tel.: +31 33 460 06 90
Fax: +31 33 460 06 99
Email (NL): info@HellermannTyton.nl
Email (BE): info@HellermannTyton.be
www.HellermannTyton.nl
www.HellermannTyton.be
HellermannTyton AS – Norway
PO Box 240 Alnabru
0614 Oslo
Tel.: +47 23 17 47 00
Fax: +47 22 97 09 70
Email: firmapost@HellermannTyton.no
www.HellermannTyton.no
HellermannTyton Sp. z o.o. –
Poland
Kotunia 111
62-400 Słupca
Tel.: +48 63 2237111
Fax: +48 63 2237110
Email: info@HellermannTyton.pl
www.HellermannTyton.pl
HellermannTyton – Romania
Email: oceRO@HellermannTyton.at
www.HellermannTyton.at
OOO HellermannTyton – Russia
40/4, Pulkovskoe road
BC Technopolis Pulkovo, oce A 8081
196158, St. Petersburg
Tel.: +7 812 386 00 09
Fax: +7 812 386 00 08
Email: info@HellermannTyton.ru
www.Hellermanntyton.ru
HellermannTyton – Slovenia
Branch Oce Ljubljana
Podružnica Ljubljana, Leskoškova 6
1000 Ljubljana
Tel.: +386 1 433 70 56
Fax: +386 1 433 63 21
Email: oceSl@HellermannTyton.at
www.HellermannTyton.si
HellermannTyton España s.l. –
Spain/Portugal
Avda. de la Industria 37 2⁰ 2
28108 Alcobendas, Madrid
Tel.: +34 91 661 2835
Fax: +34 91 661 2368
Email:
HellermannTyton@HellermannTyton.es
www.HellermannTyton.es
HellermannTyton AB – Sweden
Isafjordsgatan 5
16440 Kista
Tel.: +46 8 580 890 00
Fax: +46 8 580 348 02
Email:
kundsupport@HellermannTyton.se
www.HellermannTyton.se
HellermannTyton
Engineering GmbH – Turkey
Saray Mah Dr. Adnan Büyükdeniz
Cad. No:4
Akkom Oce Park 2. Blok Kat: 10
34768 Ümraniye-İstanbul
Tel.: +90 216 687 03 40
Fax: +90 216 250 32 32
Email: info@HellermannTyton.com.tr
www.HellermannTyton.com.tr
HellermannTyton operates

HellermannTyton Ltd – UK
William Prance Road
Plymouth International Medical
and Technology Park
Plymouth, Devon PL6 5WR
Tel.: +44 1752 701 261
Fax: +44 1752 790 058
Email: info@HellermannTyton.co.uk
www.HellermannTyton.co.uk
HellermannTyton Ltd – UK
Sharston Green Business Park
1 Robeson Way
Altrincham Road, Wythenshawe
Manchester M22 4TY
Tel.: +44 161 947 2200
Fax: +44 161 947 2220
Email: sales@HellermannTyton.co.uk
www.HellermannTyton.co.uk
HellermannTyton Ltd – UK
Cley Road, Kingswood Lakeside
Cannock, Staffordshire
WS11 8AA
Tel.: +44 1543 728282
Fax: +44 1543 728284
Email: [email protected]
www.HellermannTyton.co.uk
HellermannTyton Data Ltd – UK
Cornwell Business Park
43-45 Salthouse Road, Brackmills
Northampton NN4 7EX
Tel.: +44 1604 707 420
Fax: +44 1604 705 454
Email: [email protected]
www.htdata.co.uk
Middle East
HellermannTyton – UAE
Email: info@HellermannTyton.ae
www.HellermannTyton.ae
North America
HellermannTyton – Canada
Tel: +1 905 726 1221
Fax: +1 905 726 8538
E-Mail: sales@HellermannTyton.ca
www.HellermannTyton.ca
HellermannTyton – Mexico
Tel.: +52 333 133 9880
Fax: +52 333 133 9861
Email: info@HellermannTyton.com.mx
www.HellermannTyton.com
HellermannTyton – USA
Tel.: +1 414 355 1130
Fax: +1 414 355 7341
Email: [email protected]
www.HellermannTyton.com
South America
HellermannTyton – Argentina
Tel.: +54 11 4754 5400
Fax: +54 11 4752 0374
Email:
ventas@HellermannTyton.com.ar
www.HellermannTyton.com.ar
HellermannTyton – Brazil
Tel.: +55 11 4815 9000
Fax: +55 11 4815 9030
Email:
vendas@HellermannTyton.com.br
www.HellermannTyton.com.br
Asia-Pacific
HellermannTyton – Australia
Tel.: +61 2 9525 2133
Fax: +61 2 9526 2495
Email:
cservice@HellermannTyton.com.au
www.HellermannTyton.com.au
HellermannTyton – China
Tel.: +86 510 8528 2536
Fax: +86 510 8528 2731
Email:
cservice@HellermannTyton.com.cn
www.HellermannTyton.com.cn
HellermannTyton – Hong Kong
Tel.: +852 2832 9090
Fax: +852 2832 9381
Email:
cservice@HellermannTyton.com.hk
www.HellermannTyton.com.sg
HellermannTyton – India
Tel.: +91 120 413 3384
Email:
cservice@HellermannTyton.co.in
www.HellermannTyton.co.in
HellermannTyton – Japan
Tel.: +81 3 5790 3111
Fax: +81 3 5790 3112
Email: [email protected]
www.HellermannTyton.co.jp
HellermannTyton –
Republic of Korea
Tel.: +82 32 833 8012
Fax: +82 32 833 8013
Email:
cservice@HellermannTyton.co.kr
www.HellermannTyton.co.kr
HellermannTyton – Philippines
Tel.: +63 2 752 6551
Fax: +63 2 752 6553
Email:
cservice@HellermannTyton.com.ph
www.HellermannTyton.com.ph
HellermannTyton – Singapore
Tel.: +65 6 586 1919
Fax: +65 6 752 2527
Email: cservice@HellermannTyton.sg
www.HellermannTyton.com.sg
HellermannTyton – Thailand
Tel.: +662 237 6702 / 266 0624
Fax: +662 266 8664
Email:
cservice@HellermannTyton.co.th
www.HellermannTyton.com.sg
Africa
HellermannTyton – South Africa
Tel.: +27 11 879 6600
Fax: +27 11 879 6603
Email: [email protected]
www.HellermannTyton.co.za
HellermannTyton operates globally in 37 countries

2
3
4
6
1
5
A
B C
AC
220V / 12V
D
E

F
H
G
I
J K
Click !
Click !
L
M

English
Deutsch
Français
Italiano
Nederlands
Polski
3
11
19
27
35
43
GBDEFRITNLPL

GBDEFRITNLPL
Operating Instructions • SpotClip-Box • 12-2016
User information
3
Operating Instructions
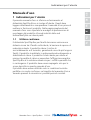
1 User information
These operating instructions only apply for the SpotClip-Box
spacer product and are intended for the user. The user must
carefully read and understand the operating instructions before
commissioning the product. On the fold-out page of the
operating instructions, you will find figures providing an
overview and for the assembly of the product, along with
contact details for your local HellermannTyton country
representative.
1.1 Intended use
The SpotClip-Box spacer for downlight covers ensure a safety
distance between the light, damp-proof foil or vapour barrier
and the insulation wool. The product reduces the risk of
overheating and a fire. It also increases the service life of the
lights. The product is made of self-extinguishing, heat-stabilised
polyamide. The product is designed to reduce the heat loss to a
minimum and to increase the energy eciency. The SpotClip-
Box is suitable both for use in panels as well as in plasterboard.
The product may only be used for the purposes described in
these operating instructions.
The product may only be used in technically perfect condition in
accordance with its intended use and the operating instructions
and only by safety-conscious persons who are fully aware of the
risks involved.

Operating Instructions • SpotClip-Box • 12-2016
Safety instructions
4
1.2 Fire protection properties/standards
The product is self extinguishing and its fire protection
properties comply with UL94 V2. The product is tested
according to the filament test (GWT) at 960°C as well as
standards EN60598-1 and EN60598-2-2. The used insulating
materials and damp-proof foils or vapour barriers comply with
DINEN13501-1A2s1d0 and DIN4102-1A2. Use only
insulating materials and damp-proof foils or vapour barriers of
low flammability, which do not emit smoke in the case of fire
and do not drip.
1.3 Customer service
If you require any information or have any questions for our
customer services, please contact the HellermannTyton branch
in your country. The contact details are listed on the fold-out
page of these operating instructions.
1.4 Information about the operating instructions and
actuality
Please keep these instructions in a safe place.
fPlease note:
due to the continuous development of the product, there may be
deviations between the documentation and the product. The
current edition can be found at:
http://www.hellermanntyton.co.uk/site/downloads.
2 Safety instructions
The product was manufactured according to the current state
of technology and the recognised safety regulations.
Nonetheless, improper use of the product can result in hazards
to the life and limb of the user or third parties, or in damage to
the product and other material property.
These operating instructions contain information on safety.
fAlways follow all of the instructions to prevent personal injury,
material damage or environmental damage.

GBDEFRITNLPL
Operating Instructions • SpotClip-Box • 12-2016
Safety instructions
5
2.1 Representation and layout of warning instructions
The warning instructions relate to actions and are structured as
follows:
WARNING
Type and source of danger!
Explanations on the type and source of danger.
fMeasures to prevent danger.
A warning indicates possible risk of lethal or serious injuries.
2.2 Limitations of use
fObserve the following requirements for the operational
environment:
• The suspended ceiling height must be sucient in order to
ensure that there is enough insulation above the SpotClip-Box.
• As the installation is partially carried out from above the
suspended ceiling, for this purpose, there must either be access
to this or the assembly must be carried out before the ceiling is
installed.
• Can be used for LED and fluorescent lights with external
transformers. Not suitable for halogen lamps.
• The available inner usable height is 130mm.
• Can be used for ceiling cut-outs with diameters of up to 75mm.
• Can be used with voltages of 230V and 12V.
• Not suitable for the protection of converters or transformers.
These must be installed outside the SpotClip-Box, where
overheating can also not occur.
• Can be used up to IP protection class 65.

Operating Instructions • SpotClip-Box • 12-2016
Product overview
6
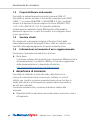
3 User obligations
The user must observe and comply with the respectively
applicable national legal regulations and accident prevention
regulations. The use of the SpotClip-Box does not exempt the
user from complying with the installation instructions from the
spotlight manufacturer. Please contact a specialist if you have
any questions.
4 Transport and storage
Do not stack heavy objects on the packaged product.
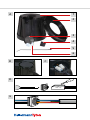
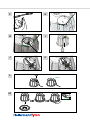
5 Product overview
In Figure A , you can find an overview image of the product.
Figures B and C show the product details. You can find the
figures on the fold-out page.
Legends A , B and C :
1 Hood 4 Cable grommet
2 Base plate 5 Q30R cable tie (x 1)
3 Cover 6 HelaCon HECL (x 2)

GBDEFRITNLPL
Operating Instructions • SpotClip-Box • 12-2016
Product overview
7
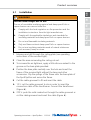
5.1 Installation
WARNING
Possible lethal danger due to fire!
The use of unsuitable insulating material and damp-proof foils or
vapour barriers can cause a lethal fire.
fComply with the local regulation on fire prevention and the
installation instructions from the light manufacturer.
fComply with the applicable stipulations and standards for
insulating materials and damp-proof foils or vapour barriers.
fDo not use flammable insulating materials.
fOnly use flame-resistant damp-proof foils or vapour barriers.
fDo not use insulating materials made of natural substances
such as wood, hemp or straw.
1 Measure and drill through the ceiling plate (see operating
instructions of the recessed light).
2 Clean the area surrounding the ceiling cut-out.
3 To increase the air-tightness, apply a little silicone sealant to the
groove on the base plate provided.
4 Position the base plate centrally over the hole and insert the
frame of the recessed light without the lamp and other
accessories. Clip the springs of the frame onto the base plate of
the SpotClip-Box and secure the frame.
5 Cut the cable grommet to fit and insert the cable.
f12V: cut the cable grommet to size in order to insert the
connection cable of the transformer. Connect the transformer
(Figure D ).
f230V: push the solid conductors through the cable grommet or
cut the cable grommet and insert the cable (Figure E ).

Operating Instructions • SpotClip-Box • 12-2016
Product overview
8
6 Fold over the ends of the cable tie (Figure F ) and thread through
the cable tie socket into the connection area of the hood
(Figure G ).
7 Install the connection area.
f12V: insert the connection cable through the cable
feed-through into the connection area (Figure H ).
f230V: feed the connection cable through the cable
feed-through of the connection area into the hood from below
(Figure I ).
8 Using both of the clamping rails supplied, connect to the mains
(Figure K ).
9 Fit the cable grommet and complete the assembly.
f12V/230V: insert the cable grommet in the groove provided. Fix
the connecting cable using the cable tie and tighten it up. Please
note that at least 4-5cm of the connection cable must hang
from the hood to connect directly to the lamp. Cut off the
protruding end of the cable tie directly at the head (Figures J
and K ).
10 Close off the connection area with the cover (Figure L ).
11 Position the hood on the base plate and close up the product
with the bayonet catch (Figure M ).
12 Connect the lamp according to the operating instructions.
13 Fix the spotlight according to the operating instructions.
;The SpotClip-Box spacer is installed.

GBDEFRITNLPL
Operating Instructions • SpotClip-Box • 12-2016
Maintenance
9
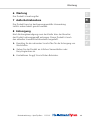
6 Maintenance
The product requires no maintenance.
7 Withdrawing from operation
When installed and used for its intended purpose, the product
will perform continuously without issues.
8 Disposal
At the end of use, the purchaser or the user must dispose of the
product properly. This product has been manufactured in
compliance with the current environmental standards.
fObserve the national regulations for the disposal of recyclable
materials.
fTake the product to a local collection point or recycling centre.
fIf necessary, contact your local environmental oce.

Operating Instructions • SpotClip-Box • 12-2016
Technical data
10
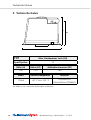
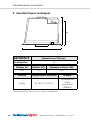
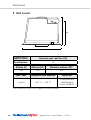
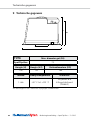
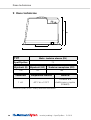
9 Technical data
H
H2
OD
FH
TYPE
Max. hole diameter (FH)
SpotClip-Box 75
Height (H) Height (H2) Outer diameter (OD)
140 130 184
Content Operating temperature Material
1 piece -40°C to +105°C
Polyamide 6.6
heat-stabilised
(PA66HS)
All dimensions in mm. We reserve the right to make technical changes without notice.

GBDEFRITNLPL
Betriebsanleitung • SpotClip-Box • 12-2016
Benutzerhinweise
11
Betriebsanleitung
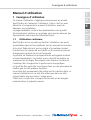
1 Benutzerhinweise
Diese Betriebsanleitung gilt ausschließlich für das Produkt
SpotClip-Box Abstandhalter und richtet sich an den Benutzer.
Dieser muss die Betriebsanleitung vor der Inbetriebnahme des
Produktes aufmerksam lesen und verstehen. In der
Ausklappseite der Betriebsanleitung befinden sich Abbildungen
zur Übersicht und zur Montage des Produktes sowie die
Adressen der jeweiligen Ländervertretungen von
HellermannTyton.
1.1 Bestimmungsgemäße Verwendung
Der SpotClip-Box Abstandhalter für Einbaustrahler sorgt für
einen sicheren Abstand zwischen Leuchte, Dampfsperrfolie bzw.
Dampfbremse und Dämmwolle. Das Produkt reduziert das
Risiko einer Überhitzung und die Brandgefahr. Ebenso wird die
Lebensdauer der Leuchten erhöht. Das Produkt besteht aus
selbstverlöschendem, hitzestabilisiertem Polyamid.
Das Produkt ist so konzipiert, dass der Wärmeverlust auf ein
Minimum reduziert wird und die Energieezienz gesteigert
wird.
Der SpotClip-Box Abstandhalter eignet sich sowohl für die
Verwendung in Paneelen als auch in Gipskartonplatten (GKP).
Das Produkt darf nur zu dem in dieser Betriebsanleitung
beschriebenen Zweck eingesetzt werden.
Das Produkt darf nur in technisch einwandfreiem Zustand sowie
bestimmungsgemäß, sicherheits- und gefahrenbewusst unter
Beachtung der Betriebsanleitung benutzt werden.

Betriebsanleitung • SpotClip-Box • 12-2016
Sicherheitshinweise
12
1.2 Brandschutzeigenschaften/Normen
Die Brandschutzeigenschaften entsprechen der UL94 V2 und
das Produkt ist selbstverlöschend. Das Produkt ist gemäß dem
Glühdrahttest (GWT) mit 960°C, der Normen EN60598-1 und
EN60598-2-2 getestet. Für die verwendeten Dämmstoffe und
Dampfsperrfolien bzw. Dampfbremsen gelten die DIN
EN13501-1 A2 s1 d0 und die DIN4102-1 A2. Es dürfen
ausschließlich schwer entflammbare Dämmstoffe und
Dampfsperrfolien bzw. Dampfbremsen, die im Brandfall keinen
Rauch entwickeln und nicht abtropfen, verwendet werden.
1.3 Kundenservice
Falls Sie Informationen wünschen oder Fragen an den
Kundenservice haben, wenden Sie sich bitte an die
HellermannTyton Niederlassung in Ihrem Land. Die
Kontaktdaten sind in der Ausklappseite dieser Betriebsanleitung
aufgeführt.
1.4 Informationen zur Betriebsanleitung und Aktualität
Bewahren Sie diese Anleitung sicher auf.
fBeachten Sie:
Durch die ständige Weiterentwicklung des Produkts können
Abweichungen zwischen der Dokumentation und dem Produkt
auftreten. Die aktuelle Ausgabe finden Sie unter
http://www.hellermanntyton.de/site/downloads.
2 Sicherheitshinweise
Das Produkt ist nach dem Stand der Technik und den
anerkannten sicherheitstechnischen Regeln gefertigt. Dennoch
können bei der nicht sachgemäßen Verwendung Gefahren für
Leib und Leben des Benutzers oder Dritter bzw.
Beeinträchtigungen des Produktes und anderer Sachwerte
entstehen.
Die vorliegende Betriebsanleitung beinhaltet Anweisungen zur
Sicherheit.
fBefolgen Sie alle Anweisungen, um Personen-, Sach- oder
Umweltschäden zu vermeiden.

GBDEFRITNLPL
Betriebsanleitung • SpotClip-Box • 12-2016
Sicherheitshinweise
13
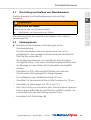
2.1 Darstellung und Aufbau von Warnhinweisen
Die Warnhinweise sind handlungsbezogen und wie folgt
aufgebaut:
WARNUNG
Art und Quelle der Gefahr!
Erläuterung zur Art und Quelle der Gefahr.
fMaßnahmen zur Abwendung der Gefahr.
Eine Warnung weist auf mögliche Lebensgefahr oder schwere
Verletzungen hin.
2.2 Einsatzgrenzen
fBeachten Sie die folgenden Anforderungen an die
Einsatzumgebung:
• Die Zwischendeckenhöhe muss ausreichend sein, um zu
gewährleisten, dass genügend Isolationsmaterial oberhalb der
SpotClip-Box vorhanden ist.
• Da die Montage teilweise von oberhalb der Zwischendecke
durchgeführt wird, muss hierzu entweder Zugang bestehen oder
die Montage vor dem Einbau der Deckenplatte durchgeführt
werden.
• Einsetzbar für LED- und Leuchtstoffstrahler mit externem
Transformator. Nicht geeignet für Halogenlampen.
• Die verfügbare innere Nutzhöhe beträgt 130 mm.
• Einsetzbar für Deckenausschnitte mit Durchmessern bis 75 mm.
• Einsetzbar für Spannungen von 230 V und 12 V.
• Nicht zum Schutz von Konvertern oder Transformatoren geeignet.
Diese müssen außerhalb der SpotClip-Box installiert werden, wo
es ebenfalls zu keiner Überhitzung kommen kann.
• Einsetzbar bis IP-Schutzklasse 65

Betriebsanleitung • SpotClip-Box • 12-2016
Pflichten des Benutzers
14
3 Pflichten des Benutzers
Der Benutzer muss die jeweils national geltenden gesetzlichen
Vorschriften und Unfallverhütungsvorschriften beachten und
einhalten. Die Verwendung der SpotClip-Box befreit den
Benutzer nicht von der Beachtung der Installationsanleitung des
Herstellers der Einbauleuchten. Bei Fragen wenden Sie sich bitte
an einen Fachmann.
4 Transport und Lagerung
Stapeln Sie keine schweren Gegenstände auf dem verpackten
Produkt.
5 Produktübersicht
In der Abbildung A finden Sie ein Übersichtsbild zum Produkt.
In Abbildung B und C sind die Produktdetails dargestellt. Die
Abbildungen finden Sie in der Ausklappseite.
Legende A , B und C :
1 Haube 4 Kabeltülle
2 Bodenplatte 5 Kabelbinder Q30R (x 1)
3 Abdeckung 6 HelaCon HECL (x 2)

GBDEFRITNLPL
Betriebsanleitung • SpotClip-Box • 12-2016
Produktübersicht
15
5.1 Montage
WARNUNG
Mögliche Lebensgefahr durch Feuer!
Die Verwendung von ungeeigneten Dämmstoffen und
Dampfsperrfolien bzw. Dampfbremsen kann einen
lebensgefährlichen Brand verursachen.
fBeachten Sie die lokalen Vorschriften zum Brandschutz und
die Installationsanweisung der Leuchtenhersteller.
fBeachten Sie die gültigen Bestimmungen und Normen für
Dämmstoffe und Dampfsperrfolien bzw. Dampfbremsen.
fVerwenden Sie keine leicht entzündlichen Dämmstoffe.
fVerwenden Sie nur feuerbeständige Dampfsperrfolien bzw.
Dampfbremsen.
fVerwenden Sie keine Dämmstoffe aus ökologischen
Materialien wie z.B. Holz, Hanf oder Stroh.
1 Deckenplatte ausmessen und durchbohren (siehe
Betriebsanleitung des Einbaustrahlers).
2 Bereich um den Deckenausschnitt reinigen.
3 Um die Luftdichtigkeit zu erhöhen, etwas Silikon auf die hierfür
vorgesehene Nut der Bodenplatte aufbringen.
4 Bodenplatte mittig über dem Loch platzieren und den Rahmen
des Einbaustrahlers ohne Leuchtkörper und sonstiges Zubehör
einsetzen. Die Federn des Rahmens um die Bodenplatte des
SpotClip-Box klemmen und den Rahmen so befestigen.
5 Kabeltülle zurecht schneiden und Kabel durchführen.
f12V: Kabeltülle zurechtschneiden, um das Anschlusskabel des
Transformators durchzuführen. Transformator anschließen
(Abbildung D ).
f230V: Kabeltülle mit starren Leitern durchstechen oder Kabeltülle
zurechtschneiden und Kabel durchführen (Abbildung E ).

Betriebsanleitung • SpotClip-Box • 12-2016
Produktübersicht
16
6 Ende des Kabelbinders knicken (Abbildung F ) und durch den
Kabelbindersockel im Verbindungsbereich der Haube fädeln
(Abbildung G ).
7 Verbindungsbereich installieren.
f12V: Anschlusskabel durch die Kabeldurchführung im
Verbindungsbereich führen (Abbildung H ).
f230V: Von unterhalb der Haube das Anschlusskabel durch die
Kabeldurchführung des Verbindungsbereichs der Haube führen
(Abbildung I ).
8 Mithilfe der beiden mitgelieferten Klemmleisten an das Netz
anschließen (Abbildung K ).
9 Kabeltülle montieren und Montage abschließen.
f12 V / 230 V: Kabeltülle in der dafür vorgesehenen Nut
platzieren. Das Anschlusskabel mit dem Kabelbinder fixieren und
festziehen. Bitte beachten Sie, dass mindestens 4-5 cm des
Anschlusskabels zum direkten Anschluss an den Leuchtkörper aus
der Haube heraushängen müssen. Das abstehende Ende des
Kabelbinders direkt am Kopf abschneiden (Abbildungen J
und K ).
10 Verbindungsbereich mit der Abdeckung verschließen
(Abbildung L ).
11 Haube auf der Bodenplatte aufsetzen und das Produkt mit dem
Bajonettverschluss verschließen (Abbildung M ).
12 Leuchte nach Betriebsanleitung anschließen.
13 Einbaustrahler nach Betriebsanleitung fixieren.
;Der SpotClip-Box Abstandhalter ist montiert.
La pagina si sta caricando...
La pagina si sta caricando...
La pagina si sta caricando...
La pagina si sta caricando...
La pagina si sta caricando...
La pagina si sta caricando...
La pagina si sta caricando...
La pagina si sta caricando...
La pagina si sta caricando...
La pagina si sta caricando...
La pagina si sta caricando...
La pagina si sta caricando...
La pagina si sta caricando...
La pagina si sta caricando...
La pagina si sta caricando...
La pagina si sta caricando...
La pagina si sta caricando...
La pagina si sta caricando...
La pagina si sta caricando...
La pagina si sta caricando...
La pagina si sta caricando...
La pagina si sta caricando...
La pagina si sta caricando...
La pagina si sta caricando...
La pagina si sta caricando...
La pagina si sta caricando...
La pagina si sta caricando...
La pagina si sta caricando...
La pagina si sta caricando...
La pagina si sta caricando...
La pagina si sta caricando...
La pagina si sta caricando...
La pagina si sta caricando...
La pagina si sta caricando...
La pagina si sta caricando...
La pagina si sta caricando...
-
 1
1
-
 2
2
-
 3
3
-
 4
4
-
 5
5
-
 6
6
-
 7
7
-
 8
8
-
 9
9
-
 10
10
-
 11
11
-
 12
12
-
 13
13
-
 14
14
-
 15
15
-
 16
16
-
 17
17
-
 18
18
-
 19
19
-
 20
20
-
 21
21
-
 22
22
-
 23
23
-
 24
24
-
 25
25
-
 26
26
-
 27
27
-
 28
28
-
 29
29
-
 30
30
-
 31
31
-
 32
32
-
 33
33
-
 34
34
-
 35
35
-
 36
36
-
 37
37
-
 38
38
-
 39
39
-
 40
40
-
 41
41
-
 42
42
-
 43
43
-
 44
44
-
 45
45
-
 46
46
-
 47
47
-
 48
48
-
 49
49
-
 50
50
-
 51
51
-
 52
52
-
 53
53
-
 54
54
-
 55
55
-
 56
56


HellermannTyton SpotClip-Box Manuale del proprietario
- Tipo
- Manuale del proprietario
in altre lingue
Documenti correlati
-
HellermannTyton SpotClip-III Manuale del proprietario
-
-
-
-
-
-