
Handheld Thermography Camera
HIKMICRO G Series
Quick Start Guide

Handheld Thermography Camera Quick Start Guide
English
3
Kurzanleitung für tragbare Wärmebildkamera
Deutsch
7
Guide de démarrage rapide de la caméra thermographique
portable
Français
10
Guía de inicio rápido de la cámara portátil de análisis termográfico
Español
14
Guia de início rápido da câmara termográfica portátil
Português
18
Guida rapida all'uso della termocamera portatile
Italiano
21
Ruční termokamera Stručná příručka
Čeština
25
Ručná termografická kamera – stručná úvodná príručka
Slovenčina
28
Ręczna kamera termowizyjna Skrócony podręcznik użytkownika
Polski
32
ézi hőkamera rövid útmutatója
Magyar
35
Ghid de iniţiere rapidă a camerei termografice portabile
Română
39
Thermografische handcamera Snelstartgids
Nederlands
43
Håndholdt termografisk kamera Startvejledning
Dansk
46
Hurtigstartguide for håndholdt termografisk kamera
Norsk
49
Kannettavan lämpökameran pika-aloitusopas
Suomi
53
Snabbstartsguide för bärbar värmekamera
Svenska
56
Портативная термографическая камера Краткое руководство
Русский
59
El Tipi Termografi Kamerası Hızlı Başlangıç Kılavuzu
Türkçe
63
ハンドヘルドサーモグラフィカメラクイックスタートガイド
日本語
66
휴대용 열화상 카메라 빠른 시작 가이드
한국어
70
手持式熱成像攝影機快速入門指南
繁體中文
73

1
A
1
2
3
4
6 7
5
89
10 11
12
13 14
15
16
17
18
19
20
21
22
I
II
23
24
25
23
26
24
27
B

2
C
D
I
II
E
Android
iOS

3
English
1. Appearance (Page 1 – A)
No.
Component
Function
1
Interface
Cover
Protect the interfaces from dust.
2
Microphone
Input audio information.
3
Charging
Indicator
Red: Charging
Green: Fully charged
4
Loudspeaker
Play voice note, voice alarm, and
video voice.
5
Touch
Screen
Touch the screen to set
parameters.
6
Power
Button
Hold: Power on/off
7
Shutter
Button
Press: Perform image correction
with a shutter click in the
camera.
8
File
Inspection Route Mode:
Press the button to view the
information of inspection
points.
Non-Inspection Route
Mode: Press the button to
view the capture and video.
9
Back Button
Exit the menu or return to
previous menu.
10
Navigation
Button
Menu Mode:
Press , , , and to
select parameters.
Press OK to confirm.
Press to enter the
submenu.
Press to return to the
previous menu.
Non-Menu Mode:
Press to turn on/off the
LED light supplement.
Press to start digital
zoom.
11
Laser Button
Hold the button to turn on laser,
and release the button to turn
off laser.
12
Battery
Provide power for the device.
13
Laser
Distance
Meter
Measure the distance with laser.
14
Optical Lens
View the optical image.
15
LED Light
Increase ambient brightness in
dark environment.
16
Thermal Lens
View the thermal image.
17
Focus Ring
Adjust the lens position at the
optical axis of the thermal lens.
18
Tripod
Interface
Install the tripod.
19
Hand Strap
Buckle
Interface
Insert the screw to fix the hand
strap buckle.
20
Focus Trigger
Pull the trigger to enable laser
assisted focus/auto focus
function.
No.
Component
Function
21
Main Trigger
Pull the trigger to capture or
scan the QR code.
Hold the trigger to record
videos.
22
Hand Strap
Hole
Thread the lower part of the
hand strap through the hole.
23
Memory
Card Slot
Insert the memory card.
24
Type-C
Interface
Connect to power supply and
transmit data.
25
CVBS
Interface
Connect the device and display
unit to view the image for
details.
26
Reserved
Card Slot
Insert the reserved card.
27
Micro HDMI
Interface
Connect the device and display
unit with Micro HDMI (type D) to
HDMI (type A) cable to view the
image for details.
Note:
The warning sign is under the laser and on the left of
the device.
The interfaces may vary according to different
models. Please refer to the actual products.
Initialize the memory card before first use of it.
Please refer to the product specification for details
about the device accessories.
2. Charge Device via Charging Base
(Page 1 – B)
After the device starts up, the OSD (on-screen display)
shows the battery status. When the battery is low, charge
the device and ensure it works properly.
For the first charge, charge the device for 10 hours when
the device is turned on.
Note:
The built-in cell battery that powers the real time
clock (RTC) of the device may drain during longtime
transportation or storage. It is recommended to
recharge the RTC battery for the wellfunctioning of
the device clock.
To fully charge the RTC battery, the following
requirements should be met:
a) The rechargeable lithium batteries should be
installed on the device.
b) The device should keep working for more than
10 hours before shutting down.
Steps:
1. Hold the device, and press both battery lock catches
of the device.
2. Hold the lock catches, and draw the battery base to
take out the battery.
3. Insert the battery into the charging base. You can see
the charging status via the pilot lamp on the charging
base.
4. When the battery is fully charged, draw the battery
from the charging base.
5. Insert battery into the device.
Note: Please purchase the charging base in advance.
3. Mount Interchangeable Lens
(Optional)(Page 2 – C)
Note: Please purchase the interchangeable lens in
advance.

4
Steps
1. Turn the decorative ring anticlockwise to remove the
decorative ring.
2. Align the two dots on the interchangeable lens and
the device.
3. Rotate the interchangeable lens clockwise to finish
mounting.
4. Mount Protective Cover
(Optional)(Page 2 – D – I)
Attach the protective cover when the device is not in use.
Steps
1. Align the threaded hole of the device with the
mounting hole of the lens cover.
2. Insert the screw, and rotate it clockwise to fix the lens
cover.
5. Connect to App (Page 2 – E)
Search and download HIKMICRO Viewer on App Store (iOS
System) or Google Play™ (Android System), or scan the QR
code to download and install the App. After conneting the
device to the mobile App, you can capture snapshots,
record videos, and set parameters by HIKMICRO Viewer.
you can download HIKMICRO Analyzer
(www.hikmicrotech.com) to analyze pictures offline
professionally, and generate a custom format report on
your PC.
6. More Operations
Scan the QR code to obtain the user manual for more
detailed operations.
Legal Information
© 2023 Hangzhou Microimage Software Co., Ltd. All rights
reserved.
About this Manual
The Manual includes instructions for using and managing
the Product. Pictures, charts, images and all other
information hereinafter are for description and explanation
only. The information contained in the Manual is subject to
change, without notice, due to firmware updates or other
reasons. Please find the latest version of this Manual at the
HIKMICRO website (www.hikmicrotech.com/).
Please use this Manual with the guidance and assistance of
professionals trained in supporting the Product.
Trademarks Acknowledgement
and other HIKMICRO’s trademarks and logos
are the properties of HIKMICRO in various jurisdictions.
: The terms HDMI and HDMI High-Definition
Multimedia Interface, and the HDMI Logo are trademarks
or registered trademarks of HDMI Licensing Administrator,
Inc. in the United States and other countries.
Other trademarks and logos mentioned are the properties
of their respective owners.
LEGAL DISCLAIMER
TO THE MAXIMUM EXTENT PERMITTED BY APPLICABLE
LAW, THIS MANUAL AND THE PRODUCT DESCRIBED, WITH
ITS HARDWARE, SOFTWARE AND FIRMWARE, ARE
PROVIDED “AS IS” AND “WITH ALL FAULTS AND ERRORS”.
HIKMICRO MAKES NO WARRANTIES, EXPRESS OR IMPLIED,
INCLUDING WITHOUT LIMITATION, MERCHANTABILITY,
SATISFACTORY QUALITY, OR FITNESS FOR A PARTICULAR
PURPOSE. THE USE OF THE PRODUCT BY YOU IS AT YOUR
OWN RISK. IN NO EVENT WILL HIKMICRO BE LIABLE TO YOU
FOR ANY SPECIAL, CONSEQUENTIAL, INCIDENTAL, OR
INDIRECT DAMAGES, INCLUDING, AMONG OTHERS,
DAMAGES FOR LOSS OF BUSINESS PROFITS, BUSINESS
INTERRUPTION, OR LOSS OF DATA, CORRUPTION OF
SYSTEMS, OR LOSS OF DOCUMENTATION, WHETHER
BASED ON BREACH OF CONTRACT, TORT (INCLUDING
NEGLIGENCE), PRODUCT LIABILITY, OR OTHERWISE, IN
CONNECTION WITH THE USE OF THE PRODUCT, EVEN IF
HIKMICRO HAS BEEN ADVISED OF THE POSSIBILITY OF
SUCH DAMAGES OR LOSS.
YOU ACKNOWLEDGE THAT THE NATURE OF THE INTERNET
PROVIDES FOR INHERENT SECURITY RISKS, AND HIKMICRO
SHALL NOT TAKE ANY RESPONSIBILITIES FOR ABNORMAL
OPERATION, PRIVACY LEAKAGE OR OTHER DAMAGES
RESULTING FROM CYBER-ATTACK, HACKER ATTACK, VIRUS
INFECTION, OR OTHER INTERNET SECURITY RISKS;
HOWEVER, HIKMICRO WILL PROVIDE TIMELY TECHNICAL
SUPPORT IF REQUIRED.
YOU AGREE TO USE THIS PRODUCT IN COMPLIANCE WITH
ALL APPLICABLE LAWS, AND YOU ARE SOLELY RESPONSIBLE
FOR ENSURING THAT YOUR USE CONFORMS TO THE
APPLICABLE LAW. ESPECIALLY, YOU ARE RESPONSIBLE, FOR
USING THIS PRODUCT IN A MANNER THAT DOES NOT
INFRINGE ON THE RIGHTS OF THIRD PARTIES, INCLUDING
WITHOUT LIMITATION, RIGHTS OF PUBLICITY,
INTELLECTUAL PROPERTY RIGHTS, OR DATA PROTECTION
AND OTHER PRIVACY RIGHTS. YOU SHALL NOT USE THIS
PRODUCT FOR ANY PROHIBITED END-USES, INCLUDING
THE DEVELOPMENT OR PRODUCTION OF WEAPONS OF
MASS DESTRUCTION, THE DEVELOPMENT OR PRODUCTION
OF CHEMICAL OR BIOLOGICAL WEAPONS, ANY ACTIVITIES
IN THE CONTEXT RELATED TO ANY NUCLEAR EXPLOSIVE OR
UNSAFE NUCLEAR FUEL-CYCLE, OR IN SUPPORT OF HUMAN
RIGHTS ABUSES.
IN THE EVENT OF ANY CONFLICTS BETWEEN THIS MANUAL
AND THE APPLICABLE LAW, THE LATTER PREVAILS.
Regulatory Information
These clauses apply only to the products bearing
the corresponding mark or information.
FCC Information
Please take attention that changes or modification not
expressly approved by the party responsible for compliance
could void the user’s authority to operate the equipment.
This device complies with Part 15 of the FCC Rules.
Operation is subject to the following two conditions:
(1) This device may not cause harmful interference, and
(2) This device must accept any interference received,
including interference that may cause undesired operation.
Note: Due to the device size limit, the above statement
may not be disclaimed on the device.
This equipment complies with FCC radiation exposure limits
set forth for an uncontrolled environment.
Note: This product has been tested and found to comply
with the limits for a Class B digital device, pursuant to Part
15 of the FCC Rules. These limits are designed to provide
reasonable protection against harmful interference in a
residential installation. This product generates, uses, and
can radiate radio frequency energy and, if not installed and
used in accordance with the instructions, may cause
harmful interference to radio communications. However,
there is no guarantee that interference will not occur in a
particular installation. If this product does cause harmful
interference to radio or television reception, which can be
determined by turning the equipment off and on, the user
is encouraged to try to correct the interference by one or
more of the following measures:
—Reorient or relocate the receiving antenna.
—Increase the separation between the equipment and
receiver.
—Connect the equipment into an outlet on a circuit
different from that to which the receiver is connected.
—Consult the dealer or an experienced radio/TV technician
for help.

5
EU Conformity Statement
This product and - if applicable - the supplied
accessories too are marked with "CE" and
comply therefore with the applicable
harmonized European standards listed under the Directive
2014/53/EU(RED), Directive 2014/30/EU(EMCD), Directive
2014/35/EU(LVD), Directive 2011/65/EU(RoHS).
This product and - if applicable - the supplied
accessories too are marked with "UKCA" and
comply therefore with the following directives:
Radio Equipment Regulations 2017,
Electromagnetic Compatibility Regulations 2016, Electrical
Equipment (Safety) Regulations 2016, the Restriction of
the Use of Certain Hazardous Substances in Electrical and
Electronic Equipment Regulations 2012.
Frequency Bands and Power (for CE/UKCA)
The frequency bands and transmitting power (radiated
and/or conducted) nominal limits applicable to the
following radio equipment are as follows:
Equipment
Model
Frequency Bands and Power
G40, G60
Wi-Fi 2.4 GHz (2.4 GHz to 2.4835 GHz):
20 dBm
Bluetooth 2.4 GHz
(2.4 GHz to 2.4835 GHz): 20 dBm
G31, G41, G61*
Wi-Fi 2.4 GHz (2.4 GHz to 2.4835 GHz):
20 dBm;
Wi-Fi 5 GHz (5.15 GHz to 5.25 GHz):
23 dBm;
Wi-Fi 5 GHz (5.25 GHz to 5.35 GHz):
23 dBm;
Wi-Fi 5 GHz (5.47 GHz to 5.725GHz):
23 dBm;
Wi-Fi 5 GHz (5.725 GHz to 5.85 GHz):
14 dBm
Bluetooth 2.4 GHz
(2.4 GHz to 2.4835 GHz): 20 dBm
*For G31, G41, G61, please pay attention to the following
notes when the device is operating in 5 GHz:
According to Article 10 (10) of Directive 2014/53/EU, when
operating in the 5150 to 5350 MHz frequency range, this
device is restricted to indoor use in: Austria (AT), Belgium
(BE), Bulgaria (BG), Croatia (HR), Cyprus (CY), the Czech
Republic (CZ), Denmark (DK), Estonia (EE), Finland (FI),
France (FR), Germany (DE), Greece (EL), Hungary (HU),
Iceland (IS), Ireland (IE), Italy (IT), Latvia (LV), Liechtenstein
(LI), Lithuania (LT), Luxembourg (LU), Malta (MT),
Netherlands (NL), Northern Ireland (UK(NI)), Norway (NO),
Poland (PL), Portugal (PT), Romania (RO), Slovakia (SK),
Slovenia (SI), Spain (ES), Sweden (SE), Switzerland (CH), and
Turkey (TR).
In accordance with the Radio Equipment Regulations 2017
in the UK, the device working in the 5150 to 5350 MHz
frequency range is restricted to indoor use in the United
Kingdom.
Use the power adapter provided by a qualified
manufacturer. Refer to the product specification for
detailed power requirements.
Use the battery provided by a qualified manufacturer. Refer
to the product specification for detailed battery
requirements.
Directive 2012/19/EU (WEEE Directive): Products
marked with this symbol cannot be disposed of as
unsorted municipal waste in the European Union.
For proper recycling, return this product to your
local supplier upon the purchase of equivalent
new equipment, or dispose of it at designated collection
points. For more information see: www.recyclethis.info.
According to the Waste Electrical and Electronic Equipment
Regulations 2013: Products marked with this symbol
cannot be disposed of as unsorted municipal waste in the
United Kingdom. For proper recycling, return this product
to your local supplier upon the purchase of equivalent new
equipment, or dispose of it at designated collection points.
For more information see: www.recyclethis.info.
Directive 2006/66/EC and its amendment
2013/56/EU (Battery Directive): This product
contains a battery that cannot be disposed of as
unsorted municipal waste in the European Union. See the
product documentation for specific battery information.
The battery is marked with this symbol, which may include
lettering to indicate cadmium (Cd), lead (Pb), or mercury
(Hg). For proper recycling, return the battery to your
supplier or to a designated collection point. For more
information see: www.recyclethis.info.
According to the Batteries and Accumulators (Placing on
the Market) Regulations 2008 and the Waste Batteries and
Accumulators Regulations 2009: This product contains a
battery that cannot be disposed of as unsorted municipal
waste in the United Kingdom. See the product
documentation for specific battery information. The
battery is marked with this symbol, which may include
lettering to indicate cadmium (Cd), lead (Pb), or mercury
(Hg). For proper recycling, return the battery to your
supplier or to a designated collection point. For more
information see: www.recyclethis.info.
Industry Canada ICES-003 Compliance
This device meets the CAN ICES-003 (B)/NMB-003(B)
standards requirements.
Cet appareil répond aux exigences des normes CAN
ICES-003 (B)/NMB-003 (B).
This device complies with Industry Canada
licence-exempt RSS standard(s). Operation is subject to
the following two conditions:
(1) this device may not cause interference, and
(2) this device must accept any interference, including
interference that may cause undesired operation of the
device.
Le présent appareil est conforme aux CNR d'Industrie
Canada applicables aux appareils radioexempts de
licence. L'exploitation est autorisée aux deux conditions
suivantes :
(1) l'appareil ne doit pas produire de brouillage, et
(2) l'utilisateur de l'appareil doit accepter tout brouillage
radioélectrique subi, même si le brouillage est
susceptible d'en compromettre le fonctionnement.
This equipment complies with IC RSS-102 radiation
exposure limits set forth for an uncontrolled
environment.
ce matériel est conforme aux limites de dose d'exposition
aux rayonnements, CNR-102 énoncée dans un autre
environnement.
For G31, G41, G61, please pay attention to the following
notes when the device is operating in 5 GHz:
(i) The device for operation in the band 5150-5250 MHz
is only for indoor use to reduce the potential for harmful
interference to co-channel mobile satellite systems;
(ii) The maximum antenna gain permitted for devices in
the bands 5250-5350 MHz and 5470-5725 MHz shall
comply with the e.i.r.p. limit; and
(iii) The maximum antenna gain permitted for devices in
the band 5725-5825 MHz shall comply with the e.i.r.p.
limits specified for point-to-point and non point-to-point
operation as appropriate.
Pour les modèles G31, G41 et G61, veuillez prêter
attention aux remarques suivantes lorsque l’appareil
fonctionne en 5 GHz :
(i)Les dispositifs fonctionnant dans la bande 5150-5250
MHz sont réservés uniquement pour une utilisation à
l'intérieur afin de réduire les risques de brouillage
préjudiciable aux systèmes de satellites mobiles utilisant
les mêmes canaux.
(ii) Le gain d'antenne maximal autorisé pour les appareils

6
dans les bandes 5250-5350 MHz et 5470-5725 MHz
doivent respecter le pire limiter; et
(iii) Le gain d'antenne maximal autorisé pour les appareils
dans la bande 5725-5825 MHz doivent respecter le pire
limites spécifiées pour le point-à-point et l'exploitation
non point à point, le cas échéant.
Safety Instruction
These instructions are intended to ensure that user can
use the product correctly to avoid danger or property loss.
Laws and Regulations
● Use of the product must be in strict compliance with
the local electrical safety regulations.
Transportation
● Keep the device in original or similar packaging while
transporting it.
● Keep all wrappers after unpacking them for future use.
In case of any failure occurred, you need to return the
device to the factory with the original wrapper.
Transportation without the original wrapper may result
in damage on the device and the company shall not
take any responsibilities.
● Do not drop the product or subject it to physical shock.
Keep the device away from magnetic interference.
Power Supply
● The input voltage should meet the Limited Power
Source (5 VDC, 940 mA ) according to the IEC61010-1
standard. Please refer to technical specifications for
detailed information.
● Make sure the plug is properly connected to the power
socket.
● DO NOT connect multiple devices to one power
adapter, to avoid over-heating or fire hazards caused
by overload.
Battery
● The built-in battery cannot be dismantled. Please
contact the manufacture for repair if necessary.
● DO NOT charge other battery types with the supplied
charger. Confirm there is no flammable material within
2 m of the charger during charging.
● For long-term storage of the battery, make sure it is
fully charged every half year to ensure the battery
quality. Otherwise, damage may occur.
● DO NOT place the battery near heating or fire source.
Avoid direct sunlight.
● DO NOT swallow the battery to avoid chemical burns.
● DO NOT place the battery in the reach of children.
● When the device is powered off and the RTC battery is
full, the time settings can be kept
for 15 days.
● In the first use, power on the device and charge the
RTC battery with the lithium battery for more than 10
hours.
● The battery voltage is 3.6 V, and the battery capacity is
6700 mAh.
● The battery is certified by UL2054.
● CAUTION: Risk of explosion if the battery is replaced by
an incorrect type.
Maintenance
● If the product does not work properly, please contact
your dealer or the nearest service center. We shall not
assume any responsibility for problems caused by
unauthorized repair or maintenance.
● A few device components (e.g., electrolytic capacitor)
require regular replacement. The average lifespan
varies, so periodic checking is recommended. Contact
your dealer for details.
● Wipe the device gently with a clean cloth and a small
quantity of ethanol, if necessary.
● If the equipment is used in a manner not specified by
the manufacturer, the protection provided by the
device may be impaired.
● We recommend you send the device back for
calibration once a year, and please contact the local
dealer for the information on maintenance points.
● Please notice that the current limit of USB 3.0
PowerShare port may vary with the PC brand, which is
likely to result in incompatibility issue. Therefore it’s
advised to use regular USB 3.0 or USB 2.0 port if the
USB device fails to be recognized by PC via USB 3.0
PowerShare port.
● Your camera will periodically perform a self-calibration
to optimize image quality and measurement accuracy.
In this process the image will pause briefly and you’ll
hear a “click” as a shutter moves in front of the
detector. The self-calibration will be more frequent
during start up or in very cold or hot environments.
This is a normal part of operation to ensure optimum
performance for your camera.
Using Environment
● DO NOT expose the device to extremely hot, cold,
dusty, corrosive, saline-alkali, or damp environments.
Make sure the running environment meets the
requirement of the device. The operating temperature
shall be -20 °C to 50 °C (-4 °F to 122 °F), and the
operating humidity shall be 90% or less.
● Place the device in a dry and well-ventilated
environment.
● DO NOT expose the device to high electromagnetic
radiation or dusty environments.
● DO NOT aim the lens at the sun or any other bright
light.
● When any laser equipment is in use, make sure that the
device lens is not exposed to the laser beam, or it may
burn out.
● The device is suitable for indoor and outdoor uses, but
do not expose it in wet conditions.
● The level of protection is IP 54.
● The pollution degree is 2.
Technical Support
● The https://www.hikmicrotech.com portal will help
you as a HIKMICRO customer to get the most out of
your HIKMICRO products. The portal gives you access
to our support team, software and documentation,
service contacts, etc.
Emergency
● If smoke, odor, or noise arises from the device,
immediately turn off the power, unplug the power
cable, and contact the service center.
Laser
Warning: The laser radiation emitted
from the device can cause eye injuries,
burning of skin or inflammable
substances. Prevent eyes from direct
laser. Before enabling the Light Supplement function,
make sure no human or inflammable substances are in
front of the laser lens. The wave length is 650 nm, and the
power is less than 1 mW. The laser meets the
IEC60825-1:2014 standard.
Laser maintenance: It is not necessary to maintain the
laser regularly. If the laser does not work, the laser
assembly needs to be replaced in the factory under
warranty. Keep the device power off when replacing laser
assembly. Caution-Use of controls or adjustments or
performance of procedures other than those specified
herein may result in hazardous radiation exposure.
Manufacture Address
Room 313, Unit B, Building 2, 399 Danfeng Road, Xixing
Subdistrict, Binjiang District, Hangzhou, Zhejiang 310052,
China
Hangzhou Microimage Software Co., Ltd.
COMPLIANCE NOTICE: The thermal series products might
be subject to export controls in various countries or
regions, including without limitation, the United States,
European Union, United Kingdom and/or other member
countries of the Wassenaar Arrangement. Please consult
your professional legal or compliance expert or local

7
government authorities for any necessary export license
requirements if you intend to transfer, export, re-export
the thermal series products between different countries.
Deutsch
1. Erscheinungsbild (Seite 1 – A)
Nr.
Komponente
Funktion
1
Anschlussabdeckung
Schützt die Anschlüsse vor
Staub.
2
Mikrofon
Nimmt Audioinformationen
auf.
3
Ladeanzeige
Rot: Aufladen
Grün: Vollständig
geladen
4
Lautsprecher
Gibt Sprachnotizen,
Alarmansagen und Videoton
wieder.
5
Touchscreen
Berühren Sie den Bildschirm
zur Festlegung von
Einstellungen.
6
Ein/Aus-Taste
Gedrückt halten:
Ein-/Ausschalten
7
Auslöser
Drücken: Führt eine
Bildkorrektur mit einem
Auslöseklick in der Kamera
durch.
8
Datei
Prüfroutenmodus:
Drücken Sie die Taste
zur Anzeige der
Informationen zu den
Prüfpunkten.
Nicht-
Prüfroutenmodus:
Drücken Sie die Taste
zur Anzeige der Bild-
und Videoaufnahme.
9
Zurücktaste
Menü verlassen oder zum
vorherigen Menü
zurückkehren.
10
Navigationstaste
Menümodus:
Drücken Sie , ,
und zur Auswahl von
Parametern.
Drücken Sie OK zur
Bestätigung.
Drücken Sie , um zum
entsprechenden
Untermenü zu
wechseln.
Drücken sie , um zum
vorherigen Menü
zurückzukehren.
Nicht-Menümodus:
Drücken Sie , um das
LED-Zusatzlicht ein- und
auszuschalten.
Drücken Sie , um den
Digital-Zoom zu starten.
11
Lasertaste
Halten Sie die Taste
gedrückt, um den Laser
einzuschalten und lassen Sie
die Taste wieder los, um den
Laser auszuschalten.
12
Batterie
Versorgt das Gerät mit
Strom.
13
Laser-Entfernungsmesser
Misst die Entfernung mit
dem Laser.
14
Optisches Objektiv
Optisches Bild anzeigen.
Nr.
Komponente
Funktion
15
LED
Erhöht die Helligkeit in
dunklen Umgebungen.
16
Wärmebildobjektiv
Wärmebild anzeigen.
17
Fokusring
Passt die Objektivposition
auf der optischen Achse des
Wärmebildobjektivs an.
18
Stativanschluss
Zur Installation des Stativs.
19
Schnallenanschluss für
Handschlaufe
Setzen Sie die Schraube zur
Fixierung der Schnalle für die
Handschlaufe ein.
20
Fokusauslöser
Ziehen Sie den Auslöser zur
Aktivierung der
lasergestützten
Fokus-/Autofokus-Funktion.
21
Hauptauslöser
Ziehen Sie zum Erfassen
oder um den QR-Code
zu scannen den
Auslöser.
Halten Sie den Auslöser
gedrückt, um Videos
aufzunehmen.
22
Loch für Handschlaufe
Fädeln Sie den unteren Teil
der Handschlaufe durch das
Loch.
23
Speicherkarteneinschub
Hier wird eine Speicherkarte
eingesetzt.
24
Type-C-Schnittstelle
Stellt eine Verbindung zur
Stromquelle her und
überträgt Daten.
25
CVBS-Anschluss
Verbinden Sie das Gerät und
ein Display zur detaillierten
Bildanzeige.
26
Reservekartensteckplatz
Hier wird eine Reservekarte
eingesetzt.
27
Micro-HDMI-Anschluss
Verbinden Sie das Gerät und
ein Display zur detaillierten
Bildanzeige für ein
Micro-HDMI- (Typ D)
auf-HDMI (Typ A) Kabel.
Hinweis:
Das Warnzeichen befindet sich unter dem Laser und
links auf dem Gerät.
Die Anschlüsse können je nach Modell variieren.
Informieren Sie sich bitte am jeweiligen Produkt.
Initialisieren Sie die Speicherkarte vor der ersten
Benutzung.
Einzelheiten zum Gerätezubehör entnehmen Sie
bitte den technischen Daten des Produktes.
2. Gerät über Ladestation laden
(Seite 1 – B)
Nachdem das Gerät hochgefahren ist, zeigt der Bildschirm
den Akkustatus an. Wenn der Akku schwach ist, laden Sie
das Gerät und vergewissern Sie sich, dass es
ordnungsgemäß funktioniert.
Laden Sie das Gerät beim ersten Aufladen im
eingeschalteten Zustand 10 Stunden lang auf.
Hinweis:
Die eingebaute Batterie, die die Echtzeituhr (RTC) des
Geräts mit Strom versorgt, kann sich entladen, wenn
das Gerät über längere Zeit nicht verwendet wird. Es
ist es ist empfehlenswert, die RTC-Batterie
aufzuladen, damit die Uhr des Geräts einwandfrei
funktioniert.

8
Um die RTC-Batterie vollständig aufzuladen, müssen
die folgenden Voraussetzungen erfüllt sein:
a) Die Lithium-Akkus müssen sich im Gerät
befinden.
b) Das Gerät muss mindestens 10 Stunden
eingeschaltet sein.
Schritte:
1. Halten Sie das Gerät mit einer Hand und drücken Sie
die beiden Akkuverriegelungen des Geräts.
2. Ziehen Sie den Akku aus dem Gerät.
3. Setzen Sie den Akku in die Ladestation ein. Sie können
den Ladestatus über die Kontrollanzeige an der
Ladestation ablesen.
4. Wenn der Akku vollständig geladen ist, nehmen Sie
den Akku aus der Ladestation.
5. Setzen Sie die Batterie in das Gerät ein.
Hinweis: Kaufen Sie die Ladebasis im Voraus.
3. Wechselobjektiv montieren (optional)
(Seite 2 – C)
Hinweis: Kaufen Sie das Wechselobjektiv im Voraus.
Schritte
1. Drehen Sie den Zierring gegen den Uhrzeigersinn, um
ihn zu entfernen.
2. Richten Sie die beiden Punkte an Wechselobjektiv und
Gerät aus.
3. Drehen Sie das Wechselobjektiv im Uhrzeigersinn, um
die Montage abzuschließen.
4. Schutzabdeckung montieren (optional)
(Seite 2 – D – I)
Bringen Sie die Schutzabdeckung an, wenn das Gerät nicht
verwendet wird.
Schritte
1. Richten Sie die Gewindebohrung des Geräts mit der
Montagebohrung des Objektivdeckels aus.
2. Setzen Sie die Schraube ein und drehen Sie sie im
Uhrzeigersinn, um die Objektivabdeckung zu fixieren.
5. Mit App verbinden (Seite 2 – E)
Suchen Sie den HIKMICRO Viewer im App Store
(iOS-System) oder bei Google Play™ (Android-System) und
laden Sie ihn herunter, oder scannen Sie QR-Code, um die
App herunterzuladen und zu installieren. Nach
Verbindung des Gerätes mit der Mobil-App können Sie
Bilder und Videos aufnehmen sowie Einstellungen per
HIKMICRO Viewer festlegen.
Sie können HIKMICRO Analyzer (www.hikmicrotech.com)
herunterladen, um Bilder offline professionell zu
analysieren und einen Bericht in einem
benutzerdefinierten Format auf Ihrem PC zu erstellen.
6. Weitere Aktionen
Scannen Sie den QR-Code, um für detailliertere Aktionen
das Benutzerhandbuch zu erhalten.
Rechtliche Informationen
© 2023 Hangzhou Microimage Software Co., Ltd. Alle
Rechte vorbehalten.
Hinweise zu dieser Bedienungsanleitung
Die Bedienungsanleitung enthält Anleitungen zur
Verwendung und Verwaltung des Produkts. Bilder,
Diagramme, Abbildungen und alle sonstigen Informationen
dienen nur der Beschreibung und Erklärung. Die Änderung
der in der Bedienungsanleitung enthaltenen Informationen
ist aufgrund von Firmware-Aktualisierungen oder aus
anderen Gründen vorbehalten. Die neueste Version dieses
Handbuchs finden Sie auf der HIKMICRO-Website
(www.hikmicrotech.com/).
Bitte verwenden Sie diese Bedienungsanleitung unter
Anleitung und Unterstützung von Fachleuten, die für den
Support des Produkts geschult sind.
Marken
und andere Marken und Logos von
HIKMICRO sind Eigentum von HIKMICRO in verschiedenen
Gerichtsbarkeiten.
: Die Begriffe HDMI und HDMI High-Definition
Multimedia Interface sowie das HDMI-Logo sind
Handelsnamen oder eingetragene Markenzeichen der
HDMI Licensing Administrator, Inc. in den Vereinigten
Staaten und anderen Ländern.
Andere hier erwähnte Marken und Logos sind Eigentum
ihrer jeweiligen Inhaber.
HAFTUNGSAUSSCHLUSS
DIESE BEDIENUNGSANLEITUNG UND DAS BESCHRIEBENE
PRODUKT MIT SEINER HARDWARE, SOFTWARE UND
FIRMWARE WERDEN, SOWEIT GESETZLICH ZULÄSSIG, IN
DER „VORLIEGENDEN FORM“ UND MIT „ALLEN FEHLERN
UND IRRTÜMERN“ BEREITGESTELLT. HIKMICRO GIBT KEINE
GARANTIEN, WEDER AUSDRÜ CKLICH NOCH
STILLSCHWEIGEND, EINSCHLIEßLICH, ABER NICHT DARAUF
BESCHRÄNKT, MARKTGÄNGIGKEIT, ZUFRIEDENSTELLENDE
QUALITÄT ODER EIGNUNG FÜR EINEN BESTIMMTEN
ZWECK. DIE NUTZUNG DES PRODUKTS DURCH SIE ERFOLGT
AUF IHRE EIGENE GEFAHR. IN KEINEM FALL IST HIKMICRO
IHNEN GEGENÜBER HAFTBAR FÜR BESONDERE, ZUFÄLLIGE,
DIREKTE ODER INDIREKTE SCHÄDEN, EINSCHLIEßLICH,
JEDOCH NICHT DARAUF BESCHRÄNKT, VERLUST VON
GESCHÄFTSGEWINNEN, GESCHÄFTSUNTERBRECHUNG,
DATENVERLUST, SYSTEMBESCHÄDIGUNG, VERLUST VON
DOKUMENTATIONEN, SEI ES AUFGRUND VON
VERTRAGSBRUCH, UNERLAUBTER HANDLUNG
(EINSCHLIEßLICH FAHRLÄSSIGKEIT), PRODUKTHAFTUNG
ODER ANDERWEITIG, IN VERBINDUNG MIT DER
VERWENDUNG DIESES PRODUKTS, SELBST WENN
HIKMICRO Ü BER DIE MÖ GLICHKEIT DERARTIGER SCHÄDEN
ODER VERLUSTE INFORMIERT WAR.
SIE ERKENNEN AN, DASS DIE NATUR DES INTERNETS DAMIT
VERBUNDENE SICHERHEITSRISIKEN BEINHALTET. HIKMICRO
ÜBERNIMMT KEINE VERANTWORTUNG FÜR ANORMALEN
BETRIEB, DATENVERLUST ODER ANDERE SCHÄDEN, DIE
SICH AUS CYBERANGRIFFEN, HACKERANGRIFFEN,
VIRUSINFEKTION ODER ANDEREN SICHERHEITSRISIKEN IM
INTERNET ERGEBEN. HIKMICRO WIRD JEDOCH BEI BEDARF
ZEITNAH TECHNISCHEN SUPPORT LEISTEN.
SIE STIMMEN ZU, DIESES PRODUKT IN ÜBEREINSTIMMUNG
MIT ALLEN GELTENDEN GESETZEN ZU VERWENDEN, UND
SIE SIND ALLEIN DAFÜR VERANTWORTLICH, DASS IHRE
VERWENDUNG GEGEN KEINE GELTENDEN GESETZE
VERSTÖßT. INSBESONDERE SIND SIE DAFÜR
VERANTWORTLICH, DIESES PRODUKT SO ZU VERWENDEN,
DASS DIE RECHTE DRITTER NICHT VERLETZT WERDEN,
EINSCHLIEßLICH, ABER NICHT BESCHRÄNKT AUF
VERÖ FFENTLICHUNGSRECHTE, DIE RECHTE AN GEISTIGEM
EIGENTUM ODER DEN DATENSCHUTZ UND ANDERE
PERSÖ NLICHKEITSRECHTE. SIE DÜRFEN DIESES PRODUKT
NICHT FÜR VERBOTENE ENDANWENDUNGEN VERWENDEN,
EINSCHLIESSLICH DER ENTWICKLUNG ODER HERSTELLUNG
VON MASSENVERNICHTUNGSWAFFEN, DER ENTWICKLUNG
ODER HERSTELLUNG CHEMISCHER ODER BIOLOGISCHER
WAFFEN, JEGLICHER AKTIVITÄTEN IM ZUSAMMENHANG
MIT EINEM NUKLEAREN SPRENGKÖRPER ODER
UNSICHEREN NUKLEAREN BRENNSTOFFKREISLAUF BZW.
ZUR UNTERSTÜ TZUNG VON
MENSCHENRECHTSVERLETZUNGEN.
IM FALL VON WIDERSPRÜCHEN ZWISCHEN DIESER
BEDIENUNGSANLEITUNG UND GELTENDEM RECHT IST
LETZTERES MASSGEBLICH.
Behördliche Informationen

9
Diese Bestimmungen gelten nur für Produkte, die
das entsprechende Zeichen oder die
entsprechenden Informationen tragen.
EU-Konformitätserklärung
Dieses Produkt und – falls zutreffend – auch
das mitgelieferte Zubehör sind mit dem
„CE“-Zeichen gekennzeichnet und entsprechen
somit den gültigen harmonisierten Europäischen
Normen, die in den Richtlinien 2014/53/EU (RED),
2014/30/EU (EMCD), 2014/35/EU (LVD) und
2011/65/ EU (RoHS) aufgeführt sind.
Frequenzbänder und Leistung (für CE/UKCA)
Die für das folgende Funkgerät geltenden Frequenzbänder
und die nominalen Grenzwerte für die Sendeleistung
(gestrahlt und/oder leitungsgeführt) sind wie folgt:
Gerätemodell
Frequenzbänder und Leistung
G40, G60
WLAN 2,4 GHz (2,4 bis 2,4835 GHz):
20 dBm
Bluetooth 2,4 GHz (2,4 bis 2,4835 GHz):
20 dBm
G31, G41,
G61*
WLAN 2,4 GHz (2,4 bis 2,4835 GHz):
20 dBm;
WLAN 5 GHz (5,15 bis 5,25 GHz):
23 dBm;
WLAN 5 GHz (5,25 bis 5,35 GHz):
23 dBm;
WLAN 5 GHz (5,47 bis 5,725 GHz):
23 dBm;
WLAN 5 GHz (5,725 bis 5,85 GHz):
14 dBm
Bluetooth 2,4 GHz (2,4 bis 2,4835 GHz):
20 dBm
*Bei G31, G41, G61 beachten Sie bitte folgende Hinweise
beim Betrieb des Gerätes im 5-GHz-Band:
Entsprechend dem Artikel 10 (10) der Richtlinie
2014/53/EU ist dieses Gerät beim Betrieb im
Frequenzbereich von 5150 bis 5350 MHz auf die
Verwendung im Innenbereich beschränkt: Ö sterreich (AT),
Belgien (BE), Bulgarien (BG), Kroatien (HR), Zypern (CY),
Tschechische Republik (CZ), Dänemark (DK), Estland (EE),
Finnland (FI), Frankreich (FR), Deutschland (DE),
Griechenland (EL), Ungarn (HU), Island (IS), Irland (IE),
Italien (IT), Lettland (LV), Liechtenstein (LI), Litauen (LT),
Luxemburg (LU), Malta (MT), Niederlande (NL), Nordirland
(UK(NI)), Norwegen (NO), Polen (PL), Portugal (PT),
Rumänien (RO), Slowakei (SK), Slowenien (SI), Spanien (ES),
Schweden (SE), Schweiz (CH) und Türkei (TR).
Entsprechend den Radio Equipment Regulations 2017 im
Bereinigten Königreich ist der Betrieb eines Gerätes im
Frequenzbereich von 5150 bis 5350 MHz im Vereinigten
Königreich auf den Innenbereich beschränkt.
Verwenden Sie das von einem zugelassenen Hersteller
mitgelieferte Netzteil. Detaillierte Angaben zu den
Batterie-/Akku-Anforderungen finden Sie in der
Produktspezifikation.
Verwenden Sie nur einen von einem qualifizierten
Hersteller gelieferten Akku. Detaillierte Angaben zu den
Batterie-/Akku-Anforderungen finden Sie in der
Produktspezifikation.
Richtlinie 2012/19/EU (WEEE-Richtlinie):
Produkte, die mit diesem Symbol
gekennzeichnet sind, dürfen innerhalb der
Europäischen Union nicht mit dem Hausmüll
entsorgt werden. Für korrektes Recycling geben
Sie dieses Produkt an Ihren örtlichen Fachhändler zurück
oder entsorgen Sie es an einer der Sammelstellen.
Weitere Informationen finden Sie unter:
www.recyclethis.info.
Richtlinie 2006/66/EC und ihre Änderung
2013/56/EU (Batterierichtlinie): Dieses Produkt
enthält eine Batterie, die innerhalb der
Europäischen Union nicht mit dem Hausmüll entsorgt
werden darf. Siehe Produktdokumentation für spezifische
Hinweise zu Batterien. Die Batterie ist mit diesem Symbol
gekennzeichnet, das zusätzlich die Buchstaben Cd für
Cadmium, Pb für Blei oder Hg für Quecksilber enthalten
kann. Für korrektes Recycling geben Sie die Batterie an
Ihren örtlichen Fachhändler zurück oder entsorgen Sie sie
an einer der Sammelstellen. Weitere Informationen
finden Sie unter: www.recyclethis.info.
Sicherheitshinweis
Diese Anleitungen sollen gewährleisten, dass Sie das
Produkt korrekt verwenden, um Gefahren oder
Sachschäden zu vermeiden.
Gesetze und Vorschriften
● Die Verwendung des Produkts muss in strikter
Übereinstimmung mit den örtlichen Vorschriften zur
elektrischen Sicherheit erfolgen.
Transportwesen
● Bewahren Sie das Gerät beim Transport in der
ursprünglichen oder einer vergleichbaren Verpackung
auf.
● Bewahren Sie das gesamte Verpackungsmaterial nach
dem Auspacken für zukünftigen Gebrauch auf. Im Falle
eines Fehlers müssen Sie das Gerät in der
Originalverpackung an das Werk zurücksenden. Beim
Transport ohne Originalverpackung kann das Gerät
beschädigt werden und wir übernehmen keine
Verantwortung.
● Lassen Sie das Produkt nicht fallen und vermeiden Sie
heftige Stöße. Halten Sie das Gerät von magnetischen
Störungen fern.
Spannungsversorgung
● Die Eingangsspannung muss einer Stromquelle mit
begrenzter Leistung (5 V DC, 940 mA) gemäß der Norm
IEC61010-1 entsprechen. Siehe technische Daten für
detaillierte Informationen.
● Stellen Sie sicher, dass der Stecker richtig in der
Steckdose steckt.
● Verbinden Sie NICHT mehrere Geräte mit einem
Netzteil, da es andernfalls durch Überlastung zu einer
Überhitzung oder einem Brand kommen kann.
Batterie
● Der integrierte Akku darf nicht demontiert werden.
Wenden Sie sich gegebenenfalls zur Reparatur an den
Hersteller.
● Laden Sie keine anderen Akkutypen mit dem
mitgelieferten Ladegerät auf. Stellen Sie sicher, dass
sich während des Ladevorgangs im Umkreis von 2 m
um das Ladegerät kein brennbares Material befindet.
● Achten Sie bei langfristiger Lagerung des Akkus darauf,
dass er alle sechs Monate vollständig geladen wird, um
seine Lebensdauer zu gewährleisten. Anderenfalls kann
es zu Schäden kommen.
● Lagern Sie den Akku NICHT in unmittelbarer Nähe einer
Wärme- oder Feuerquelle. Keinem direkten
Sonnenlicht aussetzen.
● Den Akku NICHT verschlucken, es besteht
Verätzungsgefahr.
● Bewahren Sie den Akku NICHT in der Reichweite von
Kindern auf.
● Wenn das Gerät ausgeschaltet und der RTC-Akku voll
ist, können die Zeiteinstellungen 15 Tage lang
gespeichert werden.
● Schalten Sie bei der ersten Verwendung das Gerät ein
und laden Sie den RTC-Akku und den Lithium-Akku
mindestens 10 Stunden lang auf.
● Der Akku hat eine Spannung von 3,6 V und eine
Kapazität von 6700 mAh.

10
● Er ist nach UL2054 zertifiziert.
● ACHTUNG: Bei Austausch der Batterie durch einen
falschen Typ besteht Explosionsgefahr.
Wartung
● Falls das Produkt nicht einwandfrei funktionieren sollte,
wenden Sie sich an Ihren Händler oder den
nächstgelegenen Kundendienst. Wir übernehmen keine
Haftung für Probleme, die durch nicht Reparatur- oder
Instandhaltungsarbeiten von nicht autorisierten Dritten
verursacht werden.
● Einige Gerätekomponenten
(z. B. Elektrolytkondensator) müssen regelmäßig
ausgetauscht werden. Die durchschnittliche
Lebensdauer variiert, weshalb eine regelmäßige
Prüfung empfohlen wird. Einzelheiten erfahren Sie von
Ihrem Händler.
● Wischen Sie das Gerät bei Bedarf sanft mit einem
sauberen Tuch und einer geringen Menge Ethanol ab.
● Wenn das Gerät nicht vom Hersteller vorgegebenem
Sinne genutzt wird, kann der durch das Gerät
bereitgestellte Schutz beeinträchtigt werden.
● Wir empfehlen Ihnen, das Gerät einmal im Jahr zur
Kalibrierung einzusenden. Wenden Sie sich bitte an
Ihren Händler vor Ort, um Informationen zu den
Wartungspunkten zu erhalten.
● Beachten Sie bitte, dass die Stromgrenze des USB 3.0
PowerShare-Anschlusses je nach PC-Marke variieren
kann. Dies kann Kompatibilitätsprobleme verursachen.
Verwenden Sie daher einen normalen USB 3.0- oder
USB 2.0-Anschluss, wenn der PC das USB-Gerät über
den USB 3.0 PowerShare-Anschluss nicht erkennt.
● Ihre Kamera führt in regelmäßigen Abständen eine
Selbstkalibrierung durch, um Bildqualität und
Messgenauigkeit zu optimieren. Bei diesem Vorgang
wird stoppt das Bild kurz und Sie hören einen
„Klickton“, wenn sich ein Verschluss vor dem Detektor
bewegt. Die Selbstkalibrierung findet während des
Startvorgangs oder in sehr kalten oder heißen
Umgebungen häufiger statt. Dies ist ein normaler
Vorgang, um die optimale Leistung Ihrer Kamera zu
erzielen.
Einsatzumgebung
● Setzen Sie das Gerät NICHT extrem heißen, kalten,
staubigen, korrosiven, salzhaltigen, alkalischen oder
feuchten Umgebungen aus. Achten Sie darauf, dass die
Betriebsumgebung den Anforderungen des Geräts
entspricht. Die Betriebstemperatur des Geräts beträgt
-20 °C bis +50 °C und die Betriebsluftfeuchtigkeit darf
höchstens 90 % betragen.
● Stellen Sie das Gerät an einem kühlen und gut
belüfteten Ort auf.
● Setzen Sie das Gerät KEINER hohen
elektromagnetischen Strahlung oder staubigen
Umgebungen aus.
● Richten Sie das Objektiv NICHT auf die Sonne oder eine
andere helle Lichtquelle.
● Achten Sie bei Verwendung eines Lasergeräts darauf,
dass das Objektiv des Geräts nicht dem Laserstrahl
ausgesetzt wird. Andernfalls könnte es durchbrennen.
● Das Gerät ist für den Innen- und Außenbereich
geeignet, darf jedoch nicht in feuchten Umgebungen
eingesetzt werden.
● Die Schutzart ist IP 54.
● Der Verschmutzungsgrad beträgt 2.
Technischer Support
● Das Portal https://www.hikmicrotech.com hilft Ihnen
als HIKMICRO-Kunde, Ihre HIKMICRO-Produkte optimal
zu nutzen. Über dieses Portal haben Sie Zugang zu
unserem Support-Team, zu Software und
Dokumentation, zu Servicekontakten usw.
Notruf
● Sollten sich Rauch, Gerüche oder Geräusche in dem
Gerät entwickeln, so schalten Sie es unverzüglich aus
und ziehen Sie den Netzstecker; wenden Sie sich dann
an den Kundendienst.
Laser
Warnung: Die vom Gerät abgegebene
Laserstrahlung kann zu
Augenverletzungen,
Hautverbrennungen oder der
Entzündung brennbarer Substanzen führen. Achten Sie
darauf, dass niemand direkt in das Laserlicht blickt. Bevor
Sie die Funktion Zusatzlicht aktivieren, vergewissern Sie
sich, dass sich weder Personen noch brennbare
Substanzen vor der Laserlinse befinden. Die Wellenlänge
beträgt 650 nm, und die Leistung liegt unter 1 mW. Der
Laser entspricht der Norm IEC60825-1:2014.
Wartung des Lasers: Der Laser muss nicht regelmäßig
gewartet werden. Wenn der Laser nicht funktioniert,
muss die Lasereinheit im Rahmen der Garantie im Werk
ausgetauscht werden. Schalten Sie das Gerät aus, wenn
Sie die Lasereinheit austauschen. Achtung – Die
Verwendung von Bedienelementen oder Einstellungen
oder ein Gebrauch, die bzw. der von der Beschreibung in
dieser Anleitung abweicht, kann zu einer gefährlichen
Strahlenbelastung führen.
Anschrift des Herstellers
Raum 313, Einheit B, Gebäude 2, 399 Danfeng-Straße,
Gemarkung Xixing, Stadtbezirk Binjiang, Hangzhou,
Zhejiang 310052, China
Hangzhou Microimage Software Co., Ltd.
RECHTLICHER HINWEIS: Die Produkte der
Wärmebild-Serie unterliegen unter Umständen in
verschiedenen Ländern oder Regionen Exportkontrollen,
wie zum Beispiel in den Vereinigten Staaten, der
Europäischen Union, dem Vereinigten Königreich
und/oder anderen Mitgliedsländern des
Wassenaar-Abkommens. Bitte wenden Sie sich an Ihren
professionellen Rechts- oder Compliance-Experten oder
an die zuständigen Behörden, wenn Sie beabsichtigen,
Produkte der Wärmebild-Serie zwischen verschiedenen
Ländern zu transferieren, zu exportieren oder zu
reexportieren, um Informationen über eine eventuell
erforderliche Ausfuhrgenehmigung zu erhalten.
Français
1. Apparence (page 1 – A)
N°
Composant
Fonction
1
Cache de
l’interface
Protège les interfaces de la
poussière.
2
Microphone
Informations audio d’entrée.
3
Indicateur de
chargement
Rouge : en charge
Vert : Charge complète
4
Haut-parleur
Lecture de remarques vocales,
alarme vocale et son de vidéo.
5
Écran tactile
Touchez l’écran pour définir les
paramètres.
6
Bouton
d’alimentation
Maintien : Allumer/éteindre
7
Bouton
déclencheur
Appuyer pour: effectuer une
correction de l’image par un clic
d’obturateur dans la caméra.
8
Fichier
Mode itinéraire
d’inspection : appuyer sur
ce bouton pour afficher les
informations des points
d’inspection.
Mode itinéraire sans
inspection : appuyer sur ce
bouton pour afficher la
capture et la vidéo.
9
Bouton de retour
Permet de sortir du menu ou de
revenir au menu précédent.

11
N°
Composant
Fonction
10
Bouton de
navigation
Dans le menu Mode :
Appuyez sur les touches ,
, , et pour
sélectionner les paramètres.
Appuyez sur OK pour
confirmer.
Appuyez sur pour
accéder à un sous-menu.
Appuyez pour retourner
au menu précédent.
En dehors du menu Mode :
Appuyez sur la touche
pour allumer/éteindre
l’éclairage LED
supplémentaire.
Appuyez sur la touche
pour lancer le zoom
numérique.
11
Bouton laser
Maintenez ce bouton enfoncé
pour allumer le laser, puis
relâchez-le pour éteindre le
laser.
12
Batterie
Alimente l’appareil en
électricité.
13
Télémètre laser
Mesure de la distance par laser.
14
Objectif
Observer l’image optique.
15
Éclairage LED
Augmente la luminosité
ambiante dans un
environnement sombre.
16
Objectif
thermique
Observer l’image thermique.
17
Bague de mise au
point
Réglez la position de l’objectif
sur l’axe optique de l’objectif
thermique.
18
Interface pour
trépied
Installez le trépied.
19
Interface de la
boucle de la
dragonne
Insérez la vis pour fixer la boucle
de la dragonne.
20
Gâchette de mise
au point
Appuyez sur la gâchette pour
activer la fonction de mise au
point assistée par laser/mise au
point automatique.
21
Gâchette
principale
Enfoncez la gâchette pour
capturer ou scanner le
code QR.
Maintenez la gâchette
enfoncée pour enregistrer
des vidéos.
22
Trou pour
dragonne
Enfilez la partie inférieure de la
dragonne dans le trou.
23
Fente pour carte
mémoire
Insérez-y la carte mémoire.
24
Interface type C
Se connecte à l’alimentation
électrique et transmet les
données.
25
Interface CVBS
Connectez l’appareil et l’unité
d’affichage pour visualiser
l’image en détail.
26
Emplacement
pour carte
réservée
Insérez la carte réservée.
N°
Composant
Fonction
27
Interface Micro
HDMI
Connectez l’appareil et l’unité
d’affichage à l’aide du câble
Micro HDMI (type D) à HDMI
(type A) pour visualiser l’image
en détail.
Remarque :
L’étiquette d’avertissement se situe sous le laser et à
gauche de l’appareil.
Les interfaces peuvent varier selon les modèles.
Reportez-vous au produit.
Initialisez la carte mémoire avant sa première
utilisation.
Veuillez vous référer aux spécifications du produit
pour plus de détails sur les accessoires de l’appareil.
2. Chargement de l’appareil via une
station de recharge (page 1 – B)
Après le démarrage de l’appareil, l’affichage à l’écran
indique l’état de la batterie. Lorsque la batterie est faible,
chargez l’appareil et assurez-vous qu’il fonctionne
correctement.
Pour la première charge, rechargez l’appareil pendant
10 heures tandis qu’il est allumé.
Remarque :
La batterie intégrée qui alimente l’horloge en temps
réel (RTC) de l’appareil peut se décharger en cas de
transport ou de stockage de longue durée. Il est
recommandé de recharger la batterie RTC pour le
bon fonctionnement de l’horloge de l’appareil.
Pour charger complètement la batterie RTC, les
conditions suivantes doivent être remplies :
a) Les piles rechargeables au lithium doivent être
installées dans l’appareil.
b) L’appareil doit pouvoir fonctionner pendant
plus de 10 heures avant de s’éteindre.
Procédures :
1. Tenez l’appareil, puis appuyez simultanément sur les
deux dispositifs de verrouillage de la batterie situés sur
l’appareil.
2. Maintenez les dispositifs de verrouillage, puis tirez la
base de la batterie pour sortir la batterie.
3. Insérez la batterie dans la station de recharge. Vous
pouvez voir l’état de charge grâce à la lampe témoin
située sur la station de recharge.
4. Lorsque la batterie est complètement chargée,
retirez-la de la station de recharge.
5. Insérez la batterie dans l’appareil.
Remarque : Veuillez acheter la station de recharge à
l’avance.
3. Montage de l’objectif interchangeable
(en option)(page 2 – C)
Remarque : Veuillez acheter l’objectif interchangeable à
l’avance.
Procédures
1. Tournez l’anneau décoratif dans le sens antihoraire
pour le retirer.
2. Alignez les deux points sur l’objectif interchangeable et
l’appareil.
3. Tournez l’objectif interchangeable dans le sens horaire
pour terminer le montage.
4. Montage du couvercle de protection
(en option) (page 2 – D – I)
Remettez le cache-objectif en place lorsque l’appareil
n’est pas utilisé.

12
Procédures
1. Alignez le trou fileté de l’appareil sur le trou de
montage du cache-objectif.
2. Insérez la vis, puis serrez-la dans le sens horaire pour
fixer le cache-objectif.
5. Connexion à l’application (page 2 – E)
Recherchez et téléchargez l’application HIKMICRO Viewer
dans l’App Store (système iOS) ou sur Google Play™
(système Android) ou scannez le code QR pour la
télécharger et l’installer. Après avoir connecté l’appareil à
l’application mobile, vous pouvez prendre des instantanés,
enregistrer des vidéos et définir des paramètres grâce à
HIKMICRO Viewer.
Vous pouvez également télécharger HIKMICRO Analyzer
(www.hikmicrotech.com) pour analyser de manière
professionnelle des images hors ligne et générer un
rapport au format personnalisé sur votre ordinateur.
6. Autres opérations
Scannez le code QR pour obtenir le manuel d’utilisation
pour des opérations plus détaillées.
Informations légales
© 2023 Hangzhou Microimage Software Co., Ltd. Tous
droits réservés.
À propos de ce manuel
Ce manuel fournit des instructions d’utilisation et de
gestion du produit. Les images, les tableaux, les figures et
toutes les autres informations ci-après ne sont donnés qu’à
titre de description et d’explication. Les informations
contenues dans ce manuel sont modifiables sans préavis,
en raison d’une mise à jour d’un micrologiciel ou pour
d’autres raisons. Veuillez trouver la dernière version de ce
manuel sur le site Internet de HIKMICRO
(www.hikmicrotech.com).
Veuillez utiliser ce mode d’emploi avec les conseils et
l’assistance de professionnels spécialement formés dans la
prise en charge de ce produit.
Reconnaissance des marques de commerce
et les autres marques commerciales et logos
de HIKMICRO sont la propriété de HIKMICRO dans diverses
juridictions.
: Les termes HDMI et HDMI High-Definition
Multimedia Interface, et le logo HDMI sont des marques
commerciales ou des marques déposées de HDMI Licensing
Administrator, Inc. aux États-Unis et dans d’autres pays.
Toutes les autres marques et tous les logos mentionnés
appartiennent à leurs propriétaires respectifs.
MENTIONS LÉGALES
DANS LES LIMITES AUTORISÉES PAR LA LOI EN VIGUEUR, LE
PRÉSENT MANUEL ET LE PRODUIT DÉCRIT, AINSI QUE SON
MATÉRIEL, SES LOGICIELS ET SES MICROLOGICIELS, SONT
FOURNIS « EN L’ÉTAT » ET « AVEC CES FAIBLESSES ET
ERREURS ». HIKMICRO NE FAIT AUCUNE GARANTIE,
EXPLICITE OU IMPLICITE, Y COMPRIS, MAIS SANS S’Y
LIMITER, DE QUALITÉ MARCHANDE, DE QUALITÉ
SATISFAISANTE, OU D’ADÉQUATION À UN USAGE
PARTICULIER. VOUS UTILISEZ LE PRODUIT À VOS PROPRES
RISQUES. EN AUCUN CAS, HIKMICRO NE SERA TENU
RESPONSABLE DE TOUT DOMMAGE SPÉCIAL, CONSÉCUTIF,
ACCESSOIRE OU INDIRECT, Y COMPRIS, ENTRE AUTRES, LES
DOMMAGES RELATIFS À LA PERTE DE PROFITS
D’ENTREPRISE, À L’INTERRUPTION D’ACTIVITÉS
COMMERCIALES, OU LA PERTE DES DONNÉES, LA
CORRUPTION DES SYSTÈMES, OU LA PERTE DES
DOCUMENTS, S’ILS SONT BASÉS SUR UNE VIOLATION DE
CONTRAT, UNE FAUTE (Y COMPRIS LA NÉGLIGENCE), LA
RESPONSABILITÉ EN MATIÈRE DE PRODUITS, OU AUTRE, EN
RAPPORT AVEC L’UTILISATION DU PRODUIT, MÊME SI
HIKMICRO A ÉTÉ INFORMÉ DE LA POSSIBILITÉ D’UN TEL
DOMMAGE OU D’UNE TELLE PERTE.
VOUS RECONNAISSEZ QUE LA NATURE D’INTERNET EST
SOURCE DE RISQUES DE SÉCURITÉ INHÉRENTS, ET
HIKMICRO SE DÉGAGE DE TOUTE RESPONSABILITÉ EN CAS
DE FONCTIONNEMENT ANORMAL, DIVULGATION
D’INFORMATIONS CONFIDENTIELLES OU AUTRES
DOMMAGES DÉCOULANT D’UNE CYBERATTAQUE, D’UN
PIRATAGE INFORMATIQUE, D’UNE INFECTION PAR DES
VIRUS, OU AUTRES RISQUES DE SÉCURITÉ LIÉS À INTERNET ;
TOUTEFOIS, HIKMICRO FOURNIRA UNE ASSISTANCE
TECHNIQUE DANS LES DÉLAIS SI NÉCESSAIRE.
VOUS ACCEPTEZ D’UTILISER CE PRODUIT CONFORMÉMENT
À L’ENSEMBLE DES LOIS EN VIGUEUR. IL EST DE VOTRE
RESPONSABILITÉ EXCLUSIVE DE VEILLER À CE QUE VOTRE
UTILISATION SOIT CONFORME À LA LOI APPLICABLE. IL
VOUS APPARTIENT SURTOUT D’UTILISER CE PRODUIT
D’UNE MANIÈRE QUI NE PORTE PAS ATTEINTE AUX DROITS
DE TIERS, Y COMPRIS, MAIS SANS S’Y LIMITER, LES DROITS
DE PUBLICITÉ, LES DROITS DE PROPRIÉTÉ INTELLECTUELLE,
OU LA PROTECTION DES DONNÉES ET D’AUTRES DROITS À
LA VIE PRIVÉE. VOUS NE DEVEZ PAS UTILISER CE PRODUIT
POUR TOUTE UTILISATION FINALE INTERDITE,
NOTAMMENT LA MISE AU POINT OU LA PRODUCTION
D’ARMES DE DESTRUCTION MASSIVE, LA MISE AU POINT
OU LA FABRICATION D’ARMES CHIMIQUES OU
BIOLOGIQUES, LES ACTIVITÉS DANS LE CONTEXTE LIÉ AUX
EXPLOSIFS NUCLÉAIRES OU AU CYCLE DU COMBUSTIBLE
NUCLÉAIRE DANGEREUX, OU SOUTENANT LES VIOLATIONS
DES DROITS DE L’HOMME.
EN CAS DE CONFLIT ENTRE CE MANUEL ET LES LOIS EN
VIGUEUR, CES DERNIÈRES PRÉVALENT.
Réglementation
Ces clauses ne s’appliquent qu’aux produits
portant la marque ou l’information
correspondante.
Déclaration de conformité UE
Ce produit et, le cas échéant, les accessoires
qui l’accompagnent, sont estampillés « CE » et
sont donc conformes aux normes européennes
harmonisées en vigueur répertoriées sous la
Directive 2014/53/UE (DER), la Directive 2014/30/UE
(DCEM), la Directive 2014/35/UE (DBT) et la
Directive 2011/65/UE (RoHS).
Bandes de fréquence et puissance (pour la CE/UKCA)
Les bandes de fréquences et les limites nominales de la
puissance d’émission (rayonnée et/ou conduite)
applicables aux équipements radio suivants sont les
suivantes :
Modèle
d’équipement
Bandes de fréquences et puissance
G40, G60
Wi-Fi 2,4 GHz (2,4 à 2,4835 GHz) :
20 dBm
Bluetooth 2,4 GHz
(2,4 GHz à 2,4835 Ghz) : 20 dBm
G31, G41,
G61*
Wi-Fi 2,4 GHz (2,4 à 2,4835 GHz) :
20 dBm ;
Wi-Fi 5 GHz (5,15 GHz à 5,25 Ghz) :
23 dBm ;
Wi-Fi 5 GHz (5,25 GHz à 5,35 Ghz) :
23 dBm ;
Wi-Fi 5 GHz (5,47 GHz à 5,725 Ghz) :
23 dBm ;
Wi-Fi 5 GHz (5,725 GHz à 5,85 Ghz) :
14 dBm
Bluetooth 2,4 GHz
(2,4 GHz à 2,4835 Ghz) : 20 dBm
*Pour les G31, G41, G61, veuillez prêter attention aux

13
notes suivantes lorsque l’appareil fonctionne à 5 Ghz :
Conformément à l’Article 10 (10) de la Directive
2014/53/UE, lorsque cet appareil fonctionne sur la plage de
fréquence 5 150 – 5 350 MHz, son utilisation est restreinte
à une utilisation en intérieur dans les pays suivants :
Autriche (AT), Belgique (BE), Bulgarie (BG), Croatie (HR),
Chypre (CY), République Tchèque (CZ), Danemark (DK),
Estonie (EE), Finlande (FI), France (FR), Allemagne (DE),
Grèce (EL), Hongrie (HU), Islande (IS), Irlande (IE), Italie (IT),
Lettonie (LV), Liechtenstein (LI), Lituanie (LT), Luxembourg
(LU), Malte (MT), Pays-Bas (NL), Irlande du Nord (UK(NI)),
Norvège (NO), Pologne (PL), Portugal (PT), Roumanie (RO),
Slovaquie (SK), Slovénie (SI), Espagne (ES), Suède (SE),
Suisse (CH) et Turquie (TR).
Conformément à la réglementation sur les équipements
radio de 2017 au Royaume-Uni, l’appareil fonctionnant
dans la gamme de fréquences 5150 à 5350 MHz est limité à
une utilisation en intérieur au Royaume-Uni.
Utilisez l’adaptateur d’alimentation fourni par un fabricant
qualifié. Reportez-vous aux spécifications du produit pour
les dispositions nécessaires et détaillées en matière
d’alimentation.
Utilisez une pile fournie par un fabricant qualifié.
Reportez-vous aux spécifications du produit pour les détails
concernant la batterie.
Directive 2012/19/UE (directive DEEE) : Dans
l’Union européenne, les produits portant ce
pictogramme ne doivent pas être déposés dans
une décharge municipale où le tri des déchets
n’est pas pratiqué. Pour un recyclage adéquat,
remettez ce produit à votre revendeur lors de l’achat d’un
nouvel équipement équivalent, ou déposez-le dans un lieu
de collecte prévu à cet effet. Pour de plus amples
informations, visitez le site Web : www.recyclethis.info.
Directive 2006/66/CE et son
amendement 2013/56/UE (directive sur les
batteries) : Ce produit renferme une batterie qui
ne doit pas être déposée dans une décharge municipale
où le tri des déchets n’est pas pratiqué, dans l’Union
européenne. Pour plus de précisions sur la batterie,
reportez-vous à sa documentation. La batterie porte le
pictogramme ci-contre, qui peut inclure la mention Cd
(cadmium), Pb (plomb) ou Hg (mercure). Pour la recycler
correctement, renvoyez la batterie à votre revendeur ou
déposez-la dans un point de collecte prévu à cet effet.
Pour de plus amples informations, visitez le site Web :
www.recyclethis.info.
Consignes de sécurité
L’objectif de ces instructions est de garantir que
l’utilisateur soit en mesure d’utiliser correctement le
produit sans danger ou dommage aux biens.
Lois et réglementations
● L’appareil doit être strictement utilisé conformément à
la réglementation locale en matière de sécurité
électrique.
Transport
● Gardez l’appareil dans son emballage d’origine ou dans
un emballage similaire lors de son transport.
● Veuillez conserver l’emballage de l’appareil pour toute
utilisation ultérieure. En cas de panne, vous devrez
renvoyer l’appareil à l’usine dans son emballage
d’origine. Le transport de l’appareil sans son emballage
d’origine peut l’endommager, et l’entreprise se dégage
de toute responsabilité dans ce cas.
● Ne pas faire tomber le produit ou le soumettre à un
choc physique. Éloigner l’appareil d’interférences
magnétiques.
Alimentation électrique
● La tension d’entrée doit être conforme à celle d’une
source d’alimentation limitée (5 VCC, 940 mA) selon la
norme IEC61010-1. Veuillez vous référer aux
caractéristiques techniques pour des informations
détaillées.
● Vérifiez que la prise est correctement branchée à la
prise électrique.
● Pour éviter tout risque de surchauffe ou d’incendie dû
à une surcharge, ne reliez PAS plusieurs appareils à un
seul adaptateur d’alimentation.
Batterie
● La batterie intégrée ne peut pas être démontée.
Veuillez contacter le fabricant pour réparation si
nécessaire.
● NE chargez pas d’autres types de piles avec le chargeur
fourni. Pendant la recharge des piles, vérifiez qu’il n’y a
aucun matériau inflammable à moins de 2 m du
chargeur.
● En cas de stockage à long terme de la batterie,
assurez-vous qu’elle est complètement chargée tous
les six mois afin d’en conserver la qualité. Dans le cas
contraire, elle pourrait se détériorer.
● NE placez PAS la batterie à proximité d’une source de
chaleur ou de feu. Ne l’exposez pas à la lumière directe
du soleil.
● N’avalez PAS la batterie pour éviter les risques de
brûlures chimiques.
● NE laissez PAS la batterie à portée des enfants.
● Lorsque l’appareil est éteint et que la batterie RTC est
complètement chargée, les réglages de l’heure peuvent
être conservés pendant 15 jours.
● À la première utilisation, allumez l’appareil et chargez
la batterie RTC au lithium pendant plus de 10 heures.
● La tension de la batterie est de 3,6 V et une capacité de
6 700 mAh.
● La batterie est certifiée conforme à la norme UL2054.
● ATTENTION : Il y a un risque d’explosion lorsque la pile
est remplacée par une pile de type incorrect.
Maintenance
● Si le produit ne fonctionne pas correctement, contactez
votre revendeur ou le centre de service le plus proche.
Nous n’assumerons aucune responsabilité concernant
les problèmes causés par une réparation ou une
opération de maintenance non autorisée.
● Certains composants de l’appareil (p. ex., condensateur
électrolytique) doivent être remplacés régulièrement.
Leur durée de vie moyenne est variable, c’est pourquoi
des contrôles périodiques sont recommandés. Veuillez
contacter votre distributeur pour plus d’informations.
● Essuyez délicatement l’appareil à l’aide d’un chiffon
propre imbibé d’une petite quantité d’éthanol, si
nécessaire.
● Si l’appareil n’est pas utilisé conformément aux
indications du fabricant, le dispositif de protection
fourni par l’appareil peut être compromis.
● Nous vous recommandons de renvoyer l’appareil pour
étalonnage une fois par an. Veuillez également
contacter le revendeur local pour obtenir des
informations sur les points d’entretien.
● Sachez que la limite actuelle du port USB 3.0
PowerShare peut varier selon la marque de l’ordinateur.
C’est pourquoi un problème d’incompatibilité peut
survenir. Par conséquent, il est conseillé d’utiliser un
port USB 3.0 ou USB 2.0 standard si le
périphérique USB n’est pas reconnu par l’ordinateur en
utilisant le port USB 3.0 PowerShare.
● Votre caméra effectue automatiquement et
régulièrement un étalonnage pour optimiser la qualité
des images et la précision des mesures. Pendant cette
opération, l’image s’interrompt brièvement et vous
entendez un déclic lorsque l’obturateur s’ouvre devant
le détecteur. L’étalonnage automatique est plus
fréquent au démarrage ou dans des environnements
très froid ou chaud. Ce comportement est normal et
permet de garantir des performances optimales de
votre caméra.
Environnement d’exploitation
● N’exposez PAS l’appareil à des environnements

14
extrêmement chauds, froids, poussiéreux, corrosifs,
salins-alcalins ou humides. Assurez-vous que
l’environnement d’exploitation répond aux exigences
de l’appareil. La température de fonctionnement doit
être comprise entre -20°C et 50 °C (-4 °F et 122 °F), et
l’humidité de fonctionnement doit être inférieure ou
égale à 90 %.
● Placez l’appareil dans un endroit sec et bien aéré.
● N’exposez PAS l’appareil à de puissants rayonnements
électromagnétiques ou à des environnements
poussiéreux.
● N’orientez PAS l’objectif vers le soleil ou toute autre
source de lumière vive.
● Pendant l’utilisation de tout équipement générant un
laser, veillez à ce que l’objectif de l’appareil ne soit pas
exposé au faisceau laser, car il pourrait brûler.
● L’appareil convient à une utilisation en intérieur
comme en extérieur, mais ne l’exposez pas à
l’humidité.
● Le niveau de protection est IP 54.
● Le degré de pollution est de 2.
Assistance technique
● Le portail https://www.hikmicrotech.com vous aidera
en tant que client HIKMICRO à tirer le meilleur de vos
produits HIKMICRO. Depuis le portail, accédez à notre
équipe d’assistance, à des logiciels et de la
documentation, à des contacts en rapport avec le
support, etc.
Urgence
● Si de la fumée, des odeurs ou du bruit s’échappent de
l’appareil, mettez immédiatement l’appareil hors
tension et débranchez le câble d’alimentation, puis
contactez un centre de réparation.
Laser
Avertissement : Le rayonnement laser
émis par l’appareil peut provoquer des
blessures aux yeux, des brûlures de la
peau ou générer des substances
inflammables. Évitez le contact direct des yeux avec le
laser. Avant d’activer la fonction de complément de
lumière, assurez-vous qu’aucune personne ni aucune
substance inflammable ne se trouvent devant l’objectif du
laser. La longueur d’onde est de 650 nm pour une
puissance inférieure à 1 mW. Le laser est conforme à la
norme IEC60825-1:2014.
Entretien du laser : Il n’est pas nécessaire d’entretenir
régulièrement le laser. Si le laser ne fonctionne pas,
l’ensemble laser doit être remplacé en usine dans le cadre
de la garantie. L’appareil doit être hors tension lors du
remplacement de l’ensemble laser. Attention : l’utilisation
de commandes ou de réglages ou l’exécution de
procédures autres que celles spécifiées ici peut entraîner
une exposition dangereuse aux rayonnements.
Adresse de fabrication
Logement 313, Unité B, Bâtiment 2, 399 Danfeng Road,
Sous-district de Xixing, District de Binjiang, Hangzhou,
Zhejiang 310052, Chine
Hangzhou Microimage Software Co., Ltd.
AVIS DE CONFORMITÉ : Il est possible que les produits de
la série thermique soient soumis à des contrôles
d’exportation dans divers pays ou diverses régions, ce qui
inclut, sans s’y limiter, les États-Unis, l’Union européenne,
le Royaume-Uni ou d’autres pays membres de
l’Arrangement de Wassenaar. Veuillez consulter votre
expert professionnel en questions juridiques ou en
conformité ou les autorités de votre gouvernement local
pour toute exigence de permis d’exportation si vous
prévoyez de transférer, d’exporter ou de réexporter des
produits de la série thermique entre différents pays.
Español
1. Apariencia (página 1 – A)
Nº.
Componente
Función
1
Tapa de
conexiones
Protecte las conexiones del
polvo.
2
Micrófono
Información de audio de entrada.
3
Indicador de
carga
Rojo: Cargando
Verde: Carga completa
4
Altavoz
Reproduce las notas y las
alarmas de voz y el sonido de los
vídeos.
5
Pantalla táctil
Toque la pantalla para establecer
los parámetros.
6
Botón de
encendido
Mantener pulsado:
Encendido/apagado
7
Botón del
obturador
Pulsar brevemente: Realice la
corrección de la imagen con un
toque del obturador de la
cámara.
8
Archivo
Modo de ruta de
inspección: Pulse el botón
para ver la información de
los puntos de inspección.
Modo de ruta sin inspección:
Pulse el botón para ver la
captura y el vídeo.
9
Botón atrás
Sale del menú o regresa al menú
anterior.
10
Botón de
navegación
Modo menú:
Pulse , , y para
seleccionar los ajustes.
Pulse OK para confirmar.
Pulse para acceder al
submenú.
Pulse para volver al menú
anterior.
Modo sin menú:
Pulse para
encender/apagar el
suplemento de luz led.
Pulse para iniciar el zoom
digital.
11
Botón de láser
Mantenga pulsado el botón para
encender el láser y suéltelo para
apagarlo.
12
Batería
Proporciona alimentación para el
dispositivo.
13
Medidor de
distancia del
láser
Medir la distancia con láser.
14
Lente óptica
Ver la imagen óptica.
15
Luz led
Aumenta la luminosidad en
entornos oscuros.
16
Lente térmica
Ver la imagen térmica.
17
Anillo de
enfoque
Ajusta la posición de la lente al
eje óptico de la lente térmica.
18
Interfaz de
trípode
Instale el trípode.
19
Interfaz de la
hebilla de la
correa de mano
Inserte el tornillo para fijar la
hebilla de la correa de mano.

15
Nº.
Componente
Función
20
Disparador de
enfoque
Pulse el disparador para habilitar
la función de enfoque
asistido/enfoque automático.
21
Gatillo principal
Pulse el gatillo para capturar
o escanear el código QR.
Mantenga pulsado el
activador para grabar
vídeos.
22
Agujero para la
correa de mano
Enrosque la parte inferior de la
correa de mano por el orificio.
23
Ranura de la
tarjeta de
memoria
Inserte la tarjeta de memoria.
24
Interfaz de tipo
C
Conecte la alimentación eléctrica
y transmisión de datos.
25
Interfaz CVBS
Conecte el dispositivo y la unidad
de visualización para ver la
imagen para obtener más
detalles.
26
Ranura de
tarjeta
reservada
Inserte la tarjeta reservada.
27
Interfaz Micro
HDMI
Conecte el dispositivo y la unidad
de visualización con un cable
Micro HDMI (tipo D) a HDMI
(tipo A) para ver la imagen y ver
los detalles.
Nota:
El aviso de advertencia se encuentra bajo el láser y a
la izquierda del dispositivo.
Las conexiones pueden diferir según los modelos. Por
favor, consulte la documentación que corresponda al
producto en cuestión.
Inicialice la tarjeta de memoria antes de usarla por
primera vez.
Consulte las especificaciones de producto para ver
información acerca de los accesorios del dispositivo.
2. Cargar el dispositivo mediante la base
de carga (página 1 – B)
Después de encender el dispositivo, la OSD (visualización
en pantalla) muestra el estado de la batería. Cuando el
nivel de batería sea bajo, cargue el dispositivo y
compruebe que funcione correctamente.
La primera carga se debe realizar durante 10 horas con el
dispositivo encendido.
Nota:
La batería integrada que alimenta el reloj en tiempo
real (RTC) del dispositivo se puede agotar en
periodos largos de almacenamiento o transporte. Se
recomienda recargar la batería RTC para el buen
funcionamiento del reloj del dispositivo.
Para cargar completamente la batería del reloj en
tiempo real, se debe cumplir con los siguientes
requisitos:
a) Las baterías de litio recargables se deben instalar
en el dispositivo.
b) El dispositivo debería seguir funcionando durante
más de 10 horas antes de apagarse.
Pasos:
1. Sujete el dispositivo y presione la batería y los cierres
del dispositivo.
2. Presione los cierres y tire de la base de la batería para
sacarla.
3. Inserte la batería en la base de carga. Puede ver el
estado de carga a través del piloto luminoso de la base
de carga.
4. Cuando la batería esté completamente cargada,
retírela de la base de carga.
5. Introduzca la batería en el dispositivo.
Nota: Compre la base de carga por adelantado.
3. Montar las lentes intercambiables
(opcional) (página 2 – C)
Nota: Compre la lente intercambiable por adelantado.
Pasos
1. Gire el anillo decorativo en sentido antihorario para
retirarlo.
2. Alinee los dos puntos de la lente intercambiable y el
dispositivo.
3. Gire la lente intercambiable en sentido horario para
terminar de montarla.
4. Montar la cubierta protectora (opcional)
(página 2 – D – I)
Siempre coloque la cubierta protectora cuando el
dispositivo no esté en uso.
Pasos
1. Alinee el orificio roscado del dispositivo con el orificio
de montaje de la cubierta de la lente.
2. Inserte el tornillo y gírelo en sentido horario para fijar
la cubierta de la lente.
5. Conectar a la aplicación (página 2 – E)
Busque y descargue HIKMICRO Viewer en App Store
(sistemas iOS) o Google Play™ (sistemas Android) o
escanee el código QR para descargar e instalar la
aplicación. Una vez conectado el dispositivo a la aplicación
móvil, puede realizar capturas de pantalla, grabar vídeos y
establecer parámetros para HIKMICRO Viewer.
Puede descargar HIKMICRO Analyzer
(www.hikmicrotech.com) para analizar imágenes sin
conexión de manera profesional y generar un informe de
formato personalizado en su PC.
6. Más operaciones
Escanee el código QR para obtener el manual del usuario
y conocer más detalles de las operaciones.
Información legal
© 2023 Hangzhou Microimage Software Co., Ltd. Todos los
derechos reservados.
Sobre este manual
Este manual incluye las instrucciones de utilización y
gestión del producto. Las figuras, gráficos, imágenes y
cualquier otra información que encontrará en lo sucesivo
tienen únicamente fines descriptivos y aclaratorios. La
información incluida en el manual está sujeta a cambios, sin
aviso previo, debido a las actualizaciones de software u
otros motivos. Visite el sitio web de HIKMICRO
(www.hikmicrotech.com/) para encontrar la última versión
de este manual.
Utilice este manual con la guía y asistencia de profesionales
capacitados en el soporte del producto.

16
Reconocimiento de marcas comerciales
y otras marcas comerciales y logotipos de
HIKMICRO son propiedad de HIKMICRO en diferentes
jurisdicciones.
: Los términos HDMI y HDMI High-Definition
Multimedia Interface, y el logo HDMI son marcas
comerciales o marcas registradas de HDMI Licensing
Administrator, Inc. en Estados Unidos y en otros países.
Las demás marcas comerciales y logotipos mencionados
son propiedad de sus respectivos dueños.
AVISOS LEGALES
EN LA MEDIDA MÁXIMA PERMITIDA POR LAS LEYES
APLICABLES, ESTE MANUAL Y EL PRODUCTO DESCRITO
—INCLUIDOS SU HARDWARE, SOFTWARE Y FIRMWARE—
SE SUMINISTRAN «TAL CUAL» Y «CON TODOS SU FALLOS Y
ERRORES». HIKMICRO NO OFRECE GARANTÍAS, EXPLÍCITAS
O IMPLÍCITAS, INCLUIDAS, A MODO MERAMENTE
ENUNCIATIVO MAS NO LIMITATIVO, AQUELLAS DE
COMERCIABILIDAD, CALIDAD SATISFACTORIA O IDONEIDAD
PARA UN PROPÓ SITO EN PARTICULAR. EL USO QUE HAGA
DEL PRODUCTO CORRE BAJO SU ÚNICO RIESGO. EN
NINGÚ N CASO, HIKMICRO PODRÁ CONSIDERARSE
RESPONSABLE ANTE USTED DE NINGÚ N DAÑO ESPECIAL,
CONSECUENTE, INCIDENTAL O INDIRECTO, INCLUYENDO,
ENTRE OTROS, DAÑOS POR PÉRDIDAS DE BENEFICIOS
COMERCIALES, INTERRUPCIÓN DE LA ACTIVIDAD
COMERCIAL, PÉRDIDA DE DATOS, CORRUPCIÓ N DE LOS
SISTEMAS O PÉRDIDA DE DOCUMENTACIÓ N, YA SEA POR
INCUMPLIMIENTO DEL CONTRATO, AGRAVIO
(INCLUYENDO NEGLIGENCIA), RESPONSABILIDAD DEL
PRODUCTO O EN RELACIÓ N CON EL USO DEL PRODUCTO,
INCLUSO CUANDO HIKMICRO HAYA RECIBIDO UNA
NOTIFICACIÓ N DE LA POSIBILIDAD DE DICHOS DAÑOS O
PÉRDIDAS.
USTED RECONOCE QUE LA NATURALEZA DE INTERNET
IMPLICA RIESGOS DE SEGURIDAD INHERENTES Y QUE
HIKMICRO NO TENDRÁ NINGUNA RESPONSABILIDAD POR
NINGÚ N FUNCIONAMIENTO ANORMAL, FILTRACIONES DE
PRIVACIDAD U OTROS DAÑOS RESULTANTES DE ATAQUES
CIBERNÉTICOS, ATAQUES DE PIRATAS INFORMÁTICOS,
INFECCIONES DE VIRUS U OTROS RIESGOS DE SEGURIDAD
PROPIOS DE INTERNET; NO OBSTANTE, HIKMICRO
PROPORCIONARÁ EL APOYO TÉCNICO OPORTUNO DE SER
NECESARIO.
USTED ACEPTA USAR ESTE PRODUCTO DE CONFORMIDAD
CON TODAS LAS LEYES APLICABLES Y SOLO USTED ES EL
ÚNICO RESPONSABLE DE ASEGURAR QUE EL USO CUMPLA
CON DICHAS LEYES. EN ESPECIAL, USTED ES RESPONSABLE
DE USAR ESTE PRODUCTO DE FORMA QUE NO INFRINJA
LOS DERECHOS DE TERCEROS, INCLUYENDO, DE MANERA
ENUNCIATIVA MAS NO LIMITATIVA, DERECHOS DE
PUBLICIDAD, DERECHOS DE PROPIEDAD INTELECTUAL,
DERECHOS RELATIVOS A LA PROTECCIÓ N DE DATOS Y
OTROS DERECHOS RELATIVOS A LA PRIVACIDAD. NO
UTILIZARÁ ESTE PRODUCTO PARA NINGÚN USO FINAL
PROHIBIDO, INCLUYENDO EL DESARROLLO O LA
PRODUCCIÓ N DE ARMAS DE DESTRUCCIÓ N MASIVA, EL
DESARROLLO O PRODUCCIÓ N DE ARMAS QUÍMICAS O
BIOLÓGICAS, NINGUNA ACTIVIDAD EN EL CONTEXTO
RELACIONADO CON ALGÚN EXPLOSIVO NUCLEAR O EL
CICLO DE COMBUSTIBLE NUCLEAR INSEGURO O EN APOYO
DE ABUSOS DE LOS DERECHOS HUMANOS.
EN CASO DE HABER CONFLICTO ENTRE ESTE MANUAL Y LA
LEGISLACIÓ N VIGENTE, ESTA ÚLTIMA PREVALECERÁ.
Información normative
Estas cláusulas solo se aplican a los productos que
lleven la marca o la información correspondiente.
Declaración de conformidad de la UE
Este producto, así como los accesorios
suministrados (si procede), tienen el marcado
«CE» y, por lo tanto, cumplen con las
normativas europeas armonizadas aplicables que se
enumeran en la Directiva 2014/53/UE (RED), la Directiva
2014/30/UE (EMCD), la Directiva 2014/35/UE (LVD) y la
Directiva 2011/65/UE (RoHS).
Bandas de frecuencia y potencia (para la UE/UKCA)
Las bandas de frecuencia y los límites nominales de
potencia de transmisión (radiada y/o conducida)
aplicables a los siguientes equipos de radio son los
siguientes:
Modelo del
equipo
Bandas de frecuencia y potencia
G40, G60
Wifi a 2,4 GHz
(de 2,4 GHz a 2,4835 GHz): 20 dBm
Bluetooth 2,4 GHz
(2,4 GHz a 2,4835 GHz): 20 dBm
G31, G41, G61*
Wifi a 2,4 GHz
(de 2,4 GHz a 2,4835 GHz): 20 dBm;
Wi-Fi 5 GHz
(5,15 GHz a 5,25 GHz): 23 dBm;
Wi-Fi 5 GHz
(5,25 GHz a 5,35 GHz): 23 dBm;
Wi-Fi 5 GHz
(5,47 GHz a 5,725GHz): 23 dBm;
Wi-Fi 5 GHz
(5,725 GHz a 5,85 GHz): 14 dBm
Bluetooth 2,4 GHz
(2,4 GHz a 2,4835 GHz): 20 dBm
*Para los modelos G31, G41, G61, preste atención a las
notas siguientes cuando el dispositivo funcione a 5 GHz:
De conformidad con el artículo 10, apartado 10, de la
Directiva 2014/53/UE, cuando se opera en la gama de
frecuencias de 5150 a 5350 MHz, este dispositivo está
restringido al uso en interiores en: Austria (AT), Bélgica (BE),
Bulgaria (BG), Croacia (HR), Chipre (CY), República Checa
(CZ), Dinamarca (DK), Estonia (EE), Finlandia (FI), Francia
(FR), Alemania (DE), Grecia (EL), Hungría (HU), Islandia (IS),
Irlanda (IE), Italia (IT), Letonia (LV), Liechtenstein (LI),
Lituania (LT), Luxemburgo (LU), Malta (MT), Países Bajos
(NL), Irlanda del Norte (UK(NI)), Noruega (NO), Polonia (PL),
Portugal (PT), Rumanía (RO), Eslovaquia (SK), Eslovenia (SI),
España (ES), Suecia (SE), Suiza (CH) y Turquía (TR).
En conformidad con el reglamento de equipos de radio de
2017 de Reino Unido, los dispositivos que funcionan en el
rango de frecuencias de 5150 a 5350 MHz tiene restringido
el uso en interiores en el Reino Unido.
Utilice el adaptador eléctrico de un fabricante autorizado.
Consulte las especificaciones técnicas del producto para
conocer los requisitos eléctricos detallados.
Use una batería provista por un fabricante cualificado.
Consulte las especificaciones técnicas del producto para
conocer los requisitos detallados de la batería.
Directiva 2012/19/UE (directiva RAEE): En la
Unión Europea, los productos marcados con este
símbolo no pueden ser desechados en el sistema
de basura municipal sin recogida selectiva. Para
un reciclaje adecuado, entregue este producto
en el lugar de compra del equipo nuevo equivalente o
deshágase de él en el punto de recogida designado a tal
efecto. Para más información visite: www.recyclethis.info.
Directiva 2006/66/CE y su enmienda
2013/56/UE (directiva sobre baterías): Este
producto lleva una batería que no puede ser
desechada en el sistema municipal de basuras sin
recogida selectiva dentro de la Unión Europea. Consulte la
documentación del producto para ver la información
específica de la batería. La batería lleva marcado este
símbolo, que incluye unas letras indicando si contiene
cadmio (Cd), plomo (Pb), o mercurio (Hg). Para un
reciclaje adecuado, entregue la batería a su vendedor o
llévela al punto de recogida de basuras designado a tal
efecto. Para más información visite: www.recyclethis.info.
Instrucciones de seguridad
Estas instrucciones están destinadas a garantizar que el

17
usuario pueda utilizar el producto correctamente para
evitar peligros o pérdidas materiales.
Leyes y normativas
● El uso del producto ha de cumplir estrictamente con las
normas de seguridad eléctrica locales.
Transporte
● Guarde el dispositivo en su paquete original o en uno
similar cuando lo transporte.
● Guarde el embalaje para uso futuro. En el caso de que
ocurra algún fallo, deberá devolver el dispositivo a la
fábrica con el envoltorio original. En caso de transporte
sin el envoltorio original podría resultar en daños en el
dispositivo y la empresa no se hará responsable.
● No deje caer el producto ni lo someta a impactos físicos.
Mantenga el dispositivo alejado de interferencias
magnéticas.
Fuente de alimentación
● La tensión de entrada debe cumplir con el límite de la
fuente de alimentación (5 V CC, 940 mA) según el
estándar IEC61010-1. Consulte las especificaciones
técnicas para obtener información detallada.
● Asegúrese de que el enchufe esté correctamente
conectado a la toma de corriente.
● NO conecte múltiples dispositivos a un mismo
adaptador de corriente, para evitar el
sobrecalentamiento y los riesgos de incendio por
sobrecarga.
Batería
● La batería integrada no puede ser desmontada.
Póngase en contacto con el fabricante para solicitar las
reparaciones necesarias.
● No cargue otros tipos de baterías con el cargador
suministrado. Confirme que no haya material
inflamable a menos de 2 m del cargador durante la
carga.
● Para almacenar la batería durante un periodo
prolongado, compruebe que esté completamente
cargada cada medio año para garantizar la calidad de la
misma. De lo contrario, podrían ocurrir daños.
● NO coloque la batería cerca de fuentes de calor o de
fuego. Evite la luz directa del sol.
● NO se trague la batería para evitar quemaduras
químicas.
● NO deje la batería al alcance de los niños.
● Cuando el dispositivo esté apagado y la batería RTC
esté llena, los ajustes de tiempo se podrán guardar
durante 15 días.
● En el primer uso, encienda el dispositivo y cargue la
batería RTC con la batería de litio durante más de
10 horas.
● La tensión de la batería es de 3,6 V y la capacidad de la
batería es de 6700 mAh.
● La batería cuenta con la certificación UL2054.
● PRECAUCIÓ N: Riesgo de explosión si se reemplaza la
batería por otra de tipo incorrecto.
Mantenimiento
● Si el producto no funciona correctamente, por favor,
póngase en contacto con su distribuidor o con el centro
de servicio técnico más próximo. No nos haremos
responsables de los problemas derivados de una
reparación o mantenimiento no autorizados.
● Algunos componentes del dispositivo (p. ej.: el
condensador electrolítico) necesita una sustitución
periódica. La vida útil promedio puede variar, por lo
que se recomienda una revisión periódica. Contacte
con su vendedor para más detalles.
● Limpie suavemente el dispositivo con una gamuza
limpia con una pequeña cantidad de etanol, si fuese
necesario.
● Si se utiliza el equipo de una manera no especificada
por el fabricante, la protección del dispositivo podría
verse mermada.
● Le recomendamos llevar el dispositivo para su
calibración una vez al año. Póngase en contacto con su
distribuidor local para obtener información sobre el
mantenimiento.
● Tenga en cuenta que el límite real del puerto
USB 3.0 PowerShare puede variar según la marca del
ordenador, lo que podría causar problemas de
incompatibilidad. Por ello, se aconseja utilizar un
puerto USB 3.0 o USB 2.0 normal si el ordenador no
reconoce el dispositivo USB a través del puerto
USB 3.0 PowerShare.
● La cámara realizará periódicamente una
autocalibración para optimizar la calidad de la imagen y
la precisión de las mediciones. Durante este proceso, la
imagen se detendrá brevemente y se oirá un «clic»
cuando el obturador se mueva delante del detector. La
autocalibración será más frecuente durante el
arranque o en ambientes muy fríos o cálidos. Se trata
de un proceso normal para garantizar un rendimiento
óptimo de la cámara.
Entorno de uso
● NO exponga el dispositivo a entornos excesivamente
cálidos, fríos, con polvo, corrosivos, salinos-alcalinos o
húmedos. Compruebe que el entorno de uso se adapte
a los requisitos del dispositivo. La temperatura de
funcionamiento estará entre -20 °C y 50 °C, y la
humedad relativa será del 90% o inferior.
● Coloque el dispositivo en un entorno seco y con buena
ventilación.
● NO exponga el dispositivo a radiaciones
electromagnéticas o entornos polvorientos.
● NO oriente la lente hacia el sol ni a otras luces
brillantes.
● Cuando utilice equipos láser, asegúrese de que el
objetivo del dispositivo no quede expuesto al rayo láser
ya que podría quemarse.
● El dispositivo es apto para su uso tanto en exteriores
como en interiores, pero no lo exponga a condiciones
de humedad.
● Su nivel de protección es IP 54.
● El grado de contaminación es 2.
Soporte técnico
● El sitio https://www.hikmicrotech.com le ayudará
como cliente de HIKMICRO a sacarle el máximo partido
a sus productos HIKMICRO. El sitio le ofrece acceso a
nuestro equipo de soporte, software y documentación,
contactos de servicio, etc.
Emergencia
● Si hay presencia de humo, olores o ruidos procedentes
del dispositivo, apague la alimentación
inmediatamente, desenchufe el cable de alimentación
y contacte con el servicio técnico.
Láser
Advertencia: La radiación láser emitida
por el dispositivo puede causar lesiones
oculares, quemaduras cutáneas o
inflamar sustancias. Evite la exposición
directa de la luz láser a los ojos. Antes de activar la
función de luz suplementaria, compruebe que no haya
personas ni sustancias inflamables frente al objetivo láser.
La longitud de onda es de 650 nm y la tensión es inferior a
1 mW. El láser cumple con la normativa IEC60825-1:2014.
Mantenimiento del láser: No es necesario hacer ningún
mantenimiento del láser de forma regular. Si el láser no
funciona, el módulo del láser debe ser reemplazado en el
taller bajo garantía. Apague el dispositivo al reemplazar el
módulo del láser. Atención: el uso de los controles o los
ajustes o la ejecución de procedimientos para otros
propósitos que no se hayan especificado aquí, puede
conllevar una exposición peligrosa a la radiación.
Dirección de fabricación
Habitación 313, Unidad B, Edificio 2, Carretera de Danfeng
399, Subdistrito de Xixing, Distrito de Binjiang, Hangzhou,
Zhejiang 310052, China
Hangzhou Microimage Software Co., Ltd.

18
AVISO DE CONFORMIDAD: Los productos de las series
térmicas podrían estar sujetos a controles de exportación
en algunos países o regiones; entre ellos, por ejemplo, los
Estados Unidos, la Unión Europea, el Reino Unido y/o
otros países miembros del Arreglo de Wassenaar.
Consulte con algún experto en cumplimiento normativo y
legal o con las autoridades gubernamentales locales para
cumplir con los requisitos de licencia de exportación
necesarios si desea transferir, exportar o reexportar los
productos de las series térmicas entre distintos países.
Português
1. Aspeto (Página 1 – A)
Nº
Componente
Função
1
Tampa da
interface
Protege as interfaces do pó.
2
Microfone
Entrada de informações de
áudio.
3
Indicador de
carga
Vermelho: Carregamento
Verde: Totalmente
carregada
4
Altifalante
Reproduzir notas de voz, alarmes
de voz e vozes de vídeo.
5
Ecrã tátil
Tocar no ecrã para ajustar os
parâmetros.
6
Botão de energia
Premir sem soltar: Ligar/desligar
7
Botão do
obturador
Premir: Efetuar a correção da
imagem com um clique do
obturador da câmara.
8
Ficheiro
Modo com rota de
inspeção: Premir o botão
para ver as informações dos
pontos de inspeção.
Modo sem rota de inspeção:
Premir o botão para ver as
capturas e os vídeos.
9
Botão
Retroceder
Sair do menu ou regressar ao
menu anterior.
10
Botão de
navegação
Modo de menu:
Premir , , e para
selecionar os parâmetros.
Premir OK para confirmar.
Premir para entrar no
submenu.
Premir para regressar ao
menu anterior.
Modo não-menu:
Premir para ligar/desligar
o suplemento de luz LED.
Prima para iniciar o zoom
digital.
11
Botão de laser
Manter o botão premido para
ligar o laser e libertar o botão
para o desligar.
12
Bateria
Fornece energia ao dispositivo.
13
Medidor de
distâncias a laser
Medir a distância com o laser.
14
Lente ótica
Ver a imagem ótica
15
Luz LED
Aumentar a luminosidade em
ambientes escuros.
16
Lente térmica
Ver a imagem térmica
17
Anel de foco
Ajustar a posição da lente no
eixo ótico da lente térmica.
Nº
Componente
Função
18
Interface do
tripé
Instalar o tripé.
19
Interface para
fivela de correia
de transporte
Inserir o parafuso para prender a
fivela da correia de transporte.
20
Gatilho de
focagem
Premir o gatilho para ativar a
função de focagem
assistida/focagem automática.
21
Gatilho principal
Prima o gatilho para captar
ou ler o código QR.
Segurar no gatilho para
gravar vídeos.
22
Orifício para
correia de
transporte
Insira a parte inferior da correia
de transporte no orifício.
23
Ranhura para
cartão de
memória
Inserir o cartão de memória.
24
Interface Tipo-C
Ligar à fonte de alimentação e
transmitir dados.
25
Interface CVBS
Ligar o dispositivo e a unidade de
visualização para ver a imagem
de forma detalhada.
26
Ranhura do
cartão reservado
Inserir o cartão reservado.
27
Interface Micro
HDMI
Ligar o dispositivo e a unidade de
visualização com um cabo Micro
HDMI (tipo D) para HDMI (tipo A)
para ver a imagem de forma
detalhada.
Nota:
O sinal de advertência encontra-se por baixo do laser,
no lado esquerdo do dispositivo.
As interfaces podem variar consoante os diferentes
modelos. Consulte o produto real.
Formate o cartão de memória antes de o utilizar pela
primeira vez.
Consulte as especificações do produto para obter
detalhes sobre os acessórios do dispositivo.
2. Carregar o dispositivo através da base
de carregamento (Página 1 – B)
Após o arranque do dispositivo, a OSD (apresentação no
ecrã) mostra o estado da bateria. Quando a bateria estiver
fraca, carregue o dispositivo e garanta que este funciona
adequadamente.
No primeiro carregamento, carregue o dispositivo durante
10 horas com o mesmo ligado.
Nota:
A bateria integrada que alimenta o relógio de tempo
real (RTC) do dispositivo pode descarregar durante o
transporte ou o armazenamento prolongados. É
recomendável recarregar a bateria do RTC para
garantir o bom funcionamento do relógio do
dispositivo.
Para carregar completamente a bateria do RTC, os
seguintes requisitos devem ser cumpridos:
a) As baterias de lítio recarregáveis devem estar
instaladas no dispositivo.
b) O dispositivo deve funcionar durante mais de
10 horas antes de ser desligado.
Passos:
1. Segure no dispositivo e prima os dois trincos de fixação
da bateria do dispositivo.
La pagina sta caricando ...
La pagina sta caricando ...
La pagina sta caricando ...
La pagina sta caricando ...
La pagina sta caricando ...
La pagina sta caricando ...
La pagina sta caricando ...
La pagina sta caricando ...
La pagina sta caricando ...
La pagina sta caricando ...
La pagina sta caricando ...
La pagina sta caricando ...
La pagina sta caricando ...
La pagina sta caricando ...
La pagina sta caricando ...
La pagina sta caricando ...
La pagina sta caricando ...
La pagina sta caricando ...
La pagina sta caricando ...
La pagina sta caricando ...
La pagina sta caricando ...
La pagina sta caricando ...
La pagina sta caricando ...
La pagina sta caricando ...
La pagina sta caricando ...
La pagina sta caricando ...
La pagina sta caricando ...
La pagina sta caricando ...
La pagina sta caricando ...
La pagina sta caricando ...
La pagina sta caricando ...
La pagina sta caricando ...
La pagina sta caricando ...
La pagina sta caricando ...
La pagina sta caricando ...
La pagina sta caricando ...
La pagina sta caricando ...
La pagina sta caricando ...
La pagina sta caricando ...
La pagina sta caricando ...
La pagina sta caricando ...
La pagina sta caricando ...
La pagina sta caricando ...
La pagina sta caricando ...
La pagina sta caricando ...
La pagina sta caricando ...
La pagina sta caricando ...
La pagina sta caricando ...
La pagina sta caricando ...
La pagina sta caricando ...
La pagina sta caricando ...
La pagina sta caricando ...
La pagina sta caricando ...
La pagina sta caricando ...
La pagina sta caricando ...
La pagina sta caricando ...
La pagina sta caricando ...
La pagina sta caricando ...
La pagina sta caricando ...
-
 1
1
-
 2
2
-
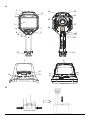 3
3
-
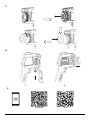 4
4
-
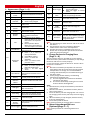 5
5
-
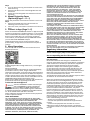 6
6
-
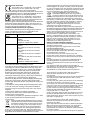 7
7
-
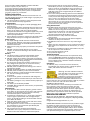 8
8
-
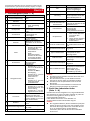 9
9
-
 10
10
-
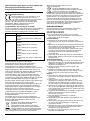 11
11
-
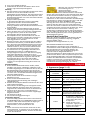 12
12
-
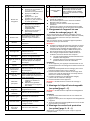 13
13
-
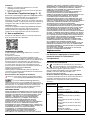 14
14
-
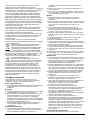 15
15
-
 16
16
-
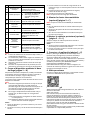 17
17
-
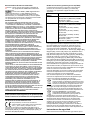 18
18
-
 19
19
-
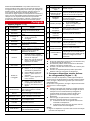 20
20
-
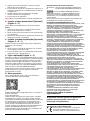 21
21
-
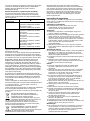 22
22
-
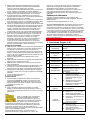 23
23
-
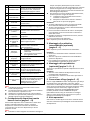 24
24
-
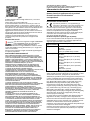 25
25
-
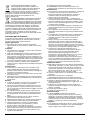 26
26
-
 27
27
-
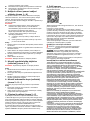 28
28
-
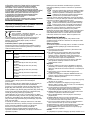 29
29
-
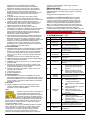 30
30
-
 31
31
-
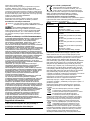 32
32
-
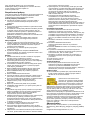 33
33
-
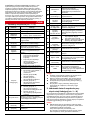 34
34
-
 35
35
-
 36
36
-
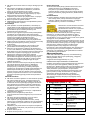 37
37
-
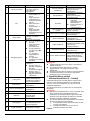 38
38
-
 39
39
-
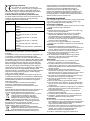 40
40
-
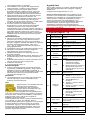 41
41
-
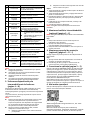 42
42
-
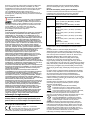 43
43
-
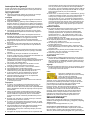 44
44
-
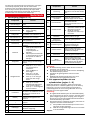 45
45
-
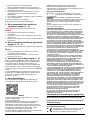 46
46
-
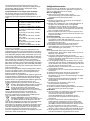 47
47
-
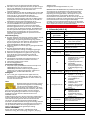 48
48
-
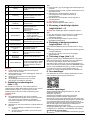 49
49
-
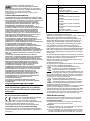 50
50
-
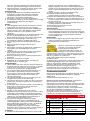 51
51
-
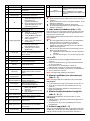 52
52
-
 53
53
-
 54
54
-
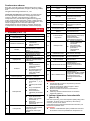 55
55
-
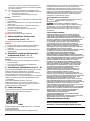 56
56
-
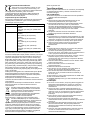 57
57
-
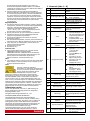 58
58
-
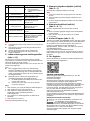 59
59
-
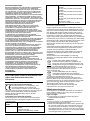 60
60
-
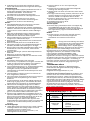 61
61
-
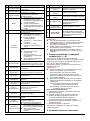 62
62
-
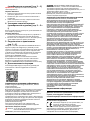 63
63
-
 64
64
-
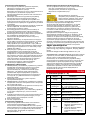 65
65
-
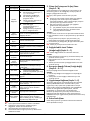 66
66
-
 67
67
-
 68
68
-
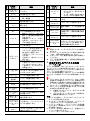 69
69
-
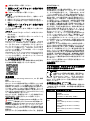 70
70
-
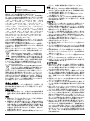 71
71
-
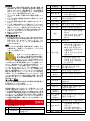 72
72
-
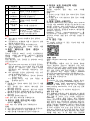 73
73
-
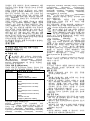 74
74
-
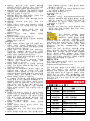 75
75
-
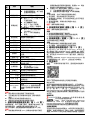 76
76
-
 77
77
-
 78
78
-
 79
79


in altre lingue
Documenti correlati
-
HIKMICRO Mini Series Guida Rapida
-
HIKMICRO E Series Guida utente
-
 HIKMICRO Battery Chargers Guida Rapida
-
 HIKMICRO Owl Guida Rapida
-
 HIKMICRO LYNX Pro Guida Rapida
-
 HIKMICRO FB series Guida Rapida
-
 HIKMICRO M Series Handheld Thermography Camera Guida utente
-
 HIKMICRO Pocket Series Guida Rapida
-
HIKMICRO G Series Guida utente
-
 HIKMICRO ALPEX Guida Rapida


