
Hardware Review
A
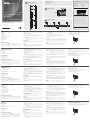
Front View
1. Power Cord
2. Circuit Breaker
3. Power Outlet
4. Sensor Ports
5. LAN Port and LEDs
6. Readout Section, LEDs and Reset Switch
Readout Section
B
1. Reset Switch
2. Selection Pushbutton
3. Readout Section
4. ID Section
5. LEDs
Hardware Setup
C
To set up your eco PDU installation, refer to the installation diagram (the numbers in
the diagram correspond to the numbered steps), and do the following:
1. For each device you want to connect, use its power cable to connect from the
device's AC socket to any available outlet on the eco PDU. Use ATEN Lok-U-Plug
cable holders to secure them (Optional).
2. Plug the cable that connects the eco PDU to the LAN into the eco PDU's LAN
port.
3. If you are using sensors in your eco PDU installation, connect them to the sensor
ports on the unit’s front panel.
Note: Sensors are optional.
4. Connect the eco PDU's power cord to an AC power source.
Note: We strongly advise that you do not plug the eco PDU into a multi socket
extension cord, since it may not receive enough amperage to operate
correctly.
Once you have fi nished these installation steps, you can turn on the eco PDU and
the connected devices.
Note: We strongly recommend using cable ties and cable bars to safely and securely
route the cables attached to the front of the unit.
Operation
NRGence eco PDU models provide three methods to access and manage your
installation: Browser, eco Sensors (eco PDU Management Software), and SNMP.
Browser
eco PDU can be accessed and controlled via any supported Internet browser from
any platform.
To operate the eco PDU from an Internet browser, begin by logging in:
1. Open your browser and specify the IP address of the eco PDU you want to access
in the browser's URL location bar.
Note: You can get the IP address from the eco PDU administrator, or see the "IP
Address Determination" section of the user manual. (Default IP Address:
192.168.0.60)
2. If a Security Alert dialog box appears, accept the certifi cate – it can be trusted.
The Login page appears:
3. Provide a valid Username and Password, and select your language.
Note: If you are logging in for the fi rst time, use the default Username:
administrator; and the default Password: password.
4. Then Click Login to bring up the browser Main Page.
eco Sensors
All eco PDUs support eco Sensors (eco PDU Manager Software). NRGence eco
Sensors provides you with an easy method for managing multiple devices, offering
an intuitive and user-friendly Graphical User Interface that allows you to confi gure a
PDU device and monitor power status of the equipment connected to it. NRGence
eco Sensors can be found on the software CD provided with the eco PDU package.
SNMP
NRGence eco PDUs support any 3rd party V1, V2 & V3 SNMP Manager Software.
SNMP Management Information Database (MIB) fi les for the eco PDU device can be
found on the software CD provided with the eco PDU package.
Securing the Cables
For added safety, use ATEN Lok-U-Plug cable holders to secure the cables from your
attached devices in place on the eco PDU unit.
• 2X-EA07 Lok-U-Plug Cable Holder (10 pcs)
• 2X-EA08 Lok-U-Plug Installation Tool (4 pcs)
Package Contents
1 PE5324TA/PE5342TB/PE5342TG eco PDU
1 Mounting Kits
1 User Instructions
© Copyright 2015 ATEN
®
International Co., Ltd.
ATEN and the ATEN logo are trademarks of ATEN International Co., Ltd. All rights reserved. All
other trademarks are the property of their respective owners.
This product is RoHS compliant.
Part No. PAPE-1224-F00G Printing Date: 08/2015
eco PDU
Quick Start Guide
PE5324TA/PE5342TB/PE5342TG
PE5324TA / PE5342TB / PE5342TG eco PDU Quick Start Guide
www.aten.com
PE5324TA / PE5342TB / PE5342TG eco PDU Guide de démarrage rapide
www.aten.com
PE5324TA / PE5342TB / PE5342TG eco PDU Kurzanleitung
www.aten.com
PE5324TA / PE5342TB / PE5342TG eco PDU Guía rápida
www.aten.com
PE5324TA / PE5342TB / PE5342TG eco PDU Guida rapida
www.aten.com
ATEN NRGence
™
Presentación del hardware
A
Vista frontal
1. Cable de alimentación
2. Disyuntores
3. Salida de alimentación
4. Puertos para sensores
5. Puerto LAN e indicadores LED
6. Sección de lectura, LEDs de estado e interruptor de reseteo
Sección de lectura
B
1. Interruptor de reseteo
2. Pulsador de selección
3. Sección de lectura
4. Seccion de ID
5. Indicadores LED
Instalación del hardware
C
Para instalar la eco PDU, véase el diagrama de instalación (los números del
diagrama corresponden a los diferentes pasos a seguir) y proceda como se indica a
continuación:
1. Para cada dispositivo que desee conectar, enchufe su cable de alimentación a una
toma eléctrica de salida de la eco PDU. Emplee sujetadores para cables de tipo U
especiales de ATEN para fi jarlos (opcional).
Description du matériel
A
Vue avant
1. Câble d’alimentation
2. Disjoncteurs
3. Sortie d’alimentation
4. Ports pour capteurs
5. Port LAN et voyants
6. Zone d’affi chage, voyants et bouton de réinitialisation
Section d’affi chage
B
1. Bouton de réinitialisation
2. Bouton de sélection
3. Section d’affi chage
4. Section d’ identifi cation
5. Voyants
Confi guration matérielle
C
Pour l’installation de votre unité d’alimentation eco PDU, reportez-vous au schéma
d’installation (les numéros du schéma correspondent aux étapes numérotées ci-
dessous) et procédez comme suit :
1. Pour chaque appareil que vous souhaitez connecter, utilisez son câble
d’alimentation pour relier la prise CA de l’appareil à n’importe quelle sortie
disponible de l’unité d’alimentation eco PDU. Pour fi xer les câbles, utilisez les
supports de câble Lock-U-Plug ATEN (en option).
Hardwareübersicht
A
Vorderseitige Ansicht
1. Netzkabel
2. Leistungsschutzschalter
3. Ausgangsseitige Steckdose
4. Sensorports
5. LAN-Port und LED-Anzeigen
6. Readout-Abschnitt, LEDs für Zustandsanzeige und Reset-Taste
Readout-Abschnitt
B
1. Schalter zum Zurücksetzen
2. Auswahl-Drucktaste
3. Readout-Abschnitt
4. ID-Abschnitt
5. LED-Anzeigen
Hardware installieren
C
Zur Installation einer eco PDU, siehe das Installationsdiagramm (die Nummern im
folgenden Diagramm entsprechen der Reihenfolge). Gehen Sie wie folgt vor:
1. Verbinden Sie jedes anzuschließende Gerät mit einer freien Steckdose an der eco
PDU. Verwenden Sie dazu das jeweilige Netzkabel des betreffenden Gerätes.
Sichern Sie die Kabel mit den speziellen Kabelhaltern (U-Klemmen) von ATEN
(optional).
2. Enchufe el cable que conecta la eco PDU a la red informática en el puerto LAN de
la eco PDU.
3. Si desea instalar sensores en el sistema eco PDU, conéctelos a los puertos para
sensores ubicados en el panel frontal.
Nota: Los sensores son opcionales.
4. Conecte el cable de alimentación de la eco PDU a una toma eléctrica.
Nota: Le advertimos que no debe conectar la eco PDU a una toma múltiple
de un cable de extensión, dado que posiblemente no reciba la corriente
sufi ciente para funcionar sin problemas.
Cuando haya completado todos los pasos de la instalación, podrá encender la eco
PDU y los dispositivos conectados.
Nota: Le recomendamos que emplee bridas y canaletas para instalar los cables de
forma segura en la parte anterior de la unidad.
Funcionamiento
Los modelos de unidades de distribución de alimentación NRGence eco PDU
ofrecen varios métodos para acceder a y para administrar su instalación: navegador,
software eco Sensors (de administración de eco PDU) y SNMP.
Navegador
Puede acceder a la eco PDU a través de un navegador Web, independientemente de
la plataforma informática.
Para utilizar la eco PDU mediante un navegador Web, empiece por conectarse:
1. Abra el navegador Web e indique la dirección IP de la eco PDU en la barra de
direcciones URL del navegador.
2. Branchez le câble qui relie l’unité d’alimentation eco PDU au réseau LAN dans le
port LAN de l’unité d’alimentation eco PDU.
3. Si vous utilisez des capteurs dans le cadre de l’installation de votre unité
d’alimentation eco PDU, raccordez-les aux ports pour capteurs situés sur le
panneau avant de l’appareil.
Remarque : les capteurs sont en option.
4. Connectez le câble d’alimentation de l’unité d’alimentation eco PDU à une source
d’alimentation CA.
Remarque : nous vous déconseillons fortement de brancher l’unité d’alimentation
eco PDU sur une rallonge multiprise car elle ne recevra peut-être
pas un ampérage suffi sant pour pouvoir fonctionner correctement.
Une fois les étapes d’installation terminées, vous pouvez allumer l’unité
d’alimentation eco PDU et les périphériques connectés.
Remarque : il est fortement recommandé d’utiliser des attaches de câble et
des barres guide-câble pour acheminer en toute sécurité les câbles
raccordés à l’avant de l’unité.
Fonctionnement
Les unités d’alimentation eco PDU NRGence offrent trois méthodes permettant
d’accéder à votre installation et de la gérer : navigateur, eco Sensors (logiciel de
gestion de l’énergie de l’unité d’alimentation eco PDU) et SNMP.
Navigateur
On peut accéder à l’unité d’alimentation eco PDU par le biais de n’importe quel
navigateur Internet pris en charge et sur n’importe quelle plate-forme.
Pour utiliser l’unité d’alimentation eco PDU à l'aide d'un navigateur Internet,
2. Verbinden Sie die eco PDU mit Ihrem lokalen Netzwerk. Verbinden Sie dazu das
Netzwerkkabel mit dem LAN-Anschluss der eco PDU.
3. Wenn Sie Sensoren für die eco PDU verwenden, schließen Sie diese an die
Sensorports auf der Gerätevorderseite an.
Hinweis: Die Sensoren sind optional.
4. Verbinden Sie das Netzkabel der PDU mit dem Wechselstromnetz.
Hinweis: Schließen Sie die PDU keinesfalls an eine Mehrfachsteckdose an, da die
verfügbare Stromstärke bei hoher Belastung zu niedrig sein könnte.
Nachdem Sie die Installation beendet haben, können Sie die eco PDU und die
angeschlossenen Geräte einschalten.
Hinweis: Wir empfehlen, Kabelbinder und Kabelkanäle zu verwenden, um die
Sicherheit zu erhöhen, sowie die Kabel zusammengebunden vor dem
Gerät entlang zu führen.
Bedienung
Sie können auf die NRGence eco PDU-Modelle folgendermaßen zugreifen und
die Installation verwalten: Browser, eco Sensors-Software (zur Verwaltung von eco
PDUs) und SNMP.
Browser
Sie können auf die eco PDU über einen Web-Browser zugreifen. Das Betriebssystem
spielt dabei keine Rolle.
Um die eco PDU über einen Web-Browser zu bedienen, müssen Sie sich zunächst
anmelden:
Nota: Puede pedirle la dirección IP a su administrador de la eco PDU o consultar
el capítulo “IP Address Determination” (Determinar la dirección IP) del
manual del usuario para averiguar cómo determinarla. (Dirección IP
predeterminada: 192.168.0.60)
2. En caso de que aparezca un cuadro de diálogo "Advertencia de seguridad",
acepte el certifi cado. Aparecerá la página de inicio de sesión:
3. Escriba un nombre de usuario y una contraseña válidos y seleccione su idioma.
Nota: Si se va a conectar por primera vez, el nombre de usuario predeterminado
es: administrator; y la contraseña predeterminada es: password.
4. Haga clic en “Iniciar sesión” para abrir la página principal.
eco Sensors
Todas las unidades eco PDU admiten el software eco Sensors (software de
administración de unidades de distribución de alimentación eco PDU). NRGence
eco Sensors le ofrece funciones de administración de múltiples dispositivos, en una
interfaz gráfi ca de usuario intuitiva y fácil de usar. Con ella podrá confi gurar un
dispositivo PDU y monitorizar el estado de la alimentación eléctrica de los equipos
que tiene conectados a ésta. NRGence eco Sensors se encuentra en el CD de
software incluido con el paquete de la eco PDU.
SNMP
Las unidades NRGence eco PDU admiten programas de administración V1, V2 y
V3 basados en SNMP de otros fabricantes. Los archivos para la base de datos de
administración SNMP (MIB) para el dispositivo eco PDU se encuentran en el CD de
software incluido.
commencez par vous connecter :
1. Ouvrez votre navigateur et saisissez l'adresse IP de l'unité d'alimentation eco PDU
à laquelle vous voulez accéder dans la barre d'adresses URL du navigateur.
Remarque : pour obtenir l’adresse IP, contactez l’administrateur de l’unité
d’alimentation eco PDU ou consultez la section « Détermination
de l’adresse IP » du manuel d’utilisation. (Adresse IP par défaut :
192.168.0.60)
2. Si une boîte de dialogue d’alerte de sécurité apparaît, acceptez le certifi cat : vous
pouvez vous y fi er. La page de connexion s'affi che :
3. Entrez un nom d'utilisateur et un mot de passe corrects, puis sélectionnez votre
langue.
Remarque : si vous vous connectez pour la première fois, indiquez le nom
d'utilisateur par défaut administrator, et le mot de passe par défaut
: password.
4. Cliquez ensuite sur Login (Connexion) pour faire apparaître la page principale
dans le navigateur.
eco Sensors
L’unité d’alimentation eco PDU prend en charge le logiciel eco Sensors (logiciel
de gestion de l’unité d’alimentation eco PDU). NRGence eco Sensors constitue
un moyen simple de gérer plusieurs périphériques, qui passe par une interface
graphique utilisateur intuitive et conviviale vous permettant de confi gurer une unité
d’alimentation et de surveiller le statut de l’alimentation des équipements qui y sont
connectés. Le logiciel NRGence eco Sensors est disponible sur le CD fourni avec
l’unité d’alimentation eco PDU.
1. Öffnen Sie Ihren Web-Browser, und geben Sie in die Adressleiste des Browsers die
IP-Adresse der eco PDU ein, die Sie verwalten möchten.
Hinweis: Sie können die IP-Adresse bei Ihrem eco PDU-Administrator erfragen
oder im Abschnitt „IP Address Determination“ (IP-Adresse feststellen)
des Benutzerhandbuchs nachsehen, wie Sie sie anderweitig
herausfi nden können. (Voreingestellte IP-Adresse: 192.168.0.60)
2. Falls ein Sicherheitshinweis erscheint, akzeptieren Sie das Zertifi kat – es ist
vertraulich. Ein Anmeldebildschirm erscheint:
3. Geben Sie Benutzernamen und Kennwort ein, und wählen Sie Ihre Sprache aus.
Hinweis: Wenn Sie sich zum ersten Mal anmelden, lautet der voreingestellte
Benutzername: administrator; das Standardkennwort lautet: password.
4. Klicken Sie anschließend auf Anmelden, um das Hauptmenü zu öffnen.
eco Sensors
Alle eco PDUs unterstützen die PDU-Verwaltungssoftware eco Sensors. Mit
NRGence eco Sensors können Sie schnell und einfach zahlreiche Geräte verwalten.
Sie besitzt eine intuitive und benutzerfreundliche grafi sche Benutzeroberfl äche, über
die Sie Ihre PDU-Geräte konfi gurieren und den Zustand der Stromversorgung aller
angeschlossenen Geräte überwachen können. NRGence eco Sensors befi ndet sich
auf der Software-CD, die zum eco PDU-Paket gehört.
SNMP
Die NRGence eco PDUs unterstützen auch handelsübliche V1-, V2- sowie V3-
Verwaltungssoftware für SNMP anderer Hersteller. Die Dateien der SNMP-
Instalar los cables de forma segura
Para una mayor seguridad, fi je los cables de los dispositivos conectados a la unidad
eco PDU con los sujetadores Lok-U-Plug especiales de ATEN.
• Sujetadores de cables 2X-EA07 Lok-U-Plug (10 unidades)
• Herramientas de instalación 2X-EA08 Lok-U-Plug (4 unidades)
SNMP
Les unités d’alimentation eco PDU NRGence prennent en charge n’importe
quel logiciel de gestion de protocole SNMP V1, V2 et V3 tiers. Les fi chiers MIB
(Management Information Base) pour protocole SNMP sont disponibles sur le CD
fourni avec l’unité d’alimentation eco PDU.
Fixation des cables
Pour augmenter la sécurité, utilisez les supports de câble Lok-U-Plug ATEN pour fi xer
les câbles provenant de vos appareils sur l’unité d’alimentation éco.
• Support de câble Lok-U-Plug 2X-EA07 (10 pièces)
• Support de câble Lok-U-Plug 2X-EA08 (4 pièces)
Verwaltungsinformationsdatenbank (MIB) für die eco PDU-Geräte befi nden sich auf
der mitgelieferten Software-CD.
Kabel sicher verlegen
Verwenden Sie zur Sicherheit die Lok-U-Plug-Kabelhalter von ATEN, um die von den
angeschlossenen Geräten verlegten Kabel an der eco PDU zu sichern.
• 2X-EA07 Lok-U-Plug Kabelhalter (10 Stk.)
• 2X-EA08 Lok-U-Plug Einbauwerkzeuge (4 Stk.)
Hardware
A
Vista anteriore
1. Cavo di alimentazione
2. Interruttori
3. Presa di alimentazione in uscita
4. Porte sensori
5. Porta e LED LAN
6. Sezione di lettura, LED di stato e interruttore di ripristino
Sezione di lettura
B
1. Interruttore di ripristino
2. Pulsante di selezione
3. Sezione di lettura
4. Sezione ID
5. LED
Impostazione hardware
C
Per effettuare un’installazione eco PDU, fare riferimento all’illustrazione (i numeri
nella fi gura corrispondono ai vari passi delle istruzioni) e procedere come segue:
1. Per ogni dispositivo da collegare, utilizzare il relativo cavo d’alimentazione per
connettere la presa CA del dispositivo con una qualsiasi presa disponibile dell’eco
PDU. Utilizzare i passacavi ATEN con chiusura di sicurezza a U (opzionale).
2. Collegare il cavo di connessione fra l’eco PDU e la LAN alla porta LAN dell’eco
PDU.
3. Se l’installazione eco PDU fa uso di sensori, collegarli alle relative porte sul
pannello anteriore del dispositivo.
Nota: i sensori sono opzionali.
4. Collegare il cavo d’alimentazione dell’eco PDU a una presa d’alimentazione CA.
Nota: Non collegare il dispositivo eco PDU a una prolunga con prese multiple,
in quanto potrebbe ricevere un amperaggio insuffi ciente per funzionare
correttamente.
Una volta terminata l’installazione, accendere l’eco PDU e i dispositivi collegati.
Nota: Si consiglia di utilizzare gli appositi stringi cavi e barrette per arrotolare in
maniera sicura ed effi cace i cavi collegati al davanti del dispositivo.
Funzionamento
I modelli di eco PDU NRGence offrono tre metodi per accedere e gestire l’installazione:
browser, eco Sensors (eco PDU Management Software), e SNMP.
Browser
È possibile accedere e controllare l’eco PDU da qualsiasi piattaforma tramite un
browser Internet supportato.
Per utilizzare l’eco PDU tramite un browser Internet, per prima cosa effettuare
l’accesso:
1. Aprire il browser e digitare nella barra degli indirizzi l’indirizzo IP dell’eco PDU a cui
si vuole accedere.
Nota: per reperire l’indirizzo IP dell’eco PDU, rivolgersi all’amministratore o
consultare la sezione “Determinare l’indirizzo IP” del manuale dell’utente.
(Indirizzo IP predefi nito: 192.168.0.60)
2. Quando apparirà la fi nestra di dialogo Security Alert (Avviso di Sicurezza),
accettare la certifi cazione – è affi dabile. Apparirà una pagina di login:
3. Immettere nome utente e password validi e scegliere la lingua.
Nota: se si sta effettuando il primo accesso, utilizzare il Nome utente predefi nito:
administrator (amministratore) e la password predefi nita: password.
4. Fare poi clic su Login per accedere alla pagina principale del browser.
eco Sensors
L’eco PDU supporta eco Sensors (software di gestione eco PDU). NRGence eco
Sensors offre un metodo semplice per gestire più dispositivi, grazie a un’interfaccia
utente grafi ca user-friendly che consente di confi gurare un dispositivo PDU e di
monitorare lo stato dell’alimentazione delle apparecchiature a esso collegate.
NRGence eco Sensors si trova sul CD software fornito con il pacchetto eco PDU.
SNMP
Le eco PDU NRGence supportano qualsiasi software di gestione V1, V2 e V3 SNMP
di terze parti. I fi le SNMP Management Information Database (MIB) per il dispositivo
eco PDU sono presenti sul CD software in dotazione con il pacchetto eco PDU.
Messa in sicurezza dei cavi
Per una maggiore sicurezza, utilizzare i passacavi ATEN con chiusura di sicurezza
Lok-U-Plug per mettere in sicurezza i dispositivi collegati con l'unità eco PDU.
• Passacavo con chiusura di sicurezza Lok-U-Plug 2X-EA07 (10 pz)
• Strumento d’installazione con chiusura di sicurezza Lok-U-Plug 2X-EA08 (4 pz)
B
C
Readout Section
Hardware Setup
Important Notice
Considering environmental protection, ATEN does not provide a fully
printed user manual for this product. If the information contained in the
Quick Start Guide is not enough for you to confi gure and operate your
product, please visit our website www.aten.com, and download
the full user manual.
Online Registration
http://eservice.aten.com
Technical Phone Support
International:
886-2-86926959
All information, documentation, firmware, software utilities, and
specifi cations contained in this package are subject to change without
prior notification by the manufacturer. Please visit our website http://
www.aten.com/download/?cid=dds for the most up-to-date versions.
The following contains information that relates to China:
North America:
1-888-999-ATEN Ext: 4988
United Kingdom:
44-8-4481-58923
EMC Information
FEDERAL COMMUNICATIONS COMMISSION INTERFERENCE STATEMENT:
This equipment has been tested and found to comply with the limits for a Class A
digital device, pursuant to Part 15 of the FCC Rules. These limits are designed to provide
reasonable protection against harmful interference when the equipment is operated
in a commercial environment. This equipment generates, uses, and can radiate radio
frequency energy and, if not installed and used in accordance with the instruction
manual, may cause harmful interference to radio communications. Operation of this
equipment in a residential area is likely to cause harmful interference in which case the
user will be required to correct the interference at his own expense.
FCC Caution: Any changes or modifi cations not expressly approved by the party
responsible for compliance could void the user's authority to operate this equipment.
CE Warning: This is a class A product. In a domestic environment this product may cause
radio interference in which case the user may be required to take adequate measures.
This device complies with Part 15 of the FCC Rules. Operation is subject to the following
two conditions:(1) this device mat not cause harmful interference, and(2) this device
must accept any interference received, including interference that may cause undesired
operation.
1
2
3
4
5
6
3
PE5342TB / PE5342TG PE5324TA
3
5
1
24
1
1
2
3
A
Hardware Review
La pagina sta caricando ...
-
 1
1
-
 2
2


ATEN PE5324TA Guida Rapida
- Tipo
- Guida Rapida
in altre lingue
- English: ATEN PE5324TA Quick start guide
- français: ATEN PE5324TA Guide de démarrage rapide
- español: ATEN PE5324TA Guía de inicio rápido
- Deutsch: ATEN PE5324TA Schnellstartanleitung
- русский: ATEN PE5324TA Инструкция по началу работы
- português: ATEN PE5324TA Guia rápido
- 日本語: ATEN PE5324TA クイックスタートガイド