
Warm Crystal
User manual | Manual de instrucciones


4
INDEX
ENGLISH
Security instructions 6
Installation instructions 8
Leg installation 8
Wall installation 8
Heater control panel 9
Wifi connection 10
Using the create home app 11
Heater control 11
Schedule the heater 11
Other features 11
Cleaning and care 12
Maintenance 12
Storage 12
ESPAÑOL
Instrucciones de seguridad 13
Instrucciones de instalación 15
Instalación de las patas 15
Instalación en pared 15
Panel de control del calefactor 16
Conexión wifi 17
Uso de la app create home 18
Control del calefactor 18
Programar el calefactor 18
Otras características 18
Limpieza y cuidado 19
Mantenimiento 19
Almacenaje 19
PORTUGUÊS
Instruções de segurança 20
Instruções de instalação 22
Instalação da perna 22
Instalação na parede 22
Painel de controle do aquecedor 23
Conexão wifi 24
Usando o aplicativo criar casa 25
Controle do aquecedor 25
Programe o aquecedor 25
Outras características 25
Limpeza e cuidados 26
Manutenção 26
Armazenar 26
FRANÇAIS
Consignes de sécurité 27
Instructions d'installation 29
Installation des jambes 29
Montage mural 29
Panneau de commande de chauffage 30
Connexion Wifi 31
Utilisation de l'application
de création d'accueil 32
Commande de chauffage 32
Programmer le chauffage 32
Autres caractéristiques 32
Nettoyage et entretien 33
Entretien 33
Stockage 33

5
ITALIANO
Istruzioni di sicurezza 34
Istruzioni per l'installazione 36
Installazione della gamba 36
Installazione a parete 36
Pannello di controllo del riscaldatore 37
Connessione wifi 38
Utilizzando l'app crea casa 39
Controllo del riscaldatore 39
Pianifica il riscaldamento 39
Altre caratteristiche 39
Pulizia e cura 40
Manutenzione 40
Magazzinaggio 40
DEUTSCH
Sicherheitshinweise 41
Installationsanleitung 43
Beininstallation 43
Wandmontage 43
Heizungsbedienfeld 44
Wifi verbindung 45
Mit der create home-app 46
Heizungssteuerung 46
Planen sie die heizung 46
Andere eigenschaften 46
Reinigung und pflege 47
Wartung 47
Lagerung 47
NEDERLANDS
Beveiligingsinstructies 48
Installatie instructies 50
Been installatie 50
Muur installatie 50
Bedieningspaneel van de verwarming 51
Wifi verbinding 52
De create home-app gebruiken 53
Verwarming controle 53
Plan de verwarming 53
Andere mogelijkheden 53
Reiniging en verzorging 54
Onderhoud 54
Opslag 54
POLSKI
Instrukcje bezpieczeństwa 55
Instrukcje instalacji 57
Instalacja nóg 57
Instalacja na ścianie 57
Panel sterowania nagrzewnicą 58
Połączenie wifi 59
Korzystanie z aplikacji
do tworzenia domu 60
Sterowanie grzałką 60
Zaplanuj grzejnik 60
Inne funkcje 60
Czyszczenie i pielęgnacja 61
Konserwacja 61
Magazynowanie 61
INDEX

6ENGLISH
ENGLISH
Thank you very much for choosing our heater. Before using the appliance, read these instruc-
tions carefully for its correct use.
The listed safety precautions will reduce the risk of death, injury and electric shock if strict-
ly followed. Keep this manual in a safe place for future reference, along with the original
product packaging and proof of purchase. If possible, pass these instructions on to the next
owner of the appliance. Follow basic safety precautions and accident prevention rules at all
times when using an appliance. We decline all liability arising from non-compliance with
these instructions by the client.
SECURITY INSTRUCTIONS
When using any appliance, basic safety measures must be respected
at all times:
• Before use, check that the heater and all supplied accessories are
complete and intact.
• The heater must be installed following the installation instructions.
The heater must be plugged into an outlet that meets the following
requirements: 220-240 V AC, frequency 50/60 Hz.
• The heater is only suitable for indoor use. Do not use it outdoors.
• Do not leave heater unattended during use. Keep the heater out of the
reach of children, as there is a risk of burns.
• Do not use an external controller with the heater.
• Do not use the heater near ammable or explosive materials, as there
is a risk of re or explosion.
• It is strictly forbidden to insert objects into the protection grille of the
heater, as there is a risk of electric shock.
• Do not touch the metal casing as it becomes hot during use and you
may be at risk of burns. Wait for the heater to cool down before put-
ting it away.
• Unplug the heater if it is not going to be used for a long period of time.
• Before using the electric heater, check that it is in good condition and
intact. Do not plug in or use heater if housing, cord, or plug is damaged.
• The heating element could be damaged if the heater is dropped or hit.
Check the heating element for damage before each use. Do not use
the heater if it is broken.
• Disconnect plug from outlet when moving or cleaning heater. At the
time of disconnection, please turn off the switch rst, then unplug
the plug. Do not pull on the cord.

7
ENGLISH
• It is strictly forbidden to destroy the electric heater without authoriza-
tion. If the heater is damaged, seek the help of a professional service.
• The product is exclusively for domestic use.
• During use, do not allow direct contact of the surface of the device
with the skin, as there is a risk of burns.
• Do not share the electrical outlet of the heater with other appliances,
as there is a risk of re due to excessive load.
CAUTION: Do not cover the heater, as there is a risk of overheating and re.
• The heater should not be located directly below an electrical outlet.
• If the power cord is damaged, it must be replaced by the manufactur-
er, its service agent or a qualied person in order to avoid a hazard.
• Avoid using an extension cord as it may overheat and cause a re hazard.
• This heater is not intended for use in bathrooms, laundry areas, or
similar locations where moisture may be present. Do not place heater
where it could fall into a bathtub or other container of water.
• Do not use the heater near a bathtub, shower or swimming pool.
• Children under three years of age should be kept away from the appli-
ance if they are not going to be continuously supervised.
• Children between the ages of three and eight may only turn the ap-
pliance on and off if the appliance is placed or installed in its nor-
mal operating position, they have been instructed in how to use the
appliance safely, and they understand the hazards involved. Children
between the ages of three and eight are not allowed to plug in, adjust
or clean the appliance, or carry out maintenance work.
• This appliance can be used by children aged from eight years and
above and persons with reduced physical, sensory or mental capabili-
ties, as well as persons with lack of experience and knowledge if they
have been given supervision or instruction concerning its safe use
and understand the hazards. potential partners. Children must not
play with this appliance. Children will not be able to carry out clean-
ing and maintenance tasks without supervision.
CAUTION: Some parts of this product can become very hot and cause
burns. Pay special attention if there are children and vulnerable people.

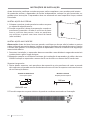
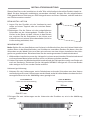
8ENGLISH
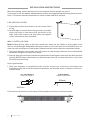
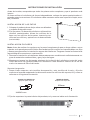
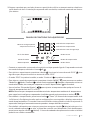
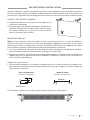
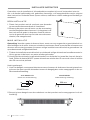
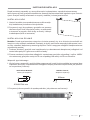
2. Attach two brackets to the bottom of the product as shown in the illustration.
INSTALLATION INSTRUCTIONS
Before installing, check that all parts are complete and the product is intact.
If you want to use the heater independently, attach the supplied feet following these instruc-
tions. The heater must be mounted on a clean, stable and level surface.
1. Place the product face down on a soft cotton cloth
or rug.
2. Attach legs to heater base using screws provided.
Align the holes in the base with the holes in the
legs, insert the screws into the holes and tighten
with a screwdriver (not included).
Hook type bracket.
1. Take four brackets, six expansion bolts and six screws out of the box, and attach two
brackets to the wall with the distances between the bracket holes as shown in the illus-
tration below.
LEG INSTALLATION
WALL INSTALLATION
ALL THE MODELS
Holes for support
UNIT:mm
1500W MODEL
Support separation
816
50
8320mm
Note: Before drilling holes in the wall, make sure there are no cables or other pipes in the
wall to avoid damage. Remember that the screws on the wall must be xed and rm to en-
sure the safe installation of the heater. Please note the safety distance mentioned below.
1. During installation, the heater must be kept at a safe enough distance from combustible
materials and gas and away from water.
2. Always keep the minimum installation distances of the heater from both the oor and the
ceiling. NEVER place the heater at a distance less than 15 cm from the oor or less than
50 cm from the ceiling.

9
ENGLISH
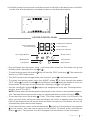
3. Hold the product from one side, note the position of the hole on the back cover, and slide it
into the slot. Wall installation is nished, as shown in the illustration below.
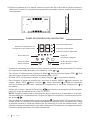
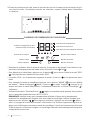
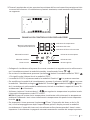
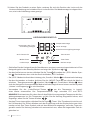
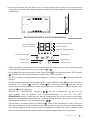
HEATER CONTROL PANEL
• Plug the heater into the power outlet, it will beep when turned on. The heater will go into
standby mode, displaying the icon Y .
• To start heating, press the button . You will see the “ECO” mode icon . This means the
device is in “ECO” mode status.
• The “ECO” mode is the average power, the “Comfort” mode is the maximum power.
• To change the heating mode, press the “MODE” button to cycle through the modes:
“ECO” mode ,“Comfort” mode and “Antifreeze” mode . When the heater is in the se-
lected mode, it will begin to heat up and the “Heating” icon it will light up.
• Use the “Left/Right” buttons to adjust the temperature in any way. The temperature
range is from 5°C to 50°C.
NOTE: Please note that the temperature displayed on the screen is the ambient tempera-
ture. The temperature you set the heater to is displayed when you press the keys .
• To set the timer, press the button “Timer” (The timer range is from 1 to 24 hours.) The
digits will ash after setting and then the display will return to heating mode. The timer
icon will be displayed on the screen when the timer has been set. The heater will turn off
automatically when the set time elapses.
• To set the child lock, press and hold the button (right) until the padlock icon appears
on the screen, then the control panel will be locked. To unlock, press and hold the
button (left) . The padlock icon will disappear and all buttons can be used again.
Show temperature
or timer setting
Temperature indicator
Timer indicator
Safety lock indicator
Timer button
Button on/off
Wi-Fi/Light Button
Mode button
Left button Right button
min.
15cm

10 ENGLISH
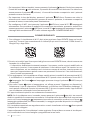
2. Download and install the app. If you do not already have a CREATE Home account, you will
need to create one by clicking Register.
• The device will automatically determine your country, although you can change it if nec-
essary. Enter your phone number or your email address. If you enter a phone number, a
verication number will be sent to your phone; enter this number for approval and then
create a password. If you enter your email address, you will need to create a password.
3. To add your heater to the app, rst put it in Wi-Fi connection mode. The heater is in Wi-Fi
connection mode when the Wi-Fi icon ashes. If the icon does not ash, long press
the button WIFI/light for three seconds.
4. Once the icon starts ashing, go to the app and press “Add a device”. Select the type
of device (Heater) and conrm that the indicator is ashing. You will then be prompted to
enter your home WiFi password. In this way, the app will nd your heater using your Wi-Fi
connection.
5. The app will then display its connection screen.
NOTE: If the heater does not turn on, press and hold the button for another three seconds.
It will go into secondary connection mode. The heater has two connection modes: one in
which the icon ashes slowly (once per second) and another in which the icon ashes
rapidly (three times per second). Most devices will connect in fast ash mode.
6. The heater will beep and an icon will be displayed xed when the device is connected.
The app will conrm that the heater has been added. Now you can give your device a name,
share it with your family or schedule your heater.
iPhone Android
WIFI CONNECTION
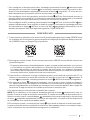
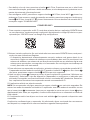
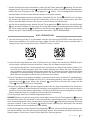
1. To connect the heater to Wi-Fi, you must rst download the CREATE Home app on your
device. You will nd the app by scanning the QR code below or searching for “CREATE
Home” in Google Play or App Store.
• To set the display light, press the button WIFI/light. Press once, the screen will be in half
lighting, press the button again, the screen will disappear, press again, it will return to full
lighting.
• To congure WiFi, press and hold the button WIFI/light, WiFi icon will ash quickly.
To access the secondary connection mode, press and hold the button again WIFI/light,
WiFi icon will ash slowly. Read the Wi-Fi connection details in the following section
“WIFI CONNECTION”.

11
ENGLISH
You can use the app to control multiple devices. The status of your devices is displayed in
the device list:
• Disconnected (the device is turned off at the switch).
• Off (device is in standby mode).
• Power on (device is in warm-up mode).
When the device is connected, select the device name to go to the control interface.
Note: if the device is unplugged, you will not be able to control it with the app.
You can schedule your heater by creating a schedule of "events" to turn it on and off. These
events can be temporary, such as a timer being set, or they can be repeated, so that the
heater turns on at the same time throughout the week. You can set an unlimited number of
events, turning the heater on and off throughout the week.
For each event, you must set the start time. Then choose if you want it to repeat. Select "Only
once" if you want to set a timer for now. If you want the event to repeat, select the days you
want it to repeat. Lastly, choose whether you want the heater to turn on or off. Conrm the
settings in each step and tap Save to store the event.
All events will appear on your calendar. You can turn events on and off whenever you want.
You can also delete events by scrolling left and selecting the Delete option.
The heater will beep when a new heating event begins. The heater will heat in the mode it
was last set to: you cannot program mode changes. Note that if you change the heater set-
ting during an event (ie turning it on when it was scheduled to be off), the heater will remain
as it is until the next scheduled event.
You can change the current heater mode by touching the mode buttons. You can adjust the
mode temperature by using the + and – buttons when in the mode.
USING THE CREATE HOME APP
Scenes
SCHEDULE THE HEATER
HEATER CONTROL
OTHER FEATURES
It gathers all its devices to respond to environmental conditions. Event triggering includes
temperature, humidity levels, air quality, sunrise and sunset, and device behavior. So, for
example, you can set the windows to close every time the heater comes on, or the lights to
come on, the curtains to close, and the heater to come on when the sun goes down. Only
devices connected to the app can be used in these views.
Share
You can share control of devices with your family members. Go to “Share devices”, select the
devices you want to share and hit the option Share with new member. You can then add the
email address or phone number. If they have the app, the device will appear in their list of
devices. If they don't have the app, they will receive a link to download it.
Note: you can only share with numbers and email addresses that are connected to compati-
ble devices: smartphones or tablets.

12 ENGLISH
In compliance with Directives: 2012/19/EU and 2015/863/EU on the restriction of the use of dangerous substances in elec-
tric and electronic equipment as well as their waste disposal. The symbol with the crossed dustbin shown on the package
indicates that the product at the end of its service life shall be collected as separate waste. Therefore, any products that
have reached the end of their useful life must be given to waste disposal centres specialising in separate collection of
waste electrical and electronic equipment, or given back to the retailer at the time of purchasing new similar equipment,
on a one for one basis. The adequate separate collection for the subsequent start-up of the equipment sent to be recycled,
treated and disposed of in an environmentally compatible way contributes to preventing possible negative effects on the
environment and health and optimises the recycling and reuse of components making up the apparatus. Abusive disposal
of the product by the user involves application of the administrative sanctions according to the laws.
Always unplug the appliance and let it cool down completely before any maintenance. Use
a handheld vacuum to remove dust from the vents. Wipe the exterior of the unit with a damp
cloth, and then wipe it dry with a dry cloth. Never immerse the unit in water or let water drip
into the unit.
Always unplug the appliance, let it cool down completely and clean it before putting it away.
If you do not use the device for a long time, please put the unit and instruction manual back
in the original box and store them in a dry and ventilated place. Do not place heavy objects on
top of the cardboard box during storage, as this may damage the appliance.
CLEANING AND CARE
MAINTENANCE
STORAGE
Voice integration
Frequent questions
CREATE Home is compatible with Amazon Echo and Google Home.
Find the answer to the problems that may arise in the frequently asked questions section of
the app.

ESPAÑOL 13
ESPAÑOL
Muchas gracias por elegir nuestro calefactor. Antes de usar el aparato, lea detenidamente
estas instrucciones para su correcta utilización.
Las precauciones de seguridad incluidas reducirán el riesgo de muerte, lesiones y descarga
eléctrica si se respetan estrictamente. Guarde este manual en un lugar seguro para consul-
tarlo en el futuro, junto con el embalaje original del producto y el justicante de compra. Si es
posible, entregue estas instrucciones al siguiente propietario del electrodoméstico. Respete
en todo momento las precauciones de seguridad básicas y las normas de prevención de ac-
cidentes cuando utilice un electrodoméstico. Declinamos toda responsabilidad derivada del
incumplimiento de estas instrucciones por parte del cliente.
INSTRUCCIONES DE SEGURIDAD
Al utilizar cualquier electrodoméstico, se deberán respetar en todo
momento las medidas de seguridad básicas:
• Antes de usarlo, compruebe que el calefactor y todos los accesorios
suministrados estén completos e intactos.
• El calefactor debe instalarse siguiendo las instrucciones de insta-
lación. El calefactor debe enchufarse a una toma que cumpla los si-
guientes requisitos: 220-240 VCA, frecuencia 50/60Hz.
• El calefactor solo es apto para su uso en interiores. No lo utilice en
exteriores.
• No deje el calefactor desatendido durante el uso. Mantenga el calefactor
fuera del alcance de los niños, ya que existe riesgo de quemaduras.
• No utilice un controlador externo con el calefactor.
• No utilice el calefactor cerca de materiales inamables o explosivos,
ya que existe riesgo de incendio o explosión.
• Está terminantemente prohibido insertar objetos en la rejilla de pro-
tección del calefactor, ya que hay riesgo de descarga eléctrica.
• No toque la carcasa metálica, ya que se calienta durante el uso y pue-
de correr riesgo de quemaduras. Espere a que el calefactor se enfríe
antes de guardarlo.
• Desenchufe el calefactor si no se va a utilizar durante un período largo.
• Antes de usar el calefactor eléctrico, compruebe que esté en buenas
condiciones e intacto. No enchufe ni utilice el calefactor si la carcasa,
el cable o el enchufe están dañados.
• El elemento calefactante podría dañarse si el calefactor se cae o reci-
be un golpe. Compruebe que el elemento calefactante no esté dañado
antes de cada uso. No utilice el calefactor si está roto.
• Desconecte el enchufe de la toma al mover o limpiar el calefactor. En
el momento de desconectar, apague primero el interruptor y después
desenchufe el enchufe. No tire del cable.

ESPAÑOL
14
• Está estrictamente prohibido destruir el calefactor eléctrico sin auto-
rización. Si el calefactor sufre daños, solicite la ayuda de un servicio
profesional.
• El producto es exclusivamente para uso doméstico.
• Durante el uso, no permita el contacto directo de la supercie del
aparato con la piel, ya que hay riesgo de quemaduras.
• No comparta la toma eléctrica del calefactor con otros aparatos, ya
que hay riesgo de incendio debido a un exceso de carga.
PRECAUCIÓN: No cubra el calefactor, ya que hay riesgo de sobreca-
lentamiento e incendio.
• El calefactor no debe situarse justo debajo de una toma eléctrica.
• Si el cable de alimentación está deteriorado, debe ser sustituido por
el fabricante, su agente de servicio o una persona cualicada para
evitar peligros.
• Evite el uso de un cable alargador, ya que se podría sobrecalentar y
causar un riesgo de incendio.
• Este calefactor no está previsto para su uso en baños, zonas de la-
vandería o ubicaciones similares en las que pudiera haber humedad.
No coloque el calefactor en un lugar en el que pudiera caerse a una
bañera u otro recipiente de agua.
• No utilice el calefactor cerca de una bañera, una ducha o una piscina.
• Los niños menores de tres años deben mantenerse alejados del apa-
rato si no van a estar continuamente supervisados.
• Los niños de entre tres y ocho años solo pueden encender y apagar el
aparato si este está colocado o instalado en su posición de funciona-
miento normal, se les ha enseñado cómo usar el aparato con seguri-
dad y entienden los peligros que comporta. Los niños de entre tres y
ocho años no pueden enchufar, regular ni limpiar el aparato, ni reali-
zar tareas de mantenimiento.
• Este electrodoméstico puede ser utilizado por niños mayores de ocho
años y personas con discapacidad física, sensorial o mental, así como
por personas con falta de experiencia y conocimientos siempre que
se encuentren bajo supervisión o hayan recibido instrucciones re-
lacionadas con su uso seguro y entiendan los peligros potenciales
asociados. Los niños no deben jugar con este aparato. Los niños no
podrán realizar tareas de limpieza y mantenimiento sin supervisión.
PRECAUCIÓN: Algunas piezas de este producto pueden calentarse
mucho y provocar quemaduras. Preste especial atención si hay niños y
personas vulnerables.

ESPAÑOL 15
2. Fije dos soportes a la parte inferior del producto, tal y como se indica en la ilustración.
INSTRUCCIONES DE INSTALACIÓN
Antes de instalar, compruebe que todas las piezas estén completas y que el producto esté
intacto.
Si desea utilizar el calefactor de forma independiente, coloque las patas suministradas si-
guiendo estas instrucciones. El calefactor debe montarse sobre una supercie limpia, esta-
ble y nivelada.
1. Coloque el producto boca abajo sobre una alfombra
o un paño de algodón suave.
2. Fije las patas a la base del calefactor utilizando los
tornillos suministrados. Alinee los oricios de la
base con los oricios de las patas, inserte los tor-
nillos en los oricios y apriete con un destornillador
(no incluido).
Soporte tipo gancho.
1. Saque cuatro soportes, seis tornillos de expansión y seis tornillos de la caja, y je dos
soportes a la pared respetando las distancias entre los oricios del soporte, tal y como se
muestra en la siguiente ilustración.
INSTALACIÓN DE LAS PATAS
INSTALACIÓN EN PARED
Nota: Antes de realizar los agujeros en la pared, asegúrese de que no haya cables u otras
tuberías en la pared para evitar daños. Recuerde que los tornillos en la pared deben ser jos
y rmes para garantizar la instalación segura del calefactor. Tenga en cuenta la distancia de
seguridad que se menciona a continuación.
1. Durante la instalación, el calefactor debe mantenerse a una distancia sucientemente se-
gura de materiales combustibles y gas y lejos del agua.
2. Mantenga siempre las distancias mínimas de instlación del calefactor tanto del suelo
como del techo. No coloque NUNCA el calefactor a una distancia inferior de 15 cm del
suelo ni a menos de 50 cm del techo.
TODOS LOS MODELOS
Agujeros para soporte
UNIDAD: mm
MODELO 1500W
Separación soportes
816
50
8320mm

ESPAÑOL
16
3. Sujete el producto por un lateral, observe la posición del oricio de la cubierta trasera y
deslice en la ranura. La instalación en pared ha terminado, como se muestra en la ilustra-
ción siguiente.
PANEL DE CONTROL DEL CALEFACTOR
• Conecte el calentador a la toma corriente, emitirá un pitido cuando se encienda. El calefac-
tor se pondrá en modo de espera, mostrando el icono y .
• Para iniciar el calentamiento, presione el botón . Verá el icono del modo “ECO” . Esto
signica que el dispositivo está en el estado de modo “ECO”.
• El modo “ECO” es la potencia media, el modo “Confort” es la potencia máxima.
• Para cambiar el modo de calefacción, presione el botón “MODO” para recorrer los
modos: Modo “ECO” ,Modo “Confort” y modo “Antihielo” . Cuando el calentador
esté en el modo seleccionado, comenzará a calentarse y el ícono de “Calefacción” se
encenderá.
• Utilice los botones “Izquierda/Derecha” para ajustar la temperatura de cualquier
modo. El rango de temperatura es de 5°C a 50°C.
NOTA: Tenga en cuenta que la temperatura que se muestra en la pantalla es la tempe-
ratura ambiental. La temperatura a la que congure el calefactor se muestra al pulsar
las teclas .
• Para congurar el temporizador, presione el botón “Temporizador” (El rango del tempo-
rizador es de 1 a 24 horas). Los dígitos parpadearán después de la conguración y luego
la pantalla volverá al modo de calefacción. Se mostrará el icono del temporizador en la
pantalla cuando el temporizador haya sido congurado. El calefactor se apagará automáti-
camente cuando transcurra el tiempo establecido.
Muestra la temperatura o la
conguración del temporizador
Indicador temperatura
Indicador temporizador
Indicador bloqueo seguridad
Botón del temporizador
Botón de
encendido / apagado
Botón WiFi/Luz
Botón de modo
Botón izquierda Botón derecha
min.
15cm

ESPAÑOL 17
2. Descargue e instale la app. Si aún no tiene una cuenta CREATE Home, deberá crearse una
pulsando Registro.
• El aparato determinará automáticamente su país, aunque puede cambiarlo si es necesa-
rio. Introduzca su número de teléfono o su dirección de correo electrónico. Si introduce
un número de teléfono, se enviará un número de vericación a su teléfono; introduzca
este número para la aprobación y después cree una contraseña. Si introduce su dirección
de correo electrónico, tendrá que crear una contraseña.
3. Para añadir su calefactor a la app, colóquele primero en el modo de conexión wi. El ca-
lefactor se encuentra en modo de conexión wi cuando el icono del wi parpadea. Si
el icono no parpadea, mantenga pulsado el botón WIFI/luz durante tres segundos.
4. Una vez que el icono empiece a parpadear, vaya a la app y pulse «Añadir un dispositi-
vo». Seleccione el tipo de dispositivo (calefactor) y conrme que el indicador está parpa-
deando. Seguidamente se le pedirá que introduzca su contraseña del WiFi de su hogar. De
esta forma, la app encontrará su calefactor utilizado su conexión wi.
5. La app mostrará a continuación su pantalla de conexión.
NOTA: Si el calefactor no se conecta, mantenga pulsado el botón durante otros tres se-
gundos. Pasará al modo de conexión secundaria. El calefactor dispone de dos modos de co-
nexión: uno en el que el icono parpadea lentamente (una vez por segundo) y otro en el que
el icono parpadea rápidamente (tres veces por segundo). La mayoría de los dispositivos
se conectarán en el modo de parpadeo rápido.
6. El calefactor pitará y se mostrará un icono jo cuando el dispositivo esté conectado.
La app conrmará que se ha añadido el calefactor. Ahora puede ponerle un nombre al dispo-
sitivo, compartirlo con sus familiares o programar su calefactor.
iPhone Android
CONEXIÓN WIFI
1. Para conectar el calefactor a la conexión wi, primero debe descargar la app CREATE Home
en su dispositivo. Encontrará la app escaneando el código QR que aparece debajo o buscan-
do «CREATE Home» en Google Play o App Store.
• Para congurar el bloqueo para niños, mantenga presionado el botón (derecho) hasta
que aparezca el icono del candado en la pantalla, entonces el panel de control se blo-
queará. Para desbloquear, mantenga presionado el botón (izquierdo) . El icono del can-
dado desaparecerá y se podrán volver a utilizar todos los botones.
• Para congurar la luz de la pantalla, presione el botón WIFI/luz. Presionando una vez, la
pantalla estará en la mitad de la iluminación, presione el botón nuevamente y la pantalla
desaparecerá, presione nuevamente y volverá a la iluminación completa.
• Para congurar el WiFi, mantenga presionado el botón WIFI/luz, el ícono de WiFi par-
padeará rápidamente. Para acceder al modo de conexión secundaria, mantenga presiona-
do nuevamente el botón WIFI/luz, el ícono de WiFi parpadeará lentamente. Lea los
detalles de conexión Wi en el apartado siguiente “CONEXIÓN WiFi”.

ESPAÑOL
18
Puede usar la app para controlar varios dispositivos. El estado de sus dispositivos se muestra
en la lista de dispositivos:
• Desconectado (el dispositivo está apagado en el interruptor).
• Apagado (el dispositivo se encuentra en modo standby).
• Encendido (el dispositivo se encuentra en modo de calentamiento).
Cuando el dispositivo esté conectado, seleccione el nombre del dispositivo para ir a la inter-
faz de control.
Nota: si el dispositivo está desenchufado, no podrá controlarlo con la app.
Puede programar su calefactor creando un calendario de «eventos» para encenderlo y apa-
garlo. Estos eventos pueden ser temporales, como el ajuste de un temporizador, o pueden ser
reiterados, de manera que el calefactor se encienda a la misma hora durante toda la semana.
Puede congurar un número ilimitado de eventos, encendiendo y apagando el calefactor a
lo largo de la semana.
Para cada evento, debe congurar la hora de inicio. A continuación, elija si quiere que se repi-
ta. Seleccione «Solo una vez» si desea congurar un temporizador de momento. Si desea que
el evento se repita, seleccione los días que quiere que lo haga. Por último, elija si quiere que
el calefactor se encienda o se apague. Conrme los ajustes en cada paso y pulse Guardar
para almacenar el evento.
Todos los eventos aparecerán en su calendario. Puede activar y desactivar los eventos cuan-
do quiera. También puede eliminar eventos desplazándose hacia la izquierda y seleccionan-
do la opción Borrar.
El calefactor pitará cuando comience un nuevo evento de calentamiento. El calefactor se
calentará en el modo en el que estuviera congurado la última vez: no puede programar
cambios de modo. Tenga en cuenta que si cambia la conguración del calefactor durante un
evento (es decir, encendiéndolo cuando estaba programado para estar apagado), el calefac-
tor se mantendrá como está hasta el siguiente evento programado.
Puede cambiar el modo actual del calefactor tocando los botones de modo. Puede ajustar
la temperatura del modo utilizando los botones + y – cuando se encuentre en dicho modo.
USO DE LA APP CREATE HOME
Escenas
PROGRAMAR EL CALEFACTOR
CONTROL DEL CALEFACTOR
OTRAS CARACTERÍSTICAS
Reúne todos sus dispositivos para responder a las condiciones ambientales. La activación de
eventos incluye la temperatura, los niveles de humedad, la calidad del aire, el amanecer y el
anochecer, y el comportamiento del dispositivo. Así, por ejemplo, puede congurar que las ven-
tanas se cierren cada vez que el calefactor se encienda, o que se enciendan las luces, se cie-
rren las cortinas y se encienda el calefactor cuando se pone el sol. En estas vistas solo podrán
utilizarse los dispositivos conectados a la app.

ESPAÑOL 19
Desconecte siempre el aparato y déjelo enfriar completamente antes de cualquier manteni-
miento. Utilice una aspiradora de mano para eliminar el polvo de las rejillas. Limpie el exterior
de la unidad con un paño húmedo y luego séquelo con un paño seco. Nunca sumerja la unidad
en agua ni deje que el agua gotee dentro de la unidad.
Desconecte siempre el aparato, déjelo enfriar completamente y límpielo antes de guardarlo. Si
no utiliza el dispositivo durante un período prolongado, vuelva a colocar la unidad y el manual
de instrucciones en la caja original y guárdelos en un lugar seco y ventilado. No coloque obje-
tos pesados encima de la caja de cartón durante el almacenamiento, ya que esto puede dañar
el aparato.
LIMPIEZA Y CUIDADO
MANTENIMIENTO
ALMACENAJE
Compartir
Integración de voz
Preguntas frecuentes
Puede compartir el control de los dispositivos con sus familiares. Vaya a «Compartir dispositi-
vos», seleccione los dispositivos que desea compartir y apriete la opción Compartir con nuevo
miembro. Seguidamente puede añadir la dirección de correo electrónico o el número de telé-
fono. Si tienen la app, el dispositivo aparecerá en su lista de dispositivos. Si no tienen la app,
recibirán un enlace para descargarla.
Nota: solo puede compartir con números y direcciones de correo electrónico que estén conec-
tados a dispositivos compatibles: smartphones o tablets.
CREATE Home es compatible con Amazon Echo y con Google Home.
Encuentre la respuesta a los problemas que pudieran surgir en la sección de preguntas fre-
cuentes de la app.
En cumplimiento de las directivas: 2012/19 / UE y 2015/863 / UE sobre la restricción del uso de sustancias peligrosas en
equipos eléctricos y electrónicos, así como su eliminación de residuos. El símbolo con el cubo de basura cruzado que se
muestra en el paquete indica que el producto al nal de su vida útil se recogerá como residuo separado. Por lo tanto, cualquier
producto que haya llegado al nal de su vida útil debe entregarse a centros de eliminación de residuos especializados en la
recogida selectiva de equipos eléctricos y electrónicos de desecho, o devolverse al minorista al momento de comprar equipos
nuevos similares, en uno para Una base. La recolección separada adecuada para la posterior puesta en marcha de los equipos
enviados para ser reciclados, tratados y eliminados de una manera compatible con el medio ambiente contribuye a prevenir
posibles efectos negativos sobre el medio ambiente y la salud y optimiza el reciclaje y la reutilización de los componentes
que componen el aparato. La eliminación abusiva del producto por parte del usuario implica la aplicación de las sanciones
administrativas de acuerdo con las leyes.

PORTUGUÊS
20
PORTUGUÊS
Muito obrigado por escolher nosso aquecedor. Antes de utilizar o aparelho, leia atentamente
estas instruções para uma utilização correcta.
As precauções de segurança listadas reduzirão o risco de morte, ferimentos e choque elétri-
co se forem rigorosamente seguidas. Mantenha este manual em um local seguro para refe-
rência futura, juntamente com a embalagem original do produto e o comprovante de compra.
Se possível, passe estas instruções para o próximo proprietário do aparelho. Sempre siga as
precauções básicas de segurança e as regras de prevenção de acidentes ao usar um apare-
lho. Declinamos qualquer responsabilidade decorrente do incumprimento destas instruções
por parte do cliente.
INSTRUÇÕES DE SEGURANÇA
Ao usar qualquer aparelho, as medidas básicas de segurança devem
ser sempre respeitadas:
• Antes de usar, verique se o aquecedor e todos os acessórios forneci-
dos estão completos e intactos.
• O aquecedor deve ser instalado seguindo as instruções de instalação.
O aquecedor deve ser conectado a uma tomada que atenda aos se-
guintes requisitos: 220-240 V AC, frequência 50/60 Hz.
• O aquecedor é adequado apenas para uso interno. Não o use ao ar
livre.
• Não deixe o aquecedor sem vigilância durante o uso. Mantenha o aque-
cedor fora do alcance das crianças, pois há risco de queimaduras.
• Não use um controlador externo com o aquecedor.
• Não use o aquecedor próximo a materiais inamáveis ou explosivos,
pois há risco de incêndio ou explosão.
• É expressamente proibido inserir objetos na grade de proteção do
aquecedor, pois há risco de choque elétrico.
• Não toque na caixa de metal, pois ela ca quente durante o uso e você
corre o risco de queimaduras. Espere o aquecedor esfriar antes de
guardá-lo.
• Desligue o aquecedor se não for usá-lo por um longo período de tempo.
• Antes de usar o aquecedor elétrico, verique se ele está em boas con-
dições e intacto. Não conecte ou use o aquecedor se a carcaça, o cabo
ou o plugue estiverem danicados.
• O elemento de aquecimento pode ser danicado se o aquecedor cair
ou bater. Verique o elemento de aquecimento quanto a danos antes
de cada uso. Não use o aquecedor se estiver quebrado.
• Desconecte o plugue da tomada ao mover ou limpar o aquecedor. No
momento da desconexão, desligue primeiro o interruptor e, em segui-
da, desconecte o plugue. Não puxe pelo cordão.
La pagina si sta caricando...
La pagina si sta caricando...
La pagina si sta caricando...
La pagina si sta caricando...
La pagina si sta caricando...
La pagina si sta caricando...
La pagina si sta caricando...
La pagina si sta caricando...
La pagina si sta caricando...
La pagina si sta caricando...
La pagina si sta caricando...
La pagina si sta caricando...
La pagina si sta caricando...
La pagina si sta caricando...
La pagina si sta caricando...
La pagina si sta caricando...
La pagina si sta caricando...
La pagina si sta caricando...
La pagina si sta caricando...
La pagina si sta caricando...
La pagina si sta caricando...
La pagina si sta caricando...
La pagina si sta caricando...
La pagina si sta caricando...
La pagina si sta caricando...
La pagina si sta caricando...
La pagina si sta caricando...
La pagina si sta caricando...
La pagina si sta caricando...
La pagina si sta caricando...
La pagina si sta caricando...
La pagina si sta caricando...
La pagina si sta caricando...
La pagina si sta caricando...
La pagina si sta caricando...
La pagina si sta caricando...
La pagina si sta caricando...
La pagina si sta caricando...
La pagina si sta caricando...
La pagina si sta caricando...
La pagina si sta caricando...
La pagina si sta caricando...
La pagina si sta caricando...
La pagina si sta caricando...
-
 1
1
-
 2
2
-
 3
3
-
 4
4
-
 5
5
-
 6
6
-
 7
7
-
 8
8
-
 9
9
-
 10
10
-
 11
11
-
 12
12
-
 13
13
-
 14
14
-
 15
15
-
 16
16
-
 17
17
-
 18
18
-
 19
19
-
 20
20
-
 21
21
-
 22
22
-
 23
23
-
 24
24
-
 25
25
-
 26
26
-
 27
27
-
 28
28
-
 29
29
-
 30
30
-
 31
31
-
 32
32
-
 33
33
-
 34
34
-
 35
35
-
 36
36
-
 37
37
-
 38
38
-
 39
39
-
 40
40
-
 41
41
-
 42
42
-
 43
43
-
 44
44
-
 45
45
-
 46
46
-
 47
47
-
 48
48
-
 49
49
-
 50
50
-
 51
51
-
 52
52
-
 53
53
-
 54
54
-
 55
55
-
 56
56
-
 57
57
-
 58
58
-
 59
59
-
 60
60
-
 61
61
-
 62
62
-
 63
63
-
 64
64


in altre lingue
- français: Create WARM Manuel utilisateur
- español: Create WARM Manual de usuario
- Deutsch: Create WARM Benutzerhandbuch
- Nederlands: Create WARM Handleiding
- português: Create WARM Manual do usuário
- polski: Create WARM Instrukcja obsługi