
AIPB-961768-O
A
User’s Guide
ADVISOR
Pro
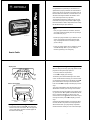
Advisor Pro ALPHANUMERIC PAGER
Congratulations on purchasing a new
Advisor Pro
alphanumeric pager by Motorola, the world leader in
paging. Your
Advisor Pro
pager incorporates many of
the most advanced electronic, communications, and
wireless technologies available. It’s reliable, conve-
nient, and designed for easy operation.
The Operating Instructions explain how to use your
new
Advisor Pro
pager and provides helpful sugges-
tions for first-time as well as experienced users. Keep
this booklet handy for quick reference.
To Get The Most Out Of Your Advisor Pro
Pager:
• Give your pager number to secretaries, business
associates, friends and family. This lets you keep in
touch wherever you go!
• Include your pager number on your business cards
and on your telephone answering machine mes-
sage. Let people know how to contact you when
you're on the go.
• Leave your pager number at your children’s school
and with the baby-sitter so you can always be
reached, right away, in an emergency.
3
Turning the Advisor Pro Pager On:
• Press the
READ/RESET
button
Ë
. Your pager will
alert and show the
ON indicator ë in the upper left
corner of the display. The time and date appear at
the bottom of the display
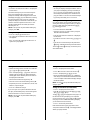
Display Icons
Delete
Delete
All
Set
Alert
Set
Time
Set
Alarm
Lock/
Unlock
Tur n
Audible/
Silent Mode
Prompt
Auto
On/Off
SET ALARM
åÈÑÖÉóíïñ
Off
Msg
Msg
A
dvisor Pro Controls
A
Directional Control
Arrows
Function/Select
Button
Read/Reset
Button
4
Receiving and Reading Your Messages:
When receiving a message, your pager alerts and dis-
plays the incoming message symbol
ü
.
• Press any button to stop the alert.
• Press
Ë
to display your message.
The flashing arrow at the bottom right corner of the
screen
Ü
indicates the message you received contin-
ues beyond the first two lines of the display. Each
Ë
press advances the message to the next two lines.
Press and hold
Ë
to rapidly scroll through your mes-
sage.
Your pager automatically stores the message, along
with the time and date your message was received.
If more than one message exists in your pager’s mem-
ory, press the left
ä
or right
ã
directional arrow but-
tons to select the message you wish to read. The
reversed arrow cursor
Ó
indicates the location of your
message in memory. Press
Ë
to display your mes-
sage.
A flashing
ë
symbol indicates a message has been
received, but has not yet been read. If programmed
with reminder alerts, your pager beeps at predeter-
mined intervals to remind you of an unread message.

5
Using the Function Menu:
• Press the
FUNCTION/SELECT
button Á to display the
function menu.
The function menu gives you access to the many fea-
tures of your pager through a series of icons and
prompts. For example, when the function menu screen
first displays, the
TURN OFF
icon
ó
flashes, indicating
the present position of the cursor. The
TURN OFF
prompt also displays on the first line on the LCD. As you
move the cursor left or right across the icons, a corre-
sponding prompt appears. To activate your function
selection, press
Á
.
NOTE: To escape from any field without making any
changes, press
Ë
.
Turning Your Pager Off:
• Press
Á
to display the function menu.
• The
TURN OFF icon
ó
flashes when this menu item
first appears.
• Press
Á
to select the TURN OFF function. Press
Á
again to turn your pager off.
6
Backlighting:
• To view your display in low light conditions, turn on
your pager's backlight by pressing and holding
Á
for 1.5 seconds. If no further buttons are pressed,
the backlight automatically turns off when the dis-
play goes blank. You can also turn off the backlight
by pressing and holding
Á
for 1.5 seconds.
Locking and Unlocking Messages:
Up to 10 messages can be “locked” in memory, pre-
venting them from being replaced when your pager’s
memory is full or from being deleted if the
DELETE
ALL
function ñ is chosen.
• Press the
READ/RESET
button
Ë
.
• Select the message you wish to lock by using the
ä
or
ã
directional buttons.
• Press the
FUNCTION/SELECT
button
Á
to display the
function menu.
• Press
ã
to move the cursor to the LOCK MSG icon
í
.
• Press the
Á
to lock the message. The padlock icon
í
appears, indicating the message has been locked.
To unlock
ì
a locked
í
message, use the same proce-
dure outlined above.
7
Setting the Clock:
• While in the function menu, move the cursor left to the
SET TIME icon
Ñ
by pressing the
ä
.
• Press
Á to display the
SET TIME
screen. The cursor
flashes in the hour position. The
ä
increments the
flashing digits. This is defined by the
+
icon shown on
the display above the button.
• Advance to the desired hour by pressing
ä
.
• Move the cursor to the minute field by pressing
ã
.
• Repeat the process for each field hour, minute, AM/
PM/24 hr., day/month/year.
• Press
Á to initiate the change.
If you move your cursor past the last field in the row
(far right), it automatically wraps around and appears
at the first function icon in the row (far left).
NOTE: To escape from any field without making any
changes, press
Ë
.
8
Setting the Alert Pattern:
• Press Á to display the function menu.
• Press
ä
to move the cursor to the alert icon
È
.
• Press
Á
to display the
SET ALERT
screen.
• Move to the desired alert and press
Á
to initiate the
alert change. The selected alert number flashes while
a 2 second sample of the selected alert plays through
the internal speaker.
NOTE: To escape from any field without making any
changes, press
Ë.
Setting the Alert Mode (Silent/Audible):
• Press
Á
to display the function menu.
• Press
ã
to move the cursor to the AUDIBLE MODE
É
or
SILENT MODE
Ç
icon.
The
AUDIBLE MODE icon É appears if the pager is in
the silent alert mode (prompting you to enter that
mode, if desired). The
SILENT MODE icon Ç appears
if the pager is in the audible alert mode (prompting
you to enter that mode, if desired).
• Press
Á to select the desired alert.
If the selected mode is
É, your pager emits a short
“chirp.” If the selected mode is
Ç,
and
if equipped with a
vibrator, your pager vibrates.

9
Setting the Alarm
If your pager is equipped with the ALARM feature,
and
you wish to set the alarm:
• Press
Á to display the function menu.
• Press the
ä to move the cursor to the SET ALARM
Ö icon.
• Press
Á to display the set alarm screen.
When the screen first appears, the cursor is at the left-
most position. This icon defines the alarm status:
either alarm enable
À, or alarm disable Ã.
• Press the left directional button to increment or toggle
between alarm enable À and alarm disable Ã.
• Press
ã to move the cursor to the hour field.
• Repeat the process for each field (hour, minute).
• Press
Á to make the change.
The alarm indicator
À appears if an alarm has been
set. At the selected time, your pager either vibrates or
emits a unique 8-second alert, depending on the alert
mode.
NOTE: To escape from any field without making any
changes, press
Ë.
Setting the Auto On/Off function:
If your pager is equipped with the AUTO ON/OFF fea-
ture,
and
you wish to activate this feature:
10
• Press Á to display the function menu.
• Press
ä to move the cursor to the AUTO ON/OFF
icon
å.
• Press
Á to display the AUTO ON/OFF screen.
When the screen first appears, the cursor appears at the
left-most position. This icon defines the
AUTO ON/OFF sta-
tus: either
AUTO ON/OFF Enabled å, or Disabled õ.
• Press
ä to increment or toggle between AUTO ON/
OFF
Enable å or Disable õ.
• Press
ã to move the cursor to the hour field. The
auto
ON time is shown on the left and the auto OFF
time is shown on the right.
• Repeat the process for each field for both the ON
time and the
OFF time (hour, minute, and AM/PM if your
pager is set to display time in the 12 hour mode).
• Press
Á to activate the AUTO ON/OFF function.
The indicator
Î displays in the upper left-hand cor-
ner of the display if the
AUTO ON/OFF function has been
enabled. If the
ON time is equal to the OFF time, the
AUTO ON/OFF function is not enabled.
NOTE: To escape from any field without making any
changes, press
Ë.
11
Deleting Messages from Memory:
You can clear or delete an unlocked message from
memory while you are viewing it, or through the func-
tion menu.
• Select the message you wish to delete from mem-
ory by pressing
ä or ã directional buttons to the
desired memory position.
• Press
Á to display the function menu.
• Press
ã to move the cursor to the DELETE MSG
icon
ï.
• Press
Á to receive confirmation of delete request.
• Press
Á to delete the message.
If your pager is equipped with the
DELETE ALL fea-
ture,
and
you wish to delete all unlocked messages
from memory, move the cursor within the function
menu screen to the
DELETE ALL icon ñ and press Á
twice.
Other Features:
Low Battery Alert: A low battery icon Ì appears in
place of the date at the onset of low battery conditions.
An audible low battery alert is also heard at that time.
Duplicate Message: If the same message is received
more than once,
DUPLICATE appears at the begin-
ning of your new message to indicate that your mes-
12
sage has already been received. Your new message
will contain the latest time stamp.
Out of Range: With this option installed, whenever you
are too far away from your paging system's transmitter to
reliably receive messages, your pager displays an
OUT
OF RANGE
message and an out-of-range icon ö.
Cleaning Your Advisor Pro Pager:
To clean smudges and grime from the exterior of the
Advisor Pro
housing, use a soft, nonabrasive cloth
moistened in a mild soap and water solution. Rinse the
surface using a second cloth moistened in clean water.
Do not use alcohol or other cleaning solutions.
Repair and Maintenance:
Your
Advisor Pro
pager, properly handled, is capable of
many years of trouble-free service. However, should it
ever require service, Motorola’s National Service Organi-
zation, staffed with specially trained technicians, offers
conveniently located repair and maintenance facilities
worldwide.

13
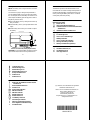
Battery Information:
NOTE: The battery door is hinged and does not need
to be removed.
Your
Advisor Pro
pager is designed to operate with a
AAA-size alkaline battery (do not use carbon zinc batter-
ies). See diagram (across) for battery door location. To in-
stall or replace the battery, place the pager face down in
the palm of your hand. Then,
➊ Unlock the battery door by sliding the door latch up
with your thumb.
➋ Slide the battery door to your right (toward the outer
edge).
➌ Lift the battery door toward you to install or replace
the battery.
Advisor Pro Rear View (Battery Replacement)
CAUTION: Do not insert the battery backwards. All mes-
sages stored and/or locked in memory will be erased.
Ì
➊
➋
➌
14
Patent Information:
This Motorola product is manufactured under one or
more Motorola U.S. Patents. A listing of these patents is
provided inside the battery compartment which can be
seen by removing the battery door. Other U.S. Patents
covering this product are pending.
Advisor Pro Icon Quick Reference List
Display Annunciators
ë
Power On Icon
Ï
Auto On/Off Mode Enabled Icon
Î
Combined Power On and Auto On/Off Mode
Enabled Icon
Í
Audible Alert Mode Enabled Icon
Message Status Icons
í
Lock Message Icon
î
Cursor on Locked Message
Ÿ
Maildrop Indicator
Ó
Cursor on Message Indicator
ü
Message In Memory Indicator
é
Memory Full Indicator (optional)
Function Menu Icons
É
Set Audio Alert Icon (or)
Ç
Set Silent Alert Icon
ó
Turn Pager Off Icon
í
Lock Message Icon
ì
Unlock Message Icon
ï
Delete Message Icon
ò
Delete All Messages Icon
È
Escape to Main Screen
Ö
Set Alert Icon
+
Set Alarm Icon
Other Icons
å
Enter Auto On/Off Menu and Auto On/Off
Enabled Icon
õ
Auto On/Off Disabled Icon
Ñ
Set Time Icon
ô
24 Hour Time Indicator
AM
AM Time Indicator
PM
PM Time Indicator
Ã
Disable Alarm Icon
À
Enable Alarm Icon
Ì
Low Battery Alert Icon
ö
Out Of Range Indicator
Ü
Message Continuation Indicator
à
Press Right Arrow Button Prompt
+
Increment Value
t , Motorola, and
ADVISOR
are registered
trademarks of Motorola, Inc.
Advisor Pro
is a trademark of Motorola, Inc.
1993, 1994 by Motorola, Inc.,
Paging Products Group,
1500 Gateway Boulevard.,
Boynton Beach, FL 33426-8292 U.S.A.
All Rights Reserved
@6881022B55@
6881022B55-A
-
 1
1
-
 2
2
-
 3
3
-
 4
4


in altre lingue
- English: Motorola Advisor Pro User manual
- français: Motorola Advisor Pro Manuel utilisateur
Documenti correlati
-
Motorola Advisor II Manuale utente
-
-
Motorola ADVISOR Gold Manuale utente
-
-
-
-
Motorola Scriptor FLX4 Manuale utente
-
Motorola V2267 Introduction Manual
-
Motorola T2267 Manuale utente
-