Elvox 46216.310E Istruzioni per l'uso
- Categoria
- Telecamere di sicurezza
- Tipo
- Istruzioni per l'uso

Manuale per l’installazione e l’uso
Installation and operation manual
46216.310E
Telecamera Bullet IR IP 5 Mpx, obiettivo 3,6-10 mm, PoE, H.265
IP IR Bullet camera, 5 Mpx, 3.6-10 mm lens, PoE, H.265

2

1
Telecamera
Istruzioni
per l’uso
CD Modello Viti Cacciavite
Cavo di
connessione
CVBS e DC
IN
Cappuccio
impermeabile
I
Avvertenze
- Prima di utilizzare il prodotto si raccomanda vivamente di leggere il manuale e di conservarlo in un luogo sicuro per consulta-
zione futura.
- Utilizzarel'alimentazionespecicataperilcollegamento.
- Evitare di azionare il prodotto in modo improprio, sottoporlo a urti o vibrazioni, forti pressioni che possono danneggiarlo.
- Non utilizzare detergenti corrosivi per pulire il corpo principale della telecamera. Se necessario, utilizzare un panno morbido
e asciutto per pulirla; in caso di sporco resistente utilizzare un detergente neutro. È possibile utilizzare detergenti per mobili di
qualità.
- Non puntare la telecamera direttamente verso oggetti estremamente luminosi, ad esempio il sole, in quanto si potrebbe dan-
neggiare il sensore d'immagine.
- Seguire le istruzioni per installare la telecamera. Non rovesciare la telecamera, altrimenti riceverà un'immagine rovesciata.
- Nonazionarlasetemperatura,umiditàealimentazionenoncorrispondonoailimitiovalorispecicati.
- Tenere lontano da fonti di calore quali radiatori, bocchette dell'aria calda, stufe e simili.
- Il presente documento contiene le istruzioni per l'uso del prodotto. Non è la garanzia di qualità. Ci riserviamo il diritto di correg-
gere errori di stampa, incongruenze con la versione più recente, aggiornamenti del software e miglioramenti, interpretazione
emodichealprodotto.Talicambiamentisarannopubblicatinellaversionepiùrecentesenzaprevianotica.
- Quando il prodotto è in uso, sono applicabili i contenuti di Microsoft, Apple e Google. Le immagini e le schermate di questo
manuale hanno lo scopo di spiegare l'utilizzo del prodotto. La proprietà dei marchi commerciali, dei logo e altre proprietà
intellettuali relative a Microsoft, Apple e Google appartengono alle suddette aziende.
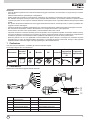
1 Confezione
Una volta ricevuto il dispositivo, controllare gli accessori indicati di seguito.
Le immagini valgono solo come riferimento.
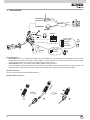
2 Panoramica
Questa serie di telecamere supporta obiettivi varifocali.
1
Cavo di rete
7
Cavo alimentazione
2
Cavo microfono
8
Zoom
3
Cavocufe
9
Messa a fuoco
4
Uscita video CVBS
10
Foro per il reset
5
Ingresso/Uscita allarme
11
Porta CVBS/DC IN per test
6
Cavo RS485
12
Slot per scheda TF

2
I
5RXWHU
&RPSXWHU
1
H
WZRUN&DEOH
1HWZRUN&DEOH
1HWZRUN&DEOH
1HWZRUN&DEOH
1HWZRUN&DEOH
0 R GHP
,QWHUQHW
0, &,1
0RQL WRU
+HDGSKRQH
'&9
$/0&20
$/012
$/0,1
$/0 *1'
567
567
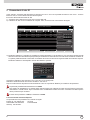
Collegamento dell'allarme
- Ingresso allarme: Sono presenti un morsetto di ingresso allarme (ALM-IN) e un morsetto di messa a terra (ALM-GND).
Nonsonorichiestisensoriditipospecico,datochesaràpossibileselezionarelamodalitàNO(normalmenteaperto)oNC
(normalmente chiuso). Unire i terminali di messa a terra del sensore e della telecamera, quindi collegare il cavo del segnale
del sensore alla porta di ingresso allarme della telecamera.
- Uscita allarme: Èpresenteun’uscitaallarme1CH,disponibilesulleconnessioniCOMeNO.
Allentarelevitidelmorsettodiuscitaallarme.CollegareicavideldispositivodiallarmerispettivamentealleconnessioniNO
eCOM.Inneserrareleviti.Alcunidispositiviesternidiuscitaallarmenecessitanodialimentazione.
Connessione RS485
È possibile controllare la Speed dome tramite l'interfaccia RS485.
Connessione cavo di rete
Router
Modem
Microfono
12 Vdc
Internet
Computer
Cufe
Cavi di rete
Cavi di rete
Cavi di rete
Cavi di rete
ALM-COM
ALM-NO
ALM-IN
ALM-GND
RS485T+
RS485T-
Cavi di rete
Monitor
3 Connessioni

3
r
r
r
I
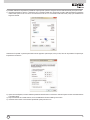
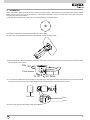
4 Installazione
Primadiiniziare,assicurarsichelapareteoilsofttosianosufcientementesolidipersopportaretrevolteilpesodellateleca-
mera. Installare e utilizzare la telecamera in ambiente asciutto. Si consiglia di riposizionare il copriobiettivo entro 4 ore dalla sua
rimozione. La procedura di montaggio è la seguente:
1) Praticare i fori per le viti e per il cavo sulla parete utilizzando la dima di foratura.
2) Passare i cavi e collegare il cavo di alimentazione e il cavo video.
3) Fissare la base di montaggio della telecamera alla parete con le viti, come descritto di seguito.
4) Regolazione della staffa. Prima della regolazione, visualizzare l’immagine della telecamera su un monitor e quindi allentare
laghieradissaggioperregolarel’angolodivisualedellatelecamera.
5)Regolazionedellamessaafuocoedellozoom(selatelecameraèdotatadiobiettivosso,saltarequestopassaggio).Ri-
muovereilcopriobiettivoeregolarelevitiperlamessaafuocoelozoomperottenereun'immaginenitida.Inne,serrarele
due viti e il copriobiettivo.
Copri obiettivo
Zoom
Messa a fuoco
6) Rimuovere delicatamente la pellicola di protezione per completare l'installazione.
Brandeggio
Vitisse
Inclinazione
Rotazione

4
I
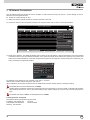
5 Connessioni di rete IE
Come esempio, accediamo alla telecamera IP attraverso la LAN. In una LAN è possibile accedere in due modi: 1. Accesso
tramite IP-Tool; 2. Accesso diretto tramite Internet Explorer.
►AccessoallatelecameratramiteIP-Tool
1) Assicurarsi che la telecamera e il PC siano connessi alla LAN.
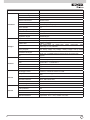
2) IndividuareIP-ToolnelCDeinstallarlosulcomputer.Inne,avviareIP-Toolcomemostratodiseguito.
Mac Address
IP Address
Modify Network Parameter
Modify
CE :98 :23 :75 :35 :22
192 .168 . 1 . 201
255 . 255 . 255 . 0
192 .168 . 1 . 1
Subnet Mask
Gateway
Device Network Search
Immediate Refresh
name
name
name
IPC
IPC
IPC
unknown
unknown
unknown
192.168.226.201
192.168.1.2
192.168.1.3
80
80
80
9008
9008
9008
255.255.
255.255.
255.255.
Modify Network Parameter
Mac Address
IP Address
Modify
CE :98 :23 :75 :35 :22
192 .168 . 226 . 201
255 . 255 . 255 . 0
192 .168 . 226 . 1
i
Tip: Enter the administrator password, and
then modify the network parameters.
Total Device: 3
Local IP Address:192.168.1.4
Subnet Mask:255.255.255.0 Gateway: 192.168.1.1 DNS210.21.196.6
Device NameDevice Type IP AddressHttp Port Data Port
Subnet
Product Model
About
Subnet Mask
Gateway
Restore IPC Default Configuration
3)Modicarel'indirizzoIP.L'indirizzoIPpredenitodiquestatelecameraè192.168.226.201.Fareclicsulleinformazionidella
telecameraelencatenellatabellasoprariportatapervisualizzareleinformazionidiretesulladestra.Modicarel'indirizzoIP
e il gateway della telecamera e assicurarsi che l'indirizzo di rete si trovi nello stesso segmento della rete locale del computer.
Modicarel'indirizzoIPdeldispositivoinbaseallasituazionespecica.
Mac Address
IP Address
Modify Network Parameter
Modify
CE :98 :23 :75 :35 :22
192 .168 . 1 . 201
255 . 255 . 255 . 0
192 .168 . 1 . 1
Subnet Mask
Gateway
Device Network Search
Immediate Refresh
name
name
name
IPC
IPC
IPC
unknown
unknown
unknown
192.168.226.201
192.168.1.2
192.168.1.3
80
80
80
9008
9008
9008
255.255.
255.255.
255.255.
Modify Network Parameter
Mac Address
IP Address
Modify
CE :98 :23 :75 :35 :22
192 .168 . 226 . 201
255 . 255 . 255 . 0
192 .168 . 226 . 1
i
Tip: Enter the administrator password, and
then modify the network parameters.
Total Device: 3
Local IP Address:192.168.1.4
Subnet Mask:255.255.255.0 Gateway: 192.168.1.1 DNS210.21.196.6
Device NameDevice Type IP AddressHttp Port Data Port
Subnet
Product Model
About
Subnet Mask
Gateway
Restore IPC Default Configuration
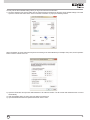
Ad esempio, l'indirizzo IP del computer in uso è 192.168.1.4. Di conseguenza
l'indirizzo IP della telecamera deve essere cambiato in 192.168.1.X.
Dopolamodicainserirelapassworddiamministratoreefareclicsulpulsante"Modica"permodicarel'impostazione.
Mac Address
IP Address
Modify Network Parameter
Modify
CE :98 :23 :75 :35 :22
192 .168 . 1 . 201
255 . 255 . 255 . 0
192 .168 . 1 . 1
Subnet Mask
Gateway
Device Network Search
Immediate Refresh
name
name
name
IPC
IPC
IPC
unknown
unknown
unknown
192.168.226.201
192.168.1.2
192.168.1.3
80
80
80
9008
9008
9008
255.255.
255.255.
255.255.
Modify Network Parameter
Mac Address
IP Address
Modify
CE :98 :23 :75 :35 :22
192 .168 . 226 . 201
255 . 255 . 255 . 0
192 .168 . 226 . 1
i
Tip: Enter the administrator password, and
then modify the network parameters.
Total Device: 3
Local IP Address:192.168.1.4
Subnet Mask:255.255.255.0 Gateway: 192.168.1.1 DNS210.21.196.6
Device NameDevice Type IP AddressHttp Port Data Port
Subnet
Product Model
About
Subnet Mask
Gateway
Restore IPC Default Configuration
Lapasswordpredenitadell'amministratoreè123456.
4) Fare doppio clic sull'indirizzo IP, il sistema aprirà Internet Explorer per collegare l'IP-CAM. Internet Explorer scarica auto-
maticamenteicontrolliActiveX.Dopoildownloadvienevisualizzatalanestradiaccesso.ImmettereUserName(Nome
utente) e Password per accedere.
Mac Address
IP Address
Modify Network Parameter
Modify
CE :98 :23 :75 :35 :22
192 .168 . 1 . 201
255 . 255 . 255 . 0
192 .168 . 1 . 1
Subnet Mask
Gateway
Device Network Search
Immediate Refresh
name
name
name
IPC
IPC
IPC
unknown
unknown
unknown
192.168.226.201
192.168.1.2
192.168.1.3
80
80
80
9008
9008
9008
255.255.
255.255.
255.255.
Modify Network Parameter
Mac Address
IP Address
Modify
CE :98 :23 :75 :35 :22
192 .168 . 226 . 201
255 . 255 . 255 . 0
192 .168 . 226 . 1
i
Tip: Enter the administrator password, and
then modify the network parameters.
Total Device: 3
Local IP Address:192.168.1.4
Subnet Mask:255.255.255.0 Gateway: 192.168.1.1 DNS210.21.196.6
Device NameDevice Type IP AddressHttp Port Data Port
Subnet
Product Model
About
Subnet Mask
Gateway
Restore IPC Default Configuration
IlNomeUtentepredenitoèadmin, la Password è 123456.
► Accesso diretto da Internet Explorer
Leimpostazionidiretepredenitesonoindicatediseguito:
Indirizzo IP: 192.168.226.201 HTTP:80
Subnet Mask: 255.255.255.0 Porta Dati:9008
Gateway: 192.168.226.1

5
I
Mac Address
IP Address
Modify Network Parameter
Modify
CE :98 :23 :75 :35 :22
192 .168 . 1 . 201
255 . 255 . 255 . 0
192 .168 . 1 . 1
Subnet Mask
Gateway
Device Network Search
Immediate Refresh
name
name
name
IPC
IPC
IPC
unknown
unknown
unknown
192.168.226.201
192.168.1.2
192.168.1.3
80
80
80
9008
9008
9008
255.255.
255.255.
255.255.
Modify Network Parameter
Mac Address
IP Address
Modify
CE :98 :23 :75 :35 :22
192 .168 . 226 . 201
255 . 255 . 255 . 0
192 .168 . 226 . 1
i
Tip: Enter the administrator password, and
then modify the network parameters.
Total Device: 3
Local IP Address:192.168.1.4
Subnet Mask:255.255.255.0 Gateway: 192.168.1.1 DNS210.21.196.6
Device NameDevice Type IP AddressHttp Port Data Port
Subnet
Product Model
About
Subnet Mask
Gateway
Restore IPC Default Configuration
2)AprireInternetExplorer,inserirel'indirizzopredenitodell'IP-CAMeconfermare.InternetExplorerscaricaautomaticamente
i controlli ActiveX.
3)DopoildownloaddeicontrolliActiveX,vienevisualizzatalanestradidialogodiaccesso.
4)InserireilNomeUtenteelaPasswordpredenitequindipremereInvio.
Èpossibileutilizzareleimpostazionipredenitesoprariportatequandosieseguel'accessoallatelecameraperlaprimavolta.
1)Impostarel'indirizzoIPdelPCeassicurarsicheilsegmentodellaretecorrispondaaquellodelleimpostazionipredenite
dell'IP-CAM.Aprirelareteeilcentrodicondivisione.Fareclicsu"Connessioneallaretelocale(LAN)"pervisualizzarela
seguentenestra.
Selezionare"Proprietà"equindiilprotocolloInternetopportuno(adesempio,IPV4).Inne,fareclicsulpulsante"Proprietà"per
impostare la rete del PC.
Mac Address
IP Address
Modify Network Parameter
Modify
CE :98 :23 :75 :35 :22
192 .168 . 1 . 201
255 . 255 . 255 . 0
192 .168 . 1 . 1
Subnet Mask
Gateway
Device Network Search
Immediate Refresh
name
name
name
IPC
IPC
IPC
unknown
unknown
unknown
192.168.226.201
192.168.1.2
192.168.1.3
80
80
80
9008
9008
9008
255.255.
255.255.
255.255.
Modify Network Parameter
Mac Address
IP Address
Modify
CE :98 :23 :75 :35 :22
192 .168 . 226 . 201
255 . 255 . 255 . 0
192 .168 . 226 . 1
i
Tip: Enter the administrator password, and
then modify the network parameters.
Total Device: 3
Local IP Address:192.168.1.4
Subnet Mask:255.255.255.0 Gateway: 192.168.1.1 DNS210.21.196.6
Device NameDevice Type IP AddressHttp Port Data Port
Subnet
Product Model
About
Subnet Mask
Gateway
Restore IPC Default Configuration

6
I
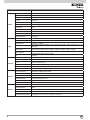
Articolo 46216.310E
Telecamera
Sensore di immagine 1/1.8"CMOS
Dimensione immagine 2592×1944
Otturatoreelettronico 1/25 s ~ 1/100000 s
Diaframma automatico Diaframmasso
Illuminazione minima 0,01lux(conF1.2),AGCON:0LuxconIR
Obiettivo 3,6~10 mm (con F1,4), angolo di visuale: 83,7°~36,7°
Attacco obiettivo ø14
Day & Night (giorno/notte) ICR
WDR WDR digitale
NR digitale DNR 3D
Regolazione angolo Qualsiasi angolo
Immagine
Compressione video H.265/H.264/MJPEG
Tipo H.265 Proloprincipale(conLivello4.1HighTier)
Bit Rate video 64 Kbps ~ 10 Mbps
Risoluzione
5MP (2592×1944), 2K (2560×1440), 1080P (1920×1080), 720P
(1280×720), D1, CIF, 480×240
Flusso principale
60Hz: 5MP (1~30fps) / 2K (1~30fps) / 1080P (1~30fps) / 720P (1~30fps)
50Hz: 5MP (1~25fps) / 2K (1~25fps) / 1080P (1~25fps) / 720P (1~25fps)
Impostazioni immagine
Saturazione, luminosità, colore, contrasto, WDR, nitidezza, riduzione
rumore, ecc., regolabile tramite il software client o il browser web
ROI Supporto
Interfacce
Rete 1 Porta RJ45 10M/100M/1000M
Video Uscita CVBS (BNC ×1)
Audio Ingresso MIC × 1, Uscita MIC × 1
Archiviazione SupportoschedaTF,noa64GB
RS485 Supporto
Allarme Ingresso allarme 1CH; uscita allarme 1CH.
Funzione
Monitoraggio remoto Browser IE, controllo da remoto con CMS
Collegamento online
Supportailmonitoraggiosimultaneonoa10utentietrasmissionemulti
usso
Protocollo di rete TCP/IP, UDP, DHCP, NTP, RTSP, PPPoE, DDNS, SMTP, FTP
Protocollo interfaccia ONVIF,GB-T/28181-2011
Archiviazione Archiviazione su scheda TF, archiviazione remota in rete
Allarme intelligente Allarme movimento, Allarme sensore
Funzione
Portata IR 30~50 m
Livello protezione IP66
Alimentazione 12 VCC / PoE
Assorbimento <3W(ICROFF);<7,5W(ICRON)
Parametri ambientali Temperatura: -20°C ~ 50°C, Umidità: 10%~90%

7
EN
Cautions
- Before operation, we strongly advise users to read this manual and keep it properly for using later.
- Pleaseusethespeciedpowersupplytoconnect.
- Avoid from in correct operation, shock vibration, heavy pressing which can cause damage to product.
- Do not use corrosive detergent to clean main body of the camera. If necessary, please use soft dry cloth to wipe dirt; for hard
contamination, use neutral detergent. Any cleanser for high grade furniture is applicable.
- Avoid aiming the camera directly towards extremely bright objects, such as, sun, as this may damage the image sensor.
- Please follow the instructions to install the camera. Do not reverse the camera, or the reversing image will be received.
- Do not operate it incase temperature, humidity and power supply are beyond the limited stipulations.
- Keep away from heat sources such as radiators, heat registers, stove., etc.
- This is product instructions not quality warranty. We may reserve the rights of amending the typographical errors, inconsisten-
cieswiththelatestversion,softwareupgradesandproductimprovements,interpretationandmodication.Thesechangeswill
bepublishedinthelatestversionwithoutspecialnotication.
- When this product is in use, the relevant contents of Microsoft, Apple and Google will be involved in. The pictures and scre-
enshots in this manual are only used to explain the usage of our product. The ownerships of trademarks, logos and other
intellectual properties related to Microsoft, Apple and Google belong to the above-mentioned companies.
Camera
Quick Start
guide
CD
Drill
template
Screws &
spiles
Screw-
driver
CVBS & DC
IN cables
Water-proof
Cap
1 Package
After you receive your device, please check the following accessories.
The pictures here are for reference only.
2 Overview
This series of cameras support varifocal lens.
1
Network Cable
7
Power Cable
2
Microphone Cable
8
Zoom
3
Headphone Cable
9
Focus
4
CVBSVideoOutput
10
Reset Hole
5
AlarmInput/Output
11
CVBS/DC IN port for testing
6
RS485 Cable
12
TF Card Slot

8
5RXW HU
&RPSXWHU
1
H
WZRUN&DEOH
1HWZRUN&DEOH
1HWZRUN&DEOH
1HWZRUN&DEOH
1HWZRUN&DEOH
0 R GHP
,QWHUQHW
0, &,1
0RQL WRU
+HDGSKRQH
'&9
$/0&20
$/012
$/0,1
$/0 *1'
567
567
Alarm Connection:
- Alarm Input: There is one independent alarm input port (ALM-IN) and one grounding port (ALM-GND).There are no type
requirementsforsensors.NOandNCarebothavailable.Jointhegroundingendsofthesensorandthecameraandthen
connect the signal cable of the sensor to the alarm input port of the camera.
- Alarm Output: Thereis1CHalarmoutputincludingCOMandNOconnections.
Loosenthescrewsinthealarmoutputport.TheninsertthesignalwiresofthealarmoutputdevicesintotheportofNOand
COMseparately.Finallytightenthescrews.Someoftheexternalalarmoutputdevicesneedthepowersupply.
RS 485 Connection:
You can control the speed dome by RS485 interfaces.
Network Cable Connection:
EN
Router
Modem
Mic IN
12 Vdc
Internet
Computer
Headphone
Network cables
Network cables
Network cables
Network cables
ALM-COM
ALM-NO
ALM-IN
ALM-GND
RS485T+
RS485T-
Network
cables
Monitor
3 Connections

9
EN
4 Installation
Before start, please make sure that the wall or ceiling is strong enough to withstand 3 times the weight of the camera. Please
install and use the camera in the dry environment. You’d better install back the lens cover less than 4 hours after removing it.
The mounting steps are as follows:
1) Drill the screw holes and the cable hole on the wall according to the drill template.
2) Route the cables and connect the power cable and video cable.
3) Secure the mounting base with camera to the wall with screws as shown below.
4)Bracketadjustment.Beforeadjustment,previewtheimageofthecameraonamonitorandthenloosenthexedringtoadjust
the view angle of the camera.
r
r
r
5)Focusandzoomadjustment(Ifthemodelyougetisxedlens,pleaseskipthisstep).Removethelenscoverandthenadjust
the focus and zoom screws to get a clear image. Finally, tighten these two screws and the lens cover.
Lens cover
Zoom
Focus
6)Removetheprotectionlmsoftlytonishtheinstallation.
PAN
Fixed screws
Tilt
Rotate

10
EN
5 IE Network Connections
Here we take accessing IP camera via LAN for example. In LAN, there are two ways to access. 1. Access through IP-Tool; 2.
Directly Access through IE Browser
►AccessthecamerathroughIP-Tool
1) Make sure that the camera and the PC are well connected to the LAN.
2) Find the IP-Tool from the CD and then install it in the computer. After
that, run the IP-Tool as shown below.
Mac Address
IP Address
Modify Network Parameter
Modify
CE :98 :23 :75 :35 :22
192 .168 . 1 . 201
255 . 255 . 255 . 0
192 .168 . 1 . 1
Subnet Mask
Gateway
Device Network Search
Immediate Refresh
name
name
name
IPC
IPC
IPC
unknown
unknown
unknown
192.168.226.201
192.168.1.2
192.168.1.3
80
80
80
9008
9008
9008
255.255.
255.255.
255.255.
Modify Network Parameter
Mac Address
IP Address
Modify
CE :98 :23 :75 :35 :22
192 .168 . 226 . 201
255 . 255 . 255 . 0
192 .168 . 226 . 1
i
Tip: Enter the administrator password, and
then modify the network parameters.
Total Device: 3
Local IP Address:192.168.1.4
Subnet Mask:255.255.255.0 Gateway: 192.168.1.1 DNS210.21.196.6
Device NameDevice Type IP AddressHttp Port Data Port
Subnet
Product Model
About
Subnet Mask
Gateway
Restore IPC Default Configuration
3) Modify the IP address. The default IP address of this camera is 192.168.226.201. Click the information of the camera listed
in the above table to show the network information on the right hand. Modify the IP address and gateway of the camera and
make sure its network address is in the same local network segment as the computer’s. Please modify the IP address of your
device according to the practical situation.
Mac Address
IP Address
Modify Network Parameter
Modify
CE :98 :23 :75 :35 :22
192 .168 . 1 . 201
255 . 255 . 255 . 0
192 .168 . 1 . 1
Subnet Mask
Gateway
Device Network Search
Immediate Refresh
name
name
name
IPC
IPC
IPC
unknown
unknown
unknown
192.168.226.201
192.168.1.2
192.168.1.3
80
80
80
9008
9008
9008
255.255.
255.255.
255.255.
Modify Network Parameter
Mac Address
IP Address
Modify
CE :98 :23 :75 :35 :22
192 .168 . 226 . 201
255 . 255 . 255 . 0
192 .168 . 226 . 1
i
Tip: Enter the administrator password, and
then modify the network parameters.
Total Device: 3
Local IP Address:192.168.1.4
Subnet Mask:255.255.255.0 Gateway: 192.168.1.1 DNS210.21.196.6
Device NameDevice Type IP AddressHttp Port Data Port
Subnet
Product Model
About
Subnet Mask
Gateway
Restore IPC Default Configuration
For example, the IP address of your computer is 192.168.1.4. So the IP
address of the camera shall be changed to 192.168.1.X.
Aftermodication,pleaseinputthepasswordoftheadministratorandclick“Modify”buttontomodifythesetting.
Mac Address
IP Address
Modify Network Parameter
Modify
CE :98 :23 :75 :35 :22
192 .168 . 1 . 201
255 . 255 . 255 . 0
192 .168 . 1 . 1
Subnet Mask
Gateway
Device Network Search
Immediate Refresh
name
name
name
IPC
IPC
IPC
unknown
unknown
unknown
192.168.226.201
192.168.1.2
192.168.1.3
80
80
80
9008
9008
9008
255.255.
255.255.
255.255.
Modify Network Parameter
Mac Address
IP Address
Modify
CE :98 :23 :75 :35 :22
192 .168 . 226 . 201
255 . 255 . 255 . 0
192 .168 . 226 . 1
i
Tip: Enter the administrator password, and
then modify the network parameters.
Total Device: 3
Local IP Address:192.168.1.4
Subnet Mask:255.255.255.0 Gateway: 192.168.1.1 DNS210.21.196.6
Device NameDevice Type IP AddressHttp Port Data Port
Subnet
Product Model
About
Subnet Mask
Gateway
Restore IPC Default Configuration
The default password of the administrator is 123456.
4) Double-click the IP address and then the system will pop up the IE browser to connect IP-CAM . IE browser will automati-
cally download the Active X control. After downloading, a login window will pop up. Input the user name and password to
login.
Mac Address
IP Address
Modify Network Parameter
Modify
CE :98 :23 :75 :35 :22
192 .168 . 1 . 201
255 . 255 . 255 . 0
192 .168 . 1 . 1
Subnet Mask
Gateway
Device Network Search
Immediate Refresh
name
name
name
IPC
IPC
IPC
unknown
unknown
unknown
192.168.226.201
192.168.1.2
192.168.1.3
80
80
80
9008
9008
9008
255.255.
255.255.
255.255.
Modify Network Parameter
Mac Address
IP Address
Modify
CE :98 :23 :75 :35 :22
192 .168 . 226 . 201
255 . 255 . 255 . 0
192 .168 . 226 . 1
i
Tip: Enter the administrator password, and
then modify the network parameters.
Total Device: 3
Local IP Address:192.168.1.4
Subnet Mask:255.255.255.0 Gateway: 192.168.1.1 DNS210.21.196.6
Device NameDevice Type IP AddressHttp Port Data Port
Subnet
Product Model
About
Subnet Mask
Gateway
Restore IPC Default Configuration
The default user name is admin; the default password is 123456.
► Directly Access Through IE
The default network settings are as shown below:
IP address: 192.168.226.201 HTTP:80
Subnet Mask: 255.255.255.0 Data Port:9008
Gateway: 192.168.226.1

11
EN
Mac Address
IP Address
Modify Network Parameter
Modify
CE :98 :23 :75 :35 :22
192 .168 . 1 . 201
255 . 255 . 255 . 0
192 .168 . 1 . 1
Subnet Mask
Gateway
Device Network Search
Immediate Refresh
name
name
name
IPC
IPC
IPC
unknown
unknown
unknown
192.168.226.201
192.168.1.2
192.168.1.3
80
80
80
9008
9008
9008
255.255.
255.255.
255.255.
Modify Network Parameter
Mac Address
IP Address
Modify
CE :98 :23 :75 :35 :22
192 .168 . 226 . 201
255 . 255 . 255 . 0
192 .168 . 226 . 1
i
Tip: Enter the administrator password, and
then modify the network parameters.
Total Device: 3
Local IP Address:192.168.1.4
Subnet Mask:255.255.255.0 Gateway: 192.168.1.1 DNS210.21.196.6
Device NameDevice Type IP AddressHttp Port Data Port
Subnet
Product Model
About
Subnet Mask
Gateway
Restore IPC Default Configuration
2)OpentheIEBrowserandinputthedefaultaddressofIP-CAMandconrm.TheIEbrowserwilldownloadActiveXcontrol
automatically.
3) After downloading Active X control, the login dialog box will pop up.
4) Input the default username and password and then enter to view.
Youmayusetheabovedefaultsettingswhenyouloginthecameraforthersttime.
1) Set the IP address of the PC and make sure the network segment should be as the same as the default settings of IP-CAM.
Openthenetworkandsharecenter.Click“LocalAreaConnection”topopupthefollowingwindow.
Select“Properties”andthenselectInternetprotocolaccordingtotheactualsituation(forexample:IPv4).Next,click“Properties”
button to set the network of the PC.
Mac Address
IP Address
Modify Network Parameter
Modify
CE :98 :23 :75 :35 :22
192 .168 . 1 . 201
255 . 255 . 255 . 0
192 .168 . 1 . 1
Subnet Mask
Gateway
Device Network Search
Immediate Refresh
name
name
name
IPC
IPC
IPC
unknown
unknown
unknown
192.168.226.201
192.168.1.2
192.168.1.3
80
80
80
9008
9008
9008
255.255.
255.255.
255.255.
Modify Network Parameter
Mac Address
IP Address
Modify
CE :98 :23 :75 :35 :22
192 .168 . 226 . 201
255 . 255 . 255 . 0
192 .168 . 226 . 1
i
Tip: Enter the administrator password, and
then modify the network parameters.
Total Device: 3
Local IP Address:192.168.1.4
Subnet Mask:255.255.255.0 Gateway: 192.168.1.1 DNS210.21.196.6
Device NameDevice Type IP AddressHttp Port Data Port
Subnet
Product Model
About
Subnet Mask
Gateway
Restore IPC Default Configuration

12
Article 46216.310E
Camera
Image Sensor 1/1.8"CMOS
Image Size 2592×1944
Electronic Shutter 1/25 s ~ 1/100000 s
Auto Iris Fixed iris
Min. llumination 0.01lux@F1.2,AGCON:0luxwithIR
Lens 3.6~10 mm @ F1.4, angle of view: 83.7°~36.7°
Lens mount ø14
Day & Night ICR
WDR Digital WDR
Digital NR 3D DNR
Angle Adjustment Any angle
Image
Video compression H.265/H.264/MJPEG
H.265 Type MainProle@Leve4.1HighTier
Video Bit Rate 64 Kbps ~ 10 Mbps
Resolution
5MP (2592×1944), 2K (2560×1440), 1080P (1920×1080), 720P (1280×720), D1, CIF,
480×240
Main Stream
60Hz: 5MP (1~30fps) / 2K (1~30fps) / 1080P (1~30fps) / 720P (1~30fps)
50Hz: 5MP (1~25fps) / 2K (1~25fps) / 1080P (1~25fps) / 720P (1~25fps)
Image Settings
Saturation, Brightness, Chroma, Contrast, Wide Dynamic, Sharpen, NR, etc. adju-
stable through client or web browser
ROI Support
Interfaces
Network 1 RJ45 10M/100M/1000M port
Video CVBS output (BNC ×1)
Audio MICIN×1;MICOUT×1
Storage Support TF card, up to 64GB
RS485 Support
Alarm 1 CH alarm input; 1 CH alarm output
Function
Remote Monitoring IE browser, CMS remote control
OnlineConnection Support simultaneous monitoring for up to 10 users and multi-stream transmission
Network Protocol TCP/IP, UDP, DHCP, NTP, RTSP, PPPoE, DDNS, SMTP, FTP
Interface Protocol ONVIF,GB-T/28181-2011
Storage TF card storage; network remote storage
Smart Alarm Motion alarm; sensor alarm
Function
IR Distance 30~50 m
Protection Grade IP66
Power 12 Vdc / PoE
Power Consumption <3W(ICROFF);<7.5W(ICRON)
OpteratingEnvironment Temperature: -20 °C~50 °C; Humidity: 10%~90%
EN

13

Vimar SpA: Viale Vicenza, 14
36063 Marostica VI - Italy
Tel. +39 0424 488 600 - Fax (Italia) 0424 488 188
Fax (Export) 0424 488 709
www.vimar.com
49400986A0 00 16 01
VIMAR - Marostica - Italy
-
 1
1
-
 2
2
-
 3
3
-
 4
4
-
 5
5
-
 6
6
-
 7
7
-
 8
8
-
 9
9
-
 10
10
-
 11
11
-
 12
12
-
 13
13
-
 14
14
-
 15
15
-
 16
16


Elvox 46216.310E Istruzioni per l'uso
- Categoria
- Telecamere di sicurezza
- Tipo
- Istruzioni per l'uso
in altre lingue
Documenti correlati
Altri documenti
-
Vimar 4621.2812DA Manuale utente
-
-
CAME XTNC50BV, XTNC40BV1 Guida d'installazione
-
-
-
-
-
-
-
Messoa NCB858 Guida Rapida