Brandt AX545FXZ1 Manuale del proprietario
- Categoria
- Lavastoviglie
- Tipo
- Manuale del proprietario

EN INSTRUCTIONS FOR USE
Dishwasher

Présentation de votre lave-vaisselle
2
EN
Contents
Please read carefully Precautions when using
Environmental protection Advice, tips and remarks
Page
1 - Description of your dishwasher _______________4-5
2 - What to do before using the machine for the first time______6-9
Step 1: A
djusting the water softener – Measuring the water hardness _
6
Setting on the control panel ______________________________6
Filling the regenerating salt reservoir _______________________7
Step 2:
Rinse aid – Filling – Setting _______________________8
Step 3: Washing products _______________________________9
3 - Loading the dishwasher___________________10-12
The lower basket – Cutlery – The upper basket ___________10-12
4 – Everyday: selecting a washing programme __________13
Everyday: selecting a delayed programme finishing time13
The washing programmes ________________________14-15
Maining of the symbols _______________________16-17
Starting the programme; its various stages __________17
5 - Occasionally : Options, settings ___________________18
Setting the time - Releasing the regenerating salt____________18
and rinsing agent – Checking the water softener’s setting _____18
Cancelling a programme - Interaxio - Air drying System _______19
6 - The safety systems _________________________20
7 - Running maintenance ________________________21-22
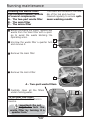
Cleaning the waste filters _______________________________21
Cleaning and maintenance_______________________________22
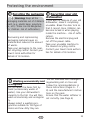
8 - Protecting the environment________________23
Recycling the packaging ________________________________23
Recycling your old dishwasher____________________________23
Washing ecologically and economically_____________________23
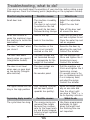
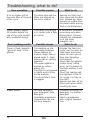
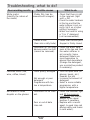
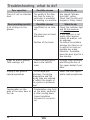
9 - Troubleshooting, what to do? ______________24-28
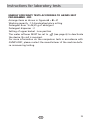
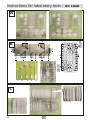
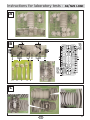
10 - Instructions for laboratory tests ___________29-31

3
EN
Dear Customer,
You have just acquired a BRANDT dishwasher and we would like to thank you.
We have invested all our dedication and know-how in this appliance so that it
would best meet your needs. With innovation and performance, we designed it to
be always easy to use.
In the BRANDT product range, you will also find a wide choice of ovens, micro-
waves, cooking hobs, ventilation hoods, cookers, washing machines, driers,
fridges and freezers, that you can coordinate with your new BRANDT dishwasher.
Visit our website
www.brandt.com
where you will find all of our products, as well
as useful and complementary information.
BRANDT
As part of our commitment to constantly improving our products, we reserve the right to
make changes to them based on technical advances to their technical and functional fea-
tures and appearance.
WWaarrnniinngg ::
BBeeffoorree iinnssttaalllliinngg aanndd uussiinngg yyoouurr aapppplliiaannccee,, pplleeaassee ccaarreeffuullllyy rreeaadd tthhiiss
GGuuiiddee ttoo UUssee,, wwhhiicchh wwiillll aallllooww yyoouu ttoo qquuiicckkllyy ffaammiilliiaarriissee yyoouurrsseellff wwiitthh iittss
ooppeerraattiioonn..

Présentation de votre lave-vaisselle
4
EN
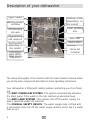
Description of your dishwasher
The above photograph of the machine with the lower basket removed shows
you all the main components described in these operating instructions.
Regenerating
salt reservoir
Waste filters
Washing product
container
Rinse aid
container
Lower sprinkling
arm
Information
plate (After-
Sales service
reference)
Drying valve
(depending on
the model)
Upper basket
Main filter
Anti-blocking
size wire
Your dishwasher is fitted with safety systems protecting you from flood-
ing:
The ANTI-OVERFLOW SYSTEM. This system automatically activates
the drain pump if the water in the tub reaches an abnormal level.
The ANTI-LEAK SYSTEM. This system cuts off the water supply if a
leak is detected under the machine.
The OVERALL SAFETY DEVICE: The water supply hose is fitted with
a mechanism that cuts off the water supply directly at the tap if a water
leak occurs.
Rotating nozzle
(depending on
the model)

Présentation de votre lave-vaisselle
5
EN
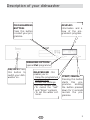
Description of your dishwasher
ON/OFF:Press
this button to
switch your dish-
washer on.
START/CANCEL:
Pressing this button
starts this pro-
gramme. Holding
the button pressed
down for 2 seconds
cancels the pro-
gramme.
PROGRAMMES
BUTTON:
Press this button
to select your pro-
gramme.
DISPLAY:
Information and a
view of the pro-
gramme’s progress.
DELAYED END : this
enables you to:
- Delay the programme’s
finishing time
- Access the settings:
•
For the current time
•
To cancel the “Salt”
and “Rinse” symbols
•
To set the water sof-
tener
.
WASHING OPTION:
Special Pot programme

Présentation de votre lave-vaisselle
6
EN
What to do before using the machine for the first time
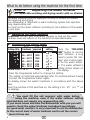
STEP 1: Adjusting the water softener
For impeccable washing and drying results with no streaks.
The water softener must be adjusted correctly to ensure no streaks
after washing and drying.
Your dishwasher is fitted with a water softening system that operates
using regenerating salt.
You must set the water softener according to the hardness of the water
in your area.
Salt
required
Dureté d’eau > 70 °F
0 - 10°F
10 - 18°F
18 - 25°F
25 - 40°F
40 - 55°F
55 - 70°F
NO
YES
YES
YES
YES
YES
YES
Water softener
setting
Water
hardness
Testing strip
➁➁
-
Settings on the control panel
Press the “
DELAYED
END
” button to set the
water softener: a long
press to access the “set-
tings” and 3 short press-
es for the water soften-
er. The water softener’s
setting is then shown on
the display.
• Press the Programmes button to change the setting
• The setting is confirmed automatically after 10 seconds without having
to press the Programmes button again.
The display shows the water’s hardness in accordance with the above
table.
When the machine is first switched on, the setting is 10 - 25° ( on
the display)
.
Ca
Ca
Ca
Ca
Ca
Ca
Ca
Ca
You must fill the salt reservoir with water before
using the machine, even if the water softener setting
selected does not require any regenerating salt.
If you move house and take the dishwasher with you you will
need to check the water hardness and adjust accordingly.
For good wash results it is very important to set the dishwasher
to the correct level of water hardness and to set the correct
level of rinse aid.
➀➀
-
Measuring the water hardness
To do this: contact your local water supplier to find out the water
hardness level and adjust on the machine as described below.

Présentation de votre lave-vaisselle
7
EN
What to do before using the machine for the first time
See Page 18-20 : symbol
indicating the level of regener-
ating salt:
After you have refilled the salt
reservoir, this symbol may still
flash until the salt has dissolved
sufficiently, generally after one
cycle (or if the reservoir has not
been completely filled, for instance
when putting the machine into
operation using the sample).
If the water is especial-
ly soft and does not require
the use of any regenerating salt, the
SALT light remains lit.
③③
Filling the regenerating salt reservoir
You must fill this, with water just
before starting your first wash then
add the salt:
Filling with salt is essential to obtain a good
wash with no streaks. The salt regener-
ates the resins, which soften the water by
removing its limestone content unless
the water is already sufficiently soft
(see “Adjusting the water softener”).
Salt reservoir
Should any regenerating salt overflow when filling,
we recommend that you remove the loose salt crystals
to avoid oxidising the machine.
Never put deter-
gent in this reser-
voir: this will ruin
the water softener.
- Unscrew the salt reservoir’s stopper and
remove it.
- Use the funnel to introduce the salt.
(available from the after-sales department
under reference : 31X3964).
- Fill the reservoir with regenerating salt
specially designed for dishwashers.
- On the first time, add
water until it reaches the
edge of the reservoir.
- Screw the salt reservoir’s stop
back in fully.
Do not use kitchen salt.
SALT

Présentation de votre lave-vaisselle
8
EN
What to do before using the machine for the first time
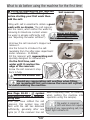
Contents: 120 ml (approx. one glass)
Should any regenerating salt
overflow when filling, mop up the
excess to avoid foam forming.
➀➀
Filling
When putting the machine into oper-
ation, fill the container level with the
top of the adjustment lever.
Put in at least all the contents of the
sample supplied.
Close the container tightly
See Page 18-20: symbol indicating the level of rinse aid.
Opaque: some product remaining
Brilliant: container empty
Indicator:
STEP 2: Rinse aid
For brilliant and very dry results
➁➁
Adjustment (if necessary)
The original setting is in the middle
(Medium position: setting 2).
After a few cycles, if there are streaks or
the drying is poor, you can adjust the set-
ting using the adjustment lever:
- Setting 1 to reduce the dose, (soft water)
- Setting 3 to increase the dose
(hard water)
Adjustment lever

Présentation de votre lave-vaisselle
9
EN
What to do before using the machine for the first time
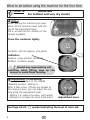
STEP 3: the washing products
for a clean wash
For easy loading, the detergent container is located on the front of the
upper basket.
The detergent container is designed to take tablets powder or liquid
recommended for dishwasher use.
VERY IMPORTANT:
- For good wash results it is recommended to use individual
detergent, salt and rinse aid products.
- However “2 in 1” tablets (detergent and rinse aid) can be
used, if so, you may need to adjust the rinse aid dial according
to the wash results.
- Good wash results depend on getting the salt + rinse aid
levels set correctly according to use level of water hardness.
Tablets
Place the tablet in the compartment.
underneath the top basket.
Only use the washing
products specially desi-
gned for dishwasher use.
Powder or liquid
Pull the container out to fill it with liquid deter-
gent or powder.
Fill it up to the Minimum mark for lightly soiled
items.
Fill it up to the Maximum mark for dirty items.
Close the container.
Keep all these pro-
ducts out of children’s
reach and away from
any damp environments.

Présentation de votre lave-vaisselle
10
EN
Loading the dishwasher
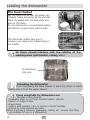
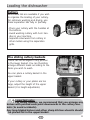
The lower basket
Lay the items out so that the water can
circulate freely and spray all the utensils.
Place the plates and the wide pots and
pans at the sides.
Do not intersperse or superimpose plates
and dishes or place them side-by-side.
The fold-down spikes help you to
arrange your large items (depending on
the model).
No items should interfere with the rotation of the
washing arms (pot handles, cutlery, etc.)
Anti-blocking
size wire
Unloading the dishwasher
First of all empty the lower basket to avoid any drops of water
falling onto it from the upper basket.
Items unsuitable for dishwasher use
- Wooden cutting boards
- Oxidisable steel or non heat-resistant plastic utensils,
- Pewter or copper items,
- Glued items,
- Cutlery with wooden, horn or mother-of-pearl handles,
- Antique or hand-painted porcelain.
When purchasing crockery, glassware, cutlery, etc., ensure that they
are suitable for use in a dishwasher.

Présentation de votre lave-vaisselle
11
EN
Loading the dishwasher
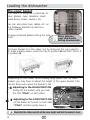
Important note:
For safety reasons, we recommend that you arrange any
knives with pointed ends point downwards in the cutlery bas-
kets (to avoid accidents).
Any long-bladed knives and other sharp kitchen utensils should
be placed flat in the upper basket.
The sliding cutlery baskets
These can be arranged in any position
in the lower basket. You can therefore
arrange different loads according to the
items you wish to wash.
You can place a cutlery basket in the
upper basket.
If your cutlery or your plates are too
large, adjust the height of the upper
basket (it is height-adjustable).
Cutlery
Removable lids are available if you wish
to organise the loading of your cutlery.
For optimum washing and drying, use
these separation lids fully or partially.
- Place your cutlery with the handles at
the bottom.
- Avoid washing cutlery with horn han-
dles in your machine.
- Separate silverware from cutlery in
other metals using the separation
grills.

Présentation de votre lave-vaisselle
12
EN
Loading the dishwasher
①①
②②
Adjusting to the HIGH POSITION:
Gently lift the basket until you hear
the first “Click” on both sides.
Adjusting to the LOW POSITION:
Lift the basket at the back on both sides
(“Click”) and then gently lower it.
Depending on the model: when loading large plates into the lower
basket, you may have to adjust the height of the upper basket. This
can be done even when the basket is full.
Check that the slides are both at the same height and that the basket is level.
The upper basket
This basket is designed in particular to
take: glasses, cups, ramekins, small
salad bowls, bowls, saucers, etc.
You can also place cups, ladles, etc. on
the foldaway brackets as well as a
cutlery basket.
Arrange stemmed glasses along the wire
shelf.
Place glasses,
cups and bowls
facing downwards.
The wire tray enables you to load cutlery of all sizes. You can lay it in
the lower basket or in the upper one by removing the cup supports.
To make loading easier, move the tray to position
➊
and then return it
to position
➋
.

Présentation de votre lave-vaisselle
13
EN
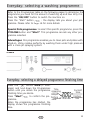
Everyday: selecting a washing programme
Everyday: selecting a delayed programme finishing time
Refer to the Programmes table on the following pages to determine the
programme you need for the amount of washing up and how dirty it is.
Press the “ON/OFF” button to switch the machine on.
Press the “Start” button : the display tells you about your pro-
gramme. Please refer to Page 16 for more details.
Press the “”button once (1 short
press) and hold down the Programmes
button until you obtain the programme
finishing time you desire.
Press “Start” to confirm the pro-
gramme.
When the programme has started, the
display shows the programme finishing
time.
Delayed
finishing
time
Finishing
time
Time
remaining
Current
time
Special Pots programme: to select this specific programme, press the
CYCLONE button and “Start”. This programme cancels any other pro-
gramme selected.
Advantages: this programme enables you to clean pots and plates with
dried-on, sticky residue perfectly by washing them under high pressure
with a cross-jet spraying system.

Présentation de votre lave-vaisselle
14
EN
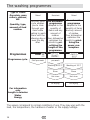
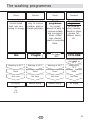
The washing programmes
Air drying
Resistant
An automatic
programme
adapted to the
quantity of
items and any
amount of
residue.
Your dishwasher
optimises the
results by pri-
oritising the
length of the
programme.
Mixed
Type of items:
-Porcelain, pans,
cutlery, glasses,
etc.
Quantity, type,
amount of food
residue.
Programmes
Programme cycle.
For information
only
Length in minutes
Water
Energy
Hot rinse
Air drying
Hot rinse
Rinse Rinse
Washing at 55°C Washing at 55°C
pre-wash
Mixed
This very short
cycle enables
you to rinse
through your
items while
waiting to wash
them until the
following day or
even the day
after.
Cold pre-wash
An automatic
programme
adapted to the
quantity of items
and any amount
of residue.
Your dishwasher
optimises the
results by priori-
tising the
power con-
sumption.
Soak
The values correspond to normal conditions of use. They may vary with the
load, the temperature, the hardness of water or the supply voltage.

Présentation de votre lave-vaisselle
15
EN
The washing programmes
Delicate Mixed
Natural drying
Small amount of
easy to remove
residue: glass or
fragile porcelain.
Hot rinse
Natural drying
Rapid
programme
for a small
amount of easy to
remove residue
and non-greasy
items: coffee
cups, dessert
bowls or everyday
items.
Hot rinse
Rinse Rinse
Washing at 45°C Washing at 40°C
Mixed
Air drying
Hot rinse
Rinse
Washing at 60°C
Recommended for
normal soiled
load. Less con-
suming in energy.
Bio
Fragile
Resistant
CYCLONE
Air drying
Special Pot
programme:
for dried-on,
sticky residue,
baked on stains,
grease, fat,
cheese, sauce,
etc.
Hot rinse
Rinse
Washing at
70°C
pre-wash at
55°C
140
16
0,75

16
EN
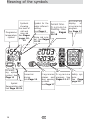
Meaning of the symbols
Safety sys-
tems.
See Page
page 20
Animated
display of
programme
progress.
See Page 17
Programme
temperature
symbol
Programme
progress. See
Pages 13-17
Symbols
showing
the level of
salt and
rinse aid
See Pages
pages 18-
20
Programme
phases and
door opening
symbols.
See Page 17
Pot wash-
ing option
symbol. See
Page
13
Symbol
Regenerating salt
See Page 18-20
Current time.
Programme
finishing time.
See Pages
13-18
Symbol for the
water softener’s
setting.
See Page 6
Rinse aid sym-
bol. See Pages
18-20
Forced air
drying.
See Page 19

17
EN
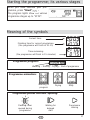
Meaning of the symbols
Washing – Rinsing – Drying – End of programme
Programme progress:
Programme animation:
Stop
Washing in
progress
Drying
Programme phases and door opening:
Flashing: door
opened during
programme
Waiting for
delayed
start
Programme
running
Finishing time for current programme:
(the programme will finish at 21:15)
Time remaining:
(the programme will finish in 15 minutes)
Current time:
When you have selected your pro-
gramme, press “Start” .
The progress lights show the various
programme stages up to “STOP”.
Starting the programme; its various stages

Présentation de votre lave-vaisselle
18
EN
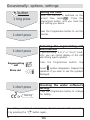
Occasionally: options, settings
Regenerating
salt
Rinse aid
flashing
The setting is confirmed automatically after 10 seconds without pressing
or by pressing the “ ” button again.
Checking the water softener’s
setting:
Press the Programmes button to change
the setting.
Setting the time:
When the machine is switched on the
current time reads
.
Press the
Programmes button until you have the
hour setting you desire.
Press the Programmes button to set the
minutes.
Releasing the regenerating salt
and rinse aid:
If you are using “2-in-1” or “3-in-1” prod-
ucts, you can cancel display of the salt
and rinsing agent symbols.
Press the Programmes button: the
“Level” symbol disappears. Repeat the
operation if you wish to see the symbols
displayed.
1 short press
1 short press
1 short press
button
1 long press

Présentation de votre lave-vaisselle
19
EN
Options / Settings / Information
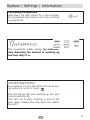
Cancelling a programme
Hold down the Start button for a few seconds:
the programme light will go out and you can then
re-programme.
Your machine is set at the factory for the air dry-
ing system to run for 5 hours.
This will ensure that your washing up and your
tub are perfectly dry.
Take care not to place anything in front of the
door (bags, towels) that may block the ventila-
tion grill.
This programme makes savings by automati-
cally detecting the amount of washing up
and how dirty it is.

Présentation de votre lave-vaisselle
20
EN
The safety systems
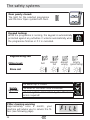
Keypad locking:
While the programme is running, the keypad is automatically
protected against any activities. It unlocks automatically when
the programme finishes or if it is cancelled.
Full
Almost
full
Regenerating salt
Rinse aid
Almost
empty
Empty
(symbol flashing)
The water tap is closed.
The drain or the drain hose is blocked.
Anti-leak system: intervention by the
After-Sales
Service required!
Filling level:
Door poorly closed:
The light for the selected programme
and the Door Open symbol both flash.
Safety
systems
Filter cleaning warning
Approximately once a month, your
machine will advise you to service the fil-
ters (see following page).
La pagina si sta caricando...
La pagina si sta caricando...
La pagina si sta caricando...
La pagina si sta caricando...
La pagina si sta caricando...
La pagina si sta caricando...
La pagina si sta caricando...
La pagina si sta caricando...
La pagina si sta caricando...
La pagina si sta caricando...
La pagina si sta caricando...
La pagina si sta caricando...
-
 1
1
-
 2
2
-
 3
3
-
 4
4
-
 5
5
-
 6
6
-
 7
7
-
 8
8
-
 9
9
-
 10
10
-
 11
11
-
 12
12
-
 13
13
-
 14
14
-
 15
15
-
 16
16
-
 17
17
-
 18
18
-
 19
19
-
 20
20
-
 21
21
-
 22
22
-
 23
23
-
 24
24
-
 25
25
-
 26
26
-
 27
27
-
 28
28
-
 29
29
-
 30
30
-
 31
31
-
 32
32


Brandt AX545FXZ1 Manuale del proprietario
- Categoria
- Lavastoviglie
- Tipo
- Manuale del proprietario
in altre lingue
- English: Brandt AX545FXZ1 Owner's manual
Documenti correlati
Altri documenti
-
Groupe Brandt DVF742WE1 Manuale del proprietario
-
Candy CD 132/1 L-S Manuale utente
-
-
-
Hoover DDY 095TX/3-AUS Manuale utente
-
-
-
-
-