Smeg UKC7172NP Manuale utente
- Categoria
- Frigo-congelatori
- Tipo
- Manuale utente

UKC7172NP
User Manual
Fridge
Freezer
Istruzioni per
l’uso
Frigo-Con‐
gelatore

CONTENTS
Safety information 2
Safety instructions 3
Operation 5
Daily use 5
Hints and tips 7
Care and cleaning 8
Troubleshooting 9
Installation 12
Technical data 13
Subject to change without notice.
SAFETY INFORMATION
Before the installation and use of the appliance, carefully read
the supplied instructions. The manufacturer is not responsible
for any injuries or damages that are the result of incorrect
installation or usage. Always keep the instructions in a safe
and accessible location for future reference.
Children and vulnerable people safety
• This appliance can be used by children aged from 8 years
and above and persons with reduced physical, sensory or
mental capabilities or lack of experience and knowledge if
they have been given supervision or instruction concerning
the use of the appliance in a safe way and understand the
hazards involved.
• Do not let children play with the appliance.
• Children shall not carry out cleaning and user maintenance
of the appliance without supervision.
•
Keep all packaging away from children and dispose of it
appropriately.
General Safety
•
This appliance is intended to be used in household and
similar applications such as:
–
Farm houses; staff kitchen areas in shops, offices and
other working environments
–
By clients in hotels, motels, bed and breakfast and other
residential type environments
•
Keep ventilation openings, in the appliance enclosure or in
the built-in structure, clear of obstruction.
2

• Do not use mechanical devices or other means to accelerate
the defrosting process, other than those recommended by
the manufacturer.
• Do not damage the refrigerant circuit.
• Do not use electrical appliances inside the food storage
compartments of the appliance, unless they are of the type
recommended by the manufacturer.
• Do not use water spray and steam to clean the appliance.
• Clean the appliance with a moist soft cloth. Only use neutral
detergents. Do not use abrasive products, abrasive cleaning
pads, solvents or metal objects.
• Do not store explosive substances such as aerosol cans
with a flammable propellant in this appliance.
• If the supply cord is damaged, it must be replaced by the
manufacturer, its Authorised Service Centre or similarly
qualified persons in order to avoid a hazard.
SAFETY INSTRUCTIONS
Installation
WARNING! Only a qualified
person must install this
appliance.
• Remove all the packaging and the transit
bolts.
• Do not install or use a damaged
appliance.
• Follow the installation instruction
supplied with the appliance.
• Always take care when moving the
appliance as it is heavy. Always use
safety gloves and enclosed footwear.
• Make sure the air can circulate around
the appliance.
• At first installation or after reversing the
door wait at least 4 hours before
connecting the appliance to the power
supply. This is to allow the oil to flow
back in the compressor.
• Before carrying out any operations on
the appliance (e.g. reversing the door),
remove the plug from the power socket.
• Do not install the appliance close to
radiators or cookers, ovens or hobs.
• Do not install the appliance where there
is direct sunlight.
• Do not install this appliance in areas that
are too humid or too cold, such as the
construction appendices, garages or
wine cellars.
• When you move the appliance, lift it by
the front edge to avoid scratching the
floor.
• The appliance contains a bag of
desiccant. This is not a toy. This is not
food. Please dispose of it immediately.
Electrical connection
WARNING! Risk of fire and
electrical shock.
• The appliance must be earthed.
• Make sure that the parameters on the
rating plate are compatible with the
electrical ratings of the mains power
supply.
• Always use a correctly installed
shockproof socket.
• Do not use multi-plug adapters and
extension cables.
3

• Make sure not to cause damage to the
electrical components (e.g. mains plug,
mains cable, compressor). Contact the
Authorised Service Centre or an
electrician to change the electrical
components.
• The mains cable must stay below the
level of the mains plug.
• Connect the mains plug to the mains
socket only at the end of the installation.
Make sure that there is access to the
mains plug after the installation.
• Do not pull the mains cable to
disconnect the appliance. Always pull
the mains plug.
Use
WARNING! Risk of injury,
burns, electrical shock or fire.
• Do not change the specification of this
appliance.
• Do not put electrical appliances (e.g. ice
cream makers) in the appliance unless
they are stated applicable by the
manufacturer.
• Be careful not to cause damage to the
refrigerant circuit. It contains isobutane
(R600a), a natural gas with a high level of
environmental compatibility. This gas is
flammable.
• If damage occurs to the refrigerant
circuit, make sure that there are no
flames and sources of ignition in the
room. Ventilate the room.
• Do not let hot items to touch the plastic
parts of the appliance.
• Do not put soft drinks in the freezer
compartment. This will create pressure
on the drink container.
• Do not store flammable gas and liquid in
the appliance.
• Do not put flammable products or items
that are wet with flammable products in,
near or on the appliance.
• Do not touch the compressor or the
condenser. They are hot.
• Do not remove or touch items from the
freezer compartment if your hands are
wet or damp.
• Do not freeze again food that has been
thawed.
• Obey the storage instructions on the
packaging of frozen food.
Internal light
• The type of lamp used for this appliance
is not suitable for household room
illumination
Care and cleaning
WARNING! Risk of injury or
damage to the appliance.
• Before maintenance, deactivate the
appliance and disconnect the mains
plug from the mains socket.
• This appliance contains hydrocarbons in
the cooling unit. Only a qualified person
must do the maintenance and the
recharging of the unit.
• Regularly examine the drain of the
appliance and if necessary, clean it. If
the drain is blocked, defrosted water
collects in the bottom of the appliance.
Disposal
WARNING! Risk of injury or
suffocation.
• Disconnect the appliance from the mains
supply.
• Cut off the mains cable and discard it.
• Remove the door to prevent children
and pets to be closed inside of the
appliance.
• The refrigerant circuit and the insulation
materials of this appliance are ozone-
friendly.
• The insulation foam contains flammable
gas. Contact your municipal authority for
information on how to discard the
appliance correctly.
• Do not cause damage to the part of the
cooling unit that is near the heat
exchanger.
4

OPERATION
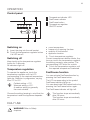
Control panel
1 2
4 3
1
Temperature indicator LED
2
FastFreeze indicator
3
FastFreeze button
4
Temperature regulator
ON/OFF button
Switching on
1. Insert the plug into the wall socket.
2. Touch the temperature regulator button
if all LED are off.
Switching off
Keep touching the temperature regulator
button for 3 seconds.
All indicators light off.
Temperature regulation
To operate the appliance, touch the
temperature regulator until the LED
corresponding to the required temperature
lights up. Selection is progressive, varying
from 2°C to 8°C.
Coldest setting: +2°C.
Warmest setting: +8°C.
A medium setting is generally
the most suitable.
Choose the setting keeping in mind that the
temperature inside the appliance depends
on:
• room temperature
• frequency of opening the door
• quantity of food stored
• appliance location.
1. Touch temperature regulator.
Current temperature indicator blinks. Any
time you touch the temperature regulator,
the setting moves by one position. The
corresponding LED blinks for a while.
2. Touch the temperature regulator until
the required temperature is selected.
FastFreeze function
You can activate FastFreezefunction by
pressing the FastFreeze button.
The LED corresponding to the symbol
FastFreeze indicator lights up.
You can deactivate FastFreezefunction by
pressing the FastFreeze button again.
The FastFreeze indicator will light off.
This function stops automatically
after 28 hours.
This function stops automatically
after 52 hours.
DAILY USE
WARNING! Refer to Safety
chapters.
5

Cleaning the interior
Before using the appliance for the first time,
the interior and all internal accessories
should be washed with lukewarm water
and some neutral soap to remove the
typical smell of a brand-new product, then
dried thoroughly.
CAUTION! Do not use
detergents, abrasive powders,
chlorine or oil-based cleaners as
they will damage the finish.
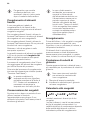
Positioning the door shelves
To permit storage of food packages of
various sizes, the door shelves can be
placed at different heights.
1.
Gradually pull the shelf in the direction
of the arrows until it comes free.
2.
Reposition as required.
Movable shelves
The walls of the refrigerator are equipped
with a series of runners so that the shelves
can be positioned as desired.
Do not move the glass shelf
above the vegetable drawer to
ensure correct air circulation.
Freezing fresh food
The freezer compartment is suitable for
freezing fresh food and storing frozen and
deep-frozen food for a long time.
To freeze fresh food activate the FastFreeze
function and place the food to be frozen in
the freezer compartment.
To freeze fresh food activate the FastFreeze
function at least 24 hours before placing the
food to be frozen in the freezer
compartment.
Place the fresh food to be frozen in the top
compartment.
The maximum amount of food that can be
frozen in 24 hours is specified on the rating
plate, a label located on the inside of the
appliance.
The freezing process lasts 24 hours: during
this period do not add other food to be
frozen.
When the freezing process is completed,
return to the required temperature (see
"FastFreeze Function").
In this condition, the refrigerator
compartment temperature might
drop below 0°C. If this occurs
reset the temperature regulator
to a warmer setting.
6

Storage of frozen food
When first starting-up or after a period out
of use, before putting the products in the
compartment let the appliance run at least
2 hours with the FastFreeze function turned
on.
In the event of accidental
defrosting, for example due to a
power failure, if the power has
been off for longer that the value
shown in the technical data
chart under "Rising time", the
defrosted food must be
consumed quickly or cooked
immediately and then re-frozen
(after cooling).
Thawing
Deep-frozen or frozen food, prior to being
used, can be thawed in the refrigerator
compartment or at room temperature,
depending on the time available for this
operation.
Small pieces may even be cooked still
frozen, directly from the freezer: in this
case, cooking will take longer.
Ice-cube production
This appliance is equipped with one or
more trays for the production of ice-cubes.
Do not use metallic instruments
to remove the trays from the
freezer.
1. Fill these trays with water
2. Put the ice trays in the freezer
compartment.
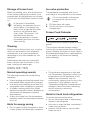
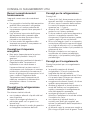
Frozen Food Calendar
The symbols show different types of frozen
goods.
The numbers indicate storage times in
months for the appropriate types of frozen
goods. Whether the upper or lower value of
the indicated storage time is valid depends
on the quality of the foods and treating
before freezing.
HINTS AND TIPS
Normal operating sounds
The following sounds are normal during
operation:
• A faint gurgling and bubbling sound from
coils sound when refrigerant is pumped.
• A whirring and pulsating sound from the
compressor when refrigerant is pumped.
• A sudden cracking noise from inside
appliance caused by thermic dilatation (a
natural and not dangerous physical
phenomenon).
• A faint click noise from the temperature
regulator when the compressor switches
on or off.
Hints for energy saving
• Do not open the door frequently or leave
it open longer than absolutely necessary.
• If the ambient temperature is high and
the Temperature Regulator is set to low
temperature and the appliance is fully
loaded, the compressor may run
continuously, causing frost or ice on the
evaporator. If this happens, set the
Temperature Regulator toward warmer
settings to allow automatic defrosting
and so a saving in electricity
consumption.
Hints for fresh food refrigeration
To obtain the best performance:
• do not store warm food or evaporating
liquids in the refrigerator
• do cover or wrap the food, particularly if
it has a strong flavour
• position food so that air can circulate
freely around it
7

Hints for refrigeration
Useful hints:
• Meat (all types): wrap in a suitable
packaging and place it on the glass shelf
above the vegetable drawer. Store meat
for at most 1-2 days.
• Cooked foods, cold dishes: cover and
place on any shelf.
• Fruit and vegetables: clean thoroughly
and place in a special drawer. Bananas,
potatoes, onions and garlic must not be
kept in the refrigerator if not packed.
• Butter and cheese: place in a special
airtight container or wrap in an
aluminium foil or a polythene bag to
exclude as much air as possible.
• Bottles: close with a cap and place on
the door bottle shelf, or (if available) on
the bottle rack.
Hints for freezing
To help you make the most of the freezing
process, here are some important hints:
• the maximum quantity of food which can
be frozen in 24 hours is shown on the
rating plate;
• the freezing process takes 24 hours no
further food to be frozen should be
added during this period;
• freeze only top quality, fresh and
thoroughly cleaned, foodstuffs;
• prepare food in small portions to enable
it to be rapidly and completely frozen
and to make it possible subsequently to
thaw only the quantity required;
• wrap up the food in aluminium foil or
polythene and make sure that the
packages are airtight;
• do not allow fresh, unfrozen food to
touch food which is already frozen, thus
avoiding a rise in temperature of the
latter;
• lean foods store better and longer than
fatty ones; salt reduces the storage life
of food;
• water ices, if consumed immediately
after removal from the freezer
compartment, can possibly cause the
skin to be freeze burnt;
• it is advisable to show the freezing in
date on each individual pack to enable
you to keep tab of the storage time.
Hints for storage of frozen food
To obtain the best performance from this
appliance, you should:
• make sure that the commercially frozen
foodstuffs were adequately stored by the
retailer;
• be sure that frozen foodstuffs are
transferred from the foodstore to the
freezer in the shortest possible time;
• not open the door frequently or leave it
open longer than absolutely necessary;
• once defrosted, food deteriorates rapidly
and cannot be refrozen;
• do not exceed the storage period
indicated by the food manufacturer.
CARE AND CLEANING
WARNING! Refer to Safety
chapters.
General warnings
CAUTION! Unplug the
appliance before carrying out
any maintenance operation.
This appliance contains
hydrocarbons in its cooling unit;
maintenance and recharging
must therefore only be carried
out by authorized technicians.
The accessories and parts of
the appliance are not suitable for
washing in a dishwasher.
8

Periodic cleaning
CAUTION! Do not pull, move or
damage any pipes and/or
cables inside the cabinet.
CAUTION! Take care of not to
damage the cooling system.
CAUTION! When moving the
cabinet, lift it by the front edge
to avoid scratching the floor.
The equipment has to be cleaned regularly:
1.
Clean the inside and accessories with
lukewarm water and some neutral soap.
2.
Regularly check the door seals and
wipe clean to ensure they are clean and
free from debris.
3.
Rinse and dry thoroughly.
4.
If accessible, clean the condenser and
the compressor at the back of the
appliance with a brush.
This operation will improve the
performance of the appliance and save
electricity consumption.
Defrosting of the refrigerator
Frost is automatically eliminated from the
evaporator of the refrigerator compartment
every time the motor compressor stops,
during normal use. The defrost water drains
out through a trough into a special
container at the back of the appliance, over
the motor compressor, where it evaporates.
It is important to periodically clean the
defrost water drain hole in the middle of the
refrigerator compartment channel to
prevent the water overflowing and dripping
onto the food inside.
Defrosting the freezer
The freezer compartment is frost free. This
means that there is no build up of frost
when it is in operation, neither on the
internal walls nor on the foods.
Periods of non-operation
When the appliance is not in use for long
periods, take the following precautions:
1. Disconnect the appliance from
electricity supply.
2. Remove all food.
3. Clean the appliance and all accessories.
4. Leave the door/doors open to prevent
unpleasant smells.
WARNING! If you want to keep
the appliance switched on, ask
somebody to check it once in a
while to prevent the food inside
from spoiling in case of a power
failure.
TROUBLESHOOTING
WARNING! Refer to Safety
chapters.
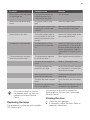
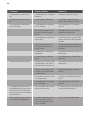
What to do if...
Problem Possible cause Solution
The appliance does not oper-
ate.
The appliance is switched
off.
Switch on the appliance.
9

Problem Possible cause Solution
The mains plug is not con-
nected to the mains socket
correctly.
Connect the mains plug to the
mains socket correctly.
There is no voltage in the
mains socket.
Connect a different electrical
appliance to the mains socket.
Contact a qualified electrician.
The appliance is noisy. The appliance is not sup-
ported properly.
Check if the appliance stands
stable.
The lamp does not work. The lamp is in stand-by. Close and open the door.
The lamp does not work. The lamp is defective. Contact the nearest Authorised
Service Centre.
The compressor operates
continually.
Temperature is set incor-
rectly.
Refer to "Operation".
Many food products were
put in at the same time.
Wait some hours and then
check the temperature again.
The room temperature is
too high.
Refer to climate class chart on
the rating plate.
Food products placed in
the appliance were too
warm.
Allow food products to cool to
room temperature before stor-
ing.
The door is not closed cor-
rectly.
Refer to "Closing the door".
The FastFreeze is switched
on.
Refer to "FastFreeze function".
There is too much frost and
ice.
The door is not closed cor-
rectly or the gasket is de-
formed/dirty.
Refer to "Closing the door".
The water drainage plug is
not correctly positioned.
Position the water drainage
plug in the correct way.
Food products are not
wrapped properly.
Wrap the food products better.
Temperature is set incor-
rectly.
Refer to "Operation" .
The compressor does not
start immediately after press-
ing the FastFreeze, or after
changing the temperature.
This is normal, no error has
occurred.
The compressor starts after a
period of time.
10

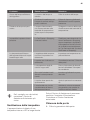
Problem Possible cause Solution
Water flows on the rear plate
of the refrigerator.
During the automatic de-
frosting process, frost
melts on the rear plate.
This is correct.
Water flows inside the refrig-
erator.
The water outlet is clog-
ged.
Clean the water outlet.
Food products prevent that
water flows into the water
collector.
Make sure that food products
do not touch the rear plate.
Water flows on the floor. The melting water outlet is
not connected to the evap-
orative tray above the com-
pressor.
Attach the melting water outlet
to the evaporative tray.
Temperature cannot be set. The FastFreeze or Shop-
ping function is switched
on.
Switch off FastFreeze or Shop-
ping manually, or wait until the
function resets automatically to
set the temperature. Refer to
"FastFreeze or Shopping func-
tion".
The temperature in the appli-
ance is too low/too high.
The temperature regulator
is not set correctly.
Set a higher/lower temperature.
The door is not closed cor-
rectly.
Refer to "Closing the door".
The food products' tem-
perature is too high.
Let the food products tempera-
ture decrease to room temper-
ature before storage.
Many food products are
stored at the same time.
Store less food products at the
same time.
The door has been opened
often.
Open the door only if necessa-
ry.
There is no cold air circula-
tion in the appliance.
Make sure that there is cold air
circulation in the appliance.
If the advice does not lead to
the desired result, contact the
nearest Authorised Service
Centre.
Replacing the lamp
The appliance is equipped with a longlife
LED interior light.
Only service is allowed to replace the
lighting device. Contact your Authorised
Service Centre.
Closing the door
1. Clean the door gaskets.
2. If necessary, adjust the door. Refer to
assembly instructions.
11

3. If necessary, replace the defective door
gaskets. Contact the Authorised
Service Centre.
INSTALLATION
Location
Refer to the assembly
instructions for the installation.
To ensure best performance, install the
appliance well away from sources of heat
such as radiators, boilers, direct sunlight
etc. Make sure that air can circulate freely
around the back of the cabinet.
Positioning
Install the appliance in a dry, well ventilated
indoors where the ambient temperature
corresponds to the climate class indicated
on the rating plate of the appliance.
Cli-
mate
class
Ambient temperature
SN +10°C to + 32°C
N +16°C to + 32°C
ST +16°C to + 38°C
T +16°C to + 43°C
Some functional problems might
occur for some types of models
when operating outside of that
range. The correct operation
can only be guaranteed within
the specified temperature range.
If you have any doubts
regarding where to install the
appliance, please turn to the
vendor, to our customer service
or to the nearest Authorised
Service Centre.
Electrical Connection
CAUTION! Any electrical work
required to install this appliance
should be carried out by a
qualified electrician or
competent person.
WARNING! This appliance must
be earthed.
The manufacturer declines any
liability should these safety
measures not be observed.
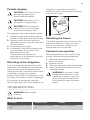
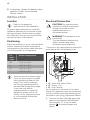
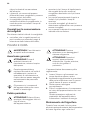
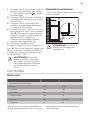
The wires in the mains lead are coloured in
accordance with the following code:
A B
C
D
E
• A - green and yellow: Earth
• C - brown: Live
• D - blue: Neutral
As the colours of the wires in the mains
lead of this appliance may not correspond
with the coloured markings identifying the
terminals in your plug, proceed as follows:
1. Connect the wire coloured green and
yellow to the terminal marked either
with the letter “E“ or by the earth
symbol
or coloured green and
yellow.
12

2. Connect the wire coloured blue to the
terminal either marked with the letter
“N“ or coloured black.
3. Connect the wire coloured brown to the
terminal either marked with the “L“ or
coloured red.
4. Check that no cut, or stray strands of
wire is present and the cord clamp (E) is
secure over the outer sheath.
Make sure the electricity supply voltage
is the same as that indicated on the
appliance rating plate.
5. Switch on the appliance.
The appliance is supplied with a 13 amp
fuse (B). In the event of having to change
the fuse in the plug supplied, a 13 amp
ASTA approved (BS 1362) fuse must be
used.
WARNING! A cut off plug
inserted into a 13 amp socket is
a serious safety (shock) hazard.
Ensure that it is disposed of
safely.
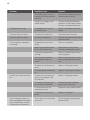
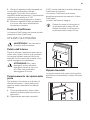
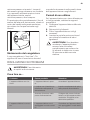
Ventilation requirements
The airflow behind the appliance must be
sufficient.
5 cm
min.
200 cm
2
min.
200 cm
2
CAUTION! Refer to the
assembly instructions for the
installation.
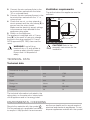
TECHNICAL DATA
Technical data
Dimensions of the recess
Height mm 1780
Width mm 560
Depth mm 550
Rising time Hours 16
Voltage Volts 230-240
Frequency Hz 50
The technical information is situated in the
rating plate, on the external or internal side
of the appliance and in the energy label.
ENVIRONMENTAL CONCERNS
Recycle the materials with the symbol .
Put the packaging in applicable containers
to recycle it. Help protect the environment
and human health and to recycle waste of
electrical and electronic appliances. Do not
dispose appliances marked with the symbol
13

with the household waste. Return the
product to your local recycling facility or
contact your municipal office.
14

INDICE
Informazioni di sicurezza 15
Istruzioni di sicurezza 16
Uso dell'apparecchiatura 18
Utilizzo quotidiano 19
Consigli e suggerimenti utili 21
Pulizia e cura 22
Risoluzione dei problemi 23
Installazione 26
Dati tecnici 27
Con riserva di modifiche.
INFORMAZIONI DI SICUREZZA
Leggere attentamente le istruzioni fornite prima di installare e
utilizzare l'apparecchiatura. I produttori non sono responsabili
di eventuali lesioni o danni derivanti da un'installazione o un
uso scorretti. Conservare sempre le istruzioni in un luogo
sicuro e accessibile per poterle consultare in futuro.
Sicurezza dei bambini e delle persone vulnerabili
• Questa apparecchiatura può essere usata da bambini a
partire dagli 8 anni e da adulti con limitate capacità fisiche,
sensoriali o mentali o con scarsa esperienza o conoscenza
sull'uso dell'apparecchiatura, solamente se sorvegliati o se
istruiti relativamente all'uso dell'apparecchiatura e se hanno
compreso i rischi coinvolti.
• Non consentire ai bambini di giocare con l'apparecchiatura.
• I bambini non devono eseguire interventi di pulizia e
manutenzione sull'apparecchiatura senza essere
supervisionati.
•
Tenere gli imballaggi lontano dai bambini e smaltirli in modo
adeguato.
Avvertenze di sicurezza generali
•
L'apparecchiatura è destinata all'uso domestico e
applicazioni simili, tra cui:
–
case di campagna; cucine di negozi, uffici e altri ambienti
di lavoro
–
clienti di hotel, motel, bed and breakfast e altri ambienti
residenziali
15

• Verificare che le aperture di ventilazione, sia
sull'apparecchiatura che nella struttura da incasso, non
siano ostruite.
• Non usare dispositivi elettrici o altri mezzi artificiali non
raccomandati dal produttore allo scopo di accelerare il
processo di sbrinamento.
• Non danneggiare il circuito refrigerante.
• Non utilizzare apparecchiature elettriche all'interno dei
comparti di conservazione degli alimenti, ad eccezione di
quelli consigliati dal costruttore.
• Non nebulizzare acqua né utilizzare vapore per pulire
l'apparecchiatura.
• Pulire l'apparecchiatura con un panno inumidito e morbido.
Utilizzare solo detergenti neutri. Non usare prodotti abrasivi,
spugnette abrasive, solventi od oggetti metallici.
• Non conservare in questa apparecchiatura sostanze
esplosive come bombolette spray contenenti un propellente
infiammabile.
• Se il cavo di alimentazione è danneggiato, deve essere
sostituito dal produttore, da un tecnico autorizzato o da una
persona qualificata per evitare situazioni di pericolo.
ISTRUZIONI DI SICUREZZA
Installazione
AVVERTENZA! L’installazione
dell'apparecchiatura deve
essere eseguita da personale
qualificato.
• Togliere tutto l'imballaggio e i bulloni per
il trasporto.
• Non installare o utilizzare
l'apparecchiatura se è danneggiata.
• Attenersi alle istruzioni fornite insieme
all'apparecchiatura.
• Prestare sempre attenzione in fase di
spostamento dell'apparecchiatura, dato
che è pesante. Usare sempre i guanti di
sicurezza e le calzature adeguate.
• Assicurarsi che l'aria possa circolare
liberamente attorno all'apparecchiatura.
• In fase di prima installazione o dopo aver
girato la porta, attendere almeno 4 ore
prima di collegare l'apparecchiatura alla
sorgente di alimentazione. Questo serve
a consentire all'olio di fluire nuovamente
nel compressore.
• Prima di eseguire eventuali operazioni
sull'apparecchiatura (ad esempio
invertire la porta), togliere la spina dalla
presa di corrente.
• Non installare l'apparecchiatura in
prossimità di radiatori, fornelli, forni o
piani di cottura.
• Non installare l'apparecchiatura dove sia
esposta alla luce solare diretta.
• Non installare questa apparecchiatura in
luoghi troppo umidi o freddi, come
aggiunte strutturali, garage o cantine.
16

• Quando si sposta l'apparecchiatura,
sollevarla dal bordo anteriore, così da
non graffiare il pavimento.
• L'apparecchiatura contiene un sacchetto
di essiccante. Questo prodotto non è un
giocattolo. Questo prodotto non è un
alimento. Smaltirlo immediatamente.
Collegamento elettrico
AVVERTENZA! Rischio di
incendio e scossa elettrica.
• L'apparecchiatura deve disporre di una
messa a terra.
• Verificare che i parametri sulla targhetta
siano compatibili con le indicazioni
elettriche dell'alimentazione.
• Utilizzare sempre una presa elettrica con
contatto di protezione correttamente
installata.
• Non utilizzare prese multiple e
prolunghe.
• Accertarsi di non danneggiare i
componenti elettrici (ad es. la spina di
alimentazione, il cavo di alimentazione, il
compressore). Contattare il Centro di
Assistenza Autorizzato o un elettricista
per sostituire i componenti elettrici.
• Il cavo di alimentazione deve rimanere
sotto il livello della spina di
alimentazione.
• Inserire la spina di alimentazione nella
presa solo al termine dell'installazione.
Verificare che la spina di alimentazione
rimanga accessibile dopo l'installazione.
• Non tirare il cavo di alimentazione per
scollegare l’apparecchiatura. Tirare
sempre dalla spina.
Utilizzo
AVVERTENZA! Rischio di
lesioni, scottature o scosse
elettriche.
• Non modificare le specifiche tecniche
dell'apparecchiatura.
• Non introdurre apparecchiature
elettriche (ad es. gelatiere)
nell'apparecchiatura se non
specificamente consentito dal
produttore.
• Fare attenzione a non danneggiare il
circuito refrigerante. Esso contiene
isobutano (R600a), un gas naturale con
un alto livello di compatibilità ambientale,
tuttavia il gas è infiammabile.
• Nel caso di danno al circuito refrigerante,
assicurarsi che non si sviluppino fiamme
libere e scintille nel locale. Aerare bene
l'ambiente.
• Non appoggiare oggetti incandescenti
sulle parti in plastica
dell'apparecchiatura.
• Non introdurre bevande analcoliche nel
vano congelatore. Si verrà a creare una
pressione nel contenitore della bevanda.
• Non conservare gas e liquidi infiammabili
nell'apparecchiatura.
• Non appoggiare o tenere liquidi o
materiali infiammabili, né oggetti
facilmente incendiabili
sull'apparecchiatura, al suo interno o
nelle immediate vicinanze.
• Non toccare il compressore o il
condensatore. Sono incandescenti.
• Non togliere o toccare gli oggetti nel
vano congelatore con le mani bagnate o
umide.
• Non ricongelare del cibo
precedentemente scongelato.
• Attenersi alle istruzioni per la
conservazione riportate sulla confezione
del cibo surgelato.
Luce interna
• Il tipo di lampadina utilizzata per questa
apparecchiatura non può essere
utilizzato per l'illuminazione domestica
Pulizia e cura
AVVERTENZA! Vi è il rischio di
ferirsi o danneggiare
l'apparecchiatura.
• Prima di eseguire qualunque intervento
di manutenzione, spegnere
l'apparecchiatura ed estrarre la spina
dalla presa.
• L'unità refrigerante di questa
apparecchiatura contiene idrocarburi.
L’unità deve essere ricaricata ed
17

ispezionata esclusivamente da personale
qualificato.
• Controllare regolarmente lo scarico
dell'apparecchiatura e, se necessario,
pulirlo. L'ostruzione dello scarico può
causare un deposito di acqua di
sbrinamento sul fondo
dell'apparecchiatura.
Smaltimento
AVVERTENZA! Rischio di
lesioni o soffocamento.
• Staccare la spina dall'alimentazione
elettrica.
• Tagliare il cavo di rete e smaltirlo.
• Rimuovere la porta per evitare che
bambini e animali domestici rimangano
chiusi all’interno dell’apparecchiatura.
• Il circuito refrigerante e i materiali di
isolamento di questa apparecchiatura
rispettano l'ozono.
• La schiuma isolante contiene gas
infiammabili. Contattare le autorità locali
per ricevere informazioni su come
smaltire correttamente
l'apparecchiatura.
• Non danneggiare i componenti dell'unità
refrigerante che si trovano vicino allo
scambiatore di calore.
USO DELL'APPARECCHIATURA
Pannello dei comandi
1 2
4 3
1
LED indicatore della temperatura
2
Spia FastFreeze
3
Tasto FastFreeze
4
Regolatore temperatura
Tasto ON/OFF
Accensione
1. Inserire la spina nella presa a muro.
2. Premere il tasto regolatore della
temperatura se tutti i LED sono spenti.
Spegnimento
Continuare a premere il tasto regolatore
della temperatura per 3 secondi.
Tutte le spie si spengono.
Regolazione della temperatura
Per attivare l'apparecchiatura, sfiorare il
regolatore della temperatura fino a quando
non si accende il LED corrispondente alla
temperatura desiderata. La selezione è
progressiva, variando da + 2°C a + 8°C.
Impostazione più fredda: +2°C.
Impostazione più calda: +8°C.
In condizioni normali, si consiglia
di utilizzare una regolazione
media.
È importante ricordare che la temperatura
all'interno dell'apparecchiatura è
condizionata dai seguenti fattori:
• temperatura ambiente
• frequenza di apertura della porta
• quantità di alimenti conservati
• posizione dell'apparecchiatura.
18

1. Sfiorare il regolatore della temperatura.
La spia della temperatura attuale
lampeggia. Ogni volta che si sfiora il
regolatore della temperatura, l'impostazione
cambia di una posizione. Il LED
corrispondente lampeggia per un istante.
2. Sfiorare il regolatore della temperatura
fino a che non viene selezionata la
temperatura richiesta.
Funzione FastFreeze
La funzione FastFreeze può essere attivata
premendo il tasto FastFreeze.
Il LED corrispondente al simbolo della spia
FastFreeze si accende.
La funzione FastFreeze può essere
disattivata premendo nuovamente il tasto
FastFreeze.
La spia FastFreeze si spegne.
Questa funzione si interrompe in
modo automatico dopo 28 ore.
Questa funzione si interrompe in
modo automatico dopo 52 ore.
UTILIZZO QUOTIDIANO
AVVERTENZA! Fare riferimento
ai capitoli sulla sicurezza.
Pulizia dell'interno
Prima di utilizzare l'apparecchiatura per la
prima volta, lavare l'interno e gli accessori
con acqua tiepida e sapone neutro per
eliminare il tipico odore dei prodotti nuovi,
quindi asciugare accuratamente.
ATTENZIONE! Non usare
detergenti, polveri abrasive,
detergenti a base di cloro od
olio, dato che potrebbero
danneggiare le finiture.
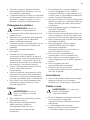
Posizionamento dei ripiani della
porta
Per facilitare l'introduzione di alimenti di
diverse dimensioni, i ripiani della porta
possono essere posizionati ad altezze
differenti.
1.
Tirare gradualmente il ripiano nella
direzione indicata dalle frecce fino a
sbloccarlo.
2. Riposizionare secondo necessità.
Ripiani rimovibili
Le guide presenti sulle pareti del frigorifero
permettono di posizionare i ripiani a diverse
altezze.
19

Per garantire una corretta
circolazione dell'aria, non
spostare il ripiano in vetro posto
sopra il cassetto delle verdure.
Congelamento di alimenti
freschi
Il vano congelatore è adatto al
congelamento di cibi freschi e alla
conservazione a lungo termine di alimenti
congelati e surgelati.
Per congelare alimenti freschi, attivare la
funzione FastFreeze e introdurre gli alimenti
da congelare nel vano congelatore.
Per congelare alimenti freschi, attivare la
funzione FastFreeze almeno 24 ore prima di
introdurli nel vano congelatore.
Sistemare i cibi da surgelare in nello
scomparto superiore.
La quantità massima di alimenti congelabili
in 24 ore è riportata sulla targhetta dei
dati, un'etichetta presente sulle pareti
interne dell'apparecchiatura.
Il processo di congelamento dura 24 ore:
non aggiungere altri alimenti da congelare
per tutta la durata del processo.
Al termine del processo di congelamento,
ritornare alla temperatura richiesta (vedere
"Funzione FastFreeze").
In questa condizione la
temperatura del vano frigorifero
potrebbe scendere al di sotto di
0°C. Qualora ciò accadesse, è
necessario reimpostare la
temperatura a un livello più alto.
Conservazione dei surgelati
Al primo avvio o dopo un periodo di non
utilizzo, lasciare in funzione
l'apparecchiatura per almeno 2 ore
attivando la funzione FastFreeze prima di
introdurre gli alimenti.
In caso di sbrinamento
accidentale, per esempio a
causa di un'interruzione
dell'alimentazione elettrica, se
l'alimentazione manca per un
periodo superiore al valore
indicato nella tabella dei dati
tecnici sotto "Tempo di risalita",
il cibo scongelato deve essere
consumato rapidamente o
cucinato immediatamente e
quindi ricongelato (dopo il
raffreddamento).
Scongelamento
Prima dell'utilizzo, i cibi surgelati o congelati
possono essere scongelati nel vano
frigorifero o, per un processo più veloce, a
temperatura ambiente.
Gli alimenti divisi in piccole porzioni
possono essere cucinati direttamente,
senza essere prima scongelati: in questo
caso, tuttavia, la cottura durerà più a lungo.
Produzione di cubetti di
ghiaccio
Questa apparecchiatura è dotata di una o
più vaschette per la produzione di cubetti di
ghiaccio.
Non usare strumenti metallici
per estrarre le vaschette dal
vano congelatore.
1. Riempire d’acqua le vaschette
2. Introdurre le vaschette per il ghiaccio
nel vano congelatore.
Calendario cibi congelati
I simboli mostrano i diversi tipi di cibi
congelati.
I numeri indicano i mesi di conservazione
dei tipi di surgelati corrispondenti. La
validità dei tempi di conservazione dipende
dalla qualità degli alimenti e dal loro
trattamento prima del congelamento.
20
La pagina sta caricando ...
La pagina sta caricando ...
La pagina sta caricando ...
La pagina sta caricando ...
La pagina sta caricando ...
La pagina sta caricando ...
La pagina sta caricando ...
La pagina sta caricando ...
La pagina sta caricando ...
La pagina sta caricando ...
La pagina sta caricando ...
La pagina sta caricando ...
-
 1
1
-
 2
2
-
 3
3
-
 4
4
-
 5
5
-
 6
6
-
 7
7
-
 8
8
-
 9
9
-
 10
10
-
 11
11
-
 12
12
-
 13
13
-
 14
14
-
 15
15
-
 16
16
-
 17
17
-
 18
18
-
 19
19
-
 20
20
-
 21
21
-
 22
22
-
 23
23
-
 24
24
-
 25
25
-
 26
26
-
 27
27
-
 28
28
-
 29
29
-
 30
30
-
 31
31
-
 32
32


Smeg UKC7172NP Manuale utente
- Categoria
- Frigo-congelatori
- Tipo
- Manuale utente
in altre lingue
- English: Smeg UKC7172NP User manual
Documenti correlati
-
Smeg UKC3170P Manuale utente
-
-
-
Smeg UKC7172NP1 Manuale utente
-
Smeg UKS3C090P1 Manuale utente
-
-
-
Smeg UKUD7108FSEP Manuale utente
-
Smeg UKS8F174NF Manuale utente
-