Panasonic VW-MKA100GUK Manuale utente
- Categoria
- Accessori per telecamere di sicurezza
- Tipo
- Manuale utente
Questo manuale è adatto anche per

A
1
45
23
LOCK
UNLOCK
F
Operating Instructions
Bedienungsanleitung
Manuel d’utilisation
Istruzioni d’uso
Instrucciones de funciona-
miento
Инструкция по
эксплуатации
Multi Mount
Montage-Kit
Support polyvalent
Aggancio Multiplo
Montaje Múltiple
Универсальное Крепление
/Model No./Modell-Nr./
Modèle/Modello N./Modelo N./
Номер модели
VW-MKA100
パナソニック株式会社
AVC ネットワークス社
Panasonic Corporation
Web site: http://panasonic.net
C Panasonic Corporation 2013
VQT4W84
F0113MT0 (6000 A)
∫
k k
g
D
E
≥
≥
≥
≥
≥ [D]
1
2
≥
≥
3
4
≥
≥
5 1
≥
≥
≥
1 2
3
≥
2 4
3
4 1
1 4
2 1
≥
∫
∫
1
2
3
4
≥
≥
≥ 1
[F]
≥
≥
A
≥
≥
B
C
E
1
until
2013/2/28
VW-MKA100.fm 1 ページ 2013年1月22日 火曜日 午後4時34分

B C
1
2
12
34
Thank you for purchasing this Panasonic product.
• Please read these instructions carefully before
using this product, and save this manual for future
use.
• The Wearable camera is sold separately.
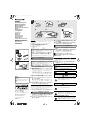
• Check the supplied accessories [D].
Attach the multi mount to a smooth surface, such as
a helmet.
1 Peel off one side of the double sided
tape, and attach it to the smoother side
of the fastener that has a harder texture
(hook fastener).
2 Peel off the other side of the double
sided tape, and attach the hook fastener
to a location where the multi mount will
be attached to.
• Dust, etc. adhering to the contact surface will
weaken the adhesion. Before attaching the double
sided tape, remove the dust, etc., and wipe with a
dry cloth.
• The double sided tape is not peelable. Taking
account of the height, width, etc. of the multi mount
attached to the camera, attach the tape to a location
where it will not come in contact with a helmet
shield, etc.
3 Pass the fastener that has a softer
texture (loop fastener) through the multi
mount so that the soft fabric side will
face down.
4 Fasten the multi mount securely by
aligning the two fasteners to one
another.
• Fasten securely to prevent the multi mount from
falling off.
• Dust, etc. adhering to the hook and loop fastener
will weaken the adhesion. Before attaching it, check
if dust, lint, etc. is adhering.
5 Hold the adjustment knob 1 as shown
in the figure, and insert the camera unit
in the direction of the arrow until it
clicks into place.
• When removing the multi mount, do not pull the
multi mount. Remove it by peeling off the hook and
loop fastener from the edge.
• Do not peel off the double sided tape attached to
the hook and loop fastener. Once the tape is peeled
off, the adhesion weakens, making the tape
unusable.
• When attaching the multi mount, check if the hook
and loop fastener is fastened securely and the
adhesion of the double sided tape has weakened.
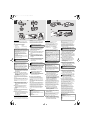
1 Pass the band through the buckle 3 so
that the hook and loop fastener side 2
of the band will face out, and fold the
band as shown in the figure.
• Adjust the length according to the location you
intend to attach the band to.
2 Insert the notched portion 4 of the multi
mount into the band as shown in the
figure.
3 Place the band attached to the multi
mount around the shoulder strap of a
backpack, etc., and fasten as shown in
the figure.
4 Hold the adjustment knob 1 as shown
in the figure, and insert the camera unit
in the direction of the arrow until it
clicks into place.
1 Insert the notched portion 4 of the multi
mount into the band.
2 Hold the adjustment knob 1 as shown
in the figure, and insert the camera unit
in the direction of the arrow until it
clicks into place.
• Make sure that the camera unit does not wobble.
∫ Notes for Using the Multi Mount
• Do not attach the multi mount to a location where
the multi mount ends up restricting your body
movements. Doing so may cause accidents and
injuries. Check if your body can move freely after
attaching it.
• Do not disassemble or modify. Doing so may cause
trouble, such as the wearable camera and other
parts falling off.
• Attach correctly as per these operating instructions.
• Attach correctly using the supplied accessories.
Using other items may cause accidents, such as
damaging the camera or failing to fix parts securely.
• Check how securely the multi mount is attached on
a regular basis. Failure to do so may cause
accidents and injuries, such as the multi mount or
wearable camera coming off or falling off during
use. Check if the multi mount has not become
loose.
Vielen Dank, dass Sie sich für ein Panasonic-
Produkt entschieden haben.
• Bitte lesen Sie diese Anleitung vor der
Inbetriebnahme dieses Produkts aufmerksam
durch, und bewahren Sie dieses Handbuch für
spätere Bezugnahme griffbereit auf.
• Die tragbare Kamera wird einzeln verkauft.
• Prüfen Sie das mitgelieferte Zubehör [D].
Bringen Sie die Mehrzweck-Halterung an einer
glatten Oberfläche an, wie an einem Helm.
1
Ziehen Sie die Schutzfolie auf einer Seite
des doppelseitigen Klebebandes ab und
bringen Sie auf der klebenden Seite die
rauhe Seite des Klettbandes an.
2 Ziehen Sie die Schutzschicht auf der
anderen Seite des doppelseitigen
Klebebandes ab und bringen Sie das mit
der rauen Seite des Klettbandes
verbundene doppelseitige Klebeband an
der Stelle an, wo die Mehrzweck-
Halterung befestigt werden soll.
•
Staub usw., der an der Kontaktfläche anhaftet, schwächt
die Haftung. Entfernen Sie vor dem Anbringen des
doppelseitigen Klebebandes den Staub usw. und wischen
Sie die Fläche mit einem trockenen Tuch ab.
•
Das doppelseitige Klebeband lässt sich nicht abziehen.
Berücksichtigen Sie die Höhe, Breite, usw. der an der
Kamera angebrachten Mehrzweck-Halterung und bringen
Sie das Band an einer Stelle an, an dem es nicht mit
einem Helmschirm, usw. in Kontakt kommt.
3 Führen Sie die weichere Seite des
Klettbandes durch die Mehrzweck-
Halterung, so dass die weiche Seite
nach unten gerichtet ist.
4 Bringen Sie die Mehrzweck-Halterung
fest durch Aufeinanderlegen der beiden
Klettbandseiten an.
•
Drücken Sie sie gut zusammen, um ein Herunterfallen
der Mehrzweck-Halterung zu verhindern.
• Staub, usw. der am Klettband anhaftet, schwächt
die Haftung. Prüfen Sie vor dem Anbringen, ob
Staub, Fusseln, o.a. daran anhaften.
5 Halten Sie den Stellknopf 1, wie in der
Abbildung gezeigt, fest und setzen Sie
die Kamera in Pfeilrichtung ein, so dass
sie mit einem Klicken einrastet.
• Ziehen Sie zum Entfernen der Mehrzweck-
Halterung nicht an dieser. Entfernen Sie sie durch
Lösen des Klettbandes.
• Entfernen Sie nicht das doppelseitige Klebeband
vom Klettband. Dabei wird das Haftvermögen
geschwächt, wodurch das Band unbrauchbar wird.
• Prüfen Sie beim Anbringen der Mehrzweck-
Halterung, ob das Klettband fest angebracht sind
und sich das Haftvermögen des doppelseitigen
Klebebandes verringert hat.
1 Führen Sie das Band durch die Schnalle
3, so dass die Seite mit dem Klettband
2 nach außen zeigt, und falten Sie das
Band, wie in der Abbildung gezeigt.
• Korrigieren Sie die Länge entsprechend der Stelle,
an der Sie das Band anbringen wollen.
2 Schieben Sie den verzahnten Teil 4 der
Mehrzweck-Halterung auf das Band, wie
in der Abbildung gezeigt wird.
3 Führen Sie das an der Mehrzweck-
Halterung angebrachte Band um den
Schulterriemen eines Rucksacks, o.ä.
und befestigen Sie es, wie in der
Abbildung gezeigt.
4 Halten Sie den Stellknopf 1, wie in der
Abbildung gezeigt, fest und setzen Sie
die Kamera in Pfeilrichtung ein, so dass
sie mit einem Klicken einrastet.
1 Schieben Sie den verzahnten Teil 4 der
Mehrzweck-Halterung auf das Band.
2 Halten Sie den Stellknopf 1, wie in der
Abbildung gezeigt, fest und setzen Sie
die Kamera in Pfeilrichtung ein, so dass
sie mit einem Klicken einrastet.
• Stellen Sie sicher, dass die Kamera nicht wackelt.
∫ Hinweise zur Mehrzweck-Halterung
•
Bringen Sie die Mehrzweck-Halterung nicht an Stellen
an, an denen sie die Bewegungen Ihres Körpers
einschränkt. Dies kann zu Unfällen und Verletzungen
führen. Prüfen Sie nach dem Anbringen, ob Sie Ihren
Körper ungehindert bewegen können.
• Nicht zerlegen oder verändern. Dies kann zu
Problemen führen, wie einem Herunterfallen der
tragbaren Kamera oder anderer Teile.
• Nehmen Sie die Montage gemäß dieser
Bedienungsanleitung vor.
• Nehmen Sie die Montage unter Einsatz des
mitgelieferten Zubehörs vor. Die Verwendung
anderer Teile kann zu Unfällen führen, wie einer
Beschädigung der Kamera oder einer nicht
vollkommen sicheren Befestigung der Teile.
• Prüfen Sie regelmäßig, ob die Mehrzweck-
Halterung fest angebracht ist. Anderenfalls kann es
zu Unfällen und Verletzungen kommen, wie einem
Ablösen der Mehrzweck-Halterung oder der
tragbaren Kamera sowie ihrem Herunterfallen
während des Gebrauchs. Stellen Sie sicher, dass
sich die Mehrzweck-Halterung nicht gelockert hat.
1 Multi Mount
2 Hook and Loop
Fastener (1 set)
3 Band
4 Double Sided Tape
• Avoid touching the lens or pull the camera/unit
connection cable when attaching or removing.
• Be careful that the camera/unit connection cable
of the wearable camera does not get tangled up
when it is mounted.
• After mounting the wearable camera, fix the
wearable camera securely by turning the
adjustment knob 1 in the direction of LOCK
while holding the ring portion of the multi
mount. ([F])
• The multi mount cannot be attached to a helmet,
etc. depending on its shape.
• Terminate usage if a feeling of discomfort arises,
including any skin reactions.
A
Attaching to a helmet, etc.
Note the following points so that the multi
mount will achieve an optimal adhesion
strength:
• Avoid high or low temperatures and high
humidity, and do the attachment work indoors.
• Attach the multi mount at least 24 hours before
use. (Adhesion is optimized after a period of at
least 24 hours in the environment above.)
ENGLISH
B
Attaching to the shoulder
strap of a backpack, etc.
C
Attaching directly to goggles,
etc.
E
Removing the camera unit
from the multi mount:
Hold the adjustment knob 1 as shown in
the figure, and pull out the camera unit in
the direction of the arrow.
∫ Specifications
Multi Mount
Dimensions:
60 mm (W)k56 mm (H)k55 mm (D)
[2.36 q (W)k2.2 q (H)k2.17 q (D)]
(The height is that of when the camera unit is fixed
horizontally.)
Mass (Weight):
Approx. 32 g (Approx. 0.071 lbs.)
1 Montage-Kit
2 Klettband (1 Set)
3 Band
4 Doppelseitiges
Klebeband
• Berühren Sie beim Anbringen und Abnehmen
nicht die Linse und ziehen Sie nicht am
Verbindungskabel zwischen Kamera/Gerät.
•
Achten Sie darauf, dass sich das Verbindungskabel
der tragbaren Kamera zwischen Kamera/Gerät beim
Anbringen nicht verheddert.
• Befestigen Sie nach dem Anbringen der tragbaren
Kamera, diese gut durch Drehen des Stellknopfes
1 in Richtung der Markierung LOCK, während Sie
den ringförmigen Teil der Mehrzweck-Halterung
festhalten. ([F])
• Die Mehrzweck-Halterung kann auf Grund ihrer
Form nicht direkt an einem Helm, o.ä. angebracht
werden.
•
Verwenden Sie sie nicht weiter, sollten Sie beim
Gebrauch eine ungewöhnliche Hautreaktion feststellen.
A
Anbringen an einen Helm, o.ä.
Beachten Sie die folgenden Hinweise, so
dass die Mehrzweck-Halterung eine optimale
Haftfestigkeit erreicht:
• Vermeiden Sie hohe oder niedrige
Temperaturen sowie starke Feuchtigkeit.
Führen Sie das Anbringen nicht im Freien aus.
•
Bringen Sie die Mehrzweck-Halterung mindestens
24 Stunden vor dem Gebrauch an. (Die Haftung ist
nach einem Zeitraum von mindestens 24 Stunden
in der obigen Umgebung optimal.)
DEUTSCH
B
Anbringen am Schulterriemen
eines Rucksacks, o.ä.
C
Direktes Anbringen an einer
Brille, o.ä.
E
Entfernen der Kamera aus der
Mehrzweck-Halterung:
Halten Sie den Stellknopf 1, wie in der
Abbildung gezeigt, fest und ziehen Sie die
Kamera in Pfeilrichtung heraus.
∫ Technische Daten
Montage-Kit
Abmessungen:
60 mm (B)k56 mm (T)k55 mm (D)
(Die Höhe ist die, wenn die Kamera, horizontal angebracht
ist.)
Masse:
Ca
.32 g
VW-MKA100.fm 2 ページ 2013年1月22日 火曜日 午後4時34分

A
1
45
23
LOCK
UNLOCK
F
D
E
Nous vous remercions d'avoir acheté ce produit
Panasonic.
•
Avant de raccorder, régler ou utiliser l’appareil, il est
recommandé de lire attentivement le manuel
d'utilisation
et de le conserver pour consultation ultérieure.
• La caméra portable est vendue séparément.
• Vérifiez les accessoires fournis [D].
Fixez le support polyvalent sur une surface lisse, tel
un casque.
1
Retirez la protection d'un côté du ruban à
double face (4), puis collez-y le côté lisse
de la bande autoagrippante à crochets (2).
2
Retirez la protection de l'autre côté du ruban
à double face (4) pour coller la bande
autoagrippante à crochets (2) à l'endroit où
sera installé le support polyvalent.
• Les poussières et autres qui adhèrent à la surface
de contact diminueront l'adhésion. Avant de fixer le
ruban double face, retirez les poussières et autres
contaminants, puis essuyez avec un linge sec.
• Le ruban double face n'est pas pelable. En tenant
compte de la hauteur, de la largeur, etc. du support
polyvalent fixé à la caméra, installez le ruban à un
endroit où il n'entrera pas en contact avec la visière
du casque, etc.
3 Insérez la bande autoagrippante douce
(bande à boucles) (2) à travers le
support polyvalent de façon que le côté
boucles soit orienté vers le bas.
4 Attachez solidement le support
polyvalent en alignant les deux faces
des bandes autoagrippantes.
• Attachez solidement de manière à empêcher le
support polyvalent de tomber.
• Les poussières et autres qui adhèrent aux deux
faces des bandes autoagrippantes diminueront
l'adhésion. Avant d'attacher, vérifiez la présence de
poussières, charpies, etc.
5 Tenez la vis 1 de la manière indiquée et
insérez l'unité caméra de la caméra
portable jusqu'à ce qu'elle
s'enclencheen place.
• Pour enlever le support polyvalent, ne tirez pas sur
ce dernier. Enlevez-le en pelant les deux bandes
autoagrippantes à partir du rebord.
• Ne détachez pas le ruban double face collé à la
bande autoagrippante. Une fois le ruban double
face décollé, la force d'adhésion diminue, ce qui
rend le ruban inutilisable.
• Lors de la mise en place du support polyvalent,
assurez-vous que les deux bandes autoagrippantes
sont fermement agrippées et que le ruban double
face est parfaitement collé.
1 Enfilez la sangle dans la boucle 3 de
manière que les faces boucles et
crochets 2 de la sangle soient vers
l'extérieur, puis pliez la sangle de la
manière illustrée.
• Ajustez la longueur selon l'endroit où vous désirez
fixer la sangle.
2
Insérez la sangle dans l'encoche
4
du
support polyvalent de la manière illustrée.
3
Placez la sangle fixée au support polyvalent
autour de la bretelle du sac dos, etc. et
serrez bien de la manière illustrée.
4 Tenez la vis 1 de la manière indiquée et
insérez l'unité caméra de la caméra
portable jusqu'à ce qu'elle
s'enclencheen place.
1 Insérez la sangle dans l'encoche 4 du
support polyvalent.
2 Tenez la vis 1 de la manière indiquée et
insérez l'unité caméra de la caméra
portable jusqu'à ce qu'elle
s'enclencheen place.
• Assurez-vous que l'unité caméra n'oscille pas.
∫ Conseils pour l'utilisation du support
polyvalent
•
Ne fixez pas le support polyvalent à un endroit où il
pourrait restreindre vos mouvements. Cela pourrait
causer des accidents ou des blessures. Vérifiez que votre
corps peut bouger facilement après l'avoir l'installé.
• Ne désassemblez ni ne modifiez pas le support.
Cela pourrait causer des problèmes qui feraient
tomber la caméra portable ou d'autres pièces.
• Fixez correctement selon les présentes
instructions.
• Fixez correctement en utilisant les accessoires
fournis. L'utilisation d'autres accessoires pourrait
causer des accidents, comme des dommages à la
caméra ou une mauvaise fixation des pièces.
• Vérifiez régulièrement la solidit de la fixation du
support polyvalent. Autrement, il y aurait danger
d'accidents ou de blessures. Entre autres, le
support polyvalent ou la caméra portable pourrait se
séparer ou tomber pendant l'utilisation. Vérifiez que
le support polyvalent ne s'est pas desserré.
Grazie per aver acquistato questo prodotto
Panasonic.
•
Leggere attentamente queste istruzioni prima di utilizzare il
presente prodotto, e conservare questo manuale per usi
futuri.
• La Videocamera indossabile è venduta
separatamente.
• Controllare gli accessori in dotazione [D].
Fissare il supporto polivalente ad una superficie
liscia, come un casco.
1 Staccare la protezione su un lato del
nastro biadesivo, e fissare sulla parte
adesiva esposta, il retro del lato ruvido
del velcro.
2 Staccare la protezione sull'altro lato del
nastro biadesivo, e fissare l'insieme
nastro biadesivo/lato ruvido del velcro
in una posizione dove verrà fissato il
supporto polivalente.
• Eventuale polvere che aderisca alla superficie di
contatto indebolirà l'adesione. Prima di fissare il
nastro biadesivo, rimuovere la polvere, ecc., e
pulire con un panno asciutto.
• Il nastro biadesivo non è rimuovibile. Tenendo conto
dell'altezza, della larghezza, ecc. del supporto
polivalente fissato alla videocamera, fissare il
nastro in una posizione dove non verrà a contatto
con la visiera di un casco, ecc.
3
Fare scorrere il lato soffice del velcro
attraverso il supporto polivalente in modo
che il lato soffice sia rivolto verso il basso.
4
Fissare strettamente il supporto
polivalente allineando i due lati del velcro.
• Fissare strettamente per prevenire la caduta del
supporto polivalente.
• Eventuale polvere sul velcro indebolirà l'adesione.
Prima del fissaggio verificare l'eventuale presenza
di polvere e filacce.
5 Tenere la manopola di regolazione 1
come mostrato nella figura e inserire
l'unità videocamera nella direzione
indicata dalla freccia finché non scatta
in posizione.
• Quando si rimuove il supporto polivalente, non
tirarlo. Rimuoverlo distaccando il velcro dal bordo.
• Non rimuovere il nastro biadesivo attaccato al
velcro. Una volta rimosso il nastro, l'adesione si
indebolisce, rendendo il nastro inutilizzabile.
• Quando si fissa il supporto polivalente, verificare se
il velcro è fissato strettamente e se l'adesione del
nastro biadesivo si è indebolita.
1 Passare la cinghia attraverso la fibbia 3
in modo che il lato della cinghia con il
velcro 2 sia rivolto verso l'esterno, e
piegare la cinghia come mostrato nella
figura.
• Regolare la lunghezza in base alla posizione in cui
si desidera fissare la cinghia.
2 Inserire la parte dentellata 4 del
supporto polivalente nella cinghia come
mostrato nella figura.
3 Posizionare la cinghia fissata al
supporto polivalente attorno alla
spallina di uno zaino o simile e fissare
come mostrato in figura.
4 Tenere la manopola di regolazione 1
come mostrato nella figura e inserire
l'unità videocamera nella direzione
indicata dalla freccia finché non scatta
in posizione.
1 Inserire la parte dentellata 4 del
supporto polivalente nella cinghia.
2 Tenere la manopola di regolazione 1
come mostrato nella figura e inserire
l'unità videocamera nella direzione
indicata dalla freccia finché non scatta
in posizione.
• Accertarsi che la videocamera non oscilli.
∫ Note relative al supporto polivalente
• Non fissare il supporto polivalente in una posizione
dove possa limitare i movimenti del corpo. Questo
può provocare incidenti e lesioni. Verificare di poter
muovere liberamente il corpo dopo il fissaggio.
• Non smontare o modificare. Questo può provocare
problemi, come la caduta della Videocamera
indossabile e di altre parti.
• Fissare correttamente seguendo queste istruzioni
per l'uso.
• Fissare correttamente usando gli accessori in
dotazione. L'utilizzo di accessori diversi può
causare incidenti, come danni alla videocamera o
fissaggio non sicuro di parti.
• Verificare periodicamente la tenuta del fissaggio del
supporto polivalente. La mancata verifica può
portare ad incidenti e lesioni, come il distacco o la
caduta del supporto polivalente o della
videocamera indossabile durante l'utilizzo.
Controllare che il supporto polivalente non si sia
allentato.
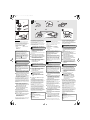
1 Support polyvalent
2 Bandes
autoagrippantes à
crochets et à
boucles (1 jeu)
3 Sangle
4 Ruban double face
• Évitez de toucher l'objectif ou de tirer sur le
câble de connexion caméra/appareil lors de la
mise en place ou le retrait.
• Assurez-vous que le câble de connexion
caméra/appareil de la caméra portable ne
s'emmêle lors de la mise en place.
• Après avoir monté la caméra portable, fixez-la
solidement en tournant la vis 1 dans le sens de
(LOCK) (verrouillé) tout en tenant la base du
support polyvalent. ([F])
• Le support polyvalent ne peut pas être attaché
sur tous les casques, etc., selon leur forme.
• En cas d'inconfort, incluant des réactions
cutanées, cessez d'utiliser le support.
A
Installation sur un casque, etc.
Observez les points suivants afin d'obtenir une
adhésion optimale pour le support polyvalent :
• Évitez les températures élevées ou basses,
ainsi que l'humidité excessive, et procédez à la
fixation à l'intérieur.
• Fixez le support polyvalent au moins 24 heures
à l'avance. (L'adhésion est optimale après une
durée d'au moins 24 heures dans les conditions
indiquées ci-dessus.)
FRANÇAIS
B
Installation sur la bretelle d'un
sac à dos, etc.
C
Installation sur des lunettes,
etc.
E
Retrait de l'unité caméra du
support polyvalent:
Tenez la vis 1 de la manière indiquée et
tirez l'unité caméra dans le sens de la
flèche.
∫ Spécifications
Support polyvalent
Dimensions:
60 mm (
L)k56 mm (H)k55 mm (P)
[2,36 po (
L)k2,2 po (H)k2,17 po (P)]
(La hauteur est celle lorsque la caméra est installée
à l'horizontale.
Masse (Poids):
Environ 32 g (Environ 0,071 lb)
1 Aggancio Multiplo
2 Dispositivo di
fissaggio in velcro
(1 coppia)
3 Cinghia
4 Nastro biadesivo
• Evitare di toccare l'obiettivo o di tirare il cavo di
connessione videocamera/unità durante la
connessione o la rimozione.
• Fare attenzione che il cavo di connessione
videocamera/unità della videocamera
indossabile non si aggrovigli durante il
collegamento.
• Dopo aver montato la videocamera indossabile,
fissarla strettamente ruotando la manopola di
regolazione 1 nella direzione di blocco (LOCK)
tenendo l'anello del supporto polivalente. ([F])
• il supporto polivalente non può essere fissato
direttamente ad un casco o simili a causa della
sua forma.
• Se si rilevano anomalie della pelle durante l'uso,
interrompere l'uso.
A
Fissaggio ad un casco, ecc.
Fare attenzione ai seguenti punti in modo che
il supporto polivalente abbia una forza di
adesione ottimale:
• Evitare temperature elevate o basse ed umidità
elevata, e non effettuare il fissaggio all'aperto.
•
Fissare il supporto polivalente almeno 24 ore prima
dell'uso (l'adesione è massima dopo un periodo di
almeno 24 ore nell'ambiente indicato sopra).
ITALIANO
B
Fissaggio alla spallina di uno
zaino o simili.
C
Fissaggio diretto ad occhiali e
simili.
E
Rimozione dell'unità
videocamera dal supporto
polivalente:
Tenere la manopola di regolazione 1
come mostrato nella figura ed estrarre
l'unità videocamera nella direzione
indicata dalla freccia.
∫ Dati tecnici
Aggancio Multiplo
Dimensioni:
60 mm (L)k56 mm (A)k55 mm (P)
(L'altezza si riferisce a quando l'unità videocamera è
fissata orizzontalmente.)
Peso:
Circa 32 g
VW-MKA100.fm 3 ページ 2013年1月22日 火曜日 午後4時34分

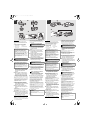
B C
1
2
12
34
Gracias por comprar este producto Panasonic.
•
Lea cuidadosamente estas instrucciones antes de usar
este producto, y guarde este manual para usarlo en el
futuro.
• La cámara utilizable se vende por separado.
• Verifique los accesorios suministrados [D].
Colocar el montaje múltiple en una superficie lisa,
como un casco.
1 Quite el protector de uno de los lados de
la cinta de doble faz y adhiérala al lado
más suave de la cinta velcro que tiene
una textura más rígida (lado de
ganchos).
2 Quite el protector del otro lado de la
cinta de doble faz y coloque el lado de
ganchos de la cinta velcro en el lugar
donde se colocará el montaje múltiple.
• Si la superficie de contacto se ensucia con polvo,
etc., la adhesión se debilitará. Antes de colocar la
cinta de doble faz, limpie el polvo, etc., con un paño
seco.
• La cinta de doble faz no se puede quitar. Teniendo
en cuenta la altura, el ancho, etc. del montaje
múltiple colocado en la cámara, coloque la cinta en
un lugar donde no entrará en contacto con el
protector de un casco, etc.
3 Pase la cinta velcro con textura más
suave (el lado de lazos) a través del
montaje múltiple de modo que el lado de
tela suave quede hacia abajo.
4 Ajuste el montaje múltiple en forma
segura alineando las dos cintas velcro
entre sí.
• Ajuste en forma segura para evitar que el montaje
múltiple se caiga.
• Si la cinta velcro tiene polvo, se debilitará la
adhesión. Antes de colocarla, verifique que no haya
polvo, pelusas, etc.
5 Sostenga la perilla de ajuste 1 como se
muestra en la figura e inserte la unidad
de la cámara en la dirección de la flecha
hasta que haga clic en el lugar.
• Al quitar el montaje múltiple, no tire de este. Quítelo
desprendiendo del extremo de la correa con cinta
velcro.
• No quite la cinta de doble faz adjunta a la correa
con cinta velcro. Si lo hace, la adhesión disminuirá
y la cinta quedará inutilizable.
• Al adjuntar el montaje múltiple, verifique que la
correa con cinta velcro esté ajustada en forma
segura y que la adhesión de la cinta de doble faz no
haya disminuido.
1 Pase la correa por la hebilla 3 para que
el lado de la correa con cinta velcro 2
de la banda mire hacia afuera, como se
muestra en la figura.
• Ajuste el largo según el lugar donde desea colocar
la banda.
2 Inserte la parte con muescas 4 del
montaje múltiple en la banda, como se
muestra en la figura.
3 Coloque la banda adjunta al montaje
múltiple, alrededor de la correa para el
hombro de un morral, etc., y ajuste
como se muestra en la figura.
4 Sostenga la perilla de ajuste 1 como se
muestra en la figura e inserte la unidad
de la cámara en la dirección de la flecha
hasta que haga clic en el lugar.
1 Inserte la parte con muescas 4 del
montaje múltiple en la banda.
2 Sostenga la perilla de ajuste 1 como se
muestra en la figura e inserte la unidad
de la cámara en la dirección de la flecha
hasta que haga clic en el lugar.
• Asegúrese de que la unidad de la cámara no se
mueva.
∫ Notas sobre el uso del montaje múltiple
• No coloque el montaje múltiple en un lugar donde
restrinja los movimientos del cuerpo, ya que esto
podría causar accidentes y lesiones. Verifique si
puede moverse libremente luego de colocarlo.
• No desmonte ni realice modificaciones porque
podría causar problemas, como la caída de la
cámara utilizable o de otras piezas.
• Ajuste correctamente, según se indica en estas
instrucciones de funcionamiento.
• Coloque en forma correcta utilizando los accesorios
suministrados. Si usa otras piezas podría causar
accidentes, como dañar la cámara o no fijar piezas
en forma segura.
• Verifique la seguridad de la colocación del montaje
múltiple con frecuencia. Si no lo hace, es posible
que se produzcan accidentes o lesiones, como el
desprendimiento o la caída del montaje múltiple o
de la cámara utilizable durante el uso. Verifique si el
montaje múltiple no se ha aflojado.
Благодарим вас за покупку изделия Panasonic.
•
Перед использованием этого изделия, пожалуйста,
внимательно прочитайте данные инструкции и сохраните
это руководство для дальнейшего использования.
• Носимая камера продается отдельно.
• Проверьте поставляемые в комплекте
принадлежности [D].
Прикрепляйте универсальное крепление к
гладкой поверхности, например к шлему.
1 Отделите одну сторону двусторонней
ленты и прикрепите ее к более ровной
части застежки с более жесткой
текстурой (застежки с "крючками").
2 Отделите другую сторону
двусторонней ленты и прикрепите
застежку с "крючками" к месту, на
которое будет устанавливаться
универсальное крепление.
• Попавшая на контактную поверхность пыль и т. п.
ослабляет сцепление. До прикрепления
двусторонней ленты удалите пыль и т. п. и протрите
поверхность сухой тканью.
•
Двусторонняя лента не является съемной. Учитывая
высоту, ширину и т. п. универсального крепления для
камеры, прикрепите ленту к месту, в котором она не будет
соприкасаться с маской шлема и т. п.
3 Проденьте застежку с более мягкой
текстурой (застежку с "петлями")
через универсальное крепление, так
чтобы сторона с мягкой тканью была
обращена вниз.
4 Надежно закрепите универсальное
крепление, совместив две застежки
друг с другом.
• Закрепите надежно, чтобы универсальное
крепление не отпало.
•
Попавшая на застежку-липучку пыль и т. п. ослабляет
сцепление. До прикрепления убедитесь в отсутствии
на ней пыли, ворсинок и т. п.
5 Возьмитесь за регулировочную
головку 1, как показано на рисунке, и
вставьте камеру, так чтобы она встала
на место со щелчком.
• Снимая универсальное крепление, не тяните за
него. Снимите крепление, отделив застежку-липучку
с края.
• Не снимайте двустороннюю ленту, прикрепленную к
застежке-липучке. После снятия ленты сцепление
ослабевает, и лента становится непригодной.
• Прикрепляя универсальное крепление, проверьте,
надежно ли закреплена застежка-липучка и не
ослабло ли сцепление двусторонней ленты.
1 Проденьте браслет через пряжку 3,
так чтобы сторона застежки-липучки
2 браслета была обращена наружу, и
сложите браслет, как показано на
рисунке.
• Отрегулируйте длину в соответствии с местом, к
которому будет крепиться браслет.
2 Вставьте часть с выемкой 4
универсального крепления в браслет,
как показано на рисунке.
3 Расположите браслет, прикрепленный
к универсальному креплению, вокруг
наплечного ремня рюкзака и т. п. и
закрепите, как показано на рисунке.
4 Возьмитесь за регулировочную
головку 1, как показано на рисунке, и
вставьте камеру, так чтобы она встала
на место со щелчком.
1 Вставьте часть с выемкой 4
универсального крепления в браслет.
2 Возьмитесь за регулировочную
головку 1, как показано на рисунке, и
вставьте камеру, так чтобы она встала
на место со щелчком.
• Убедитесь, что камера не шатается.
∫ Примечания об использовании
универсального крепления
• Не прикрепляйте универсальное крепление к месту,
в котором крепление ограничивает движения
вашего тела. В противном случае это может
привести к повреждениям и травмам. Проверьте
после его прикрепления, может ли ваше тело
свободно двигаться.
• Не разбирайте и не вносите изменения. В
противном случае это может привести к проблемам,
например падению носимой
камеры и других
деталей.
• Правильно выполняйте прикрепление, как указано в
данной инструкции по эксплуатации.
• Правильно выполняйте прикрепление с помощью
поставляемых в комплекте принадлежностей.
Использование других деталей может привести к
повреждению камеры или ненадежному
закреплению частей.
• Регулярно проверяйте надежность прикрепления
универсального крепления. Иначе это может
привести к повреждениям и травмам, например
если универсальное крепление или носимая
камера соскочит или упадет во время
использования. Проверяйте, не ослабло ли
универсальное крепление.
1 Montaje Múltiple
2 Correa con cinta
velcro (1 juego)
3 Banda
4 Cinta de doble faz
• Evite tocar la lente o tirar del cable de conexión
de la cámara o unidad mientras coloca o retira.
• Tenga cuidado de no enredar el cable de
conexión de la cámara utilizable durante el
montaje.
• Luego de montar la cámara utilizable, fíjela en
forma segura girando la perilla de ajuste 1 en la
dirección del LOCK mientras sostiene la parte
del anillo de montaje múltiple. ([F])
• El montaje múltiple no se puede colocar en un
casco, etc., según la forma.
• Si siente molestias en la piel al usar, suspenda el
uso.
A
Colocar en un casco, etc.
Tenga en cuenta lo siguiente para que el
montaje múltiple se adhiera en forma óptima:
• Evite temperaturas altas y bajas y la humedad
alta, y realice el montaje en interiores.
• Coloque el montaje múltiple al menos 24 horas
antes de usar (la adhesión se optimiza luego de
un período de al menos 24 horas en el entorno
mencionado anteriormente).
ESPAÑOL
B
Colocar en la correa para el
hombro de un morral, etc.
C
Colocar directamente en
gafas, etc.
E
Quitar la unidad de la cámara
del montaje múltiple:
Sostenga la perilla de ajuste 1 como se
muestra en la figura y tire de la unidad de
la cámara en la dirección de la flecha.
∫ Especificaciones
Montaje Múltiple
Dimensiones:
60 mm (L)k56 mm (A)k55 mm (P)
(La altura es la misma que cuando la unidad de la cámara
está fija en posición horizontal.)
Masa:
Aprox. 32 g
1 Универсальное
крепление
2 Застежка-липучка
(1 комплект)
3 Браслет
4 Двусторонняя
лента
• Не прикасайтесь к объективу и не тяните
соединительный кабель камеры/устройства во
время прикрепления или снятия.
• Следите за тем, чтобы соединительный кабель
камеры/устройства носимой камеры не
перекрутился во время монтажа.
•
После прикрепления носимой камеры надежно
закрепите носимую камеру, повернув
регулировочную головку
1
в направлении LOCK,
держась за кольцевую часть универсального
крепления. (
[F]
)
•
Универсальное крепление может не прикрепляться к
шлему и т. п. в зависимости от его формы.
•
Если во время использования вы почувствуете
болезненность кожи, прекратите использование.
A
Прикрепление к шлему и т. п.
Обратите внимание на следующие пункты, с
тем чтобы достичь оптимальной прочности
сцепления для универсального крепления:
• Избегайте высоких или низких температур и
высокой влажности, а также выполняйте
прикрепление в помещении.
• Прикрепляйте универсальное крепление не
менее чем за 24 часа до использования.
(Сцепление становится оптимальным после
периода не менее 24 часов при описанных выше
условиях окружающей среды.)
РУССКИЙ
B
Прикрепление к наплечному
ремню рюкзака и т. п.
C
Прикрепление
непосредственно к
защитным очкам и т. п.
E
Извлечение камеры из
универсального крепления:
Возьмитесь за регулировочную головку
1, как показано на рисунке, и выньте
камеру в направлении стрелки.
∫ Технические характеристики
Универсальное крепление
Размеры:
60 мм (Ш)k56 мм (В)k55 мм (Г)
(Высота соответствует случаю, когда камера
прикреплена горизонтально.)
Масса:
Прибл. 32 г
VW-MKA100.fm 4 ページ 2013年1月22日 火曜日 午後4時34分
-
 1
1
-
 2
2
-
 3
3
-
 4
4


Panasonic VW-MKA100GUK Manuale utente
- Categoria
- Accessori per telecamere di sicurezza
- Tipo
- Manuale utente
- Questo manuale è adatto anche per
in altre lingue
- français: Panasonic VW-MKA100GUK Manuel utilisateur
- español: Panasonic VW-MKA100GUK Manual de usuario
- Deutsch: Panasonic VW-MKA100GUK Benutzerhandbuch